

SUMMARY
We describe a protocol for the global identification of the in vitro substrates targeted by protein kinases using protein microarray technology. Large numbers of fusion proteins TAP-tagged at their carboxy-termini are purified in 96-well format and spotted in duplicate onto amino-silane coated slides in a spatially addressable manner. These arrays are incubated in the presence of purified kinase and radiolabeled ATP, and then washed, dried, and analyzed by autoradiography. The extent of phosphorylation of each spot is quantified and normalized, and proteins that are reproducibly phosphorylated in the presence of the active kinase relative to control slides are scored as positive substrates. This approach enables the rapid determination of kinase-substrate relationships on a proteome-wide scale, and although developed for yeast, has since been adapted to higher eukaryotic systems.
INTRODUCTION
Often regarded as one of the most important posttranslational modifications, protein phosphorylation has been shown to be involved in virtually every basic cellular process. With nearly one-third of the eukaryotic proteome estimated to be phosphorylated1,2, much effort has been dedicated to unraveling the phosphoproteome, or network of kinase signaling pathways. However, methods to systematically and globally examine these networks have been lacking until as of late. In the recent years, several approaches have emerged which have enabled phosphorylation to be analyzed on a global scale. Among these is the use of protein microarrays as substrates in enzymatic assays.
Proteome microarrays are typically generated using whole genome overexpression collections. In yeast, there are two such collections: an N-terminally tagged GST collection3,4 and a C-terminally tagged TAP-tag (6xHis-HA-3C protease cleavage site-ZZ domain of protein A) collection5. Both have successfully been used to generate protein microarrays. We describe here the generation of protein microarrays using the TAP-tag collection as this collection is a second generation collection boasting greater coverage, higher quality (more thoroughly sequenced), and updates of more recently annotated or unannotated genes. Furthermore, C-terminal tags likely circumvent issues of improper targeting of proteins destined for the secretory pathway, an issue that may arise with the use of an N-terminal tag.
To generate the arrays, TAP-tag fusion proteins are first batch purified in 96-well format using IgG sepharose and eluted by cleaving the ZZ-domain from the rest of the fusion protein using 3C protease. The purified proteins are then printed in duplicate in 48 blocks on an amino-silane surface coated glass slide (Figure 1). Other slide surfaces have been tested, including nitrocellulose and nickel-coated surfaces, however, the amino-silane surface appears to offer the lowest background in radioactive assays. Once protein microarrays have been generated, radioactive kinase assays can be performed using the immobilized fusion proteins as substrates. For each kinase, three arrays are used; the assay is performed in duplicate and a negative control (no kinase) assay is included to determine any autophosphorylating proteins.
Figure 1.
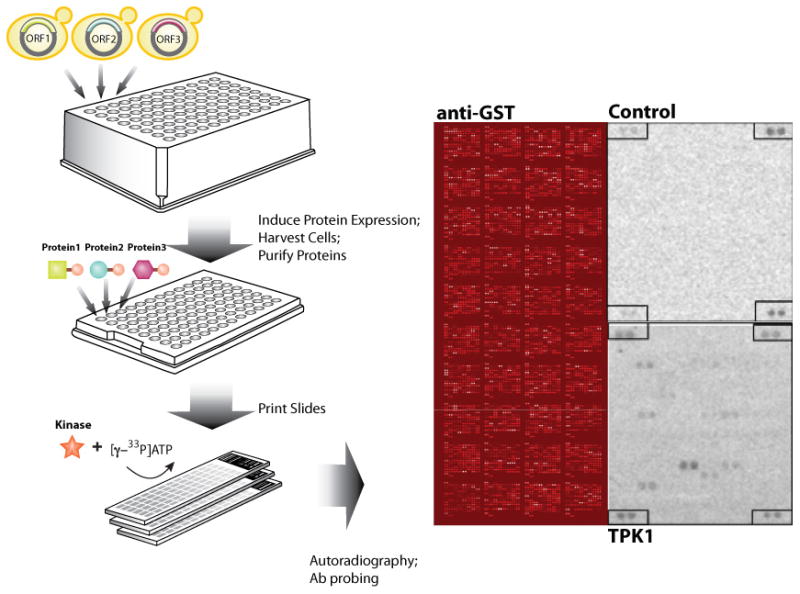
Workflow of a protein microarray-based kinase assay to identify candidate substrates targeted by the yeast kinases. Shown are a representative probing of a yeast proteome microarray generated using an N-terminal GST overexpression ORF collection probed with anti-GST antibodies followed by Cy5-labeled anti-rabbit antibodies (entire array with all 40 blocks, left), a control kinase assay preformed in the absence of any kinase (single block of 256 spots, upper right), and a [γ-33P]ATP Tpk1 kinase assay (single block of 256 spots, lower right). Dark spots in each of the kinase assays represent radiolabeled phosphorylated proteins. Positive controls for kinase assays are printed in each corner of the block and serve as reference points on the slide. Figure is adapted from Ptacek et al., Nature 438 (2005).
This approach allows the examination of all potential phosphorlyation reactions in a single direct assay. However, there are limitations. First, the kinase-substrate relationships are identified in vitro and may not represent bona fide in vivo relationships. Further validation is thus necessary using traditional genetic and biochemical techniques. Second, substrates may be missed (or occur) due to lack of appropriate modifications or the presence of adaptor/scaffold proteins. Finally, creating a collection of expression ORFs and developing methods to overexpress large numbers of proteins can require considerable effort. Many expression collections have nonetheless been generated to date 6–10, and improved high-throughput protein production has led to the construction of several high content arrays including Arabidopsis proteome arrays and human proteome arrays10–12. Despite these limitations, it is clear that the use of protein microarrays in enzymatic assays is readily amenable for many eukaryotes.
Below we describe protocols for protein purification and protein kinase assay using microarrays for yeast. These can be easily adapted for any organism.
Experiment Design
The first part of the protocol describes the growth and induction of the >5,500 yeast clones. The second part describes the purification of TAP-tagged fusion proteins in 96-well format. The third part describes briefly the printing of the purified proteins on the modified glass slides for protein attachment. More detailed instruction on the actual printing is beyond the scope of this protocol. Please refer to http://robinsonlab.stanford.edu/microarrays/index.htm for documentation on planning a plate for printing, printing proteins onto a slide surface, and analyzing the quality of the printed slides. Finally, the last part of the protocol describes the in vitro kinase assay on the printed slides.
MATERIALS
REAGENTS
96-well round bottom boxes with fitted silicone mat seals (Dot Scientific PC92271-NS9, R618-NS9)
96-deep well boxes with fitted silicone mat seals (Dot Scientific R6530)
50 ml flip top conical tubes
Wide bore pipette tips, 200 μl
96-well microtiter plates
384-well flat bottom polyproplylene plates
8 mm glass beads, autoclaved
3.5 mm glass beads, autoclaved
0.5 mm glass beads
1.2 μm pore hydrophilic PVDF filter plates (Millipore)
0.65 μm pore hydrophilic low protein binding filter plates (Millipore)
UltraGAPS slides (Corning Life Sciences)
1 ml syringe
0.45 μm filter tip
Hybrislip hybridization coverslips (Grace Bio Labs)
SC-ura media, agar plates and liquid
SC-ura/raffinose media, liquid
3x YP + 6% galactose (yeast extract, peptone and galactose)
IgG Sepharose 6 Fast Flow (GE Healthcare 17-0969-02)
Glutathione Sepharose 4B (GE Healthcare 27-4574-01)
PreScission 3C protease (GE Healthcare 27-0843-01)
Bovine PKA
Histone H1
Lysis(150) buffer: 50 mM Tris-HCl, pH 7.5/150 mM NaCl/10% glycerol/0.1% Triton X-100/1 mM EGTA/0.5 mM DTT/1 mM PMSF/protease inhibitor tablets (Roche)/phosphatase inhibitor tablets (Roche)
Lysis(650) buffer: 50 mM Tris-HCl, pH 7.5/650 mM NaCl/10% glycerol/0.1% Triton X-100/1 mM EGTA/0.5 mM DTT/1 mM PMSF/protease inhibitor tablets (Roche)/phosphatase inhibitor tablets (Roche)
Lysis(0) buffer: 50 mM Tris-HCl, pH 7.5/10% glycerol/0.1% Triton X-100/1 mM EGTA/0.5 mM DTT/1 mM PMSF/protease inhibitor tablets (Roche)/phosphatase inhibitor tablets (Roche)
Elute(150) buffer: 50 mM Tris-HCl, pH 7.5/150 mM NaCl/30% glycerol/0.1% Triton X-100
Superblock (Thermo Scientific) with added Triton X-100 to a final concentration of 0.1%
Kinase to be assayed
Kinase buffer containing 25% glycerol (specific to kinase of interest, but typically 20 mM Hepes, pH 7.4/150 mM NaCl/10 mM MgCl2/0.1% Triton X-100)
20% Triton X-100
-
γ-[33P]-ATP or γ-[32P]-ATP, 10 μCi/μl, 2000 Ci/mmol
CAUTION! If using γ-[32P]-ATP, all handling of the isotope should be done behind an acrylic shield. Disposal of radioactive waste should be according to the guidelines of your institution.
Wash buffer: 10 mM Tris-HCl pH 7.4/0.5% SDS
Autoradiography film
EQUIPMENT
96-well array prong
Multichannel pipetter, 2–20 μl and 1 ml
Tabletop centrifuge with 50 ml conical tube and microplate carriers (Sorvall RTH-250)
30°C incubator with shakers fitted for 50 ml conical tubes
Paint shaker (Harbil 5G-HD)
Nutator
48-pin ESI contact printer (Genomic Solutions)
Humidified chamber
PROCEDURE
Purification of yeast proteome
-
1|
Grow yeast cells for proteome purification. All steps should be performed using sterile technique.
Using a 96-well array prong, prong out TAP-tagged yeast strains onto a SC-ura plate and incubate in 30°C incubator. Patches should take about two days to grow up.
Prepare 96-well round bottom culture box by adding a 3.5 mm glass bead and 800 μl of SC-ura media to each well.
Inoculate starter cultures using a multichannel pipetter to add cells row by row. Touch each patch of cells gently and then eject the tips into the wells of the box.
Manual swirl each tip in each well and discard tips. Seal box firmly using a fitted silicone mat.
Allow starter cultures to grow overnight in shaking incubator at 30°C.
Prepare 50 ml conical tubes for outgrowth culture by adding an 8 mm glass bead and 20 ml of SC-ura/raffinose media to each tube.
Inoculate outgrowth cultures by adding 400 μl of each starter culture to prepared 50 ml conical tube.
Incubate outgrowth cultures for 15 hours at 30°C to an OD600 of 0.8.
Induce protein expression by adding 10 ml of 3x YP + 6% galactose and allowing cells to grow another six hours. This yields final concentrations of 1% yeast extract, 2% peptone, and 2% galactose.
Collect cells by spinning cultures in a tabletop centrifuge for five minutes at 1000 x g.
Carefully pour off media, retaining the glass bead in the culture tube.
Vortex briefly (15 seconds) to resuspend cells in residual media.
Transfer cells to a 96-deep well box.
Wash cells by adding 1 ml of ice cold ddH2O to each well followed by spinning in tabletop centrifuge for five minutes at 1000 x g.
Remove water by inverting each box over a paper towel and tapping gently on the benchtop.
**PAUSE POINT The cell pellets can be stored by sealing the 96-deep well box with a fitted polypropylene seal and placing the box at −80°C. When ready to proceed to purification, thaw cell pellets on ice.
-
2|
Prepare fresh and pre-chill lysis and elution buffers. The remaining steps of protein purification should be carried out at 4°C (in the cold room or on ice).
-
3|
Equilibrate IgG sepharose beads by washing three times using five volumes of Lysis(150) buffer. 40 μl of IgG bead slurry is used for each cell pellet and should be resuspended in the same volume and added to each well of a fresh 96-well round bottom box.
-
4|
Prepare crude lysates. Crude lysates are obtained through two rounds of lysis, once using Lysis(150) buffer and once using Lysis(650) buffer.
To perform the first round of lysis, add 300 μl of 0.5 mm glass beads and 200 μl of Lysis(150) buffer to each well of the 96-deep well box. Seal box with fitted silicone mat. Shake in paint shaker for six minutes, pellet glass beads and cell debris by spinning in tabletop centrifuge for five minutes at 1000 x g, and, using wide bore pipette tips, remove supernatants to the 96-well round bottom box containing the equilibrated IgG sepharose beads through a 1.2 μm pore hydrophilic PVDF filter plate.
Perform the second round of lysis with new fitted silicone mat in the same manner using 200 μl of Lysis(650) buffer for each well and a fresh filter plate. Combine the lysates from the first and second rounds.
Add 400μl of Lysis(0) buffer to bead and lysate mixtures to adjust the salt concentration to ~150 mM.
-
4|
Seal the 96-well round bottom box with a fitted silicone mat and nutate for two hours allowing the TAP-tagged proteins to bind to the beads. Manually invert box twice during incubation.
-
5|
Wash beads five times with Lysis(150) buffer.
Spin beads in tabletop centrifuge for two minutes at 250 x g.
Carefully pour off lysate.
Add 800 μl of Lysis(150) buffer to each well.
Nutate for five minutes.
Repeat steps 5i. – 5iv. four more times.
-
6|
Elute bound proteins using GST-3C.
Resuspend bound beads using another 600 μl of Lysis(150) buffer for each well and using wide bore tips, transfer them to a 0.65 μm pore filter plate affixed onto a microtiter plate.
Spin in tabletop centrifuge two minutes at 250 × g to remove buffer. Affix a new microtiter plate under the filter plate.
Add 40 μl of Elute(150) buffer and 1 μl of GST-3C to each well of the filter plate.
Place microtiter plate with affixed filter plate on a nutator and allow the cleavage reaction to proceed overnight.
Equilibrate glutathione sepharose beads by washing three times using five volumes of Elute(150) buffer, and add to cleavage reaction. 20 μl of glutathione bead slurry is used for each well and should be resuspended in the same volume.
Nutate for one more hour allowing the GST-3C to bind to the glutathione beads. Spin in tabletop centrifuge for five minutes at max speed.
**PAUSE POINT Purified proteins can be snap frozen in an ethanol/dry ice slurry and stored at −80°C.
Printing of proteome microarrays
-
7|
Check pin printing using 30% glycerol arrayed into a 384-well plate. Make sure all 48 pins are printing and positioned on the slide correctly.
TROUBLESHOOTING? Single pins that do not touch the surface may be due to water or debris in the pin-holding block preventing the pins from going down all the way. Carefully clean pins as necessary using a cotton swab.
-
8|
Rearray four 96-well plates containing purified proteins into a 384-well plate. This should be done by first thawing the plates on ice and adding control mixtures to the control wells. In addition to a buffer only control, positive control mixtures for array kinase assays typically include histone H1 (a generic protein kinase substrate) and PKA (a kinase that readily autophosphorylates) as these mixtures help with orienting each block upon autoradiography exposure.
-
9|
Lay out slides in the printer. For the first few slides, lay out regular glass slides since initial printed spots tend to bleed during experiments. ULTRA GAP or full moon slides are recommended to use for assay slides.
-
10|
Spin rearrayed 384-well plate briefly (30 seconds) in tabletop centrifuge at 1000 x g.
-
11|
Position plate in the plate holder and press the operator button. Each well will be spotted in duplicate increasing confidence of positive signals in the enzymatic assay. Each 384-well plate takes approximately 20 minutes to print 60 slides. Meanwhile, thaw the next four 96-well plates on ice, rearray, and spin briefly as before.
-
12|
Replace plates as necessary. Freeze plates as soon as printing for that plate is complete using an ethanol/dry ice slurry.
**PAUSE POINT Printed slides can be stored in a slide box at −20°C. (Slides at this point can also be probed using an anti-HA antibody followed by a fluorescently labeled secondary antibody to visualize protein spotting on the array.)
Processing kinase assays
-
13|
Block three protein microarrays with Superblock/0.1% Triton X-100 for one hour at 4°C. If using a slide box, 5 ml per slide should be sufficient. In addition to a negative control array, each assay is performed in duplicate on two separate arrays.
-
14|
Prepare kinase mastermix by diluting the kinase of interest in kinase buffer containing 0.5 mg/ml bovine serum albumin, 0.1% Triton X-100, and 33.3 mM [γ-33P]ATP to a final volume of 400 μl (200 μl for each positive array). Transfer mastermix to 1 ml syringe fitted with a 0.45 μm filter tip.
-
15|
Prepare 200 μl negative control mastermix (same as kinase mastermix leaving out the kinase) and transfer to a second 1 ml syringe fitted with a 0.45 μm filter tip.
-
16|
Overlay 200 μl of the kinase mastermix onto each of two arrays, and 200 μl of the negative control mastermix onto the third array.
-
17|
Cover each array with a coverslip and place in a humidified chamber for 1 hour at 30°C.
-
18|
Remove coverslip. Wash arrays twice with wash buffer and once with ddH2O.
-
19|
Place each array carefully into a 50 mL conical tube. Spin arrays dry in tabletop centrifuge (three minutes) at 500 × g.
-
20|
Cover arrays with plastic wrap and expose to autoradiography film. Expose for 24 hours, or for several days if the signal is weak.
TROUBLESHOOTING? If the signal is weak or absent, add more kinase to the reaction or let the reaction go longer (up to six hours). If the signal is too strong and little selectivity is observed, reduce the amount of kinase in the kinase mastermix by ten-fold.
TIMING
Step 1, 15 minutes on day 1, one hour on day 2, 15 minutes followed by a six hour break and another 1.5 hours on day 3 for 96 cell pellets (1 box)
Steps 2–6, eight hours on day 1 followed by two hours on day 2 for four 96-well boxes of cell pellets
Steps 7–11, about five hours for 60 slides
Steps 12–19, three hours
ANTICIPATED RESULTS
This assay produces an array of spots with varying intensities representing the extent of phosphorylation of each protein. Autoradiography films can then be scanned and the spots quantified using any number of array analysis softwares. We routinely use GenePix 2.2 to align an array file containing each protein’s ID onto our scanned array, calculate the average intensity value of duplicate spots, and normalize this intensity value to the background. The data is then filtered by subtracting out autophosphorylating proteins, as identified from the negative control assay. We found that kinases exhibit a wide range of specificities, with some kinases targeting hundreds of substrates and others targeting only a single substrate.
Acknowledgments
This work was supported by a grant from the NIH. The assays shown in Figure 1 were performed by Dr. Jason Ptacek and Dr. Geeta Devgan. We thank Dr. Rui Chen and Dr. Vincent Bruno for helpful comments.
References
- 1.Cohen P. Trends Biochem Sci. 2000;25(12):596. doi: 10.1016/s0968-0004(00)01712-6. [DOI] [PubMed] [Google Scholar]
- 2.Ficarro SB, McCleland ML, Stukenberg PT, et al. Nat Biotechnol. 2002;20(3):301. doi: 10.1038/nbt0302-301. [DOI] [PubMed] [Google Scholar]
- 3.Ptacek J, Devgan G, Michaud G, et al. Nature. 2005;438(7068):679. doi: 10.1038/nature04187. [DOI] [PubMed] [Google Scholar]
- 4.Zhu H, Klemic JF, Chang S, et al. Nat Genet. 2000;26(3):283. doi: 10.1038/81576. [DOI] [PubMed] [Google Scholar]
- 5.Gelperin DM, White MA, Wilkinson ML, et al. Genes Dev. 2005;19(23):2816. doi: 10.1101/gad.1362105. [DOI] [PMC free article] [PubMed] [Google Scholar]
- 6.Brandner CJ, Maier RH, Henderson DS, et al. BMC Genomics. 2008;9:321. doi: 10.1186/1471-2164-9-321. [DOI] [PMC free article] [PubMed] [Google Scholar]
- 7.Dricot A, Rual JF, Lamesch P, et al. Genome Res. 2004;14(10B):2201. doi: 10.1101/gr.2456204. [DOI] [PMC free article] [PubMed] [Google Scholar]
- 8.Lamesch P, Li N, Milstein S, et al. Genomics. 2007;89(3):307. doi: 10.1016/j.ygeno.2006.11.012. [DOI] [PMC free article] [PubMed] [Google Scholar]
- 9.Lamesch P, Milstein S, Hao T, et al. Genome Res. 2004;14(10B):2064. doi: 10.1101/gr.2496804. [DOI] [PMC free article] [PubMed] [Google Scholar]
- 10.Popescu SC, Popescu GV, Bachan S, et al. Genes Dev. 2009;23(1):80. doi: 10.1101/gad.1740009. [DOI] [PMC free article] [PubMed] [Google Scholar]
- 11.Popescu SC, Popescu GV, Bachan S, et al. Proc Natl Acad Sci U S A. 2007;104(11):4730. doi: 10.1073/pnas.0611615104. [DOI] [PMC free article] [PubMed] [Google Scholar]
- 12.Boyle SN, Michaud GA, Schweitzer B, et al. Curr Biol. 2007;17(5):445. doi: 10.1016/j.cub.2007.01.057. [DOI] [PubMed] [Google Scholar]