Abstract
We have developed an automated specimen search algorithm for cryo-electron microscopy imaging of ice-embedded single particles suspended across regularly spaced holes. To maximize the particle visibility under a low electron exposure rate condition, specimen searching is carried out in diffraction mode. However, images in diffraction mode contain significant pincushion distortion, making it difficult to computationally predict the locations of the regularly spaced holes. We have implemented a distortion-correction mechanism to restore the primitive distortion-free image and a correlation-based algorithm to accurately determine the periodicity of the holes. A stage-shift method to optimize positional reproducibility is also implemented. Addition of our algorithms to the JADAS software for automated transmission electron microscopy data acquisition has significantly improved the accuracy of specimen search.
Keywords: TEM automation, distortion correction, DIFF-defocus imaging, pattern recognition, automatic search, low-contrast image
Introduction
Transmission electron microscopy (TEM) has become a powerful tool in the material and biological sciences. However, beam alignment and data collection are tedious and prone to user error. Introducing automation to TEM would improve both the quality and efficiency of data collection. For example, one of the essential tasks during TEM imaging is focusing the objective lens. Several algorithms have been proposed for this task [1,2]. One algorithm estimates the defocus value from the displacement between two images obtained at different beam-tilt angles [1]. Alternatively, defocus can be estimated by the analysis of diffractograms, requiring a highly coherent electron beam and available areas containing amorphous film [3]. This method is also applicable in astigmatism correction and coma-free alignment when combined with beam tilting. These sorts of automation methodologies have already been implemented in several commercial products [4].
In addition to the electron optics alignment, biological cryo-electron microscopy (EM) has been well advanced for recording ice-embedded specimens automatically [5,6]. Such automation is warranted by the necessity of a large data set for three-dimensional (3-D) reconstruction and the repetitive nature of the experimental steps. One of the most time-consuming steps in these experiments is searching for favorable specimen areas for imaging. The specimen search can be divided into two steps: global and local search. The global search seeks to identify areas of the specimen grid that appear to have appropriate ice thickness. This is done at very low magnification (×100 to ×1000) at the beginning of the experiment. The locations on the specimen grid can be memorized and returned for subsequent local area search to identify specific areas for imaging.
Previous approaches for automated local specimen area search have utilized a low magnification (e.g. approximately ×700) to identify holes for imaging [5]. Although most microscopes have the option of setting a very low magnification, the objective lens setting must be changed from the normal MAG to LOW MAG-mode condition. A subsequent switch back from LOW MAG mode to the normal MAG mode for data acquisition can generate substantial lens hysteresis, which can affect image quality. In microscopes where sufficiently low magnifications can be achieved in MAG mode, image contrast may be too low for efficient specimen search.
Alternatively, defocused DIFF mode is frequently used for local specimen search in manual data collection because it generates a larger viewing area and has higher contrast due to the highly defocused equivalent condition. Since the excitation of the objective lens is unchanged in switching between DIFF and MAG modes, hysteresis is avoided. Despite these advantages, the distortions introduced in DIFF-defocus present challenges to automatic hole detection. The image shape distortions create difficulties in mapping positions between the camera system and specimen. Additionally, the image intensity is also distorted, and this must be corrected to estimate ice thickness from intensity. In the present paper, we describe an algorithm for DIFF mode distortion correction using the programmable automated data acquisition system JADAS [7]. Our approach does not require any specialized hardware or microscope modification. We also present a method for controlling goniometer movement that increases accuracy of automated movement and effectively reduces the effect of backlashing.
Methods
Correction of distortion
Distortion in DIFF mode images
Many types of image distortion are generated in a TEM column, most of which can be removed by proper alignment and tuning of the in-column lenses. However, in the case of DIFF-defocus imaging, not all distortions can be corrected by the lenses. Figure 1a shows a MAG-mode image of an ice-embedded chaperonin specimen at ×2000 magnification, which is the lowest possible setting for MAG-mode imaging on the JEM-3200FSC. The image reveals the limited field of view and poor image contrast in MAG-mode imaging, which makes MAG mode impractical for searching. While image contrast could be improved by increasing the exposure rate, the exposure must be minimized during searching to prevent radiation damage.
Fig. 1.

(a) An example of a MAG image (scale bar: 5 μm) and (b) a DIFF-defocus image of the same specimen. (c) The DIFF-defocus image after distortion correction by our algorithm.
DIFF-defocus imaging (Fig. 1b) allows for a larger field of view and higher contrast at lower exposure rate than MAG mode (Fig. 1a). However, this mode introduces a significant pincushion distortion that skews the shapes of grid holes and creates a brightness gradient across the image. This distortion is typically irrelevant in manual operations since preservation of the specimen’s original shape is not necessary for manual specimen search. However, automated specimen search requires that such distortion be computationally corrected in order to correlate search-mode images with linear stage movement.
There are two possible methods for dealing with this distortion in automated processes. The first possibility is to imitate the human feedback process used in manual operation. In this design, many images are captured repeatedly as the stage is shifted step by step. The stage motion is calculated by comparing the previous image with the present image, and the results are used for feedback to the next step of stage movement until the correct position is reached. However, this method is impractical for cryo-TEM, which requires the electron exposure to be as small as possible.
The second possibility is to measure and computationally correct the distortion to yield a distortion-free image (Fig. 1c) based on the original image (Fig. 1b). Although this strategy requires extra calibration to determine the parameters describing the distortion, stage positioning with this method is much simpler than that with the feedback strategy because the stage moves linearly in a corrected (distortion-free) image.
The latter strategy of using distortion-corrected image has been adopted in the present study. In sections ‘Distortion of a DIFF-defocus image’ and ‘Distortion effects on image intensity’, we describe how the image is distorted geometrically in a DIFF-defocus image and how the distortion influences the image intensity. A method to calibrate and correct the distortion is explained in sections ‘Total correction of distortion’ and ‘Implementation of functions in a software for automation’.
Distortion of a DIFF-defocus image
A non-astigmatic DIFF-defocus image has a pincushion-type distortion, which is numerically described in various forms [8,9], such as:
| (1) |
where (u,v) and (U,V) are the coordinate values of the original position and the distorted position, respectively, and k is the distortion parameter. The reverse transformation of Eq. (1) is:
| (2) |
One can use Eq. (2) to correct a geometrical distortion from an observed (distorted) point of (U,V) to the corresponding original (undistorted) point of (u,v).
Distortion effects on image intensity
After generating a geometrically distortion-free image, it is possible to shift the goniometer successfully to a desirable position using the corrected image. However, this geometrical correction is still not sufficient for automatic determination of suitable holes containing a thin layer of vitreous ice because the distortion also introduces an intensity gradient in the image. Such images have relatively darker edges compared to the center.
To correct the undesirable effects on image intensity, it is useful to express Eqs. (1) and (2) in polar coordinates:
| (3) |
| (4) |
where (R,Θ) and (r,θ) are the polar coordinates corresponding to (U,V) and (u,v) in Eqs. (1) and (2), respectively.
The non-uniform intensity of the observed image originates from the uneven effective magnification from the center to edges of the DIFF-defocus image. The total beam intensity of each area on the specimen remains constant. Since the effective magnification is higher farther from the distortion center, the intensity near the edges is spread over a larger area resulting in reduced brightness. Thus, the relationship between an original area s with the primary intensity t and its measured (distorted) area S with the measured intensity T is described as
| (5) |
This means the primary intensity t can be derived from the measured area S and the intensity T if the distortion parameter relating s and S is known. Therefore, the original intensity can be expressed as:
| (6) |
Suppose that an original small area Δs formed from r to r + Δr and θ to θ + Δθ in polar coordinates is distorted into ΔS formed from R to R + ΔR and Θ to Θ + ΔΘ.
When these two areas are small enough, they can be expressed by the following equations:
| (7) |
| (8) |
The differential of r with respect to R can be calculated from Eq. (4) to be:
| (9) |
Since Δr and ΔR are small enough, Δs can be written by
| (10) |
Using this equation, the primary intensity t of the area can be calculated from the measured values, T and R, and the calibrated distortion parameter, k, described in Eq. (1).
| (11) |
Total correction of distortion
Figure 1c shows an estimated primitive image derived from the observed image (Fig. 1b) after the correction of the total distortion by using Eqs. (2) and (11). The shape and the intensity of the measured image are corrected satisfactorily—the holes appear on an equally spaced square array with uniform intensity.
To quantitatively evaluate the hole shape and intensity in the corrected image, the observed image was converted to 8-bit (256-step) grayscale format and corrected by our algorithm in JADAS. Subsequently, the intensity distribution and eccentricity (ratio of the ellipse radii) of each hole were measured for both of the original observed image and the corrected one. Based on this evaluation, our algorithm significantly improves the eccentricity and intensity uniformity of each hole (data not shown). For example, using the images shown in Fig. 1, the standard deviation of intensity improved from 45.5 to 27.1 after correction by our algorithm. Additionally, our algorithm improved the maximum hole eccentricity from 1.35 to 1.05.
Automatic detection algorithm of arrayed holes
The distortion-correction method described above restores the distorted shape of arrayed holes to uniform circles. Subsequently, it is necessary to automatically detect the coordinates of the hole array in the distortion-corrected images of each local search area. The most common way to detect a given shape in an image is cross correlation between the image and a template [10]. However, cross correlation is often inefficient for minimal exposure images, where low contrast makes it difficult to distinguish the cross-correlation peaks corresponding to each hole. Figure 2a shows an example of an image of holey carbon, and Fig. 2b is the cross correlation between this image and a circle representing a single hole. The peaks are barely visible by eye, and it is difficult for automated computer software to select the correct peak position. Saxton and Baumeister [11] showed the correlation averaging method to yield reliable averaging results from electron micrographs of 2-D protein crystal by extracting the reference pattern from the micrograph itself and by making use of the molecule’s symmetry to find the displacement between the center of the unit cell and that of the molecule. Although the holes are rotationally symmetric and ordered in a periodic pattern in the image just like the unit cells in the 2-D protein crystal, this algorithm did not work well for our purpose because the contrast within each repeating unit (i.e. hole) is quite small in our target (results shown in Fig. 4). Thus, we implemented a new hole-detection algorithm that takes advantage of the previously calibrated periodicity of the holes.
Fig. 2.
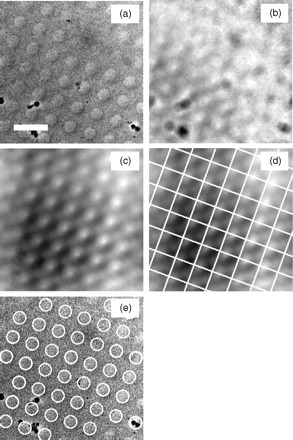
(a) An example image of a holey carbon sample (scale bar: 5 μm). (b) The cross correlation of the example image and an artificial hole (circle). (c) The cross correlation of the example image and an artificial hole array. (d) The same correlation map segmented with a square array corresponding to the spacing of the artificial hole array. All square segments are summed to enhance the peak corresponding to the hole location in each segment. (e) The automatically detected holes overlaid on the original image.
Fig. 4.
The frequencies of hole position displacements from the nearest manually picked hole detected by our algorithm (solid dark line with filled circles), simple cross correlation (dashed line with square markers) and the correlation averaging method (solid light gray line with triangle markers). Data are taken with JEM-1400 in (a) MAG and (b) DIFF conditions, JEM-2100 in (c) MAG and (d) DIFF conditions and JEM-3200FSC in (e) MAG and (f) DIFF conditions.
In our application, the diameter of the hole and the interval between adjacent holes must be initially calibrated. The cross-correlation function can be calculated more precisely by generating an artificial hole array with the diameter and the interval according to the initial calibration. These calibrations can be executed simultaneously with the calibration of the distortion parameter (section ‘Correction of distortion’).
Figure 2c shows the cross-correlation map of an image of holey carbon (Fig. 2a) with an artificial hole array. Such procedure accentuates the peaks compared to using simple cross correlation with a single hole (Fig. 2b), but it is still too noisy to ensure that the automated algorithm detects all the holes successfully.
To further improve the clarity of the cross-correlation peaks, we integrate small areas segmented from the periodic cross-correlation image. The peaks in the cross-correlation image must be arranged in the same way as the holes are in the original image. Since the holes are arranged as a 2-D lattice, the cross-correlation peaks must also form a 2-D lattice. Using this lattice, we segment the cross-correlation map into a square array (Fig. 2d) with each side equivalent to the previously calibrated hole-to-hole distance. This results in a one-to-one mapping of holes to squares, so that each repeating unit in the cross-correlation map contains a single peak corresponding to the hole’s location. Since the dimensions of the square array are defined by the hole periodicity, the hole location within each square must be nearly identical, and thus the cross-correlation peaks within all repeating units will add constructively. Summing all repeating units results in a single enhanced peak that is easily distinguishable by computational methods. Based on this single cross-correlation peak, the location of the hole array with respect to the square array can be determined, and thus all the holes in the original image can be accurately identified (Fig. 2e).
Method to move a goniometer
Even if the positions of the specimen in a search image are measured precisely, it is of little value if the goniometer cannot move the specimen accurately. Although the precision of goniometer motion is sufficient for manual operation, automated positioning is still hindered by goniometer ‘backlashing,’ which causes goniometer positioning with respect to absolute coordinates x and y not to be accurately reproducible. Movement to an identical targeted position from two different directions often results in slightly different final x and y goniometer coordinates, due to the flexural torsion of the drive system. The differences are negligible when the goniometer approaches a targeted position from a consistent direction. Thus, to improve goniometer accuracy, our software utilizes an approach vector, so that the goniometer must always approach a targeted position from the same direction. For example, if the software must move the goniometer to the position (x,y), the goniometer must first move to (x–x',y–y'), before moving to the absolute position (x,y). Since the approach vector (x',y') is constant, the goniometer will consistently approach any targeted position from the same direction, regardless of the initial position. This ensures the linearity of the stage motion, preventing backlashing and allowing for successful automated positioning.
Implementation of functions in a software for automation
The algorithms described above are all implemented in JADAS software, which has been introduced recently [7].
Each data-collection session contains parameter tuning and calibration at the beginning of the whole operation. JADAS asks the user to tune parameters (magnification, beam shift, etc.) for each low-dose mode at the parameter-tuning phase. The user must tune such parameters, switching each mode in the same order, adjusting centers of views for search and photo modes using beam shift and image shift coils. This parameter setting for each low-dose mode must be repeated sequentially until the image displacement between each mode becomes stable. Generally, this condition can be established within a few cycles, and once it’s established, the image displacement remains stable for several hours of data collection.
The distortion parameter k in Eq. (1) and the position of the distortion center are required by the software to correct the distortion. Since JADAS cannot currently learn these parameters automatically, a graphical calibration tool is provided for user-friendly manual determination of these parameters.
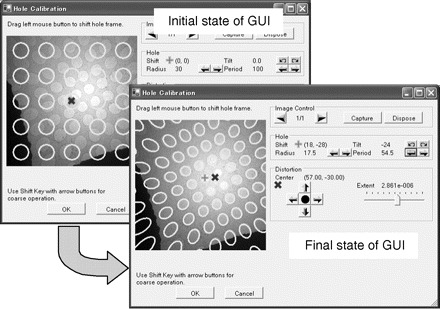
Figure 3 shows the calibration tool graphical user interface (GUI). The image shown in the GUI window is a search (DIFF-defocus) mode image overlaid with an artificial array of holes described by user-defined parameters. The artificial array of holes shifts and changes shape as the user interactively adjusts distortion and hole-array parameters with the GUI controls. Calibration is complete when the user finds parameters that result in a satisfactory match between the template array of holes and the actual search-mode image array of holes. This GUI tool is always shown at the beginning of each data collection session since some parameters of TEM condition like camera length and beam shift affect the effective magnification and the distortion parameter.
Fig. 3.

The initial and final states of the GUI tool in JADAS for calibration of distortion and hole-array parameters.
Results and discussion
We have completed several tests to verify our algorithms with the following JEOL TEMs: JEM-1400 (120 kV, tungsten filament), JEM-2100 (200 kV, LaB6 filament) and JEM-3200FSC (300 kV, FEG). Tests on the 120- and 200-kV microscopes were completed at room temperature using an empty Quantifoil® grid. Tests on the JEM-3200FSC were carried out at the liquid nitrogen temperature with ice-embedded Epsilon 15 virus on a Quantifoil® grid.
Hole detection
With 24 search-mode images from the empty holey carbon (JEM-1400 and JEM-2100) and seven search-mode images of the ice-embedded specimen (JEM-3200FSC), we measured x and y pixel coordinates of hole centers (Table 1) Based on these images, we compared the deviation between the manually determined hole centers with the results of three different hole-detection algorithms: the simple cross-correlation method, the correlation averaging method and our new algorithm.
Table 1.
Effective magnification and numbers of images and holes used in the test of hole detection
| TEM | MAG-mode search |
DIFF-mode search |
||||
|---|---|---|---|---|---|---|
| Effective magnification | Number of search images | Number of holes | Effective magnification | Number of search images | Number of holes | |
| JEM-1400 | ×426 | 4 | 349 | ×558 | 3 | 124 |
| JEM-2100 | ×2077 | 10 | 30 | ×1255 | 7 | 54 |
| JEM-3200FSC | ×4260 | 4 | 164 | ×2568 | 3 | 89 |
Manual selection was completed by manually selecting the center of each hole individually in search images. However, the positions were determined by fitting an array of holes to search images under MAG condition for JEM-3200FSC since the image contrast of this condition was too low to pick holes up manually.
Some images contained the copper grid bar, but ‘holes’ detected on such area were excluded from analysis since these false holes over grid bars do not affect automatic search because JADAS selects holes for imaging according to the mean pixel intensity in each detected hole.
Figure 4 shows histograms of these detection errors for each condition. The horizontal axis of each graph represents the distance of automatically detected hole position from the nearest manually picked hole, and the vertical axis is on the frequency. The mean errors of our new algorithm for each condition are listed in Table 2 in comparison with the results of the simple cross-correlation method and the correlation averaging method.
Table 2.
The numerical result of the test of hole detection
| TEM | MAG-mode search |
DIFF-mode search |
||||
|---|---|---|---|---|---|---|
| Our new algorithm | Simple cross correlation | Correlation averaging | Our new algorithm | Simple cross correlation | Correlation averaging | |
| JEM-1400 | 210.8 | 1946.2 | 1297.4 | 160.8 | 1716.0 | 1339.3 |
| JEM-2100 | 40.6 | 1810.9 | 323.0 | 92.0 | 1823.2 | 330.4 |
| JEM-3200FSC | 374.5 | 1669.1 | 774.8 | 217.6 | 1801.1 | 1116.2 |
Mean error [nm] of detected hole position from the nearest manually picked hole position.
Based on repeated manual picking of the same hole of a search-mode image taken with the JEM-2100 at ×2077 effective magnification in MAG mode, we estimated the error of manual hole detection to be ∼40 nm. The difference between the positions picked manually and detected by our algorithm on the images of the same condition is about 20 to 50 nm, and thus, the error of our algorithm is sufficiently small since it mimics manual operation.
Reproducibility of goniometer positioning
As previously described, automated stage movement has been hindered by repositioning errors, wherein the same coordinate position is not always achieved after relocating to the same area of a specimen. We have minimized this error by using an approach vector to trace every targeted position from a consistent direction.
To compare the reproducibility of the absolute-positioning method and our new approach-vector method, we fixed the numerical value of the final destination of the goniometer and manually compared the position actually reached by comparing charge-coupled device (CCD) images captured after each stage movement. The starting positions were chosen to surround the destination from all directions. The distance traveled for each specimen movement was designed to be about 30 μm, which is similar to distances traveled during local search (specimen search within a grid square). The results are shown in Fig. 5.
Fig. 5.
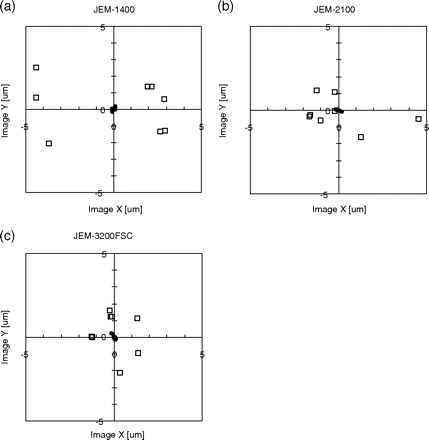
Deviation in the actual specimen position from the desired specimen position after ∼30 μm stage movements using our new approach-vector method (filled circles) and the original absolute-positioning method (square frames) of (a) JEM-1400, (b) JEM-2100 and (c) JEM-3200FSC. The origin is located at the averaged position observed in images.
Each plotted datum represents the distance of actually reached position from the averaged position. The range of stage movement error is less than 0.2 μm with our approach-vector strategy. This is an order of magnitude better than the conventional absolute-positioning method, which had an error range of about 1 to 5 μm.
Accuracy of automatic positioning
We tested the accuracy of positioning in completely automated data collection by capturing images at the center of each automatically detected hole. Local search tests were performed in the DIFF condition. The imaging magnification used to capture the resulting image was selected to contain the whole area of a hole in each image. We assessed the accuracy of hole detection and automated positioning using the deviation in the coordinates of the center of the imaged hole. To exclude systematic errors from insufficient alignment of search and photo conditions, we calculated the deviation of each hole center with respect to the center of each CCD frame.
Results of this analysis are shown in Fig. 6. About 50 data points are shown for each TEM, representing the deviation from the average of the center of each imaged hole. For the JEM-1400 (Fig. 6a), the standard deviation of the positioning error was 131.7 nm in the x direction and 76.5 nm in the y direction, corresponding to only 5% and 3% of the hole diameter (2600 nm), respectively. For the JEM-2100 (Fig. 6b), the standard deviation was 177.7 nm (7%) and 178.1 nm (7%) in the x and y directions, respectively. For the JEM-3200FSC (Fig. 6c), in which case the measured diameter of the hole was 2244 nm, the standard deviation was 325 nm (14%) and 65 nm (3%) in the x and y directions, respectively. The systematic bias of the plots in Fig. 6c is due to imperfect initial image shift alignment between search and photo modes. In this case of JEM-3200FSC, the error seemed to be conditioned by horizontal axis value of image coordinate, and the error was larger for holes detected around the left and right edges of the search image. Such error might come from residual astigmatism of the intermediate lens system, which stretches the image in one direction.
Fig. 6.
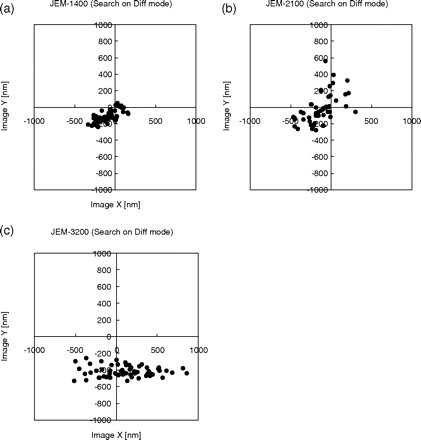
Distribution of the measured deviations of the centers of imaged holes from the center of CCD frame, using DIFF-defocus search mode for the (a) JEM-1400, (b) JEM-2100 and (c) JEM-3200FSC.
The positioning accuracy is sufficient to take pictures entirely inside holes when the images are taken at ×40 000 nominal magnification, that is ×57 258 effective magnification in our JEM-3200FSC, which is equipped with 61 mm square CCD camera. In this case, the size of the corresponding specimen area is about 1070 nm, and the image will not contain the hole edges even if the positioning error is 300 nm because the hole diameter is 2244 nm.
Concluding remarks
One of the most critical steps in automated TEM data collection is specimen search, which is encumbered by three primary challenges:
Significant pincushion distortion in DIFF-defocus images used in specimen search
Low contrast, which causes difficulty in accurately recognizing holes of holey carbon grids by automated procedures (especially when the specimen is embedded in vitreous ice)
Poor reproducibility of TEM goniometer movement
We have overcome these difficulties by implementing a distortion-correction method and a pattern recognition algorithm that takes advantage of the periodicity of holey carbon. The effectiveness of our software was evaluated with three different TEM models, and results show that automated positioning accuracy is sufficiently accurate for automated single-particle imaging, since the standard deviation of the positioning error was less than 15% of the common hole diameter (2.2 μm).
We have previously reported the utility of automated specimen search for single-particle cryo-EM data collection [7]. However, we expect that the positioning accuracy established here will allow many other TEM applications to be automated. For example, accurate positioning is a prerequisite for successful automatic imaging of Focused-Ion-Beam processed fragments mounted together on one TEM grid in the field of semiconductor science.
Acknowledgments
We thank Dr Chikara Sato for helpful advice on writing and Mr Takaki Ishikawa and Mr Yoshihiro Okura for assistance about goniometer characterization. We thank Dr Jonathan King and Dr Peter Weigele at M.I.T. for providing the epsilon 15 phage samples. This work was supported by the Robert Welch Foundation (Q1242) and National Institutes of Health grants [P41RR02250 through the National Center of Research Resources; PN2EY016525 through the Nanomedicine Development Center; R90DK71504 and T32GM008280 through Training Grants administered by the Keck Center of the Gulf Coast Consortia].
References
- 1.Koster A J, van den Bos A, van der Mast K D. An autofocus method for a TEM. Ultramicroscopy. 1987;21:209–222. [Google Scholar]
- 2.Downing K H, Koster A J, Typke D. Overview of computer-aided electron microscopy. Ultramicroscopy. 1992;46:189–197. [Google Scholar]
- 3.Kanaya K, Yamamoto Y, Ogasawara M, Baba N, Yonehara K. An automatic focusing and astigmatism correction method for high resolution electron microscopy. Micron and Microscopica Acta. 1989;20:179–192. [Google Scholar]
- 4.Hosokawa F, Kondo Y, Honda T, Hertsens C. Application of an Auto Adjustment System for a High-Resolution Transmission Electron Microscope, ICEM 13-PARIS 207. 1994 [Google Scholar]
- 5.Carragher B, Kisseberth N, Kriegman D, Milligan R A, Potter C S, Pulokas J, Reilein A. Leginon: an automated system for acquisition of images from vitreous ice specimens. J. Struct. Biol. 2000;132:33–45. doi: 10.1006/jsbi.2000.4314. [DOI] [PubMed] [Google Scholar]
- 6.Zhang P, Borgnia M J, Mooney P, Shi D, Pan M, O'Herron P, Mao A, Brogan D, Milne J L S, Subramaniam S. Automated image acquisition and processing using a new generation of 4K × 4K CCD cameras for cryo electron microscopic studies of macromolecular assemblies. J. Struct. Biol. 2003;143:135–144. doi: 10.1016/s1047-8477(03)00124-2. [DOI] [PubMed] [Google Scholar]
- 7.Zhang J, Nakamura N, Shimizu Y, Liang N, Liu X, Jakana J, Marsh M P, Booth C R, Shinkawa T, Nakata M, Chiu W. JADAS: a customizable automated data acquisition system and its application to ice-embedded single particles. J. Struct. Biol. 2009;165:1–9. doi: 10.1016/j.jsb.2008.09.006. [DOI] [PMC free article] [PubMed] [Google Scholar]
- 8.Katz M. Introduction to Geometrical Optics. Vol. 8. River Edge, NJ: World Scientific; 2002. [Google Scholar]
- 9.Hawkes P W. Image Processing and Computer-aided Design in Electron Optics. New York: Academic Press; 1973. [Google Scholar]
- 10.Sonka M, Hlavac V, Boyle R. Image Processing, Analysis and Machine Vision. New York: Chapman and Hall; 1993. [Google Scholar]
- 11.Saxton W O, Baumeister W. The correlation averaging of a regularly arranged bacterial cell envelope protein. J Microscopy. 1982;127:127–138. doi: 10.1111/j.1365-2818.1982.tb00405.x. [DOI] [PubMed] [Google Scholar]


