

Abstract
Context:
The ulnar collateral ligament of the elbow (UCL) is frequently injured in throwing athletes, most commonly baseball pitchers. The ligament is reconstructed through bone tunnels using palmaris longus or gracilis autograft.
Results:
This study highlights the following technique for UCL reconstruction in over 2000 athletes.2
Conclusion:
When conservative management fails, ligament reconstruction can allow the athlete to return to their sport.1
Keywords: Ulnar Collateral Ligament, UCL, Tommy John, Thrower’s elbow
The ulnar collateral ligament (UCL) of the elbow is frequently injured in throwing athletes, most commonly baseball pitchers. When conservative management fails, ligament reconstruction can allow the athlete to return to sport.6 The ligament is reconstructed through bone tunnels using palmaris longus or gracilis autograft. We have used the following technique for UCL reconstruction in over 2000 athletes.2
Once the patient is indicated for surgery, the operative forearm must be examined for the presence of a palmaris longus tendon, which is our preferred graft choice. If the palmaris is absent, the gracilis tendon from the contralateral leg is used.4
After induction of general anesthesia, a nonsterile tourniquet is applied to the upper arm. The arm is prepped and draped, then exsanguinated with an esmarch bandage. The tourniquet is inflated to 250 mm Hg. The palmaris longus tendon is harvested first. Great care must be taken when harvesting this tendon, as the other flexor tendons and median nerve are in very close proximity. To ensure that the correct structure is harvested, we use 3 transverse incisions directly over the palmaris tendon, each 7 to 10 mm in length. The first incision is made at the wrist flexion crease, directly over the palmaris tendon. A No. 15 blade is used to incise the skin, and blunt dissection is used to isolate the tendon, which is immediately subcutaneous. A small hemostat is placed around the tendon and used to pull tension on it. This shows the course of the tendon along the length of the forearm. A second incision is made 3 to 5 cm proximal and parallel to the first, directly over the tendon. After the skin is sharply incised with a No. 15 blade, the tendon is delivered out of the second incision with a blunt hemostat. The final incision is then made parallel to the others at the site of the musculotendinous junction, near the junction of the proximal and middle thirds of the forearm. The tendon is again delivered out of the wound with a hemostat, and the surgeon confirms that the correct structure has been identified in all 3 locations. The tendon is then cut at the most distal incision, and a 0 Vicryl suture is used to whipstitch the exposed end. The tendon is then delivered out of the proximal incision and cut free at the musculotendinous junction (Figure 1). Any remaining muscle is removed from the proximal end on the back table, and the end is whipstitched with a 0 Vicryl suture. The tendon is then protected in a moist sponge for later use. Each incision is then closed with subcutaneous 2-0 Vicryl and subcuticular 3-0 Prolene sutures.
Figure 1.
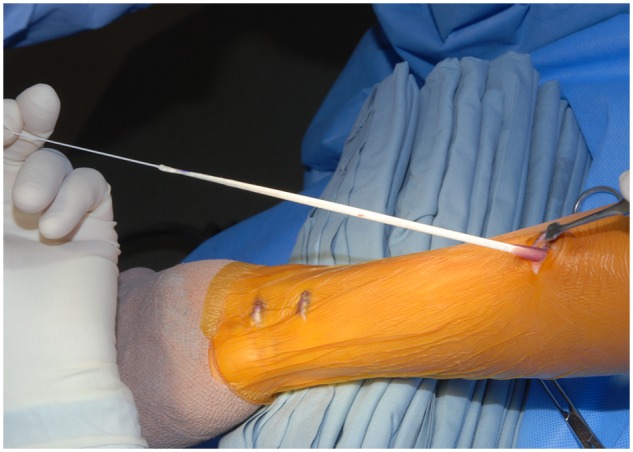
The Palmaris graft is confirmed at all 3 incision sites before it is cut distally, secured with a whipstitch, and delivered out of the proximal wound.
The incision over the medial elbow is made directly over the medial epicondyle, extending approximately 3 cm proximal and 6 cm distal to the medial epicondyle. Blunt dissection is then used to identify and protect the medial antebrachial cutaneous nerve. This nerve is variable in its size and location and can often have multiple branches at this location. Its most common location is in the distal third of the incision (Figure 2). Once this nerve is protected, full-thickness flaps are elevated to expose the medial epicondyle, the flexor/pronator mass, and the cubital tunnel.
Figure 2.
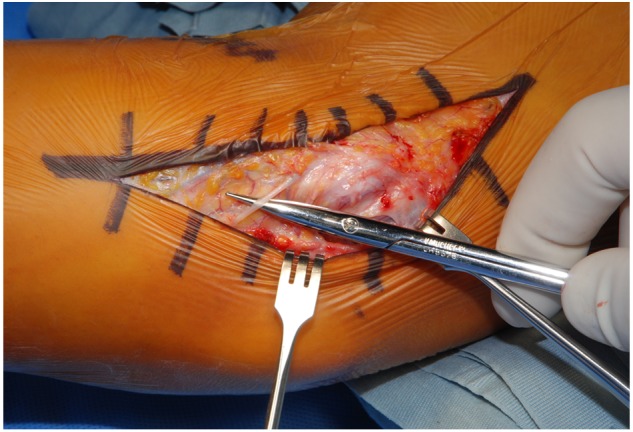
The medial antebrachial cutaneous nerve is usually found in the distal third of the exposure.
We transpose the ulnar nerve in all UCL reconstructions for several reasons. First, the nerve must be mobilized to expose the UCL through the interval we use. Second, when humeral tunnels are drilled, the drill is aimed directly at the ulnar nerve if it is left in situ. Finally, athletes often have ulnar nerve symptoms as well as UCL pathology.1,3
The cubital tunnel is opened with a No. 15 blade or a tenotomy scissors, and the ulnar nerve is identified. The ulnar nerve is released and mobilized from as far proximal into the posterior compartment as can be safely reached (Figure 3). The fascia of the flexor carpi ulnaris is split sharply, and then the muscle fibers overlying the ulnar nerve are spread bluntly. The first motor branch to the flexor carpi ulnaris is identified and protected. A vessel loop is then placed around the ulnar nerve to allow for gentle retraction during the procedure. The medial intermuscular septum of the upper arm is then divided at the most proximal aspect of the incision, and the remaining distal septum is taken down from the medial humerus but left attached distally to the superior edge of the medial epicondyle. This strip of tissue is then used as a sling at the end of the procedure to hold the ulnar nerve in its anteriorly transposed position. Blood vessels at the posterosuperior edge of the medial epicondyle are coagulated to prepare for drilling of the humeral tunnels.
Figure 3.
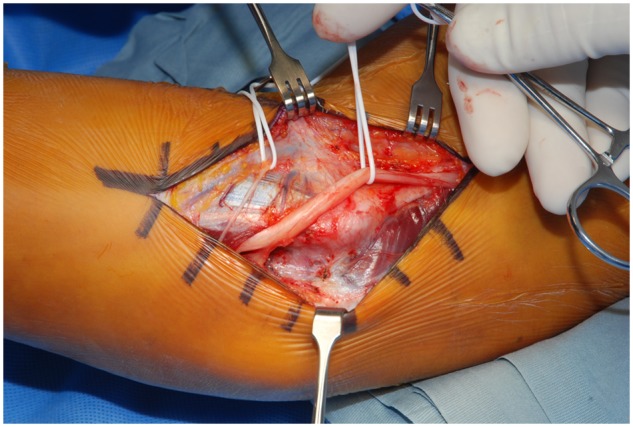
The ulnar nerve is dissected free from the cubital tunnel and mobilized with a vessel loop.
If the patient has posteromedial olecranon osteophytes, a small incision is made in the joint capsule to expose the posteromedial olecranon tip. With the ulnar nerve protected anteriorly, osteophytes can be removed with a rongeur, osteotome, or 4.0-mm burr. The capsule is then closed with interrupted 0 Vicryl suture.
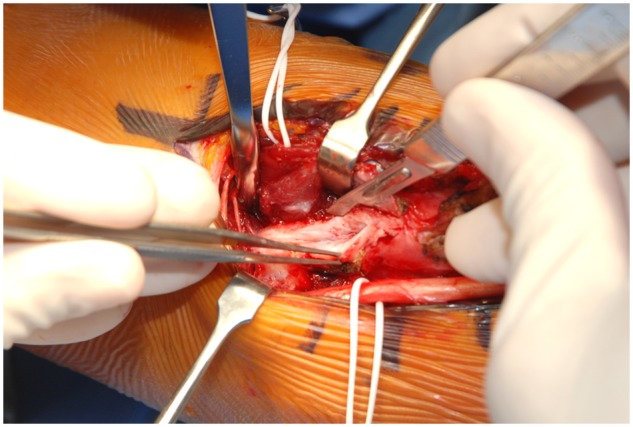
Next, the injured UCL is exposed. The native UCL inserts on the sublime tubercle of the ulna, which lies deep and anterior to the ulnar nerve. Once it is mobilized, the posterior fibers can be easily visualized. The flexor digitorum profundus muscle overlies the anterior fibers of the UCL and must be elevated off of the ligament with a No. 15 or No. 69 blade and a small periosteal elevator (Figure 4). This dissection begins distally and is carried proximally up the humeral origin on the medial epicondyle. Depending on the location, severity, and chronicity of the injury, a defect in the ligament is appreciated at this point. The remaining fibers of the injured UCL are split longitudinally with a scalpel to expose the ulnohumeral articulation. Exposing the joint surfaces provides a visual reference for proper ulnar tunnel position and allows inspection of partial undersurface tears of the UCL (Figure 5).7
Figure 4.
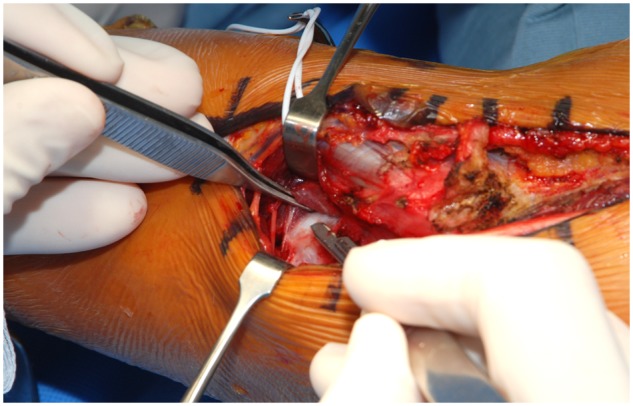
The flexor digitorum profundus muscle belly is elevated to expose the native ulnar collateral ligament, which is directly beneath the scalpel blade.
Figure 5.
The ulnar collateral ligament is split longitudinally with a scalpel to expose its deep fibers as well as the ulnohumeral joint.
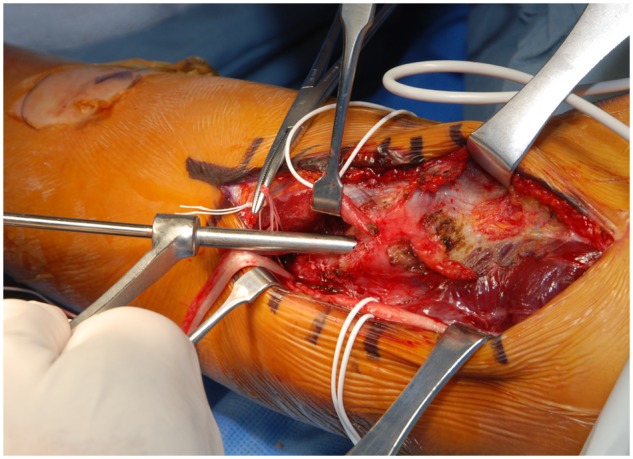
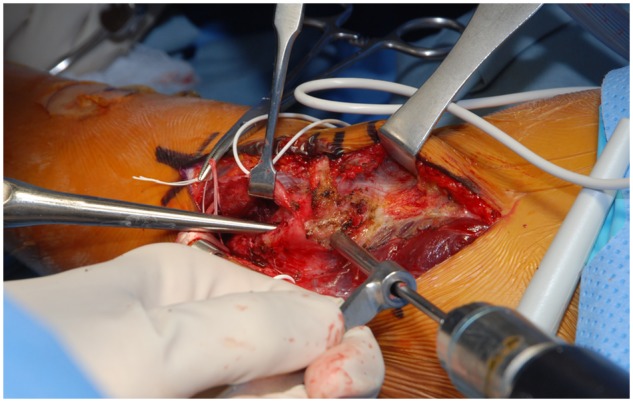
With the exposure complete, tunnels can now be drilled. The first ulnar drill hole is placed at the posterior edge of the sublime tubercle with a 3.6-mm drill, aiming anterior and parallel to the joint line (Figure 6). A hemostat is then placed in the first drill hole, and the second hole is made with the same drill, starting at the anterior border of the sublime tubercle, 1 cm distal to the joint line.5 When the drill is deep enough, it will hit the hemostat. No. 0 and No. 1 angled curettes are then used to clean and connect the tunnels and to remove bone debris to allow for easier graft passage. Any remaining bone debris in the soft tissues should be washed away to prevent heterotopic ossification. A Hewson suture passer is bent to fit through the curved tunnel and used to pass the palmaris graft through the ulnar tunnels, leaving equal lengths of tendon on each side (Figure 7). Attention is then directed toward the humeral tunnels. The 3.6-mm drill bit is placed at the humeral origin of the UCL and is aimed proximal and lateral to exit the posterosuperior border of the medial epicondyle (Figure 8).5 Care must be taken to exit as close as possible to the medial border of the humeral shaft to leave the largest bone bridge possible. A No. 0 curette is then placed in the tunnel. A second hole is drilled starting at the medial prominence of the medial epicondyle and aiming toward the humeral insertion of the UCL. This will create a Y-shaped tunnel configuration. The starting point for this second tunnel must be sufficiently distant from the exit point of the first tunnel to prevent fracturing of the bone bridge between them (Figure 9). The drill contacts the curette when it has reached the proper depth. No. 0 and No. 1 straight and curved curettes are used to clear bone debris from the tunnels. If a gracilis graft is used, a 4.0-mm drill and No. 2 curettes are used to prepare the ulnar and humeral tunnels.
Figure 6.
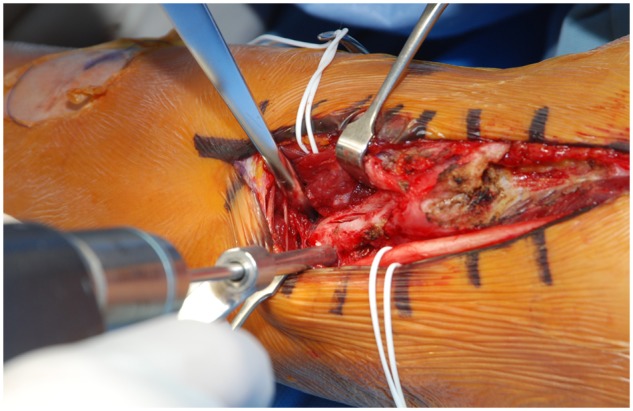
The ulnar tunnels are drilled on either side of the sublime tubercle, perpendicular to the joint surface.
Figure 7.
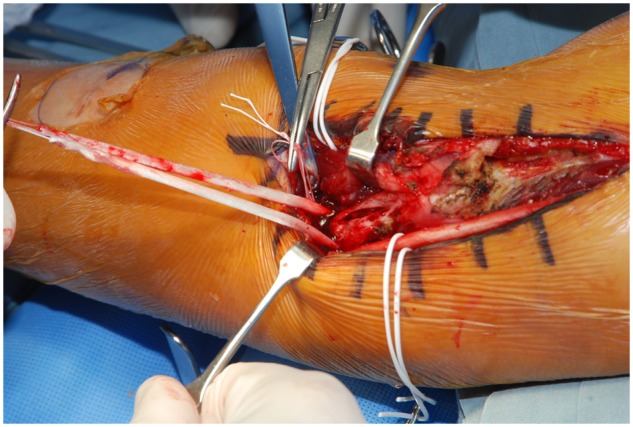
The graft is passed through the ulnar tunnel.
Figure 8.
The humeral tunnel is drilled from distal to proximal, starting at the native insertion of the ulnar collateral ligament onto the humerus.
Figure 9.
A curette is placed in the first humeral tunnel while the second tunnel is drilled.
A straight Hewson suture passer is then passed through one of the limbs of the Y-shaped humeral tunnels, and the suture on the end of the graft is passed and clamped. Only the suture is passed through the tunnel, to allow adequate space for the Hewson suture passer to go through the tunnel a second time. The suture passer is then passed through the second limb of the humeral tunnel, and the other end of the graft is passed. The clamped suture is then used to deliver the final limb of the graft through the remaining humeral tunnel (Figure 10).
Figure 10.
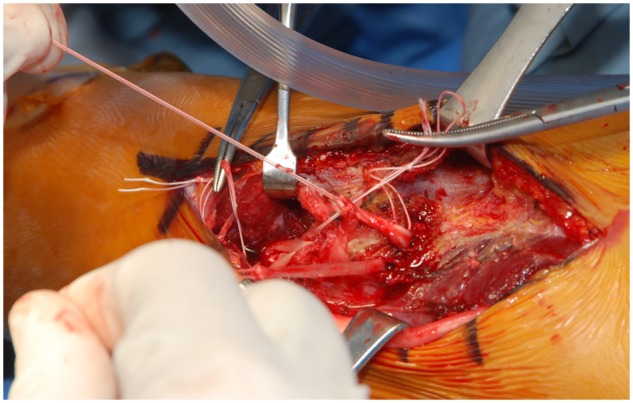
The graft is passed through the humeral tunnels.
The graft can now be fixed in place. An assistant holds the elbow in 30° of flexion with a slight varus stress so that the articular surfaces of the ulnohumeral joint are in contact. A second assistant holds tension on the 2 ends of the graft in an overlapping position on the posteromedial epicondyle, and 0 Ticron suture is used to sew the 2 limbs to each other and to the underlying periosteum. The 2 limbs of the graft are then sewn together between the humeral and ulnar tunnels to increase tension within the graft and re-create the course of the native UCL (Figure 11). Excess graft is then resected with a No. 15 blade.
Figure 11.
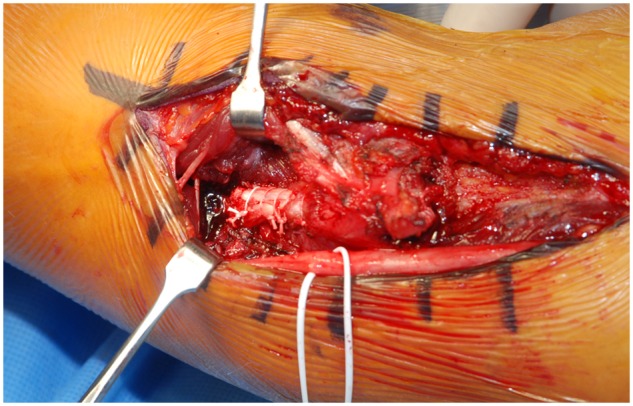
The graft is sewn together between the humeral and ulnar tunnels to increase tension within the graft and re-create the course of the native ligament.
The ulnar nerve is then transferred anterior to the medial epicondyle, and the sling of medial intermuscular septum is laid over the nerve. The end of the sling is sewn to the fascia of the flexor/pronator mass with 3-0 Ticron suture. Care must be taken to leave the sling of septum very loose so that the ulnar nerve is not compressed under it and can move freely.
The flexor carpi ulnaris fascia and the fascia of the cubital tunnel are closed with 0 Vicryl suture. The tourniquet is let down, and hemostasis is obtained with electrocautery. The wound is irrigated with normal saline, and a Hemovac drain is placed in the dependent portion of the wound, exiting proximally. The wound is closed with subcutaneous 2-0 Vicryl and subcuticular 3-0 Prolene, followed by Steri-strips. Sterile dressings are placed, and a posterior splint is molded at 90° of flexion.
References
- 1. Aoki M, Takasaki H, Muraki T, et al. Strain on the ulnar nerve at the elbow and wrist during throwing motion. J Bone Joint Surg Am. 2005;87(11):2508-2514 [DOI] [PubMed] [Google Scholar]
- 2. Cain EL, Andrews JR, Dugas JR, et al. Outcome of ulnar collateral ligament reconstruction of the elbow in 1281 athletes: results in 743 athletes with minimum 2-year follow-up. Am J Sports Med. 2010;38(12):2426-2434 [DOI] [PubMed] [Google Scholar]
- 3. Ciccotti MG, Jobe FW. Medial collateral ligament instability and ulnar neuritis in the athlete’s elbow. Instr Course Lect. 1999;48:383-391 [PubMed] [Google Scholar]
- 4. Dugas JR, Bilotta J, Watts CD, et al. Ulnar collateral ligament reconstruction with gracilis tendon in athletes with intraligamentous bony excision: technique and results [published online May 11, 2012]. Am J Sports Med. [DOI] [PubMed] [Google Scholar]
- 5. Dugas JR, Ostrander RV, Cain EL, Kingsley D, Andrews JR. Anatomy of the anterior bundle of the ulnar collateral ligament. J Shoulder Elbow Surg. 2007;16(5):657-660 [DOI] [PubMed] [Google Scholar]
- 6. Jobe FW, Stark H, Lombardo SJ. Reconstruction of the ulnar collateral ligament in athletes. J Bone Joint Surg Am. 1986;68(8):1158-1163 [PubMed] [Google Scholar]
- 7. Timmerman LA, Andrews JR. Undersurface tear of the ulnar collateral ligament in baseball players: a newly recognized lesion. Am J Sports Med. 1994;22(1):33-36 [DOI] [PubMed] [Google Scholar]