Abstract
Context:
With the evolution of hip arthroscopy has come an increased recognition of intra-articular hip pathologies and improved techniques for their management. Whereas mechanical problems can often be corrected through surgery, functional deficits must be corrected through the rehabilitation process. Therefore, the evolution of hip arthroscopy has necessitated a progression in hip rehabilitation to ensure optimal postsurgical results.
Evidence Acquisition:
Literature review was conducted with PubMed, EMBASE, and PEDro (1992 to 2009) with the terms hip, rehabilitation, and physical therapy.
Results:
Although it is generally accepted that rehabilitation after hip arthroscopy is important, there is limited evidence-based research to support the rehabilitative guidelines.
Conclusion:
The common goal of hip rehabilitation should remain focused on the return to pain-free function of the hip joint. Outcome data indicate that this goal is being met; however, further data are required to completely validate the long-term success of hip rehabilitation after arthroscopy.
Keywords: hip arthroscopy, hip pathology, hip rehabilitation, clinical rehabilitation guidelines
Over the past decade, hip arthroscopy has gained an increased popularity. With this has come an increased recognition of intra-articular hip pathologies and improved techniques for their management.3,5-10,15,17,20 Whereas mechanical problems can often be corrected through surgery, functional deficits must be corrected through the rehabilitation process.
The evolution of hip arthroscopy has necessitated a progression in hip rehabilitation to ensure optimal postsurgical results. Although it is generally accepted that rehabilitation after hip arthroscopy is important, there is limited evidence-based research to support the rehabilitative guidelines.14,16,22,25 Rehabilitative methods commonly used after minimally invasive surgery for other joints—such as the knee, shoulder, elbow, and ankle—have been applied in the management of hip disorders. The key to obtaining successful outcomes with any technique lies in understanding and respecting basic principles.
The goal of the rehabilitation plan is to reduce symptoms (ie, modulate pain and inflammation) and improve function (ie, restore mobility, strength, proprioception, and endurance), as approached through a systematic progression that depends on the patient’s status (ie, present pathology) and functional needs. During the assessment process, it is important to determine the patient’s level of understanding regarding the pathology, the goal expectations, and the time frame for achieving them. Patient education is the foundation of the rehabilitation plan. The patient must comprehend the related precautions and the recommended progression for his or her situation. Through collaborative consultation with the surgeon, reasonable goals and expectations can be formulated for favorable outcomes specific to a patient.
Treatment/Rehabilitation Progression
Needs and areas of concern can be identified from the subjective and objective assessment of the clinician and from information provided by the surgeon.4 For example, a patient with significant degenerative changes can have a slower recovery, as dictated by the symptoms. For this patient, a home-based rehabilitation program may suffice, depending on the level of compliance and understanding of the progression. After initial exercise instruction regarding frequency and duration, the patient can often accomplish the program with the simplest home equipment. A home-based program can be convenient for the patient and so limit financial burden and use of insurance benefits. For a patient undergoing abrasion arthroplasty or microfracture, the rehabilitation process is much more deliberate, with a prolonged interval of protected weightbearing. During this interval, the intensity of rehabilitation is conservative and may be easily accomplished with an independent program and only occasional supervision. Conversely, a patient with a repair of a labral tear and otherwise healthy joint may be expected to progress much more aggressively through the protocol phases with the anticipation of regaining full function and return to sports. Because of the faster pace, the use of a well-equipped facility may be preferred so that the patient has access to rehabilitative tools and equipment that will complement the high-level demands of the rehabilitative program. In addition, this higher level patient may require more clinical attention to gauge response to exercise and ensure a safe progression.
Although pathology-specific protocols have been developed for routine arthroscopic procedures, general guidelines can be applied across 4 phases of rehabilitation: (1) mobility and initial exercise, (2) intermediate exercise and stabilization, (3) advanced exercise and neuromotor control, and (4) return to activity. Appendix A includes sample rehabilitation protocols for routine arthroscopic procedures that require little to no biological healing (loose body removal, labral debridement, synovectomy, ligamentum teres debridement, etc); appendix B includes sample protocols for those arthroscopic procedures that require more extensive biological healing (labral repair, microfracture, femoroplasty) (appendices available online at http://sph.sagepub.com/supplemental).
Postoperative recovery actually begins with the preoperative educational process, which may be a structured prehabilitation program that addresses impairments such as pain, swelling, postural deviations, compensated mobility, range of motion loss, and decreased proprioception, as well as general muscle strength and muscular and cardiovascular endurance. Hip pain may alter lumbo-pelvic hip movement, creating patterns that lead to impairments of muscular balances and faulty mechanics.2,23 In other cases, a single comprehensive preoperative visit will suffice for instruction, explanation, and demonstration of the expected postoperative rehabilitation protocol. The patient should be aware that one’s rehabilitative responsibilities—such as understanding weightbearing precautions, wound care, and use of assistive devices—begins before leaving the outpatient area. Many initial exercises can be performed independently, but the patient should understand the importance of beginning isometric contractions at the hip and ankle plantarflexion and dorsiflexion pumps to facilitate lower extremity circulation.
Phase 1: Mobility and Initial Exercise
During the initial phase of rehabilitation, the goals of the program are to protect the repaired tissue, diminish pain and inflammation, restore pain-free range of motion, prevent muscle inhibition, and normalize gait without crutches. The primary constraint during this phase is that of soft tissue healing and avoiding the negative effects of immobilization.12
The patient’s weightbearing status can vary, depending on the surgeon’s findings and the procedure performed. Unless the surgical procedure addressed a pathology that required extensive healing (ie, labral repair, microfracture), foot-flat weightbearing is typically allowed as tolerated, and crutches are discontinued within the first week. In cases where healing is required, the patient may remain on a limited weightbearing status for up to 8 to 10 weeks. Although the discomfort associated with arthroscopy might be surprisingly minimal owing to the combination of capsular penetration with the arthroscopic portals and the traction applied to the capsule during the procedure, there can be significant reflex inhibition. This reflex inhibition can lead to limited or poor muscle function, thereby altering normal patterns of movement.22 The gluteus medius muscle is an example that commonly exhibits reflex muscle inhibition following hip injury or surgery. In a typical arthroscopic procedure, the anterolateral and posterolateral portals pass through this muscle. Clinically, it is common for the patient to have a difficult time regaining muscle tone and function postsurgery. Functionally, the gluteus medius muscle provides a level pelvis during ambulation. With gluteus medius weakness, a Trendelenburg gait will occur as the contralateral pelvis drops when the limb becomes unsupported in the swing phase of gait. Additionally, the short moment arm of the gluteus medius causes a large joint compression force during the single-limb stance phase of gait.1,11,21 In a patient with hip articular pathology, it is common to find inhibition of the gluteus medius because of pain.22 Consequently, assistive devices are helpful to minimize the Trendelenburg pelvis drop and reestablish a normal gait pattern with synchronous muscle activity. The most effective method of neutralizing compressive forces across the hip is to allow the patient to apply the equivalent weight of the leg on the ground.26 Maintaining a true nonweightbearing status requires significant muscle force to suspend the extremity off the ground, thus generating considerable dynamic compression across the joint as a result of muscle contraction.26 Resting the weight of the lower extremity on the ground neutralizes this dynamic compressive effect of the muscles.26
Early range of motion is initiated to decrease the likelihood of adhesions forming about the joint.12 Joint motion is normalized by restoring capsular extensibility, with emphasis on passive internal rotation and flexion to prevent scarring between the hip joint capsule and the acetabular labrum. Limitation of hip flexion and internal rotation can occur because of posterior capsular tightness.25 Stretching of the posterior hip capsule can be achieved through quadruped rocking (Figure 1). Exercises are directed in all planes of hip motion, and the end ranges for motion are determined by the patient’s level of discomfort. Stretching is typically pushed only to tolerance, and the patient is educated about these parameters. Pushing the extremes of motion does little to enhance function, and it may exacerbate discomfort. An exception to this rule may be after excision of large bony osteophytes that created a block to motion. Aggressive early stretching under these circumstances can regain the previously blocked motion and might indeed improve function.
Figure 1.
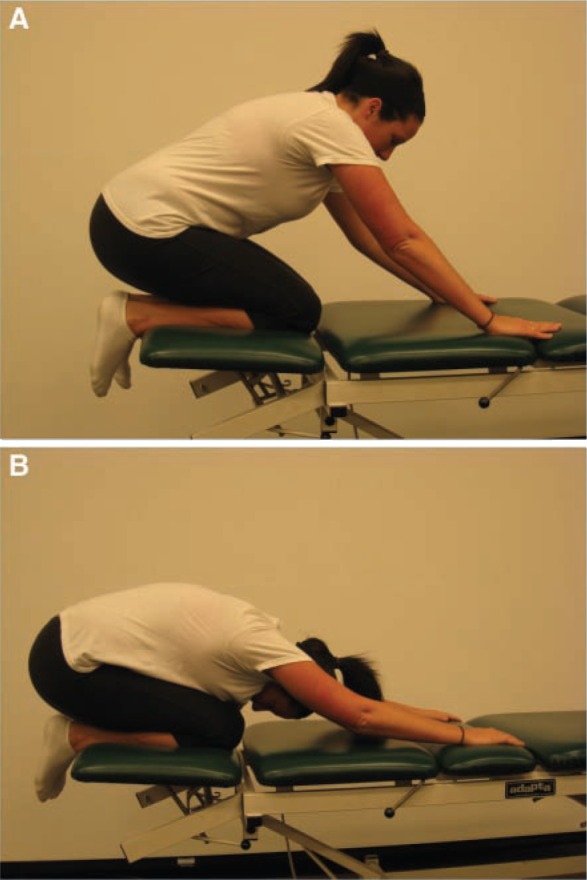
Progressive prone rocking (A, B) to stretch the posterior hip capsule and facilitate hip flexion and internal rotation.
Manual mobilization techniques can assist in the reduction of compressive forces across the articular surfaces,18 lessening discomfort and enhancing cartilage healing. Small accessory oscillation movements stimulate joint mechanoreceptors that assist in pain modulation while helping to maintain capsular mobility.25 Graded mobilization with flexion and adduction movement or internal rotation should be gently implemented with the moderately painful joint. Stationary bicycling with minimal to no resistance is an excellent adjunct to the range of motion program and should be done daily. Caution must be taken to not use a recumbent bike or bend over in the aerodynamic riding position to minimize the extreme of hip flexion.
Distraction techniques (longitudinal movement) are most useful when hip movements are painful (Figure 2). Oscillatory longitudinal movements are produced by gently pulling on the lower extremity down the long axis of the femur. This technique can be assisted by a rolling or sliding motion with support under the patient’s thigh in the direction of the treatment movement, and it can be performed in varying degrees of hip flexion. In addition, capsular stretching can be specific with 3-dimensional mobilization by rotating the femur into the restrictive barrier and performing a longitudinal or inferior glide (Figure 3). Oscillatory movements in a compression mode, stopping short of the painful position, can be helpful, especially for weightbearing pain.
Figure 2.
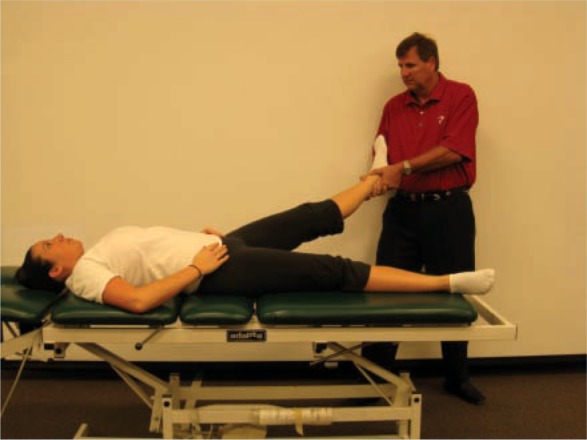
Straight-plane distraction performed in the loose-pack position of the hip by applying axial traction force on the lower extremity.
Figure 3.
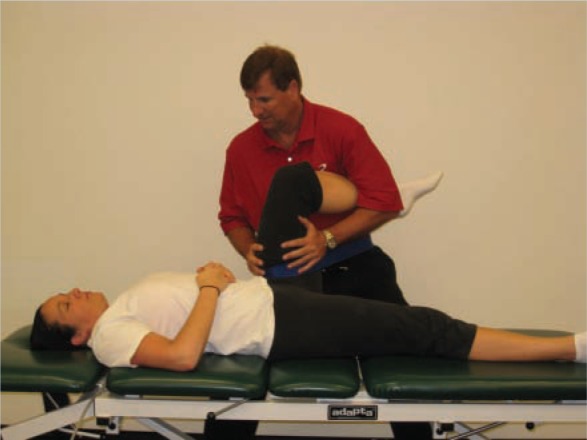
Three-dimensional mobilization to help restore internal hip rotation.
Very little anterior-posterior movement takes place within the acetabulum, but anterior and posterior glides can be beneficial for the modulation of pain through the stimulation of joint mechanoreceptors.25 Glides can also be used as an accessory movement at the limit of physiological range to increase motion of the joint. The presence of a capsular hip pattern is often secondary to a postoperative effusion:19 a gross limitation of flexion, abduction, and internal rotation with minimal loss of extension and external rotation.19 Regardless of the pattern of restriction, every attempt should be made to restore full capsular mobility and a physiologic range of motion. In cases with painful restricted motion, the clinician must carefully assess the end feel to motion and the physical status of the joint to determine whether mobilization techniques are a treatment option.
The prevention of muscle inhibition can be achieved through muscle-toning exercises performed within the first week after surgery. Progression depends on the patient’s tolerance and should not be overly aggressive. Isometric exercises are the simplest and least likely to aggravate the joint and include sets for the gluteals, quadriceps, hamstrings, adductor, abductor, and lower abdominal muscle groups. Isometric contraction of the antagonistic muscle group may inhibit spasms and promote pain relief. Because of reflex inhibition, emphasis should be placed on isolating and strengthening the gluteal muscles. Assessment of gluteal muscle weakness can best be accomplished with standardized manual muscle-testing procedures in the side-lying and prone positions. The dynamic quality of single-leg support as a part of the kinetic chain can be functionally assessed with a single-leg squat. The single-limb squat test requires frontal plane stability of the pelvis and control of the lower limb in the frontal and transverse planes, both of which require high gluteus medius muscle activation. The single-leg squat test also activates the gluteus maximus muscle. The motion of the single-limb squat requires stability of the lumbo-pelvic region while providing eccentric control of hip flexion and concentric hip extension.
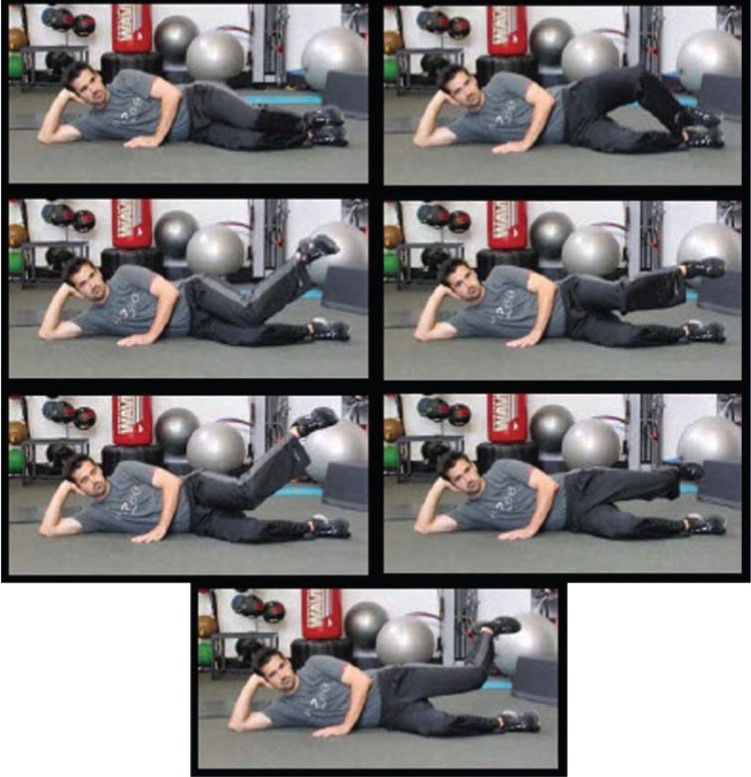
Gluteal isometrics in a neutral pelvic position may decrease spasm of the iliopsoas and provide a decrease in anterior hip pain. The clam shell progression is used to emphasize internal rotation while strengthening the gluteus medius (Figure 4). It begins with the patient positioned in the side-lying position with the hips flexed approximately 30° feet together, while he or she externally rotates the hip, activating the posterior fibers of the gluteus medius. Progression is achieved by keeping the knees together and performing hip internal rotation (reverse clam shell) activating the anterior and middle portions of the gluteus medius. Further gluteus medius activation is accomplished by abducting and isometrically holding the upper thigh parallel with the floor while performing internal hip rotation. During this phase, patients can start double-leg bridging, limited arc leg press, and minisquats for the gluteus maximus (Figure 5; Table 1). Previous research has indicated that muscle activation greater than 50% to 60% maximum voluntary isometric contraction is considered adequate for muscle strengthening.13
Figure 4.
Clam shell exercise progression for strengthening the gluteus medius. From the side-lying position, flex both knees and support head with the down hand. Start by keeping feet together and separating the knees with rotating the pelvis. Next, separate the feet while keeping the knees together. Then elevate the top leg and repeat the last move (bring the foot to the ceiling). Finally, elevate and extend the top hip and repeat the same move—foot to ceiling.
Figure 5.
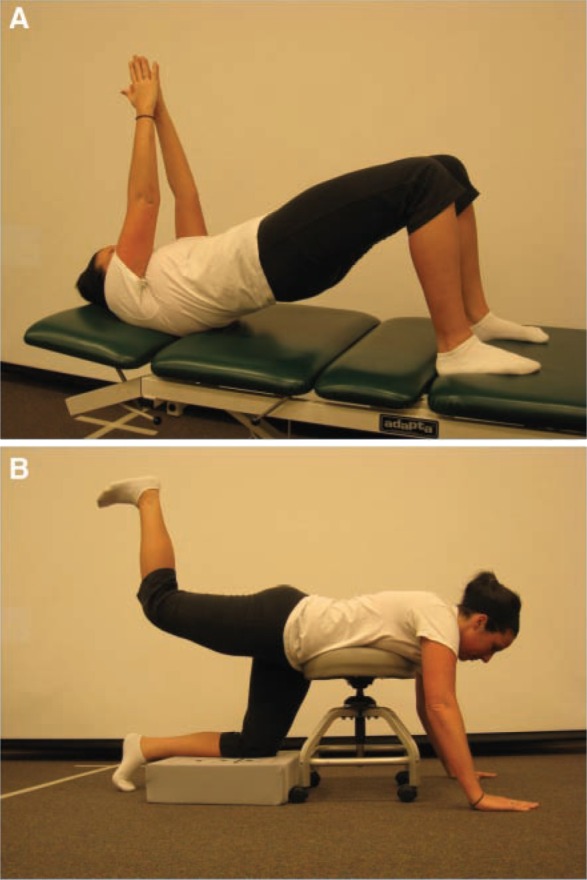
A, gluteal strengthening with 3-point bridging; B, gravity-resisted hip extension with the pelvis braced. This position also inhibits the hip flexor muscles through reciprocal inhibition.
Table 1.
Strong gluteus medius and gluteus maximus as evidenced by muscle activation greater than 50% maximum voluntary isometric contraction.
| Gluteus Medius | Gluteus Maximus |
|---|---|
| Side plank with hip abduction | Single-leg deadlift |
| Side-lying hip abduction | Single-leg squat |
| Single-leg bridge with core activation | Bench steps with hip extension |
| Single-leg squat | Front plank with hip extension |
| Lateral stepping with resistance bands | Backward walking with resistance bands |
| Single-limb deadlifts | Single-leg bridge with core activation |
| Reverse clam shell progression | Resisted quadruped hip extension |
An aquatic program is often beneficial for allowing early return to exercise, and it can begin as soon as the portal sites have healed and the sutures have been removed.22 A pool program allows for muscle relaxation, encouraging joint mobilization and gentle strengthening in a reduced-weight environment. The water buoyancy provides safe resistance, gait progression in waist-deep water, and assistance to movement in all planes. To progress to the intermediate phase, patients should achieve close to full range of motion, a normalized gait pattern without crutches, and minimal to no pain.
Phase 2: Intermediate Exercise and Stabilization
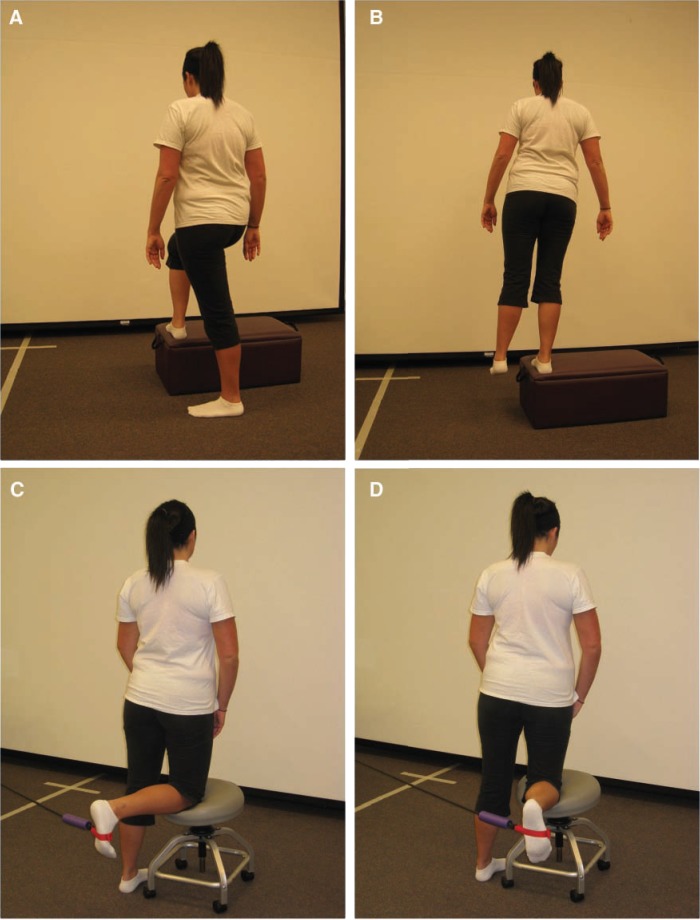
The intermediate phase of rehabilitation typically begins at week 4. Range of motion exercises should be continued until full pain-free range of motion is achieved and while strengthening and stabilization exercises are advanced. Weightbearing and a progressive resistance exercise program can be added during this phase (Figure 6). Emphasis should be on the elimination of muscle imbalances and motor substitution patterns that occur with activities of daily living. The most common cause for muscle imbalance is chronic overuse or injury, which leads to neuromuscular compromise and an eventual change in the elasticity of the muscle.2,22,23 The neuromuscular compromise can manifest by 3 mechanisms:
Figure 6.
Strengthening of posterior fibers of gluteus medius: A, starting position—foot is positioned on step in full external hip rotation, at a 90° angle to the stance foot; B, ending position—patient performs a step-up and returns to the starting position. Strengthening with tubing resistance: C, hip internal rotation; D, hip external rotation.
arthrokinetic inhibition: when a muscle is inhibited by joint dysfunction—overuse leads to shortening and tightening (not spasm) of postural muscles, and disuse, to a weakening and inhibition of phasic muscles;
synergistic dominance: when synergists, stabilizers, and neutralizers overcome a weak or inhibited prime mover23; and
reciprocal inhibition: when a tight muscle decreases neural drive to its functional antagonist,23 leading to compensation and predictable injury patterns.
The most common muscle imbalance seen clinically is tightness of the hip flexors and erector spinae muscles with weakness of the gluteals and abdominals, resulting in anterior pelvic tilt with increased lumbar lordotic curve.23 Therefore, core stabilization exercises progress in conjunction with the hip progressive resistive exercise program.
Addressing the proximal stabilizing musculature of trunk and pelvis is an important, often overlooked, aspect of hip rehabilitation; it is critical for optimizing performance and minimizing reinjury risk. Core stabilization and strengthening emphasize the trunk musculature for improved pelvic stability and abdominal control (Figure 7).22 Patients often develop the strength, power, and endurance of specific extremity muscles required for activities but are deficient in lumbopelvic-hip complex strength. The core stabilization system should be assessed and challenged as part of the rehabilitation program.4
Figure 7.
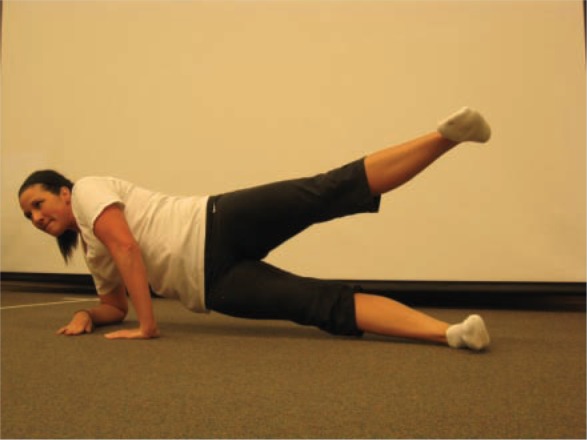
Side-plank core stabilization exercise with hip abduction.
Pelvic tilt test
The pelvic tilt test (Figure 8) is good for mobility of the hips and lumbar spine; it also controls pelvic posture, which links the upper and lower body. The test begins with tilting the pelvis forward and backward, arching the back (rolling pelvis forward), and then flattening the lower back (rolling the pelvis backward). The quality and degree of movement indicate the frequency of day-to-day use.
Figure 8.
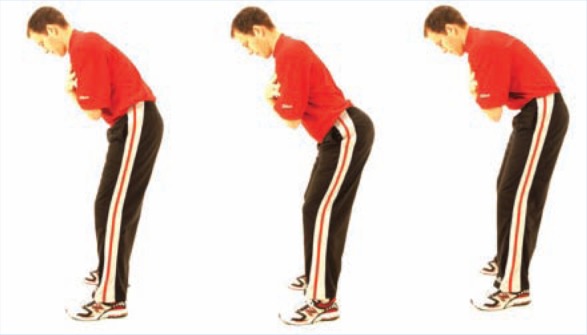
Pelvic tilt test. In the forward bent position, the patient tilts the pelvis anterior, or forward, increasing the arch in the lumbar spine. Once accomplished, the patient tilts the pelvis posterior, or backward, removing the arch in the lower back. Observe for the amount of motion and smoothness or nature of the movement.
Pelvic rotation test
The pelvic rotation test (Figure 9) determines the ability of the patient to rotate the lower body independently from the upper. This requires good mobility of the spine, hips, and pelvis, as well as good trunk stability. Check for smooth lateral movement without lateral pelvis motion. This test requires hip rotators and oblique abdominals to rotate the pelvis.
Figure 9.
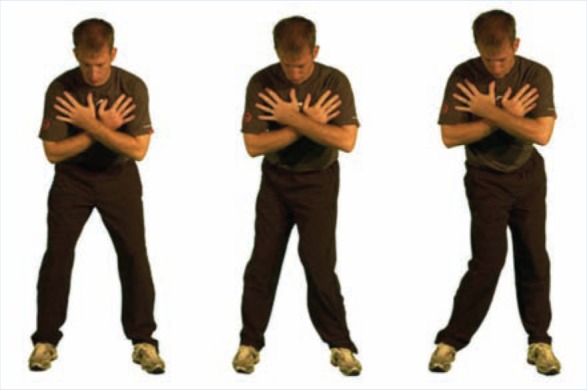
Pelvic rotation test. With arms crossed over the shoulders and feet shoulder-width apart, the patient rotates the lower body without any movement in the upper body. Look for any movement of the shoulders or excessive lateral motion of the pelvis versus rotation. Continue testing in both directions being sure to monitor the fluidity of motion of the pelvis in both the right direction and the left. A proper pelvic rotation test yields no motion above the waistline, with only the pelvis rotating.
Torso rotation test
The torso rotation test (Figure 10) checks the ability of the patient to rotate the upper body independently from the lower. This movement requires good mobility of the trunk and stability of the hips and pelvis. There should be no motion below the waistline.
Figure 10.
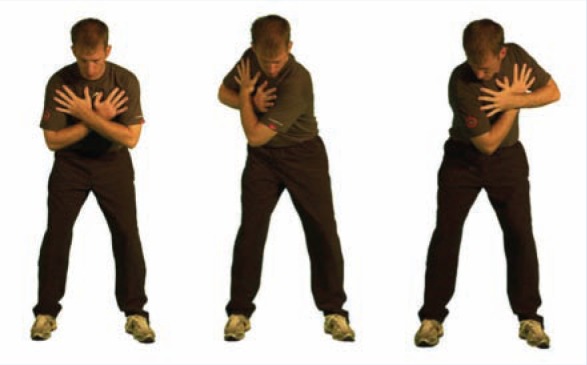
Torso rotation test. With arms crossed over the shoulders and feet shoulder-width apart, the patient rotates the upper body without any movement in the lower body. Look for any movement of the hips or extension and side bend of the thoracic spine versus rotation. Continue testing in both directions being sure to monitor the coordination of the motion. A proper torso rotation test yields no motion below the waistline, with only the thorax and shoulders rotating.
Bridge with leg extension test
The bridge with leg extension test (Figure 11) evaluates stability in the pelvic, lumbar, and core musculature—especially, the gluteal. This test highlights gluteus maximus weakness with overrecruitment of synergistic muscles: hamstrings and erector spinae muscles in the lower back. If the unsupported pelvis side drops or the support leg shakes, this indicates gluteal weakness on the support side. If the support leg hamstrings or lower back muscles cramp, this indicates gluteal inhibition. The most common reason for a failed test is gluteal deactivation. The hamstrings and lower back muscles are used for hip extension; they become hyperactive when going into a bridge position and when the leg is extended, a position that is easy for the gluteals to support. If the gluteals are inhibited, cramping will usually occur in the synergistic muscles. Weakness in the abdominals, hamstrings, and gluteals can produce a positive test result.
Figure 11.
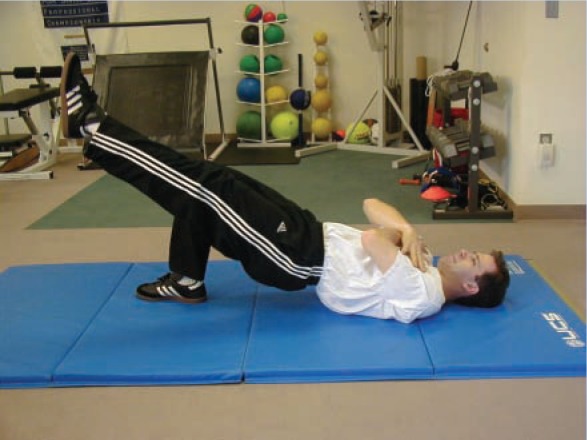
Bridge with leg extension test. The patient keeps the belt line parallel to the floor and extends the right leg from the knee. The position should be held for 10 seconds. The test indicates weakness in the gluteals on the left side when the pelvis on the right side drops or the left leg cramps or shakes. Repeat the test on the other side.
An integrated functional core stabilization system with a strong lumbopelvic-hip complex will allow for the efficient distribution of weight and absorption and transfer of compressive forces.13
Phase 3: Advanced Exercise and Neuromotor Control
Proprioceptive deficits routinely occur in conjunction with articular injuries.28 The acetabular labrum contains free nerve endings and sensory organs,21,22 which may contribute to nociceptive and proprioceptive mechanisms.28 The acetabular labrum improves the stability of the hip joint by maintaining a negative intra-articular pressure.27 With injury, negative pressure may be lost and stability of the hip compromised5,22 by inhibition of normal motor response.22 Proprioceptive retraining should reestablish neuromotor control, including proprioception and dynamic joint stability.28 Joint-positioning tasks performed early in the rehabilitative process can enhance proprioceptive and kinesthetic awareness,28 whereas advanced proprioceptive neuromuscular techniques in functional patterns of movement and modified ranges may be acceptable transition exercises depending on hip symptoms and status (Figure 12).
Figure 12.
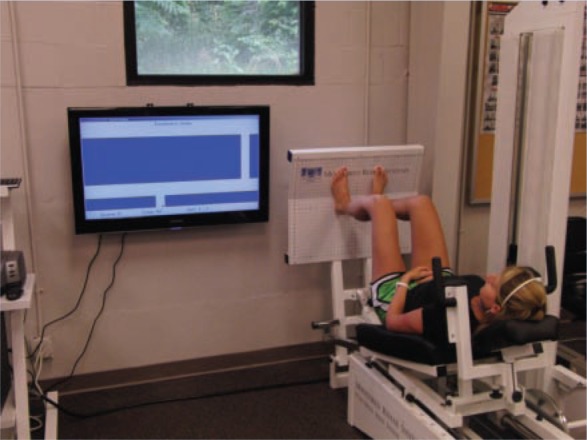
Motor control tracking exercise on the Monitored Rehab Systems functional squat machine.
Dynamic stabilization exercises encourage muscular co-contractions to balance joint forces. Closed chain methods allow progressive weightbearing transference to the lower extremity that lessens the shear and translational forces across the joint surface.28 Simple static balance maneuvers in full stance can evolve to single-limb stance, with and without visual input. Progression is then to a combination of balance and strength activities: bilateral heel raises and minisquats to unilateral heel raises and minisquats. More advanced closed kinetic exercises (partial squats, lunges, and dynamic weight shifts) should be initially performed in the pool. Low-force, slow-speed, and controlled activities may transition to high-force, fast-speed activities if the joint allows. Balance devices, minitrampolines, and creative upper extremity activities with balancing can further challenge the neuromuscular system (Figure 13), emphasizing balance and functional training with core stabilization and proper gluteus medius recruitment.
Figure 13.
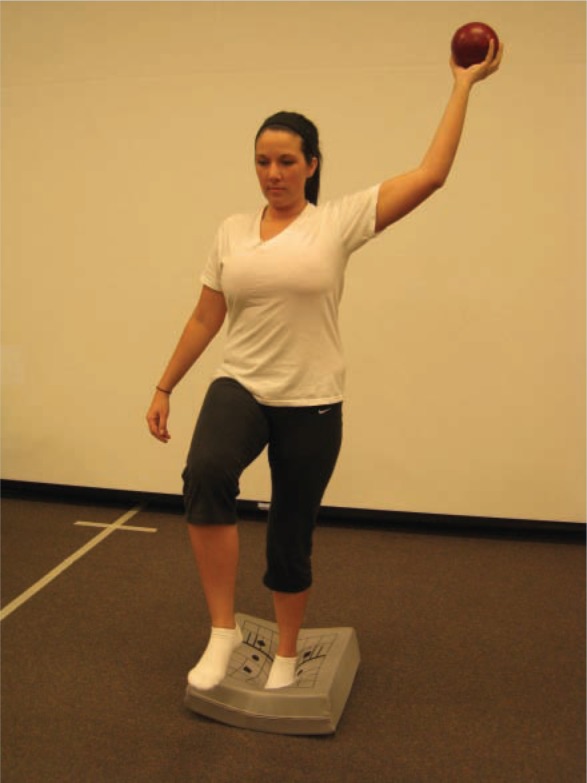
Dynamic stabilization training with single-leg stance on an unstable surface. External weight is moved through a diagonal pattern to challenge the patient’s limits of stability.
Static, transitional, and dynamic stabilization are phases of progression—from closed chain loading to conscious motion control with high joint tolerance and, ultimately, unconscious control with loading of the joint. Depending on tolerance, the exercise program may progress from slow to fast, simple to complex, stable to unstable, low to high force, and general to specific.19-24
Phase 4: Return to Activity
The time frame for return to function depends on the hip pathology present and the specific demands of the anticipated activities. Functional exercises simulating daily activities and sports should be individualized within the constraints of hip pathology.
Depending on the extent of hip pathology and the surgical procedure, compressive forces generated by physical and sports activities may need to be curtailed or modified during healing.
Conclusion
The common goal of hip rehabilitation should remain focused on the return to pain-free movement and a long-term restoration of hip joint function.
Footnotes
No potential conflict of interest declared.
References
- 1. Anderson FC, Pandy MG. Individual muscle contribution to support in walking. Gait Posture. 2003;17:159-169 [DOI] [PubMed] [Google Scholar]
- 2. Austin A, Souza R, Meyer J, Powers C. Identification of abnormal hip motion associated with acetabular labral pathology. J Orthop Sports Phys Ther. 2008;38:558-565 [DOI] [PubMed] [Google Scholar]
- 3. Boyd KT, Peirce NS, Batt ME. Common hip injuries in sport. Sports Med. 1997;24:273-280 [DOI] [PubMed] [Google Scholar]
- 4. Byrd JWT. Examination of the hip: history and physical examination. North Am J Sports Phys Ther. 2007;2:231-240 [PMC free article] [PubMed] [Google Scholar]
- 5. Byrd JWT. Hip arthroscopy in the athlete. North Am J Sports Phys Ther. 2007;2:217-230 [PMC free article] [PubMed] [Google Scholar]
- 6. Byrd JWT. Hip arthroscopy in athletes. Oper Tech Sports Med. 2005;13:24-36 [Google Scholar]
- 7. Byrd JWT. Hip arthroscopy utilizing the supine position. Arthroscopy. 1994;10(3):275-280 [DOI] [PubMed] [Google Scholar]
- 8. Byrd JWT. Labral lesions: an elusive source of hip pain case reports and literature review. Arthroscopy. 1996;12:603-612 [DOI] [PubMed] [Google Scholar]
- 9. Byrd JWT, Jones KS. Hip arthroscopy in athletes. Clin Sports Med. 2001;20:749-762 [PubMed] [Google Scholar]
- 10. Byrd JWT, Jones KS. Hip arthroscopy in athletes: 10 year follow-up. Am J Sports Med. 2009;37:2140-2143 [DOI] [PubMed] [Google Scholar]
- 11. Crowninsheild RD, Johnston RC, Andrews JG, et al. A biomechanical investigation of the human hip. J Biomech. 1978;11:75-85 [DOI] [PubMed] [Google Scholar]
- 12. Dehne E, Tory R. Treatment of joint injuries by immediate mobilization based upon spinal adaptation concept. Clin Orthop Relat Res. 1971;77:218-232 [PubMed] [Google Scholar]
- 13. Ekstrom R, Donatelli R, Carp K. Electromyographic analysis of core trunk, hip, and thigh muscles during 9 rehabilitation exercises. J Orthop Sports Phys Ther. 2007;37:754-762 [DOI] [PubMed] [Google Scholar]
- 14. Enseki K, Martin R, Draovitch P, et al. The hip joint: arthroscopic procedures and postoperative rehabilitation. J Orthop Sports Phys Ther. 2006;36:516-525 [DOI] [PubMed] [Google Scholar]
- 15. Farjo LA, Glick JM, Sampson TG. Hip arthroscopy for acetabular labrum tears. Arthroscopy. 1999;15:132-137 [DOI] [PubMed] [Google Scholar]
- 16. Griffen KM, Henry CO, Byrd JWT. Rehabilitation after hip arthroscopy. J Sport Rehabil. 2000;9:77-88 [Google Scholar]
- 17. Kelley BT, Riley JW, Philapon MJ. Hip arthroscopy: current indications, treatment options, and management issues. Am J Sports Med. 2003;31:1020-1037 [DOI] [PubMed] [Google Scholar]
- 18. Maitland GD. Peripheral Manipulation. Boston, MA: Butterworth; 1977:207-229 [Google Scholar]
- 19. Magee DJ. Orthopedic Physical Assessment. 3rd ed. Philadelphia, PA: WB Saunders;1997:20-26 [Google Scholar]
- 20. McCarthy JC, Lee J. Hip arthroscopy: indications, outcomes, and complications. J Bone Joint Surg Am. 2005;87:1138-1145 [Google Scholar]
- 21. Norkin C, Levangie PK. Joint Structure and Function: A Comprehensive Analysis. 2nd ed. Philadelphia, PA: FA Davis; 1992:300-332 [Google Scholar]
- 22. Robinson TK, Griffen KM. Rehabilitation. In: Byrd JWT, ed. Operative Hip Arthroscopy. New York, NY: Springer-Theime; 2004:236-251 [Google Scholar]
- 23. Sahrmann S. Diagnosis and Treatment of Movement Impairment Syndromes. St Louis, MO: Mosby; 2002:1-50 [Google Scholar]
- 24. Salter RB, Simmonds DF, Malcolm BW, Rumble EJ, et al. The biological effect of continuous passive motion on the healing of full-thickness defects in articular cartilage. J Bone Joint Surg Am. 1980;62:1232-1251 [PubMed] [Google Scholar]
- 25. Stalzer S, Wahoff M, Scanlon M. Rehabilitation following hip arthroscopy. Clin Sports Med. 2006;25:337-357 [DOI] [PubMed] [Google Scholar]
- 26. Tackson SJ, Krebs DE, Harris BA. Acetabular pressures during hip arthritis exercises. Arthritis Care Res. 1997;10:308-319 [DOI] [PubMed] [Google Scholar]
- 27. Takechi H, Nagashima H, Ito S. Intra-articular pressure of the hip joint outside and inside the lumbus. J Japanese Orthop Assn. 1982;56:529-536 [PubMed] [Google Scholar]
- 28. Voight M, Cook G. Impaired neuromuscular control: reactive neuromuscular training. In: Voight M, Hoogenboom B, Prentice W, eds. Musculoskeletal Interventions: Techniques for Therapeutic Exercise. New York, NY: McGraw-Hill; 2007:181-212 [Google Scholar]


