

Abstract
In vitro biochemical and cell-based small molecule screens have been widely used to identify compounds that target specific signaling pathways. But the identified compounds frequently fail at the animal testing stage, largely due to the in vivo absorption, metabolism and toxicity of chemicals. Zebrafish has recently emerged as a vertebrate whole organism model for small molecule screening. The in vivo bioactivity and specificity of compounds are examined from the very beginning of zebrafish screens. In addition, zebrafish is suitable for chemical screens at a large scale similar to cellular assays. This protocol describes an approach for in situ hybridization (ISH)-based chemical screening in zebrafish, which, in principle, can be used to screen any gene product. The described protocol has been used to identify small molecules affecting specific molecular pathways and biological processes. It can also be adapted to zebrafish screens with different readouts.
Keywords: zebrafish, in situ hybridization, small molecule screen, drug discovery, in vivo
INTRODUCTION
The zebrafish Danio rerio has emerged as a powerful model system for small molecule screening for novel biological and therapeutic discovery. The zebrafish system is a cost effective and efficient vertebrate model. They propagate in large numbers with a single mating pair producing 200-300 embryos at a time. Our lab has recently developed a specialized breeding vessel to enhance their natural reproductive capability. This allows for the collection of very large number of developmentally synchronized embryos in brief windows of time and greatly accelerates the potential throughput (Adatto et al. 2011). Zebrafish embryos can be placed into 96- to 384-well plates and readily absorb chemicals from the water without the need for an invasive injection. Zebrafish screening is performed on whole embryos, providing in vivo assessment of toxicity as well as evaluation of multiple biological pathways. Developing embryos are optically clear, allowing for in depth visualization and monitoring of a perturbation in interested processes. More importantly, the zebrafish is a model organism with conserved pathways, and the chemicals from zebrafish screens typically have analogous effects on mammalian systems.
Small molecule screens in zebrafish embryos have successfully identified a number of compounds regulating a variety of biological processes, and some of the chemicals are starting to make it into clinic (North et al. 2007; White et al. 2011). These screens have searched for small molecules targeting specific developmental processes or known signaling pathways (Yu et al. 2008; Kokel et al. 2010; Molina et al. 2009). This includes finding small molecules that suppress a mutant or diseased phenotype through a number of readouts including behavior, morphology, and gene expression (Peterson et al. 2004; Stern et al. 2005; Yeh et al. 2009). The protocol described here utilizes in situ hybridization (ISH) as a read-out. This assay provides visualization of localized mRNA transcripts that are expressed in a tissue specific manner, and has been successfully employed in a number of recent screens from our lab. Using runx1/cmyb as targets, we have previously identified prostaglandin E2 (PGE2) pathway as a mediator of hematopoietic stem cell (HSC) formation during developmental hematopoiesis (North et al. 2007). A stable derivative of PGE2 (dm PGE2) significantly increased HSC repopulation in murine transplantation model. In a more recent screen, we searched for chemical inhibitors of melanoma growth by examining expression of crestin (the marker of melanocyte precursors) in chemical treated embryos, and found that Dihydroorotate dehydrogenase (DHOH) inhibitors such as leflunomide completely abrogated melanocyte precursor (neural crest cell) development and also significantly inhibited melanoma growth (White et al. 2011). Further mechanistic studies revealed a critical role of transcription elongation in melanocyte development and melanoma growth. dmPGE2 and lefluonomide are currently in clinical trials for HSC transplantation and melanoma treatment, respectively (Goessling et al. 2011; White and Zon, unpublished data).
The protocol outlined here (Figure 1) allows one to carry out a high-throughput screen to find compounds that target specific developmental process marked by critical signaling molecules. Basic protocol 1 describes a breeding vessel set up for the collection of thousands of developmentally synchronized embryos for high-throughput screening. Basic protocol 2 illustrates the plating and chemical treatment of the embryos. Basic protocol 3 describes the ISH method for analysis of gene expression. Although this protocol illustrates an approach for an in situ-based chemical screen, it can be easily modified to the high-throughput screens utilizing different read-outs.
Figure 1. Flow chart showing the procedures of a zebrafish chemical screen with in situ hybridization (ISH) as a read-out.

O/N, overnight; AP, alkaline phosphatase.
STRATEGIC PLANNING
Selection of targets and read-outs
One of the most important decisions in planning a zebrafish chemical screen is to select the appropriate targets and read-outs. The selected target and read-out should accurately reflect the desired process, and should also be robust, reliable and sensitive. In principle, ISH can be used to visualize the expression of any gene product. This assay requires prior knowledge of the biologic process and depends on the selected molecular target, which should be critical for the developmental process. This assay also requires the development of gene specific antisense probe and optimization of ISH condition. The support protocol in this article describes the design and synthesis of an antisense probe. If a suppressor screen is performed, particularly for suppressors of a homozygous recessive mutation, the high penetrance of ISH staining phenotype in the mutant embryos is desired, which may require the evaluation of several different molecular targets. Besides ISH for molecular targets, several other assays have been employed successfully in previous screens (Kaufman et al. 2009). For example, a visible morphological trait associates with the developmental process such as the D-V axis of the developing embryos has been used a read-out (Yu et al. 2008). This type of assay does not require much prior knowledge about the process, but the phenotypes may not be specifically linked to the biology, and many structures like internal organs are not easily assayable. A tissue or pathway-specific reporter transgenic zebrafish are convenient for fluorescent imaging-based high-throughput screen (Molina et al. 2009), but they often require the searching for a suitable promoter and generation of stable transgenic lines.
Timing of Chemical Treatment
The appropriate timing for chemical treatment depends on the targeted gene or biological process. Generally, chemical treatments should start before and continue until the expression of targeted gene or the occurrence of interested process. For example, to evaluate HSC development and specification in zebrafish, embryos are treated from 3 somite stage to 36 hours post fertilization (hpf) (North et al. 2007). In another screen searching for signals regulating HSC migration and mobilization to the caudal hematopoietic tissue (equivalent to mammalian fetal liver), zebrafish embryos are treated from 48 hpf to 72 hpf (Tamplin and Zon, unpublished data). The Zebrafish Information Network (ZFIN) is a valuable online resource that provides a comprehensive collection of gene expression data for multiple developmental time points.
Another factor to keep in mind is toxicity; younger embryos are more vulnerable to the harmful effects of some chemicals. In our experience, treatment before gastrulation stage (10 hpf) and particularly before 50% epiboly stage (6 hpf), significantly increases the death or the developmental delays of embryos as compared to the treatment after gastrulation finishes. The early treatment can also interfere with the developmental patterning during embryogenesis that will likely affect gene expression, and thus compound the interpretation of results. Extended exposure to the chemicals (more than 24 hours) is also toxic to the embryos. If the assay is read out at the late developmental stages, a wash-out step may be added to remove the chemicals after the initial treatment. The effects from the early chemical treatment should be monitored during the subsequent development steps.
Choosing a Chemical Library
Many chemical libraries are available from small collections of characterized compounds with known molecular targets to larger libraries consisting of tens of thousands of compounds of unknown function. A careful introduction and comparison of different libraries have been discussed elsewhere (Kaufman et al. 2009). One should choose the library based on the aimed pathways, the throughput of the assay and the cost of library. Chemical libraries with characterized compounds are commonly used in zebrafish small molecule screens. Once a list of validated hits is generated, the follow-up and mechanistic studies can be quickly performed. Additional single commercial chemicals can be purchased to further study pathways that appear significant during the screen. If a chemical library with a large number of chemicals is selected, pooling of chemicals can be used to facilitate the speed of the screen, which has been successfully used in the small molecule suppressor screen of zebrafish bmyb mutants (Stern et al. 2005). But a chemical pool may result in unexpected interactions between pooled chemicals and also increased toxicity to the embryos. This is particularly true for libraries with bioactive compounds. In addition, one should carefully decide the pooling strategy. For example, as in the above mentioned screen (Stern et al. 2005), each chemical is screened twice in two different chemical pools.
BASIC PROTOCOL 1
ZEBRAFISH EMBRYO COLLECTION
A major advantage to using the zebrafish for chemical screening is the ease and cost effectiveness of materials. Large amounts of developmentally synchronized embryos can be obtained all at once, allowing for reliable, high-throughput screening. Timing of embryo collection is extremely important to ensure synchronized embryos. Our lab has recently developed a breeding vessel to further enhance the fecundity of zebrafish (Figure 2). This protocol describes the set-up and take-down of this system.
Figure 2. Schematic describing the operation of the breeding vessel (iSpawn).
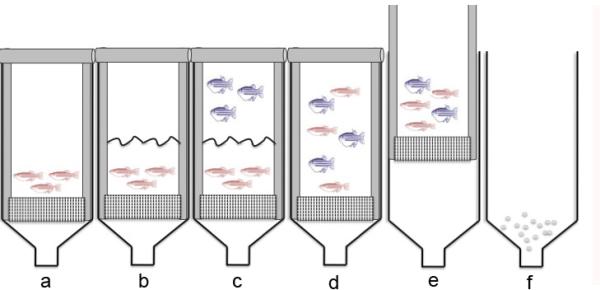
(a) Insert the mesh spawning platform into the vessel and fill up the vessel with water. Place male fish above the spawning platform. (b) Place mesh separator into the vessel so male fish are confined in the bottom half of the iSpawn. (c) Add in female fish above the separator. Allow fish to prime overnight. (d) On the next morning, remove the separator so that male and female fish mix in the deep water. (e) Raise the spawning platform so that fish are in shallow water. Allow fish to spawn for desired time (around 10 minutes). (f) Remove the spawning platform and fish to stop spawning. Place a strainer at the bottom of the vessel. Open the valve and drain the water into the strainer. Collect the fallen embryos.
Materials
Solution and reagents
Zebrafish strain (a wild type strain or a specific mutant strain, depending on the purpose of the screen)
E3 Buffer (see recipe)
Special equipment
Breeding Vessel (iSPAWN, Tecniplast)
- On the evening prior to the morning when embryos are desired, separate the male and female fish to be mated.The total number of fish should not exceed 250 as it will reduce mating performance. It may be helpful to bias the sex ratio towards males to ensure that all females spawn immediately.
Set up zebrafish breeding vessel (Figure 2)
-
2
Insert the spawning platform into the chamber until the platform's bottom has reached the cone shaped base of the chamber. Place one sex in the bottom of the spawning platform.
-
3
Insert the separator and place the other sex above it. Leave the fish in the breeding vessel over night.
Collect embryos (Figure 2)
-
4
On the following morning when embryos are desired, remove the separator to allow male and females to co-exist in “deep water conditions”.
-
5
Raise the spawning platform to the “shallow condition” to trigger spawning behavior. Typical spawning time is between 10-15 minutes to ensure synchronized embryos.
-
6
Stop the spawning by removing the spawning platform and the fish from the vessel.
-
7
Place a sieve underneath the bottom of the chamber and open the ball valve at the bottom of the chamber, draining the water into the sieve to collect fallen embryos from the bottom of the cylinder.
-
8Rinse the embryos several times with the water and store embryos in E3 buffer in petri dishes. Keep embryos at appropriate temperatures (25-31°C) to the desired stages.Do not put too many embryos on the same petri dish (maximum 800 embryos per 150-mm pertri dish and 80 embryos per 100-mm dish).
BASIC PROTOCOL 2
ZEBRAFISH EMBRYO PREPARATION AND CHEMICAL TREATMENT
To minimize variability later on, it is important to be consistent when plating the embryos. We recommend 10 embryos per well in 48-well or 96-well plates. If the embryos are fixed after 24 hpf for ISH or the embryos older than 24 hpf are used for chemical treatment, 96-well mesh filter plates can be used (See additional protocol), which allows the chemical treatment and ISH steps performed on the same plate and greatly increases the speed of the screen. It is important to normalize the volume in all wells so that chemical dose remains consistent. In addition, timing is extremely important; complete each step for every plate before moving on to the next part of the protocol. This basic protocol describes how to chemically treat the embryos as well as prep the embryos for ISH.
Materials
Reagents
Embryos (collected from basic protocol 1 and should be plated several hours before the desired stage, considering the timing of transferring and plating embryos)
E3 Buffer (see recipe)
Multi-well plates (48-well flat bottom plates, Falcon, cat. no. 353078 or 96-well flat bottom plates, Costar, cat. no. 3596)
Chemical library (e.g. Chembridge DIVERSet)
DMSO
Pronase (Roche, cat. No. 11-459-643-001, dissolve in E3 buffer to 2.5mg/ml)
PBT (see recipe)
4% PFA (see recipe)
Methanol
Instrumentation
Multi-channel pipette
Multi-channel vacuum wand (optional, e.g. from V& P scientific, Inc.)
Normalization of Well Volume and Chemical Treatment
Clean the embryos under microscope. Remove dirt, unfertilized, and dead embryos with a plastic pipette (see Figure 3 for examples of these embryos).
- Transfer 10 embryos into each well of a labeled 48-well plate. Lean plates against a support such as a pipette tip box and tap gently to collect the embryos at the bottom of each well. Use a vacuum pipette (or a multi-channel vacuum) to remove the liquid from each well. Use a multi-channel pipette to refill wells with 200 μl of E3. Return embryos to appropriate temperatures until they develop to the desired stage.The chemical treatment can be done in 48- or 96-well plates. If 96-well plates are used, the volume of solutions in each of the following steps need to be adjusted accordingly. If the wild type embryos are used, we recommend 10 embryos in each well. For a suppressor screen of homozygous mutant embryos, we recommend the use of 20 embryos from the heterozygous adults in 48-well plates.
- Dilute the chemicals from the master chemical plate. Load 100 μl of E3 containing 1% DMSO to each well of 48- (or 96-) well ‘transfer’ plates. Remove 1 μl of each chemical solution from the stock plates and place into the transfer plates. Mix the chemicals well by rocking the plates a few times or using a liquid handling robot to pipet the contents of each well.We recommend 1:100 dilution of the stock chemicals and typically store stock compounds at 10 mM, although one can choose the appropriate dilution based on the chosen library.
- Load the diluted chemical (100 μl) from the transfer plate into the corresponding wells of 48-well plates that contains embryos in 200 μl of E3 using a multi-channel pipette. Add 100 μl of the vehicle control E3 (containing only DMSO and no test compounds) to the control wells (see Figure 4 for plate layout). Keep embryos at appropriate temperature to proper stages.The final dilution of the chemicals in this protocol is 1:300. Thus, if starting with 10 mM stock compounds, the final screening concentration is ~30 μM. The final concentration of DMSO in this protocol is 0.33%. We recommend keeping the final DMSO concentration in each well at or below 1% in the presence of the zebrafish embryos.
Figure 3.

Representative images of normal embryos (a), unfertilized embryos (b) and dead embryos (c) at 6 hours post fertilization.
Figure 4. Schema showing 48-well and 96-well plate layouts for chemical treatment and ISH.

(a) For 48-well plate, columns 1 and 6 can be treated with vehicle (DMSO),the negative control, and positive controls. The rest of the wells can be filled with test chemicals. (b) When two 48-well plates are combined to one 96-well mesh filter plate for ISH, one plate of samples (rotated 90 degrees) can be plated on the left side of the 96-well plate, and the other plate can be plated on the right side of the 96-well plate. If a 96-well plate is used in the chemical treatment, rows A and H can be used for negative and positive controls.
Toxicity Screening
-
5
When embryos reach desired stages, check treated plates under a microscope for toxicity by comparing each well to the vehicle control wells. Specifically, look for mutant, delayed, and dead embryos. Record observations for wells with significant numbers of abnormal or dead embryos.
Chemical removal, dechorionation, and fixation of embryos
-
6Lean plates against a support and tap gently to collect embryos at the bottom of a well. Use a vacuum pipette to remove medium in wells and refill each well with 750μl of E3 to wash away any residual chemicals using a multi-channel pipette.Set plates on a black background to see the embryos clearly.Cautions: Be sure to dispose of chemical waste in the proper container.
-
7Remove E3 from wells and add back 250 μl of pronase solution. After an approximately 10-minute incubation at room temperature (RT) or when the chorion becomes noticeably softened, remove pronase solution and wash twice with 750 μl of E3.Be careful not to over-digest embryos – this limits maximum number of plates to 7 plates processed per session per person running the assay.
-
8Remove E3 and wash once with 750 μl of PBT in each well for 5 minutes. Remove PBT and refill with 500 μl of 4% PFA. Seal each plate with parafilm and place them at 4°C overnight.Caution: 4%PFA is toxic, use fume hood when adding and wear proper lab attire. Do not leave embryos in 4% PFA for more than 2-3 days. Longer incubation in fixative will diminish the quality of ISH.
Dehydration
-
9Remove 4% PFA from wells using a vacuum pipette and dispose of waste in proper container. Wash once with 500 μl of PBT. Replace PBT with 500 μl of 100% methanol.For embryos older than 24 hpf, if pigmentation needs to be removed (which may interfere with the ISH results), hydrogen peroxide treatment can be used to remove pigments before the embryos are dehydrated in 100% methanol (see details in Thisse & Thisse 2008).
-
10Seal the plates with parafilm and place at -20 °C until ISH. The embryos may be stored in methanol at -20°C for months.Embryos should be left in methanol for at least 2 hours to overnight.
BASIC PROTOCOL 3
IN SITU HYBRIDIZATION STAINING OF CHEMICAL TREATED EMBRYOS
The following ISH protocol is a standard procedure as described by (Thisse & Thisse 2008). Automation of ISH using an in situ robot such as the Biolane HTI is already available, and has been described elsewhere (Kaufman et al. 2009). This protocol is designed for the use of 96-well mesh filter plate manually.
Materials
Solutions and reagents
Embryos (fixed and dehydrated from basic protocol 2)
96-well mesh filter plate and 96-well receiver plate (Millipore, MANM10010)
1.5 cup air tight container (Lock n’ Lock, 4.3×5.9×1.8 inches)
Methanol
PBT (see recipe)
Proteinase K solution (Roche, 03115828001, dilute in PBT to 10 μg/ml before use)
4% PFA (see recipe)
25% Glutaraldehyde (Sigma, cat. no. G4004)
Hybe+ (see recipe)
DIG-labeled RNA probe (prepared as support protocol)
Hybe – (see recipe)
2XSSC (see recipe)
0.2XSSC (see recipe)
Blocking Solution (see recipe)
Anti-DIG-AP antibody (Roche, cat. no. 11 093 274 910)
Prestain Solution (see recipe)
Staining buffer (see recipe)
Stop solution (see recipe)
Spot plates in white porcelain, 12 cavities (Fisher, cat. no. S337241)
96 well round bottom plate (BD, cat. no. 353227)
Special equipment
Belly dance rotator (STOVALL life science Inc.)
70°C incubator (Thermo Electron)
Microscope (Zeiss Stereo Discovery.V8)
ISH of embryos
- Place a 96-well mesh filter plate into a sealable Lock n’ Lock container, and fill the plate with methanol. Transfer the embryos from 48-well plates by plastic transfer pipette into the corresponding wells of the mesh filter plate (see Figure 4 for plate layout).-Be very careful when transferring the embryos to retain the well order.-We recommend washing and incubating embryos in 30-50 ml of solution per 96- well per wash/incubation step within this protocol.-Seal the Lock-n-Lock container for all incubations, particularly for the steps performed at 70°C
- Wash the embryos with a successive mixture of methanol : PBT (2:1 for 5 minutes, then 1:2 for 5 minutes) at RT. Perform four washes with 100% PBT, 5 minutes each. Place plates on a swirling rotator for this and the following wash steps. If embryos are older than 10-somite stage, proteinase K treatment (10 μg/ml) at RT is necessary after PBT wash steps.Suggested proteinase K treatment time:10 som-20 som: 1 minute20 som-26 som: 2minutes26 som-24 hpf: 6-10 minutes36hpf- 48 hpf: 12 minutesNote: Excessive proteinase K treatment will make embryos disintegrate during the ISH procedure.
- If proteinase K treatment is applied, quickly wash out the proteinase K solution once, using PBT. Whether or not using proteinase K, next fix the embryos with 4% PAF + 0.2% glutaraldehyde at RT for 20 minutes.The addition of 0.2% glutaraldehyde helps to maintain the integrity of embryos and to reduce the background staining. Prewarm the hybe+ and RNA probe solution in the 70°C incubator for the next step.
Remove the fixing solution and wash four times with PBT at RT for 5 minute each time. Replace PBT with Hybe+, and leave the plate in the 70°C incubator for 1-3 hours. Change the Hybe+ buffer with the DIG-labeled RNA probe (~1ng probe /μl Hybe+ buffer). Leave the incubation at 70°C overnight.
- Remove the RNA probe and collect the used probe in a separate container. Continue the next series of washes in the 70°C incubator with gentle agitation. Start with a 5 minute wash of Hybe- buffer, then three 10 minute washes of a series of Hybe- : 2XSSC mixtures, with increasing ratios (3:1, 1:1, 1:3). Do a final wash of 100% 2XSSC for 10 minutes, then two 30 minute washes of 0.2XSSC.The RNA probe solution can be reused for at least 3 times and should be stored at -20°C. To remove the residual liquids retained in the mesh-bottom plate, use a kimwipe paper to blot the bottom of the mesh plates before putting in new solution.All solutions should be warmed to 70°C before use.
Perform the following washes at RT on a swirling rotator. Three 10-minute washes with 0.2XSSC : PBT at gradually increasing ratios (3:1, 1:1, 1:3). One 10-minute wash with 100% PBT. Finally, block the embryos in blocking solution for 3-4 hours at RT.
Replace blocking solution with anti-DIG antibody solution diluted at 1:5000 in blocking solution. Incubate overnight at 4°C on a swirling rotator.
- The final washes are to be done at RT on a swirling rotator. Wash with PBT five times for 15 minutes each. Remove all PBT solution by blotting the bottom of the plate with a Kimwipe and add prestain solution. Prestain the embryos for at least 10 minutes, then replace with staining buffer (prestaining + BCIP and NBT; see recipe). Cover the plates with aluminum foil and check on the staining every hour.The prestaining buffer needs to be carefully adjusted to pH 9.5 to avoid non-specific purple precipitation. The time required for proper staining color reaction depends on the gene examined and could range from 15 minutes to 1 or 2 days.
When the staining is done, deposit staining solution in waste container and rinse the plates once with PBT for 5 minutes. Replace with stop solution and store in 4°C in an airtight lock n’ lock container in the dark.
Scoring of embryos
-
10When scoring the in situ results, transfer the embryos from the mesh plates to observation spot plate. Use toplighting and a white background to view and compare the chemical treated embryos to the vehicle treated embryos from the same plate (see Figure 5 for an example of in situ staining after chemical treatment). Record changes in staining results such as intensity and size. Take pictures for the potential hits. After the scoring, transfer the embryos to a 96-well round bottomed plate. They can be sealed and kept at 4°C.It is helpful to use a quantitative scoring system to specify the changes. Being familiar with the control stainings including the vehicle controls, positive and negative controls will help one to discern differences in the chemically treated embryos. The stained embryos can be kept in stop solution at 4°C in the dark for several months.
Figure 5. ISH of neural crest progenitor marker (crestin) in 24 hpf embryos following chemical treatment.

DMSO (a) is used as a control for crestin expression. Treatment with NSC210627 (b) completely abrogated crestin levels. Based on structural similarities the authors tested Leflunomide (c) that was not found in the original chemical library, but displays robust reduction in crestin expression. (Adapted from White et al. 2011)
SUPPORT PROTOCOL
SYNTHESIS OF AN ANTISENSE RNA PROBE
To generate the antisense probe for ISH, the 3’ prime end of a gene including the 3’ UTR is often used as a template (generally 200 bp to 1kb in length). It is better to use gene specific sequence to make antisense probe, although the full length cDNA can also be used to generate efficient probes. The probes are reuseable, and often get better with more use. This protocol describes the method of making probes from a cDNA template from plasmids. Alternatively, PCR amplification using primers containing a T3 or T7 polymerase promoter can be used to prepare DNA template (Thisse & Thisse 2008).
Materials
Solutions and reagents
The vector with the cDNA template for the probe (It should contain a T3, T7 or SP6 RNA polymerase promoter around the cDNA insert)
Restriction enzyme digestion reagents (New England Biolabs)
DEPC H2O (see recipe)
Phenol:Chloroform:isoamyl alcohol (25:24:1, Sigma, cat. no. P2069)
Chloroform:isoamyl alcohol (24:1, Sigma, cat. no. C0549)
Agarose
1X TBE (see recipe)
3 M Sodium Acetate pH 5.5 (Ambion, cat. no. 9740)
Ethanol
70% ethanol in DEPC H2O (vol/vol)
DIG RNA labeling mixture
10X transcription buffer (Roche, cat. no. 14735400)
NTP DIG labeling mix labeling mixture (Roche, cat. no. 11277073910)
Appropriate RNA polymerase (T3, Promega, cat. no. P207C; T7, Promega, cat. no. P207B; SP6 Promega, cat. no. P207A)
RNAse inhibitor (RNasein, Promega, cat. no. N2511, 40 u/μl)
RNase free DNase I (Roche, cat. no. 04716728001, 10 u/μl)
1M Lithium Chloride
To avoid contamination, be sure to use clean tips and make any transfers into clean tubes. Unless they are incubating, keep tubes on ice as much as possible.
Special equipment
NanoDrop Spectrophotometer (Thermo Scientific, NanoDrop 2000)
Preparation of linearized cDNA template
- The vector with the cDNA should contain a T3, T7 or SP6 RNA polymerase promoter around the cDNA insert. Pick a restriction enzyme (RE) that has a unique site located at 5’ of cDNA to make the antisense probe. In a microfuge tube, mix 5-10 μg DNA plasmid with 3-4 μl RE in a 100 μl reaction volume, and digest at an appropriate temperature for 2-6 hours. Use 2μl of the reaction to run 1.2% agarose gel in TBE to check the digestion.Complete digestion of the plasmid should yield only one band on the gel.
- Purification of DNA template by phenol/chloroform extraction. Add 100 μl of phenol: chloroform :isoamyl alcohol (25:24:1) to the digestion, tap tube lightly to mix, and centrifuge at top speed for 3 minutes at RT. Transfer upper phase to a new microfuge tube and add 100 μl of chloroform :isoamyl alcohol (24:1). Tap and centrifuge again for 3 minutes.Take care not to transfer any of the bottom phase to the new tube. Phenol and chloroform are toxic, so collect them and dispose used tubes in an appropriate waste container.
Transfer upper phase to a new tube, then add 10 μl of 3M sodium acetate (pH 5.5) and 200 μl of 100% Ethanol. Vortex 10 seconds and let precipitate in -20°C for at least 2 hours to overnight.
Centrifuge at 12000g for 15 minutes at room temperature. Carefully decant the supernatant.
Wash the pellet in 70% ethanol-DEPC H2O. Centrifuge for another15 min 12000g at RT. Remove the supernatant. Air-dry the pellet for about 10 minutes (Do not over dry the pellets). Add 10.5 μl DEPC H2O to dissolve the pellet. Take 1 ul to measure the concentration (μg/mL) by NanoDrop spectrophotometer, using DEPC H2O as blank.
Synthesize and purification of DIG-labeled antisense RNA probe
-
6Add the following items to a microfuge tube:
- 1 μg DNA template + DEPC H2O to 13 uL
- 2 μl 10X transcription buffer
- 2 μl NTP DIG labeling mixture
- 2 μl RNA polymerase (T3, T7 or SP6)
- 1 μl RNase inhibitor
A good probe should appear as 1 or several distinct bands on the gel. A smear usually indicates degradation. -
7
Add 6 μl of DEPC H2O and 75 μl of 100 % ethanol to the probe tube, mix well. Add 10 μl of 1M Lithium Chloride and precipitate RNA probe overnight at -20°C.
-
8
Centrifuge at 4°C, 12000g for 30 minutes. Wash resulting pellet with 70% ethanol-DEPC H2O. Centrifuge at room temperature at 8000g for 5 minutes. Air dry for 5-10 minutes. Add 100 μl DEPC H2O to dissolve the pellet and 40 units of RNasin to prevent RNase activity. Measure the concentration of probe using spectroscopy. Store the probe at -20°C.
ADDITIONAL PROTOCOL
CHEMICAL TREATMENT OF EMBRYOS IN 96-WELL MESH FILTER PLATES
If zebrafish embryos older than 24 hpf are fixed for ISH after chemical treatments, or the embryos older than 24 hpf are used for chemical treatment, the chemical treatment can be done in 96-well mesh filter plates. The subsequent dechorination and in situ hybridization can be done in the same plates. This will save lots of time during the washing steps after chemical treatment and the embryo transferring procedure.
Additional materials
96-well mesh filter plate (Pion, cat. no. PN 120655)
96-well receive plate (Millipore, cat. no. MATRNPS50)
Multiscreen single well culture tray (Millipore, cat. no. MAMCS0110)
- Place the mesh filter plate in single well receiving plate with adequate amount of E3 to cover the wells of the mesh filter plate. Place ~10 embryos in each well and keep the embryos at appropriate temperature to the expected stage.If embryos older than 24 hpf are used for chemical treatment, dechorionate the embryos first and carefully transfer them to 96-well mesh filter plate. Let the embryos grow in mesh filter plate to desired stage and then follow step 2, step 3 and step 5. Note: The 96-well mesh plate and the receiver plate from basic protocol 3 can be used instead after the dechorionation for embryos older than 24 hpf.
Dilute the chemicals from the master plate into a 96-well transfer plate. Take 1μl chemical from the stock plate and transfer it to the 96-well plate containing 300 μl of E3 (1:300 dilution of chemicals) plus 1 ul DMSO (0.33%) in each well including controls as shown in Figure 4.
Take the mesh filter plate from the single well receiving plate, wipe out extra liquid with Kimwipes. Transfer the mesh plate into the 96-well receive plate with the diluted chemicals in each well, being sure to align the wells and avoid spilling. Cover the plate and return the embryos to the incubator.
- When the embryos reach the expected stage, carefully take the mesh plate out of the chemical plate, and wash out the chemicals in an appropriate container like a 150-mm petri dish. Leave embryos in pronase solution for 10 minutes in the container, and gently shake a few times during the incubation. Take the plates out of pronase solution, and wash several times with E3. Wash once with PBT.Carefully move the plate up and down out of solution to wash out the chonrion debris. The mesh surface may be too rough for the embryos to be pressed or scratched against it without causing damage. It should be noted that only embryos old enough (>24hpf) would remain intact in this mesh bottom plate during this procedure.
Transfer the mesh filter plate into an airtight container. Fix the embryos in 4% PFA at 4°C overnight. Follow the rest of the steps from basic protocol 2 and 3 to finish the ISH.
REAGENTS AND SOLUTIONS
E3 buffer (embryo water)
Prepare a 50X stock and store up to 1 year at RT
1L deionized H2O
14.61g NaCl
0.63g KCl
2.43g CaCl2.2H20
1.99g MgSO4
Dilute to 1X in deionized H2O before use.
Phosphate buffer saline with Tween 20 (PBT)
900ml double distilled water
100ml 10X Phosphate Buffered Saline (PBS) (Fisher Scientific, cat. no. BP3994)
1ml Tween-20 (American Bioanalytical, cat. no. AB02038-01000, final concentration 0.1%)
Store up to 1 year at RT
4% PFA (wt/vol)
Dissolve Paraformaldehyde (PFA, Electron Microscopy Sciences, cat. no. 19210) in 1XPBS in a chemical fume hood. Heat until the powder has dissolved completely (Never boil the solution!). Cool to RT before use. If stored at RT, the solution can be used for a couple of days. Alternatively, it can be frozen at -20°C for months and thaw just before use.
Hybe+
500 ml 100% formamide (Invitrogen, cat. no. 15515-026)
250 ml 20X SSC
1ml Tween-20
50 μg/ml heparin (Sigma, H3393)
500 μg/ml total yeast RNA (Sigma, R6625)
Add DEPC H2O to final volume of 1L
Store up to 1 year at -20°C
Hybe-
Leave out heparin and total yeast RNA in Hybe+
20X SSC
175.3g NaCl
88.2g Citric acid trisodium salt
Dissolve in 1 liter of double distilled water
Store up to 1 year at RT
2X SSC
Dilute 20X SSC in double distilled water to 2X
DEPC H2O
Add 1ml of 0.1% Diethylpyrocarbonate (DEPC, Sigma, cat. no. D5758) to 1000 ml distilled water. Mix well and let set at room temperature for 1 hour to overnight. Autoclave at 121°C for 20 minutes. Cool to room temperature prior to use. Store at RT for several months
Blocking solution
50 ml PBT
100 mg Bovine serum albumin (BSA, sigma, cat. no. A2135-10G)
1 ml heat inactivated lamb serum (GibcoBRL, cat. no. 16070 096). To heat inactivate, warm at 55°C for 30 minutes, aliquot into small tubes and store at -20°C up to 1 year. Prepare fresh before use
Prestain solution
10 ml Tris pH 9.5 (Dissolve 121.1 g of Trizma base in 900 ml of water, adjust pH to 9.5 by adding HCl, and then adjust the volume to 1 L by adding distilled water)
5ml 1M MgCl2
2ml 5M NaCl
50 μl Tween-20
Add distilled H2O to 50 ml, prepare fresh before use.
Staining buffer
4.5 ul/ml NBT (nitroblue tetrazolium, Promega, cat. no. S3771)
3.5 ul/ml BCIP (5-bromo-4-chloro-3-indolyl phosphate, Promega, cat. no. S3771)
In prestaining buffer, prepare fresh and cover with aluminum foil.
Stop solution
1X PBS pH5.5 (Adjust pH with HCl)
1mM EDTA
0.1% Tween-20
Store up to 1 year at RT
1XTBE buffer
12.1 g Trizma base
0.75 g EDTA
7.6 g boric acid
Dissolve in 1 L of water.
Store up to 1 year at RT
COMMENTARY
Background information
Previous large-scale genetic screens in zebrafish have generated thousands of mutations and identified numerous genes that govern essential developmental processes including organogenesis, physiology and behavior (Patton & Zon 2001; Zon & Peterson 2005). In recent years, zebrafish have been increasingly used for screening small molecules for their effects on development as well as on disease models. These screens have identified a variety of signaling pathways affecting different biological phenotypes. Compared to traditional genetic screening, small molecule screening offers several advantages. First, small molecules provide a more precise temporal control of the target genes and the effect on target genes are often reversible by allowing addition and removal of a compound at selected time periods. This is particularly useful to study the function of genes that play dynamic roles during different developmental stages. In addition, as a conditional approach, chemical screen have the potential to identify signals that may not be found through traditional genetic approaches. Second, a small molecule can modulate multiple targets from a same protein family, and thus avoiding the difficulty to make combined genetic knockout animals to study the genes with multiple copies or isoforms in genome. Third, the identified chemicals can not only be used as new molecular tools to modify the affected biological process, but also have the potential to be transferred to therapeutic applications.
In vitro protein and cell-based assays are frequently used to screen for small molecules targeting specific signaling pathways. As a whole organism screening system, zebrafish screening has its own advantages, and provides the potential to identify compounds that may not be found in cell-based screens. It allows one to visualize the molecular pathway in native cell types and in the physiological context, and has the ability to detect the in vivo absorption, distribution and metabolism of the chemicals that cannot be evaluated in cell-based assays. For example, using phosphor-histone H3 as a mitotic marker, our lab has screened a 16320-compound library for cell cycle inhibitors in zebrafish embryos and identified 14 chemicals that had not been previously linked to cell cycle activity despite numerous mitotic screens of the same library with mammalian cell lines (Murphey et al. 2006), demonstrating the effectiveness of using zebrafish to identify chemicals with novel activity. In support of the utility of zebrafish screens, about half of the chemicals have confirmed activities in mammalian cells (Murphey et al. 2006). Furthermore, the off-target side effects and drug toxicity, which may be missed in cellular assays and are frequently challenges encountered at the stages of animal testing, are evaluated from the very beginning of zebrafish screens.
Critical Parameters
Dilution of the stock chemicals
Before beginning the experiments, several key conditions must be carefully evaluated. The concentration of chemicals is one of them. In our experience, different dilutions of the chemicals from a stock library (such as 1:300 vs. 1:1200 dilution) could result in different hits. As a good starting point, a final compound concentration between 10 μM-20 μM can be used in the initial screen. At higher doses, the compounds may have significant off-target effects. A pilot screen with about 400 chemicals is highly recommended to estimate the death rate and “hit” rate and to find a proper dilution range of the chemicals. Overall, it is acceptable that less than 10% compounds cause death or severe developmental delay of the embryos after the treatment. The toxic compounds can then be retested at a lower concentration.
Experimental Controls
There are many opportunities for variability during the chemical screening process, making it important to have reliable controls. A positive control will help you to set up an appropriate experimental design. Including a positive control for chemical treatment will confirm the success of each treatment round, and allow you to properly assess potential hits. Both positive and negative (vehicle only) controls are helpful in dealing with staining variability. It is not uncommon to see a great deal of variation in staining between different locations on the plate as well as within individual wells. We recommend using negative and positive controls in multiple wells on each plate to fully assess staining variability. If a positive control is not available, a mutant or a morphant can be used as a substitute.
Stages of embryos
The stages of the embryos greatly affect the expression of many developmental genes. If more than 3000 embryos are employed in a given round of screening, the stages of the embryos could be variable, which may result in variations in the expression of targeted genes and also affect the chemicals’ effect as a given chemical may only function during a specific developmental time. The massive mating system using the breeding vessel from basic protocol 1 will significantly help reduce heterogeneity of embryonic stages. Alternatively, multiple mating pairs could be set up separately and embryos collected over a short period of time (i.e. 10 minutes). One should carefully stage the embryos from each clutch before pooling them together. After the chemical treatment, the development of the embryos should be examined prior to chorion removal and fixation. Familiarity with the staging of the embryos and the staining of targeted genes at various stages will facilitate to determine if the alterations of staining is from the chemical treatment or simply due to the stage differences. To help staging, a morphology marker or a second in situ marker that indicates the developmental stages can be used.
Troubleshooting
High background and variations of ISH staining
If embryos appear deep blue/purple after the staining, one can shorten the incubation time in the staining buffer and carefully wrap the containers with alumni foil to avoid light exposure. The condition for each new antisense probe must be individually optimized before the screen. For example, the concentration of the probe and the DNA sequence used to generate the antisense probe should be carefully tested first in microfuge tubes, and then further optimized in multi-well mesh plates. The new probe usually gives high background in the first time use. Preclearing the probe with wild type embryos for several times will help to reduce the background.
The in situ staining results may be quite variable. It is strongly recommended to test control or untreated embryos on a multi-well plate first to get familiar with the basal staining and the inherent variability of the staining. Multiple controls including the negative control (vehicle alone) and the positive control that produces the desired readout (if available) should be included on each plate to monitor the quality of ISH. It could also happen that the staining on the outside wells of the multi-well plate is lighter than the embryos in the center of the plate. If this happens, the outside wells can be used for control/untreated embryos or simply left empty. A second ISH marker that does not crosstalk with the targeted pathway can be included as an internal control for the staining intensity.
Too few or too many “hits” from the screen
It is possible that the majority of chemicals will give mild alterations in probe staining, particularly if the chemicals that increase the gene expression are pursued. Not every embryo will respond to the chemical treatment. In a given well of 8-10 embryos, if 30-50% of embryos demonstrate alterations in staining, the chemical may be considered as a hit. In the follow-up testing, the chemical can be tested at a higher dose or a related more “active” molecule can be tested.
If too many hits are found from the screen, it may come from the technical and biological variation associated within ISH of the target genes. The chance of “false positive” correlates with the strength of the phenotype. A quantitative scoring system will help to reveal the spectrum of the phenotypes and prioritize the chemicals for follow-up.
Anticipated Results
This protocol will allow one to identify the small molecules that modulate the targeted pathway or biological process. Depending on the specific phenotype, a 0.5-5% hit rate is possible. After the potential hits are isolated, it is necessary to repeat and validate the effect of chemicals. The promising compounds should also be tested in a wide dose range, for example, at 1, 5, 20, 50,100 μM. An effective chemical should mediate the targets in a dose-dependent manner.
For example, in the aforementioned screen for small molecules inhibiting neural crest progenitors (the crestin+ lineage), White et al found that 3% of the screened chemicals significantly reduced crestin staining (White et al. 2011). Among those chemicals, a molecule of unknown function, NSC210627, almost completely abolished the expression of crestin at 40 μM (Figure 5b). Further analysis using chemoinfomatic algorithm DiscoveryGate revealed the structural similarity between NSC210267 and brequinar, a DHODH inhibitor. NSC210627 inhibited DHODH activity in vitro. Another DHODH inhibitor, leflunomide, phenocopied NSC210627 (Figure 5c). Due to its availability, leflunomide was then used in the subsequent studies and the following clinical studies.
Time consideration
A summary of approximate time for collecting embryos, chemical treatment and ISH is shown in Figure 1. For experienced eyes, it takes about 2 hours to score the staining results of embryos on one 96-well plate. After assay development and optimization, one person can screen 500-1000 chemicals in two weeks. But, validating the identified hits will take much more time.
Acknowledgments
We thank Isaac Adatto for assistance with the operation of Ispawn and the additional protocol; Margot Brandt for taking pictures of Figure 3. L.I. Z is an investigator of the Howard Hughes Medical Institute.
Literature Cited
- Adatto I, Lawrence C, Thompson M, Zon LI. A new system for the rapid collection of large numbers of developmentally staged zebrafish embryos. PLoS One. 2011;6:e21715. doi: 10.1371/journal.pone.0021715. [DOI] [PMC free article] [PubMed] [Google Scholar]
- Goessling W, Allen RS, Guan X, Jin P, Uchida N, Dovey M, Harris JM, Metzger ME, Bonifacino AC, Stroncek D, Stegner J, Armant M, Schlaeger T, Tisdale JF, Zon LI, Donahue RE, North TE. Prostaglandin E2 enhances human cord blood stem cell xenotransplants and shows long-term safety in preclinical nonhuman primate transplant models. Cell Stem Cell. 2011;8:445–458. doi: 10.1016/j.stem.2011.02.003. [DOI] [PMC free article] [PubMed] [Google Scholar]
- Kaufman CK, White RM, Zon L. Chemical genetic screening in the zebrafish embryo. Nat. Protoc. 2009;4:1422–1432. doi: 10.1038/nprot.2009.144. [DOI] [PMC free article] [PubMed] [Google Scholar]
- Kokel D, Bryan J, Laggner C, White R, Cheung CY, Mateus R, Healey D, Kim S, Werdich AA, Haggarty SJ, Macrae CA, Shoichet B, Peterson RT. Rapid behavior-based identification of neuroactive small molecules in the zebrafish. Nat. Chem. Biol. 2010;6:231–237. doi: 10.1038/nchembio.307. [DOI] [PMC free article] [PubMed] [Google Scholar]
- Molina G, Vogt A, Bakan A, Dai W, Queiroz de Oliveira P, Znosko W, Smithgall TE, Bahar I, Lazo JS, Day BW, Tsang M. Zebrafish chemical screening reveals an inhibitor of Dusp6 that expands cardiac cell lineages. Nat. Chem. Biol. 2009;5:680–687. doi: 10.1038/nchembio.190. [DOI] [PMC free article] [PubMed] [Google Scholar]
- Murphey RD, Stern HM, Straub CT, Zon LI. A chemical genetic screen for cell cycle inhibitors in zebrafish embryos. Chem. Biol. Drug Des. 2006;68:213–219. doi: 10.1111/j.1747-0285.2006.00439.x. [DOI] [PubMed] [Google Scholar]
- North TE, Goessling W, Walkley CR, Lengerke C, Kopani KR, Lord AM, Weber GJ, Bowman TV, Jang IH, Grosser T, Fitzgerald GA, Daley GQ, Orkin SH, Zon LI. Prostaglandin E2 regulates vertebrate haematopoietic stem cell homeostasis. Nature. 2007;447:1007–1011. doi: 10.1038/nature05883. [DOI] [PMC free article] [PubMed] [Google Scholar]
- Patton EE, Zon LI. The art and design of genetic screens: zebrafish. Nat. Rev. Genet. 2001;2:956–966. doi: 10.1038/35103567. [DOI] [PubMed] [Google Scholar]
- Peterson RT, Shaw SY, Peterson TA, Milan DJ, Zhong TP, Schreiber SL, MacRae CA, Fishman MC. Chemical suppression of a genetic mutation in a zebrafish model of aortic coarctation. Nat. Biotechnol. 2004;22:595–599. doi: 10.1038/nbt963. [DOI] [PubMed] [Google Scholar]
- Stern HM, Murphey RD, Shepard JL, Amatruda JF, Straub CT, Pfaff KL, Weber G, Tallarico JA, King RW, Zon LI. Small molecules that delay S phase suppress a zebrafish bmyb mutant. Na.t Chem. Biol. 2005;1:366–370. doi: 10.1038/nchembio749. [DOI] [PubMed] [Google Scholar]
- Thisse C, Thisse B. High-resolution in situ hybridization to whole-mount zebrafish embryos. Nat. Protoc. 2008;3:59–69. doi: 10.1038/nprot.2007.514. [DOI] [PubMed] [Google Scholar]
- White RM, Cech J, Ratanasirintrawoot S, Lin CY, Rahl PB, Burke CJ, Langdon E, Tomlinson ML, Mosher J, Kaufman C, Chen F, Long HK, Kramer M, Datta S, Neuberg D, Granter S, Young RA, Morrison S, Wheeler GN, Zon LI. DHODH modulates transcriptional elongation in the neural crest and melanoma. Nature. 2011;471:518–522. doi: 10.1038/nature09882. [DOI] [PMC free article] [PubMed] [Google Scholar]
- Yeh JR, Munson KM, Elagib KE, Goldfarb AN, Sweetser DA, Peterson RT. Discovering chemical modifiers of oncogene-regulated hematopoietic differentiation. Nat. Chem. Biol. 2009;5:236–243. doi: 10.1038/nchembio.147. [DOI] [PMC free article] [PubMed] [Google Scholar]
- Yu PB, Hong CC, Sachidanandan C, Babitt JL, Deng DY, Hoyng SA, Lin HY, Bloch KD, Peterson RT. Dorsomorphin inhibits BMP signals required for embryogenesis and iron metabolism. Nat. Chem. Biol. 2008;4:33–41. doi: 10.1038/nchembio.2007.54. [DOI] [PMC free article] [PubMed] [Google Scholar]
- Zon LI, Peterson RT. In vivo drug discovery in the zebrafish. Nat. Rev. Drug Discov. 2005;4:35–44. doi: 10.1038/nrd1606. [DOI] [PubMed] [Google Scholar]