

Abstract
Here we describe a relatively inexpensive and easy method to produce high quality images that reveal fine topological details of vertebrate embryonic structures. The method relies on nuclear staining of whole mount embryos in combination with confocal microscopy or conventional widefield fluorescent microscopy. In cases where confocal microscopy is used in combination with whole mount nuclear staining, the resulting embryo images can rival the clarity and resolution of images of similar specimens produced by Scanning Electron Microscopy (SEM). The fluorescent nuclear staining may be performed with a variety of cell permeable nuclear dyes, enabling the technique to be performed with multiple standard microscope/illumination or confocal/laser systems. The method may be used to document morphology of embryos of a variety of organisms, as well as individual organs and tissues. Nuclear stain imaging imposes minimal impact on embryonic specimens, enabling imaged specimens to be utilized for additional assays.
Keywords: Microscopy, embryology, Pseudo-SEM
Results and Discussion
Much of developmental biology requires assessing morphology of whole embryos or developing organs and structures. Beyond initial observation, photographic images that capture fine morphological detail are needed for documentation and publication of study results. For such purposes conventional brightfield microscopy has certain limitations, namely that the lack of contrast and shallow depth of field render subtle details of embryo morphology obscure (Fig. 1a). SEM is an effective technique for generating high resolution images that capture topological details of embryonic tissues and structures (Kaufman, 1992). However, SEM is expensive and requires specialized equipment and technical expertise that are not readily available in many research settings, and the preparative dehydration of specimens and vacuum conditions of imaging may result in morphological artifacts (Fischer et al., 2005). Here we describe relatively inexpensive and easy staining and microscopy methods to document the morphology of embryonic structures in exceptional detail to produce images that, in some cases, can rival the quality and resolution of images produced by SEM.
Figure 1.

Comparison of E11.5 whole mount mouse embryo imaged by brightfield, and by nuclear fluorescent staining combined with widefield or confocal microscopy. (a) Unstained embryo imaged by conventional bright field microscopy, (b) Embryo stained with Hoechst 33342 imaged by conventional fluorescence microscopy using a fluorescent stereomicroscope. (c) DAPI-stained embryo imaged by confocal microscopy wherein a z-stack of images spanning the depth of the embryo is collapsed to form a single projection image file. This image is a composite generated by splicing multiple flattened z-stack images taken with 5× objective.
The imaging techniques we describe here are based on staining of whole mount embryos or tissues with a nuclear fluorescent dye. Embryos with nuclear fluorescent staining can be photographed effectively on a standard fluorescent microscope or stereomicroscope, with resulting images that capture much greater contrast and depth of field than that produced by brightfield illumination (Fig. 1 a–b). Such methods have been used previously by ourselves and others to document morphology of embryos and embryonic structures, but the technique has not been described in detail (Hu and Marcucio, 2009; Sandell et al., 2011). Imaging nuclear stained embryos by conventional microscopy yields excellent results, but resolution of images can be improved even further by combining whole mount nuclear staining with confocal microscopy, a combination we call “pseudo-SEM” (Sandell et al., 2012). When a projection image is generated from a z-stack of confocal optical sections of a nuclear stained specimen, the overall distribution of stained nuclei reveals morphological details of the specimen with exceptional clarity and contrast (Fig. 1c).
Nuclear staining fluorescence microscopy can be used to document morphology of whole embryos from a variety of different vertebrate organisms, and can also be used for isolated organs and tissues. We have found the techniques to be effective on embryos of mouse, chick, zebrafish, frog and other vertebrates (Fig. 1 b–c, Fig. 2a–e). In addition to usefulness in imaging whole mount embryos, whole mount fluorescent nuclear stain imaging can also be used to document details of morphogenesis of isolated tissues and organs. For example, these techniques allow detailed documentation of neural tube closure, and cardiac development, as well as morphogenesis of the limb and urogenital system (Fig. 3 a–d).
Figure 2.

Nuclear stained whole mount imaging reveals details of morphology for a variety of vertebrate embryo types. (a) Zebrafish embryo at 24 hours of development, stained with DAPI and imaged by confocal microscopy. Note evident details of eye and otic vesicle development. (b) Lateral view of frog Rana pipiens external gill stage hatched larvae, bleached with H2O2 (Wallingford, 2010), stained with DAPI, and imaged by conventional fluorescent stereo microscopy. (c) Ventral view of a 9-somite chick embryo, stained with Red Dot and imaged by confocal microscopy. (d) Lateral view of a chick embryo HH stage 21, stained with DAPI and imaged by conventional fluorescent stereo microscopy. Note clearly visible details of developing eye, otic vesicle and pharyngeal arches. (e) Lateral-Anterior view of E15.5 mouse embryo stained with DAPI and imaged by fluorescent stereo microscopy.
Figure 3.
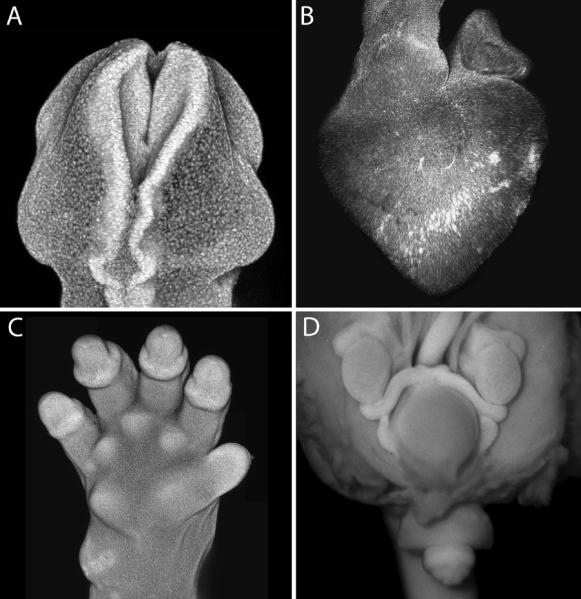
Nuclear stained whole mount imaging reveals details of morphology for a variety of organs and structures. (a) Posterior-dorsal view of neural tube closure in DAPI-stained E9.0 mouse embryo imaged by confocal microscopy. (b) Lateral view of chick heart HH stage 28 stained with Red-Dot imaged by confocal microscopy. (c) Ventral view of DAPI-stained E15.5 mouse forelimb imaged by confocal microscopy. (d) Ventral view of open posterior visceral cavity of DAPI-stained E15.5 embryo imaged on conventional widefield fluorescent stereomicroscope. Mesonephric ducts, testis, bladder and external genitalia are visible.
For organisms, such as frog and zebrafish, whose embryos develop dark pigments, pigment must be eliminated either by blocking pigment formation during development, utilizing albino embryos, or bleaching pigmented specimens after fixation. We have found that nuclear stain imaging works on zebrafish embryos that have be treated with 1-phenyl 2-thiourea (PTU) to prevent pigment formation (Karlsson et al., 2001), and Rana pipiens frog embryos that have been bleached with H202(Wallingford, 2010). The efficacy of the technique may be limited in embryos at older stages of development as the skin matures and begins to form a barrier with reduced permeability, which in the case of mouse embryos occurs at embryonic day 16.5 (E16.5) (Hardman et al., 1998). For mouse embryos, we find that nuclear stain penetration is successful in whole mount specimens through E15.5 (Fig 2D). For zebrafish and chick, we have found nuclear staining to be effective until at least day 5, and day 9, respectively.
High quality whole mount nuclear stained embryo images may be achieved by staining with a variety of nuclear dyes (Table 1). The choice of dye depends primarily on the illumination and filter options available for microscopy and imaging. DAPI or Hoechst dyes can be used for imaging on any fluorescent microscope or stereomicroscope that has fluorescence illumination and a UV filter, or on a confocal microscope with a 405nm laser and a bandpass filter for emission of violet wavelength light. For confocal microscopes that have far-red laser/filter combinations, far-red nuclear stains such as Draq5 (Cell Signaling Technology) or Red-Dot (Biotium) may be used. For our studies we have used membrane permeant dyes. Membrane impermeant dyes, such as Ethidium bromide and Propidium iodide, have been used by others. (Hu and Marcucio, 2009; Zucker, 2006; Zucker et al., 1999).
Table 1.
Examples of nuclear stains that can be used for Pseudo-SEM imaging of vertebrate embryos and embryonic tissues.
| Nuclear Stain/Dyes | Conventional microscopy lamp/filter | Confocal microscope excitation laser |
| DAPI | Xenon or mercury/UV filter | 405 nm laser |
| bisbenzimide (Hoechst) | Xenon or mercury/UV filter | 405 nm laser |
| Red Dot 1 (Biotium) | 488, 532, 543, 568, 594, 633, 635 and 647 nm | |
| 647 nm optimal; | ||
| Draq5 (Biostatus) | 488, 514, 568, 633 nm sub-optimal |
With respect to mode of microscopy, conventional fluorescent microscopy has advantages over confocal microscopy in terms of speed, ease, accessibility and modest digital file size. Conventional fluorescent microscopy can yield images that, while not of confocal quality, are distinctly superior to those obtained by brightfield microscopy (Fig. 1b, Fig. 2 b, d, e, Fig. 3 e). Also, since many confocal systems are not set up for low magnification imaging, conventional fluorescence stereomicroscopy is often the most appropriate choice for large specimens such as whole mouse embryos E12.5 or older or any specimen for which relatively low magnification is required.
Confocal microscopy is superior to conventional microscopy in terms of apparent depth of field, resolution, and contrast, which together yield images of exceptional clarity and exquisite morphological detail. The disadvantages of confocal microscopy are the lengthy time requirement to capture the needed z-stack of images and the large data storage size of the resulting multiple image files. For many embryo specimens excellent detail can be obtained using a 10× objective, which, depending on the optics of the microscope, can allow a field of view in the X–Y axis sufficient to collect an entire E9.5 mouse embryo in a single frame. For larger specimens, lower power objectives, such as 5× or 2.5×, may be used, or multiple z-stack frames may be collected with a 10× objective and subsequently spliced into a single composite image.
A key component in generating a good pseudo-SEM image from a confocal z-stack is properly defining the top and bottom optical slice position when setting up the parameters for collecting an image stack. The position of the top and bottom optical slice must be defined to avoid cropping the specimen in the z-axis (Fig. 4 a–b). In practice, this can be accomplished by defining the first and last optical section according to the focal positions at the starting and ending limits of detection of nuclear staining. In addition, when setting the confocal microscopy acquisition parameters, it is important to keep sufficient overlap between optical sections. This can be accomplished by defining the appropriate distance between optical sections relative to pinhole size, which impacts the thickness of the optical section (Table 2). Insufficent overlap between optical section slices can result in a final projection image that has an uneven stacked or layered appearance (Fig. 4 c).
Figure 4.

Confocal acquisition parameters affect image quality. All images DAPI-stained E9.5 mouse embryo. (a) Embryo imaged with optimal parameter settings appears whole and complete. (b) Optical z-axis cropping results when first and last optical sections are not set at the limits of detection of the specimen. (c) Artifact of apparent stacked or layered appearance occurs when the parameters for pinhole size and distance between sections is set with insufficient overlap between optical sections.
Table 2.
Examples of confocal z-stack acquisition parameters for E9.5 mouse embryo demonstrating the relationship between pinhole diameter, optical slice thickness and number of optical sections.
| Pinhole diameter | Optical slice thickness | # optical sections | Total imaging depth |
|---|---|---|---|
| 196 | 33.3 μm | 24 | 765 μm |
| 70 | 12.15 μm | 62 | 740 μm |
Uncleared specimens that are imaged in aqueous physiological buffer produce images that are most similar to SEM micrographs. In such specimens the natural optical density of tissues is rendered as opaque and solid, which gives them an appearance similar to samples scanned by SEM (Fig. 5a). Images of cleared embryos appear less like SEM micrographs (compare Fig. 5 a and b). Nonetheless, confocal imaging of nuclear stained embryos that are cleared to transparency is a very effective way to reveal tissue and embryo morphology in combination with other fluorescent labels. Nuclear stained embryos may be cleared with agents such as buffered glycerol, methyl salicylate or BABB (Benzyl Alcohol/Benzyl Benzoate) (Fig. 5b–c). Agents such as these that have a refractive index near 1.5 allow internal fluorescent immunostaining or expressed fluorochromes to be visualized.
Figure 5.

Comparison of uncleared vs. cleared specimens. (a) Lateral view of uncleared DAPI-stained E10.5 mouse embryo. Tissues in physiological buffer are opaque and appear solid. (b) Lateral view of BABB-cleared DAPI-stained E10.75 mouse embryo. Exterior morphology of cleared specimen is evident, but embryo appears transparent and topological features from the far side of the embryo such as eye and forebrain vesicle are visible. (c) Lateral view of BABB-cleared DAPI-stained E10.75 mouse embryo immunostained for NCAM1. Nuclear DAPI signal is rendered in magenta for optimal contrast with green neuronal antibody staining.
The method we describe here relies on nuclear staining to reveal the overall morphology of embryonic structures. It is therefore clearly suitable only for organisms for which the distribution of cells and nuclei are a reasonable proxy for the topological structures and tissues of the embryo. The technique is unsuitable for embryos with significant a-cellular or non-nuclear structures, or non-permeable tissues. The technique cannot be used to visualize sub-cellular structures such as filopodia, cilia, or extracellular matrix.
One distinct advantage of the whole mount nuclear staining technique over bona fide SEM is that nuclear staining and aqueous imaging conditions have minimal impact on embryonic specimens, making it possible to use individual samples for multiple purposes. For example, embryos that have been stained with DAPI and imaged in physiological buffer may be processed subsequently for paraffin or frozen section and stained with histological stains. The potential to utilize individual samples for multiple purposes can be particularly valuable for experimental situations involving samples that are rare or difficult to obtain.
Methods
Nuclear stain embryo imaging step-by-step summary
Example given is for an intact E9.0 mouse embryo stained with DAPI imaged in physiological buffer (not cleared) on upright confocal microscope.
Isolate embryos and wash in physiological buffer: Dissect mouse embryos in Phosphate Buffered Saline (PBS). Discard decidua, yolk sac and amnion. Rinse in PBS to eliminate debris. (Individual organs or tissues of interest may be isolated at this step. When individual organs or tissues are to be imaged, it is advisable to isolate the tissue prior to fixation and staining so that the entire surface of specimen to be examined is exposed to the fixative and stain.)
Fix embryos: Incubate embryos overnight in 4% paraformaldehyde (formaldehyde) at 4°C with gentle rocking. (Fixation variations are possible, see below.)
Rinse: Rinse embryos in PBS to remove fixative.
Stain embryos with nuclear stain: Prepare needed volume (1ml/embryo) of DAPI dilactate to final working dilution concentration of 10nM in PBS (diluted from stock DAPI dilactate solution of 10 mM in H2O). Stain embryos in DAPI PBS solution at room temp, with gentle rocking for 20 minutes. (Staining may proceed overnight at 4°C. Nuclear stains other than DAPI may be used, details below and Table 1. Note: nuclear stains may be mutagenic and should be handled with care.)
Rinse: Remove nuclear stain solution and rinse specimen in PBS. (Note: nuclear stains may be mutagenic and waste solution should be treated as hazardous waste.)
Mount or arrange specimen for microscopy: For upright microscopes, place specimen in PBS in an open dish. If a particular orientation is needed, use a small petri dish that has been pre-prepared with a 1–3 mm deep layer of solidified 1% agarose. Using a pair of forceps, dig a trench of suitable size and shape in the agarose that will allow the embryo to fall or wedge in the desired orientation so that the surface to be imaged will face upward toward the objective lens. Final placement of the embryo specimen may need to be adjusted while the dish in place on the microscope stage. Other options for “mounting” specimens described below.
Image stained specimen by confocal microscopy: Adjust the position and orientation of specimen on the microscope stage to center embryo within field of view. For DAPI-stained embryos scan using a 405nm laser. To set the confocal acquisition parameters, first scan in the fast X-Y mode in 512 × 512 image format mode to identify the top and bottom limits of fluorescence signal detection. Mark these limits as the first and last optical slices to be collected in the z-stack. Once the top and bottom slice positions are set, reduce the scan speed and expand image format mode (e.g. 1024 pixels × 1024 pixels) to the parameters that will be used for final acquisition. The slower scan sped and larger image format are needed to accurately set the signal acquisition parameters such as pinhole diameter, gain, offset. Once the parameters are set verify that the optical slice thickness/ pinhole diameter and distance between slices are sufficient to allow overlap between sections so that a complete image will be generated when the individual optical sections are collapsed. When all acquisition parameters optimized, collect a z-stack of images. If multiple x-y frames are needed to capture the entire specimen, determine top and bottom section for entire specimen and collect the needed multiple z-stacks with all settings, including first and last section position, gain, pinhole diameter, etc. identical for each z-stack. (In lieu of confocal microscopy, specimens may be imaged by standard widefield fluorescence microscopy).
Collapse Z-stack of optical sections images: Once a z-stack of confocal optical sections is collected, collapsed the multiple sections into a single projection view to generate the pseudo-SEM image.
Fixation
Differing concentrations and length of fixation in formaldehyde are suitable with nuclear stain imaging. Specimens that have been dehydrated in alcohol for storage and then subsequently rehydrated in physiological buffer may be stained and imaged. We have imaged whole mount nuclear stained embryos primarily using fixed specimens. However, depending on the permeability characteristics of the nuclear dye used, unfixed tissues may be stained. For unfixed specimens, the different permeability characteristics of healthy live cells versus dead or dying cells results in varying intensity of nuclear stain, a characteristic which may be useful when the goal is to document distribution of cell death, but detracts from the image when pure morphology is the desired result.
Nuclear stains and antibodies
DAPI dilactate, (Biotium), stock solution suspended at 10mM in H20, final working concentration 10nM. Red Dot 1 (Biotium), stock suspension 200× in H20, final working concentration 1X in PBS. Hoechst 33342 trihydrochloride trihydrate (Invitrogen), stock solution 10mg/ml in H20, final working concentration 1μg/ml in PBS. NCAM1 antibody, [H28-123] (Abcam), 1/200.
Specimen mounting for microscopy
For upright microscopes, specimens may be imaged in an open dish as described above. When imaging in liquid filled dishes, care must be taken to avoid motion of the liquid or specimen during the image acquisition period. For inverted format microscopes, embryos may be placed in a coverglass-bottom dish. For either upright or inverted formats, specimens may be mounted in a “coverslip sandwich” wherein specimens are suspended between two coverslips spaced and held by an o-ring or gasket and sealed with vacuum grease. When using an inverted confocal microscope, specimens may be imaged in one of the many commercially available coverslip bottom dishes, or by creating a “coverslip sandwich” in which the specimen is suspended between two coverslips spaced and held by an o-ring or gasket and sealed with vacuum grease.
Confocal parameter settings
The many parameters that may be varied for confocal acquisition affect image quality. For most embryo image acquisition we recommend 1024 × 1024 digital pixel format as this provides sufficient number of pixels to render a final image of 3.4 inches square at 300 dpi. The many confocal acquisition parameters that can be varied, including, gain, pinhole diameter, scan speed, image pixel format, etc., are inter-related and must be optimized in combination with one another. Changing one parameter influences other parameters. For example, differences in pinhole diameter affect optical section thickness (Table 2), as well as fluorescent signal intensity.
Microscopes
The images presented in this report were collected on the following microscopes. Confocal images were captured on a Zeiss LSM510 Pascal equipped with a 405 nm laser, or on an Olympus MPE FV1000 equipped with a far red laser. Widefield fluorescent images were collected on a Leica M165 stereomicroscope equipped with a metal halide fluorescent illumination lamp and DAPI filter.
Acknowledgements
Research in the Trainor laboratory is supported by the Stowers Institute for Medical Research and the National Institute of Dental and Craniofacial Research (R01 DE 016082). Research in the Sandell laboratory is supported by the University of Louisville and by P20 RR017702 to Dr.
Robert M. Greene, Birth Defects Center, University of Louisville, Louisville, KY. The Microscopy Suite at the Cardiovascular Innovation Institute in Louisville, KY is supported by GM103507. L.L.S. thanks Fenge Li for excellent technical assistance.
Grant Support: Research in the Trainor laboratory is supported by the Stowers Institute for Medical Research and the National Institute of Dental and Craniofacial Research (R01 DE 016082). Research in the Sandell laboratory is supported by the University of Louisville and by P20 RR017702 to Dr. Robert M. Greene, Birth Defects Center, University of Louisville, Louisville, KY. The Microscopy Suite at the Cardiovascular Innovation Institute in Louisville, KY is supported by GM103507.
References
- Fischer ER, Hansen BT, Nair V, Hoyt FH, Dorward DW. Current Protocols in Microbiology. John Wiley & Sons, Inc; 2005. Scanning Electron Microscopy. [DOI] [PMC free article] [PubMed] [Google Scholar]
- Hardman MJ, Sisi P, Banbury DN, Byrne C. Patterned acquisition of skin barrier function during development. Development. 1998;125:1541–1552. doi: 10.1242/dev.125.8.1541. [DOI] [PubMed] [Google Scholar]
- Hu D, Marcucio RS. A SHH-responsive signaling center in the forebrain regulates craniofacial morphogenesis via the facial ectoderm. Development. 2009;136:107–116. doi: 10.1242/dev.026583. [DOI] [PMC free article] [PubMed] [Google Scholar]
- Karlsson J, von Hofsten J, Olsson PE. Generating transparent zebrafish: a refined method to improve detection of gene expression during embryonic development. Mar Biotechnol (NY) 2001;3:522–527. doi: 10.1007/s1012601-0053-4. [DOI] [PubMed] [Google Scholar]
- Kaufman . The atlas of mouse development. Academic Press; London: 1992. pp. 479–489. [Google Scholar]
- Sandell LL, Iulianella A, Melton KR, Lynn M, Walker M, Inman KE, Bhatt S, Leroux-Berger M, Crawford M, Jones NC, Dennis JF, Trainor PA. A phenotype-driven ENU mutagenesis screen identifies novel alleles with functional roles in early mouse craniofacial development. Genesis. 2011;49:342–359. doi: 10.1002/dvg.20727. [DOI] [PMC free article] [PubMed] [Google Scholar]
- Sandell LL, Lynn ML, Inman KE, McDowell W, Trainor PA. RDH10 Oxidation of Vitamin A Is a Critical Control Step in Synthesis of Retinoic Acid during Mouse Embryogenesis. PLoS ONE. 2012;7:e30698. doi: 10.1371/journal.pone.0030698. [DOI] [PMC free article] [PubMed] [Google Scholar]
- Wallingford JB. Preparation of fixed Xenopus embryos for confocal imaging. Cold Spring Harb Protoc 2010; 2010. pdb prot5426. [DOI] [PubMed] [Google Scholar]
- Zucker RM. Whole insect and mammalian embryo imaging with confocal microscopy: Morphology and apoptosis. Cytometry Part A. 2006;69A:1143–1152. doi: 10.1002/cyto.a.20343. [DOI] [PubMed] [Google Scholar]
- Zucker RM, Hunter ES, Rogers JM. Confocal Laser Scanning Microscopy Morphology and Apoptosis in Organogenesis-Stage Mouse Embryos. 1999. pp. 191–202. [DOI] [PubMed] [Google Scholar]