Highlights
► The fracture behavior of UFG-copper produced by high pressure torsion was characterized. ► The critical J-Integral, JIC, and the initiation toughness, CODi, were evaluated. ► Grain refinement leads to a decrease in the fracture initiation toughness. ► The critical J-Integral remains remarkably high with simultaneous good strength.
Keywords: Severe plastic deformation (Spd), High pressure torsion, Fracture toughness, Ultrafine-grained, Copper
Abstract
In this study the fracture behavior of ultrafine-grained copper was assessed by means of elasto-plastic fracture mechanics. For the synthesis of the material high pressure torsion was used. The fracture toughness was quantitatively measured by JIC as a global measure by recording the crack growth resistance curve. Additionally, the initiation toughness in terms of the crack opening displacement (CODi) was evaluated as a local fracture parameter. The results presented here exhibit a low fracture initiation toughness but simultaneously a remarkably high fracture toughness in terms of JIC. The origin of the large difference between these two parameters, peculiarities of the fracture surface and the fracture mechanical performance compared to coarse grained copper will be discussed.
1. Introduction
Particularly in the last decade the mechanical and physical properties of bulk ultrafine-grained (UFG) and nanocrystalline (NC) materials synthesized by severe plastic deformation (SPD) techniques have strongly come into focus, see e.g. [1–3]. Although properties such as strength and ductility and the underlying deformation mechanisms are under intensive experimental and theoretical investigation, the damage tolerance, for example quantitatively expressed by the fracture toughness has been insufficiently examined so far. The necessity to deal with the fracture toughness is unambiguous, though. It describes, besides the ductility, a significant deformation related property and enables a damage tolerant design in engineering which is required for many structural applications. Furthermore, the fracture toughness is an important property determining the machinability and formability of UFG and NC semi-products which could further limit possible application areas in future. The paucity of research work in the field of fracture mechanics regarding this young material class can be explained by the fact that most processes do not deliver adequate material volumes and dimensions which would be required by experimental standards, e.g. ASTM standards, for fracture mechanical tests to assure measuring size-independent values. For applying linear elastic fracture mechanics (LEFM) the minimum dimensions depend mainly on the strength and toughness of the material and they are required to measure size-independent fracture properties and not only upper or lower estimates. On the other hand, for an elasto-plastic description of the fracture behavior the requirements are less restrictive, since plasticity is accounted for, but the measurements often become technically more difficult, for instance, when one tries to measure the exact loadline displacement on miniaturized specimens.
Despite the experimental difficulties some reports in literature regarding the fracture behavior of UFG and NC metals can be found. This is, however, only a very small number, especially, compared to the vast number of contributions dealing with the ductility of SPD materials, which does not necessarily describe the same material feature. Some of these papers deal with high strength materials such as tungsten and iron [4,5] exhibiting an unusual low fracture toughness in which small scale yielding conditions prevail and LEFM can be applied. In other cases [6,7] elasto-plastic fracture mechanics (EPFM) could be employed because the used synthesis processes delivered an adequate volume of material. The application of LEFM on low and intermediate strength materials, compared to for example UFG iron or tungsten can cause complications and lead only to estimates of the fracture toughness [8].
In contrast to the experimental approach the fracture behavior seems to be often successfully examined theoretically with analytical methods or by molecular dynamic simulations, see for instance [9–11]. In these contributions possible deformation processes ahead of the crack tip, leading finally to ductile or brittle fracture, are suggested and studied, obeying the strong constraint induced by the crack tip. The resulting critical conditions, expressed by the stress intensity or crack opening displacement for material separation are calculated. Quantitative experimental data originating from fracture mechanical experiments for comparison are missing though. Nevertheless, a quantitative validation of these simulations for confirming the occurrence of the proposed deformation mechanisms, fracture types and calculated critical fracture parameters are needed. For that reason, an accurate experimental description of the fracture behavior should be not only of great interest for engineering, as mentioned in the beginning, but also for the theoretical discussion of the deformation and fracture processes in UFG or NC materials.
The necessity to deal with the fracture toughness in general and the popularity of copper as a wide-spread and prominent model material in material science was motivation to examine the fracture behavior of ultrafine copper using an elasto-plastic approach. For the synthesis of the material severe plastic deformation (SPD) was chosen. An advantage of using this technique for the synthesis, compared to techniques such as electrodeposition or inert gas condensation, is the bottom down approach itself. Characteristic for these techniques, the purity of the material is only given by the purity of the pre-material and so by using high purity precursor materials pure UFG and NC metals are synthesized. Because of that an examination of the intrinsic fracture behavior is possible and the influence of extrinsic factors such as impurities and pre-existing flaws induced by the synthesis process can be minimized.
For the quantitative description of the fracture behavior the crack growth resistance in terms of the J-Integral was determined and the critical J value, JIC, according to an ASTM standard evaluated as a global measure for the fracture toughness. In addition the three-dimensional fracture surfaces of UFG copper were reconstructed, which enabled the determination of the crack opening displacement for crack initiation (CODi) as a local measure of the fracture toughness. This local approach combined with the crack growth resistance measurements and high resolution fractography allowed for a better understanding of the fracture characteristics of UFG copper. The results are also compared to coarse grained (CG) copper and differences are discussed.
2. Experimental
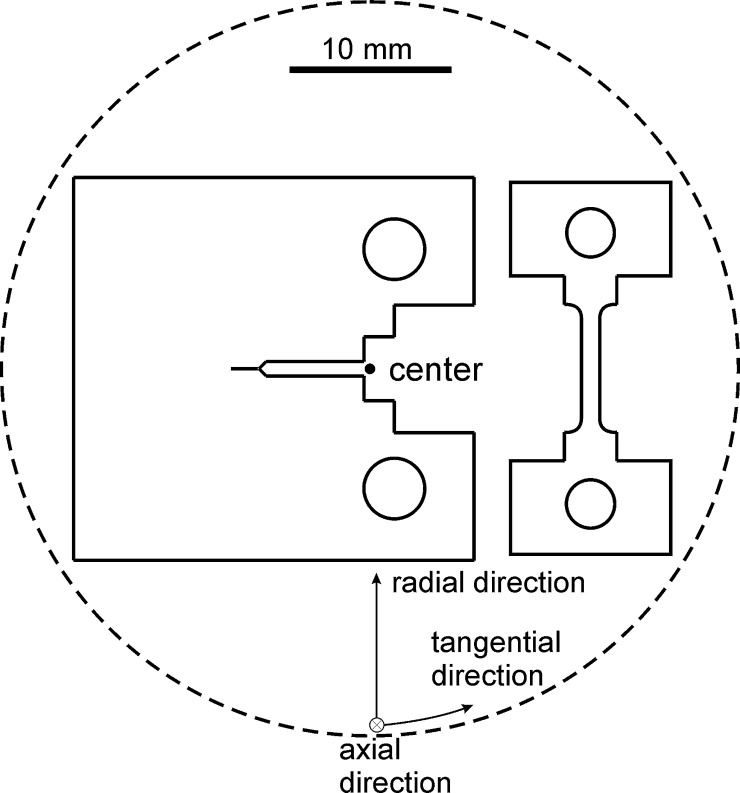
For this study copper with a purity of 99.97 wt% was used. Disk specimens having an approximate diameter of ∼48 mm and a thickness of ∼10.6 mm were annealed at 700 °C for 1 h. This annealed material state is referred to as the coarse-grained state (CG-copper). The material was then deformed by high pressure torsion (HPT) at a nominal pressure of 2 GPa at room temperature with a rotational speed of 0.1 rotations per minute up to 15 rotations. The homogeneity of the HPT disks after deformation was checked by micro-hardness measurements with a load of 500 gf (more details follow). For the tensile properties of the CG and UFG copper three tensile tests were performed with dog-bone specimens having a gage length of 6 mm and a squared cross-section of ∼1.1 mm, see Fig. 1. The tests were carried out at room-temperature on a tensile testing machine from Kammrath and Weiss© with a crosshead speed of 2.5 μm/s and the strain was measured with a clip-gage from Epsilon Technology Corp. The microstructure was characterized with a Zeiss 1525 scanning electron microscope (SEM) equipped with a TSL Electron Back Scatter Diffraction (EBSD) system. For the fracture tests Compact Tension (CT) specimens with a width, W, of 20 mm, a thickness, B, of 10 mm and a crack length, a, of ∼10 mm were machined from the disk having the expected crack propagation direction in the radial direction and the resulting crack plane parallel to the tangential direction of the disk, see Fig. 1. Specimens made from CG copper had an additional side-groove of 2 mm on each side. The evaluation of the fracture resistance by measuring the J-Integral was performed in accordance with the ASTM-standard 1820-08 [12] using a single specimen procedure. The crack extension depending on the current load was measured by applying a direct current potential drop technique as described in the ESIS-Procedure [13]. Three specimens subjected to different maximum crack extensions were used to calibrate the potential drop. The actual compliance on the load–loadline displacement curve required for the calculation of the elastic and plastic strain energy was calculated from the compliance equation in the aforementioned ASTM standard. The local CODi was evaluated by using an automatic fracture surface analysis system [14]. With this system three-dimensional models of the fracture surfaces were derived from stereoimage-pairs taken in a SEM. Then corresponding fracture path profiles from both halves of the fractured specimen were extracted for the determination of CODi-values. The evaluation practice of the CODi-values in detail can be found in preceding studies using this techniques [15,16].
Fig. 1.
Schematic of the compact tension specimen, the tensile specimen and its orientation within the HPT disc (indicated with the dashed line).
3. Results
3.1. Hardness measurements
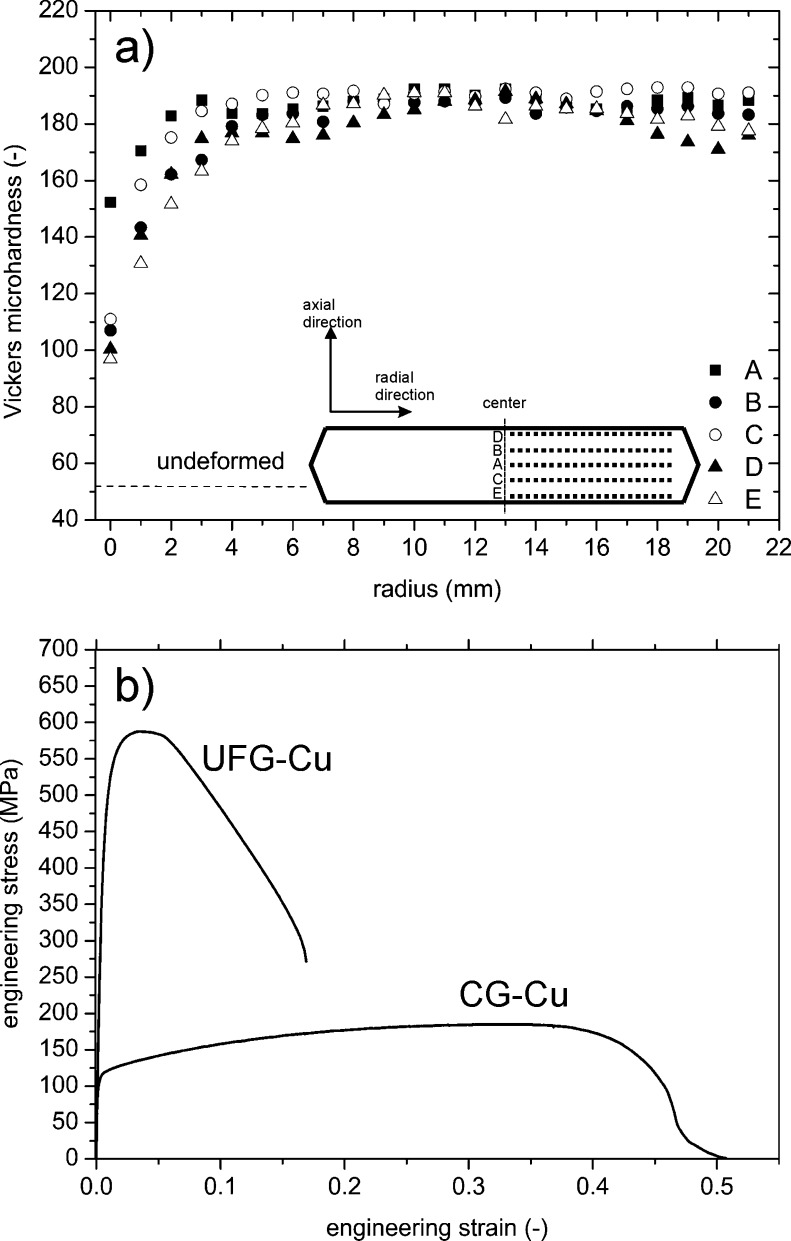
An important requirement for measuring mechanical properties on large scaled HPT specimens is satisfying homogeneity of the pre-material. In order to demonstrate the degree of homogeneity hardness measurements along the radius at different positions apart from the middle plane were performed and the results are shown in Fig. 2a. The measurements along the middle plane are labeled A, ±2 mm away from the middle plane have the index B and C, measurements ±4.5 mm apart from the middle plane have the index D and E. The hardness of the undeformed material is about 52 HV (indicated with a dashed line). As Fig. 2a illustrates, a pronounced homogeneity along the radius was reached for the middle plane (A) with a hardness of approximately 180 HV after HPT processing. This is due to the large applied strains which lead to a maximum grain fragmentation also often termed as a saturation [17] also at small radii, which was here about 4 mm. Additionally, an acceptable homogeneity across the thickness of the specimen, see profiles B–E, could be also obtained exhibiting a slightly lower hardness. A comparison of the position of the specimen in the HPT disk in Fig. 1 with the hardness measurements reveals that the position of the later crack tip of the CT-specimen is remote from the low deformed and explicitly softer center region.
Fig. 2.
(a) Results of the hardness measurements on the HPT disk. The inset picture shows the cross-section of the HPT disk. The dotted lines represent the positions of the hardness measurements performed along the radius from the center to the edge of the disk at different planes labeled (A–E) across the thickness of the HPT disk. (b) Comparison of stress–strain curves of UFG and CG copper.
3.2. Tensile tests
Fig. 2b presents representative results of a tensile test performed with UFG copper and for the later discussion also with the coarse grained pre-material (CG-Cu). In Table 1 all retrieved data from these tests are summarized. As expected, due to SPD-processing and the connected grain-refinement a strong increase in strength (yield and ultimate tensile strength) is reached, whereas most ductility related measures deteriorate. Interesting to note is that the deterioration of the ductility in terms of the reduction in area, Z, is less affected by the SPD induced grain refinement. In contrast, the CG-copper specimen shows a superior performance in ductility at the cost of explicitly lower strength.
Table 1.
Comparison of the yield strength, σy, the ultimate tensile strength, σUTS, and ductility related values of UFG and CG copper. As a measure of the ductility the uniform elongation, ɛun, the elongation at fracture, ɛfr, and the reduction in area, Z, were evaluated. All numbers are mean values of 3 tests and as an error the standard deviation is specified.
| Microstructure | σy (MPa) | σUTS (MPa) | ɛun (%) | ɛfra (%) | Z (%) |
|---|---|---|---|---|---|
| UFG-Cu | 443 ± 21 | 601 ± 12 | 3.0 ± 0.3 | 18.3 ± 1.7 | 75.3 ± 4.2 |
| CG-Cu | 111 ± 12 | 179 ± 9 | 31.8 ± 3.4 | 49.4 ± 6.0 | 89.4 ± 2.2 |
3.3. Microstructure
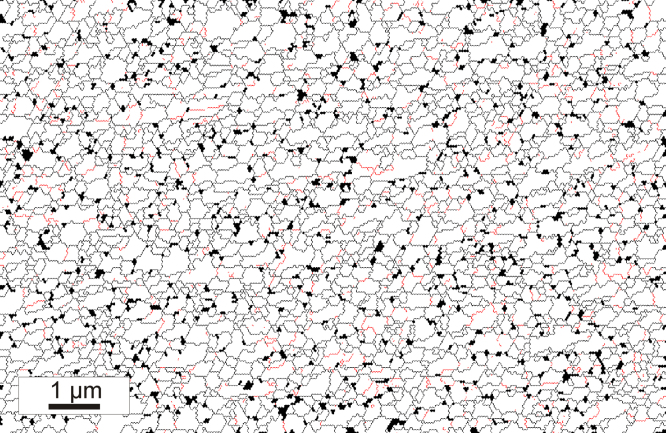
Since the hardness survey showed that the disk after processing exhibits a pronounced homogeneity only a representative micrograph of UFG copper needs to be presented taken from a disk radius of approximately 20 mm looking into the radial direction in Fig. 3. In this observation direction a slightly elongated microstructure can be observed with an average grain size of ∼340 nm. An inspection of the misorientation distribution shows that about 70% of the grain boundaries are high angle and 30% low angle boundaries. The undeformed material in the annealed state, not shown here, had an average grain size of approximately 200 μm.
Fig. 3.
Grain boundary map obtained from EBSD measurements performed in the radial observation direction at a disc radius of ∼20 mm presenting the typical ultrafine-grained microstructure of SPD-deformed copper. High angle boundaries (>15°) are labeled black, low angle grain boundaries (5–15°) are red. The average grain size is 340 nm. Areas or points that could not be indexed satisfactorily are black.
3.4. Fracture toughness
3.4.1. Local fracture toughness
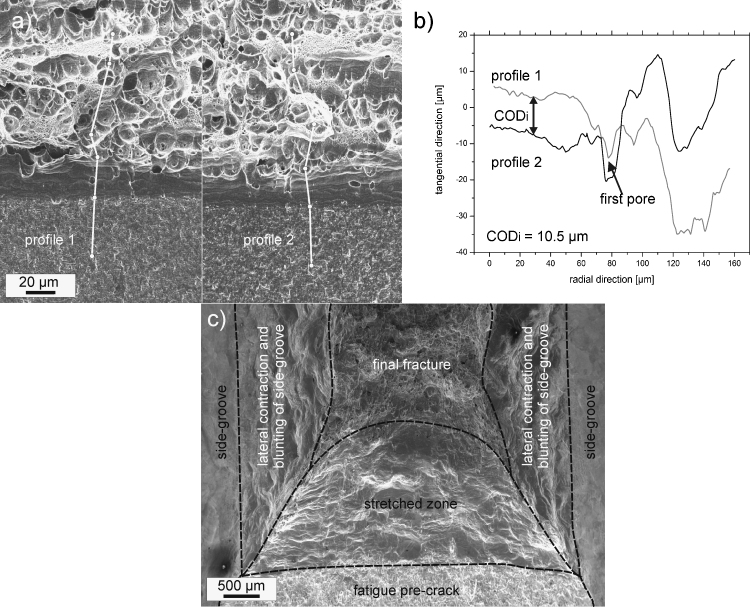
The local initiation toughness was evaluated by measuring the local CODi in the midsection of a specimen. An example of such a measurement is outlined in Fig. 4. Fig. 4a presents two corresponding fractographs taken from the two halves of a fractured specimen with the smallest extent of stable crack propagation. In the lower part of the pictures the fatigue pre-cracked area is visible. The transition from the fatigue pre-cracked area to the overload fracture area is clearly marked by a stretched zone. Additionally two corresponding crack path profiles are indicated, which were used for the evaluation of a CODi-value. In Fig. 4b the arrangement of the two corresponding profiles is shown at the point of time at which the first pore coalesces with the fatigue pre-crack. This condition is defined as the initiation fracture toughness CODi where the first pore coalescence with the blunted crack occurs. For statistics, several CODi measurements were performed and the results are presented in Table 2. An average CODi value of 11.4 μm was found.
Fig. 4.
An example of a CODi measurement on UFG copper. (a) Comparison of the fractographs taken from the two different halves of the broken specimen at the same position. A pair of corresponding crack paths for the CODi determination are indicated. (b) Arrangement of the crack path profiles at the point of time of crack initiation described by coalescence with the first pore. (c) Fractograph of CG copper. For better visualization the different areas on the fractured sample are labeled.
Table 2.
Summary of the results of the measured CODi values of UFG-copper. The average value is 11.4 ± 1.3 μm.
| Crack profile | CODi (μm) |
|---|---|
| 1 | 11.4 |
| 2 | 12.3 |
| 3 | 10.5 |
| 4 | 9.5 |
| 5 | 13.0 |
| 6 | 11.6 |
Fig. 4c presents a typical fractograph of CG-copper. For clarity, the different areas of the specimen are labeled. An excessive stretched zone (compare scale bars in Fig. 4a and c) separated from the fatigue pre-crack in the lower part of the image and the overload fracture area at the top can be found. Due to the much higher CODi of this material, which can be simply illustrated by the large stretched zone, the same procedure for evaluating the CODi as presented before for the UFG material was not used. A CODi was measured by adding the height of the stretched zones which yields in a CODi of 2290 μm. However, the CODi – value here is on the order of the thickness of the specimen and the specimens showed a strong lateral contraction of the side surfaces meaning that plane stress conditions are strongly pronounced. It is assumed that under plane strain conditions void initiation and growth would occur at lower COD values, promoted by a stronger stress triaxiality. So, this value is only an upper estimate for the fracture toughness under plane strain conditions. A lower conservative estimate for the fracture toughness can be given by the maximum applicability of the COD-concept for large scale yielding conditions. This is about 25 times the thickness, B, of the specimen [18] or in other words Bmin > 25(CODi). The side-grooved specimen here had a net-thickness of 6 mm leading to a lower limit for CODi for CG copper of at least 240 μm.
3.4.2. Global fracture toughness
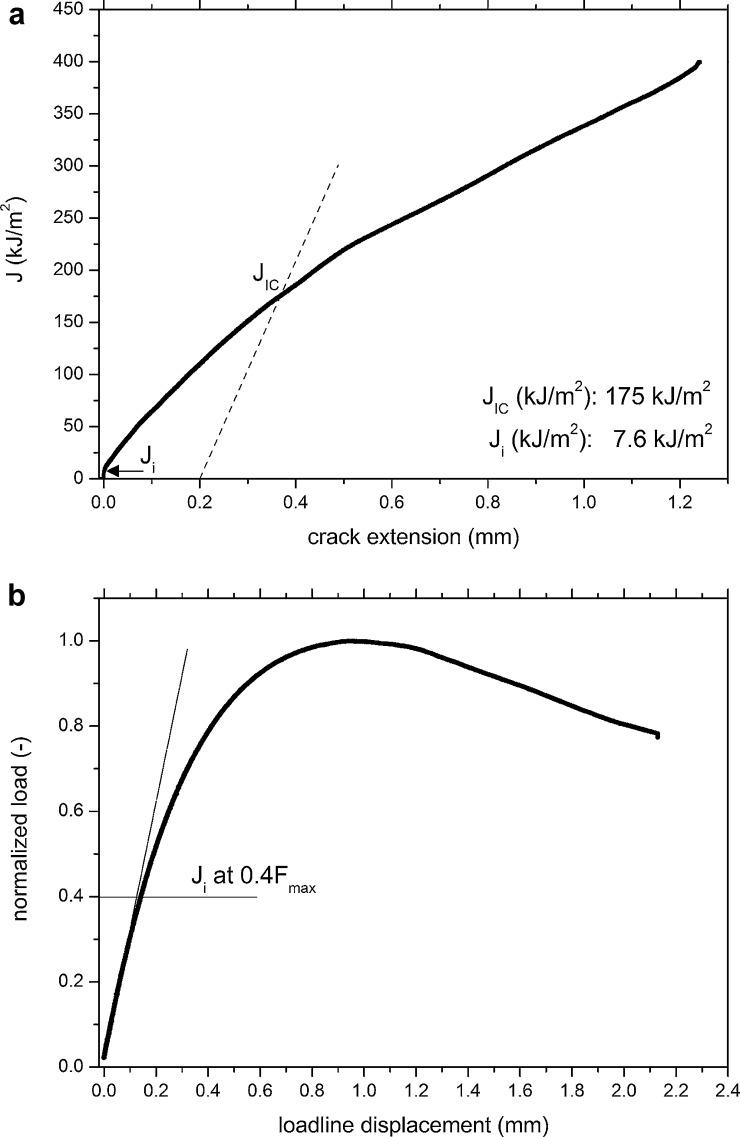
In Fig. 5 the fracture resistance curve of UFG copper in terms of the J-Integral versus the crack extension Δa is plotted. The blunting line according to the ASTM standard is:
| (1) |
The pre-factor M is 2 and σY is the average of yield strength, σy, and the ultimate tensile strength, σUTS, with a value of 522 MPa. The fracture toughness in terms of JIC allowing a stable crack propagation Δa of 0.2 mm has a value of 175 kJ/m2. (A second specimen, which exceeded the minimum crack extension to intersect with the calculated blunting line had a value of 177 kJ/m2.) For comparison the initiation toughness, Ji, was also calculated and additionally inserted in Fig. 5a. For that the averaged CODi obtained from the stereo-image measurements was converted to J using the relationship [19]:
| (2) |
The factor dn, mainly depending on stress state and strain hardening coefficient was taken to be 0.78, valid for a non-hardening material as it can be assumed as a good approximation for the deformation behavior of SPD-copper for larger strains. The reference stress σ0 is associated with the average of yield and ultimate strength, giving 522 MPa. Ji was calculated to be 7.6 kJ/m2. In Fig. 5b also the corresponding force–displacement curve is presented, which will be part of the later discussion.
Fig. 5.
(a) Representative J-resistance curve of UFG copper with indicated JIC and Ji. (b) Corresponding normalized loadline–displacement curve.
Regarding the undeformed material (CG-copper) the same evaluation procedure was not applicable for obtaining a J-resistance curve due to the very low strength of the coarse-grained starting material so that even standard large scale yielding conditions were not fulfilled.
4. Discussion
The main focus of the following discussion will be devoted to the fracture behavior of UFG copper. The fracture characteristics of CG copper will be only shortly reviewed at the end comparing UFG and CG copper regarding fracture toughness and ductility.
4.1. Fractography
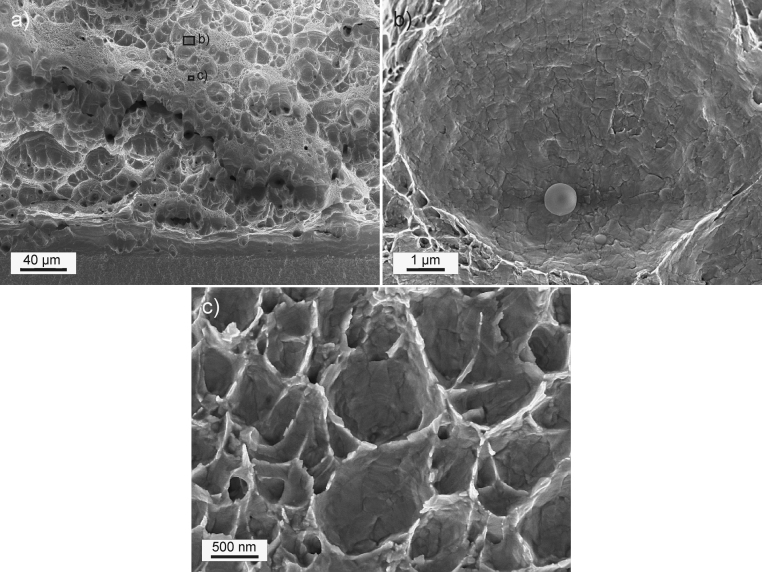
For a start, fractographs of UFG copper, Fig. 6, are displayed, showing typical features. Ductile fracture is the present type of failure characterized by dimple fracture. Besides a distinctive quantity of rather large dimples with a typical diameter of several micrometers, see overview micrograph in Fig. 6a and b, a second fraction of fairly small dimples can be seen, Fig. 6c, in areas between the larger ones. For further discrimination the large dimples are named primary dimples and the latter ones secondary dimples. The primary dimples have non-metallic inclusions as initiation sites. Their approximate size was determined measuring the diameter of 20 individual inclusions yielding to 1.1 μm, an example is shown in Fig. 6b. This number is small compared to the size of inclusions in technical alloys, but even larger than the grain size in the present study. As the example shows, the inclusions are not broken or damaged even after SPD deformation and the additional deformation during final fracture. Between primary dimples, fields of secondary dimples can be seen. As Fig. 6c shows, the dimples are fairly shallow and seem to have no obvious initiation sites such as inclusions in the case of primary dimples. Similarly as discussed in [20] for nanocrystalline Ni or in [21] for UFG Ni void initiation may also take place here at grain boundaries and triple junctions which would lead to the observation of individual grains visible in the interior of the dimples as shown in Fig. 6c.
Fig. 6.
Fractographs of UFG copper. (a) Overview fractograph of UFG copper showing classical dimple fracture. (b) Single unbroken non-metallic inclusion as an initiation site for void initiation. (c) Besides dimples initiated at non metallic inclusions also a finer dimple structure with no obvious initiation sites can be seen.
The presence of dimples plays an important role in ductile fracture. Their formation consumes energy and is so a significant contribution to the fracture toughness when ductile fracture occurs. This can be quantified by the calculation of the energy spent on the dimple structure formation which can be related to their depth, as done with the Stüwe Model [22]. Instead of the depth of the dimples also the heights of the voids at the point of fracture can be measured via stereo-photogrammetry, which accounts also for non-symmetric growth of voids. This value represents the COD for void separation. Ten primary voids were measured and the average had a value of ∼3.9 μm. By comparing this value with the crack opening displacement for crack initiation CODi, which had an average value of 11.4 μm, it can be demonstrated, that the fracture toughness is strongly underestimated by relating the toughness only to dimple formation here. The contribution to the fracture toughness of secondary dimples can however also be neglected to their shallow appearance. The second significant contribution for realizing a larger COD is the formation of the blunted crack or in other words the formation of the plastic zone beneath the fractured surface. The result of the blunting process is the formation of the stretched zone, as can be seen in Figs. 6a and 4a. In this example the crack opening due to blunting of the crack has a significant contribution of approximately 65% to the entire CODi. This implies that relating the fracture toughness only to pore formation, as done with the Stüwe-Model, can lead to strong underestimates of the fracture toughness whenever a decisive amount of energy is also spent on forming and moving the plastic zone through the sample.
4.2. Stable crack propagation of UFG copper
Further insight into the present fracture process of UFG copper can be obtained by re-inspecting the J-resistance curve in Fig. 5a and the corresponding force loadline displacement curve, Fig. 5b, where the force is normalized by the maximum load for clarity. The J-resistance curve shows unlike for classical coarse grained ductile material almost no blunting line and Ji corresponds about to 7.6 kJ/m2. From there on an enormous increase in J with a continuously changing slope is visible. In the present example stable tearing occurs up to a value of about 400 kJ/m2. (The curve ends due to unloading of the specimen in order to measure the real crack extension and not due to a fracture instability.) The JIC evaluation according to ASTM exhibited a value of 175 kJ/m2, which is more than 20 times higher compared to Ji. This large difference can be explained by the fact that the standard defines the JIC at a stable crack propagation of 0.2 mm whereas Ji is reached at the first stage of crack propagation when the pre-crack coalesces with the first pore. As indicated in Fig. 5b, the corresponding load for Ji is reached already at approximately 40% of the maximum load. The further increase in load can be referred to ongoing plastification and stable crack propagation in the specimen before the plastic limit load is reached. Nevertheless, this steep increase is surprising since for classical ductile fracture after crack initiation J-resistance curves tend to become flatter. The physical reason for that is that the crack propagation should become facilitated after reaching CODi due to the pre-damage in front of the crack tip [23].
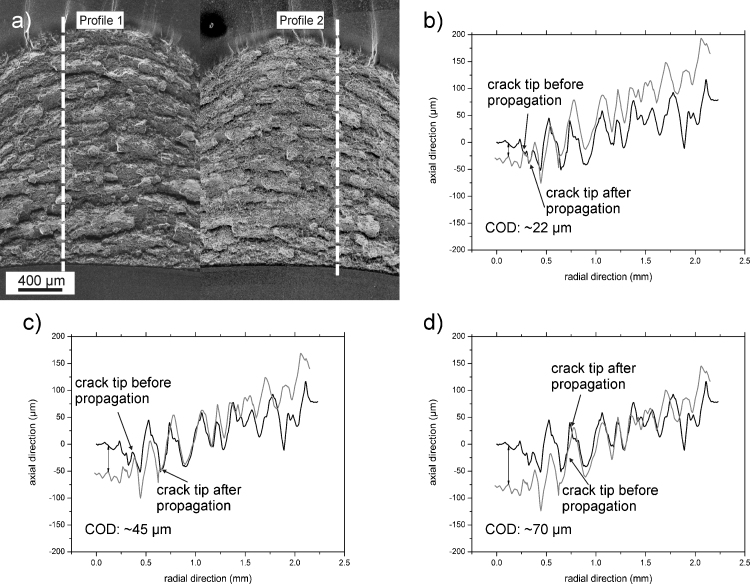
The origin of the fairly steep slope of J after reaching the crack initiation Ji which finally leads to this extraordinarily large difference between Ji and JIC was investigated by further crack profile analyses of crack propagation. Therefore full length crack profiles over the overload fracture area of a specimen were recorded. An example is illustrated in Fig. 7a showing the line of interest on both specimen halves along the crack profile was evaluated. The overload fracture is bordered by the fatigue pre-crack at the bottom and the fatigue post-crack at the top of the two micrographs. Fig. 7b–d shows selected crack configurations of the two complementary crack profiles at stages of further crack extension with additional arrows indicating the position before and after the next crack advance. In Fig. 7b COD is already far beyond CODi. Nevertheless, the crack propagation in the pure Mode I direction is strongly inhibited due to local crack path tortuosity showing a zig-zag pattern in the crack profiles, Fig. 7b–d, which is also observable on the fracture surfaces, Fig. 7a. Due to this tortuosity the crack advance in Fig. 7b is very short. From the situation after crack propagation in Fig. 7b to the next large crack advance, see in Fig. 7c the crack tip position before propagation, there is a tremendous increase in COD. Between these two steps the crack is only blunting with negligible crack advance. This blunting occurs whenever the crack propagation direction is changed and can be better understood as a local plastic shearing of the strongly deflected crack flanks. The same blunting process is again observed when inspecting the position of the crack tips after propagation in Fig. 7c and the position before further crack propagation in Fig. 7d. Again, COD strongly increases due to local crack flank shearing. This sequence shows that the crack is locally stopped by a re-blunting process where the COD significantly increases but the crack propagation is small. The origin of this re-blunting process is the local tortuosity of the crack path showing a zig-zag pattern and therefore, the extraordinarily high JIC is reached.
Fig. 7.
Crack path analysis over a wide distance of crack propagation in UFG copper. (a) Position of line along crack profiles was taken on both specimen halves. (b–d) Arrangement of the crack path profiles at points prior and after further crack propagation.
4.3. Plane strain fracture toughness of UFG copper
The fracture toughness of UFG copper was described this far in terms of Ji, and CODi and JIC in order to account for large scale yielding conditions. A discussion in terms of a critical stress intensity KIC was excluded since it seems not to be directly measurable in a valid test regarding the available dimensions and requirements according, for example, to ASTM E399 [24]. As Fig. 5b illustrates, a specimen with the current dimensions and strength and automatically also a specimen with dimensions smaller than the one used here exhibits a strong non-linearity plotting force against displacement. According to the aforementioned standard the intersection point of a line having a slope of 95% of the tangent of the initial linear part of the test record, see straight line in Fig. 5b, and the force–displacement curve is used for the calculation of a provisional result of a plain strain fracture toughness, KQ. This would lead here to an average value of 22.9 ± 1.9 MPa m1/2 for all three specimens. Although the minimum dimensions of the specimen would be satisfied to ensure small scale yielding conditions by fulfilling following relation:
| (3) |
the K-value would not qualify for a valid plane strain fracture toughness test. There is a too large ratio between the maximum force Pmax and the estimated force for unstable crack growth PQ, which has to be smaller than 1.10. There are two possible reasons so that this criterion is not fulfilled. Either extensive plastic deformation before crack propagation occurs or the material exhibits an extensive R-curve behavior, i.e. the fracture resistance increases with crack extension.
Another approach to obtain a geometry independent toughness is the conversion from Ji directly into KIC.
| (4) |
By inserting for Ji 7.6 kJ/m2, for the Young's Modulus, E, a typical value of 130 GPa and a Poisson's ratio, ν, of 0.34, an estimated fracture toughness of 33.4 MPa m1/2 is obtained for UFG copper. This shows clearly that at the before calculated KQ no crack extension took place or in other words the 5% deviation from the linear part of the force displacement curve is solely caused from extended plastic deformation. This indicates that LEFM significantly underestimates the fracture toughness value.
Regarding critical stress intensities of UFG and NC copper literature data can be found. Singh et al. [25] measured the fracture toughness of UFG copper and nanotwinned copper having different lamellar spacings copper by means of LEFM. A fracture toughness of only 12.9 MPa m1/2 was measured for UFG-Cu. A somewhat higher fracture toughness was given by the maximum cyclic stress intensity Kmax from fatigue experiment. The main reason for this discrepancy is most likely, as also mentioned in the paper itself, that small scale yielding conditions could not be fulfilled in their tests and only broad material trends were shown. Nevertheless, the authors label the result in their table as KIC. Also in a paper of Qin et al. [26] the fracture toughness of different copper microstructures differing in the volume fraction of nanotwins was estimated. The highest apparent fracture toughness incorporating an additional hypothesis accounting for the lack of plane strain conditions was found for a specimen having the highest volume fraction of twins with a value of 27.3 MPa m1/2. This is again lower than the result in this paper for pure ultrafine-grained copper (∼33.4 MPa m1/2) exhibiting a complete different microstructure but having almost the same strength as the strongly twinned structure.
Important and characteristic for the investigated ductile UFG copper is the presence of R-curve behavior which has not been explicitly shown for UFG copper in literature so far. The R-curve behavior, which is partly a result of the present dimensions of the specimen combined with the material properties of the ultrafine-grained microstructure leads to a steep increase in fracture toughness, to a high JIC, and so to a very high fracture resistance. On the contrary, the evaluation of a plane strain fracture toughness suggests the presence of a fracture instability and an instantaneous failure of the specimen. As shown in this study this does not occur for UFG copper with the present and conclusively also with smaller specimen dimensions. It is evident that also, JIC, is size dependent because of the measurement at a certain stable crack extension, however by measuring in accordance with widely used standards there is the unique possibility to compare UFG copper to other ductile engineering materials which are often treated according to the same or similar standards.
Nevertheless, the determination of the critical stress intensity under small scale yielding conditions of such materials is still an open question in the authors’ opinion. As shown here the evaluation according to the standard does not give a satisfying result. Also the conversion from Ji to KIC gives only a lower conservative estimate since it could be shown before that after crack initiation a continuous re-blunting of the crack tip occurs which implies that the plain strain fracture toughness is very likely to be higher than the one derived from Ji.
4.4. The influence of grain size on the initiation toughness
The large differences in strength and the connected size effects make a quantitative fracture mechanical comparison of UFG metals with conventional CG metals to a difficult task when ductile failure is the occurring fracture mechanism. Therefore also only very few reports treat experimentally the influence of grain size on the fracture toughness in a wide range of grain size and are often restricted to coarse grained materials, see e.g. [27,28]. An estimate for the fracture toughness of CG copper was here made with the CODi -approach as a measure for the fracture toughness giving a value of 240 μm as a lower bound value and 2290 μm as an upper bound value. The equivalent fracture toughness in terms of a critical stress intensity can be derived from the following relation [29]:
| (5) |
By inserting for CG-copper a yield strength, σy, of 111 MPa, a Young's Modulus, E, for copper of 130 GPa, a typical factor, m, of 0.5 for plane strain conditions, a Poisson's ratio, ν, of 0.34 and a minimum CODi of 240 μm, a lower bound fracture toughness, KIC, of at least 88.5 MPa m1/2 can be calculated. For the maximum CODi of 2290 μm an upper bound fracture toughness, KIC, of approximately 273 MPa m1/2 can be calculated. For further discussion only the lower limit will be regarded. This lower estimate is smaller compared to values found in textbooks [30] and is presented rather with the intention to clarify that the fracture toughness of coarse-grained copper, failing ductile is generally high. The initiation toughness of UFG copper evaluated in this paper is clearly lower with a value of 33.4 MPa m1/2 compared to CG copper. However, a direct comparison between CG and UFG copper is rather inconclusive since the increase in strength due to grain refinement is not accounted for. By recalling the well-known Ashby charts [31] it becomes clear that most of the time the combination of material parameters plotting e.g. fracture toughness versus yield strength is important for a material selection. When the damage tolerance, for instance here expressed by the product of strength and initiation toughness is taken into account the benchmark of UFG copper regarding the fracture properties is different. For UFG copper the product is ∼14,800 (MPa)2 m1/2. For CG copper the product would be ∼9820 (MPa)2 m1/2 for the lower limit and ∼30,350 (MPa)2 m1/2 taking the higher limit of fracture toughness into account. Although the damage tolerance of CG copper can only be roughly estimated with a lower and upper bound value the numbers indicate that the damage tolerance of UFG copper is not strongly affected by the decrease in toughness due to the remarkable increase in strength. Also by reviewing the range of fracture toughnesses observed in real engineering materials, looking again into the well-known Ashby chart, one will recognize that the fracture initiation toughness of UFG copper is lower compared to other copper alloys, however, shows in return also a higher strength level.
The same tendency regarding the deterioration in the mechanical performance is well known regarding the ductility of many SPD materials and was also shown here in Fig. 2b for copper. Reasons and strategies for overcoming this problem can be found e.g. in [32,33]. Although, as shown here, also the fracture toughness in terms of the initiation toughness is lower compared to CG copper, the numbers are not alarmingly low. Reaching the initiation toughness in a structure of comparable size would additionally not necessarily lead to a catastrophic failure but only to a stable crack advance.
5. Summary and conclusions
In this paper the fracture behavior of UFG-copper, synthesized by HPT, was critically examined. Based on the results the following findings can be summarized:
-
1.
UFG-copper, having the present specimen dimensions, exhibits stable ductile crack growth with an initiation toughness Ji of 7.6 kJ/m2 and a JIC of 175 kJ/m2.
-
2.
The low initiation toughness but exceptionally high fracture toughness in terms of JIC may be inferred from a steady re-blunting of the propagating crack causing a steep rise of the J-resistance curve for small crack extensions.
-
3.
Although grain-refinement of copper leads to a decrease of the initiation toughness, the damage tolerance expressed by the product of toughness and strength (KIC·σy) remains comparable with the coarse-grained pre-material.
Based on these findings the possible influence of the testing direction and the role and potential of second phase particles and inclusions for an optimization of the fracture resistance has to be studied in the future.
Acknowledgment
This work was supported by the Austrian Science Fund FWF in the framework of Research Network S 10402 N16.
Contributor Information
A. Hohenwarter, Email: anton.hohenwarter@oeaw.ac.at.
R. Pippan, Email: reinhard.pippan@oeaw.ac.at.
References
- 1.Meyers M.A., Mishra A., Benson D.J. Prog. Mater. Sci. 2006;51:427–556. [Google Scholar]
- 2.Valiev R.Z., Islamgaliev R.K., Alexandrov I.V. Prog. Mater. Sci. 2000;45:103–189. [Google Scholar]
- 3.Zhilyaev A.P., Langdon T.G. Prog. Mater. Sci. 2008;53:893–979. [Google Scholar]
- 4.Faleschini M., Kreuzer H., Kiener D., Pippan R. J. Nucl. Mater. 2007;367–370:800–805. [Google Scholar]
- 5.Hohenwarter A., Kammerhofer C., Pippan R. J. Mater. Sci. 2010;45:4805–4812. [Google Scholar]
- 6.Sabirov I., Kolednik O., Valiev R.Z., Pippan R. Acta Mater. 2005;53:4919–4930. [Google Scholar]
- 7.Sabirov I., Valiev R.Z., Semenova I.P., Pippan R. Met. Trans. A. 2010;41:727–733. [Google Scholar]
- 8.Qin E.W., Lu L., Tao N.R., Lu K. Scripta Mater. 2009;60:539–542. [Google Scholar]
- 9.Ovid’ko I.A., Sheinerman A.G. Acta Mater. 2010;58:5286–5294. [Google Scholar]
- 10.Latapie A., Farkas D. Phys. Rev. 2004;69:134110-1–134110-9. [Google Scholar]
- 11.Frederiksen S.L., Jacobsen K.W., Schiøtz J. Acta Mater. 2004;52:5019–5029. [Google Scholar]
- 12.ASTM 1820-08 . American Society of Testing and Materials; Philadelphia (PA): 2008. Annual Book of ASTM Standards. [Google Scholar]
- 13.ESIS P 2-92 . European Structural Integrity Society; Delft, The Netherlands: 1992. ESIS Procedure for Determining the Fracture Behaviour of Materials. [Google Scholar]
- 14.Stampfl J., Scherer S., Gruber M., Kolednik O. Appl. Phys. A. 1996;63:341–346. [Google Scholar]
- 15.Stampfl J., Scherer S., Berchthaler M., Gruber M., Kolednik O. Int. J. Fract. 1996;78:35–44. [Google Scholar]
- 16.Sabirov I., Duschlbauer D., Petterman H.E., Kolednik O. Mater. Sci. Eng. A. 2005;393:275–285. [Google Scholar]
- 17.Pippan R., Scheriau S., Taylor A., Hafok M., Hohenwarter A., Bachmaier A. Annu. Rev. Mater. Res. 2010;40:319–343. [Google Scholar]
- 18.Robinson J.N., Tetelman A.S. Int. J. Fract. 1975;11(3):453–468. [Google Scholar]
- 19.Shih C.F. J. Mech. Phys. Solids. 1981;29:305–326. [Google Scholar]
- 20.Kumar K.S., Suresh S., Chisholm M.F., Horton J.A., Wang P. Acta Mater. 2003;51:387–405. [Google Scholar]
- 21.Hohenwarter A., Pippan R. Scripta Mater. 2011;64:982–985. [Google Scholar]
- 22.Stüwe H.P. Eng. Fract. Mech. 1980;13:231–236. [Google Scholar]
- 23.Kolednik O., Stüwe H.P. Eng. Fract. Mech. 1986;24:277–290. [Google Scholar]
- 24.ASTM E-399-90 . American Society of Testing and Materials; Philadelphia (PA): 1990. Annual Book of ASTM Standards. [Google Scholar]
- 25.Singh A., Tang L., Dao M., Lu L., Suresh S. Acta Mater. 2011;59:2437–2446. [Google Scholar]
- 26.Qin E.W., Lu L., Tao N.R., Tan J., Lu K. Acta Mater. 2009;57:6215–6225. [Google Scholar]
- 27.Srinivas M., Malakondaiah G., Armstrong R.W., Rama Rao P. Acta Metall. Mater. 1991;39:807–816. [Google Scholar]
- 28.Fan Z. Mater. Sci. Eng. A. 1995;191:73–83. [Google Scholar]
- 29.Anderson T.L. CRC Press; Boston: 1991. Fracture Mechanics. [Google Scholar]
- 30.Atkins A.G., Mai Y.W. 1st edition. Ellis Horwood Limited; 1985. Elastic and Plastic Fracture: Metals, Polymers, Ceramics, Composites, Biological Materials. p. 798. [Google Scholar]
- 31.Ashby M.F. 2nd edition. Butterworth-Heinemann; Oxford: 1999. Materials Selection in Mechanical Design. p. 47. [Google Scholar]
- 32.Koch C.C. Scripta Mater. 2003;49:657–662. [Google Scholar]
- 33.Wang Y., Chen M., Zhou F., Ma E. Nature. 2002;419:912–915. doi: 10.1038/nature01133. [DOI] [PubMed] [Google Scholar]


