Abstract
The influence of a local thermal treatment on the properties of Ti–Al–N coatings is not understood. In the present work, a Ti0.52Al0.48N coating on a WC–Co substrate was heated with a diode laser up to 900 °C for 30 s and radially symmetric lateral gradients of phases, residual stress and hardness were characterized ex-situ using position-resolved synchrotron X-ray diffraction, Raman spectroscopy, transmission electron microscopy and nanoindentation. The results reveal (i) a residual stress relaxation at the edge of the irradiated area and (ii) a compressive stress increase of few GPa in the irradiated area center due to the Ti–Al–N decomposition, in particular due to the formation of small wurtzite (w) AlN domains. The coating hardness increased from 35 to 47 GPa towards the center of the heated spot. In the underlying heated substrate, a residual stress change from about − 200 to 500 MPa down to a depth of 6 μm is observed. Complementary, in-situ high-temperature X-ray diffraction analysis of stresses in a homogeneously heated Ti0.52Al0.48N coating on a WC–Co substrate was performed in the range of 25–1003 °C. The in-situ experiment revealed the origin of the observed thermally-activated residual stress oscillation across the laser heated spot. Finally, it is demonstrated that the coupling of laser heating to produce lateral thermal gradients and position-resolved experimental techniques opens the possibility to perform fast screening of structure–property relationships in complex materials.
Keywords: TiAlN, Residual stress, Phase transformation, Synchrotron, X-ray diffraction, Laser
Highlights
► In-situ characterization of the stress evolution in Ti–Al–N at high temperatures. ► Position-resolved hardness and stress characterization across the laser heated spot. ► High resolution transmission electron microscopy from laser treated coating areas. ► Combination of scanning techniques to reveal local structure–property relationships.
1. Introduction
Metastable face-centered cubic (fcc) Ti1-xAlxN hard coatings deposited by physical vapor deposition (PVD) on tungsten carbide substrates are extensively used in various machining applications especially for dry or high speed cutting. Compared to Ti1-xCxN or CrN, Ti1-xAlxN protective coatings exhibit better oxidation resistance, higher hardness and thermal stability [1,2]. At elevated temperatures, nanometer-size fcc-AlN and fcc-TiN domains are formed in the Ti1-xAlxN matrix by spinodal decomposition accompanied by coating self-strengthening and hardness increase. Further heating results in the formation of thermodynamically stable wurtzite (w) AlN and fcc-TiN phases [2–5].
Although Ti1-xAlxN coatings have been intensively investigated, only little is known about the influence of the phase transformations and defect recovery effects on the residual stress state in the coatings. Phase transformations in coatings are expected to lead to very pronounced changes in residual stresses especially when there are large differences in molar volumes of the involved phases. For example, in the case of AlN the volume occupied per atom in the wurtzite crystal structure (w-AlN) is about 20% larger compared to the rocksalt structure (fcc-AlN) [6,7]. The transformation from fcc-AlN to w-AlN results therefore in a large volume expansion.
Up to now, most of the temperature-dependent investigations on hard coatings have been performed on compact layers heated homogeneously across large areas [8,9]. In industrial applications, however, temperature induced phenomena occur locally in the cutting zone at length scales of few tens of μm up to few mm, leading to complex three-dimensional temperature distributions with maximal temperatures of more than 1000 °C reached within milliseconds [10–13]. There are however very few experimental studies dealing with the consequences of local thermal loads. As an important tool to simulate thermal processes in hard coatings, cyclic laser thermal pulses have been applied [11–14].
In this study, a diode laser is used to simulate local thermal loads in a nano-crystalline Ti0.52Al0.48N coating on hard metal. The peak temperature in the center of the laser spot was set to 900 °C resulting in the formation of fcc-AlN and TiN precipitates in the cubic Ti–Al–N matrix and small w-AlN domains detected by transmission electron microscopy (TEM). By using a variety of experimental techniques, the aim of this work is to determine local structure–property gradients across the heated zone and correlate local phases, hardness and residual stresses. Complementary, residual stresses in a Ti0.52Al0.48N coating heated homogenously in the temperature range of 25–1003 °C are analyzed and correlated with the oscillating stress distribution across the laser heated spot. The main aim of the paper is to understand how the local phase transformation in Ti–Al–N influences residual stresses and hardness in the coatings.
2. Experimental details
2.1. Sample preparation
Ti0.52Al0.48N coatings with a thickness of 4.5 μm were grown on polished hard metal substrates (WC–Co) in an Oerlikon Balzers INNOVA deposition system by reactive arc-evaporation in N2 atmosphere by using four compound targets with a Ti/Al atomic ratio of 50/50. During the deposition, the current was set to 200 A, the pulsed d.c. bias voltage was − 70 V (25 kHz), the deposition temperature was 350 °C and the total pressure of N2 was 3.2 Pa.
2.2. Laser treatment
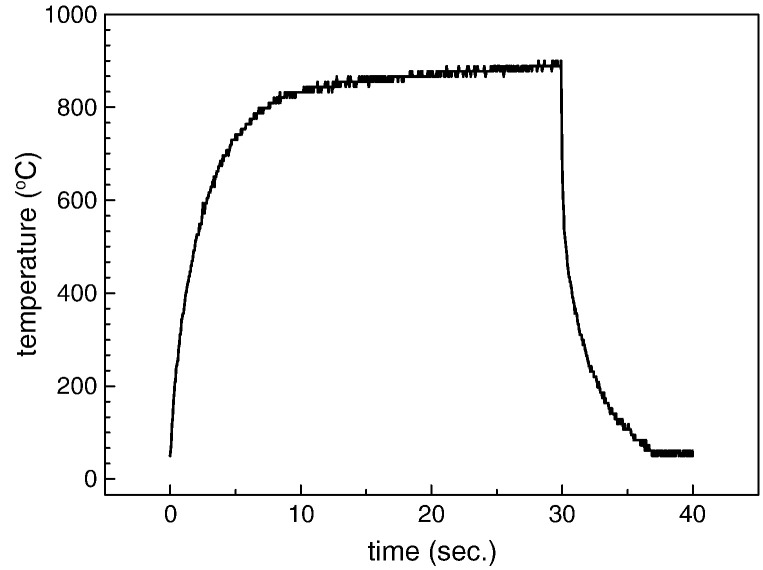
In order to simulate local thermal loads and induce lateral structure–property gradients, the as-deposited sample was locally heated with a commercial diode laser DL028Q (Rofin-Sinar Laser GmbH). The sample was placed on a copper block, which was itself embedded in a temperature controlled oil bath in order to keep the temperature at the bottom of the substrate constant at 50 °C. To avoid oxidation the laser irradiation was performed in vacuum conditions of about 10− 3 Pa. The temperature on the coating surface was monitored by a calibrated pyrometer and regulated via the laser power. The sample investigated in this study was heated by a laser beam with a diameter of 6 mm for 30 s with a peak temperature of 900 °C. After the laser irradiation the sample rapidly cooled down back to 50 °C (cf. temperature profile reported in Fig. 1).
Fig. 1.
Temperature–time dependence measured in the center of the irradiated sample by a pyrometer.
2.3. X-ray diffraction characterization
X-ray diffraction (XRD) characterization was performed at EDDI beamline of BESSY (Berlin, Germany) using a white X-ray beam of the energy range of 20–100 keV and a diameter of about 0.5 mm [15]. The relatively high penetration depth of the synchrotron radiation allowed collecting the diffraction signal from the coating and the underlying substrate during one energy-dispersive measurement. In energy-dispersive diffraction, the relation between the lattice spacing d(hkl) of (hkl) crystallographic planes and the corresponding diffraction line E(hkl) is given by
| (1) |
where h is the Planck's constant, c is the speed of light and θ is the diffraction angle [15]. The position-resolved measurements were carried out in symmetric θ/2θ configuration at a constant 2θ angle of 12° using a lateral step of 0.5 mm and acquisition time of 100 s.
In order to assess the evolution of the Ti–Al–N 111 peak profile in the energy-dispersive spectrum (cf. Section 3.2), the peaks were fitted using an exponentially modified Gaussian function (EMG), which parameters a0, a1, a2 and a3 denote area, center, width and distortion [16], respectively:
| (2) |
Complementary, in-situ high-temperature X-ray diffraction (HT-XRD) was used to determine X-ray elastic strains in an as-deposited Ti0.52Al0.48N sample which was repeatedly heated in argon atmosphere in the ranges of 25–693, 25–904 and 25–1003 °C [17,18]. Before and during the strain characterization, the temperature was kept constant. The exposure time per temperature step was about 15 min. The actual sample temperature was monitored by a thermocouple attached to the coating surface with an accuracy of ± 2 °C.
The in-plane residual stresses in the coatings and in the underlying substrate were evaluated from Ti–Al–N 111 and WC 100 diffraction lines by applying the sin2ψ method [19]. The stress states of both coating and substrate were assumed to be in-plane isotropic with σ11 = σ22 = σ. Single crystal elastic constants of TiN and WC were taken and converted into X-ray elastic constants (XECs) presuming the Hill grain interaction model [19–22]. Since XECs of the characterized Ti–Al–N coatings may differ from those of TiN, X-ray elastic strains are presented for a comparison.
2.4. Nanoindentation
The hardness across the laser treated area of the Ti–Al–N coating was determined position-resolved by instrumented nanoindentation using an Ultra-Micro Indentation System (UMIS, Fischer-Cripps Laboratories Pty Ltd, Sydney, Australia) equipped with a Berkovich diamond indenter at a constant load of 15 mN, which was chosen so that the hardness of the layer is not affected by the underlying softer substrate. The maximum indentation depth varied between 120 and 150 nm depending on the varying mechanical properties of the heat-treated layer. The nanoindentation data were analyzed according to the Oliver–Pharr method [23] including an area function, which was determined experimentally using a silica standard of known elastic modulus.
2.5. Raman scattering
Raman spectra collected across the heated spot were obtained in a micro-Raman spectrometer (LabRAM HR800, Horiba Jobin Yvon, Villeneuve d'Ascq, France). Monochromatic laser light provided by a 514.5 nm air-cooled Ar-ion laser was focused onto the specimen surface by means of a 100 × microscope objective (numerical aperture (NA) = 0.80). The laser nominal power was set to 41.5 mW at the source. Spectra were collected in backscattering geometry with the aid of a Peltier-cooled CCD camera (spectral resolution 0.53 cm− 1/pixel) and analyzed in a commercial software environment (Labspec 4.02, Horiba Jobin Yvon) with a collection of Gaussian–Lorentzian functions.
2.6. Transmission electron microscopy
Transmission electron microscopy (TEM) specimens from irradiated and not irradiated sample areas were prepared by mechanical polishing and subsequent ion milling. A TEM/STEM JEOL 2100 F, operated at 200 kV and equipped with an image-side Cs-corrector (CEOS) and energy filter (Gatan, Tridiem), was used. The atomic resolution of this microscope at 200 kV is better than 1.4 Å. The high-resolution transmission electron microscopy (HR-TEM) images presented here were recorded on a 2 k × 4 k pixel CCD camera at a magnification of 800.000 using an acquisition time of 1.0 s for each image and under a negative Cs imaging condition.
3. Results
3.1. Damage inspection and chemical analysis
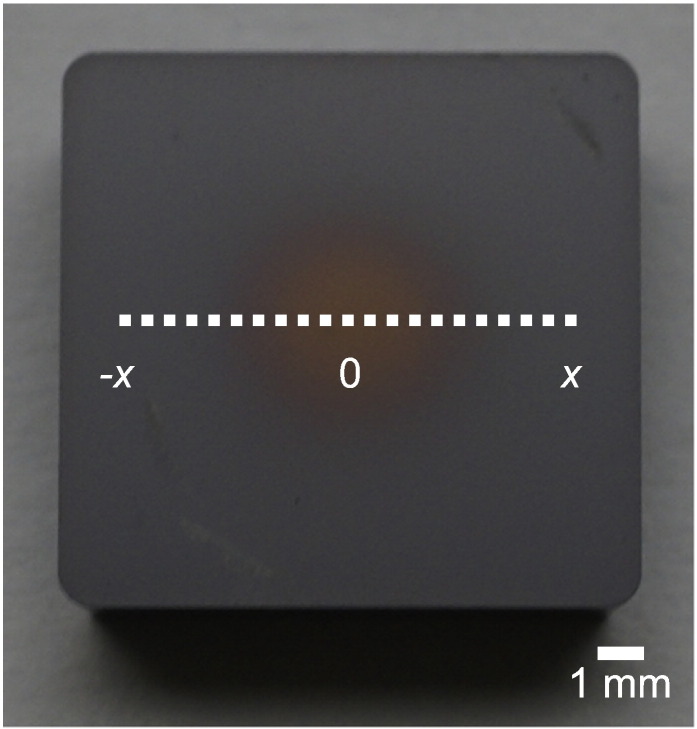
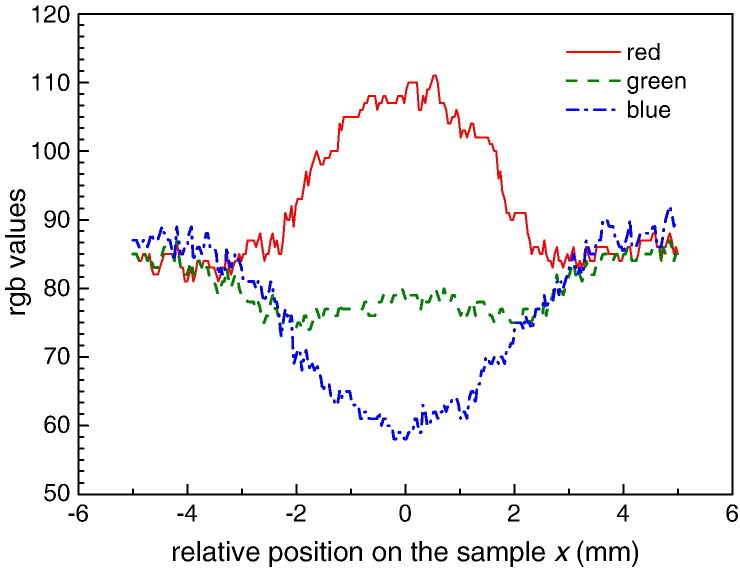
A radial symmetric color gradient can be observed on the surface of the laser treated coating (Fig. 2), which could suggest the presence of phase gradients. Outside the irradiated zone, the coating exhibits a gray color (corresponding to the as-deposited state) turning into yellowish-brown in the center of the laser spot. A quantitative representation of the coating color across the irradiated spot is presented in Fig. 3 in terms of red, green and blue values, derived from the digital image (Fig. 2). On the investigated sample, no cracks or signs of damage of the coating surface have been observed by light optical microscopy and scanning electron microscopy. Moreover, three-dimensional surface topography characterization performed using confocal optical microscopy revealed that the surface roughness of the laser heated sample was not affected by the laser. Energy-dispersive X-ray spectroscopy (EDX) showed that the coating had a composition of Ti0.52Al0.48N. Position-resolved EDX analysis across the heated spot (Fig. 2) did not indicate any lateral gradients of elemental composition.
Fig. 2.
Ti0.52Al0.48N coated WC–Co sample after laser irradiation. The radial symmetric color gradient indicates lateral phase changes in the coating. All position-resolved measurements were performed along the dotted line.
Fig. 3.
Coating color distribution along the irradiated area in terms of red green blue (rgb) values.
3.2. Microstructural changes
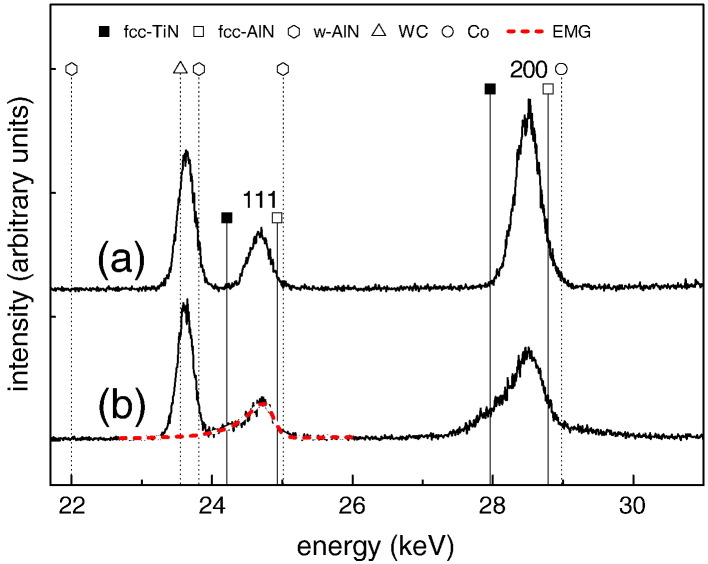
In Fig. 4a, the diffraction pattern collected from the not irradiated area of the laser heated sample revealed 111 and 200 peaks corresponding to the as-deposited fcc-Ti0.52Al0.48N with NaCl-type structure.
Fig. 4.
Energy-dispersive diffraction patterns. The single phase fcc-Ti0.52Al0.48N structure with dominant 111 and 200 peaks in the non-irradiated coating zone (a) turned into a coating structure composed of fcc-TiN, fcc-Ti–Al–N and fcc-AlN in the center of the laser spot. The w-AlN domains observed by HR-TEM (cf. Fig. 13) were not resolved (b). The peak positions are adapted from the JCPDF database [36]. The dashed line in (b) represents a fit using the EMG function [16].
In Fig. 4b, the diffraction pattern acquired from the center of the heated spot is depicted. It can be seen that the 111 and 200 peaks are broader compared to the as-deposited state indicating the presence of fcc-AlN and fcc-TiN nanocrystalline domains, which are known to form in an early stage of the decomposition of metastable Ti–Al–N [2–4,6]. Since the peak positions of the newly formed domains and the matrix peaks are within a narrow energy range in the energy-dispersive diffraction pattern, the peaks from the individual phases overlap leading to the observed broad diffraction peaks in Fig. 4b. The presence of fcc-AlN nanocrystalline domains can be identified e.g. by the slightly higher intensity at the right-hand shoulder of the matrix diffraction peaks. The contribution of fcc-TiN can be clearly seen by the pronounced left shoulder of the 111 and 200 cumulative peaks. Small domains of w-AlN, which were detected by plane-view HR-TEM investigations in the center of the heated spot (cf. Section 3.7) were not resolved in the diffraction patterns.
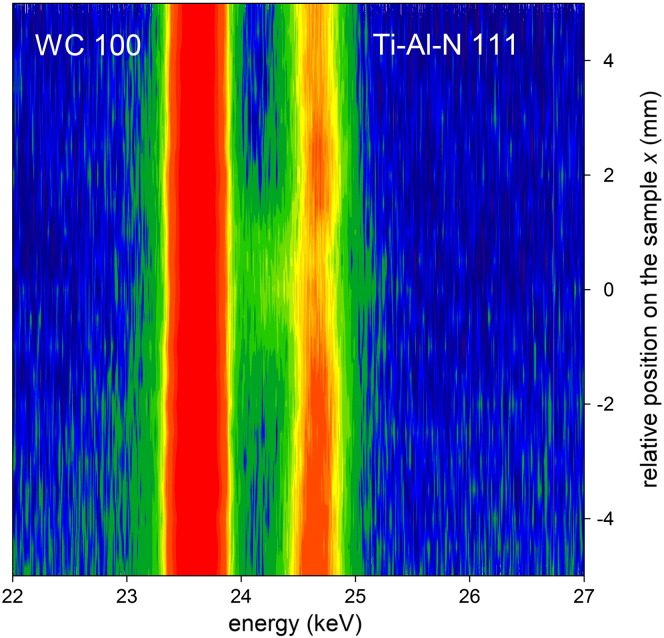
In Fig. 5, a compositional image compiled of energy scans collected at sin2ψ = 0.4 (that corresponds approximately to the Ti0.52Al0.48N unstrained direction) documents the development of the fcc-Ti–Al–N 111 peak across the heated spot. The peak appears broader in the sample center at x = 0 with a pronounced left shoulder corresponding to fcc-TiN. Moreover, Fig. 5 indicates an increase of the lattice parameter (shift to lower energy values) in the center and a slight lattice relaxation (shift to higher energy values) at about x = 2 and − 2 mm.
Fig. 5.
A compositional image compiled from energy-dispersive diffraction patterns showing the shape of Ti–Al–N 111 XRD peaks across the heated spot.
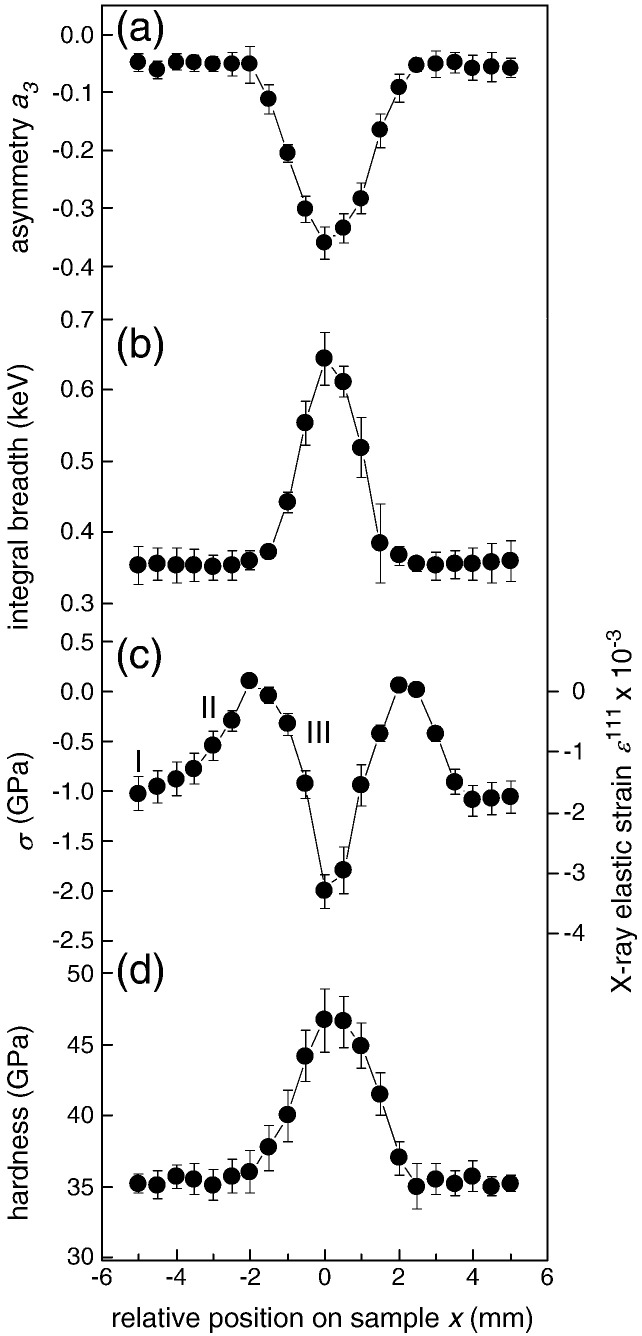
In order to assess the structural changes across the heated spot, Ti–Al–N 111 peaks were fitted using the EMG function and the peak asymmetry (expressed by the parameter a3) and the integral breadth were evaluated (Eq. (2)). The results in Fig. 6a and b indicate that the peak asymmetry and breadth start to increase at x = ± 2 mm off the laser spot center and reach maxima in the center, which is accompanied by the coating color change (Fig. 3). As mentioned above, the increase of the integral breadth towards the center of the heated spot indicates the formation of fcc-AlN and fcc-TiN domains. Also strains of second and third order associated with the decomposition may contribute to the peak broadening.
Fig. 6.
Asymmetry (a) and integral breadth (b) of Ti–Al–N 111 diffraction peaks (fitted using EMG) document the formation of fcc-TiN and fcc-AlN precipitations, the residual stress is depicted in (c) and the hardness across the heated spot in (d).
3.3. Residual stresses across the laser heated sample
The in-plane residual stresses σ and the corresponding X-ray elastic strains ε111 for the Ti–Al–N 111 reflection, determined position-resolved across the laser treated coating, are presented in Fig. 6c. The stress profile can be divided into three segments. In zone I (representing the sample edge which was not directly irradiated by the laser), the compressive residual stress of about − 1000 MPa represents a superposition of growth stress (originating primarily from the ion bombardment during the coating growth) and thermal stress (formed during cooling down from deposition temperature TD of 350 °C to room temperature TRT).
The thermal stress σThermal formed during the cooling can be expressed as follows
| (3) |
where ETiAlN and νTiAlN represent the elastic modulus and the Poisson's ratio of the coating, respectively. Considering that the coefficient of thermal expansion (CTE) of TiN (used as an approximation of CTE of Ti–Al–N) αTiN = 9.35 × 10− 6 K− 1 is larger than CTE of WC αWC = 4.8 × 10− 6 K− 1 [24], tensile thermal stress formed in the coating during cooling. The observed compressive stress in the not directly irradiated coating at room temperature (Fig. 6c) indicates a dominant contribution of the compressive growth stress to the total stress.
In zone II (Fig. 6c) from x = − 4 to − 2 and 2 to 4 mm (representing the edges of the irradiated area), a decrease of the total compressive stress can be observed, which is associated with thermally activated recovery processes (cf. [2,6]). The compressive stress relaxation involves annihilation and migration of deposition-induced defects and other mechanisms resulting in the reduction of the coating volume (cf. our previous reports on CrN [25,26]). Interestingly, the lattice recovery did not result in a significant decrease of the integral breadth (Fig. 6b) indicating an interplay between recovery processes decreasing the integral breadth and the formation of nm-sized precipitations in the early stage of the decomposition increasing the integral breadth.
In the zone III (Fig. 6c, from x = − 2 to 2 mm), one can expect that the compressive residual stress increase was induced by the formation of nanocrystalline domains of w-AlN (as detected by HR-TEM, cf. Section 3.7). The 20% larger volume occupied per atom of the wurtzite structure compared to the rocksalt structure resulted in an increase of the coating volume. Since the coating was firmly attached to a stiff substrate and thus constrained from relieving the accumulated stress, compressive stress developed. The growth of the w-AlN domains on the expense of fcc-AlN, corresponding to a more progressed state of the decomposition (towards the center of the heated spot), further increased the compressive residual stress.
The formation of defects coming along with the film decomposition may as well result in further increase of the compressive residual stress, presuming that the sum of all defects causes a coating volume expansion. For instance, strains and dislocation networks can be clearly seen in the plane-view HR-TEM image recorded in the center of the heated spot (cf. Section 3.7).
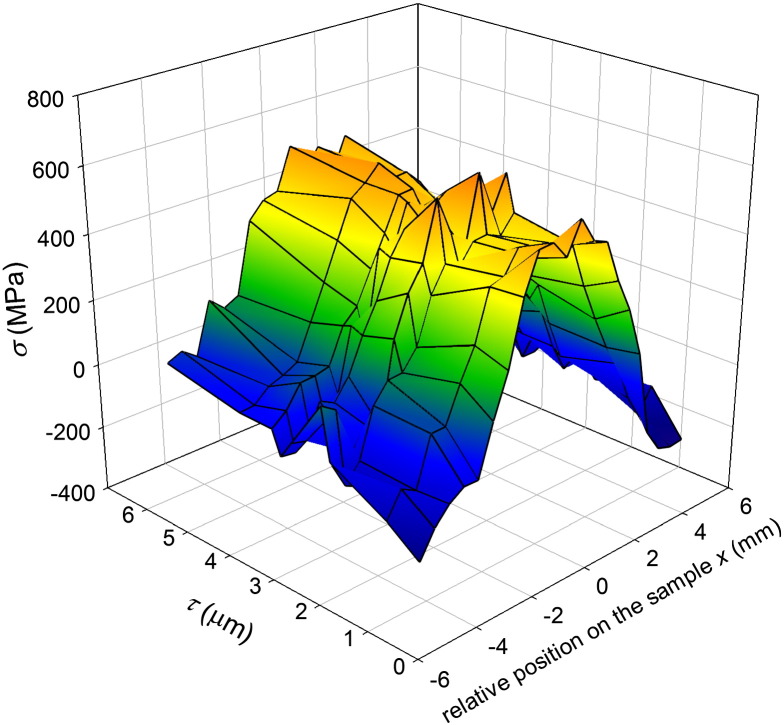
Due to the relatively large X-ray beam penetration depth τ, it was possible to determine the residual stress as a function of τ in the underlying WC–Co substrate (Fig. 7). The initial slightly compressive stress in the non-irradiated sample zone of about − 200 MPa (introduced by mechanical polishing of the substrate before the deposition process) turns into tensile stress of about 500 MPa in the center of the laser irradiated zone. The tensile stress development can be explained in the following way (cf. [13]). During the laser pulse, the substrate center faces a higher temperature than the border. The thermal expansion of the material in the center is suppressed by the colder surrounding leading to the formation of compressive stress and a subsequent plastic deformation in the heated area. During cooling down to room temperature, the elastically deformed surrounding material contracts and induces tensile stresses in the plastically deformed sample center. The data in Fig. 7 document that the plastic deformation of the substrate caused the formation of tensile stress at depths of more than 6 μm.
Fig. 7.
Residual stress depth profiles in the WC–Co substrate across the heated spot.
It is obvious that the substrate plastic deformation influenced the residual stress state in the coating (Fig. 6c). It can be expected that the observed tensile stresses caused a relaxation of compressive stresses in the center of the irradiated spot.
3.4. In-situ high-temperature residual stress characterization
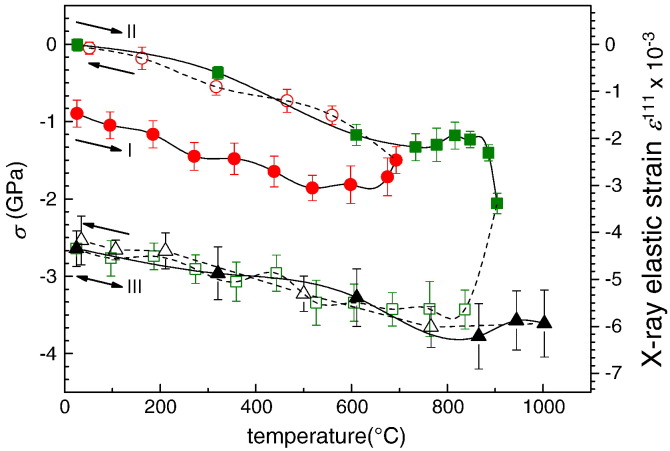
In order to understand the residual stress profile across the laser heated spot (Fig. 6c), a further sample with the same Ti0.52Al0.48N coating on hard metal was repeatedly thermally cycled and in-plane X-ray elastic strains as well as residual stresses were evaluated by analyzing the Ti–Al–N 111 peaks (Fig. 8). During the first cycle in the range of 25–693 °C (circles in Fig. 8), the as-deposited residual stress of − 900 MPa changed to -50 MPa after cooling to 25 °C. The stress relaxation is associated with defect recovery as observed in zone II in Fig. 6c.
Fig. 8.
In-situ HT-XRD characterization of residual stresses in the Ti–Al–N coating on WC–Co. The compressive residual stress relaxation in thermo-cycle (I) is followed by a steep compressive residual stress increase (II). In the third cycle (III) the stress changes thermo-elastically. The compressive stress increase in thermo-cycle II is induced by the Ti0.52Al0.48N decomposition, in particular by the fcc-AlN to w-AlN transformation. Full (open) symbols correspond to heating (cooling) segments of the heat-treatment experiment.
The subsequent heating in the range of 25–904 °C (squares in Fig. 8) induced the spinodal decomposition and a compressive stress increase to about − 3500 MPa, which decreased thermo-elastically down to − 2642 MPa after cooling down. The compressive stress increase from − 2059 to − 3429 MPa was observed even after the temperature decreased from 904 to 837 °C. This documents that the spinodal decomposition was not completed at 904 °C to a full extent, as expected [3,6]. During the third cycle in the range of 25–1003 °C (triangles in Fig. 8), the stresses in the coating changed exclusively thermo-elastically without a significant change (hysteresis) after cooling.
In the diffraction data collected during the second and third temperature cycles, not only peaks from cubic phase were observed but also very weak and broad peaks indicating the presence of w-AlN were detected at approximately 22 keV, explaining the high compressive residual stress formation in the coating.
3.5. Hardness across the laser heated sample
In Fig. 6d the hardness profile across the laser-affected zone is presented. The hardness of the not directly irradiated coating is about 35 GPa. At x = ± 2 mm the hardness starts to increase reaching a maximum of 47 GPa in the center of the laser spot. The hardness increase can be related to age hardening effects coming along with the formation of fcc-AlN and fcc-TiN domains and in particular to coherency strains between the matrix and coherent precipitations [3]. The large strains of first order (cf. Section 3.4) and lattice distortions (cf. Section 3.7) observed in the center of the heated spot additionally favor the hardness increase, being dominant over mechanisms that are known to decrease the hardness of the coating such as the formation of w-AlN and/or the introduction of misfit dislocations, relaxing the coherency strains between the precipitations and the matrix [3]. In zone II (x = − 4 to − 2 and 2 to 4 mm) the stress relaxation did not induce any significant hardness change in the coating indicating that there is an interplay between recovery processes causing coating softening and effects originating from the very early stage of the decomposition increasing the hardness.
3.6. Raman scattering across the laser heated sample
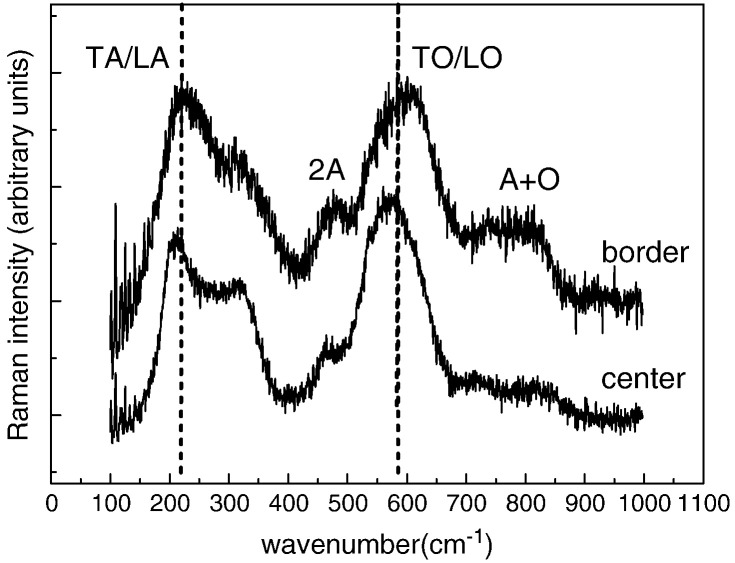
The aim of the Raman investigations was to obtain more insights into the Ti0.52Al0.48N decomposition and residual stress formation in the coating. In Ti–Al–N, the presence of both heavy metal ion and nitrogen ion vacancies reduces the local symmetry of the crystal, causing atomic displacements having non-zero first order polarizability derivatives, resulting in Raman activity [27,28]. Representative Raman spectra from the border and the center of the irradiated coating (Fig. 9) can be discussed in terms of two main features: (i) vibrations in the 150–300 cm− 1 range are longitudinal and transverse acoustic modes (LA and TA) determined by Ti and Al atoms, whereas (ii) the modes in the 400–650 cm− 1 range are longitudinal and transverse optical modes (LO and TO) associated with vibrations of the N atoms [27–29]. Other low-intensity modes are acoustic and optic overtones (cf. description of the modes in Table 1).
Fig. 9.
Raman spectra in the center and on the border of the laser irradiated spot.
Table 1.
Raman-active phonon mode assignment in Ti–Al–N [27].
| Phonon type | Peak position [cm− 1] |
|---|---|
| TA/LA | ~ 250 (215 and 327 for TiN) |
| 2A | 484 |
| TO/LO | 621 |
| A + O | ~ 800 |
| 2O | 1189 |
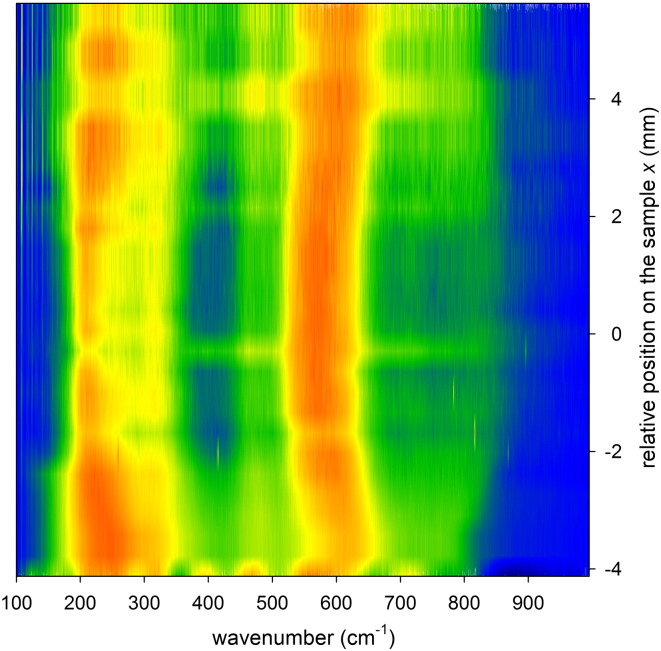
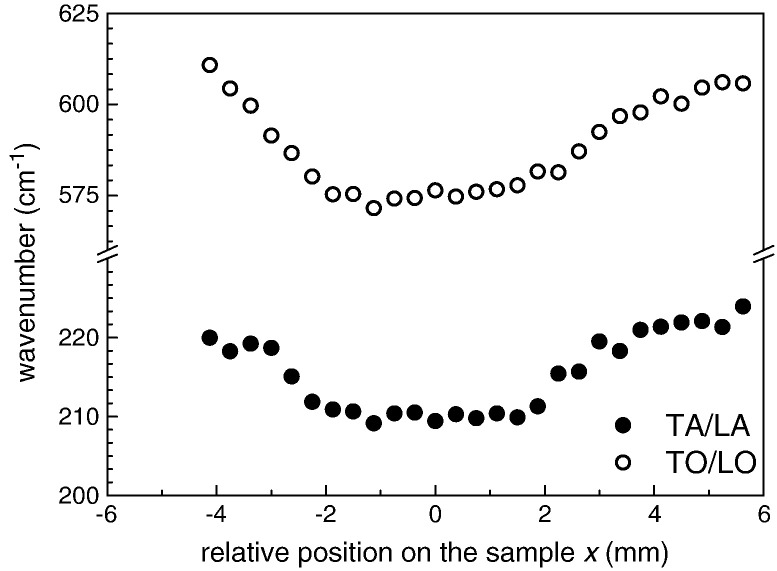
The normalized Raman spectra in Fig. 10 report the result of a line-scan performed across the irradiated sample indicating continuous changes especially for TO and LO modes in the 500–650 cm− 1 range. The spectra from Fig. 10 were fitted and the peak positions for the two main first-order acoustic and optical modes were evaluated. In Fig. 11, a consistent shift can be seen in the peak position of both modes with respect to the irradiated area in the center of the specimen. In general, in Ti–Al–N the mode shift to higher frequencies is related to compressive stress [29,30]. The shift shown in Fig. 11 could thus be precipitously associated with the presence of tensile stresses in the irradiated coating. However, the measured shift (up to ~ 40 cm− 1) would imply a residual stress level that is unrealistic (in Ti–Al–N, a typical value of biaxial stress-induced shift is about − 2.2 cm− 1/GPa [28]). Consequently, in order to evaluate the residual stress magnitudes from the collected Raman spectra (Fig. 10), values of biaxial stress-induced shifts would have to be considered for every ratio of fcc-Ti–Al–N, fcc-TiN and fcc-AlN. It is obvious that the phase changes represent here a dominant contribution in the spectral changes. Fig. 10 indicates that a consistent sharpening of the peaks appears together with a splitting of the TA/LA peak into two components at ~ 215 cm− 1 and ~ 330 cm− 1 in the irradiated center. Being Raman peak width sensitive to the degree of disorder in the lattice, those effects suggest a higher fraction of crystalline domains and are in accordance with the increasing presence of the precipitations in the irradiated sample center.
Fig. 10.
A compositional image compiled from Raman scans collected at different sample positions.
Fig. 11.
Raman peak shifts of acoustic and optical modes detected across the laser heated coating.
3.7. Transmission electron microscopy
Low magnification TEM images showed that the grain size ranged from hundreds of nanometers to about 1 μm. A typical Cs-corrected HR-TEM image (Fig. 12) recorded on the as-deposited sample within one big grain shows homogeneous intensity and a perfect cubic-lattice atomic structure of the Ti0.52Al0.48N coating. The corresponding indexed fast Fourier transformation (FFT) image further indicates the single cubic phase present in the non-irradiated sample area what is in agreement with the XRD data from Fig. 4a.
Fig. 12.
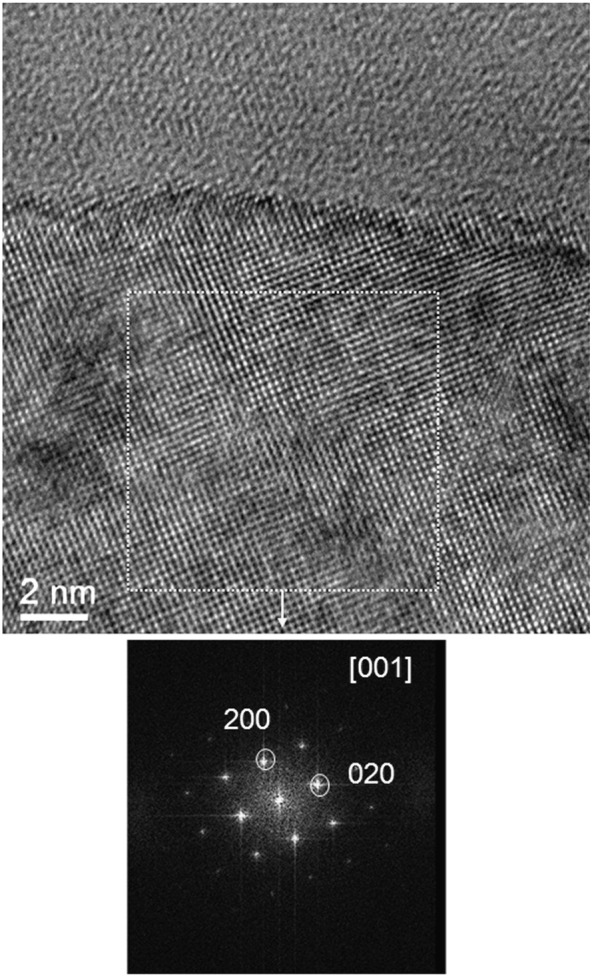
HR-TEM image and the corresponding FFT collected from the non-irradiated sample area document a perfect cubic structure of Ti0.52Al0.48N.
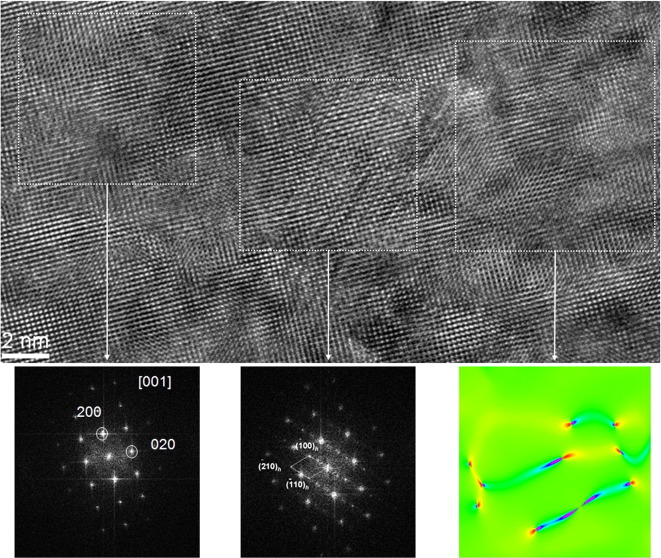
In contrast, a Cs-corrected HR-TEM acquired from the annealed sample area shows structural fluctuations (Fig. 13), where some stripes and contrast variations due to the large strains are clearly visible. The FFT images document the presence of cubic phases with lattice parameters similar to the cubic Ti0.52Al0.48N. The resolution of the FFT images does not allow distinguishing between both phases. Some additional tiny spots appear in the FFT owing to the presence of a structure modulation along a certain orientation. The analysis shows that the tiny spots originate from w-AlN domains (see Fig. 13, where a w-AlN lattice is labeled), which construct a semicoherent relationship with the matrix.
Fig. 13.
HR-TEM image and the corresponding FFTs recorded from the center of the laser irradiated sample indicate structural fluctuations caused by the Ti0.52Al0.48N decomposition. The additional tiny spots in the FFT indicate the presence of w-AlN domains. The color displacement map using the reflection (200) shows several dislocations present at the selected area.
There are numerous dislocations present in the matrix. To visualize the defects, a displacement map using the Bragg reflection (200) is available, which clearly shows several dislocations existing in the selected area. The relatively large amount of such lattice defects observed in the HR-TEM image (Fig. 13) indicates that not all precipitates are longer coherent and the strains of third order are partly relaxed by forming dislocation networks at the interface between the precipitates and the matrix.
4. Discussion
Lateral gradients of residual stress, phase and hardness observed across the laser treated Ti0.52Al0.48N coating (Fig. 2) reveal the complex nature of thermo-mechanical processes in locally heated Ti–Al–N on hard metal. Heating above 900 °C results in the formation of fcc-AlN, fcc-TiN and w-AlN. According to the HR-TEM data (Fig. 13), the precipitates are not always coherent and there is a significant amount of dislocations in the annealed area. It is obvious that coherency strains between the coherent precipitations and the matrix, the local modulations of strain and composition, the presence of atomistic structural defects as well as relatively large matrix strains of the first order are responsible for the hardness increase in the irradiated sample center (Fig. 6d). The TEM data demonstrate that even the relatively short laser pulse (Fig. 1) results also in the formation of w-AlN phase (Fig. 13) strongly influencing the residual stress state in the coating (Fig. 6c).
The results in Fig. 7 demonstrate that the local heating caused a local plastic deformation in the substrate with tensile stresses in the substrate interface area. This effect can significantly deteriorate the mechanical integrity and the performance of the coating/substrate composite. One can expect that thermal laser pulses with higher surface temperatures and/or applied repeatedly would lead to the formation of relatively large tensile stresses in the substrate/coating composite and cause the formation of cracks. Consequently, the tensile stresses in the substrate observed in Fig. 7, as well as our data collected from the CrN/steel system [25], indicate that the substrate thermo-mechanical behavior and its dimensional changes resulting from the inhomogeneous heat treatment must be considered when analyzing thermo-mechanical behavior of locally heated hard coatings. It is not enough to concentrate only on the processes in the coating, like obstacle controlled plasticity, recovery effects and spinodal decomposition.
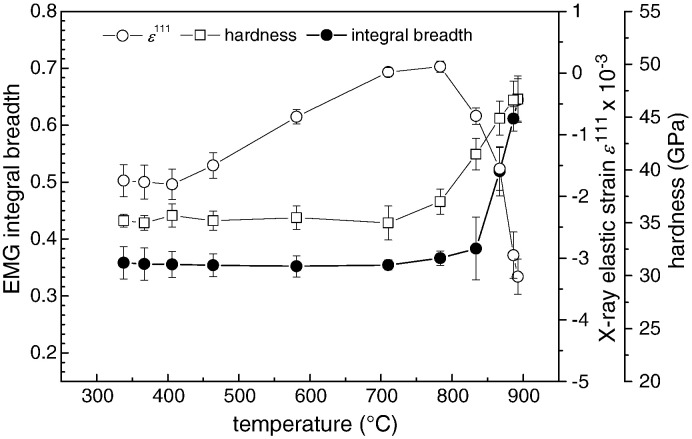
In order to correlate the local phases (Fig. 6b), residual stresses (Fig. 6c), hardness (Fig. 6d) and the temperature applied during the laser treatment, the finite element method (FEM) was used to model the temperature profile on the surface of the irradiated specimen using a transient heat transfer simulation. The temperature dependent material data for the Ti–Al–N coating [12] and the WC–Co substrate [31,32] were taken from literature. The intensity distribution of the laser was assumed to be constant across the cross section of the beam with a diameter of 6 mm. This assumption led to a good agreement of the simulated lateral temperature distribution with measurements performed on another material [33]. The laser intensity was adjusted in such a way that the maximal measured temperature reaches 900 °C and is held constant for 30 s. In Fig. 14, the experimentally determined integral breadth (Fig. 6b), in-plane X-ray elastic strain (Fig. 6c) and hardness (Fig. 6d) are correlated with the temperature distribution across the sample as obtained from FEM. The results indicate that the hardness increase correlates well with the coating phase changes (fcc-AlN and fcc-TiN domains increase the integral breadth) and reveal the residual stress evolution with temperature. The results in Fig. 14 also demonstrate that it is possible to perform fast screening of structure–property relationships in complex materials just by analyzing one sample.
Fig. 14.
Experimentally determined EMG integral breadth (in keV), in-plane X-ray elastic strain and hardness are correlated with the maximal temperature (across the irradiated sample) obtained from the FEM simulation.
By considering the results from Figs. 6c, 7 and 8, the following phenomena can be in general assumed to predetermine the volume-averaged residual stress σRT of the Ti–Al–N coating at room temperature after the heat treatment: (i) growth stress σGrowth which depends predominantly on the growth conditions such as applied bias voltage and deposition rate, (ii) thermal stress σThermal discussed in Section 3.3, (iii) stress relaxation caused by structure recovery σRecovery at temperatures above TD, (iv) stress changes caused by phase transformation in the coating σDecomposition and (v) stress changes caused by substrate dimensional changes σSubstrate like local plastic deformation.
From the practical point of view, however, it is more important to know what kinds of stresses contribute to the actual stress magnitude during the coating service. The stress–temperature dependencies in Fig. 8 indicate that the coating phase transformation represent a dominant contribution to the compressive stresses. Similar (in this specific case) compressive and growth stresses can be considered as favorable. On the other hand, the recovery effects and substrate plastic deformation can significantly deteriorate the coating performance by generating tensile stresses. In the extreme case, one can suppose that the substrate plastic deformation (resulting possible in the formation of cracks [13]) can induce crack formation in the coating. In the case of cutting tools, one should also note that cutting forces during the operation influence the actual residual stress state in the coatings and finally also their lifetime.
From the methodological point of view, by coupling the local (Figs. 4–7) and the in-situ (Fig. 8) XRD characterization it was possible to interpret the oscillating distribution of residual stresses (Fig. 6c) across the laser heated spot and understand the role of the substrate in the thermal treatment. This complex approach of tailoring the thermo-mechanical behavior of both coating and substrate represents a progress in contrast to pure modeling approaches where many experimental parameters are usually not considered.
In the case of nano-crystalline coatings like Ti–Al–N, depth gradients of microstructure and residual stresses influence decisively the coating function [34,35]. It is obvious that in the investigated Ti0.52Al0.48N coating, parameters like residual stresses, phases and microstructure change as a function of the coating thickness. Further research is therefore necessary to reveal the relationships between the coating structural depth gradients and mechanical properties.
5. Conclusions
Local lateral temperature gradients induced by laser irradiation of a Ti0.52Al0.48N coating on hard metal resulted in the formation of pronounced gradients of phases, hardness and residual stresses which were correlated using scanning characterization techniques. The results open the possibility to perform post-deposition residual stress engineering in self-hardened Ti–Al–N coatings by choosing dedicated annealing conditions.
The present study documents that local laser heating is a powerful tool to simulate local thermal loads in hard coatings. Moreover, the approach demonstrates that by combining laser heating to synthesize new material modifications and appropriate position-resolved experimental techniques, it is possible to perform fast screening of structure–property relationships in complex materials just by analyzing a relatively small sample area.
Acknowledgments
This work was supported by the FFG within the project PhaseStressEvolution. We acknowledge the Helmholtz-Zentrum Berlin — Electron storage ring BESSY II for provision of synchrotron radiation at the beamline EDDI. The authors gratefully acknowledge financial support in the framework of the Austrian COMET Competence Centre Programme. A part of this work was financially supported by the Christian Doppler Association and the companies Oerlikon Balzers, Balzers (Liechtenstein) and PLANSEE Composite Materials, Lechbruck (Germany). The authors acknowledge the support from Drs. Thomas Schöberl and Walther Heinz for preliminary measurements.
References
- 1.PalDey S., Deevi S.C. Mater. Sci. Eng. 2003;A342:58. [Google Scholar]
- 2.Hörling A., Hultman L., Odén M., Sjölén J., Karlsson L. Surf. Coat. Technol. 2005;191:384. [Google Scholar]
- 3.Mayrhofer P.H., Hörling A., Karlsson L., Sjölén J., Larsson T., Mitterer C., Hultman L. Appl. Phys. Lett. 2003;83:2049. [Google Scholar]
- 4.Rachbauer R., Stergar E., Massl S., Moser M., Mayrhofer P.H. Scr. Mater. 2009;61:725. [Google Scholar]
- 5.Alling B., Ruban A.V., Karimi A., Peil O.E., Simak S.I., Hultman L., Abrikosov I.A. Phys. Rev. B. 2007;75:045123. [Google Scholar]
- 6.Hörling A., Hultman L., Odén M., Sjölén J., Karlsson L. J. Vac. Sci. Technol., A. 2002;20:1815. [Google Scholar]
- 7.Xia Q., Xia H., Ruoff A.L. J. Appl. Phys. 1993;73:8198. [Google Scholar]
- 8.Rafaja D., Wüstefeld C., Baehtz C., Klemm V., Dopita M., Motylenko M., Michotte C., Kathrein M. Metall. Mater. Trans. A. 2011;42:559. [Google Scholar]
- 9.Terner M.R., Hedström P., Almer J., Ilavsky J., Odén M. Mater. Sci. Forum. 2006;524–525:619. [Google Scholar]
- 10.Kopac J., Sokovic M., Dolinsek S. J. Mater. Process. Technol. 2001;118:377. [Google Scholar]
- 11.Kirchhoff G., Göbel Th., Bahr H.A., Balke H., Wetzig K., Bartsch K. Surf. Coat. Technol. 2004;179:39. [Google Scholar]
- 12.Klotz K., Bahr H.A., Balke H., Göbel Th., Menzel S., Bahr U., Kirchhoff G., Wetzig K. Thin Solid Films. 2002;413:131. [Google Scholar]
- 13.Kirchlechner C., Martinschitz K.J., Daniel R., Mitterer C., Donges J., Rothkirch A., Klaus M., Genzel C., Keckes J. Scr. Mater. 2010;62:774. [Google Scholar]
- 14.Klotz K., Bahr U., Brückner W., Bahr H.A., Balke H., Kirchhoff G., Weiss H.J., Göbel Th., Menzel S., Wetzig K. Thin Solid Films. 2006;496:469. [Google Scholar]
- 15.Genzel C., Denks I.A., Gibmeier J., Klaus M., Wagener G. Nucl. Instrum. Methods. 2007;A578:23. [Google Scholar]
- 16.Grushka E. Anal. Chem. 1972;44:1733. doi: 10.1021/ac60319a011. [DOI] [PubMed] [Google Scholar]
- 17.Resel R., Tamas E., Sonderegger B., Hofbauer P., Keckes J. J. Appl. Crystallogr. 2003;36:80. [Google Scholar]
- 18.Keckes J. J. Appl. Crystallogr. 2005;38:311. [Google Scholar]
- 19.Noyan I.C., Cohen J.B. Springer; Berlin: 1987. Residual Stress: Measurement by Diffraction and Interpretation. [Google Scholar]
- 20.Kim J.O., Achenbach J.D., Mirkarimi P.B., Shinn M., Barnett S.A. J. Appl. Phys. 1992;72:1805. [Google Scholar]
- 21.van Houtte P., De Buyser L. Acta Metall. Mater. 1993;41:323. [Google Scholar]
- 22.Faurie D., Castelnau O., Brenner O., Renault P.O., Le Bourhis E., Goudeau P. J. Appl. Crystallogr. 2009;42:1073. [Google Scholar]
- 23.Oliver W.C., Pharr G.M. J. Mater. Res. 1992;7:1564. [Google Scholar]
- 24.Karlsson L., Hörling A., Johansson M.P., Hultman L., Ramanath G. Acta Mater. 2002;50:5103. [Google Scholar]
- 25.Kirchlechner C., Martinschitz K.J., Daniel R., Klaus M., Genzel C., Mitterer C., Keckes J. Thin Solid Films. 2010;518:2090. [Google Scholar]
- 26.Kirchlechner C., Martinschitz K.J., Daniel R., Mitterer C., Keckes J. Thin Solid Films. 2008;517:1167. [Google Scholar]
- 27.Constable C.P., Yarwood J., Münz W.D. Surf. Coat. Technol. 1999;116–119:155. [Google Scholar]
- 28.Barshilia H.C., Rajam K.S. J. Mater. Res. 2004;19:3196. [Google Scholar]
- 29.Constable C.P., Lewis D.B., Yarwood J., Münz W.D. Surf. Coat. Technol. 2004;184:291. [Google Scholar]
- 30.Barshilia H.C., Rajam K.S. J. Appl. Phys. 2005;98:014311. [Google Scholar]
- 31.www.sandvik.com
- 32.www.matweb.com
- 33.Ecker W., Antretter T., Ebner R. Key Eng. Mater. 2007;345–346:685. [Google Scholar]
- 34.Janssen G.C.A.M. Thin Solid Films. 2007;515:6654. [Google Scholar]
- 35.Abadias G. Surf. Coat. Technol. 2008;202:2223. [Google Scholar]
- 36.Powder Diffraction File Cards: fcc-TiN 38–1420, fcc-AlN 25–1495, w-AlN 25–1133, WC 25–1047, Co 15–0806.


