Abstract
The fracture behaviour of pure iron deformed by equal-channel angular pressing via route A was examined. The fracture toughness was determined for different specimen orientations and measured in terms of the critical plane strain fracture toughness, KIC, the critical J integral, JIC, and the crack opening displacement for crack initiation, CODi. The results demonstrate that the crack plane orientation has a pronounced effect on the fracture toughness. Different crack plane orientations lead to either crack deflection or delamination, resulting in increased fracture resistance in comparison to one remarkably weak specimen orientation. The relation between the microstructure typical for the applied deformation route and the enormous differences in the fracture toughness depending on the crack plane orientation will be analyzed in this paper.
Keywords: Equal-channel angular pressing (ECAP), Severe plastic deformation (SPD), Fracture toughness, Iron, Anisotropy
1. Introduction
Various methods of severe plastic deformation (SPD) are in laboratory use to produce ultrafine-grained (UFG) and nanocrystalline (NC) materials. The benefits of the deformation-induced grain refinement are versatile [1–3] and have sparked the interest of many scientists for the peculiar properties of these new materials over the last few years. In the future, for industrial applications of SPD materials, continuous processes will be of greater interest for the higher production efficiency as compared to batch processes. Examples of such continuous processes are accumulative roll bonding (ARB), continuous confined strip shearing or the conshearing process. A common microstructural feature when comparing theses processes for the same material, e.g. pure aluminium [4–6], is an elongated or pancake microstructure parallel to the rolling or extrusion direction. This microstructure is comparable to that of conventional equal-channel angular pressing (ECAP) processing by route A and, within limits, to route C [7]. In all these examples the also-termed lamellar or banded microstructure is a consequence of the deformation path, which effectively cannot be changed. This is particularly the case for sheet products. Irrespective of the process used, but especially for those providing only monotonic strain paths, anisotropic mechanical properties, i.e. testing-direction-dependent properties, cannot be excluded and become therefore also more in focus (e.g. [8–11]).
Although the examination of mechanical properties, particularly strength and ductility, has been intensively researched over the last few years [12,13], usually a fracture mechanical description remains in the background or parameters such as the fracture toughness are simply equated with tensile ductility. The fracture properties would, however, give valuable insight into the behaviour of the material. The use of fracture mechanics in engineering, through the critical assessment of defects, allows lastly for a damage-tolerant design of structures. This is currently the standard when safety issues are of central concern, for instance in the aviation industry or reactor engineering. Additionally, fracture properties often co-determine the machinability and formability of materials. For the subsequent processing of SPD semi-products, for example through turning, a minimum fracture toughness is required for successful operation. Consequently, parameters such as the fracture toughness will become increasingly more significant the closer these new materials come into the focus of engineers who may implement them as structural materials.
Besides this practical perspective, the theoretical interest of the fracture behaviour has risen in the last years as well (e.g. [14–17]). The significant deformation processes ahead of the crack tip causing either inter- or transcrystalline failure mode and the resulting fracture toughness are investigated; however, an experimental comparison and verification based on fracture mechanics tests are often missing. This shortcoming from the experimental side has, most of the time, its origin in the difficulties associated with size effects in fracture mechanics and the limited available sample dimensions. Many SPD samples do not fulfil the minimum dimension requirements or alternatively do not possess the minimum yield strength to allow a useful application of linear elastic fracture mechanics (LEFM). Therefore, the use of elasto-plastic fracture mechanics (EPFM), as used in this paper, would be often of great importance.
The significance of a fracture mechanical assessment of materials to be used in engineering applications and the aforementioned industrial importance regarding mechanical properties of aligned UFG microstructures are motivation to study the influence of the testing direction on the fracture mechanical properties of microstructurally aligned SPD materials. As a model material, body-centred-cubic (bcc) iron was chosen due to its large industrial relevance. It was deformed by ECAP route A because of the pronounced microstructural similarities with other continuous large scale SPD processes as discussed in the beginning of this paper. Special focus will be devoted to the relationship between the microstructure and the resulting failure characteristics depending on the crack plane orientation.
2. Experimental
For the ECAP processing, round billets of Armco iron (composition in Table 1) with a diameter of 20 mm and a length of 100 mm were machined from rods with a diameter of 30 mm. Before processing, the billets were recrystallized at 700 °C for 1 h.
Table 1.
Chemical composition in wt.% of Armco-iron (Fe in balance).
| C | Mn | P | S | Cu | N | Sn | Si | Al | Cr | Mo | Ni |
|---|---|---|---|---|---|---|---|---|---|---|---|
| 0.009 | 0.069 | 0.005 | 0.005 | 0.012 | 0.006 | 0.001 | 0.014 | 0.003 | 0.024 | 0.003 | 0.026 |
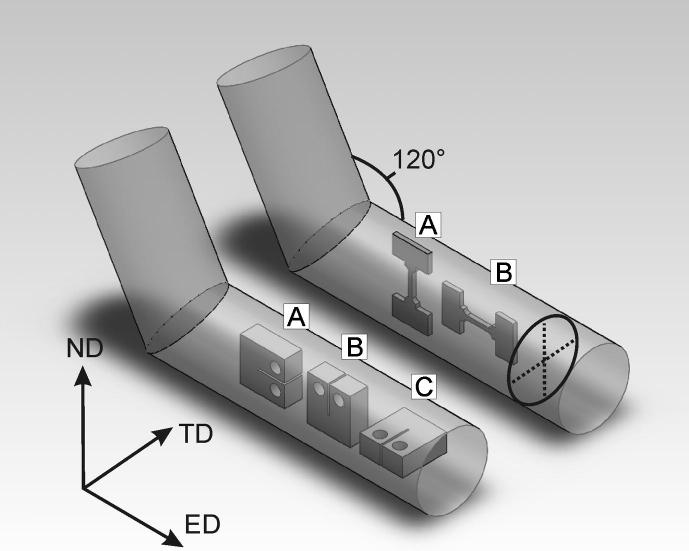
The samples were deformed at 200 °C in a round ECAP channel with a diameter of 20 mm and an intersection angle of 120°. They were then subjected to seven passes by route A, which was the maximum number of applicable passes without failure of the specimens. The number of passes corresponds to an equivalent von Mises strain of ∼5. For the fracture tests, compact-tension (CT) specimens were machined from the deformed billets. As Fig. 1 shows, three different specimen orientations were selected and labelled A, B and C. The corresponding crack plane orientation and crack propagation direction of the specimens with respect to the last deformation step can be derived from the chosen coordinate system (Fig. 1). The axes of the coordinate system are denoted as the extrusion direction (ED), the transverse direction (TD) and normal direction (ND). The specimen geometry, the measurement procedure and the calculation of the fracture toughness were based on the recommendations of the ASTM standard E-399 [18] or E-1820 [19] depending on the applicability of either small scale yielding or large scale yielding conditions.
Fig. 1.
Schematic of the machined fracture toughness and tensile specimens and their orientation in the former billet with respect to the ECAP channel used. Additionally, the horizontal and vertical positions of the hardness indents are indicated with dotted lines.
In the case of large scale yielding conditions, a single specimen technique was employed and the stable crack advance was recorded using an unloading compliance technique. The specimens had a width, W, of 10 mm, an initial crack length, a, of ∼5 mm and a thickness, B, of 5 mm. The fatigue pre-crack was introduced under cyclic compression–compression loading, followed by cyclic tension loading.
The fracture toughness was also compared to the tensile behaviour of the material. The tensile specimens had a gauge length of 6 mm, a cross-section of ∼1.1 mm2 and are labelled A and B in correspondence with the fracture toughness specimens having the same principal loading directions (see Fig. 1). Tensile tests and fracture tests were carried out on a micro-tensile testing machine from Kammrath and Weiss. The cross-head speed was 2.5 μm s−1. For the tensile tests the strain was measured with a clip-gauge from Epsilon Technology Corp. The microstructure and the fracture surfaces were characterized with a Zeiss 1525 scanning electron microscope (SEM) equipped with an electron back-scatter diffraction (EBSD) system from TSL. For in-depth analysis of the occurring failure mechanism, three-dimensional (3-D) models of the fracture surface were calculated using an automatic fracture surface analysis system. This enabled the determination of the crack opening displacement for crack initiation (CODi) as a further local fracture parameter. More details regarding the evaluation of CODi and the technique behind its evaluation can be found in Refs. [20,21].
3. Results
3.1. Hardness measurements
A requirement for mechanical tests with specimens in the size range of the ECAP billets is a satisfying homogeneity of the deformation and so also of the microstructure. In order to probe the homogeneity of the ECAP specimens, hardness measurements were performed with a Vickers indenter using a load of 200 gf on a cross-section of a billet parallel to the TD and ND after seven passes. A step size of 1 mm over a length of 19 mm was used, as shown schematically with dotted lines in Fig. 1. For each data point, three indents were made at an equivalent position and averaged. The mean value of all measurements along the TD was 293 ± 9 HV and 291 ± 10 HV parallel to the ND. The low standard deviation of the measurements in both directions implies a considerable homogeneity of the microstructure throughout the cross-section.
3.2. Microstructure
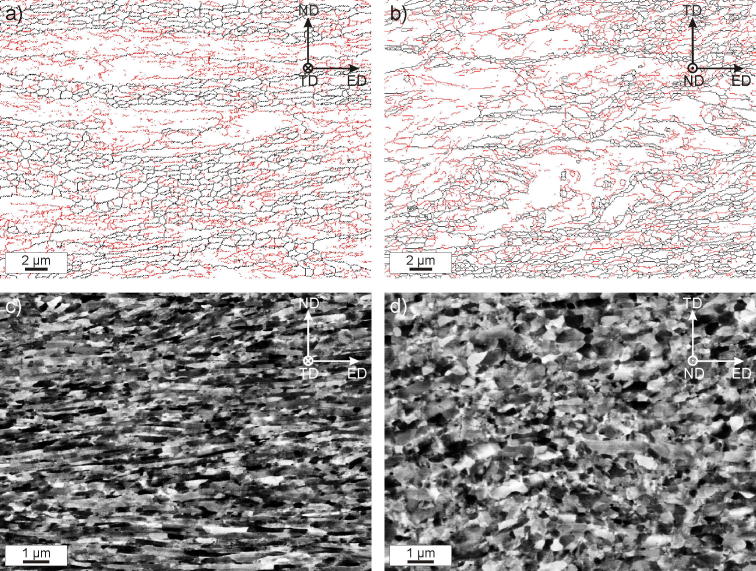
The typical microstructure of the deformed material parallel to the TD and the ND is presented with grain boundary maps obtained from EBSD measurements and back-scatter electron micrographs in Fig. 2. Low-angle grain boundaries (LAGB, in red) and high-angle grain boundaries (HAGB, in black) are inserted. Looking into the TD, Fig. 2a, a banded structure is recognizable originating from the recrystallized initial grain structure before deformation, which became strongly sheared and aligned to the ED. Within these grains, fluctuations in local orientation have formed a sub-cell structure having, in places, only low misorientation to sub-grain neighbours. In more favourably oriented starting grains, the fragmentation is already more pronounced and the sub-cells are divided by HAGBs. Both the newly formed elongated grains and the still recognizable initial structure are aligned to the ED. A similar structure is also present looking into the ND, Fig. 2b, which shows a less pronounced alignment.
Fig. 2.
Microstructure of deformed iron after seven passes looking parallel to the TD (a and c) and the ND (b and d) presented with grain boundary maps derived from electron back-scatter diffraction measurements showing high-angle boundaries in black (angle >15°) and low-angle boundaries (angle >5°) in red. Additionally electron back-scatter images at higher magnifications are displayed.
A more detailed view from areas with strong grain fragmentation for both inspection directions is presented in Fig. 2c and d with back-scatter electron images. Observations into the TD exhibit an ultrafine-grained microstructure with a pronounced grain elongation into the ED, whereas parallel to the ND, Fig. 2d, the grains have a more equiaxed shape. Thus, the 3-D grain shape of this sub-cell structure can be termed pancake structure.
3.3. Tensile tests
In Table 2 a compilation of the data retrieved from the tensile tests is given. As the table shows, there is a variation in the yield strength depending on the loading direction. This is expected as a result of the evolved texture under this processing route [22]. The ductility related parameters, especially the elongation at fracture, εfra, and the reduction in area, Z, also exhibit a strong dependence on the testing direction, which will be discussed later.
Table 2.
Summary of the tensile data for both testing directions. The yield strength, σy, the ultimate tensile strength, σUTS, the uniform elongation, εun, the elongation at fracture, εfr, and reduction in area, Z, were evaluated. All numbers are mean values of three tests. As an error the standard deviation is given.
| Orientation | σy (MPa) | σUTS (MPa) | εun (%) | εfra (%) | Z (%) |
|---|---|---|---|---|---|
| A | 798.4 ± 13.1 | 901.8 ± 9.9 | 1.18 ± 0.11 | 7.97 ± 0.56 | 57.2 ± 3.9 |
| B | 897.7 ± 8.1 | 933.2 ± 13.4 | 0.64 ± 0.01 | 13.08 ± 0.19 | 75.1 ± 0.8 |
3.4. Fracture toughness tests and fractography
3.4.1. Linear elastic approach
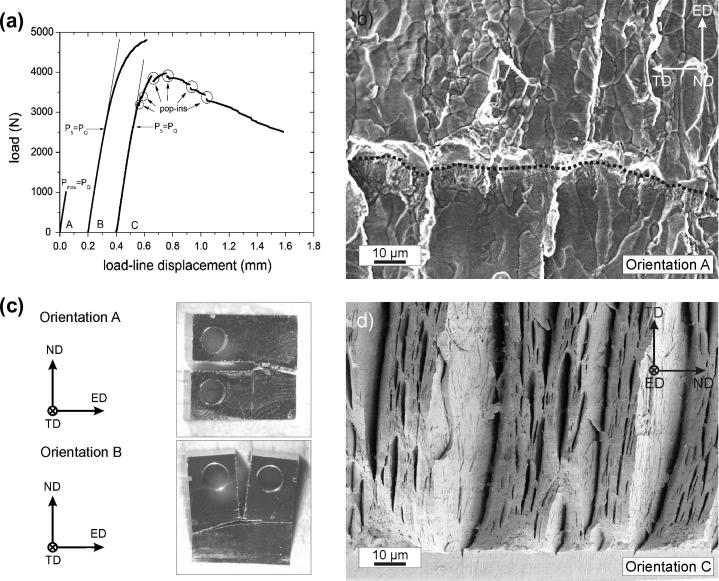
In Fig. 3a representative loadline–displacement records of the different fracture specimen orientations are presented. As specified from the ASTM standard E-399 for a linear elastic evaluation the PQ value, required for the consecutive calculation of the plain strain fracture toughness, is indicated.
Fig. 3.
(a) Examples of typical load vs. loadline displacement curves of the differently oriented fracture specimens (A, B, C) exhibiting large differences in their deformation behaviour. (b) Typical fractograph of a fracture specimen with orientation A (the dotted line represents the transition from pre-fatigued region to overload fracture). (c) Comparison of the crack propagation direction of A and B oriented specimens. In both cases the crack propagates parallel to ED. (d) Typical fractograph of orientation C.
In the case of orientation A, a linear behaviour is present and the provisional force for the fracture toughness calculation, PQ, equals the maximum force. An evaluation according to the formulas in ASTM E-399 yields an average toughness of 22.8 ± 3.1 MPa m1/2. The individual results can be found in Table 3. A fractograph characteristic for this orientation is presented in Fig. 3b. The lower half of the fractograph shows the area caused by the fatigue pre-crack; the upper half corresponds to the overload fracture. Here a granular structure can be recognized.
Table 3.
Summary of the fracture experiments for the different specimen orientation using a LEFM approach.
| Orientation | Pmax/PQa | KQ (MPa m1/2) | KIC (MPa m1/2) |
|---|---|---|---|
| A | 1 | 21.6 | 21.6 |
| 1 | 26.3 | 26.3 | |
| 1 | 20.5 | 20.5 | |
| B | 1.86 | 50.2 | – |
| 1.39 | 59.1 | – | |
| 1.23 | 75.4 | – | |
| C | 1.51 | 48.5 | – |
| 1.52 | 46.7 | – | |
| 1.75 | 46.3 | – | |
Pmax/PQ is the ratio of maximal force, Pmax, and the calculated value, PQ, using the 5% secant deviation procedure according to ASTM E-399.
Compared to orientation A, specimens with orientation B display a non-linearity in the test record before they fail, Fig. 3a. Due to this non-linearity, to estimate PQ, a secant line starting from the origin with 95% of the original gradient of the curve is used. The intersection of the curve with this line, P5, equals PQ. The ratio between the maximum force, Pmax, and PQ exceeds the standard’s limit of 1.1 to ensure small scale yielding conditions. A typical fractograph for this orientation is similar to the one presented for orientation A and is thus not shown again. The crack propagation direction strongly deviates from the expected path and propagates almost perpendicular to it. This is presented in Fig. 3c where two broken specimens having orientation A and B are directly compared. The inserted coordinate system clearly shows that in both cases (A and B) the preferential crack propagation direction is closely parallel to the extrusion direction.
In contrast, orientation C shows a considerably different fracture surface with numerous delaminations on the surface, see Fig. 3d. Also, for orientation C a large non-linear region in the test record is characteristic, Fig. 3a. Compared to orientation B there is continuous progress in the force–displacement curve, occasionally accompanied by pop-ins. The specimen does not fail through an instability and is unloaded after a certain pin-hole displacement due to experimental limits.
The same evaluation procedure to find a provisional fracture toughness, as for orientation B, is also applied here, see Fig. 3a. The Pmax/PQ-ratio, exceeds the validity criterion again. Disregarding the standard‘s recommendation for plain strain fracture toughness evaluation (ASTM E-399) and proceeding with the calculation of an apparent fracture toughness, KQ, gives a higher fracture toughness in orientations B and C, as compared with orientation A (Table 3). Nevertheless, for a well-defined fracture mechanical description an evaluation by means of EPFM must be performed.
3.4.2. Elasto-plastic approach
For orientation A, a valid test result under small scale yielding conditions could be reached. For better comparison with the other testing directions where an elasto-plastic approach is needed the critical plane strain stress intensity, KIC, is converted into a critical J-value [23], JIC:
| (1) |
By inserting the mean value of the fracture toughness, 22.8 MPa m1/2, a typical Young’s modulus of 210 GPa and a Poisson’s ratio, ν, of 0.3, a JIC of 2.3 kJ m−2 is obtained.
For orientation B, the specimens failed beyond the limits of LEFM and a single point toughness, Jc, can be evaluated for the final instability point for all three test specimens. In correspondence with the ASTM standard E-1820, the equations of the basic procedure are applied. Following this procedure a mean value of 123 kJ m−2 is obtained.
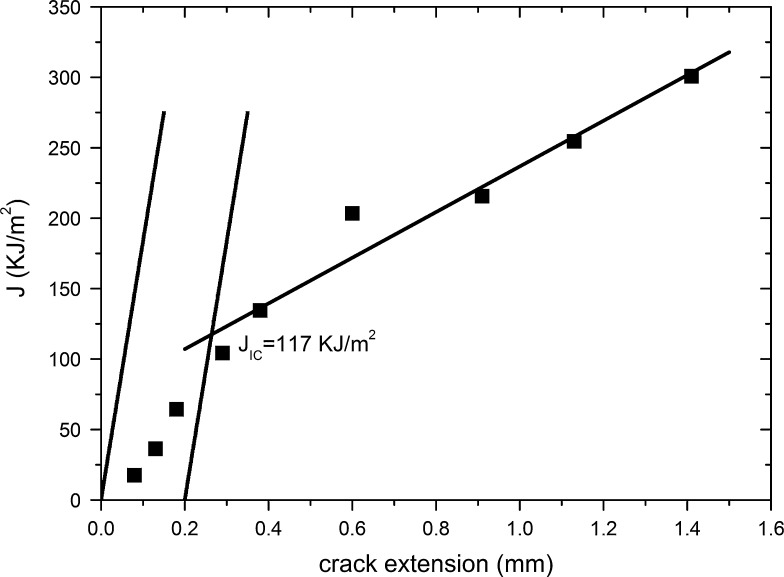
In orientation C stable tearing occurs, see Fig. 3a. Due to this different behaviour an unloading compliance technique was used to monitor the crack length and the individual J-values were calculated according to the basic procedure, as introduced before for different stable crack extensions. In this way, a J-resistance curve could be constructed and is presented in Fig. 4. The blunting line follows the relation:
| (2) |
where M is a pre-factor of 2. For σy and σUTS the measures of the tensile tests of the specimen with orientation B were taken, Table 2. This specimen orientation and the fracture specimen with orientation C have the same loading direction, compare Fig. 1. As Fig. 4 shows, the intersection point between the linear fit of the obtained data points and the 0.2 mm offset line is used for an estimate of the fracture toughness JIC giving a value of 117 kJ m−2. The results of the critical J-values are summarized in Table 4.
Fig. 4.
J-resistance curve of specimen with C orientation.
Table 4.
Summary of the data using an elasto-plastic approach evaluating JIC for all three testing directions.
| Orientation | JIC (kJ m−2) |
|---|---|
| A | 2.3 |
| B | 123 |
| C | 117 |
4. Discussion
The results showed that, depending on the testing direction, large differences in the estimated fracture toughness were observed (see Tables 3 and 4). Testing direction also influenced the general failure and deformation characteristics of the specimens, ranging from instantaneous failure to stable tearing exhibiting completely different fractographs (Fig. 3).
Large differences in the fracture toughness are often associated with extrinsic toughening mechanisms such as those found in Al alloys or steels [24–27]. In such reports, the layered structures or laminates are bonded through a weak interface. The specimen configurations are termed crack delamination, crack arrester or crack divider configuration, depending on the external loading orientation [28]. This classification was found to be applicable to the present material and helpful to understand the large differences in the measured fracture initiation toughness. The relationship between the microstructure and the acting toughening mechanisms with respect to the loading orientation will be the focus in the following sections.
4.1. Orientation A
In view of the results this orientation exhibits the smallest fracture toughness (KIC = 22.8 MPa m1/2 and JIC = 2.3 kJ m−2). Comparing the microstructure, Fig. 2, with the crack propagation direction in the ED, it is evident that the crack propagates along the aligned microstructure in this specimen orientation. An inspection of Fig. 3b shows a granular structure on the fracture surface which could suggest either inter- or transcrystalline fracture. The occurring failure type cannot be definitely defined through direct fractography due to a limited obtainable resolution thus preventing observation of more of the fracture surface characteristics. However, both failure types are generally known to exhibit a relatively low fracture toughness. The failure mechanism, transcrystalline or intercrystalline along LAGB or HAGBs, will be reviewed later in context with a different testing orientation.
4.2. Orientation B: crack-arrester orientation
The crack propagation direction in this testing direction is macroscopically perpendicular to the expected Mode-I direction, see Fig. 3c, where cracked samples of orientations A and B are directly compared. The mechanical explanation for this strong deviation is found in the low fracture resistance along the elongated microstructure parallel to the extrusion direction, which is equivalent to the low fracture toughness measured for a specimen with orientation A. For a pure Mode-I propagation the crack would have to either separate the elongated grains (transgranular fracture) or take a more tortuous crack path by passing through every elongated grain (intergranular fracture). Both possibilities seem to have the higher fracture resistance than the one along the extrusion direction under a crack bifurcation of almost 90°. A simple estimate for the toughness increase due to crack deflection can be given by considering an ideal straight crack having an infinitesimally short kink under an angle of 90°. The local Modes I and II stress intensities, k1 and k2, for the kinked crack as a function of the global stress intensity, KI in the absence of a remote Mode II loading component (KII = 0) can be expressed as [29]:
| (3) |
Calculating an effective stress intensity, Ktip, with a single parameter as the local driving force at the crack tip, for instance in the form of
| (4) |
leads to:
| (5) |
This estimate shows that the local driving force is only half of the global one and leads to a fracture toughness at least twice as large for orientation B for the same crack path compared to orientation A. In the scheme of aligned structures this orientation can be termed the crack arrester orientation. In reality, the measured fracture toughness is higher because strong plastic deformation occurs before the sample fails, as can be seen from the example of the force–displacement curve for orientation B in Fig. 3a. Nevertheless, even the measured values have to be regarded as a lower limit for a real Mode-I initiation toughness since the crack does not propagate in the designated direction.
4.3. Orientation C: crack-divider orientation
In this orientation a conspicuous fracture surface, as presented in Fig. 3d, is characteristic showing delaminations on the surface. These delaminations form a secondary crack system propagating perpendicular to the primary one into the fracture surface plane. The benefits of such delaminations on the toughness of materials are known, especially from impact toughness tests, i.e. Charpy tests [30,31]. A loss of the through-thickness constraint during the fracture initiation causes a decrease in the crack driving force. Their presence here can be directly connected to the relatively low fracture toughness of specimens with orientation A. Both the delaminations and orientation A have the same crack plane and the low fracture toughness in this crack plane, which can be directly measured through specimen orientation A, seems to trigger the formation of these delaminations.
4.3.1. Delamination formation
The delaminations could be created principally either during loading or they could be intrinsically present in the material. The later explanation can be ignored, since fracture experiments for orientation A were possible to perform. Pre-existing macro-cracks would cause a very large scatter of the results controlled by the crack length of the pre-existing cracks, which was not the case. Their formation during loading is more convincing and was attempted to be proven with the following experiment.
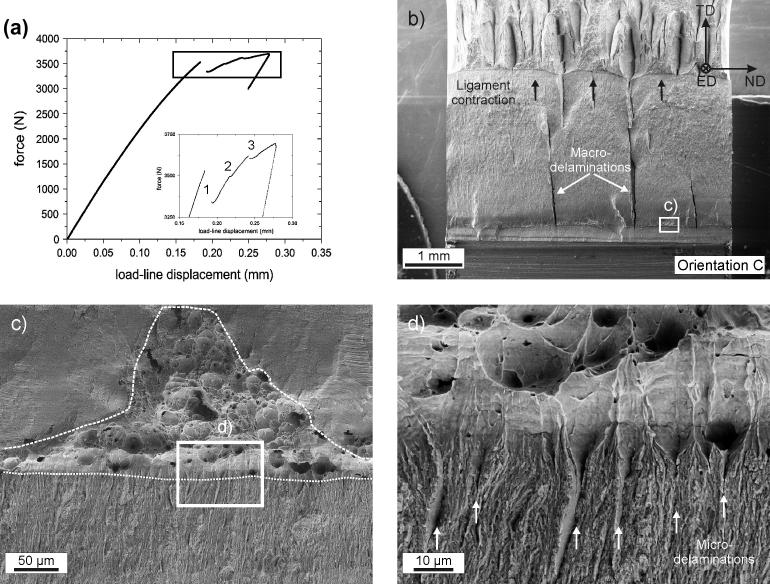
A specimen was loaded, as shown in the load–displacement curve in Fig. 5a up to a load causing a pronounced non-linearity in the test record and then unloaded. After this loading sequence the specimen was post-fatigued (ΔK = 16 MPa m1/2, stress ratio R = 0.1) to delineate clearly the deformation and fracture process induced during the first loading sequence from the rest of the fracture surface. The fracture surface after the test is shown in Fig. 5b, which is flat from the fatigue loading with the exception of the top. Here, the overload fracture is visible. Within the first loading sequence the occurrence of three load drops is noticeable in the test record (insert, Fig. 5a) and corresponds to the number of delaminations in the fatigued and flat area of the specimen (see Fig. 5b, lower half of the image). This suggests that the load drops are caused by the initiation and propagation of such delaminations. The introduction of delaminations leads to a drastic change in the stress state from plain strain to a plain stress dominated one. This stress relaxation causes an instant load drop in the displacement-controlled experiment, which can be used as a direct indicator for the formation of a delamination. A closer look onto the transition from the fatigue pre-crack to the overload fracture surface shows plastic deformation between the delaminations, see Fig. 5c and in a more detailed image in Fig. 5d. In contrast to orientation A, a clear stretched zone followed by dimple fracture between the remaining ligaments is visible.
Fig. 5.
Characteristics for orientation C: (a) test record, which was stopped after the occurrence of the first three pop-ins; (b) fractograph of the corresponding specimen having distinctive macro-delaminations; (c) magnification of inset-image of (b) showing a stretched zone and local crack propagation through ductile failure; (d) magnification of inset-image of (c) looking at the transition between pre-crack and stretched zone with single micro-delaminations.
4.3.2. Crack initiation toughness
In order to better understand the contribution of the delaminations on the fracture resistance, the crack opening displacement for crack initiation, CODi, of this localized dimple fracture area, Fig. 5c, was investigated. This was achieved by performing stereo-image measurements in such an area. An example of a chosen crack path along the CODi was measured is presented in Fig. 6a. It also shows the position of the first void on the two corresponding fracture specimen halves. The reconstructed crack profiles at the point of coalescence of the pre-crack with the first pore, defining CODi, are presented in Fig. 6b. The result shows a CODi of 40 μm. For better statistics, five measurements were performed in this way, see Table 5. An average value of 38.4 ± 6.3 μm was evaluated. In order to compare this local measurement with the global measurement determining JIC, the average CODi was converted into Ji by applying the following equation [32]:
| (6) |
Fig. 6.
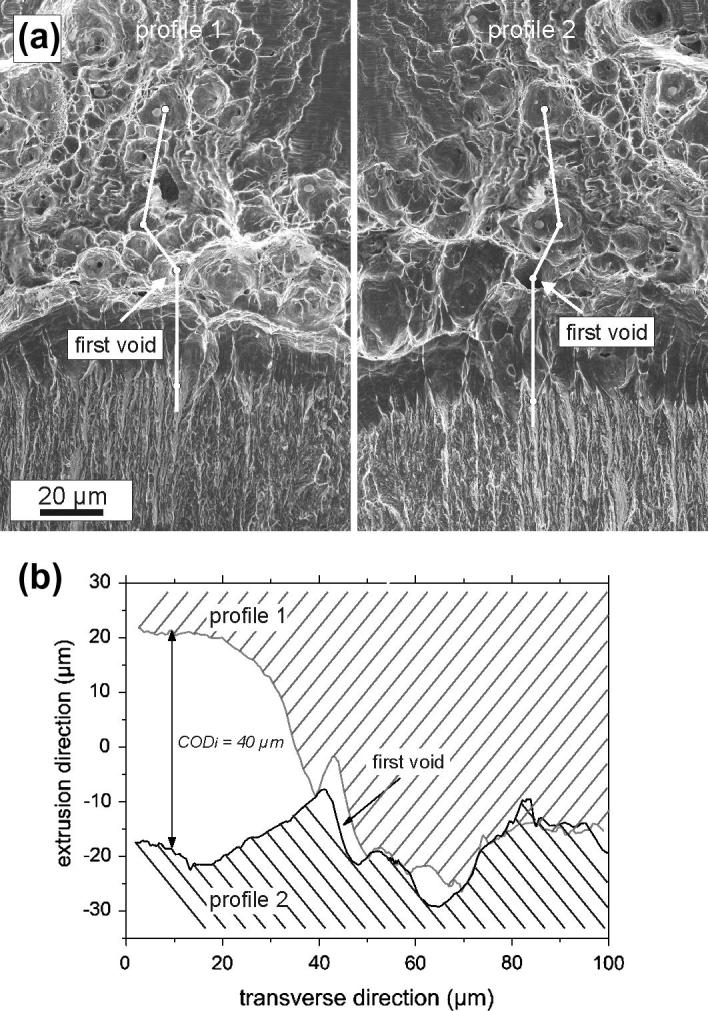
Example for the CODi determination procedure. (a) Comparison of fractographs taken from the two halves of the broken specimen at the same position. A pair of crack paths along which the CODi can be estimated is indicated. (b) Arrangement of the crack profiles at the point prior to coalescence of first void, which defines CODi.
Table 5.
Compilation of the measured CODi values for orientation C. The average value is 38.4 ± 6.3 μm.
| Crack profile | CODi (μm) |
|---|---|
| 1 | 33.3 |
| 2 | 40.0 |
| 3 | 41.7 |
| 4 | 30.6 |
| 5 | 46.2 |
The pre-factor, dn, mainly depends on the dominant stress state and strain hardening coefficient. A value of 0.78 was chosen, which is typical for a non-hardening material describing the deformation behaviour of this material well for the high strain regime. The reference stress σ0 is taken to be the average of yield and ultimate strength of testing orientation B, giving 915 MPa. The fracture initiation toughness, Ji, was calculated to be 45.1 kJ m−2. Comparing Ji with JIC clearly shows a distinctive lower fracture initiation toughness. This can be attributed to the fact that JIC is normally measured at a certain stable crack advance, here 0.2 mm and not at the point of crack initiation.
A further informative comparison can be given by calculating the J value right before the initiation of the delaminations regarding the experiment presented in Fig. 5a. A maximum load of 3500 N before the first pop-in was taken and the procedure mentioned in Section 3.4.2 was used to evaluate the J value at the initiation of the first delamination.1 Accordingly, a J value of ∼28 kJ m−2 was calculated. This value is lower than Ji with 45.1 kJ m−2, which indicates that the formation of the delaminations and the connected change in the local stress state contribute considerably to the measured initiation toughness, Ji. Simultaneously, the J value at the point of delamination initiation is approximately already 10 times higher than the one measured for orientation A with a value of only 2.3 kJ m−2. Therefore, the observed large delaminations cannot be the exlusive origin for the large toughness difference compared to orientation A.
Another type of delamination was indentified and can be seen in the fractographs in Figs. 5d and 6a. Within the pre-fatigued areas small cracks are observable which open up perpendicular to the crack propagation direction within the stretched zone. Their effect on the blunting of the crack will be the same as for the aforementioned delaminations. Also, these micro-delaminations, formed during the fatigue pre-cracking procedure, induce a stress relaxation of the blunted crack, reduce the crack driving force and allow for further deformation before crack propagation, leading to a higher fracture toughness. To conclude, these microcracks on the surface can be regarded as delaminations which promote locally dimple fracture compared to orientation A, where a type of granular fracture occurs. This type of delamination can be named micro-delamination, as introduced before, and the ones visible at low magnifications in Figs. 3d and 5b macro-delaminations. The mechanical origin of the macro- and micro-delaminations, however, is the same, namely the weak crack plane with low fracture toughness along the extrusion direction. Finally, the fracture process for this testing direction can be divided into the following stages:
-
(i)
During loading the crack blunts, micro-delaminations reduce the through-thickness constraint and reduce the local crack driving force, Fig. 5d.
-
(ii)
Macro-delaminations are formed indicated by load drops reducing the constraint further, Fig. 5a and b.
-
(iii)
The blunted crack coalesces with the voids ahead of the crack tip; the crack front propagates between the delaminations, Fig. 5c.
-
(iv)
Simultaneously the ligaments between the delamination show strong contraction comparable to a tensile specimen, see upper part of Fig. 5b.
4.4. Analysis of the observed crack path
Up to this point of the discussion it has not been clear which crack path (trans- or intercrystalline) is present in the material for orientation A. The fracture process for orientation A, which has a direct consequence for the other testing directions, was described as a failure process along the elongated microstructure. In order to investigate the crack path and the fracture process in a more detailed way, the crack path along the delaminations can be investigated since it is the same as for orientation A.
For this purpose a specimen with orientation C was cut along an inspection plane perpendicular to the macroscopic crack propagation direction, revealing single delamination reaching far into the volume beneath the actual crack surface, see inset image in Fig. 7. These cracks do not propagate through the entire specimen, unlike those in specimen orientation A. As a result it is possible to inspect the crack path at the crack tip, where the crack opening is not too large and a direct comparison of both crack wakes is possible by means of electron back-scatter diffraction (EBSD) techniques. The result of such an investigation is presented in Fig. 7 in an IPF map superimposed with the image quality revealing the crack position (black area). It can be clearly seen that the crack propagates along the aligned microstructure, as explained before. A comparison of both crack wakes shows that predominantly intercrystalline fracture occurs. The observed intercrystalline fracture does not seem to be a result of a certain texture component, because adjacent grains on both crack wakes with arbitrary orientations were found. In order to substantiate this statement several cracks were investigated. Additionally, the intercrystalline fracture should not be a consequence of an embrittlement by impurities as a coarser-grained microstructure of the same material fails in a ductile manner [33]. More likely, it seems a deformation mediated separation process at the grain boundaries is responsible for the intergranular fracture.
Fig. 7.
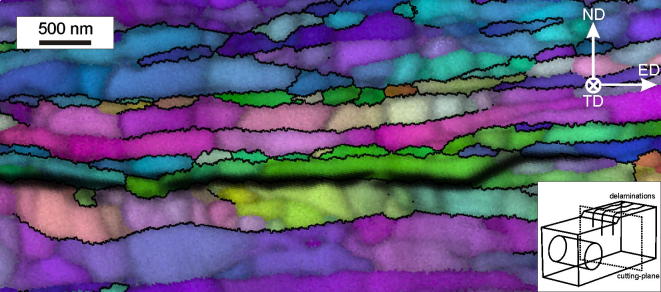
Typical crack path forming a delamination in specimens with orientation C presented in an IPF map with superimposed image quality. The crack favours propagation along the strongly fragmented areas.
If the relatively low fracture toughness in these samples would only be determined by the energy to cleave the iron grain boundaries the largest contribution to the toughness could simply be estimated by the Griffith toughness:
| (7) |
γ0 is the free surface energy with a value of 2.4 J m−2 [34] and E the Young‘s modulus of iron. Calculating the Griffith toughness yields a fracture toughness of only 1 MPa m1/2. The large difference between the calculated and the measured value indicates that in reality extensive plasticity ahead of the propagating crack must dominate, leading to intergranular separation. This fracture mechanism might also be supported by the low amount of inclusions in the material which are required to initiate ductile dimple fracture. A similar fracture type has also been observed in a former study dealing with very pure but a coarser-grained iron [35].
4.5. Impact of extrinsic toughening effects on post-necking ductility in tensile tests
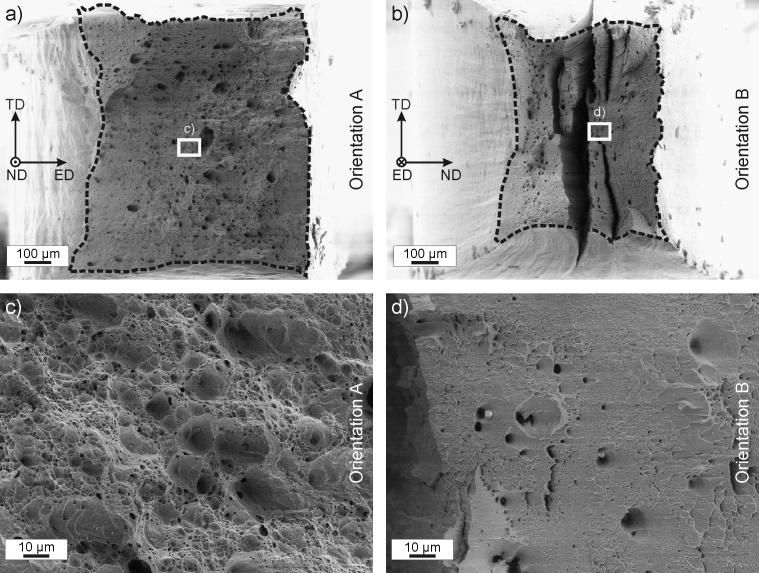
The specimen orientation of the tensile tests was chosen to enable a direct comparison between tensile specimens and fracture specimens having the same principal loading directions. As presented in Table 2, a distinctive difference in post-necking ductility-related parameters, specifically the elongation at fracture, εfra, and the reduction in area, Z, was found. In order to explain this difference in ductility, a direct comparison of the fracture surfaces is presented in Fig. 8. For orientation A, Fig. 8a, a relatively flat fracture surface was observed whereas for orientation B, Fig. 8b, the fracture surface is divided into two halves separated by a delamination. In the case of orientation A the final failure is dominated by the stress triaxiality promoting a failure process through void initiation at inclusions and coalescence of the voids, reflected by large pores on the fracture surface, Fig. 8c. The incidence of the delamination in orientation B during loading reduces the stress triaxiality and provokes shear deformation of the remaining ligaments under an inclined plane, resulting in a considerably smooth fracture surface compared to orientation A (compare Fig. 8c and d). This difference in the macroscopic deformation leads to a stronger post-necking contraction for orientation B, compare Fig. 8a and b, and so to a higher post-necking ductility. In both the fracture and the tensile tests, the described differences in the measured values can be explained by the existence of weak interfaces in the material.
Fig. 8.
Fracture surfaces after tensile testing for (a) an A oriented specimen and (b) a B oriented specimen. The reduction in area is marked with a dashed line. Details are presented in (c) and (d).
4.6. Remarks to other SPD processes
Similar trends regarding the presented anisotropy in the fracture behaviour and the significance of extrinsic toughening mechanism have already been made with iron processed by high pressure torsion (HPT) [36]. In contrast to ECAP, HPT can provide smaller grain sizes due to the possibility of applying much higher strains [37,38]. Nevertheless, the key feature determining anisotropy, namely the elongated microstructure, is present for both deformation routes: ECAP route A and monotonic HPT. Thus it cannot be precluded that such anisotropies could be found by processing iron by ARB, which is also well known to lead to elongated microstructures.
Regarding the classical ECAP deformation routes similar anisotropies can be expected from material processed by route C. A possible strategy to overcome the anisotropy may be the use of processing route Bc, which is generally known to result in a more equiaxed microstrcuture. This assumption will be the focus of future work.
In the end it should be stated that such mechanical anisotropies as found here for the fracture initiation toughness should not be regarded as a negative material feature. On the contrary, as known from naturally growing materials like wood [39] or bone [40], mechanical anisotropies are required to obtain exceptional material property combinations, such as high damage tolerance. Nevertheless, mechanical anisotropies in SPD materials need to be investigated, especially when theoretical studies attempt to correlate the fracture resistance to the grain size [41–43].
5. Conclusions and summary
In this paper the fracture characteristics of ECAP-deformed iron processed by route A were comprehensively examined and the resulting structure–property relationships were enlightened. The main results can be summarized as follows:
-
1.
The evaluated fracture toughness is greatly controlled by the chosen specimen orientation, leading to strong variations in the fracture toughness. Regarding JIC a difference by a factor of 50 between the weakest and strongest testing direction was found.
-
2.
This pronounced anisotropy can be attributed to the deformation-induced lamellar microstructure, causing a low fracture resistance through intercrystalline failure along the elongated grains.
-
3.
The weak specimen orientation causes either crack deflection or crack delamination in the other testing directions and promotes an extrinsically caused toughness increase leading to a very high fracture toughness.
-
4.
Ductility-related parameters, namely the elongation at fracture, εfra, and the reduction in area, Z, exhibit a strong dependence on the testing direction as well. This again seems to be a consequence of the discussed fracture anisotropy.
The findings clearly show the great importance of an orientation-dependent fracture mechanical assessment of SPD processed material exhibiting lamellar microstructures as typical for ECAP processing via route A, but also monotonic HPT or ARB.
Acknowledgments
This work was supported by the Austrian Science Fund FWF in the framework of Research Project P24141-N19. The authors also would like to thank Prof. Valiev and his team for the processing of the material.
Footnotes
Fig. 5b and c shows that the crack propagation throughout the specimen is very small compared to the remaining ligament length, which is a requirement for this calculation.
References
- 1.Valiev R.Z., Alexandrov I.V., Zhu Y.T., Lowe T.C. J Mater Res. 2002;17:5. [Google Scholar]
- 2.Zhu Y.T., Langdon T.G. JOM. 2004;56:58. [Google Scholar]
- 3.Zhu Y.T., Lowe T.C., Langdon T.G. Scripta Mater. 2004;51:825. [Google Scholar]
- 4.Huang X., Tsuji N., Hansen N., Minamino Y. Mater Sci Eng. 2003;A340:265. [Google Scholar]
- 5.Lee J.C., Seok H.K., Suh J.Y. Acta Mater. 2002;50:4005. [Google Scholar]
- 6.Utsunomiya H., Hatsuda K., Sakai T., Saito Y. Mater Sci Eng. 2004;A372:199. [Google Scholar]
- 7.Iwahashi Y., Horita Z., Nemoto M., Langdon T.G. Acta Mater. 1998;46:3317. [Google Scholar]
- 8.Sivaraman A., Chakkingal U. Mater Sci Eng. 2008;A487:264. [Google Scholar]
- 9.Topic I., Höppel H.W., Göken M. J Mater Sci. 2008;43:7320. [Google Scholar]
- 10.Sabirov I., Perez-Parado M.T., Molina-Aldareguia J.M., Semenova I.P., Salimgareeva G.Kh., Valiev R.Z. Scripta Mater. 2011;64:69. [Google Scholar]
- 11.Meredith C.S., Khan A.S. Int J Plast. 2012;30–31:202. [Google Scholar]
- 12.Valiev R.Z., Islamgaliev R.K., Alexandrov I.V. Prog Mater Sci. 2000;45:103. [Google Scholar]
- 13.Zhilyaev A.P., Langdon T.G. Prog Mater Sci. 2008;53:893. [Google Scholar]
- 14.Ovid’ko I.A., Sheinerman A.G., Aifantis E.C. Acta Mater. 2011;59:5023. [Google Scholar]
- 15.Frederiksen S.L., Jacobsen K.W., Schiøtz J. Acta Mater. 2004;52:5019. [Google Scholar]
- 16.Latapie A., Farkas D. Phys Rev B. 2004;69:134110. [Google Scholar]
- 17.Morozov N.F., Ovid’ko I.A., Sheinerman A.G., Aifantis E.C. J Mech Phys Solids. 2010;58:1088. [Google Scholar]
- 18.ASTM E399-90. Standard test method for plane-strain fracture toughness of metallic materials. Philadelphia (PA): American Society of Testing and Materials; 1990.
- 19.ASTM E1820-01. Standard test method for measurement of fracture toughness. Philadelphia (PA): American Society of Testing and Materials; 2001.
- 20.Stampfl J., Scherer S., Gruber M., Kolednik O. Appl Phys A. 1996;63:341. [Google Scholar]
- 21.Stampfl J., Scherer S., Berchthaler M., Gruber M., Kolednik O. Int J Frac. 1996;78:35. [Google Scholar]
- 22.Beyerlein I.J., Tóth L.S. Prog Mater Sci. 2009;54:427. [Google Scholar]
- 23.Anderson T.L. 2nd ed. CRC Press; Boca Raton (FL): 1995. Fracture mechanics—fundamentals and applications. [Google Scholar]
- 24.Taylor L.G., Ryder D.A. Composites. 1976;7(1):27. [Google Scholar]
- 25.Tayon W., Crooks R., Domack M., Wagner J., Elmustafa A.A. Exp Mech. 2010;50:135. [Google Scholar]
- 26.Emburry J.D., Petch N.J., Wraith A.E., Wright E.S. Trans Metall Soc AIME. 1967;239:114. [Google Scholar]
- 27.Guo W., Dong H., Lu M., Zhao X. Int J Press Vess Pip. 2002;79:403. [Google Scholar]
- 28.Hertzberg R.W. 4th ed. Wiley; New York: 1996. Deformation and fracture mechanics of engineering materials. [Google Scholar]
- 29.Cotterell B., Rice J.R. Int J Frac. 1980;16:155. [Google Scholar]
- 30.Shanmugam P., Pathak S.D. Eng Frac Mech. 1996;53:991. [Google Scholar]
- 31.Song R., Ponge D., Raabe D. Acta Mater. 2005;53:4881. [Google Scholar]
- 32.Shih C.F. J Mech Phys Solids. 1981;29:305. [Google Scholar]
- 33.Hohenwarter A., Kammerhofer C., Pippan R. J Mater Sci. 2010;45:4805. [Google Scholar]
- 34.Tyson W.R., Miller W.A. Surf Sci. 1977;62:267. [Google Scholar]
- 35.Bramfitt B.L., Marder A.R. Met Trans. 1977;A8:1263. [Google Scholar]
- 36.Hohenwarter A., Pippan R. Mater Sci Eng. 2010;A572:2649. [Google Scholar]
- 37.Hohenwarter A., Bachmaier A., Gludovatz B., Scheriau S., Pippan R. Int J Mater Res (formerly Z. Metallk.) 2009;100(12):1653. [Google Scholar]
- 38.Pippan R., Scheriau S., Taylor A., Hafok M., Hohenwarter A., Bachmaier A. Annu Rev Mater Res. 2010;40:319. [Google Scholar]
- 39.Ashby M.F., Easterling K.E., Harrysson R., Maiti S.K. Proc R Soc A. 1985;398:261. [Google Scholar]
- 40.Peterlik H., Roschger P., Klaushofer K., Fratzl P. Nat Mater. 2006;5:52. doi: 10.1038/nmat1545. [DOI] [PubMed] [Google Scholar]
- 41.Liu Y., Zhou J., Shen T., Hui D. J Mater Res. 2011;26:1734. [Google Scholar]
- 42.Zeng X.H., Hartmaier A. Acta Mater. 2010;58:301. [Google Scholar]
- 43.Ovid’ko I.A., Sheinerman A.G. Acta Mater. 2010;58:5286. [Google Scholar]


