Abstract
Objectives
The accuracy and precision of two new methods of model-based radiostereometric analysis (RSA) were hypothesised to be superior to a plain radiograph method in the assessment of polyethylene (PE) wear.
Methods
A phantom device was constructed to simulate three-dimensional (3D) PE wear. Images were obtained consecutively for each simulated wear position for each modality. Three commercially available packages were evaluated: model-based RSA using laser-scanned cup models (MB-RSA), model-based RSA using computer-generated elementary geometrical shape models (EGS-RSA), and PolyWare. Precision (95% repeatability limits) and accuracy (Root Mean Square Errors) for two-dimensional (2D) and 3D wear measurements were assessed.
Results
The precision for 2D wear measures was 0.078 mm, 0.102 mm, and 0.076 mm for EGS-RSA, MB-RSA, and PolyWare, respectively. For the 3D wear measures the precision was 0.185 mm, 0.189 mm, and 0.244 mm for EGS-RSA, MB-RSA, and PolyWare respectively. Repeatability was similar for all methods within the same dimension, when compared between 2D and 3D (all p > 0.28). For the 2D RSA methods, accuracy was below 0.055 mm and at least 0.335 mm for PolyWare. For 3D measurements, accuracy was 0.1 mm, 0.2 mm, and 0.3 mm for EGS-RSA, MB-RSA and PolyWare respectively. PolyWare was less accurate compared with RSA methods (p = 0.036). No difference was observed between the RSA methods (p = 0.10).
Conclusions
For all methods, precision and accuracy were better in 2D, with RSA methods being superior in accuracy. Although less accurate and precise, 3D RSA defines the clinically relevant wear pattern (multidirectional). PolyWare is a good and low-cost alternative to RSA, despite being less accurate and requiring a larger sample size.
Keywords: Polyethylene wear, RSA, PolyWare, THR, Accuracy, Radiostereometric analysis
Article focus
Comparison of accuracy and precision in measurement of polyethylene wear using model-based radiostereometric analysis (RSA) methods and plain -radiographs
The methods compared were: model-based RSA using laser-scanned models of acetabular components (MB-RSA) (RSAcore; LMUC, Leiden, The Netherlands), model-based RSA using computer-generated elementary geometrical shape models (EGS-RSA) (RSAcore; LMUC), and PolyWare (Draftware -Developers Inc., Vevay, Indiana)
Methods are compared for both two- (2D) and three-dimensional (3D) wear measurements using a phantom device to simulate 3D polyethylene wear
Key messages
For all methods, precision and accuracy were better in 2D measurements compared with the 3D measurements
The RSA methods showed superior accuracy compared with PolyWare, with the 3D RSA methods clearly defining the clinically relevant wear pattern
This is the first study to compare PolyWare with RSA
Strengths and limitations
Not all in vivo variable penetration patterns were -replicated
Experiments were conducted for a single size of -femoral head and acetabular component
The precision (repeatability) and accuracy were assessed under controlled conditions in a consistent manner
Introduction
Interest in the evaluation of the wear of hip components has increased with the growing options of new low-wear bearing surfaces and with a constantly increasing number of total hip replacements (THRs) inserted in still younger individuals. During the 1990s, computerised methods with edge-detection features for plain radiographs were developed,1-7 and the accuracy of many of these methods has been evaluated.8-12 Devane’s PolyWare method1,4,5 and Martell’s Hip Analysis Suite software6 have been the most popular methods. However, although the accuracy and precision of both methods were promising in the laboratory setting, the clinical precision proved only slightly better than manual methods.9,11,13 The poor quality of the cross-table lateral radiographs required for the three-dimensional (3D) evaluation was blamed for the inferior precision experienced in that assessment.2,4,5,14,15
Radiostereometric analysis (RSA) is the most accurate tool for the evaluation of polyethylene (PE) wear in THR and is considered to be the gold standard of PE wear measurement.8,16 With marker-based RSA, beads are placed directly into the anterior rim of the sterile PE liner during surgery, or the metal acetabular shells are modified with tantalum bead towers prior to use.12,17,18 Problems regarding the use of marker-based RSA for the analysis of PE wear include occlusion of beads in the PE liner (by the solid acetabular shell) and the potential change of bony fixation of the acetabular shell by bead towers. Recently, new model-based RSA methods, removing the need for bead-marking of implants, have been developed and validated for evaluation of implant migration with respect to a rigid body of bone markers.19-26 The immediate advantage of model-based RSA is that the expensive and often slow process of implant bead-marking and renewed CE marking of the implant becomes obsolete. Furthermore, model-based RSA methods allow for the retrospective comparison of PE wear in stereoradiographic series of THRs.
Phantom studies have been recommended for validation of new RSA methods, and while the Umeå RSA software has been studied extensively,12,17,27 only one recent phantom study evaluate the Leiden Model-based RSA software for PE wear analysis.26 The experimental accuracy and precision of marker-based RSA has been compared with the Martell plain film method,28 yet only the clinical precision of PolyWare has been compared with EGS model-based RSA.29
The setup for RSA is costly, the stereo radiographs cannot readily replace conventional radiographs, and therefore the method is not widely used. Thus many radiological in vivo studies of PE wear in THR are still based on computerised measurements on plain radiographs, and these methods are still very useful in retrospective, long-term clinical follow-up studies of PE wear and in the evaluation of older, high-wear bearing couples.9,13
The purpose of this hip phantom study was to assess the experimental accuracy and precision (repeatability) of three different computerised methods for THR wear analysis: two RSA methods using different types of models (model-based RSA using laser-scanned acetabular component models (MB-RSA) and model-based RSA using computer-generated elementary geometrical shape models (EGS-RSA)) and one plain radiological method (PolyWare). The hypothesis was that RSA methods would show superior accuracy and precision compared with PolyWare.
Materials and Methods
This study was prepared in accordance with the -Standards for Reporting of Diagnostic Accuracy (STARD) initiative.30
Phantom setup and radiographs
A custom-made phantom fixture for the femoral head and acetabular shell was constructed of radiolucent materials, allowing for radiological exposure of the components in all directions (Fig. 1). The femoral head could be moved independently in craniocaudal, mediolateral and anteroposterior (AP) directions with use of three digital dial micrometers, each with a resolution of 0.001 mm (Hofmann GmbH, Achim, Germany). If desired, the acetabular component could be rotated and fixed in any preferred combination of abduction (tilt) and anteversion. A wire marked the horizontal plane. A 56 mm Mallory-Head Solid Finned Ringloc metal shell (Biomet Inc., Warsaw, Indiana) and a 28mm cobalt-chromium femoral head fixed on a Bi-Metric femoral stem (both Biomet Inc.) were mounted in the phantom fixture with the ball placed concentrically within the acetabular component (zero wear position).
Fig. 1.
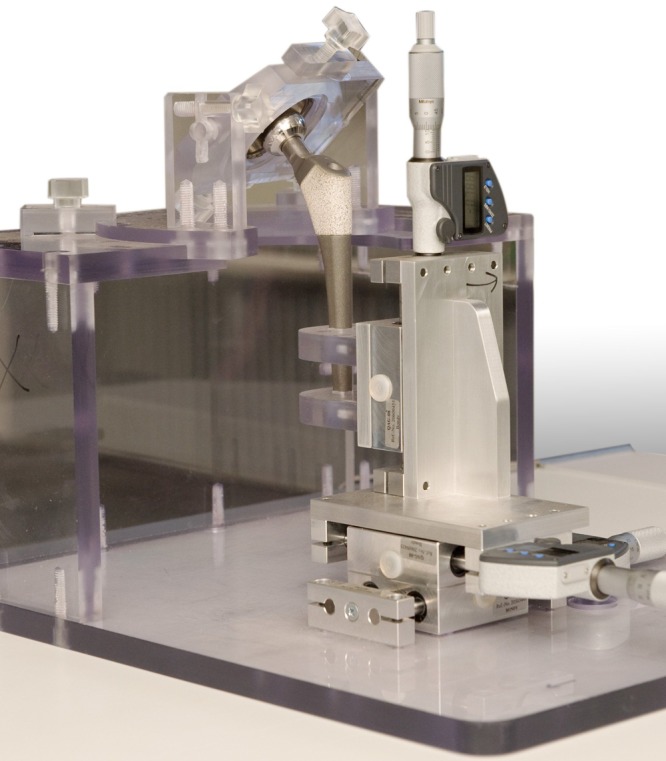
Photograph showing the phantom fixture with a Bi-Metric hip system that was used to simulate the displacement of the femoral head into the acetabular- component.
For radiological imaging, the phantom was placed on the side imitating a right hip (Fig. 2). The distance between the beam source and the femoral head was 100 cm, with the plain films placed 15 cm below the -femoral head, and the stereo film placed below the calibration box. The ray centre was positioned approximately at the centre of the femoral head. Plain AP, plain cross-table lateral (CTL) and stereo radiographs were obtained consecutively for each new position of simulated wear. A total of 16 AP, 16 CTL, and 16 stereo radiographs were made. All radiographs were obtained on one single day in January 2009, at the University Hospital of Aarhus, -Denmark. Thus the phantom was not moved from the x-ray bed. A standard RSA setup of two synchronised ceiling-fixed roentgen tubes (Arco-Ceil/Medira; Santax -Medico, Aarhus, Denmark), angled toward each other at a 40° angle, and a focused-grid uniplaner carbon calibration box (Box 24 Medis Specials, Leiden, the Netherlands) were used. All radiographs were fully digital (FCR Profect CS; Fujifilm, Tvedbæk, Denmark) and were stored without compression. The AP and CTL radiographs used for analyses were 2364 × 2964 pixels in size (grayscale tiff-format) and the stereo radiographs 2080 × 2529 pixels (grayscale bmp-format).
Fig. 2.
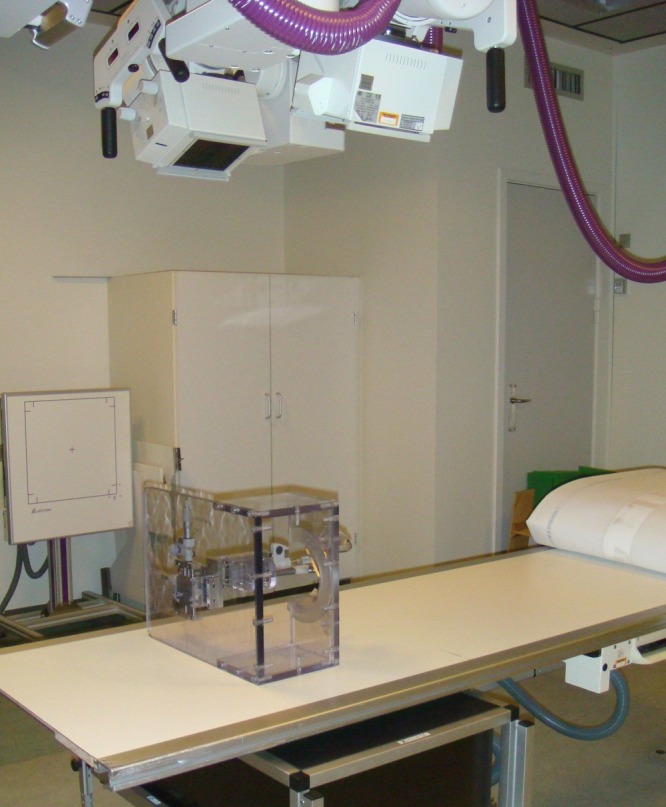
Photograph showing the stereo radiological setup with two synchronised ceiling-fixed roentgen tubes, the hip phantom on its side, and a uniplanar carbon calibration box with digital films.
Displacement protocol
The tilt and anteversion of the acetabular component were kept constant at 45° and 25°, respectively. A displacement protocol of five predefined 3D wear vectors was defined for each of three wear categories: low wear (10 µm, 20 µm, 30 µm, 40 µm and 50 µm), medium wear (100 µm, 200 µm, 300 µm, 400 µm and 500 µm) and high wear (1000 µm, 2000 µm, 3000 µm, 4000 µm and 5000 µm) in order to assess the total scale of clinical wear in numbers, and graphically the three categories of wear. Thus 15 wear advancements were obtained as well as a baseline value (vector of 0 µm) with the femoral head carefully centered in the acetabular shell (simulating a post-operative radiograph). For each wear simulation, all three micrometers were advanced according to the displacement protocol in the superior, medial, and posterior directions between radiological recordings. The head was moved from one position to the next position. In the position of the 5000 µm vector, the femoral head almost touched the dome of the acetabular shell (simulated wear-through with a resultant wear vector of 8.7 mm = liner thickness). For comparison with the measured wear, we calculated the true vector length by use of the Pythagorean Theorem, where “a” defined the advancement of the micrometer, and “r” defined the radius of the femoral head.
The calculations of true wear followed these formulae:
2D linear wear = √(a2 + a2)
3D linear wear = √(a2 + a2 + a2)
The calculated “true wear” ranged from 0.014 to 7.071 for the two-dimensional (2D) linear vectors (mm) and from 0.017 to 8.660 for the 3D linear vectors (mm).
Methods of radiological wear measurement
Wear was measured on radiographs with the use of three commercially available computerised methods – one method for plain radiographs and two methods for stereo radiographs. The method used for plain radiographs was -PolyWare 3D Pro 5.10 (Draftware Developers Inc., Vevay, Indiana).1 The RSA methods used were model-based RSA 3.2 (RSAcore; LMUC, Leiden, The Netherlands) with -models created by laser-scanning of the used components (reverse engineering) (MB-RSA)21 and model-based RSA 3.2 (RSAcore; LMUC) with models of an elementary geometrical shape created by the computer (EGS-RSA).25 The two RSA methods and PolyWare are shadow-casting methods, that is, the radiological shadows of one or both components are cast back toward the point source of the beam to determine the relative positions of each object.13,31 PolyWare as well as both RSA methods are only applicable for cementless acetabular components, and EGS-RSA is further restricted to hemispherical acetabular components.
2D RSA simply refers to a linear measure in the frontal plane obtained from two vectors (x and y), while 3D RSA refers to a linear measure obtained from three vectors (x, y, and z) in the frontal and in the sagittal plane. For the two RSA methods, 2D and 3D wear could be calculated from the measured X, Y, and Z coordinates according to the Pythagorean Theorem. The PolyWare method for plain radiographs required only AP films for 2D wear measurements, whereas for 3D both AP films and CTL films were used. The PolyWare method presented 2D and 3D wear directly in the analysis output.
Analysis of radiographs
For MB-RSA analysis, the 56 mm Mallory-Head solid finned metal shell used with the radiological recordings of the phantom was reverse engineered with laser-scanning to a cup model of 5000 triangular elements (TNO Industrie en Techniek, Eindhoven, the Netherlands).21 The MB-RSA software -program used three algorithms (IIPM, DIFDoNLP, and DIFDHsAnn) to fit the cup model to the regions of interest marked on the peripheries of the cup in the stereo radiographs (pose estimation).22 The simple spheres used with EGS-RSA were generated with the EGS-RSA software, and the EGS algorithm was used to optimise the fit of the sphere models to the regions of interest marked on the peripheries of the femoral head and cup on the stereo radiographs.25 All radiostereometric analyses were -performed by one very experienced observer (RM). For both RSA methods, the software computed the relative motion between exposures of the center of the femoral head (sphere) in relation to the center of the acetabular component (scanned model or EGS sphere model). The graphic output of model-based RSA with use of a scanned acetabular component model and an EGS sphere model is illustrated in Figs 3a and 3b, respectively.
Figs. 3a - 3c.
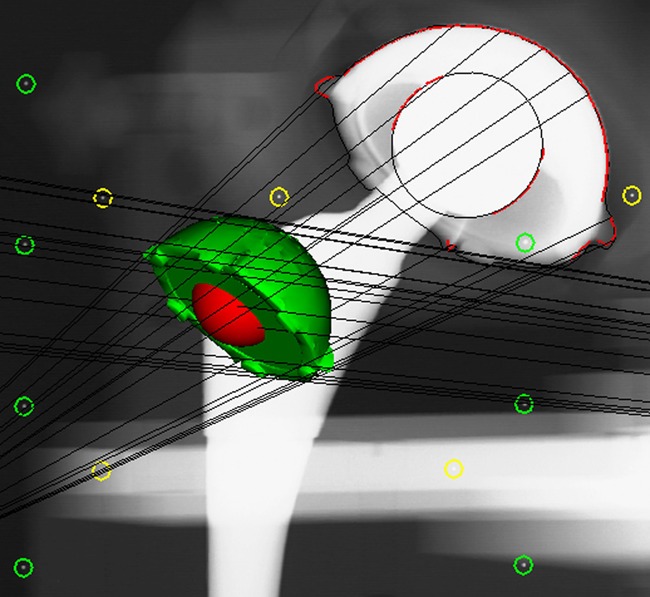
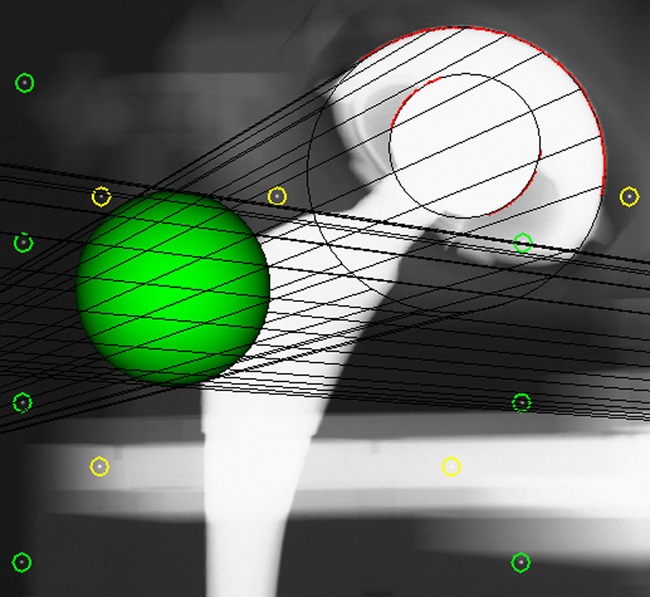
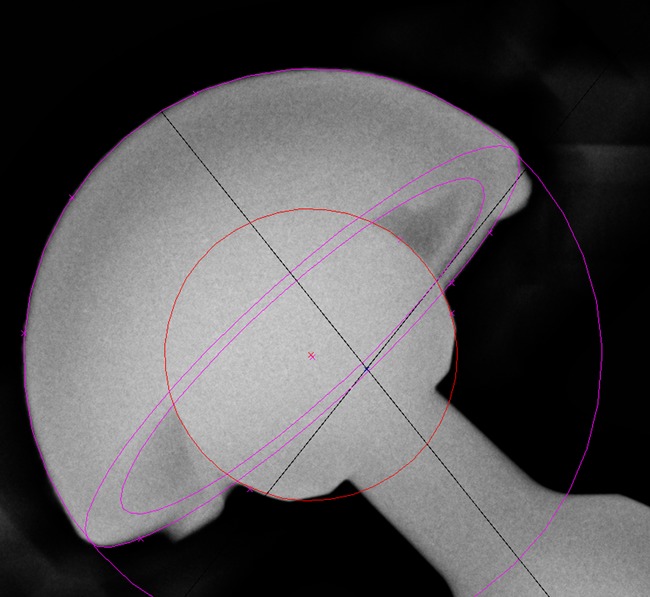
Graphic outputs for the assessment of polyethylene wear, a) using model-based radiostereometric analysis (MB-RSA), showing the scanned model of the acetabular component (in green), b) geometrical sphere model RSA (EGS-RSA), showing the regions of interest (in which the models are matched with mathematical algorithms) marked with red lines on the peripheries of the acetabular component and femoral head, and c) the PolyWare software, showing ellipses fitted to the peripheries of the acetabular component and femoral head shadows.
Before PE wear analysis on the plain radiographs, the exact location of the central ray was estimated by penciling diagonals between the corners of the rectangular exposure in the radiographs (Adobe Photoshop CS3; Adobe Systems Software Ltd, Dublin, Ireland). PolyWare is a computerised method featuring a digital edge-detection algorithm to fit circles and ellipses to the peripheral shadows of the femoral head and acetabular component. This technique, developed by Devane et al,4,5 requires computer-assisted design models of the acetabular system used (accessible in the design model library of the software), in addition to knowledge of the femoral head and cup diameters, and estimation of the beam center in the x-ray. 2D PE wear is measured in the plane of the AP radiograph, and 3D PE wear is measured by a combination of an AP and CTL radiographs between two time intervals.
The quality of the plain AP and CTL radiographs was good, and the automatic circle-fitting with the PolyWare software was never overruled by the manual digitiser tablet. However, automatic analyses of a radiograph were repeated a third time if the analyst observed a twofold difference between the first and second analyses, according to clinical practice with the software.31 This was the situation with a few analyses, and in those cases, a third analysis was performed, and the result least correspondent to the two others was excluded. Analyses were performed by one very experienced observer (LLA). The graphic output of PE wear analysis by PolyWare is illustrated in Figure 3c.
Precision
Precision of the methods was evaluated by 15 double wear measurements. The bias (systematic error) was calculated as the mean difference between the first and the second set of measurements. The random error was expressed by the repeatability standard deviation (Sr) of two test results (double analysis, calculated as the standard deviation of the differences between the two double measurements divided by square root 2) and by the 95% repeatability limits (calculated as 1.96 × the square root of 2 × Sr).32 The precision (repeatability) between the methods was compared pair-wise by testing the Sr-ratios equal to 1 (F-test).
Accuracy
For accuracy assessment, the means of 14 double measurements were used. Several methods of accuracy calculations have been suggested, and to ease comparison with the literature, we evaluated these data by three different models: Model 1 (no bias), Model 2 (constant bias) and Model 3 (linear bias) (see Supplementary Material for equations and details). In all three accuracy models the Root Mean Square Errors (RMSE) was calculated. In model 2 one takes into account a possible constant bias estimated as the mean difference between the measured and the true values, and the RMSE in this situation is the standard deviation of the difference between the measured and the true values. In model 3 one takes into account a possible linear bias using linear regression of the measured values on the true values, and the RMSE in this situation is the standard deviation around the estimated line. If in model 3 the slope is 1 then models 2 and 3 present equal results, and furthermore, if the intercept is 0, then there is no bias and models 1 and 3 give equal results. In model 2, if the constant bias is 0, then models 1 and 2 are equal. Estimated bias, slopes, and intercepts for all methods are stated with 95% confidence intervals. Accuracy between the different methods was compared pair-wise by testing the ratios of the RMSE from model 3 equal to 1 (Pitmans test).
Interpretation of the precision of the methods (Fig. 4), between methods (Fig. 5), and between the measured wear and the true wear (Fig. 6) was further assessed on the basis of Bland-Altman plots with limits of agreements (LOA = mean difference ± 1.96 × sd of differences).33
Fig. 4.
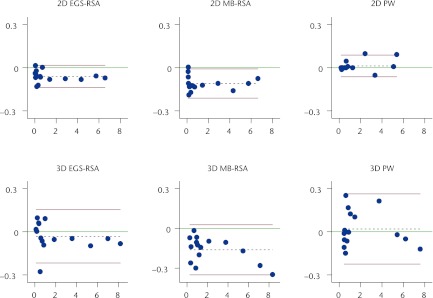
Bland-Altman plots of precision (repeatability) with 95% limits of agreement (bias with 95% repeatability limits (1.96 × √[2 × Sr]))39 for the two- (2D) and three-dimensional (3D) wear measurements with the three methods (see Table I). The x-axis shows the average of two measurements and the y-axis the difference between them (measurement 1 – measurement 2). The red lines denote the 95% repeatability limits, the dashed black line represents the bias from 0, and the green line, at y = 0, represents the line of perfect average agreement. The blue dots represent individual double measures (MB-RSA, model-based radiostereometric analysis; EGS-RSA, geometrical sphere model radiostereometric analysis; PW, PolyWare).
Fig. 5.
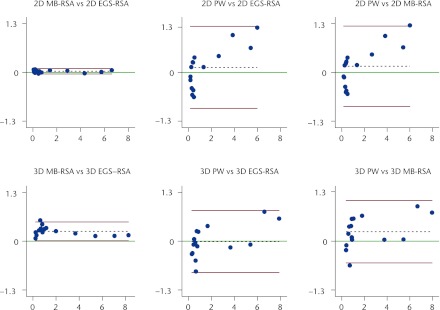
Bland-Altman plots with 95% limits of agreement (bias ± 1.96) comparing two- (2D) and three-dimensional (3D) wear measurements between the three methods.39 The x-axis shows the average of the measurements of two methods, and the y-axis the difference between measurements of two methods. The red lines denote the 95% limits of agreement, the dashed black line represents the bias from 0, and the green line, at y = 0, represents the line of perfect average agreement. The blue dots represent individual double measures (MB-RSA, model-based radiostereometric analysis; EGS-RSA, geometrical sphere model radiostereometric analysis; PW, PolyWare).
Fig. 6.
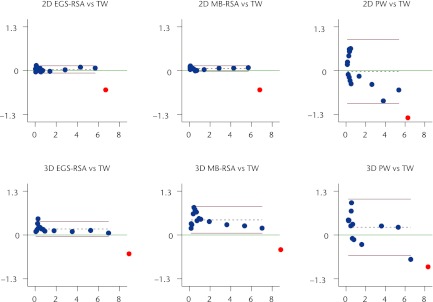
Bland-Altman plots of accuracy with 95% limits of agreement (bias ± 1.96) (the closeness of agreement between measured wear with the three methods and the true wear (TW) (n = 14)). PolyWare (PW) has problems measuring the lowest wear measures. The x-axis shows the average of measured wear and true wear, and the y-axis the difference between measured wear and true wear. The red lines denote the 95% limits of agreement, the dashed black line the bias from 0, and the green line, at y = 0, represents the line of perfect average agreement. The blue dots represent individual double measures, and the red dot the measurement of “near wear-through” of the liner. (MB-RSA, model-based radiostereometric analysis; EGS-RSA, geometrical sphere model radiostereometric analysis).
RSA
According to Ryd,34 a 3D precision is mathematically difficult to present since the precision is different for each direction (x, y, and z) and cannot easily be added. For further interpretation of RSA, we therefore presented repeatability and accuracy for each direction (x, y, and z).
Statistical analysis
Definitions as specified in “Standard Practice for Use of the Terms Precision and Bias in ASTM Test Methods; designation E 177-08”32 were applied. Statistical significance was assumed at p < 0.05.
Results
Precision
The 95% repeatability limits (mm) for 2D wear measures were 0.078 mm, 0.102 mm, and 0.076 mm for EGS-RSA, MB-RSA, and PolyWare, respectively. The 95% repeatability limits (mm) for 3D wear measures were 0.185 mm, 0.189 mm, and 0.244 mm for EGS-RSA, MB-RSA, and PolyWare, respectively. Bias was between -0.06 mm and -0.11 mm (p < 0.001) for the 2D RSA methods, and 0.01 mm (p = 0.23) for the PolyWare method. Bias for the 3D methods was -0.032 mm (p = 0.21), -0.162 mm (p < 0.001), and 0.019 mm (p = 0.56) for EGS-RSA, MB-RSA, and PolyWare, respectively. No significant difference in repeatability was observed between any of the wear measurement -methods (all p > 0.28). Further results of repeatability are presented in Tables I and II.
Table I.
Precision: repeatability of two test results within the three methods based on 15 double measurements (CI, confidence interval)
| Wear measurement method* | Mean (range)† | Bias (95% CI)‡ | Sr§ | 95% repeatability limits¶ |
|---|---|---|---|---|
| Two-dimensional wear (x and y) | ||||
| EGS-RSA (mm) | 1.568 (0.062 to 5.733) | -0.060 (-0.075 to -0.045) | 0.028 | 0.078 |
| MB-RSA (mm) | 1.598 (0.137 to 5.745) | -0.110 (-0.130 to -0.090) | 0.037 | 0.102 |
| PolyWare (mm) | 1.435 (0.267 to 5.081) | 0.013 (-0.002 to 0.028) | 0.023 | 0.076 |
| True | 1.570 (0.014 to 7.671) | |||
| Three-dimensional wear (x, y and z) | ||||
| EGS-RSA (mm) | 2.056 (0.116 to 8.179) | -0.032 (-0.069 to 0.005) | 0.067 | 0.185 |
| MB-RSA (mm) | 2.319 (0.352 to 8.343) | -0.162 (-0.200 to -0.124) | 0.068 | 0.189 |
| PolyWare (mm) | 2.066 (0.461 to 7.577) | 0.019 (-0.030 to 0.068) | 0.088 | 0.244 |
| True | 1.923 (0.017 to 8.660) | |||
* EGS-RSA, RSA method featuring analysis of head penetration by computer-generated geometric sphere models; MB-RSA, RSA method featuring analysis of head penetration by reverse engineered (scanned) cup models; PolyWare, method for polyethylene wear analysis in plain radiographs † mean of two test results (wear analyses) ‡ bias: mean difference between the first and the second wear measurement (systematic variation of repeatability within the method) § Sr, repeatability standard deviation32 ¶ 95% repeatability limits, calculated by (1.96Sr × √2): defined as the 95% limit on the difference between two test results32
Table II.
Table II. Comparison of precision (repeatability) and accuracy between methods
| Precision (repeatability) (n = 15) | Accuracy (n = 14) | ||||
|---|---|---|---|---|---|
| Method* | Repeatability ratio | p-value† | RMSE ratio‡ | p-value§ | |
| Two-dimensional | |||||
| MB-RSA versus EGS-RSA | 1.27 | 0.39 | 0.85 | 0.10 | |
| EGS-RSA versus PolyWare | 1.03 | 0.92 | 0.38 | < 0.001 | |
| MB-RSA versus PolyWare | 1.35 | 0.28 | 0.32 | < 0.001 | |
| Three-dimensional | |||||
| MB-RSA versus EGS-RSA | 1.02 | 0.94 | 1.36 | 0.10 | |
| EGS-RSA versus PolyWare | 1.32 | 0.31 | 0.42 | < 0.01 | |
| MB-RSA versus PolyWare | 1.29 | 0.35 | 0.56 | 0.04 | |
* EGS-RSA, RSA method featuring analysis of head penetration by computer-generated geometric sphere models; MB-RSA, RSA method featuring analysis of head penetration by reverse engineered (scanned) cup models; PolyWare, method for polyethylene wear analysis in plain radiographs † F-test, associated with the repeatability ratio = 1 ‡ RMSE, root mean square error ratio between methods for linear regression § Pitmans test, associated with the RMSE ratio = 1
Accuracy
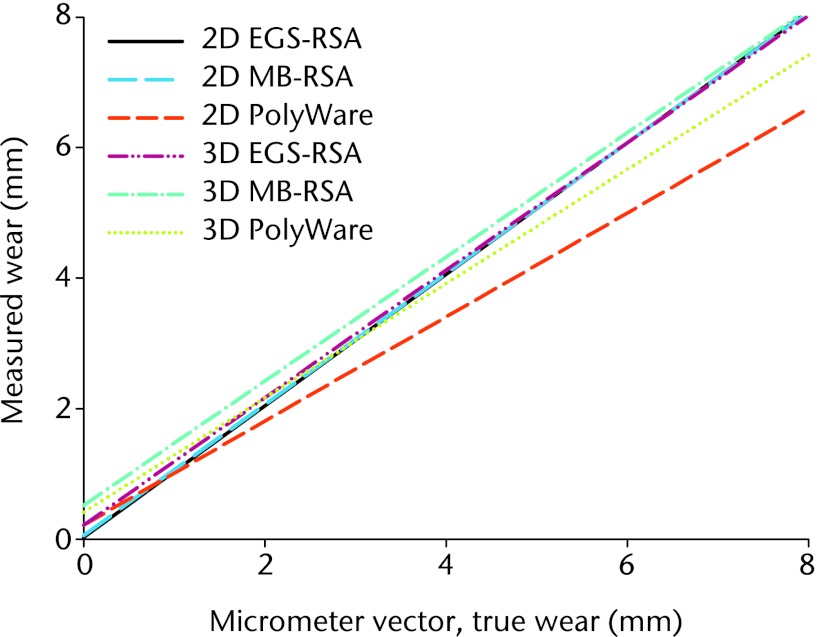
The highest measure of wear deviated more from the true values than did the other 14 measures for all methods (Fig. 6), and therefore it was excluded in all assessments of accuracy (sensitivity analysis). Both EGS-RSA and MB-RSA had a slope not significantly different from 1 (Table III, Fig. 7). The slopes for the 2D measurements were 1.01, 1.00, and 0.80, for EGS-RSA, MB-RSA, and PolyWare, respectively. For 3D measurements they were 0.98, 0.95, and 0.88, for EGS-RSA, MB-RSA, and PolyWare, respectively. 2D RSA-EGS was the only method with an intercept not significantly different from 0 (p = 0.21). RSA methods had RMSE3 below 0.055 mm for 2D wear measurements. For 3D wear measurements the RMSE3 were 0.103 for EGS-RSA, 0.177 for MB-RSA, and 0.342 for PolyWare. No significant difference in accuracy (RMSE3 ratio) was observed between the RSA methods (p = 0.10), but accuracy was statistically significantly lower for -PolyWare compared with both EGS- and MB-RSA methods (p = 0.003 and p = 0.039, respectively). Further measures are presented in Tables II and III, and Figures 6 and 7.
Fig. 7.
Regression lines (best fit lines) for accuracy of two- (2D) and three-dimensional (3D) wear by method after a sensitivity analysis (exclusion of the outlying highest wear-measure) (EGS-RSA, radiostereometric analysis using sphere models; MB-RSA, radiostereometric analysis using a acetabular component model; PW, PolyWare).
Table III.
Accuracy: three commonly used ways to present accuracy for easy comparison with other data in the literature (for statistics, see supplementary material). All results are based on the mean of 14 double wear measurements (the highest value near wear-through of the liner was excluded) (CI, confidence interval)
| No bias model | Constant bias model | Regression model (varying bias if slope ≠ 1) | ||||||
|---|---|---|---|---|---|---|---|---|
| Wear measurement method* | RMSE1† | Bias‡ (95% CI) | RMSE2§ | Slope¶ (95% CI) | Intercept** (95% CI) | RMSE3†† | ||
| Two-dimensional (x and y) | ||||||||
| EGS-RSA (mm) | 0.063 | 0.034 (0.002 to 0.066) | 0.055 | 1.01 (0.99 to 1.03) | 0.02 (-0.01 to 0.63) | 0.055 | ||
| MB-RSA (mm) | 0.073 | 0.061 (0.038 to 0.085) | 0.041 | 1.00 (0.99 to 1.02) | 0.06 (0.03 to 0.09) | 0.043 | ||
| PolyWare (mm) | 0.467 | -0.024 (-0.304 to 0.256) | 0.484 | 0.80 (0.68 to 0.91) | 0.21 (-0.02 to 0.45) | 0.335 | ||
| Three-dimensional (x, y and z) | ||||||||
| EGS-RSA (mm) | 0.207 | 0.178 (0.114 to 0.242) | 0.111 | 0.98 (0.95 to 1.01) | 0.21 (0.14 to 0.28) | 0.103 | ||
| MB-RSA (mm) | 0.487 | 0.447 (0.331 to 0.563) | 0.201 | 0.95 (0.90 to 1.00) | 0.52 (0.39 to 0.64) | 0.177 | ||
| PolyWare (mm) | 0.471 | 0.231 (-0.015 to 0.477) | 0.426 | 0.88 (0.78 to 0.97) | 0.41 (0.17 to 0.65) | 0.342 | ||
* EGS-RSA, RSA method featuring analysis of head penetration by computer-generated geometric sphere models; MB-RSA, RSA method featuring analysis of head penetration by reverse engineered (scanned) cup models; PolyWare, method for polyethylene wear analysis in plain radiographs † RMSE1, root mean square error presented as combined measure of systematic and random error17 ‡ bias: the measured wear minus the accepted reference value (true wear) with a 95% CI (systematic component of accuracy) § RMSE2, root mean square error presenting a constant systematic error (bias) and random error separately39 ¶ slope: the regression coefficient ** intercept: intercept of the line in the y-axis †† RMSE3, root mean square error considering the slope (increasing bias by increasing values if slope ≠ 1) and intercept of the line
RSA
The least precise (95% repeatability limit) axis for both EGS-RSA (0.176 mm) and MB-RSA (0.265 mm) was the z-axis. With regard to accuracy EGS-RSA had no systematic error (0.000 mm). Measures are given in Table IV.
Table IV.
Precision and accuracy: for the individualx, y and z coordinate axes for the RSA methods. True mean wear was 0.832 mm (0.01 to 4) for the x and y axes and -0.832 mm (-0.01 to -4) for the z axis (CI, confidence interval)
| Precision (n = 15 double measurements) | Accuracy (n = 14 mean double measurements) | ||||||
|---|---|---|---|---|---|---|---|
| Wear measurement method* | Bias (95% CI)* | Sr‡ | 95% repeatability limits§ | Mean (range)¶ | Bias (95% CI)** | RMSE†† | |
| EGS-RSA (mm) | |||||||
| x | -0.047 (-0.062 to -0.032) | 0.020 | 0.054 | 0.832 (0.020 to 3.975) | 0.000 (-0.026 to 0.026) | 0.046 | |
| y | -0.040 (-0.058 to -0.022) | 0.023 | 0.065 | 0.877 (0.058 to 4.130) | 0.045 ( 0.018 to 0.072) | 0.046 | |
| z | 0.090 (0.040 to 0.140) | 0.063 | 0.176 | -1.034 (-0.098 to -3.996) | -0.202 (-0.270 to -0.034) | 0.117 | |
| MB-RSA (mm) | |||||||
| x | -0.115 (-0.145 to -0.085) | 0.038 | 0.105 | 0.804 ( 0.070 to 3.941) | -0.028 (-0.061 to 0.005) | 0.056 | |
| y | -0.063 (-0.087 to -0.039) | 0.031 | 0.085 | 0.927 ( 0.103 to 4.180) | 0.095 ( 0.071 to 0.119) | 0.042 | |
| z | 0.135 (0.060 to 0.210) | 0.096 | 0.265 | -1.346 (-0.324 to -4.222) | -0.513 (-0.634 to -0.392) | 0.209 | |
* EGS-RSA, RSA method featuring analysis of head penetration by computer-generated geometric sphere models; MB-RSA, RSA method featuring analysis of head penetration by reverse engineered (scanned) cup models † bias: mean difference between the first and the second wear measurement (systematic variation of repeatability for each coordinate axis within the method) ‡ Sr, repeatability standard deviation32 § 95% repeatability limits (1.96Sr × √2): 95% limit on the difference between two test results ¶ mean of two test results (wear analyses) ** bias: the measured wear minus the accepted reference value (true wear) with a 95% CI (systematic -component of accuracy) †† RMSE, root mean square error; standard deviation of the differences between true wear and measured wear (random component of accuracy)
The mean differences between the edge of the EGS sphere-models and the marked edges of the implants (pose estimation) were 0.08 mm (sd 0.03) for the femoral head and 0.11 mm (sd 0.03) for the acetabular component. The mean difference of the pose estimation with the scanned acetabular component model for MB-RSA was 0.19 mm (sd 0.03). The program analyst could more easily adjust the component model (MB-RSA) to fit the implant edges in the stereo radiographs than was possible with the sphere models (EGS-RSA) (Figs 3a and 3b).
Discussion
Recently, two new RSA methods that alleviate the need for bead-marking of implants have become available, and this is the first study to evaluate and show that both RSA methods (scanned models (MB-RSA) and computer--generated geometrical shape models (EGS-RSA)) are -sufficiently accurate and precise for evaluation of PE wear in existing and newly introduced low-wear bearing couples in THR. Also, this is the first study to evaluate a commonly used digital method using plain radiographs (PolyWare) with RSA, which is considered the gold standard of PE wear measurement.
Precision was very good for all 2D methods, with 95% repeatability limits < 0.102 mm for the RSA methods and of 0.076 mm for PolyWare. For 3D methods they were approximately two times higher for the RSA methods and three times higher for PolyWare. A negligible but significant bias of repeatability was observed for both RSA methods, with a systematic trend of slightly higher mean differences for in the second analysis. For the evaluation of repeatability, a series of doubly analysed stereo radiographs was performed, including the reference zero-wear stereo radiograph that was used in all migration analyses, and this provided an explanation for the small systematic bias of the RSA methods.
Other phantom experiments assessing the accuracy and precision of wear in hip arthroplasty with use of older radiostereometric and plain radiological computer-assisted methods have been performed,9,12,17,19,31 Unfortunately, and owing to dissimilar study designs and various definitions of accuracy and precision, direct comparisons of reported results are difficult. We chose to present precision as suggested in the ASTM177. Von Schewelov et al12 showed the precision of marker-less digital 3D RSA wear measurements (UmRSA) to be between 0.17 mm and 0.22 mm in a phantom study, depending on the amount of measured wear. We demonstrated a similar precision (95% repeatability limit) of 0.19 mm for the 3D model-based RSA methods. Von Schwelov et al12 performed repeat wear measurements in each of three wear positions, whereas in our study, the entire repertoire of wear seen in the clinic was assessed. Furthermore, we included repeat wear measurements of substantially lower wear (between 0.01 mm and 0.1 mm) compared with their study (3D vector range; 0.2 mm to 1.5 mm), and this probably tested the lower detection limit of the RSA software. In addition, our category of high wear exceeded by far the higher wear limit in their study.12 In another marker-based RSA hip wear phantom study Bragdon et al17 obtained five -roentgen datasets of 17 pairs of stereo radiographs, as they advanced the femoral head in one direction at a time for a total of four wear positions (single vector range 0.05 mm to 0.2 mm).17 Precision32 was reported as in our study 0.025 mm for the point-motion method (UmRSA), which was approximately four times better than in our study.17 Börlin et al19 used the phantom stereo radiographs obtained by Bragdon et al35 but grouped the examinations pair-wise to generate independent measurements. They reported precision as the 95% prediction interval (1.96 × sd) in the individual three x, y and z axes to be 0.07 mm, 0.10 mm, and 0.13 mm for a novel marker-less RSA method (UmRSA) and 0.04 mm, 0.08 mm, and 0.10 mm for classical marker-based RSA (UmRSA).19 This is very close to our results; however, the UmRSA system (marker-based and marker-less) seems to be a little more precise for the z-direction. Measurement in the sagittal plane is by nature the most imprecise because out-of-plane translations are difficult to measure precisely using a single plane approach.36
For PolyWare, the precision has been described in the range of 0.02 mm (max 0.28 mm) for 2D wear measures and 0.07 mm (max 0.41 mm) for 3D wear measures based on repeat analysis of the same zero wear laboratory radiographs.31 These values, we believe, reflect our values of bias for repeatability (Table I); however, our bias was slightly lower, which could be explained by the fact that we did not change the cup angulations because different cup projections have been shown to decrease accuracy by twofold for PolyWare.31
Accuracy was assessed to determine which method was in better agreement with the true calculated wear. The definition of accuracy differs between authors.13,17,37 Because accuracy involves a combination of a random component and a systematic (bias) component,32,37 it seems appropriate to present accuracy as two measures rather than one combined measure. We assessed accuracy in a regression model and by the root mean square error in three different ways (see supplementary material) to facilitate comparison of our results with the existing literature. Accuracy (RMSE3) in our study was better for 2D (< 0.06 mm) than for 3D (< 0.18 mm) measurements with both RSA methods. This is explainable, because for geometrical reasons, the z direction is usually the least accurate.38 However, a slight loss of precision and accuracy could possibly be accepted in favour of a clinically more relevant multidirectional (3D) PE wear estimate.
The wear-direction has been shown to be slightly different for every patient and to rely on multiple factors such as component placement, biomechanics, and physical activity and type of activity.39 A phantom setting of various non-cylindrical wear patterns would be very complicated to imitate in a phantom study and lies outside the scope of this paper. The vector of x, y and z for each patient could provide an estimate of the direction of wear. In vivo wear patterns have recently been evaluated in another retrieval series.40 Most of the PE wear of hip prosthesis have been shown to occur in the frontal plane and radiological measurements of linear wear in the film-plane can provide a reliable estimation of the total wear volume.40
Von Schewelov et al12 report a total wear vector regression coefficient of 0.94 with phantom wear assessment of marker-based digital RSA (UmRSA) compared with the true value. Our results with 3D wear measurements of newer and marker-less RSA methods using models and fully digital films had a better accuracy, with slopes of exactly 1. Bragdon et al17 reported an accuracy37 for the resultant 3D vector of the point-motion of the marker-based UmRSA system (0.08 mm), which was better than in our study. Börlin et al19 reported accuracy (RMSE1) for femoral head penetration of the least accurate axis (z) to be < 0.062 for a novel marker-less RSA method (UmRSA) and < 0.052 for the classical marker-based RSA (UmRSA). We found that the accuracy of model-based RSA was similar for the x and y directions reported by Börlin et al19; however, for the z-direction, results for EGS-RSA were twofold poorer and for MB-RSA fourfold poorer than for the marker-less UmRSA method.
Devane et al5 tested the first semiautomatic PolyWare version and determined a 3D accuracy of ±0.15 mm for 3D linear wear, whereas Kang et al10 estimated the 2D and 3D measurement error of the software in a phantom setting to 0.15 and 0.21 mm, respectively. Ebramzadeh et al11 concluded that the 3D measurement error (mean difference from the micrometer true value) with PolyWare was 0.10 mm (mean and median) with the use of laboratory radiographs of a phantom. The corresponding 3D measurement error (bias or systematic error) for PolyWare in our study was 0.15 mm. We further evaluated the random error (RMSE3) of accuracy for PolyWare for comparison with model-based RSA, and to our knowledge, this is the first study to assess the accuracy of PolyWare by combining the systematic and random components. Not surprisingly, we found RSA to have superior accuracy compared with PolyWare. The major clinical importance of this finding is that the sample size for PolyWare needs to be at least threefold higher than for RSA (calculations are based on an estimated random variation of PE wear among patients (0.2 mm41) and the results of accuracy (RMSE3) from this paper).
It has been suggested that AP plain radiographs used for assessment of 2D wear with PolyWare and similar plain methods should suffice for a determination of the major vector.9,15,42 Clinically, PolyWare has been shown to underestimate 2D linear wear by 20%, and 3D wear by 18%.9 We also found PolyWare to underestimate the true simulated 2D wear by 20%, supporting the theory that the major wear vector is seen in the frontal plane. In our study, simultaneous adjustment of wear in three planes deliberately introduced a systematic error for 2D wear estimates. The RSA methods handled this better than did PolyWare, which was also emphasized by von Schewelov et al12 because they compared RSA measurements for the y-axis only with RSA total vector wear (3D).
Neither the model-based RSA methods nor the PolyWare method could accurately measure the highest simulated wear situation (wear vector of 8.66 mm), which was close to wear-through of the liner (liner thickness 8.8 mm). We reasoned that the cause was a decreased visibility of head contour because of occlusion by the metal acetabular component with increasing PE wear.
The limitations of this study were, among others, that we did not replicate all in vivo variable penetration patterns (non-cylindrical)39 because all motion imparted to the phantom followed the three coordinate axes equally (cylindrical). In a clinical situation, the differences in the pose of the patient between examinations add to the total error. This error was not explored in our study because the position of the phantom remained unchanged between examinations. Radiological quality was better than the standard for clinical radiographs, and thus precision and accuracy could be expected to be lower in the clinic situation. We only evaluated the accuracy and precision of a 28 mm femoral head and a 56 mm acetabular component. However, we do not think the latter severely affected the generalisability of our results, because it has previously been shown that RSA can accurately detect penetration of the femoral head, irrespective of the direction of penetration, or the size or brand of the acetabular component.12 Ante-version and tilt of the acetabular component were kept constant because these changes may affect both precision and accuracy in PolyWare analysis.11,13 We only assessed the intra-observer variability and not the interobserver variability, however this has previously been shown to be excellent between inexperienced and experienced observers with a Concordance Correlation Coefficient of minimum 0.97.26
The strength of the present study was that we assessed precision (repeatability) and accuracy under controlled conditions. This is not equally possible under clinical conditions. However, we have compared the EGS model-based software with PolyWare in a clinical series, and found the precision of both to be 0.23 mm.29 Further we assessed multiple amounts of wear, which is important, since the precision of marker-less RSA PE wear analysis have been shown to be dependent on the amount of wear.12
In conclusion, the most accurate and precise methods were the 2D RSA methods. However, 3D RSA methods also possess sufficient accuracy for PE wear assessment with regard to a clinically relevant detection limit for prediction of osteolysis (0.2 mm/year),43 and further provide a multidirectional wear pattern, which is considered a more correct estimate of the clinical wear.39 Based on our observations, the PolyWare software is less accurate for measurement of wear compared with model-based RSA; however, it is seemingly suitable for measurements in the range of 1 mm and 5 mm. With the aid of the bedding-in process (range 0.2 mm to 0.3 mm within 12 to 24 months depending on the type and brand of PE44) both the PolyWare and the model-based RSA wear measurement methods are thus sufficient to evaluate a midterm (5-year) wear rate for clinical use.9,13 It is therefore up to the researcher to decide between an expensive (high establishment and running costs) and highly accurate RSA setup with few patients or a low-cost but less accurate PolyWare setup that requires at least three times as many patients to achieve a sufficient sample size.29
Supplementary material
An appendix giving further details and formulae for the calculation of the three possible models for the assessment of accuracy (model 1 (no bias); model 2 (constant bias); model 3 (linear bias)) is available on our website www.bjr.boneandjoint.org.uk.
Funding Statement
This work was supported by The Danish Rheumatoid Association grant number R68-A967. Biomet Denmark donated the implant for investigation only.
Footnotes
The authors wish to thank R. Mørup for undertaking the radiostereometric analyses and L. L. Andersen for the wear analysis with PolyWare in all patients. The authors thank mechanical designer K. Frandsen (Eurocon CNC & Process ApS, Denmark) for his devotion to and creativity in the developing process of the phantom. The late and sincerely missed Associate Professor K. Larsen made important scientific contributions to the study.
Author contributions:M. Stilling: Study design, Writing and revising the paper
S. de Raedt: Data analysis, Statistical analysis, Writing the paper
O. Rahbek: Study design, Revising the paper
K. Søballe: Study design, Data collection, Data analysis, Statistical analysis, Writing and revising the paper.
S. Kold: Data analysis, Graphics and image work, Revising the paper
N. T. Andersen: Study design, Data collection, Writing the paper, Revising the paper
ICMJE Conflict of Interest:None declared
References
- 1.Devane PA, Horne JG. Assessment of polyethylene wear in total hip replacement. Clin Orthop Relat Res 1999;369:59–72 [DOI] [PubMed] [Google Scholar]
- 2.Martell JM, Berkson E, Berger R, Jacobs J. Comparison of two and three-dimensional computerized polyethylene wear analysis after total hip arthroplasty. J Bone Joint Surg [Am] 2003;85-A:1111–1117 [DOI] [PubMed] [Google Scholar]
- 3.Geerdink CH, Grimm B, Vencken W, Heyligers IC, Tonino AJ. The determination of linear and angular penetration of the femoral head into the acetabular component as an assessment of wear in total hip replacement: a comparison of four computer-assisted methods. J Bone Joint Surg [Br] 2008;90-B:839–846 [DOI] [PubMed] [Google Scholar]
- 4.Devane PA, Bourne RB, Rorabeck CH, MacDonald S, Robinson EJ. Measurement of polyethylene wear in metal-backed acetabular cups. II: clinical application. Clin Orthop Relat Res 1995;319:317–326 [PubMed] [Google Scholar]
- 5.Devane PA, Bourne RB, Rorabeck CH, Hardie RM, Horne JG. Measurement of polyethylene wear in metal-backed acetabular cups. I: three-dimensional technique. Clin Orthop Relat Res 1995;319:303–316 [PubMed] [Google Scholar]
- 6.Martell JM, Berdia S. Determination of polyethylene wear in total hip replacements with use of digital radiographs. J Bone Joint Surg [Am] 1997;79-A:1635–1641 [DOI] [PubMed] [Google Scholar]
- 7.Shaver SM, Brown TD, Hillis SL, Callaghan JJ. Digital edge-detection measurement of polyethylene wear after total hip arthroplasty. J Bone Joint Surg [Am] 1997;79-A:690–700 [DOI] [PubMed] [Google Scholar]
- 8.Ilchmann T, Mjöberg B, Wingstrand H. Measurement accuracy in acetabular cup wear: three retrospective methods compared with Roentgen stereophotogrammetry. J Arthroplasty 1995;10:636–642 [DOI] [PubMed] [Google Scholar]
- 9.Hui AJ, McCalden RW, Martell JM, et al. Validation of two and three-dimensional radiographic techniques for measuring polyethylene wear after total hip arthroplasty. J Bone Joint Surg [Am] 2003;85-A:505–511 [DOI] [PubMed] [Google Scholar]
- 10.Kang JS, Park SR, Ebramzadeh E, Dorr LD. Measurement of polyethylene wear in total hip arthroplasty: accuracy versus ease of use. Yonsei Med J 2003;44:473–478 [DOI] [PubMed] [Google Scholar]
- 11.Ebramzadeh E, Sangiorgio SN, Lattuada F, et al. Accuracy of measurement of polyethylene wear with use of radiographs of total hip replacements. J Bone Joint Surg [Am] 2003;85-A:2378–2384 [DOI] [PubMed] [Google Scholar]
- 12.von Schewelov T, Sanzén L, Börlin N, Markusson P, Onsten I. Accuracy of radiographic and radiostereometric wear measurement of different hip prostheses: an experimental study. Acta Orthop Scand 2004;75:691–700 [DOI] [PubMed] [Google Scholar]
- 13.McCalden RW, Naudie DD, Yuan X, Bourne RB. Radiographic methods for the assessment of polyethylene wear after total hip arthroplasty. J Bone Joint Surg [Am] 2005;87-A:2323–2334 [DOI] [PubMed] [Google Scholar]
- 14.Sychterz CJ, Young AM, Engh CA. Effect of radiographic quality on computer-assisted head penetration measurements. Clin Orthop Relat Res 2001; 386: 150–158 [DOI] [PubMed] [Google Scholar]
- 15.Sychterz CJ, Yang AM, McAuley JP, Engh CA. Two-dimensional versus three-dimensional radiographic measurements of polyethylene wear. Clin Orthop Relat Res 1999;365:117–123 [DOI] [PubMed] [Google Scholar]
- 16.Röhrl SM, Nivbrant B, Ström H, Nilsson KG. Effect of augmented cup fixation on stability, wear, and osteolysis: a 5-year follow-up of total hip arthroplasty with RSA. J Arthroplasty 2004;19:962–971 [DOI] [PubMed] [Google Scholar]
- 17.Bragdon CR, Malchau H, Yuan X, et al. Experimental assessment of precision and accuracy of radiostereometric analysis for the determination of polyethylene wear in a total hip replacement model. J Orthop Res 2002;20:688–695 [DOI] [PubMed] [Google Scholar]
- 18.Digas G, Thanner J, Nivbrant B, et al. Increase in early polyethylene wear after sterilization with ethylene oxide: radiostereometric analyses of 201 total hips. Acta Orthop Scand 2003;74:531–541 [DOI] [PubMed] [Google Scholar]
- 19.Börlin N, Röhrl SM, Bragdon CR. RSA wear measurements with or without markers in total hip arthroplasty. J Biomech 2006;39:1641–1650 [DOI] [PubMed] [Google Scholar]
- 20.Kaptein BL, Valstar ER, Stoel BC, Reiber HC, Nelissen RG. Clinical validation of model-based RSA for a total knee prosthesis. Clin Orthop Relat Res 2007;464:205–209 [PubMed] [Google Scholar]
- 21.Kaptein BL, Valstar ER, Stoel BC, Rozing PM, Reiber JH. A new model-based RSA method validated using CAD models and models from reversed engineering. J Biomech 2003;36:873–882 [DOI] [PubMed] [Google Scholar]
- 22.Kaptein BL, Valstar ER, Stoel BC, Rozing PM, Reiber JH. Evaluation of three pose estimation algorithms for model-based roentgen stereophotogrammetric analysis. Proc Inst Mech Eng H 2004;218:231–238 [DOI] [PubMed] [Google Scholar]
- 23.Baad-Hansen T, Kold S, Kaptein BL, Søballe K. High-precision measurements of cementless acetabular components using model-based RSA: an experimental study. Acta Orthop 2007;78:463–469 [DOI] [PubMed] [Google Scholar]
- 24.Hurschler C, Seehaus F, Emmerich J, Kaptein BL, Windhagen H. Comparison of the model-based and marker-based roentgen stereophotogrammetry methods in a typical clinical setting. J Arthroplasty 2009;24:594–600 [DOI] [PubMed] [Google Scholar]
- 25.Kaptein BL, Valstar ER, Spoor CW, Stoel BC, Rozing PM. Model-based RSA of a femoral hip stem using surface and geometrical shape models. Clin Orthop Relat Res 2006;448:92–97 [DOI] [PubMed] [Google Scholar]
- 26.Pineau V, Lebel B, Gouzy S, Dutheil JJ, Vielpeau C. Dual mobility hip arthroplasty wear measurement: Experimental accuracy assessment using radiostereometric analysis (RSA). Orthop Traumatol Surg Res 2010;96:609–615 [DOI] [PubMed] [Google Scholar]
- 27.Börlin N, Thien T, Kärrholm J. The precision of radiostereometric measurements: manual vs. digital measurements. J Biomech 2002;35:69–79 [DOI] [PubMed] [Google Scholar]
- 28.Bragdon CR, Martell JM, Greene ME, et al. Comparison of femoral head penetration using RSA and the Martell method. Clin Orthop Relat Res 2006;448:52–57 [DOI] [PubMed] [Google Scholar]
- 29.Stilling M, Larsen K, Andersen NT, et al. The final follow-up plain radiograph is sufficient for clinical evaluation of polyethylene wear in total hip arthroplasty: a study of validity and reliability. Acta Orthop 2010;81:570–578 [DOI] [PMC free article] [PubMed] [Google Scholar]
- 30.Bossuyt PM, Reitsma JB, Bruns DE, et al. Towards complete and accurate reporting of studies of diagnostic accuracy: the STARD initiative. Clin Biochem 2003;36:2–7 [DOI] [PubMed] [Google Scholar]
- 31.Collier MB, Kraay MJ, Rimnac CM, Goldberg VM. Evaluation of contemporary software methods used to quantify polyethylene wear after total hip arthroplasty. J Bone Joint Surg [Am] 2003;85-A:2410–2418 [DOI] [PubMed] [Google Scholar]
- 32.No authors listed. ASTM: standard practice for use of the terms precision and bias in ASTM test methods. In: E177 ed: Subcommittee E11.20 on test method evaluation and quality control. West Conshohocken: ASTM International, 2008.
- 33.Bland JM, Altman DG. Statistical methods for assessing agreement between two methods of clinical measurement. Lancet 1986;1:307–310 [PubMed] [Google Scholar]
- 34.Ryd L. Micromotion in knee arthroplasty: a roentgen stereophotogrammetric analysis of tibial component fixation. Acta Orthop Scand Suppl 1986;220:1–80 [PubMed] [Google Scholar]
- 35.Bragdon CR, Estok DM, Malchau H, et al. Comparison of two digital radiostereometric analysis methods in the determination of femoral head penetration in a total hip replacement phantom. J Orthop Res 2004;22:659–664 [DOI] [PubMed] [Google Scholar]
- 36.Kärrholm J, Gill RH, Valstar ER. The history and future of radiostereometric analysis. Clin Orthop Relat Res 2006;448:10–21 [DOI] [PubMed] [Google Scholar]
- 37.Ranstam J, Ryd L, Onsten I. Accurate accuracy assessment: review of basic principles. Acta Orthop Scand 2000;71:106–108 [DOI] [PubMed] [Google Scholar]
- 38.Kärrholm J, Herberts P, Hultmark P, et al. Radiostereometry of hip prostheses: review of methodology and clinical results. Clin Orthop Relat Res 1997;344:94–110 [PubMed] [Google Scholar]
- 39.Yamaguchi M, Hashimoto Y, Akisue T, Bauer TW. Polyethylene wear vector in vivo: a three-dimensional analysis using retrieved acetabular components and radiographs. J Orthop Res 1999;17:695–702 [DOI] [PubMed] [Google Scholar]
- 40.Ilchmann T, Lüem M, Pannhorst S, Clauss M. Acetabular polyethylene wear volume after hip replacement: reliability of volume calculations from plain radiographs. Wear 2012;2012:69–75 [Google Scholar]
- 41.Stilling M, Nielsen KA, Søballe K, Rahbek O. Clinical comparison of polyethylene wear with zirconia or cobalt-chromium femoral heads. Clin Orthop Relat Res 2009;467:2644–2650 [DOI] [PMC free article] [PubMed] [Google Scholar]
- 42.Dowd JE, Sychterz CJ, Young AM, Engh CA. Characterization of long-term femoral-head-penetration rates: association with and prediction of osteolysis. J Bone Joint Surg [Am] 2000;82-A:1102–1107 [DOI] [PubMed] [Google Scholar]
- 43.Sochart DH. True wear rates as predictors of risk for osteolysis after total hip arthroplasty. J Bone Joint Surg [Am] 2001;83-A:1277. [DOI] [PubMed] [Google Scholar]
- 44.Röhrl SM, Li MG, Nilsson KG, Nivbrant B. Very low wear of non-remelted highly cross-linked polyethylene cups: an RSA study lasting up to 6 years. Acta Orthop 2007;78:739–745 [DOI] [PubMed] [Google Scholar]


