

Abstract
The procedure for repairing the posterior cruciate ligament (PCL) has a steep learning curve and entails numerous difficult steps during surgery, because of the proximity of the neurovascular bundle, difficult passage of the graft through the posterior capsule, and risk of poor tibial fixation because of the long intramedullary trajectory of the graft. The use of instruments for retrograde reaming and a new device for adjustable cortical suspensory fixation allows for a safe, reproducible all-inside double-bundle PCL reconstruction by simplifying these difficult steps. We used anterior tibial allograft or hamstring autograft together with adjustable suspensory fixation devices that allow tensioning (after fixation) of the posterolateral bundle in extension and the anteromedial bundle in flexion.
During the last few years, the techniques for retrograde reaming have become increasingly popular for surgical reconstruction of the anterior cruciate ligament (ACL).1-3 These instruments may be used to improve reconstruction of the posterior cruciate ligament (PCL). PCL reconstruction includes some difficult points, such as the neurovascular bundle's proximity to the tibial attachment of the PCL,4-6 passage of the graft in the posterior capsule and tibial fixation in a long intramedullary trajectory that occasionally requires backup,7,8 and the need to tension the anteromedial (AM) and posterolateral (PL) bundles in flexion and extension of the knee.9,10 Neurovascular damage has been associated with anterograde reaming and displacement of the guide pin,11 whereas the development of retrograde reaming by Puddu and Cerullo2 and other authors3 helps create the sockets while reaming away from the bundle instead of moving closer to it. These instruments allow intact preservation of the medial cortices, which in turn makes it possible to use devices for cortical fixation, even at the tibial cortex. Such devices notably improve the strength of fixation in this area, which is the least appropriate for interference screws12 because of its long intramedullary trajectory and the lower density of cancellous bone,7 so that fixation is even poorer than fixation to the medulla of the femoral sockets,12 thus requiring the use of backup fixation.13 In our procedure this becomes unnecessary, with the further advantage that both passage and fixation of the graft may be accomplished in a single step.
The purpose of this report is to present a technique for all-inside double-bundle reconstruction of the PCL that has not been previously described that we believe reduces the risk of vascular damage and is simpler to perform. In addition, to simplify double-bundle tensioning, we use a new adjustable cortical suspension device (TightRope [TR]; Arthrex, Naples, FL) that allows tensioning after fixation and is useful particularly for the PL bundle, which must be performed in extension. As we shall show, the graft construct is built in a way so as to leave a TR device at the tibial end of the graft that is a single bundle but becomes a double bundle further on. In the part that will be used as the PL bundle, another TR is used; therefore, the PL bundle has a TR for the tibia and another TR for the femur that, after fixation, can be used to tension the bundle in extension from both the tibial and femoral ends. The AM bundle uses the same TR from the tibial side, but because of the shape of the femoral side of the graft, it is fixed with an interference screw for soft tissues. These screws have a better hold on the femoral side13; in addition, they can be used in flexion from an anterolateral (AL) portal with nearly no divergence with the graft.
Surgical Technique
Special Instruments
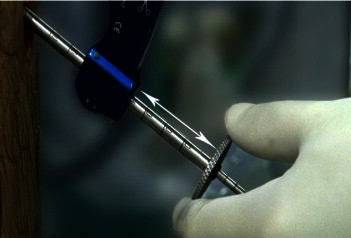
The required instruments make up a set for the reconstruction of the PCL including the tibial and femoral guides and a second-generation FlipCutter retrograde reamer (Arthrex). The FlipCutter device is a guide pin that, by way of a button at the base of the instrument, turns into a retrograde reamer once the desired position is reached so that reaming clockwise, while exerting retrograde pressure, creates a socket that reaches up to the cortex but does not advance through it. After going back to the starting point, the instrument's tip is returned to its original guide pin position and it can be removed. There is also a guide pin sleeve that is assembled together with the FlipCutter and the tibial guide; using this sleeve, by means of the laser marks in its shaft, one can precisely determine how far the FlipCutter may be inserted without the risk of breaking through the tibial cortex and injuring the neurovascular bundle (Fig 1). The sleeve also has a 7-mm stopper that is introduced within the anterior tibial cortex and prevents the FlipCutter blade from cutting through the cortex; after retrieval of the FlipCutter, the sleeve is kept in position to pass graft-passing wires or sutures.
Figure 1.
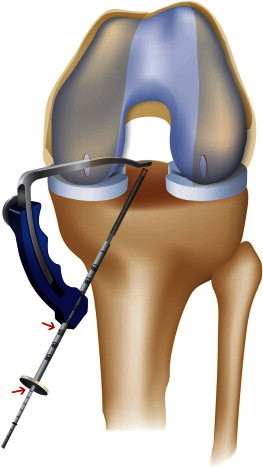
Drill sleeve showing laser marks (arrows) that measure the anteroposterior width of the tibial metaphysis in a left knee, as well as 5-mm markings on the FlipCutter shaft.
Fixation Devices
The TR is a fixation device for suspensory fixation that, instead of having a loop of fixed length, provides an adjustable loop along with passing sutures that can be retrieved through the skin, allowing cortical fixation of the button and, later, final tensioning of the graft.
Portal Creation
AL and AM portals are made after cleaning the intercondylar area of PCL remnants; under direct visual control, a posteromedial (PM) accessory portal was created by use of the outside-inside technique, with a cannula being left in position. Initially, we clean the tibial footprint of the PCL, dissecting the posterior capsule from the tibial plateau. An infusion pump was used to improve the vision of the rear compartment.
Graft Preparation
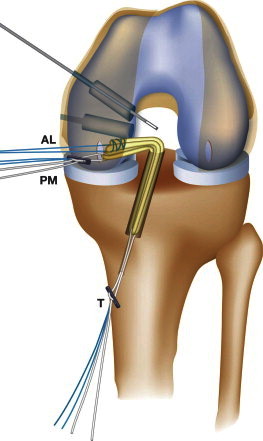
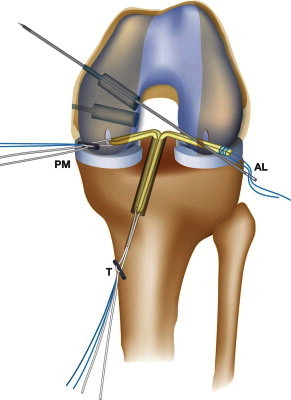
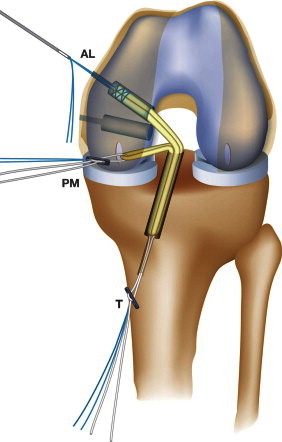
Graft preparation is a critical step for the surgical procedure. While one is making the sockets, observing the diameter of the footprints helps in selecting the diameter of the grafts. Normally, we use a long (30-cm) anterior tibialis tendon allograft. The tendon is first folded in 2; this fold is made by sliding the graft in the loop of the first TR (Fig 2), leaving this as a hinge in the center of the graft, with 2 equal parts of 15 cm each. The surgeon folds this again, sliding both free ends through a second TR (Fig 3), leaving 1 tail with a length of 7 cm, with a TR, which was the first TR used (PL bundle), and the other tail with a length of 8 cm (AM bundle), where a whipstitch suture is performed with No. 2 FiberWire (Arthrex). Therefore there is 1 central TR that is used on the tibial side and another, distal TR that is used on the PL bundle; the 2 ends sutured together will represent the AM bundle (Fig 4). The diameters of each limb of the graft construct are usually 11 mm for the tibial side, 8 mm for the AL bundle, and 7 mm for the PM bundle (Fig 5). To avoid bottoming out of the graft, the total graft length should be less than the length of both sockets plus the intra-articular graft length. However, bottoming out is very unlikely because tibial sockets are, on average, 5 to 7 cm long, and in trying to make the femoral sockets larger than 3 cm long plus the intra-articular length, we are given enough space so that, between the tibial and femoral adjustable TR systems, we can properly adjust graft tension. However, we must keep in mind that the PM bundle must be shorter than the AM bundle: if the grafts are of equal length, when the PM bundle is adjusted, the AM bundle may be left with too little tissue inside the socket, because the latter is anatomically longer than the former. As a reference, we mark the graft at 3 cm from the tibial end and at 2 cm on both femoral tails. Hamstrings could also be used for preparation of the graft but in a different configuration, combining both.
Figure 2.

TR sliding in tibialis anterior graft and folding it in 2. This TR is in the PM band one in the left knee.
Figure 3.
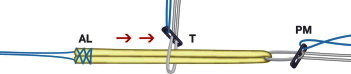
New TightRope (T) sliding in the folded graft in a left knee on the tibial side. Whip-stitched strands form the AL femoral band.
Figure 4.
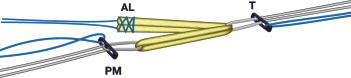
Finished graft.
Figure 5.
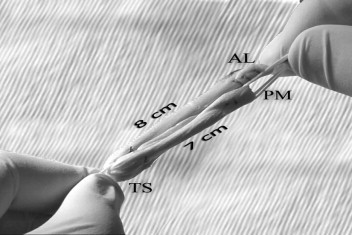
Tibial TightRope (T) with AL band measuring 8 cm in length and PM band measuring 7 cm.
Socket Preparation
The arthroscope is introduced through the PM portal, and a drill guide specifically for the PCL is passed through the AM portal. The guide's arm is rigid, and the surgeon may use it to push the posterior capsule using the marking hook while introducing the FlipCutter (Fig 6), achieving maximum safety by improving the view and pushing back and shielding the neurovascular bundle, together with the certainty provided by prior knowledge of the depth to which the FlipCutter may be safely introduced, as indicated by the laser marks on the guide pin sleeve for the RetroConstruction guide (Arthrex) when the hook is placed on the tibial footprint of the PCL (Fig 7).
Figure 6.

Left knee through AL portal view. A guide hook (G) is used to push the posterior capsule away from the FlipCutter (FC).
Figure 7.
Drill sleeve in position showing markings. The arrow shows the relation between the RetroConstruction guide and sleeve for measuring width.
The RetroConstruction guide passes through the AM portal with the arthroscope placed on the PM portal and the hook marker placed on the tibial footprint of the PCL; we generally use a 70° angle in the drill guide to minimize the killer turn in the tibial exit. Usually, we introduce an 11-mm FlipCutter through a small incision, taking notice of the laser marks of the guide pin sleeve and on the advancing FlipCutter, so as not to overshoot the tibial footprint of the PCL. Once the tip is seen, we deploy the FlipCutter's blade using the button at its hub. While forward drilling and pushing back, we create the socket in RetroConstruction mode until resistance is felt from the stepped drill sleeve, which was previously introduced in the medial tibial cortex. We then reintroduce the FlipCutter to the back of the knee and flip the blade upright using the button on its hub, turning it back to guide pin mode. Next, we retrieve the FlipCutter device, keeping the stepped guide in position, taking advantage of the sleeve's 7-mm flange, which we previously tapped into the bone. Through this sleeve, we introduce a FiberStick (Arthrex) with its plastic cannula, view it appearing out of the socket in the posterior tibia, and retrieve it anteriorly using a grasper that has been inserted through a small incision below the AM portal, leaving it in position as a suture guide for the graft that is to be inserted.
Femoral Sockets
The arthroscope is reinserted through the AL portal. We create an accessory inferior AL portal to allow the anterograde drilling of the socket for the AM bundle from inferior to superior, allowing a length of approximately 3 cm while also viewing it anterolaterally. We normally use an 8-mm anterograde drill that we slide along a fenestrated Beath pin placed in the center of the AM bundle footprint; after drilling, the pin is left inside and will later be used to pull up the graft.
We use the PCL RetroConstruction set to create the PM socket. This allows drilling at a completely different angle from the AM bundle by creating divergent sockets to prevent tunnel communication. We normally use the drilling guide with a 55° angle. We perform socket placement following the anatomic recommendations of Noyes and colleagues.14 We use a 7-mm FlipCutter, and after creating the socket, we again pass a FiberStick with its plastic envelope through the stepped sleeve and leave it inside the socket to be used later as a traction suture to pull up the PL bundle.
Graft Passage and Fixation
The passing suture left in the small AM incision is taken up with a grasper through the AM portal. This portal is enlarged to allow the passage of the tibial portion, a graft of at least 11 mm plus the corresponding TR. The passing suture is looped to the tightening strands of the TR and its traction suture. Pulling the passing suture from the tibial exit hole, we slide the TR and the graft inside the joint. On the tibial side, we retrieve the TR construct, even if the button exits out through the skin, and we pull from the tibial side until the AM and PL bundles are both completely inside the joint, thus taking up the tibial portion of the graft to the medial cortex, which is possible thanks to the length of the tibial tunnel (Fig 8).
Figure 8.
Tibial side of the graft with the TightRope (T) in position all the way down in the tibial socket of a left knee, lowering the AL band and PM band inside the joint.
We place a cannula in the inferior AL portal, and using a grasper, we take the sutures that hold together the ends of the AM bundle and then go back to the Beath pin we had left in the socket and pull it out through the same cannula, placing the sutures in the pin's eyelet (Fig 9). We then introduce the pin back into the joint and pull it out proximally, taking the AM bundle to its socket (Fig 10). We repeat the procedure with the PL bundle, but we take up the loop from the FiberStick that was left in the socket. As we pull this bundle up, we take care to prevent the TR's button from exiting through the skin. After passing the TR, we pull slightly on the bundle inside the socket. As the femoral TR is adjusted, we first ensure that the graft is introduced at approximately 2 cm; then we place the knee in extension, and with anterior drawer, we pull the tightening strands of the tibial TR until the bundle is tense. We perform the same tensioning with the TR on the femoral side to obtain even tension of the graft in the joint (Fig 11).
Figure 9.
Beath pin through an AL portal in a left knee fed with AL band sutures.
Figure 10.
Beath pin being raised into the socket of the AL band.
Figure 11.
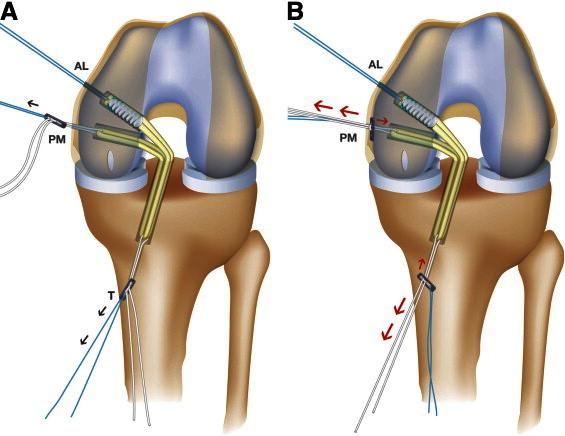
(A) PM band in position with loose TR. (B) Tensioning on femoral and tibial sides.
We then place the knee in 70° of flexion, and with anterior drawer, we fix the AL bundle using a bio-interference screw. We can go back to extension and retighten the PM bundle if needed (Video 1).
Postoperative Care and Rehabilitation
We recommend that a knee fixation device be used for 21 days, with walking on crutches and partial weight loading. We begin with passive and active motion, but active exercises of the hamstrings are avoided for 45 days. Sports practice may begin after 12 months.
Discussion
There are many newly described PCL reconstruction techniques,15-19 which indicate that PCL repair is difficult. The reconstruction technique with retrograde reaming and the new adjustable tensioning cortical fixation devices are important improvements to accomplish a safe, easy, and reproducible procedure. There are reports of tibial cortical fixation with cross-pin or TransFix (Arthrex, Naples) devices15,19 but none with an adjustable cortical suspensory device, and retrograde reaming has been reported,18 but it was not performed in an all-inside manner. Hence, this is an original technique.
The main concern with PCL reconstruction is the possibility of neurovascular damage. Other reports indicate that the key points that may trigger such damage are the proximity of the neurovascular package to the posterior capsule,4,5 the anterograde drilling, the type of drill being used,20,21,22 and the use of a guide pin for the drill that can be inadvertently pushed forward when introducing the drill.11 It has been suggested that a second incision may be useful to protect the package by feeling from behind8 and/or using fluoroscopy.
The use of retrograde drilling makes it possible to complete the procedure with only 1 drilling maneuver toward the posterior aspect of the knee instead of 2 maneuvers, in which case the first maneuver is posteriorly advancing a guide pin and the second is following up with anterograde drilling, always toward the neurovascular bundle. When FlipCutter drills are used, we initially move toward the posterior aspect using the FlipCutter as a guide pin, only one time; as the blade is deployed, reaming then proceeds in an anterior fashion, therefore away from the neurovascular package. Apart from this, the RetroConstruction set enables the guide to be supported over the tibial footprint of the PCL, together with the stepped drill sleeve being placed anteriorly. This placement gives us a precise reading of the distance between the anterior and posterior tibial cortex, which—together with the FlipCutter with markings every 5 mm—clearly indicates the point where the guide pin will pass through the posterior cortex; together with a push-back gesture on the capsule with the guide, this provides good visualization and a greater margin of safety during that step.
By leaving the medial cortex intact, the cortical fixation device may be used. By using this device we can pass the graft through the tibial tunnel and fix it in a single movement. In the usual way, first, we have to pass the graft and then from the anterior side of the tibial hole try to locate it to fix it; thus, we speed the procedure. Furthermore, the density of the cancellous bone may be different at the center of the metaphysis than in the area near the joint,12 which explains the lesser pullout and cyclical loading strength13 and the need for secondary fixation. This is not the case when cortical fixation is achieved with the TR, which also simplifies graft passage and fixation in a single step.
Having 2 adjustable cortical buttons, we can adjust the PM bundle in extension, and being able to tension from both sides, we remove any kind of tibial or femoral residual laxity that may have resulted from folding the graft at the tibial or femoral exit points and lessened tension in the killer turn.22
Given the design of the graft construct, a third cortical device cannot be used; however, the interference fixation of soft tissues in the femoral region is reliable. This interference fixation is strong because the femoral medullary bone is stronger than the bone surrounding the tibial socket. Furthermore, placing the head of the screw in the intercondylar space against the graft is stiffer than inside cancellous bone,7 and fixation is performed in flexion, with good parallelism between the screw and the soft tissues. This may be a limitation of our technique, which requires improvement because of a possible failure on cyclic loading; however, adding another TR device that could better hold sutures could be a way to improve the technique in the future.
Patients report little pain, probably because of the nonexistence of open tunnels with bruising. There are also reports of all-inside surgeries with better cosmesis and return to normal activity.23 This is especially interesting because association with other reconstructions, such as ACL and PL corner reconstructions, is usual. Furthermore, future possible revisions are made easier by the preservation of bone tissue quality.
Disagreement exists about which is the best reconstruction technique: whether simple band or double bundle24-26 or whether transtibial reconstruction of the PCL is superior to the inlay technique.27-31 We believe that this is the first report on a transtibial all-inside double-band technique with a tibial adjustable suspensory cortical device. We believe that this technique is simple and reproducible (Table 1).
Table 1.
Key Surgical Steps
| 1. Perform graft preparation |
| 2. Provide neurovascular protection |
| Measure AP width with drill sleeve |
| Push posterior capsule with guide hook |
| Perform retrograde drilling |
| 3. Pass tibial side graft until femoral ends are in joint |
| 4. Raise PM band 2 cm inside femoral socket |
| Tighten tibial TR softly and then finish in extension |
| Tighten PM femoral TR |
| 5. Fix AL band in 90° of flexion with anterior drawer |
To date, we have performed 15 repairs using the described technique: 8 isolated, 4 associated with an ACL reconstruction, and 3 with the PL side. For all of these, only short follow-up is available, which does not allow us to confirm the efficacy of this technique, despite the good outcomes obtained until now.
Footnotes
The authors report that they have no conflicts of interest in the authorship and publication of this article.
Supplementary data
References
- 1.Morgan C.D. The all-inside ACL reconstruction. In: Morgan C.D., editor. Operative Technique Manual. Arthrex; Naples, FL: 1995. [Google Scholar]
- 2.Puddu G., Cerullo G. My technique in femoral tunnel preparation: The “Retro-Drill” technique. Tech Orthop. 2005;20:224–227. [Google Scholar]
- 3.Kim S.G., Kurosawa H., Sakuraba K., Ikeda H., Takazawa S., Takazawa Y. Development and application of an inside-to-out drill bit for anterior cruciate ligament reconstruction. Arthroscopy. 2005;21 doi: 10.1016/j.arthro.2005.05.032. 1012e1-1012e4. [DOI] [PubMed] [Google Scholar]
- 4.Ramos L.A., de Carvalho R.T., Cohen M., Abdalla R.J. Anatomic relation between the posterior cruciate ligament and the joint capsule. Arthroscopy. 2008;24:1367–1372. doi: 10.1016/j.arthro.2008.07.011. [DOI] [PubMed] [Google Scholar]
- 5.Pace J.L., Wahl C.J. Arthroscopy of the posterior knee compartments: Neurovascular anatomic relationships during arthroscopic transverse capsulotomy. Arthroscopy. 2010;26:637–642. doi: 10.1016/j.arthro.2009.09.009. [DOI] [PubMed] [Google Scholar]
- 6.Zawodny S.R., Miller M.D. Complications of posterior cruciate ligament surgery. Sports Med Arthrosc. 2010;18:269–274. doi: 10.1097/JSA.0b013e3181f2f4c2. [DOI] [PubMed] [Google Scholar]
- 7.Harvey A., Thomas N.P., Amis A.A. Fixation of the graft in reconstruction of the anterior cruciate ligament. J Bone Joint Surg Br. 2005;87:593–603. doi: 10.1302/0301-620X.87B5.15803. [DOI] [PubMed] [Google Scholar]
- 8.Fanelli G.C., Beck J.D., Edson C.J. Double bundle posterior cruciate ligament reconstruction: Surgical technique and results. Sports Med Arthrosc. 2010;18:242–248. doi: 10.1097/JSA.0b013e3181f2faa1. [DOI] [PubMed] [Google Scholar]
- 9.Giffin J.R., Haemmerle M.J., Vogrin T.M., Harner C.D. Single- versus double-bundle PCL reconstruction: A biomechanical analysis. J Knee Surg. 2002;15:114–120. [PubMed] [Google Scholar]
- 10.Matava M.J., Ellis E., Gruber B. Surgical treatment of posterior cruciate ligament tears: An evolving technique. J Am Acad Orthop Surg. 2009;17:435–446. doi: 10.5435/00124635-200907000-00004. [DOI] [PubMed] [Google Scholar]
- 11.Veltri D.M., Warren R.F., Silver G. Complications in posterior cruciate ligament surgery. Oper Tech Sports Med. 1993;1:154–158. [Google Scholar]
- 12.Martin S., Martin T., Brow C.H. Anterior cruciate ligament fixation. Orthop Clin North Am. 2002;33:68–69. doi: 10.1016/s0030-5898(02)00023-8. [DOI] [PubMed] [Google Scholar]
- 13.Lee Y.S., Wang J.H., Bae J.H. Biomechanical evaluation of cross-pin versus interference screw tibial fixation using a soft-tissue graft during transtibial posterior cruciate ligament reconstruction. Arthroscopy. 2009;25:989–995. doi: 10.1016/j.arthro.2009.02.006. [DOI] [PubMed] [Google Scholar]
- 14.Mannor D.A., Shearn J.T., Grood E.S., Noyes F.R., Levy M.S. Two-bundle posterior cruciate ligament reconstruction: An in vitro analysis of graft placement and tension. Am J Sports Med. 2000;28:833–845. doi: 10.1177/03635465000280061101. [DOI] [PubMed] [Google Scholar]
- 15.Ahn J.H., Lee Y.S., Chang M.J., Kum D.H., Kim Y.H. Anatomical graft passage in transtibial posterior cruciate ligament reconstruction using bioabsorbable tibial cross pin fixation. Orthopedics. 2009;32:96–99. [PubMed] [Google Scholar]
- 16.Durbin T.C., Johnson D.L. Pearls and pitfalls of single-bundle transtibial posterior cruciate ligament reconstruction. Orthopedics. 2012;35:218–223. doi: 10.3928/01477447-20120222-09. [DOI] [PubMed] [Google Scholar]
- 17.Kim S.J., Park I.S. Arthroscopic reconstruction of the posterior cruciate ligament using tibial-inlay and double-bundle technique. Arthroscopy. 2005;21:1271.e1–1271.e6. doi: 10.1016/j.arthro.2005.08.004. [DOI] [PubMed] [Google Scholar]
- 18.Zehms C.T., Whiddon D.R., Miller M.D. Comparison of a double bundle arthroscopic inlay and open inlay posterior cruciate ligament reconstruction using clinically relevant tools: A cadaveric study. Arthroscopy. 2008;24:472–480. doi: 10.1016/j.arthro.2007.09.012. [DOI] [PubMed] [Google Scholar]
- 19.Lee Y.S., Ahn S.H., Jung Y.B. Transtibial double bundle posterior cruciate ligament reconstruction using TransFix tibial fixation. Knee Surg Sports Traumatol Arthrosc. 2007;15:973–977. doi: 10.1007/s00167-007-0300-5. [DOI] [PubMed] [Google Scholar]
- 20.Jackson D.W., Proctor C.S., Simon T.M. Arthroscopic assisted PCL reconstruction: A technical note on potential neurovascular injury related to drill bit configuration. Arthroscopy. 1993;9:224–227. doi: 10.1016/s0749-8063(05)80381-0. [DOI] [PubMed] [Google Scholar]
- 21.McGuire D.A., Hendricks S.D. Protection of posterior structures during transtibial tunnel creation for posterior cruciate ligament reconstruction. Arthroscopy. 2006;22:1254–1255. doi: 10.1016/j.arthro.2006.08.012. [DOI] [PubMed] [Google Scholar]
- 22.Markolf K., Slauterbeck J.R., Armstrong K.L., Shapiro M.S., Finerman G.M. A biomechanical study of replacement of the posterior cruciate ligament with a graft: Part I: Isometry, pre-tension of the graft, and anterior-posterior laxity. J Bone Joint Surg Am. 1997;79:375–380. doi: 10.2106/00004623-199703000-00009. [DOI] [PubMed] [Google Scholar]
- 23.Lubowitz J.H., Amhad C.H., Anderson K. All-inside anterior cruciate ligament graft-link technique: Second-generation, no-incision anterior cruciate ligament reconstruction. Arthroscopy. 2011;27:717–727. doi: 10.1016/j.arthro.2011.02.008. [DOI] [PubMed] [Google Scholar]
- 24.Kim Y.M., Lee C.A., Matava M.J. Clinical results of arthroscopic single-bundle transtibial posterior cruciate ligament reconstruction: A systematic review. Am J Sports Med. 2011;39:425–434. doi: 10.1177/0363546510374452. [DOI] [PubMed] [Google Scholar]
- 25.Yoon K.H., Bae D.K., Song S.J., Cho H.J., Lee J.H. A prospective randomized study comparing arthroscopic single-bundle and double-bundle posterior cruciate ligament reconstructions preserving remnant fibers. Am J Sports Med. 2011;39:474–480. doi: 10.1177/0363546510382206. [DOI] [PubMed] [Google Scholar]
- 26.Kohen R.B., Sekiya J.K. Single-bundle versus double-bundle posterior cruciate ligament reconstruction. Arthroscopy. 2009;25:1470–1477. doi: 10.1016/j.arthro.2008.11.006. [DOI] [PubMed] [Google Scholar]
- 27.Panchal H.B., Sekiya J.K. Open tibial inlay versus arthroscopic transtibial posterior cruciate ligament reconstructions. Arthroscopy. 2011;27 doi: 10.1016/j.arthro.2011.04.007. 1289-1289. [DOI] [PubMed] [Google Scholar]
- 28.MacGillivray J.D., Shubin Stein B.E., Park M. Comparison of tibial inlay versus transtibial techniques for isolated posterior cruciate ligament reconstruction: Minimum 2-year follow-up. Arthroscopy. 2006;22:320–328. doi: 10.1016/j.arthro.2005.08.057. [DOI] [PubMed] [Google Scholar]
- 29.Hammoud S., Reinhardt K.R., Marx R.G. Outcomes of posterior cruciate ligament treatment: A review of the evidence. Sports Med Arthrosc. 2010;18:280–291. doi: 10.1097/JSA.0b013e3181eaf8b4. [DOI] [PubMed] [Google Scholar]
- 30.Papalia R., Osti L., Del Buono A. Tibial inlay for posterior cruciate ligament reconstruction: A systematic review. Knee. 2010;17:264–269. doi: 10.1016/j.knee.2010.02.006. [DOI] [PubMed] [Google Scholar]
- 31.Kim S.J., Kim T.E., Jo S.B., Kung Y.P. Comparison of the clinical results of three posterior cruciate ligament reconstruction techniques. J Bone Joint Surg Am. 2009;91:2543–2549. doi: 10.2106/JBJS.H.01819. [DOI] [PubMed] [Google Scholar]
Associated Data
This section collects any data citations, data availability statements, or supplementary materials included in this article.