Introduction
The traditional approach to resection of anterior mediastinal masses has been via sternotomy. This approach has been associated with an average length of stay of 4–5 days, sternal precautions for 6 weeks, a visible scar, and in some cases, long term discomfort. Although some surgeons have attempted VATS resection of thymomas and other anterior mediastinal masses, we have found that a robotic assisted resection, with its enhanced vision (due to the 10× magnification) and endowrist movements, are ideal for the compact space of the anterior mediastinum [1]. Herein, we describe our technique of total thymectomy for thymoma, highlight some adjunctive techniques, discuss the results of robotic thymectomy, and identify the controversies around robotic resection for thymoma.
Right Chest Approach to Total Thymectomy
Patient Selection
For surgeons early in their experience with robotic thymic surgery, we recommend restricting patient selection to patients with thymomas less than 3 cm. As the surgeon’s skills and experience improve, this size criterion can be adjusted to accommodate larger thymomas. Additional factors that may preclude a robotic approach include extensive adhesions, prior mediastinal surgery or coronary bypass surgery, masses localized in the aorto-pulmonary (AP) window, or thymomas adherent to the phrenic nerves. We have also excluded patients requiring induction chemo or chemoradiotherapy and thymic carcinomas, but have not felt it necessary to exclude patients based on Body Mass Index (BMI), American Society of Anesthesiologists physical status classification (ASA), or age.
Patients should be evaluated with a CT scan of the chest and pulmonary function testing before undergoing resection. Serum antibodies against the acetylcholine receptor can be ordered if the patient has clinical signs and symptoms of Myasthenia Gravis. Likewise, AFP, B-HCG and LDH levels are helpful if there is a clinical suspicion of germ cell tumor or lymphoma. In general, if an anterior mediastinal mass is easily resectable, and there is no reason to suspect germ cell tumor or lymphoma, surgical resection should be offered. In cases of local invasion, distant metastases, or concern of a germ cell tumor or lymphoma, core needle biopsy of the mass may be considered.
Equipment and Operating Room Team
Relevant equipment for the procedure includes the robot, robot console, operating room (OR) bed, equipment boom, scope table and warmer, monitors, sterile back table, and supply carts. The electrical cords should be set up so that they are out of the way of the surgeon or assistant when moving from one side of the OR table to the other, or when moving to the robotic console from the bed-side. The typical instruments used for the procedure are the Cadière, “L” hook cautery, curved bipolar dissector, and vascular clips or Hem-o-lock clips for blood vessels. It is helpful to have a consistent robotic OR team so that the learning curve is minimized from case to case. Furthermore, for the first few cases, an experienced robotic surgical proctor and an Intuitive trained staff member or vendor can be invaluable when learning how to dock and troubleshoot on the robot.
Patient Positioning
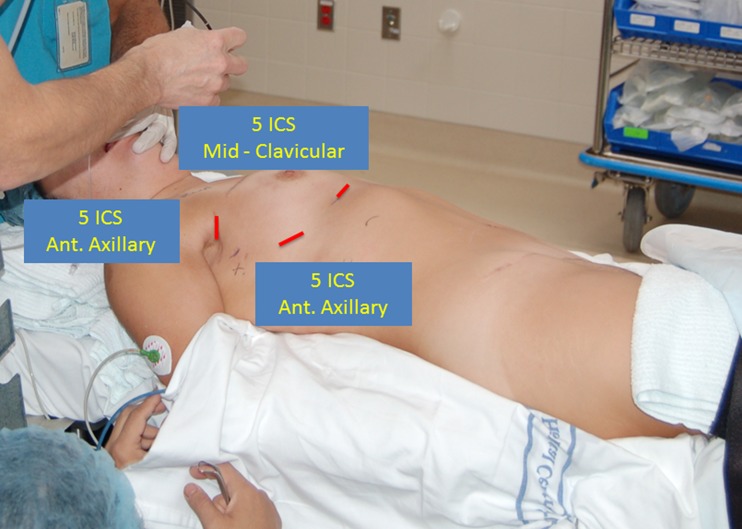
Precise patient positioning is a critical component of the robotic thymectomy. It is useful to turn the OR table 180° and use the foot as the head. The separate head piece can then be added to this new location. The benefit of this set-up is that the robot can dock without hitting the pedestal of the OR table. The patient is anesthetized with a double lumen endotracheal tube and placed in the supine position. It is important to move the patient completely to the edge of the right side of the table. This permits us to suspend the right arm below the plane of the body against the edge of the table. The right hemithorax is then elevated with a long gel roll that is placed from the patient’s hip to the level of the tip of the scapula (Fig. 1). After prepping and draping the patient, the surgeon should plan for possible conversion to sternotomy by marking the sternal notch, sternal edges and xyphoid, especially during initial experiences with this approach. The robot is brought over the left shoulder for docking and the anesthesia team can be positioned behind the patient’s right shoulder. Finally, we place the patient in 10° of reverse Trendelenberg to help the mediastinum and diaphragm fall away from the neck region.
Fig. 1.
Patient positioning and port placement
Docking and Port Positioning
Before entering the chest, the anesthetist drops the right lung. When inserting ports, 3 mL of bupivicaine 0.50 % with epinephrine are injected into the skin and interspace. It is vital that the port sites are not too big or else they will slide too much or permit the leakage of gas. A helpful technique is to use the end of the port to create a circular indentation on the skin. This mark will approximate the size of the incision. The port should be inserted in a straight line directly into the pleural space without any tunneling. This is because tunneling will limit the motion of the robotic arm. Finally, the black mark on the port should sit at the level of the intercostal space to minimize trauma and post-operative pain from port movement.
The first port is placed in the anterior axillary line in the 5th intercostal space. A 12 mm trocar is utilized at this location to accommodate the 12 mm 0° camera. The pleural space is insufflated with carbon dioxide (CO2) at a flow of 6–10 L/min at pressures of 6–8 mmHg. The next port should also be placed in the 5th interspace, but at the mid-clavicular line. It is crucial that this port be placed at least 10 cm away from the camera port. This port will be an 8.5 mm port and is used for robotic arm #1. The final port is used for robotic arm #2 and is also 8.5 mm in size (Fig. 1). It is placed higher in the anterior axillary line posterior to the edge of the pectoralis major muscle. It is advantageous to use the camera to help place the port so that the trajectory line into the chest will be inferior to the right internal mammary/vena caval junction. When docking the robot, it should be brought in at an angle over the left shoulder. The robot should then line up directly with the camera port and the midpoint of the sternum.
Thymectomy Dissection
The dissection is started with a 0° scope, a hook cautery in arm #1 (the left hand), and a Cadière grasper in arm #2 (the right hand). We begin by identifying the phrenic nerve on the right side and incising the mediastinal pleura just anterior and medial to it. The dissection is continued cephalad toward the internal mammary vein. This marks a transition point where we start to dissect onto the sternum and divide the pleura along the right internal mammary artery (IMA) and veins from the origin all the way to the diaphragm. As the dissection is carried across the sternum, the small feeding vessels from the IMA are dissected out by bluntly pushing the areolar tissue away from the sternum along the length of the vessel and then cauterized. Once the left internal mammary artery and vein are identified, the left pleura is widely opened from the origin of the left mammary vein to the diaphragm. It is helpful to follow the mammary vessels down towards the diaphragm during this portion of the dissection.
The next step involves elevating the thymus off the pericardium, again heading cephalad until the left brachiocephalic vein is encountered. At this point, the L-hook should be switched for a bipolar dissector. The thymus is dissected off of the anterior aspect of the vein using the dissector and a plane is created underneath the thymus (staying on top of the vein) until the left edge of the thymus is identified. We then switch to a 30° camera as this improves visualization and dissection of the superior poles. Our preference is to begin with the right superior pole and then move to the left superior pole. The investing fascia at this level must be precisely incised, and then a hand-over-hand technique can be utilized to gently reduce each pole out of the neck. It is often helpful to define the space between the poles and the Cadière forcep is a useful instrument for the superior pole dissection.
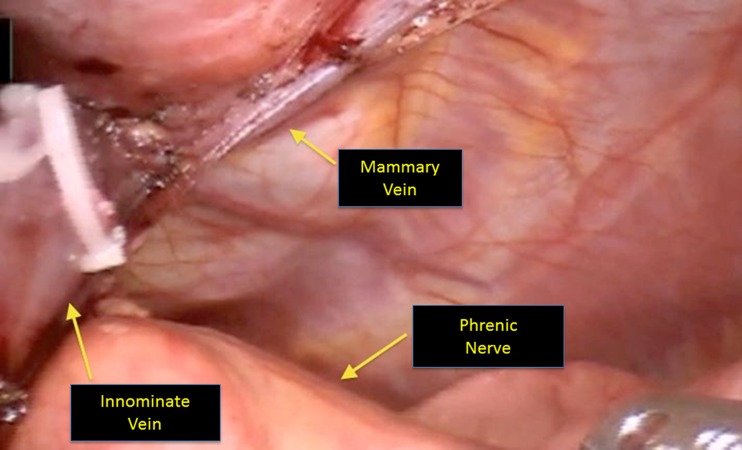
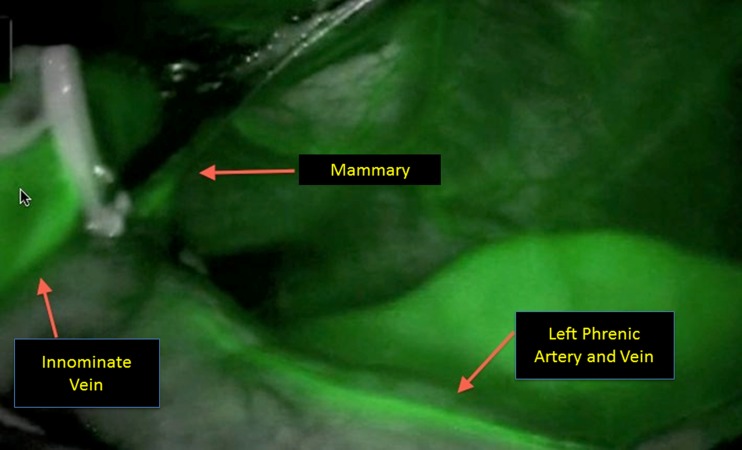
Identification and preservation of the left phrenic nerve is a critical component of this next portion of the surgery. A useful maneuverer involves reducing the tidal volume on the left lung to improve visualization. A good rule of thumb is to reduce it to 500 ml or less, but this may depend on the patient’s underlying pulmonary status. There are three different strategies to identify the nerve on the left side: 1) looking down intrapleurally with the 30° scope and retracting the pleura towards the right chest to directly visualize the nerve (Fig. 2), 2) directly visualizing the left phrenic nerve origin by dissecting out the left internal mammary complex, 3) employing the Firefly camera with indocyanine green (ICG) to fluoresce the pericardiophrenic artery and vein (Fig. 3), which run alongside the phrenic nerve [2]. Once the phrenic has been identified, the pleura is incised along the length of the nerve. An additional maneuver to help identify and protect the left phrenic nerve involves freeing the thymus from the pericardium in the AP window. The thymus can be reflected into the left chest to aid with retraction and visualization.
Fig. 2.
Visualization of the left phrenic nerve
Fig. 3.
ICG fluorescence of the phrenic nerve
To remove the thymic specimen it is placed in a specimen retrieval bag, which at our center is the Endo-bag ™ (Covidien, Mansfield, MA). The mid-clavicular incision is used to introduce the bag, and the specimen can be placed inside using either the robot or thoracoscopic instruments. Before removing the specimen through the enlarged camera port-site, the robot is undocked and moved away from the patient. Occasionally, for larger lesions (>8 cm), we have made a lower, more lateral incision to take advantage of the wider intercostal spaces for specimen extraction. While holding the camera by hand, each port site should be inspected for hemostasis and rib blocks can be performed at this time. Finally, we like to place a Blake drain through the mid-clavicular port and have it traverse the mediastinum to sit in the left hemothorax. All port sites are closed with a deeper subcutaneous layer and more superficial subcuticular layer.
When the thymoma demands a left side approach, we utilize the same ports with the mid-clavicular port placed a bit more laterally and inferiorly to avoid the heart. The set-up and thymectomy is performed in a similar fashion. The side of choice is dependent upon the location of the tumor relative to the phrenic nerve and brachiocephalic vein, and whether thymomectomy or complete thymectomy is being considered. In general, masses that tend to be juxtaposed to the aorto-pulmonary window where the left phrenic might be involved should be approached from the left side.
Adjunctive Techniques
During the learning curve, we used additional technical adjuncts to maximize our thymic resection during total thymectomy, provide visual feedback about our dissection of the contralateral phrenic nerve, and facilitate superior pole dissection.
ICG Technique
To identify the left phrenic nerve bundle (PNB) with fluorescence, a 6.25 mg bolus injection of ICG is injected into a peripheral venous catheter. This injection is followed by a 10 ml bolus of normal saline. The visual system on the robotic camera is then changed to fluorescent mode. Typically, a fluorescence response in the mediastinal blood vessels and tissue is visible within 5 to 10 s after the injection and peaks at 1 min after injection. If repeated fluorescence images are required, they should be taken with no less than 5 min between imaging sequences as this gives enough time for the previous ICG to be cleared. The camera can then be advanced into the left pleural space (after opening the left pleura) and the left PNB can be more easily identified and preserved during the subsequent dissection.
Optional Left Thoracoscopic Mobilization
As mentioned above, one of the more difficult aspects of the right chest approach is identification and preservation of the left phrenic nerve. One way to alleviate this technical challenge involves starting with a left thoracoscopic mobilization of the left side of the thymus gland away from the left phrenic nerve. Port placement is similar to the right chest approach as described above. However, 5 mm ports can be used in lieu of the 8 mm ports required for the robot and a 5 mm camera can also be utilized. The mediastinal pleura is incised medial to the left phrenic nerve and then continued superiorly and inferiorly along the length of the thymus gland making sure to stay parallel to the phrenic nerve. The thymus gland can then be dissected off of the left pericardium using a combination of blunt and cautery dissection. The surgeon then repositions the patient and moves ahead with the right chest approach as described in the preceding section. Having done this left mobilization, the surgeon will be less likely to injure the left phrenic nerve and should have an easier time mobilizing the left thymus into the right chest.
Optional Collar Incision
A small 2 cm collar incision can be useful for mobilizing the superior poles in the neck. As such, it becomes easier to reduce both poles into the chest after performing this maneuver. For the surgeon first learning how to perform a complete robotic thymectomy, the collar incision can be an invaluable adjunct. At present, we will only use a collar incision when we are having difficulty reaching the end of the superior poles or if our pathologist identifies elements of thymus at the tip of the resected upper poles on frozen section analysis.
Results
Excluding thymic carcinoma and patients requiring neoadjuvant therapy, all of our total thymectomies are performed using the daVinci robotic system. Most of our surgeons utilize the right chest approach when taking out the entire thymus gland while those still gaining experience have employed a left thoracoscopic mobilization to help with identification and preservation of the left phrenic nerve. We have moved away from the collar incision as our comfort level with the robot has increased. In a 2010 review, we compared our robotic and thoracoscopic thymectomies to those done with a sternotomy [3]. This review showed a significant reduction in hospital length of stay and similar operative time and blood loss. Since then, we have managed to further reduce overall operative time and hospital length of stay. Most patients can be discharged on the first or second post-operative day and usually return to their regular activities within the first 2 weeks postoperatively off narcotics. However, it should be noted that no long term results (minimum 10 year follow-up) for robotic thymectomy exist in the current literature.
Overall survival after surgical resection is quite favorable, even for patients with stage III and IV disease. The 10 year survival rates are approximately 90 % for stage I, 70 % for stage II, 55 % for stage III, and 35 % for stage IVa. Recurrence rates after total thymectomy are also low with only a 4 % recurrence rate for Masaoka stage I tumors and 7 % and 16 % recurrence rates for stage II and III tumors respectively [4]. To minimize the risk of recurrence and improve overall survival, strict surgical principles must be adhered to. The main principles of thymoma surgery include careful handling of the tumor to avoid breaching the capsule and obtaining a gross and microscopically complete resection. The current standard of care is to perform a total thymectomy for thymoma. This is especially true in patients with both a thymoma and Myasthenia Gravis. Additional reasons to perform a total thymectomy include minimizing the risk of recurrence and preventing the occurrence of Myasthenia Gravis in a previously asymptomatic patient. Furthermore, a second small thymoma can be found in the resected thymic specimen in up to 3 % of patients.
Controversies
Right or Left Chest Approaches
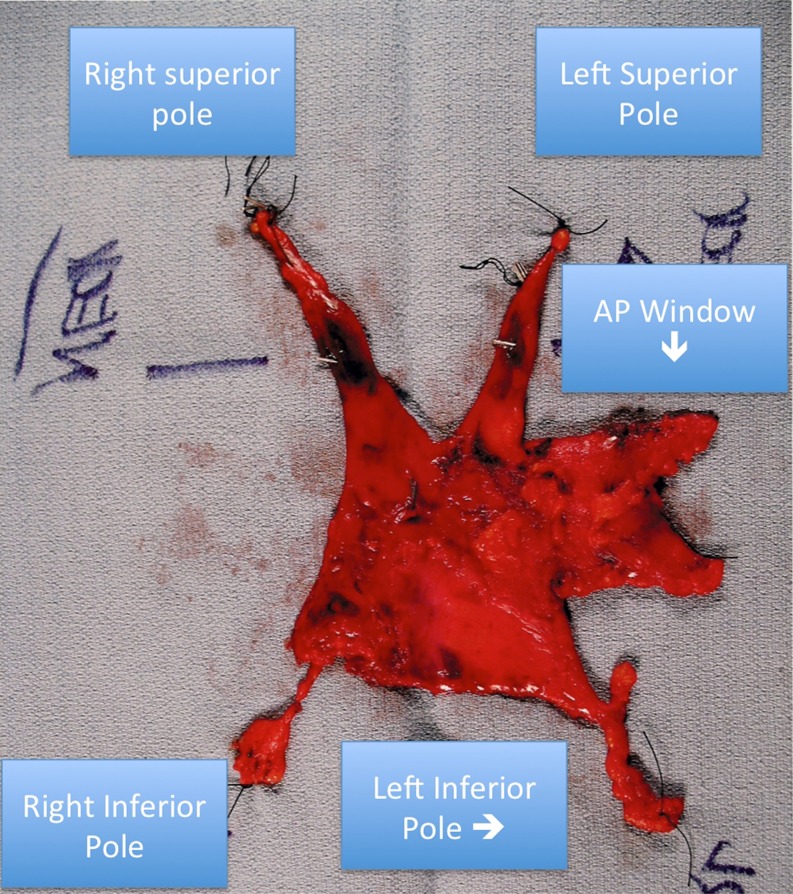
The choice between a right robotic and left robotic approach for total thymectomy often sparks vigorous debate and there are reasons to be proficient at both approaches. The right approach avoids having the majority of the heart and aorta in the operative field, which can make visualization and dissection more difficult from the left even with CO2 insufflation. Cardiac and pericardial injuries have been reported using the left sided approach [5]. Thus, early in the learning curve, a right sided approach may be easier. Conversely, a left approach makes it easier to remove thymic tissue wedged in the aorto-pulmonary window and also tissue found posterior to the phrenic nerve, which is seen in 72 % of patients [6]. Furthermore, very little thymic tissue lies posterior to the right phrenic nerve. However, with the right sided technique described above, our specimens usually contain the AP window tissue (Fig. 4).
Fig. 4.
Robotic thymectomy specimen
Conclusion
The da Vinci surgical robot system is an alternative approach to management of the anterior mediastinal mass such as thymoma. Early comparisons to sternotomy have demonstrated feasibility of resection, shortened length of hospital stay, and quicker return to usual activities while avoiding the need for sternal precautions. The surgeon must continue to follow known surgical principles in the resection of thymoma when approaching these lesions robotically. During the learning curve, using a short collar incision to aid in superior pole identification or a thoracoscope in the contralateral chest for phrenic nerve identification can help the novice robotic surgeon gain confidence with the technology. Longer term results of thymectomy for thymoma are lacking and hopefully will be reported as results mature.
Acknowledgments
Conflicts of Interest
Dr. Louie and Dr. Farivar wish to disclose that they are on the speaker’s bureau and are surgical proctors for Intuitive.
References
- 1.Rückert JC, Ismail M, Swierzy M, Sobel H, Rogalla P, Meisel A, Wernecke KD, Rückert RI, Müller JM. Thoracoscopic thymectomy with the da Vinci robotic system for myasthenia gravis. Ann N Y Acad Sci. 2008;1132:329–335. doi: 10.1196/annals.1405.013. [DOI] [PubMed] [Google Scholar]
- 2.Wagner OJ, Louie BE, Vallières E, Aye RW, Farivar AS. Near-infrared fluorescence imaging can help identify the contralateral phrenic nerve during robotic thymectomy. Ann Thorac Surg. 2012;94(2):622–625. doi: 10.1016/j.athoracsur.2012.04.119. [DOI] [PubMed] [Google Scholar]
- 3.Youssef SJ, Louie BE, Farivar AS, Blitz M, Aye RW, Vallières E. Comparison of open and minimally invasive thymectomies at a single institution. Am J Surg. 2010;199(5):589–593. doi: 10.1016/j.amjsurg.2010.01.001. [DOI] [PubMed] [Google Scholar]
- 4.Regnard JF, Magdeleinat P, Dromer C, et al. Prognostic factors and long-term results after thymoma resection: a series of 307 patients. J Thorac Cardiovasc Surg. 1996;112:376–384. doi: 10.1016/S0022-5223(96)70265-9. [DOI] [PubMed] [Google Scholar]
- 5.Marulli G, Rea F, Melfi F, et al. Robot-aided thoracoscopic thymectomy for early-stage thymoma: a multicenter European study. J Thorac Cardiovasc Surg. 2012;144:1125–1132. doi: 10.1016/j.jtcvs.2012.07.082. [DOI] [PubMed] [Google Scholar]
- 6.Rückert JC, Czyzewski D, Pest S, Müller JM. Radicality of thoracoscopic thymectomy: an anatomical study. Eur J Cardiothorac Surg. 2000;18:735–736. doi: 10.1016/S1010-7940(00)00582-0. [DOI] [PubMed] [Google Scholar]


