

Abstract
Conventional heavy metal post staining methods on thin sections lend contrast but often cause contamination. To avoid this problem, we tested several en bloc staining techniques to contrast tissue in serial sections mounted on solid substrates for examination by Field Emission Scanning Electron Microscope (FESEM). Because FESEM section imaging requires that specimens have higher contrast and greater electrical conductivity than transmission electron microscope (TEM) samples, our technique utilizes osmium impregnation (OTO) to make the samples conductive while heavily staining membranes for segmentation studies. Combining this step with other classic heavy metal en bloc stains including uranyl acetate, lead aspartate, copper sulfate and lead citrate produced clean, highly contrasted TEM and SEM samples of insect, fish, and mammalian nervous system. This protocol takes 7–15 days to prepare resin embedded tissue, cut sections and produce serial section images.
Introduction
For more than 50 years, thin section Transmission Electron Microscopy (TEM) has been a mainstay of cell biology. Early electron microscopists quickly realized the value of obtaining serial sections to gather three-dimensional (3D) information1. The application of serial section technique to the study of 3D microcircuitry of the nervous system began more than 30 years ago 2. New techniques have recently been developed to image larger volumes of tissue with the goal of understanding connectivity in the nervous system3. With the advent of serial block face (SBF-SEM) 4 and Focused Ion Beam (FIB) 5 methods for fully automated electron microscopic volume imaging and techniques for collecting long series of ultrathin sections onto large glass coverslip 6 or tape7 substrates, reflection mode Scanning Electron Microscopy (SEM) is moving to the forefront of electron microscopic 3D reconstruction. While traditional TEM methods have provided higher resolution and contrast imagery, they pose greater challenges for the collection and imaging of large specimens volumes due to the small grid sizes and the inherent fragility of the thin film supporting substrates required for transmission EM. Moreover, new Field-Emission SEM tools (FESEM) provide useful resolution that begins to approach that obtained by TEM, while the optimized en bloc staining methods we describe here provide contrast that also begins to rival that achieved by TEM.
The advantages of FIB- and SBF-SEM, which allow the collection of hundreds or thousands of automatically cut, perfectly aligned thin sections, over serial section TEM, which requires highly skilled collection and imaging techniques 8, is evident. However, these sections are lost permanently lost due to the destructive nature of the process of FIB and SBF-SEM. In contrast, the automatic collection of thin sections onto tape, and array tomography, where serial thin section ribbons are picked up onto carbon-coated coverslips (Fig. 1a, b), allow structural and multi-marker immunolabeling studies of the same section. Additionally, both tape and coverslip mounted samples permit repeated multi-site imaging of full sections without the interference of grid bars or unstable formvar films for the FESEM (Fig. 1c). Finally, the large chamber size of the FESEM easily accommodates serial sections mounted on these large specimen carriers i.e. 60 mm coverslips and 4-inch silicon wafers.
Figure 1.

Preparation of serial thin sections. (a) Block face with parallel top and bottom edges. (b) Carbon coated coverslip submerged in Jumbo Histo knife. Use eyelash tool to detach ribbon (arrow) from knife-edge (1) and move it to attach to metal bar holding water in place (2) then slowly and carefully remove the coversip from boat so ribbon lays down flat. (c) FESEM image of ribbon of ultrathin serial sections mounted on carbon-coated coverslip. Scale bar 100 μm. Animal use in this experiment was conducted in strict accordance to our institutional animal care and use committee guidelines.
While major advances have been made in the field of imaging and cutting of sections, the same basic tissue preparation techniques, fixatives and heavy metal stains have not changed significantly in many years. We have combined and compared several classical EM preparation methods to achieve the best staining combination for segmentation of neuronal membranes in FESEM images. Here, we describe a method that can be applied to ultrastructural studies of many tissue types, both for the FESEM and TEM. For 3D serial reconstructions of different tissue types, one should consider which tissue elements are to be enhanced for imaging and choose the appropriate heavy metal stain to do so.
En bloc staining is applicable to both TEM and FESEM imaging, and it advantageous to be able to go directly to the electron microscope to view thin sections without the bother of further post staining. The main limitation of this method can be inadequate contrast due to uneven stain penetration and fragility of the tissue because of heavy metal infusion. Careful attention to solution preparation, incubation times and adequate rinsing steps will minimize background. Precise specimen handling at every step to lessen contamination and tissue loss is imperative when using the osmium impregnation technique.
Membrane Contrasting Agents
The use of heavy metal on section staining methods using uranyl acetate and lead citrate 9,10 is widespread in classical Transmission Electron Microscopy (TEM) studies. The contrast enhancement observed in biological tissue is mainly due to the high affinity of uranyl and lead ions for proteins, nucleic acids, and hydroxyl groups in carbohydrates and RNA respectively 11. These positive stains, however, occasionally contaminate the sections with electron dense precipitates. Lead containing stains in particular, are notorious for causing fine pepper like precipitate that ruins the appearance of high-resolution images. In addition, the often laborious time spent staining and washing grids frequently damages formvar films and causes tears in the thin sections.
In 1960, Seligman and Hanker developed the OTO (osmium tetroxide-thiocarbohydrazide (TCH)-osmium) method12 which made use of thiocarbohydrazide as a bridging agent in the process called osmium impregnation. The osmiophilic TCH enhances the osmium staining of lipid components, and especially the cell membrane. TCH works by attaching itself to the osmium already present from the initial osmium fixation and acts as a bridge to allow deposition of additional osmium to the original osmium sites. A further advantage of using TCH is that the specimen is made more conductive to electrons by the additional metal staining. This helps prevent excess charging of the sample in the SEM13, 14,15.
The use of reduced osmium fixatives16,17 has also been shown to add contrast to specimens and preserve filaments and membranes. Addition of either potassium ferri- or ferrocyanide to the impregnation solution reduces the osmium (OsFeCN) causing it to be more reactive18. The reduced osmium stains membranes better and enhances labeling of sarcoplasmic reticulum and glycogen granules.
The use of imidazole, a tertiary amine, has been used to enhance the osmification of lipids, in particular those of cell membranes and unsaturated fatty acids19. In addition to the enhanced contrast of the plasma membrane, all intercellular membranes, including those of synaptic vesicles, the Golgi apparatus, endoplasmic reticulum, mitochondria and endosomes, have improved contrast20.
Serial Section Collection
Many beautiful serial section TEM studies have provided 3D detail and relationships of structures in neuronal tissue, as shown by the studies of several labs21, 22,23,24,25. In these traditional serial section studies, sections are collected on 3 mm formvar coated slot grids. Successful collection requires excellent manual skills and dexterity and is often a major pitfall for the novice and expert alike. For example, sections can land on the copper grid edge, become folded or be affected by irregularities in the underlying support film26. In addition, formvar films are infamously hard to cast, extremely delicate and prone to instability and breakage in the electron beam. Another disadvantage is the size of the block face, which must be made extremely small to accommodate a great number of sections on a 3 mm grid. This is adequate for small areas of tissue but becomes problematic for large volume reconstruction of sizeable brain areas. Thus, there are several advantages to having serial sections on flexible tape or carbon-coated coverslips compared to formvar coated slot grids. The biggest advantage is the strength of the supporting material and ease of handling. For example, the use of the Jumbo Histo knife makes it relatively straightforward to pick up the ribbon of serial sections on a glass coverslip (Fig. 1b). The large boat size accommodates the coverslip, which is much easier to handle than numerous formvar coated grids. In addition, more and larger sections can fit onto a 20 x 60 mm coverslip (Fig. 1c) compared to a 3 mm formvar coated slot grid.
Development of the Staining Protocol
Our own search for improving contrast of embedded samples began with the development of SBF-SEM to map neuronal circuits, a tool that needed highly contrasted specimens for imaging. An en bloc protocol27 for SBF-SEM studies of the arterial wall was expanded and further developed in our labs specifically for staining neuronal tissue membranes and elements. We included the use of OTO because it had been used to make specimens conductive for SEM studies28.
In order to find the best staining protocol, we tested many permutations of different combinations of aqueous or buffered osmium, osmium imidazole, thiocarbohyrazide, carbohydrazide, copper lead en bloc, lead aspartate en bloc, potassium ferricyanide, and ethanolic phosphotungstenic acid (PTA). These were all tested in the presence or absence of uranyl acetate en bloc to determine the best combination and times to produce consistent, highly contrasted tissue. Many of variations of these staining techniques were developed over the past several years (Stains for tracing neural circuits by electron microscopy, J.B., Winfried Denk, Heinz Hortsmann, S.J S, Stuart Thompson and Ricardo Valenzuela, Society for Neurosci. Abstract, 2005; Staining for Electron Microscopic analysis of neural circuitry, J.B. and S.JS., Society for Neurosci. Abstract, 2007) and used most recently in SSEM (serial block face electron microscopy) studies of capillaries in the lung29 and connectivity in the retina30.
We studied various tissue samples that included mouse cerebral cortex, Drosophila central and peripheral nervous system and zebrafish Danio rerio optic tectum and retina. Fish and fly samples were microwave fixed and processed while mouse brain was perfusion fixed and either bench or microwave processed. Following sample embedment and microtomy, semi thin sections were examined for structural integrity (Fig. 2). Ultra thin sections (70 nm) were cut and were directly examined for evaluation by TEM with no post staining before preparing sections for the FESEM. Only those samples with enhanced contrast and good structure were further processed for FESEM. Serial ribbons of sections for FESEM studies were collected either on carbon-coated Kapton tape (DuPont) or carbon-coated, gelatin-coated coverslips and examined by FESEM. For one study for mouse cortex, ribbons on coverslips were imaged and the Reconstruct software program31 was used to generate a 3D image of an individual dually innervated synapse (Fig. 3).
Figure 2.
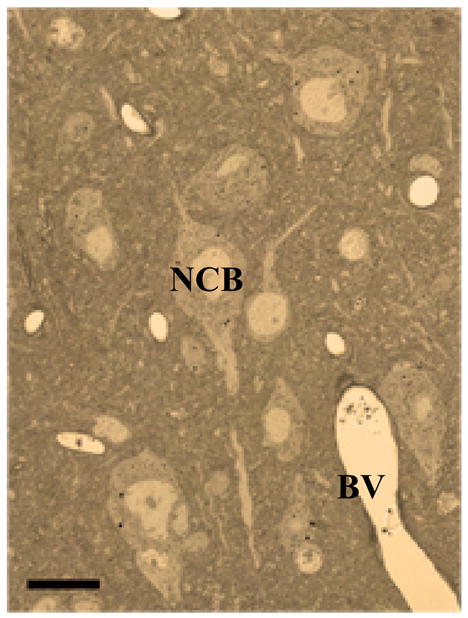
LM photomicrograph of unstained 0.5 micron semi-thin section of epoxy embedded mouse cortex shows crisp cellular details and good contrast.
NCB Neuronal cell body, BV blood vessel. Scale bar 10 μm. Animal use in this experiment was conducted in strict accordance to our institutional animal care and use committee guidelines.
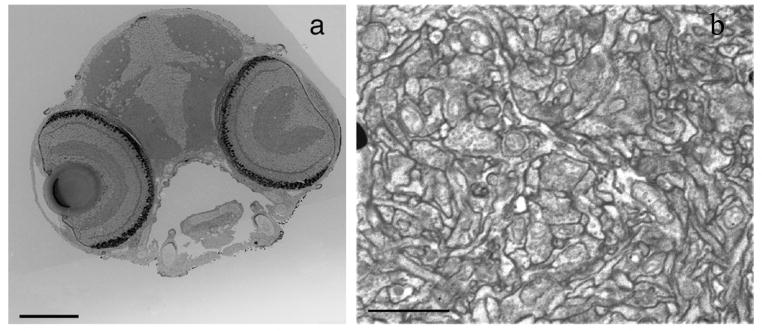
Figure 3.
Set of 3 representative FESEM images of 70 nm sections from series of 25 on carbon coated glass coverslip. Arrows (a, b) and asterisks (c) mark two different synaptic contacts onto a dually innervated spine. Panel d shows a 3D reconstruction of the dual innervations and accompanying synaptic vesicles in red and blue. Scale bar, 200 nm. Animal use in this experiment was conducted in strict accordance to our institutional animal care and use committee guidelines.
Comparison with other methods
Several different approaches can be taken to produce high contrast samples for electron microscopy. The combination of osmium, uranium and lead compounds are the basic heavy metal stains used for TEM studies, and one must test the different combinations and/or recipes to achieve optimum results for their individual preparations. It is important to consider the final goal and which cellular details need to be enhanced. In our case, we wished to have strongly stained neuronal membranes to aid in segmentation for 3D reconstructions from serial sections. This protocol can be adapted to work on a wide variety of tissue types for applications in several fields including cell biology, pathology, developmental biology and immunology.
Osmium tetroxide both stains and fixes tissue, while acting as a mordant to intensify other stains11. Reduced osmium fixatives produce higher contrast, particularly that of membranes and glycogen particles16. Reduced osmium fixatives have been reported as being variable due to the interaction of the chemical reaction with cellular components32 however we have not had this problem. Osmium imidazole (Osmid) also strongly contrasts membranes while leaving the cytoplasm electron lucent and highlighting microtubules. The downside of using imidazole compounds however is that they have a tendency to cause osmium to precipitate out of solution if the pH is not carefully controlled. One must evaluate the ultrastructural details to be reconstructed or segmented when choosing which osmium fixative to use.
Uranyl acetate (UA) is commonly used in conventional TEM tissue preparation, primarily as a section stain but also en bloc during processing of wet tissue. It is relatively non-specific stain, primarily staining proteins. It can be less effective when used en bloc as compared to section stain and can react with the buffers used during specimen processing. Often, the addition of ethanol or methanol to the staining solution improves penetration into the tissue. Using uranyl acetate in combination with lead stains has an additive effect since UA acts as a mordant for deposition of more stain33. We recommend that the researcher evaluate the sample with and without aqueous UA en bloc stain to determine which method produces acceptable contrast.
Lead compounds are routinely used for TEM studies, and stain a variety of cellular components including membranes, nucleic acids and glycogen34. The main drawback of lead containing stains is the propensity for lead to form insoluble lead carbonate precipitates upon exposure to carbon dioxide. The use of en bloc lead stains avoids deposition of lead carbonate precipitate that forms during section staining on the bench, while boosting electron density of the sample35. The combination of lead citrate and copper sulfate used together en bloc provide definitively stained membranes while leaving the cytoplasm electron lucent. According to Hyatt33 lead aspartate en bloc stain penetrates more slowly than lead citrate and ultrastructural details may be compromised. In our hands, we found that lead aspartate en bloc did not affect the quality of the sample (see Fig. 4). On the contrary, it has been reported that the combination of potassium ferricyanide reduced osmium and lead aspartate en bloc lead produce the best high contrast results for electron microscopic radioautography36.
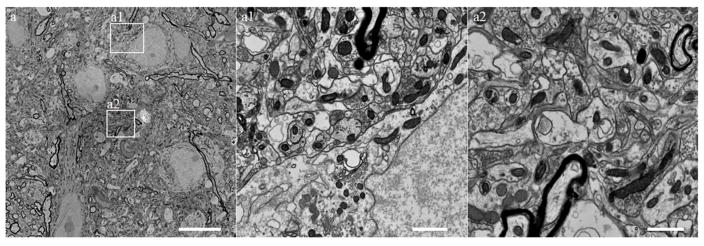
Figure 4.

FESEM images of ROTO (reduced osmium OTO)/en bloc lead aspartate staining of adult mouse brain tissue. Note the homogeneous staining of the tissue and the absence of contamination obtained after using this method. Representative regions (squares) near cell somas (a1) and neuropil (a2) are displayed at higher resolution. Observe the high contrast staining of all cellular membranes, myelin and organelles, including mitochondria, Golgi apparatus, endoplasmic reticulum, ribosomes, and synapses. Bars represent 10 (a), 1 (a1) and 1 (a2) μms respectively. Animal use in this experiment was conducted in strict accordance to our institutional animal care and use committee guidelines.
We have used osmium impregnation coupled with either buffered imidazole or potassium ferricyanide reduced osmium and found that it provides excellent membrane contrast for both TEM and SEM studies. It also makes the sample conductive by increasing the production of secondary electrons thus avoiding sample charging.
Our method avoids the loss of material at the staining stage, provides clean and evenly stained serial sections while saving time. Cellular details including synaptic vesicles, microtubles, endoplasmic reticulum, post-synaptic densities, Golgi apparatus and cell membranes are easily discernible in the FESEM (Fig. 5). Additionally, microwave fixation results in improved structure, especially for hard to preserve specimens like zebrafish brain (Fig. 6) (J.B., Meyer, M., Niell, C. & S.J S. Mol. Biol. Cell (suppl), abstract 672, 2003) and Drosophila37. This protocol has been found to work well for a wide variety of neuronal tissues including mouse brain, fruit fly Drosophila (Fig. 7) and zebrafish Danio rerio both for FESEM and TEM studies (Supplementary Figures 1 and 2).
Figure 5.

FESEM images of mouse cortex epoxy resin thin sections en bloc stained Osmid/OTO/copper sulfate lead citrate overnight at 20° C.
a) Low magnification of 70 nm ultrathin section showing well contrasted specimen. NCB, neuronal cell body BV, blood vessel. Scale bar 2 μm.
b) Higher magnification of boxed area reveals high contrast membranes and myelin. Arrow points to spine synapse with electron-dense post-synaptic density. Scale bar 200 nm. Animal use in this experiment was conducted in strict accordance to our institutional animal care and use committee guidelines.
Figure 6.
3View Block Face FESEM of Zebrafish Optic Tectum.
a) 3View Block Face FESEM pictures of larval 10 dpf zebrafish en bloc stained with Osmid, OTO, copper sulfate lead citrate overnight at 37°C. Scale bar 100 μm.
b) Higher magnification 3View FESEM image of optic tectum showing good contrast and intact structure. En bloc staining as in panel (a). Scale bar 2 μm.
Animal use in this experiment was conducted in strict accordance to our institutional animal care and use committee guidelines.
Figure 7.

FESEM images of adult Drosophila brain ultrathin section mounted on Kapton tape. (a) overview of entire brain (b) Higher magnification of boxed area in a shows neuropil and (c) axon fascicles. Higher magnification of boxed area in (c) shows detail of neuropil in d and illustrates excellent contrast of membranes and synaptic vesicles. Osmid/OTO en bloc staining. Scale bars: a is 40 μm, b is 20 μm, c is 5 μm and d is 1 μm.
Animal use in this experiment was conducted in strict accordance to our institutional animal care and use committee guidelines.
Experimental Design
Microwaving versus Bench processing
Microwave energy has been used as a tissue preparation method for light and electron microscopy for many years38, 39,40,41. Microwave energy improves fixation quality, speeds up processing times considerably and enhances antigenicity and immunolabeling 42,43. Conflicting ideas about the nature of microwave fixation remain on the mechanisms of the heating versus the microwave effects. The heating effect is believed to improve penetration of reagents and speed up fixation44. Other publications have suggested that the microwave effects were non-thermal based on a study of globular proteins45 and an increased rate of bone demineralization independent of temperature46. We agree with the finding that the microwave effect itself results in improved structure and faster processing times47. Thus newer model laboratory microwave ovens (i.e. Ted Pella Biowave®) are equipped with load coolers and wattage controllers to carefully control the temperature of the specimen during the processing steps. In this protocol, the primary preparation steps are done using a commercially available specially outfitted microwave oven. It is recommended that when used in combination with osmium impregnation, one should use bench resin infiltration instead of microwave resin infiltration to insure adequate penetration of the resin into the heavily osmicated tissue. All other steps, including fixation and dehydration, can be done using the microwave oven or bench method if a special laboratory microwave is not available.
Fixation
Zebrafish and Drosophila preparations were processed with a Ted Pella microwave oven equipped with a wattage controller, water re-circulator and chiller. Mice were perfused through the heart with glutaraldehyde and paraformaldehye mixture using either a Perfusion One or Perfusion Two system (Leica). After the brain was removed from the animal, it was sectioned with a vibratome into 100–200 μm thick sections and further processed for electron microscopy using either microwave or bench-processing methods as described in the protocol.
Technical Recommendations
The initial aldehyde fixation is very important for optimizing good ultrastructure. It is important to work quickly and expose the tissue to the fixation solution, especially during perfusion fixation (see step B iii). If dissecting tissue, work quickly and immerse in fixative rapidly. We have found microwave fixation works best for zebrafish and Drosophila samples, and fast and careful perfusion works best for mammalian brain. Zebrafish are especially difficult to get high quality ultrastructure of the nervous system, perhaps because of the water content of the tissue. The health of the animals and precise attention to detail is important when preparing and running up the tissue for EM studies, whether SEM or TEM. Use only freshly prepared reagents and healthy animals in insure the best outcome and try several batches of animals or cells. Often times, it takes several attempts to achieve high quality results.
While osmium impregnation with OTO makes the tissue more electron dense and conductive, it also makes the tissue more fragile and difficult to infiltrate especially if the volume is large. It is important to find just the right amount of osmium deposition, to rinse well with distilled water between steps and to dehydrate and infiltrate the tissue thoroughly. Specimens should be carefully handled during processing by using fine brushes to avoid tissue breakage.
During processing, freshly opened bottles of propylene oxide should be used for final dehydration steps and fresh epon mixtures used for embedding because of possible water contamination. Embedded tissue should be hardened thoroughly for two days before attempting to cut the blocks. When thin sectioning the blocks, the trimming step is critical. It is imperative that the sides be evenly angled on the trapezoid and that the top and bottom of the block are parallel in order to obtain a straight ribbon. Either a diamond trimming knife or freshly opened razor blade and steady hands can be used.
Finally, it is important to do appropriate controls if the results are uneven- checking the pH and osmolarity of the fixative, making fresh solutions, omitting the OTO or lead en bloc steps, and trying different time points. Some trial and error is necessary to adapt this protocol to different tissue types. Our protocol is presented as what works best for our test material, but different permutations in the choice of fixatives and resin mixtures can be employed. We recommend reviewing the types of stains available for all EM studies and highly recommend the book “Stains and Cytochemical Methods” for reference.
Materials
Fixation and Osmium Impregnation
Phosphate buffered saline (Sigma Cat. No. P3813-10PAK). ! CAUTION Avoid contact with skin and eyes. Avoid inhalation.
Sodium Cacodylate buffer 0.2M pH 7.4 (EMS, Cat. No. 11650) ! CAUTION Irritant by inhalation or skin contact, wear gloves and work in fume hood.
Glutaraldehyde 8% vol/vol ampoules for microwave fixation (EMS, catalog No. 16000), 50% vol/vol solution for perfusion fixation (EMS Cat. No. 16316) ! CAUTION Toxic via inhalation, skin contact. Wear gloves, use fume hood.
Osmium tetroxide 4% wt/vol (EMS Cat. No. 19150) ! CAUTION Strong oxidizer, very toxic by inhalation or skin contact, wear protective clothing, eye protection, use fume hood.
Paraformaldehyde 16% or 32% wt/vol aqueous solution. (EMS Cat. No. 15714S) ! CAUTION Toxic by inhalation, Skin contact. Use fume hood.
Thiocarbohydrazide (Sigma Cat No. T-2137) ! CAUTION Toxic, do not get in eyes or on skin, do not breathe dust.
Imidazole (Sigma Cat. No. 10125-25G). ! CAUTION Toxic, corrosive, may cause burns. Wear protective clothing, gloves, and eye protection.
Potassium Ferricyanide (Cat No. 20150)-3% in 0.2M cacodylate buffer. ! CAUTION Powder is an irritant to eyes, avoid contact.
En Bloc Stains
Lead Nitrate (EMS Cat. No. 17900) ! CAUTION Toxic by inhalation, avoid contact with skin or eyes.
Copper Sulfate (Fisher Cat. No. S75111). ! CAUTION Toxic through skin and eye contact. Wear gloves, protect eyes.
Trisodium Citrate Dihydrate (Sigma-Aldrich Cat. No. C8532).
Sodium Hydroxide 1N solution (EMS Cat No. 21170-01 S). ! CAUTION Toxic causes burns. Avoid contact with skin and eyes. Wear protective clothing, gloves and use eye protection.
L-aspartic acid (Sigma Cat No A4534).
Uranyl Acetate (E.M.S. Cat. No. 22400). ! CAUTION Toxic by inhalation, weigh out under hood, and wear gloves.
EM dehydration and Infiltration
Ethyl alcohol series-Rossville Gold Shield (Cat. No. 412804) series 50, 70, 95, 100% (vol/vol). ! CAUTION Flammable, wear gloves.
Double distilled water.
-
Propylene Oxide (S.P.I. Cat. No. 02524-AA). 30 ml bottle. ▲ CRITICAL Small sized bottles are important to avoid water contamination.
! CAUTION Flammable, avoid skin contact, wear gloves, protective clothing, use fume hood.
Embed 812 resin (EMS, Cat. No. 14120) Embedding kit with BDMA (EMS, Cat. No. 11400-25) as accelerator. ! CAUTION Toxic by inhalation, skin contact. Wear gloves, protective clothing, use fume hood.
Equipment
Perfusion and immersion fixation
Perfusion One and Perfusion Two System (MyNeuroLab, Leica Microsystems, Richmond, Il.)
Forceps
Surgical scissors
Ampoule cracker (Ted Pella, Cat. No. 439-5)
Nitrile gloves with Aloe runs small order size up (Fisher scientific 19-041-172)
Glass or plastic bell Jar
35 mm plastic petri dishes
Razor blades
Vibratome 1000 (Vibratome Co., St. Louis, MO)
Quick Bond Super glue Cyanoacrylate (EMS, Cat. No. 72588)
Paint brush
Coors porcelain spot dish 12 cavities (Fisher Scientific Cat. No. S337241)
Plastic petri dish 150 mm x 20 mm non-treated dish, (USA Scientific Cat. No. CC7672-3614)
Glass scintillation vials 20 ml with cap (Fisher scientific Cat. No. 03-337-14)
EM Processing and Embedding
Foam rack vial holder (VWR Cat. No. 82002-588 (CS))
Sample vials with caps 4 mls National Scientific (VWR Cat. No. 66030 -668)
Beem capsules, flat-bottomed (EMS Cat. No. 70021)
Beem capsule holder (EMS Cat No. 69915-01)
Laboratory embedding oven (Thermolyne Type 19200)
Laboratory Microwave Oven (Ted Pella Model Cat. No. 3451 equipped with a power controller and steady-temp water re-circulator and cold spot) ▲ CRITICAL Use only a special laboratory microwave oven with controlled wattage and chiller. The Ted Pella microwave is strongly recommended. The newest model is the Biowave (Ted Pella 36500).
Tri-pour beakers 100 mls with caps (Fisher Scientific Cat. No. S30685A)
Block Trimming
Leica EM trim (Leica Microsystems, Inc, Bannockburn, Il.)
Shark Hepa filtered bagless vacuum cleaner (connected to EM trimmer to collect epoxy dust)
Razor Blades (.009 single edge)
Beem Capsule press (Cat. No. SPI 02400-AB)
Cover Slip Preparation
Gelatin from porcine skin 300 bloom Sigma Cat. No. G1890
Chromium potassium sulfate Sigma Aldrich Cat. No. 243361
22 x 60 mm number 1.5 glass coverslips (VWR)
Gelatin coated coverslips (see subbing step)
Plasma Prep III Plasma etcher (Structure Probe Inc Cat. No. 11050)
Cressington Modular Desktop Vacuum Coating System 308R-EM (Ted Pella, Inc. Cat. No. 95000-20-220) equipped with quartz crystal thickness monitor.
Specially designed multi coverslip holder made by our department’s S.I.N.T.I.N engineering shop.
Double pointed carbon rods, double neck tip, 06.2x38mm long (01/4″x1-1/2″ L), 60Hz (Ted Pella, Inc. Cat. No. 93010)
Thin and Semi-thin sectioning
Diatome Ultra Diamond Knife (EMS/Diatome 45° 4 mm Cat. No. 40-UL)
Diatome ultratrim tool (EMS/Diatome)
Diatome Histo Knife (EMS/Diatome 45° 6 mm Cat. No. 80-HIS)
Diatome Histo Jumbo Knife (EMS/Diatome 45° 6 mm Cat. No. 80-HISJ)
Ultramicrotome (Leica Ultracut E or newer, Leica, Microsystems, Inc. Bannockburn, Il.)
Glass slides (Goldseal)
Carbon coated and gelatin coated 22 x 60 mm 1.5 glass coverslips
Special glue for serial sections DAP Weldwood Contact Cement, 3 Oz. (in hardware stores or from Amazon.com) diluted 1:2 with xylene.
Toludine Blue (EMS Cat. No. 52040) stain solution in syringe equipped with filter
Hot Plate set at level 2
Milli Q Distilled Water
Eyelash tool
Metal Loop tool (Ted Pella Cat. No. 13092)
Small metal rod approximately 4 mm long to hold water in place on diamond knife boat
Dumont Reverse action tweezers (N5AC, super fine points EMS, Cat. No.72856-D)
Slide Warmer Barnstead Lab-Line 26025)
Vacuum desiccator for storing coverslips with sections (Fisher brand Desi-Vac S97607)
Plastic slide mailer for storing carbon coated coverslips (VWR Cat. No. 95042-208)
Copper Tape (Ted Pella Cat. No. 16072-1)
FESEM Imaging
Zeiss Gemini FESEM Carl Zeiss, Thornwood, N.Y.
Zeiss EVO-4QB5D165R four quadrant 16mm diameter solid-state diode backscatter detector Carl Zeiss, SMT Inc, Peabody, MA
Fibics software for scan and stage control, Ottawa, Canada
Reagent Set Up
Cover slip subbing solution Dissolve 1.5 g of gelatin in 290 ml of distilled water by heating to 60°C. Dissolve 0.15g of chromium potassium sulfate in 10 ml of dd water. When gelatin solution cools down to 37°C, combine the two solutions, filter and pour into staining tank. Use freshly prepared solutions only. Dip coverslips in rack into solution. Allow to dry overnight in dust free environment.
Tricane (Tricaine methanesulfonate, TMS, MS-222 Sigma Cat. No. A-5040). Add 40 mg to 10 mls dd water. Make fresh right before use.
Cacodylate Buffer purchased from EMS 0.2M pH 7.4. Ready to use. Store at 4°C.
Aldehyde Fixatives Use ampoule cracker to open vials of fixative. For perfusion fixation add 20 mls of 32% wt/vol paraformaldehyde to 80 mls 2X PBS. Add 8 mls of 50% (vol/vol) glutaraldehyde and 52 mls of dd water. Make fresh before using. For insects and fish microwave immersion fixation, use 2% vol/vol glutaraldehyde and 2 % paraformaldehyde in O.1M cacodylate buffer pH 7.4. Mix 4 mls of 8% vol/vol glutaraldehye with 2 mls of 16% wt/vol paraformaldehye in 8 mls of 0.2M cacodylate buffer. Add 2 mls of dd water to make final volume of 16 mls. Make fresh right before use.
Osmium tetroxide 2% wt/vol in 0.1 M cacodylate buffer. Use ampoule cracker to open vials of fixative. Add equal amounts of 4% wt/vol aqueous osmium tetroxide and 0.2M cacodylate buffer pH 7.4 in a 20 ml scintillation vial. This fixative can be used for 1 or 2 days. Discard if the solution looks blackish (oxidized). Store at 4 °C inside of a secondary glass jar.
Phosphate buffered saline (PBS) 2X(0.02M pH 7.4) mix 1 pouch of powder with 500 ml of dd water. Can be stored for several weeks at 4 °C. If debris appears in bottle, discard.
Thiocarbohydrazide (TCH) 1% wt/vol aqueous solution. Heat 25 mls of dd water on a hot plate to 58°C. Add 0.25 g of thiocarbohydrazide to the heated water while stirring until powder is dissolved, can leave 2–3 hours, color will darken. Turn down heat while stirring. Remove from hotplate and let cool to room temperature (25 °C). Filter using a 0.45 μm syringe filter. Store at room temperature to avoid precipitation for up to 1 week.
Potassium Ferricyanide 3% wt/vol. Add 1.5 g of powder to 50 mls of 0.2M sodium cacodylate buffer, pH 7.4. Shake until dissolved. Bright yellow solution. Store at 4° C, good for several months.
Imidazole Add 0.7 g to 50 mls of sodium cacodylate buffer pH 7.4 and stir until dissolved. Adjust pH to 7.4. Store at 4° for weeks. ▲ CRITICAL STEP Be certain to pH the buffer solution to 7.4 after adding the imidazole or it will precipitate out when the osmium tetroxide is added.
Osmium/Imidazole (Osmid) Add equal amounts of 4% aqueous osmium tetroxide and imidazole/cacodylate solution. ▲ CRITICAL STEP Must adjust the pH of the osmium/imidazole solution or the osmium will precipitate out of solution. Use pH paper and add 1 N sodium hydroxide to raise the pH to ~7.4. Amber color is normal. Don’t use if precipitate is evident. Make fresh right before use for all osmium steps.
Reduced Osmium Fixative(RO) Open fixative vial using ampoule cracker. Add equal amounts of 4% wt/vol aqueous osmium tetroxide to 3% potassium ferricyanide in 0.2M cacodylate buffer. Store in double jar in refrigerator at 4 °C for 1–2 days.
Copper Sulfate Lead Citrate En Bloc Stain
First make up four components as follows. For 1M lead nitrate, dissolve 3.31 g in 10 mls of dd water on a stirrer until dissolved. For 0.4M copper sulfate dissolve 0.64 g in 10 mls of dd water on a stirrer until dissolved. For 1M sodium hydroxide dissolve 4 g of sodium hydroxide pellets in 40 mls of dd water. For 0.2 M trisodium citrate mix 0.6 g in 10 mls of dd water on a stirrer until dissolved.
Then start with a small beaker containing 1.75 mls of dd water and 3.25 mls of sodium citrate with constant stirring. Add 0.5 mls of 1M lead nitrate and 0.125 mls of copper sulfate followed by 1 ml of 1 M sodium hydroxide (carbonate free) until blue solution clears. The blue solution should be precipitate free and used immediately. Spin down 12,578 g for 5 mins. Then filter with a 20 μm syringe filter before using. Make fresh each time from stock solutions. Keep stock solutions at 4° C for weeks.
Lead Aspartate En Bloc Stain
Make up aspartic acid stock by dissolving 0.998 g of L-aspartic acid (Sigma Cat. No. A4534) into 250 ml dd water. It dissolves better at pH 3.8. Store for up to 1 month. To make heavy metal stain, dissolve 0.066 g lead nitrate in 10 ml of the aspartic acid stock; adjust pH to 5.5 with 1M KOH. Heat the solution to 60° C before use to ensure stain stability. Use only freshly prepared staining solution.
Embed 812 Resin (hard formulation)
Mix 19 mls of epoxy resin with 12.5 mls of DDSA and 10 mls of NMA in a tripour beaker on a small stir plate in the fume hood. Stir components together for 1 hour. Add 0.7 mls of BDMA under the surface and continue stirring for another 15–30 mins. Store unused portions in 15 ml tubes in the freezer at −25 °C for infiltration. Use only freshly prepared mixtures for final embedding.
Procedure
Fixation
-
1 |
Choose option A for Drosophila and zebrafish if a microwave is available, choose option B if no microwave is available and option C if performing perfusion fixation. Microwave fixation saves time and produces well-fixed material with very good ultrastructure.
! CAUTION All animal experiments must comply with proper regulations.
A. Microwave Fixation of Drosophila brains, neuromuscular junctions (NMJ ) and Zebrafish: TIMING 1.5 h
Turn on microwave and set chiller temperature to 13°C. If using Coldspot, make sure it is filled with water and there are no big bubbles. Add fixative to Coors multiwell plate placed inside of a 150 mm plastic or glass petri dish. ! CAUTION Toxic-work under fume hood, wear gloves.
-
For Drosophila, anesthetize the adult flies using carbon dioxide. Collect adult flies with a paintbrush. For brains, cut off the head and immediately add to the fixative solution in the Coors dish or multi-well plate and put into the microwave. For NMJ preparation, add fixative to dissected larval fillet pinned open on dish. When tissue is hardened, remove pins and add to multiwell plate or Coors dish using small brush.
For Zebrafish, add a few drops tricane solution to petri dish and wait until fish stop swimming. Remove water and quickly add fixative solution. Immediately place in microwave chamber. ▲ CRITICAL STEP Work quickly to get the tissue into the microwave and turn power on.
Fix at power level 1(100 watts) for 1-minute on-1 minute off-1 minute on.
Turn switch to power level 3 (300 watts) and fix for 20 seconds on-20 seconds off-20 seconds on. Do this three times. ▲ CRITICAL STEP In between pulses, gently shake the dish and move to a new spot in the microwave to avoid heating.
Remove from the microwave and let sit for 30 min-1 hour at room temperature under the fume hood.
Remove fixative and rinse 3 times in 0.1M cacodylate buffer pH 7.4.
If using fly, trim fly fillet so area with muscle fibers and synaptic boutons is blocked.
B) Bench Fixation of Drosophila brains, NMJ and Zebrafish: TIMING 1.5–2h
Anesthetize fish and flies as above (Option A step ii).
Add fixative to dishes and let sit under the fume hood for 1 hour at room temperature.
Wash 2–3 times 5 min each in 0.1M cacodylate buffer pH 7.4.
Trim fly fillet so area with muscle and synaptic boutons is blocked.
C) Mouse brain perfusion fixation and vibratoming: TIMING 4–12 h
-
Anesthetize adult mouse using sodium pentobarbital (Nembutal, 60 mg/kg) injected intraperitonially.
! CAUTION All animal experiments must comply with proper regulations.
▲ CRITICAL STEP The animal’s heart should be beating. If the animal is overdosed on pentobarbital, start over.
-
With scissors cut abdomen open, using a 27-gauge needle to puncture the right atrium and insert cannula into the left ventricle. ! CAUTION Set up perfusion apparatus under fume hood and work there. Wear gloves.
▲ CRITICAL STEP The whole process from the opening of the chest cavity and beginning of perfusion should be done in less than 100 sec.
-
Start perfusion and continue fixation until tail is stiff. Perfuse ~200 ml of solution (~flow rate 10 ml/min). Remove brain from skull and immerse in fresh fixative for 4 hours at room temperature or leave the brain overnight in fixative in the cold 4 °C.
? TROUBLESHOOTING
After 4 hours or the next day rinse 3 times in sodium cacodylate 0.1M buffer pH 7.4.
Change brain to 0.1M phosphate buffer for vibratome sectioning.
Cut brain into hemispheres using razor blade and super glue flat surface of the hemisphere to chuck and attach to vibratome for sectioning.
-
Cut 100–200 μm sections and collect using paintbrush.
▲ CRITICAL STEP Handle tissue carefully to avoid mechanical damage. Keep sections under 200 μm in thickness for best stain penetration.
Trim sections down using razor blade to smaller brain region to include barrel cortex or region of interest.
Transfer to glass vials and store in buffer until osmium step. PAUSE POINT Tissue can be stored in buffer at 4° C overnight but it is best to continue processing into osmium fixative for best results.
Osmium Impregnation
-
2
Use the microwave option (option A) to improve penetration of stains into the sample. Use option B if there is no microwave available.
A. Microwave Impregnation Method: TIMING 4 h
-
For Drosophila, add osmium fixative to the depression slides. For zebrafish, transfer fish from 35 mm Petri dishes into small glass vials after buffer rinse using small paintbrush. For brain slices, use small glass vials. ! CAUTION Toxic, avoid inhalation, wear gloves. Work in fume hood.
▲ CRITICAL STEP Be careful not to suck up small samples into pipette when changing solutions. Use fine tipped plastic pipettes. Work quickly and do not allow tissue to dry out.
Place samples in microwave. Post fix at power level 1(100 watts) for 1-minute on-1 minute off-1 minute on.
-
Turn switch to power level 3(300 watts) and fix for 20 seconds on-20 seconds off-20 seconds on. Do this three times.
▲ CRITICAL STEP In between pulses, gently shake the dish or vials and move to a new spot in the microwave to avoid heating.
-
Remove samples from microwave and let sit under fume hood for 1–2 hours at room temperature.
!! CAUTION Keep samples covered while transferring into fume hood from microwave. Keep covered while in fume hood. Osmium is volatile, avoid inhalation.
Note that longer osmium incubation times are possible but be aware tissue becomes more brittle and delicate and tissue details can become murky. Try different time points.
-
Remove the osmium solution and rinse well with distilled water until rinse water is clear at room temperature, wash 3 to 5 times for 5 mins each.
▲ CRITICAL STEP It is important to rinse very well in distilled water until rinse water is clear!
Add freshly filtered TCH to the tissue. Let sit 2 minutes then microwave on power level 2 (200 watts) for 3 minutes.
-
Remove TCH solution and wash 3–5 times 5 min each with distilled water at room temperature.
▲ CRITICAL STEP It is very important to rinse the tissue to avoid background staining before adding the second osmium step.
Add freshly made solution of the osmium fixative and repeat step ii as above. You can choose to use the same buffered osmium (Osmid or ROTO) or regular cacodylate buffered osmium at this point. Following microwaving at power level 1 for 1 min on-1 min off-1 min on let tissue sit at room temperature for 30 mins.
At room temperature, wash 3–5 times each for 5 mins in dd water.
B. Bench Fixation Osmium Impregnation Option: TIMING 5–6 h
At room temperature, place samples in osmium fixative for 2 hr in fume hood (use shorter times if background occurs).
Rinse well in distilled water, 3–5 times 5 mins each.
Add freshly filtered THC to samples and let sit at room temperature for 30 mins in fume hood.
Rinse well in distilled water, 3–5 times 5 mins each.
Add freshly prepared osmium fixative for 1 hr at room temperature in fume hood.
Rinse well in distilled water, 3–5 times 5 mins each.
En Bloc staining
-
3
Follow option A to stain the nucleus, organelles and post-synaptic density of the synapse. Follow option B to produce highly contrasted cell and organelle membranes, highlight microtubules and provide electron lucent cytoplasm and nucleus.
A. Option: Uranyl Acetate and Lead Aspartate en bloc staining: TIMING 4–5 h
Incubate samples for 2 hr at room temperature (25° C) using 2 % aqueous UA.
Rinse several times with water; at least 3 times for 5 mins each.
Incubate sample with freshly prepared lead aspartate for 1 hr at 60 °C.
Wash in water, 3 times for 15 mins each.
B. Option: Copper Sulfate Lead Citrate en bloc staining: TIMING 2 h–12 h
Transfer tissue to fresh vials in water. Mix up copper sulfate/lead citrate staining solution from stock solutions just before use and add to vials.
-
Stain in copper sulfate/lead citrate solution at 37°C for 2 hours or overnight at 25°C.
PAUSE POINT Samples can be stained overnight in copper sulfate lead citrate solution.
▲ CRITICAL STEP Do not put samples in the refrigerator as this can cause lead precipitation!
Wash well with distilled water before alcohol dehydration, 3 times 5 mins each.
Dehydration
-
4
Use option A is microwave is available, use option B if there is not a microwave available.
A. Option: Combined microwave/bench option TIMING 1 h
If using fly, using a brush or fine tipped pipet, carefully transfer fly heads to small vials containing distilled water or 50% ethanol. For fish and brain slices leave in glass vials used for fixation unless the old ones appear contaminated with previous solutions then transfer samples to fresh ones containing a solution of dd water or 50% ethanol using a fine brush.
▲ CRITICAL STEP Work quickly and do not let tissue dry out. Leave a small amount of ethanol in the vial and do not leave tissue uncovered. ! CAUTION tissue is brittle handle with care!
Put vials into foam rack and put in microwave. Make sure they make contact with cold spot.
-
Dehydrate tissue in an ascending ethanol series 50%, 70%, 95% vol/vol for 20 seconds on-20 seconds off- 20 seconds on power level 2(200 watts).
▲ CRITICAL STEP Make sure vial is less than 1/3 full. Large volumes of solutions cause heating during microwaving.
! CAUTION Wear gloves, work in fume hood.
-
Dehydrate 3 times in 100% vol/vol ethanol at power level 2 for 45 seconds.
▲ CRITICAL STEP Make sure the bottle of 100% vol/vol ethanol is only used for EM studies and has been opened within the last 3 months. Keep tightly capped with Parafilm©.
-
Further dehydrate tissue in propylene oxide (PPO). Add small amount to vials and let sit 10 mins under fume hood. Repeat for 2 changes in PPO.
▲ CRITICAL STEP Use a freshly opened bottle of propylene oxide (PPO) and add to vial. Work quickly as PPO can run out of the pipette. Always cap PPO bottles when not in use. ! CAUTION Toxic, wear nitrile gloves and work in fume hood.
B. Bench dehydration option: TIMING 1.5–2 h
At room temperature incubate for 5–10 min in each of the ascending alcohol series as in step iii and iv above. Follow to step v as above.
Infiltration and embedding: TIMING 4 days
-
5
Make up resin solution while tissue is dehydrating. Use tri-pour beakers and work under fume hood with stirrer.
! CAUTION Epoxy resin and propylene oxide are toxic, wear gloves, work under fume hood.
-
6
Mix 100% wt/vol Embed 812 resin 50:50 with 100%(vol/vol) propylene oxide (PPO) and add to vial. It is fine to have rough eyeball measurements.
Leave on shaker or rotator overnight at room temperature.
-
7
Next day change specimens to mixture containing 75:25 vol/vol Embed 812 resin: PPO and leave overnight.
Leave overnight on shaker or rotator at room temperature.
-
8
Next day change samples into 100% wt/vol Embed 812 resin. Let sit 4–6 hours in 100% resin.
▲ CRITICAL STEP Embed in freshly made Embed 812 resin hard formulation using paintbrush to remove tissue from vial.
-
9
For fish, NMJ and fly head-Add paper label to coffin mold, then fresh resin and finally tissue. Make sure there are no bubbles in the resin. Orient sample to end of mold using paintbrush. For brain slice, use flat-bottomed Beem capsules with paper labels rolled inside. Gently push slice to bottom of the capsule using paintbrush.
-
10
Harden for 2 days in an embedding oven set at 60° C.
▲ CRITICAL STEP Allow blocks to harden for 2 days for optimum block hardness.
Preparation of coverslips for sections TIMING 2 days
-
11
Gelatin coat coverslips with subbing solution.
-
12
Let air dry in dust free environment overnight.
Check that there are no dust particles adhered to slides, if so blow off with Dust- Off © can.
-
14
Set up Cressington evaporator with up to 16 glass coverslips in holder approximately 6 inches above the carbon source to avoid debris falling on them.
-
15
Place two-pointed high quality graphitized carbon rods in spring holders so they are touching.
-
16
Pump down to 10−7 mb. Outgas rods with protective plate in place.
-
17
Carbon coat with layer 7–10 nm thick as measured with the quartz thickness monitor. Coverslips should look dark gray. If you wish to glow discharge, follow steps 18–19. (Note: glow discharging may make the coverslips less hydrophobic but it is not absolutely necessary)
-
18
Press leak button and insert glow discharge plate.
-
19
Watch for purple glow and discharge for 5 mins.
-
20
Vent machine and carefully remove coverslips.
-
21
Write the word “up” on coated surface. Store in plastic slide holders until needed.
Preparation of thin sections TIMING 1–2 h
-
22
Remove blocks from molds or Beem capsules using razor blade or Beem capsule press.
-
23
Remove excess resin using Leica EM trimmer and trim block face down carefully until you get into the tissue. You should see black tissue in block. ▲ CRITICAL STEP Approach block slowly and be careful not to remove too much resin too quickly as this can damage the sample.
-
24
Form trapezoid with clean edges using razor blade or ultratrim tool.
-
25
Use Diatome Histo knife (6 mm) to cut 1 μm sections to cut full block face. Pick up sections with metal loop adding to drop of water on the slide.
-
26
Set hot plate on setting 2 and dry down for 1 minute. Stain with toluidine blue if necessary for 20 sec and rinse with distilled water. Let section dry.
-
27
Examine structure in light microscope at 100 x oil objective to evaluate structure.
-
28
Trim block further with fresh razor blade or diamond trimming tool to make a trapezoid.
▲ CRITICAL STEP Make sure top, bottom of block are parallel, and sides are evenly angled. A short wide block shape is best for serial sectioning.
-
29
Using a small paintbrush, add glue to top and bottom of the block edges. Change diamond knife to Jumbo Histo for carbon coated coverslips.
?TROUBLESHOOTING If sections fail to stick together or ribbon curves, remove block and add more glue or re-trim so trapezoid is even.
-
30
After cutting a few test sections, insert coverslip into boat filled with water and adjust water level using a syringe or pipet. Remove test sections using eyelash tool.
-
31
Place a small metal rod at edge of water to hold coverslip down and keep water at coverslip edge. Use eyelash tool and syringe to optimize water level and bring water to bar’s edge.
-
32
Cut 50–70 nm thin section ribbon and pick up on carbon coated glass coverslips using eyelash tool to manipulate ribbon. Detach ribbon from knife edge at the back of the knife and carefully move it so it attaches to the metal bar.
-
33
Pick up coverslip slowly and carefully so ribbon attaches to glass as the water wicks away.
-
34
Let air dry for 20 mins to overnight in a dust free environment. If necessary, place on slide warmer set at 50° C and allow to dry further.
-
35
Store in desi-vac container or bell jar under vacuum. Desiccate well before imaging.
Imaging of thin sections TIMING 2h-several days
-
36
For FESEM imaging, attach coverslips to specimen holder using 3 pieces of copper tape.
▲ CRITICAL STEP These conditions and the following are for a Zeiss Sigma and may differ for another instrument.
-
ii
Turn on HV and set to between 7–10 kV to achieve the best specimen contrast and avoid specimen damage and charging in the backscatter mode. It is best to use the 60 μm aperture setting. For these conditions, the filament current ranges from 2.38 – 2.469 A and the probe current is 200 nA. ▲ CRITICAL STEP These two points are highly dependent on the microscope conditions (kV, current), detector (solid state vs. scintillation) and parameters used.
-
iii
Stigmate on gold / carbon test specimen grid.
-
iv
Set backscatter detector controls (BSD) to inverted and set gain to high or very high.
-
v
Set brightness and contrast to obtain optimum image contrast. Start at low magnification (85X) to find the ribbon.
-
vi
Set image store resolution to 2048 x 1536 pixels without frame or line averaging.
-
vii
Record image using slow scan speed and dwell time of 1 μsec./pixel. Pixel size ranges from 3–100 nm per pixel depending upon the magnification
-
ii
?TROUBLESHOOTING
See Table 1 for troubleshooting guidance.
Anticipated Results
The assessment of well-prepared material takes several steps. When trimming the block for initial cutting, the hardness and infiltration of the embedded tissue should be evident. If using a razor blade to trim, the resin should feel hard and trim easily, not rubbery. When trimming the block with the Leica EM trimmer, the embedded tissue should look shiny after a smooth pass with the trimming tool, and there should be no big chips present in the specimen face.
Semi thin sections should have a dark brown color resulting from the impregnation of osmium, as in Fig. 2 and the structure should be visible by LM even without toluidine blue staining. Gross morphological aberrations such as empty spaces and white holes are indicative of poor tissue preparation-possibly fixation, dehydration or infiltration. For example, if chunks fall out of the section or block or the block face looks shredded or chipped, this indicates poor infiltration. While it is impossible to fully evaluate the quality of fixation at the LM level, it is possible to recognize poorly processed material. It is not worth it to spend any more time with poorly processed samples. The best specimens have great contrast at the LM and EM levels, sharp looking membranes and overall integrity of the structure. See Supplementary Figure 3 for a comparison of en bloc staining methods for more detail.
Thin sections should cut well and have good contrast in the both FESEM and TEM without any section staining. Contrast will be reduced in the SEM compared to the TEM, but a kV of 7–8, working distance of 6–9 mm, contrast and brightness settings of 50–70 range and a slow scan speed 8–10s with a dwell time of 1 μsec./pixel should provide a good image without any specimen damage. These conditions work well in our imaging system but may differ for different instruments and detectors.
It is important to let the sample air dry or on a slide warmer then in a vacuum desiccator after picking up the sections on coverslips, as moist samples will cause “bubbling” of sections in the FESEM and contamination of the apertures.
Box 1. Troubleshooting.
| Step | Problem | Possible Cause | Solution |
|---|---|---|---|
| 1C | Brain is soft rather than hard | Poor perfusion | Discard, try another animal |
| Brain appears bloodied | Discard, try another animal | ||
| Liver does not turn pink | Discard, try another animal | ||
| Fixation solution coming out of the nose or mouth of animal | Discard, try another animal | Use ideal perfusion pressure (~150 mmHg) | |
| 1, 2, 43 | Tissue dark and murky looking, uneven membranes | Poor initial fixation, unhealthy tissue | Use only healthiest tissue for experiments, If poor perfusion or sick animals, discard. Use fresh fixatives only |
| Inadequate rinsing between osmication and TCH treatment | Rinse well before and after osmium and TCH steps. | ||
| 23, 25 | Block chipping or tissue falling out of section | Inadequate infiltration | Be sure to infiltrate overnight on rotator for 2 nights |
| Using EM trimmer blade too fast | Approach block slowly | ||
| Block center soft | Inadequate infiltration | Longer infiltration, use only freshly prepared resins for infiltration and embedding | |
| 28.32 | Ribbon curves | Top and bottom of block face not parallel, uneven sides | Re-trim block with fresh razor blade or diamond trimming tool |
| 29 | Ribbon not sticking together | Not enough glue on top and bottom of block face | Add more glue to top and bottom of block face |
| 44 | Charging of specimen in SEM | Not enough carbon coating or copper tape on coverslips | Remove sample and try more tape or carbon coat the surface |
| Beam damage, breaks in section | Beam too bright | Try using lower voltage, reduce kV and brightness | |
| Bubbling of sections, black blobs forming | Sections have too much moisture | Allow sections to air dry then store under vacuum for 24 hours |
Acknowledgments
We thank the following foundations, companies and support funding for this work: Gatsby Charitable Trust, John S McDonnell Foundation, McKnight Foundation, The Mathers Foundation, Center for Brain Science, Harvard, Initiative for Innovative Computing, Microsoft Research, Carl Zeiss SMT, JEOL and FIBICS.
We appreciate helpful discussions with Winfred Denk, John Heuser, Tom Reese and Morris J. Karnovsky. We acknowledge Nafisa Ghori and Erika Hartwig for technical support, Kristina Micheva and Georgeanne O’Brien for comments on the manuscript, Cristel Genoud and Joel Mancuso from Gatan for SBF-SEM imaging of zebrafish samples, and Rick Giberson of Ted Pella Inc. for advice on microwave conditions.
Footnotes
The authors of this manuscript declare that they have no competing financial interests.
Author contributions
JB developed the staining concept, prepared the fish and Drosophila samples and prepared the manuscript.
JCT, NK, and RS imaged the Drosophila sections.
RS assisted with the sectioning, imaging and overall block quality assessment.
KH, RS, JCT and NK improved ultra thin sectioning and collection.
KH developed the method of collecting ultrathin sections on tape and built the ATUM devices used.
JWL helped motivate the effort to find better en bloc staining protocols, oversaw all the imaging experiments that were carried out in his laboratory and helped interpret the image data.
SJS helped motivate the effort to improve en bloc staining, and oversaw and assisted with imaging experiments carried out at Stanford.
References
- 1.Gay H, Anderson TF. Serial sections for electron microscopy. Science. 1954;120:1071–3. doi: 10.1126/science.120.3130.1071. [DOI] [PubMed] [Google Scholar]
- 2.Stevens JK, Davis TL, Friedman N, Sterling P. A systematic approach to reconstructing microcircuitry by electron microscopy of serial sections. Brain Res. 1980;3:265–93. doi: 10.1016/0165-0173(80)90010-7. [DOI] [PubMed] [Google Scholar]
- 3.Blow N. Following the wires. Nat Methods. 2007;4:975–981. [Google Scholar]
- 4.Denk W, Horstmann H. Serial block-face scanning electron microscopy to reconstruct three-dimensional tissue nanostructure. PLoS Biol. 2004;2:e329. doi: 10.1371/journal.pbio.0020329. [DOI] [PMC free article] [PubMed] [Google Scholar]
- 5.Knott G, Marchman H, Wall D, Lich B. Serial section scanning electron microscopy of adult brain tissue using focused ion beam milling. J Neurosci. 2008;28:2959–2964. doi: 10.1523/JNEUROSCI.3189-07.2008. [DOI] [PMC free article] [PubMed] [Google Scholar]
- 6.Micheva K, Smith SJ. Array Tomography: A new tool for imaging the molecular architecture of neural circuits. Neuron. 2007;55:25–36. doi: 10.1016/j.neuron.2007.06.014. [DOI] [PMC free article] [PubMed] [Google Scholar]
- 7.Hayworth KJ, Kasthuri N, Schalek R, Lichtman JW. Microscopy and Microanalysis. Vol. 12. Cambridge University Press; 2006. Automating the collection of ultrathin serial sections for large Volume TEM Reconstructions; pp. 86–87. [Google Scholar]
- 8.Hoffpauir BK, Pope BA, Spirou GA. Serial sectioning and electron microscopy of large tissue volumes for 3D analysis and reconstruction: a case study of the calyx of Held. Nat Protoc. 2007;2:9–22. doi: 10.1038/nprot.2007.9. [DOI] [PubMed] [Google Scholar]
- 9.Venable JH, Coggeshall R. A simplified lead citrate stain for use in electron microscopy. J Cell Bio. 1965;25:407–408. doi: 10.1083/jcb.25.2.407. [DOI] [PMC free article] [PubMed] [Google Scholar]
- 10.Watson ML. Staining of Tissue Sections for Electron Microscopy with Heavy Metals. J Biophys Biochem Cytol. 1958;4:475–478. doi: 10.1083/jcb.4.4.475. [DOI] [PMC free article] [PubMed] [Google Scholar]
- 11.Hayat MA. Principles and Techniques of Biological Electron Microscopy. 3. Cambridge University Press; New York, N.Y. USA: 1989. [Google Scholar]
- 12.Seligman AM, Wasserkrug HL, Hanker JS. A new staining method (OTO) for enhancing contrast of lipid-containing membranes and droplets in osmium tetroxide-fixed tissue with osmiophilic thiocarbohydrazide (TCH) J Cell Biol. 1966;30:424–432. doi: 10.1083/jcb.30.2.424. [DOI] [PMC free article] [PubMed] [Google Scholar]
- 13.Kelley RO, Dekker RAF, Bluemink JG. Ligand mediated osmium binding: its application in coating biological specimens for scanning electron microscopy. J Ultrastruc Res. 1973;45:254–258. doi: 10.1016/s0022-5320(73)80051-6. [DOI] [PubMed] [Google Scholar]
- 14.Shotton DM, Heuser JE, Reese BF, Reese TS. Postsynaptic membrane folds of the frog neuromuscular junction visualized by scanning electron microscopy. Neurosci. 1979;4:427–35. doi: 10.1016/0306-4522(79)90106-4. [DOI] [PubMed] [Google Scholar]
- 15.Friedman PL, Ellisman MH. enhanced visualization of peripheral nerve and sensory receptors in the scanning electron microscope using cryofracture and osmium-thiocarbohydrazide-osmium impregnation. J Neurocytol. 1981;10:111–131. doi: 10.1007/BF01181748. [DOI] [PubMed] [Google Scholar]
- 16.McDonald K. Osmium ferricyanide fixation improves microfilament preservation and membrane visualization in a variety of animal cell types. J Ultrastruc Res. 1984;84:107–118. doi: 10.1016/s0022-5320(84)80051-9. [DOI] [PubMed] [Google Scholar]
- 17.Willingham MC, Rutherford AV. The use of osmium-thiocarbohydrazide-osmium (OTO) and ferrocyanide- reduced osmium methods to enhance membrane contrast and preservation in cultured cells. J Histochem Cytochem. 1984;32:455–460. doi: 10.1177/32.4.6323574. [DOI] [PubMed] [Google Scholar]
- 18.White DL, Mazurkiewicz JE, Barnett RJ. A chemical mechanism for tissue staining by osmium tetroxide-ferrocyanide mixtures. J Histochem Cytochem. 1979;27:1084–91. doi: 10.1177/27.7.89155. [DOI] [PubMed] [Google Scholar]
- 19.Angermüller S, Fahimi HD. Imidazole-buffered osmium tetroxide: an excellent stain for visualization of lipids in transmission electron microscopy. Histochem J. 1982;14:823–35. doi: 10.1007/BF01033631. [DOI] [PubMed] [Google Scholar]
- 20.Thiéry G, Bernier J, Bergeron MJ. A simple technique for staining of cell membranes with imidazole and osmium tetroxide. Histochem Cytochem. 1995;43:1079–84. doi: 10.1177/43.10.7560886. [DOI] [PubMed] [Google Scholar]
- 21.Harris KM, Stevens JK. Dendritic spines of CA1 pyramidal cells in the rat hippocampus: serial electron microscopy with reference to their biophysical characteristics. J Neurosci. 1989;9:2982–2997. doi: 10.1523/JNEUROSCI.09-08-02982.1989. [DOI] [PMC free article] [PubMed] [Google Scholar]
- 22.Nusser Z, Cull-Candy S, Farrant M. Differences in synaptic GABA(A) receptor number underlie variation in GABA mini amplitude. Neuron. 1997;3:697–709. doi: 10.1016/s0896-6273(00)80382-7. [DOI] [PubMed] [Google Scholar]
- 23.Sätzler K, Söhl LF, Bollmann JH, Borst JG, Frotscher M, Sakmann B, Lübke JH. Three-dimensional reconstruction of a calyx of Held and its postsynaptic principal neuron in the medial nucleus of the trapezoid body. J Neurosci. 2002;22:10567–79. doi: 10.1523/JNEUROSCI.22-24-10567.2002. [DOI] [PMC free article] [PubMed] [Google Scholar]
- 24.Ganeshina O, Berry RW, Petralia RS, Nicholson DA, Geinisman Y. Differences in the expression of AMPA and NMDA receptors between axospinous perforated and nonperforated synapses are related to the configuration and size of postsynaptic densities. J Comp Neurol. 2004;468:86–95. doi: 10.1002/cne.10950. [DOI] [PubMed] [Google Scholar]
- 25.Popov VI, Stewart MG. Complexity of contacts between synaptic boutons and dendritic spines in adult rat hippocampus: Three-dimensional reconstructions from serial ultrathin sections in vivo. Synapse. 2009;63:369–377. doi: 10.1002/syn.20613. [DOI] [PubMed] [Google Scholar]
- 26.Harris KM, Perry E, Bourne J, Feinberg M, Ostroff L, Hurlburt J. Uniform serial sectioning for transmission electron microscopy. J Neurosci. 2006;26:12101–12103. doi: 10.1523/JNEUROSCI.3994-06.2006. [DOI] [PMC free article] [PubMed] [Google Scholar]
- 27.O’Connell MK, Murthy S, Phan S, Xu C, Buchanan J, Spilker R, Dalman RL, Zarins CK, Denk W, Taylor CA. The three dimensional micro-and nanostructure of the aortic medial lamellar unit measured using 3D confocal and electron microscopy imaging. Matrix Biol. 2008;27:171–81. doi: 10.1016/j.matbio.2007.10.008. [DOI] [PMC free article] [PubMed] [Google Scholar]
- 28.Murakami T, Iida N, Taguchi T, Ohtani O, Kikuta A, Ohtsuka, Itoshima T. Conductive staining of biological specimens for scanning electron microscopy with special reference to ligand-mediated osmium impregnation. Scanning Electron Microscopy. 1983;1:235–246. [PubMed] [Google Scholar]
- 29.West JB, Fu Z, Deerinck TJ, Mackey MR, Obayashi JT, Ellisman MH. Structure-function studies of blood and air capillaries in chicken lung using 3D electron microscopy. Respir Physiol Neurobiol. 2010;170:202–209. doi: 10.1016/j.resp.2009.12.010. [DOI] [PMC free article] [PubMed] [Google Scholar]
- 30.Briggman K, Helmstaedter M, Denk W. Wiring specificity in the direction-selectivity circuit of the retina. Nature. 2011;471:183–188. doi: 10.1038/nature09818. [DOI] [PubMed] [Google Scholar]
- 31.Fiala JC. Reconstruct: a free editor for serial section microscopy. J Microscopy. 2005;218:52–61. doi: 10.1111/j.1365-2818.2005.01466.x. [DOI] [PubMed] [Google Scholar]
- 32.Schnepf E, Hausmann K, Herth W. The osmium tetroxide-potassium ferrocyanide (OsFeCN) staining technique for electron microscopy: a critical evaluation using ciliates, algae, mosses, and higher plants. Histochemistry. 1982;76:261–271. doi: 10.1007/BF00501928. [DOI] [PubMed] [Google Scholar]
- 33.Dykstra J, Reuss LE. Biological electron microscopy: theory, techniques, and troubleshooting. Kluwer Academic/Plenum Publishers; N.Y., N.Y: 2003. pp. 179–191. [Google Scholar]
- 34.Hyatt MA. Stains and Cytochemical Methods. Plenum Press; N.Y., N.Y: 1993. pp. 215–230. [Google Scholar]
- 35.Walton J. Lead aspartate, an en bloc contrast stain particularly useful for ultrastructural enzymology. J Histochem Cytochem. 1979;27:1337–1342. doi: 10.1177/27.10.512319. [DOI] [PubMed] [Google Scholar]
- 36.Kopriwa BM. Block-staining tissues with potassium ferrocyanide-reduced osmium tetroxide and lead aspartate for electron microscopic radioautography. J Histochem Cytochem. 1984;32:552–54. doi: 10.1177/32.5.6201530. [DOI] [PubMed] [Google Scholar]
- 37.Buchanan J. Microwave processing of Drosophila tissues for electron microscopy. Microsc Today. 2004;12:42. [Google Scholar]
- 38.Mayers CP. Histological fixation by microwave heating. J Clin Pathol. 1970;23:273–275. doi: 10.1136/jcp.23.3.273. [DOI] [PMC free article] [PubMed] [Google Scholar]
- 39.Leong AS, Daymon ME, Milios J. Microwave irradiation as a form of fixation for light and electron microscopy. J Pathol. 1985;146:313–21. doi: 10.1002/path.1711460404. [DOI] [PubMed] [Google Scholar]
- 40.Jensen FE, Harris KM. Preservation of neuronal ultrastructure in hippocampal slices using rapid microwave-enhanced fixation. J Neurosci Methods. 1989;29:217–230. doi: 10.1016/0165-0270(89)90146-5. [DOI] [PubMed] [Google Scholar]
- 41.Webster P. Microwave–assisted processing and embedding for transmission electron microscopy. Methods Mol Bio. 2007;369:47–65. doi: 10.1007/978-1-59745-294-6_4. [DOI] [PubMed] [Google Scholar]
- 42.Login GR, Dvorak AM. Microwave fixation provides excellent preservation of tissue cells and antigens for light and electron microscopy. Histochem J. 1988;20:373–387. doi: 10.1007/BF01002732. [DOI] [PubMed] [Google Scholar]
- 43.Buchanan J, Micheva K, Smith SJ. Microscopy and Microanalysis. Suppl 2. Vol. 8. Cambridge University Press; 2002. Microwave Processing and Pre-Embedding Nanogold Immunolabeling for Electron Microscopy; pp. 160–161. [Google Scholar]
- 44.Leonard JB, Shepardson SP. A comparison of heating modes in rapid fixation techniques for electron microscopy. J Histochem Cytochem. 1994;42:383–391. doi: 10.1177/42.3.8308256. [DOI] [PubMed] [Google Scholar]
- 45.Bohr H, Bohr J. Microwave-enhanced folding and denaturation of globular proteins. Phys Rev E Stat Phys Plasmas Fluids Relat Interdiscip Topics. 2000;61:4310–14. doi: 10.1103/physreve.61.4310. [DOI] [PubMed] [Google Scholar]
- 46.Tinling SP, Giberson RT, Kullar RS. Microwave exposure increases bone demineralization rate independent of temperature. J Microsc. 2004;215:230–35. doi: 10.1111/j.0022-2720.2004.01382.x. [DOI] [PubMed] [Google Scholar]
- 47.Giberson RT. Understanding Microwave-assisted Fixation: Energy Versus Heating. Microscopy & Microanalysis. 2003;9:158. [Google Scholar]
- 48.Hayat MA. Stains and Cytochemical Methods. Plenum Press; New York: 1993. [Google Scholar]