

Abstract
External dacryocystorhinostomy was described in early 20th century. The introduction of nasal endoscopy and endoscopic sinus surgery in the 1980s paved the way for a transnasal endoscopic approach to lacrimal system. This article will review the indications and surgical techniques used for endoscopic dacryocystorhinostomy.
Keywords: dacryocystorhinostomy, endoscopic, epiphora, dacryocystitis
External dacryocystorhinostomy (DCR) was first described in 1904 by Toti.1 With a few modifications, the procedure remains unchanged from its original description—a cutaneous incision over the frontal process of the maxilla, dissection onto the lacrimal sac, and marsupialization of the sac into the nasal cavity. In the hands of experienced surgeons, success rates for external DCR are between 90 and 95%.2 The current endoscopic DCR techniques were developed in the 1980s and 1990s.3,4,5 The endoscopic approach avoids a cutaneous incision and provides the surgeon unprecedented visualization of the lacrimal sac during dissection and marsupialization.6 The endoscopic DCR has become a well-accepted technique for management of nasolacrimal duct obstruction, with success rates that are similar to the external approach.2,7,8,9,10
Anatomy
The lacrimal gland is located just behind the superolateral orbital rim. It is responsible for the majority of tear production, which forms a protective coating over the globe. The tears then drain into the lacrimal sac via the superior and inferior puncta/canaliculi. Each punctum is oriented at a 90-degree angle to the lid margin (Fig. 1). The superior and inferior canaliculi run perpendicular to the lid margin for approximately 2 mm, run parallel to the lid margin for ~8 mm, and then fuse to form a common canaliculus that drains into the lacrimal sac (Fig. 1). The lacrimal sac is ~12 to 15 mm in length and sits within the lacrimal fossa. The bony lacrimal fossa is made up of the frontal process of the maxilla anteriorly and the lacrimal bone posteriorly (Fig. 2). The frontal process of the maxilla is very thick bone, whereas the lacrimal bone is extremely thin. When viewed from the intranasal perspective, the lacrimal fossa is located just anterior to the middle turbinate. The superior extent of the fossa is ~8 mm above the anterior attachment of the middle turbinate, and a major portion of the sac lies above the attachment of the middle turbinate.6 The fossa widens inferiorly, extending behind the maxillary line (Fig. 3). The nasolacrimal duct exits the lacrimal fossa and provides drainage into the inferior meatus via the valve of Hasner.11
Figure 1.

Anatomy of the lacrimal system.
Figure 2.

Bony anatomy of the lacrimal fossa.
Figure 3.

Intranasal view of the lacrimal system anatomy.
Patient Evaluation
Patients with obstruction of the nasolacrimal system generally present with epiphora. Dacryocystitis may result in erythema of the medial canthus and mucopurulent discharge from the puncta. Patients should be questioned regarding any history of pain, redness, or drainage from the medial canthal region (dacryocystitis); nasal obstruction (sinusitis or nasal polyps); epistaxis (tumor); and previous sinus surgery (iatrogenic injury). A thorough physical examination should include assessment of the eyelids and sclera for evidence of active infection. Punctal patency and positioning should be assessed. Punctal stricture and/or eyelid malpositioning (i.e., entropion or ectropion) can result in poor tear flow. Nasal endoscopy should be preformed to assess the intranasal anatomy. The inferior and middle meatus should be inspected for any signs of sinusitis (mucopurulent drainage/polyposis). Septal deviation and surgical accessibility to the lacrimal fossa should be documented.
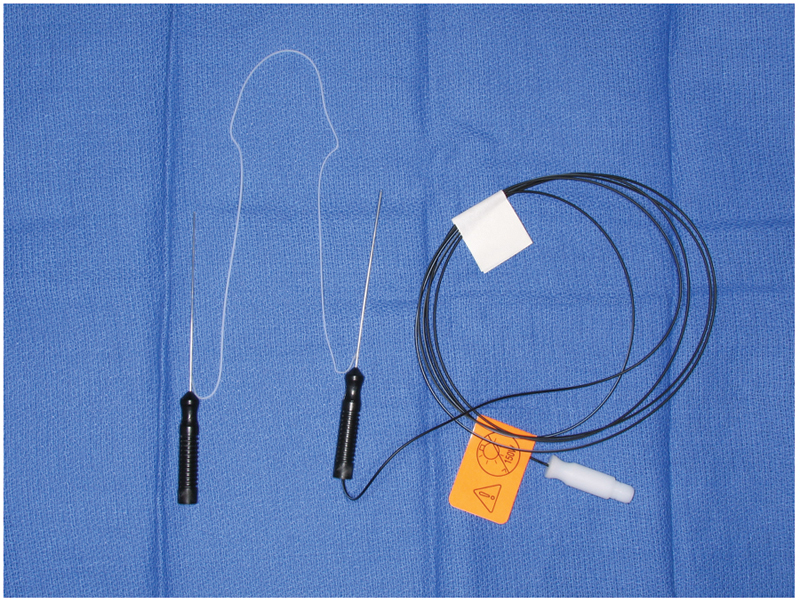
Lacrimal flow can be assessed using the Jones dye test.12 The Jones I test is a functional measure of tear flow. It is performed by placing a drop of fluorescein dye into the eye, followed by intranasal observation for tear flow. An endoscope (or cotton-tip applicator) is placed into the nose after 2 and 5 minutes. If dye is noted, patency and function is confirmed. Unfortunately, false-negative tests can be seen in up to 42% of patients. When the Jones I test is abnormal, a Jones II test is performed. It is a mechanical measure of tear flow using increased hydrostatic pressure. Proparacaine hydrochloride 0.5% is applied topically prior to lacrimal intubation. A lacrimal dilator may be required to enlarge the punctum (Fig. 4, top). A lacrimal irrigating cannula or blunt 26-guage needle is then inserted into the inferior punctum (Fig. 4, bottom). A 3-mL syringe is used to flush the lacrimal system with saline. If saline is noted in the nose, a partial obstruction may be present. Reflux of the saline from the superior punctum implies an obstruction at the level of the sac or duct. If no flow is noted, obstruction of the inferior canaliculus can be assumed. Obstruction to flow at the level of the sac or duct is amenable to DCR.
Figure 4.

Photograph of lacrimal irrigation instrumentation: lacrimal dilator (top) and lacrimal cannula (bottom).
Operative Technique
Endoscopic DCR can be performed under local or general anesthesia. The author uses exclusively general anesthesia. The patient is placed in the supine position with the head of the bed turned 180 degrees away from the anesthesia (Fig. 5). The lacrimal system is inspected and dilated as necessary to allow for passage of the lacrimal stents. Lacrimal dilation is performed by placing lateral tension on the eyelid with a finger. The lacrimal dilator is aligned perpendicular to the lid margin and inserted ~1 to 2 mm through the punctum (Fig. 6). The dilator is then turned 90 degrees (parallel with the lid margin) and gentle pressure is applied to dilate the punctum (using the conical shape of the punctual dilator). Excessive pressure should be avoided as it can result in laceration of the punctum. A lacrimal probe can then be inserted using a similar technique. The lacrimal probe will pass easily along the canaliculus and into the sac, provided there is no scaring. A “soft stop” with insertion of the probe implies that the probe has not entered the sac. This may be the result of poor technique (i.e., the lid margin has not been held on tension) or a canalicular stenosis. A “hard stop” stop indicates that the probe has entered the lacrimal fossa and bone is being palpated (Fig. 7).
Figure 5.
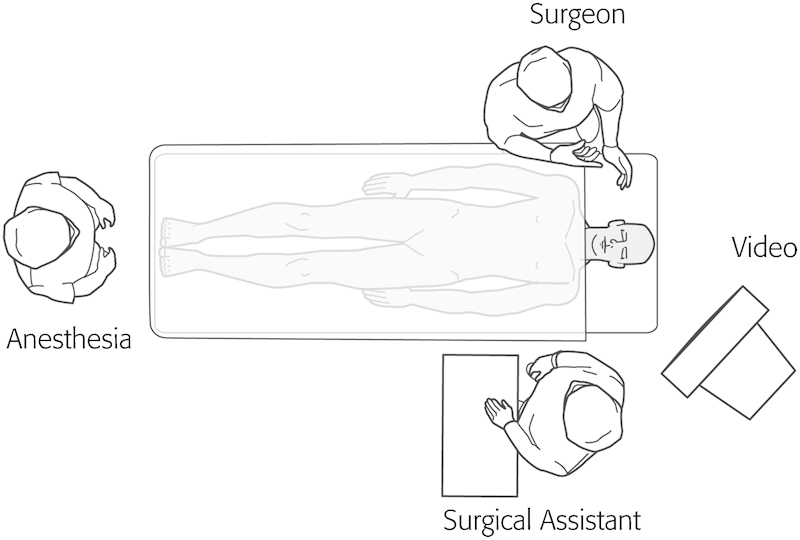
Illustration of the room setup for endoscopic dacryocystorhinostomy.
Figure 6.

Illustration demonstrating the use of a lacrimal dilator to widen the inferior punctum. The punctum is initially entered at a 90-degree angle to the lid margin and then turned parallel to the lid margin as the dilator is advanced. It is critical to keep tension on the lid throughout this process.
Figure 7.

Illustration of lacrimal cannulation showing a “soft stop” (left) when the cannula does not enter into the lacrimal sac and a “hard stop” (right) when the cannula enters into the sac and abuts against the bony medial wall of the lacrimal fossa.
A 0- or 30-degree endoscope can be used for intranasal visualization depending on surgeon preference and patient anatomy. Any septal deviation that limits visualization of the middle turbinate should be managed with a septoplasty. This will increase the surgical working space, reduce the risk of postoperative synechiae formation, and improve postoperative visualization in the clinic. Nasal pledgets (0.5 × 3 cm) soaked in 1:1000 epinephrine are inserted into the middle meatus and onto the lateral nasal wall. One percent lidocaine with 1:100,000 epinephrine is injected submucosally at the attachment of the middle turbinate and lateral nasal wall (Fig. 8).
Figure 8.

Intranasal Illustration of injection sites for local anesthetic.
Sharp dissection is used to raise a posteriorly based mucosal flap on the lateral nasal wall. Great care must be used when inserting and removing the scalpel from the nose to avoid iatrogenic injury to the nasal vestibule. The horizontal incisions (A and C in Fig. 9) are performed with a no. 15 blade. Incision a is placed ~8 mm above the insertion of the middle turbinate and extended 6 to 8 mm in front of the turbinate onto the frontal process of the maxilla. Incision c originates approximately two-thirds of the way down the middle turbinate. It extends from the uncinate process posteriorly, extending anteriorly the same distance as incision a. Incision c is then placed with a Beaver Blade (BD Surgical, Franklin Lakes, NJ), joining the leading edges of incisions a and c. Next, a suction freer is used to raise a posteriorly based mucosal flap (Fig. 10). The flap is then amputated at the uncinate process using through cutting instrumentation.13 The location of the lacrimal sac is generally quite consistent between patients. However, as an added measure of security, the location can be gained by using lighted lacrimal stents to visualize the location of the sac internally (Medtronic Xomed, Jacksonville, FL). The lighted stent is inserted through a punctum and placed into the lacrimal sac against the frontal process of the maxilla. The endoscope light source is then partially unscrewed from the scope. This dims the light intranasally and allows for intranasal transillumination of the sac (Fig. 11).
Figure 9.

Illustration demonstrating the two different scalpels used to make the mucosal incisions for a dacryocystorhinostomy. Incision a and c are made with a no. 15 blade. Incision b is made with a right angle scalpel blade.
Figure 10.

Illustration of suction freer being used to elevate a posteriorly based mucosal flap.
Figure 11.
Photograph of lighted lacrimal stents that can be used to help localize the lacrimal sac/fossa.
The thin lacrimal bone is identified just posterior to the frontal process of the maxilla. It is fractured and removed with a round knife or Cottle elevator (Fig. 12). After removal of the lacrimal bone, mild cutaneous pressure over the lacrimal system will show motion of the exposed sac internally (Fig. 13). A Kerrison or Hajek-Koeffler punch is then used to remove the thin inferior portion of the frontal process of the maxilla (Fig. 14). The bone is removed anteriorly and superiorly until it is too thick to engage and remove. Care should be taken to avoid pinching or tearing the sac in the rongeur. This is accomplished by opening the rongeur slightly before removing each bite of bone. If the sac is entrapped with the bite, it will then be released without tearing and opening the sac. When no more bone can be removed using the rongeur, a powered endoscopic microdebrider with a 2.5-mm diamond burr is used to remove the remaining bone over the sac (Fig. 15). The drill provides internal suction and irrigation for the burr. The burr should be kept in continuous motion, with gentle pressure being applied to the bony edges around the sac. Care should be taken to assure that the burr does not slip over the bony edge, allowing prolonged contact with the sac, as this can result in disruption or violation of the sac.
Figure 12.
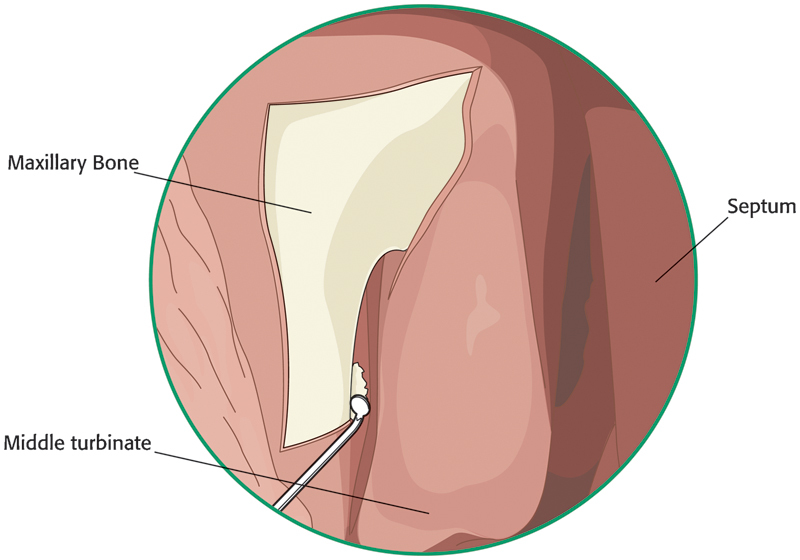
Illustration of the thin lacrimal bone being removed with a round knife.
Figure 13.

Illustration of lacrimal sac as seen from internal view (dashed outline). After removal of the Iacrimal bone, external pressure over the lacrimal sac will show mobility of the sac internally (i.e. the region shown in blue).
Figure 14.

Illustration of a Kerrison rongeur being used to remove the inferior portion of the lecrimal bone.
Figure 15.

Illustration of a diamond burr being used to remove the thick superior portion of the lacrimal bone the cannot be removed with the Kerrison rongeur.
Once the sac has been completely exposed, a lacrimal probe is placed through the punctum and into the sac. The probe is angled superiorly and inferiorly to help internally visualize the superior and inferior extent of the dissection. When viewed intranasally, the probe will “tent” up the sac and delineate the sac margins. This assures that adequate bone has been removed to expose the entire length of the sac. After the upper one-third of the sac is tented into the nose with the lacrimal probe, an angled Beaver Blade is used to make a vertical incision extending from superior to inferior (Fig. 16). Caution must be used to avoid inserting the knife too deeply into the sac, as it may injure the common canaliculus or lateral aspect of the sac. Once the blade has reached the inferior margin of the sac, a rotating motion is used to sweep the blade from the internal to external. This will cleanly open the inferior aspect of the sac. A similar technique is used to complete the incision at the top of the sac. A lacrimal mini-sickle knife is used to release the superior and inferior aspects of the anterior flap (Fig. 17). Belluci scissors are used to release the superior and inferior aspects of the posterior flap (Fig. 17). The flaps are then removed with “through cutting” Blakesley forceps.13 The common canaliculus should be clearly visible at this point. Silastic lacrimal stents (Jedmed Instrument Co., St. Louis, MO) or lighted stents mentioned previously, are then passed through the upper and lower punctum to exit into the nose. The stents are then passed out the nares. The stents are aligned side by side and passed through the middle of a 15 × 15-mm square of compressed Gelfoam (Pharmacia and Upjohn Company, Kalamazoo, MI). The Gelfoam is threaded up the stents and onto the raw internal surface of the lacrimal sac. The stents are then passed through a 10-mm segment of a 14-gauge angiocatheter (Fig. 18), and the catheter is threaded up the stents to rest against the Gelfoam. Surgical clips are then applied to maintain the position of the catheter. One clip is placed across the middle of the catheter, and a second clip is placed more proximally (i.e., closer to the nares; Fig. 19). This maintains the position of the catheter on the stent, so when the stent is removed, the catheter segment does not separate and become lost in the nasal cavity. It is critical that the stent is looped and fixated loosely through the lacrimal system, with several mm of “play” at the punctum. If the tension is too great, the stent will “cheese wire” through the punctum. If the clips are applied too loosely, the stent can migrate externally (toward the globe) and rub on the cornea, causing irritation and requiring repositioning.
Figure 16.

An angled scalpel is used to open the lacrimal sac.
Figure 17.

Belluci scissors and a mini-sickle knife are used to release the anterior and posterior margins of the lacrimal sac.
Figure 18.

An angiocatheter with a central 10-mm segment cut out (arrow). This segment is passed over the lacrimal stent and passed intranasally to secure the stent.
Figure 19.

Illustration of lacrimal stent secured within the nose by two surgical clips.
Postoperative Care
The patient is started on high volume (400 mL) nasal irrigations twice a day starting on post operative day 1. The stents are removed in the office at 4 to 6 weeks by simply cutting the stent between the upper and lower punctum, and removing the stent transnasally using an endoscope.
References
- 1.Toti A. Nuovo metodo conservatore dicura radicale delle suppurazione croniche del sacco lacrimale. Clin Moderna (Firenze) 1904 [Google Scholar]
- 2.Hartikainen J, Antila J, Varpula M, Puukka P, Seppä H, Grénman R. Prospective randomized comparison of endonasal endoscopic dacryocystorhinostomy and external dacryocystorhinostomy. Laryngoscope. 1998;6:1861–1866. doi: 10.1097/00005537-199812000-00018. [DOI] [PubMed] [Google Scholar]
- 3.McDonogh M, Meiring J H. Endoscopic transnasal dacryocystorhinostomy. J Laryngol Otol. 1989;6:585–587. doi: 10.1017/s0022215100109405. [DOI] [PubMed] [Google Scholar]
- 4.Metson R. Endoscopic surgery for lacrimal obstruction. Otolaryngol Head Neck Surg. 1991;6:473–479. doi: 10.1177/019459989110400408. [DOI] [PubMed] [Google Scholar]
- 5.Steadman M G. Transnasal dacryocystorhinostomy. Otolaryngol Clin North Am. 1985;6:107–111. [PubMed] [Google Scholar]
- 6.Wormald P J, Kew J, Van Hasselt A. Intranasal anatomy of the nasolacrimal sac in endoscopic dacryocystorhinostomy. Otolaryngol Head Neck Surg. 2000;6:307–310. doi: 10.1067/mhn.2000.105416. [DOI] [PubMed] [Google Scholar]
- 7.Feretis M, Newton J R, Ram B, Green F. Comparison of external and endonasal dacryocystorhinostomy. J Laryngol Otol. 2009;6:315–319. doi: 10.1017/S0022215108002685. [DOI] [PubMed] [Google Scholar]
- 8.Wormald P J. Powered endoscopic dacryocystorhinostomy. Laryngoscope. 2002;6:69–72. doi: 10.1097/00005537-200201000-00013. [DOI] [PubMed] [Google Scholar]
- 9.Agarwal S. Endoscopic dacryocystorhinostomy for acquired nasolacrimal duct obstruction. J Laryngol Otol. 2009;6:1226–1228. doi: 10.1017/S0022215109990776. [DOI] [PubMed] [Google Scholar]
- 10.Wormald P J Powered endoscopic dacryocystorhinostomy Otolaryngol Clin North Am 20066539–549., ix [DOI] [PubMed] [Google Scholar]
- 11.Holly F J, Lamberts D W, Buesseler J A. The human lacrimal apparatus: anatomy, physiology, pathology and surgical aspects. Plast Reconstr Surg. 1984;6:438–445. doi: 10.1097/00006534-198409000-00022. [DOI] [PubMed] [Google Scholar]
- 12.Jones L T. An anatomical approach to problems of the eyelids and lacrimal apparatus. Arch Ophthalmol. 1961;6:111–124. doi: 10.1001/archopht.1961.00960010113025. [DOI] [PubMed] [Google Scholar]
- 13.Ramakrishnan V R, Hink E M, Durairaj V D, Kingdom T T. Outcomes after endoscopic dacryocystorhinostomy without mucosal flap preservation. Am J Rhinol. 2007;6:753–757. doi: 10.2500/ajr.2007.21.3095. [DOI] [PubMed] [Google Scholar]