Abstract
Bioprinting is an emerging technology that has its origins in the rapid prototyping industry. The different printing processes can be divided into contact bioprinting1-4 (extrusion, dip pen and soft lithography), contactless bioprinting5-7 (laser forward transfer, ink-jet deposition) and laser based techniques such as two photon photopolymerization8. It can be used for many applications such as tissue engineering9-13, biosensor microfabrication14-16 and as a tool to answer basic biological questions such as influences of co-culturing of different cell types17. Unlike common photolithographic or soft-lithographic methods, extrusion bioprinting has the advantage that it does not require a separate mask or stamp. Using CAD software, the design of the structure can quickly be changed and adjusted according to the requirements of the operator. This makes bioprinting more flexible than lithography-based approaches.
Here we demonstrate the printing of a sacrificial mold to create a multi-material 3D structure using an array of pillars within a hydrogel as an example. These pillars could represent hollow structures for a vascular network or the tubes within a nerve guide conduit. The material chosen for the sacrificial mold was poloxamer 407, a thermoresponsive polymer with excellent printing properties which is liquid at 4 °C and a solid above its gelation temperature ~20 °C for 24.5% w/v solutions18. This property allows the poloxamer-based sacrificial mold to be eluted on demand and has advantages over the slow dissolution of a solid material especially for narrow geometries. Poloxamer was printed on microscope glass slides to create the sacrificial mold. Agarose was pipetted into the mold and cooled until gelation. After elution of the poloxamer in ice cold water, the voids in the agarose mold were filled with alginate methacrylate spiked with FITC labeled fibrinogen. The filled voids were then cross-linked with UV and the construct was imaged with an epi-fluorescence microscope.
Keywords: Bioengineering, Issue 77, Immunology, Cellular Biology, Biomedical Engineering, Biophysics, Molecular Biology, Materials Science, Tissue Engineering, Biomaterials, Hydrogel, Biopolymers, Structured/Patterned Hydrogels, Bioprinter, Sacrificial Mold, Thermoresponsive Polymers, Poloxamer, tissue, polymer, matrix, cell, cell culture
Introduction
Tissue engineering approaches have made much progress over the last years with respect to regeneration of human tissues and organs19,20. However, until now, the focus of tissue engineering has been often limited to tissues that have a simple structure or small dimensions such as the bladder21,22 or the skin23-25. The human body, however, contains many complex three-dimensional tissues where cells and extracellular matrix are arranged in a spatially defined manner. To manufacture these tissues, a technique is required that can place cells and extracellular matrix scaffolding within a three-dimensional construct at specified positions. Bioprinting has the potential to be such a technique where the vision of manufacturing complex three-dimensional tissues can be realized10,11,26-28.
Bioprinting is defined as "the use of material transfer processes for patterning and assembling biologically relevant materials - molecules, cells, tissues, and biodegradable biomaterials - with a prescribed organization to accomplish one or more biological functions"4. It encompasses several different techniques that work at different resolutions and length scales, ranging from the sub-micron resolution of two-photon polymerization29 to a resolution of 150 μm to 420 μm for extrusion printing1,12,30. Not a single material or material combination will satisfy the requirements of each method31. For extrusion printing, the key parameters are viscosity and gelation time32, where high viscosity and rapid gelation are desirable.
3D printing is a technique which allows the easy creation of sacrificial molds for creating complex geometries30,33,34. This process is based on the construction of a mold using a rapid prototyping technique such as an extrusion bioprinter. The created sacrificial mold is used to form complex structures from materials which are difficult to print due to their low viscosity and slow gelation time. The method presented here involves the creation of a sacrificial mold consisting of a material that dissolves quickly at low temperature and can be extruded accurately. The block copolymer poly(ethylene glycol)99-poly(propylene glycol)67-poly(ethylene glycol)99 (also known as Pluronic F127 or poloxamer 407) fulfills these requirements. It has already been used in a modified version in extrusion printing1 but, to our knowledge, has never been used for printing in its unmodified version due to its instability in liquid environments. Poloxamer 407 also shows an inverse thermal responsive behavior18 i.e. it changes from a gel to a sol upon cooling. Most importantly, it can be printed into complex arbitrarily curved structures with very high fidelity. This allows the creation of a structured hydrogel from a low viscosity material, in this case slow gelling agarose, by pipetting the solution into the printed sacrificial mold. The combination of printing the sacrificial mold with high fidelity and its quick elution from the casted structured hydrogel makes it a fast and flexible method to create molds with different geometries without the use of a mask or a stamp as it is often required in lithographic methods. The casted structured hydrogel can be further filled with another material that is not suitable for extrusion printing due to its low viscosity. This is in our case a low viscosity alginate methacrylate solution. Here we present the method of thermoresponsive reverse sacrificial molds for hydrogel patterning using the example of a pillar array.
Protocol
1. Preparation of the Poloxamer 407 Solution
If available, perform the preparation of the poloxamer solution in a cold room (4 °C). If not available, place a glass bottle in a beaker filled with ice-cold water. At higher temperatures the poloxamer will be above the gel point and will not dissolve properly.
Add 60 ml of ice cold PBS solution into a glass bottle and stir vigorously using a magnetic stirrer.
Weigh 24.5 grams of poloxamer and add it in small amounts to the cold PBS. Wait until the poloxamer has partially dissolved before adding more.
Stir the solution until all poloxamer has dissolved.
Add cold PBS until a final volume of 100 ml is reached. The final concentration will be 24.5% w/v.
Stop stirring the solution and let it rest at 4 °C until bubbles and foam in the solution have disappeared. Bubbles that are trapped within the gel will be transferred to the printer cartridge and will lead to defects in the printed sacrificial molds.
Filter (0.22 μm filter) the solution directly into the printing cartridge to remove any unwanted particles that could clog the needle. The filtering step should be performed in a cold room (or if not available with cooled tips, filter etc.) to avoid gelling of the poloxamer in the filter. Keep the loaded cartridge at 4 °C until 30 min before the experiment.
2. Preparation of the 3D Printer
The 3D printer used in this work was the "BioFactory" from regenHU. The extrusion part of the system consists of several parts. A cartridge under pressure at the top is attached to a connector via a luer-lock adapter. The connector bridges the spaces between the outlet of the cartridge and the inlet of a solenoid valve. At the outlet of the solenoid valve, needles with different diameters can be used. The material is extruded onto a substrate that is held to a moving stage by vacuum. The major parts of the system are depicted in Figure 1. Other extrusion based systems can be used for the printing process, and the optimization process needs to be done for each system.
Place the solenoid valve (nozzle diameter 0.3 mm) and the needle (inner diameter 0.15 mm) in separate 1.5 ml test tubes filled with ultrapure water and place them in a heated ultrasonic bath to clean for 30 min. Rinse the cleaned valves with ethanol and dry them with a nitrogen gun.
Install the valve and needle in the printer as well as an empty, clean cartridge.
Apply 3 bar pressure to the system and blow out any residual liquids from the installed valve and needle with compressed air. For small needle diameters, it is recommended to have a filter (common syringe filter, 0.45 μm pore size) installed at the exit of the compressed air to avoid entry of small particles that could clog the needle.
Turn the pressure off and install the cartridge loaded with the poloxamer. The cartridge should be taken out of the refrigerator approximately 30 min before mounting the cartridge so the poloxamer can reach room temperature and gel.
Apply 3 bar pressure to the system and dispense poloxamer until it reaches the needle tip and is extruded in a continuous strand.
3. Optimization of the Printing Parameters
To create accurate 3D structures, the printing process has to be optimized for the chosen material and concentration. Depending on the viscosity and the 3D printing system each material will yield a specific dispensing volume and line thickness for a fixed set of parameters.
With a suitable CAD software (able to create ISO files from the drawings), draw a single line about the same length as the structure that you intend to print.
Place a microscope glass slide 25 mm x 75 mm x 1 mm or any other substrate in the printer and secure it by turning on the vacuum.
In the printer software, set the solenoid valve to a high frequency of 50 Hz and set a high pressure of 3 bar.
Print one layer of a single line with a stage speed of 300 mm/min.
Reduce the pressure until the desired line width is reached. You can also control the volume that is extruded via the opening time of the valve.
Reduce the frequency of the valve until no continuous line can be printed anymore. Choose a frequency above this value.
Note: Once the desired line width and continuous lines are achieved, determine the optimal stage speed and layer thickness i.e. the lift of the needle after one printed layer.
Print several layers on top of each other and see if the needle is in the right position above the previous layer after several printed layers. Adjust the layer thickness (needle lift) so that each layer is printed on top of the next one (Figure 3).
Decrease the stage speed of the stage from 300 mm/min step-wise so that extruded layers start and end at the same positions as the previous ones (Figure 4). Too high stage speeds cause the stage to be moving before the extruded material has touched the previous layer.
For printing the pillar structures follow steps 3.1.-3.8., but instead of drawing a single line draw a single point. The parameters to focus on when printing the pillars are the pressure (regulates layer thickness and pillar diameter of poloxamer), the opening time of the valve (extruded volume) and the residence time of the print head at the position where the pillar should be deposited.
When the parameters are optimized, printing several layers of a line should result in a solid wall, or in case of the points, a pillar. Save the parameters for later use.
4. Printing and Elution of the Reverse Mold
Use the parameters found during the optimization procedure from this point on.
Print the inner structure (here it is a pillar array) on a glass microscope slide and let it dry overnight. This a) reduces the size and thickness of the structures and b) provides better adhesion between the structure and the substrate, so lift-off during the backfilling can be avoided.
With the CAD software, draw a structure that consists of an outer wall surrounding the structure you intend to have eluted away and filled. Print the structure with poloxamer. The printing of the wall will take 6 min.
Attention: The wall has to be printed at least 3.5 mm away from the inner structure because of the dimensions of the needle. Otherwise the printing of the outer wall will destroy the inner structure
Prepare the solution you want to backfill your sacrificial mold with (here 1% agarose in deionized water). The agarose solution should have a temperature between 35 °C and 45 °C. Beneath this temperature, the agarose will solidify too quickly; above this temperature, it might destroy the printed pillars because the poloxamer structure will soften.
Slowly fill the sacrificial mold with the backfilling solution using a pipette. This should be done slowly to avoid destruction of the structure inside the wall.
Let the backfilled solution gel or crosslink it depending on the polymer used. In the case of agarose the solidification took place at 4 °C for 10 min.
Place the backfilled sacrificial mold in an ice bath for 10 min to elute the poloxamer structure.
Blot the backfilled structure with a paper tissue and place it on a new glass microscope slide. Press the structure carefully onto the glass microscope slide to avoid leakage of the third hydrogel from the void into the space between the backfilled structure and the glass microscope slide.
5. Filling of the Voids
To fill the voids left by the eluted poloxamer, fill the intended polymer solution into a syringe equipped with a 30 G needle. In this example, we used a 1% alginate methacrylate in 0.15 M NaCl solution with the addition of 0.05% w/v lithium phenyl-2,4,6-trimethylbenzoylphosphinate (LAP) and 2.5% v/v of Alexa-488 conjugated fibrinogen. The Alexa-488 conjugated fibrinogen was added for visualization purposes.
Photopolymerize the polymer with a high intensity UV lamp (100 Watt, 365 nm, distance from substrate was 3.5 cm) for 5 min and image the construct using an epi-fluorescence or confocal microscope.
Representative Results
The representative results show that the reverse mold technique (depicted in Figure 2) will create a structured gel that can be filled with a second material. At the beginning of every printing process the printing parameters are first optimized. Step-wise adjustments of the parameters will result in printed multilayered constructs depicted in Figure 3 and Figure 4 when single lines are printed. If the layer thickness (the needle lift after one printed layer) is too low, one will observe that the needle will touch the preceding layers. If the needle is too high, a wave pattern on the surface of the printed construct will appear. This can be seen in Figures 3A-3D, where all tested layer thicknesses were too large for the given stage speed. Because a high stage speed reduces the layer thickness, small differences between the set and the actual layer thickness accumulate and the wave pattern starts to appear as the height of the construct increases. By lowering the layer thickness, the differences become smaller and the wave pattern appears at a higher position than before (indicated by the dotted lines in Figure 3C and Figure 3D). For a fixed layer thickness, if the stage speed is too fast this will result either in a wave pattern or in constructs that narrow towards the top and have a bulge at the beginning of the construct (right edge of the printed structure) as shown in Figures 4A-4C. Optimized parameters for the poloxamer were an opening time of 0.2 msec, a frequency of 31.14 Hz, a layer thickness of 0.15 mm, a pressure of 1.5 bar and a speed of 75 mm/min. Printing with these parameters resulted in smooth solid walls as in Figure 4D. However, a higher stage speed of 100 mm/min was chosen for the process to reduce the production time of the walls.
With optimized parameters for pillar printing (opening time 0.2 msec, frequency 31.14 Hz, layer thickness 0.08 mm, pressure 1.5 bar, stage speed 200 mm/min, residency time 0.3 sec) we created an array of pillars as shown in Figure 5A. Drying effects of the pillar array resulted in bending of the pillars towards the center. This effect can be reduced, but not avoided, by placing the pillars further apart from each other. A wall is then printed around the pillars as shown in Figure 5B.
After the elution of the sacrificial poloxamer mold in cold water, structured agarose hydrogels like the one shown in Figure 5C were created. After filling the voids with the fluorescent alginate methacrylate solution and subsequent crosslinking, a novel hydrogel-in-hydrogel pillar array such as the one shown in Figure 6 can be made. The 3D z-stack reconstruction clearly illustrates the fluorescent pillars that were created. Figure 7 illustrates the possibility of this technique to also create arbitrarily curved molds.
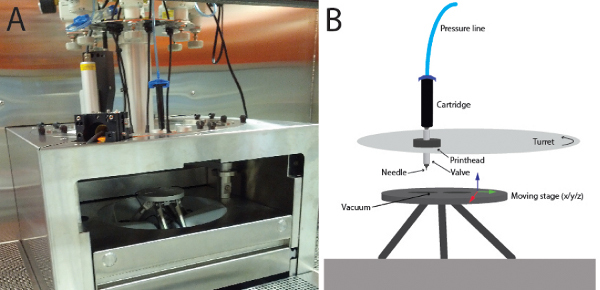 Figure 1. Depiction of the bioprinter.A) A picture of the bioprinter "BioFactory". The needle and the valve are not visible in this image, but are depicted in B). Up to 8 print heads are mounted on a turning turret which allows one to quickly change between materials. The printing is done onto a moving stage that can be moved in x-, y- and z-direction. Click here to view larger figure.
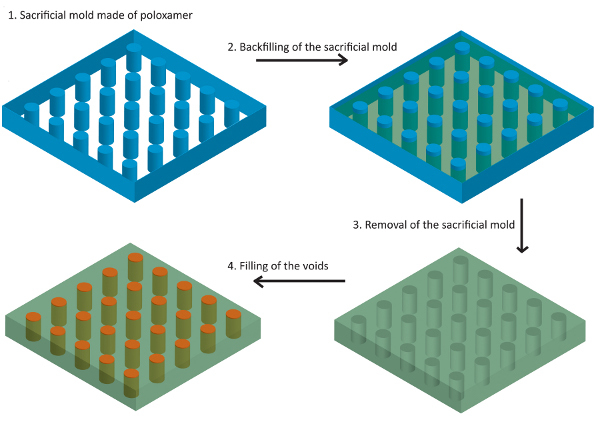 Figure 2. Scheme of the process of the production of sacrificial molds for the fabrication of structured hydrogels.
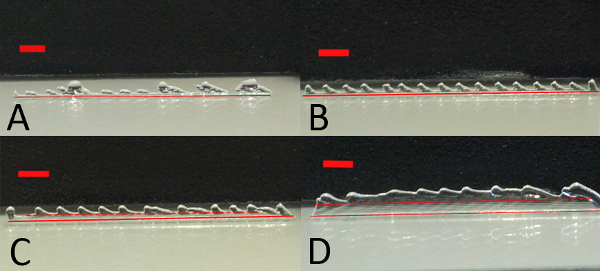 Figure 3. Layer thickness optimization. Poloxamer layers printed at a fixed stage speed (250 mm/min) with decreasing layer thickness. When the layer thickness is too high, a wave pattern emerges. This gradually disappears with decreasing layer thickness. The red solid lines indicate the bottom of the printed construct whereas the red dotted lines indicate the height of the defect free part of the printed construct. Layer thicknesses are A) 0.18 mm, B) 0.16 mm C) 0.15 mm and D) 0.13 mm. The red bar indicates 2 mm.
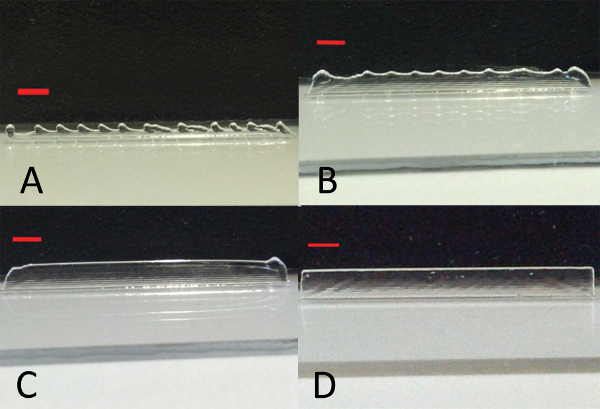 Figure 4. Stage speed optimization. Poloxamer layers printed with a layer thickness of 0.15 mm with different speeds of the stage A) 250 mm/min, B) 200 mm/min, C) 150 mm/min and D) 75 mm/min. By lowering the stage speed, the starting point of the printing process is for all layers the same and a solid wall can be printed. The red bar indicates 2 mm.
 Figure 5. Production of patterned hydrogels.A) Pillar array of dried poloxamer with pillars separated 1.75 mm from each other. The bending of the pillars is caused by drying effects. B) Pillar array enclosed by a wall made of poloxamer before pipetting the agarose. C) Structured agarose hydrogel after removal of the sacrificial mold.
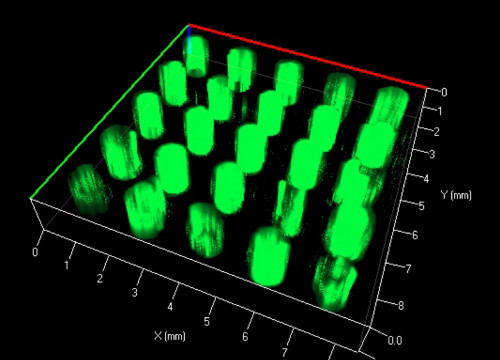 Figure 6. 3D z-stack reconstruction of fluorescently labeled pillars embedded in an agarose scaffold.
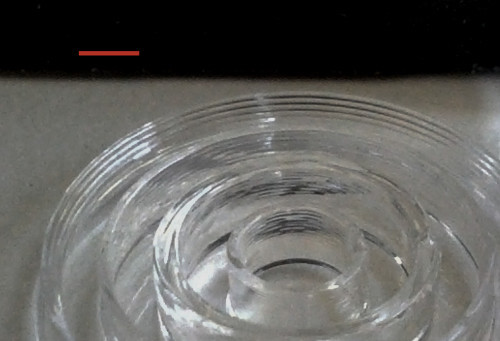 Figure 7. Concentric circles printed from poloxamer. Single layers are visible. The red bar indicates 2 mm.
| Design criteria | Printing parameter |
| Finer layer thickness |
|
| Smaller line thickness |
|
| Continuous extrusion |
|
| Faster construction speed |
|
Table 1. Four design parameters for the extrusion of poloxamer lines and how they can be influenced by different printing parameters.
Discussion
Here we present, for the first time, the use of a thermoresponsive polymer for a sacrificial mold that can be quickly eluted in cold water due to the gel-sol transition of poloxamer of ~20 °C. The speed of the entire process makes poloxamer interesting for the rapid creation of biopolymer structures which cannot be printed with adequate resolution. The technique described here can be used for patterning one hydrogel within another hydrogel or for the creation of microfluidic channels as has been previously reported for other materials35. The advantage of the poloxamer as a sacrificial mold is that it can be printed in arbitrary geometries into solid layer-by-layer constructs that can be filled and eluted afterwards.
We describe here the process of creating a sacrificial mold with poloxamer with subsequent backfilling of a second hydrogel to create structured hydrogels. The material for the structured hydrogel can be chosen with restrictions in regards to viscosity and temperature at the point of filling. Low viscous precursor solutions of commonly used polymers such as polyethylene glycol diacrylate36,37, alginate38,39, agarose40 and methacrylated biopolymers41-43 are just a few examples for suitable filling materials. High viscous materials however may not fill narrow geometries or could destroy the sacrificial mold in case of thin fragile structures such as the pillars printed here. A low percentage agarose solution was therefore chosen for the backfilling. Another advantage of using agarose in combination with poloxamer is that it gels by cooling. Therefore, when submersed in cold water, agarose retains its gelled state, a state which accurately reflects the inverse printed poloxamer pattern.
The important steps in this procedure involve the optimization of the printing parameters, the filling of the sacrificial mold and the filling of the voids. The printing parameters that were optimized were the frequency and opening time of the valve, the pressure, stage speed and the layer thickness. The layer thickness is defined as the lift of the needle after every printed layer. In case of the pillars, the residency time, i.e. the time material is extruded onto a point without moving the stage, also had to be adjusted. The optimization process can be time consuming because changes in one parameter can have effects on several design parameters of the extruded lines. The key parameters for different design criteria are described in Table 1.
The second important step in the process is the filling of the sacrificial mold. The filling of the sacrificial mold is a delicate step. Small and narrow structures need to be filled carefully, often manually, and simple casting of solutions might not always be possible.
Careful filling of the sacrificial mold with agarose was therefore performed using a 100 μl pipette to avoid destruction of the pillars. The last step, the filling of the voids, required the use of a syringe equipped with a 30 G needle. Care should be taken to avoid bubble formation during the filling.
The different gels in the construct presented here can also contain cells. By placing one cell type in the hydrogels within the voids and another cell type inside the structured hydrogel, a spatially defined co-culture setup can be created. Interconnected 3D network as in the publication from Miller et al.30, vascular or neural networks are also possible. A possible approach to such networks would be to print lines within a surrounding wall and fill the voids with the second hydrogel, crosslink the second hydrogel and continue with printing the next layer rotated by 90°. The advantage of printing poloxamer as a sacrificial mold is that it neither requires a master mold or a mask. It also does not require a heated print head to extrude the material and clogging of the system has not been observed in our experiments.
Constructs such as the ones presented here might be used in the future as spatially organized 3D co-cultures to study diffusion-based cell-cell interactions or for drug discovery. However, a fully automated version of the procedure presented here needs to be developed to become successful in the field of drug screening.
To summarize, we have presented a method that allows the printing of arbitrary geometries that can be filled with hydrogels and eluted afterwards. That way, structured hydrogel-in-hydrogel architectures can be created in a straightforward and cost-effective manner.
Disclosures
The authors have nothing to declare.
Acknowledgments
We thank Deborah Studer for the help with the bioprinter.
The work was funded by the European Union Seventh Framework Programme (FP7/2007-2013) under grant agreement n°NMP4-SL-2009-229292.
References
- Fedorovich NE, et al. Evaluation of photocrosslinked Lutrol hydrogel for tissue printing applications. Biomacromolecules. 2009;10:1689–1696. doi: 10.1021/bm801463q. [DOI] [PubMed] [Google Scholar]
- Lee KB, Park SJ, Mirkin CA. Protein nanoarrays generated by Dip-Pen Nanolithography. Abstr Pap Am Chem S. 2002;223:C94. doi: 10.1126/science.1067172. [DOI] [PubMed] [Google Scholar]
- Whitesides GM, Ostuni E, Takayama S, Jiang X, Ingber DE. Soft lithography in biology and biochemistry. Annual review of biomedical engineering. 2001;3:335–373. doi: 10.1146/annurev.bioeng.3.1.335. [DOI] [PubMed] [Google Scholar]
- Mironov V, Reis N, Derby B. Review: bioprinting: a beginning. Tissue engineering. 2006;12:631–634. doi: 10.1089/ten.2006.12.631. [DOI] [PubMed] [Google Scholar]
- Odde DJ, Renn MJ. Laser-guided direct writing of living cells. Biotechnology and bioengineering. 2000;67:312–318. doi: 10.1002/(sici)1097-0290(20000205)67:3<312::aid-bit7>3.0.co;2-f. [DOI] [PubMed] [Google Scholar]
- Derby B. Bioprinting: inkjet printing proteins and hybrid cell-containing materials and structures. J Mater Chem. 1039;18:5717–5721. [Google Scholar]
- Therriault D, White SR, Lewis JA. Chaotic mixing in three-dimensional microvascular networks fabricated by direct-write assembly. Nature. 2003;2:265–271. doi: 10.1038/nmat863. [DOI] [PubMed] [Google Scholar]
- Engelhardt S, et al. Fabrication of 2D protein microstructures and 3D polymer-protein hybrid microstructures by two-photon polymerization. Biofabrication. 2011;3:025003. doi: 10.1088/1758-5082/3/2/025003. [DOI] [PubMed] [Google Scholar]
- Mironov V. Printing technology to produce living tissue. Expert opinion on biological therapy. 2003;3:701–704. doi: 10.1517/14712598.3.5.701. [DOI] [PubMed] [Google Scholar]
- Mironov V, Kasyanov V, Drake C, Markwald RR. Organ printing: promises and challenges. Regenerative medicine. 2008;3:93–103. doi: 10.2217/17460751.3.1.93. [DOI] [PubMed] [Google Scholar]
- Mironov V, Kasyanov V, Markwald RR. Organ printing: from bioprinter to organ biofabrication line. Current opinion in biotechnology. 2011;22:667–673. doi: 10.1016/j.copbio.2011.02.006. [DOI] [PubMed] [Google Scholar]
- Fedorovich NE, De Wijn JR, Verbout AJ, Alblas J, Dhert WJ. Three-dimensional fiber deposition of cell-laden, viable, patterned constructs for bone tissue printing. Tissue engineering. Part A. 2008;14:127–133. doi: 10.1089/ten.a.2007.0158. [DOI] [PubMed] [Google Scholar]
- Dhariwala B, Hunt E, Boland T. Rapid prototyping of tissue-engineering constructs, using photopolymerizable hydrogels and stereolithography. Tissue engineering. 2004;10:1316–1322. doi: 10.1089/ten.2004.10.1316. [DOI] [PubMed] [Google Scholar]
- Cook C, Wang T, Derby B. Inkjet Printing of Enzymes for Glucose Biosensors. Mater Res Soc Symp P. 2009;1191:103–109. [Google Scholar]
- Cui X, Gao G, Qiu Y. Accelerated myotube formation using bioprinting technology for biosensor applications. Biotechnol Lett. 2012. pp. 1–7. [DOI] [PubMed]
- Wang TM, Cook C, Derby B, editors. Fabrication of a Glucose Biosensor by Piezoelectric Inkjet Printing. 2009 3rd International Conference on Sensor Technologies and Applications (Sensorcomm 2009); 2009. pp. 82–85. [Google Scholar]
- Shim JH, Lee JS, Kim JY, Cho DW. Bioprinting of a mechanically enhanced three-dimensional dual cell-laden construct for osteochondral tissue engineering using a multi-head tissue/organ building system. J. Micromech. Microeng. 2012;22 [Google Scholar]
- Malmsten M, Lindman B. Self-Assembly in Aqueous Block Copolymer Solutions. Macromolecules. 1021;25:5440–5445. [Google Scholar]
- Cebotari S, et al. Clinical application of tissue engineered human heart valves using autologous progenitor cells. Circulation. 2006;114:I132–I137. doi: 10.1161/CIRCULATIONAHA.105.001065. [DOI] [PubMed] [Google Scholar]
- Matsumura G, Hibino N, Ikada Y, Kurosawa H, Shin'oka T. Successful application of tissue engineered vascular autografts: clinical experience. Biomaterials. 2003;24:2303–2308. doi: 10.1016/s0142-9612(03)00043-7. [DOI] [PubMed] [Google Scholar]
- Kropp BP, Zwischenberger JB. Tissue-engineered autologous bladders: new possibilities for cystoplasty. Nature clinical practice. Urology. 2006;3:588–589. doi: 10.1038/ncpuro0628. [DOI] [PubMed] [Google Scholar]
- Oberpenning F, Meng J, Yoo JJ, Atala A. De novo reconstitution of a functional mammalian urinary bladder by tissue engineering. Nature. 1999;17:149–155. doi: 10.1038/6146. [DOI] [PubMed] [Google Scholar]
- Wood F. Tissue engineering of skin. Clinics in plastic surgery. 2012;39:21–32. doi: 10.1016/j.cps.2011.09.004. [DOI] [PubMed] [Google Scholar]
- Groeber F, Holeiter M, Hampel M, Hinderer S, Schenke-Layland K. Skin tissue engineering--in vivo and in vitro applications. Clinics in plastic surgery. 2012;39:33–58. doi: 10.1016/j.cps.2011.09.007. [DOI] [PubMed] [Google Scholar]
- Bannasch H, Momeni A, Knam F, Stark GB, Fohn M. Tissue engineering of skin substitutes. Panminerva medica. 2005;47:53–60. [PubMed] [Google Scholar]
- Jakab K, Neagu A, Mironov V, Forgacs G. Organ printing: fiction or science. Biorheology. 2004;41:371–375. [PubMed] [Google Scholar]
- Boland T, Mironov V, Gutowska A, Roth EA, Markwald RR. Cell and organ printing 2: fusion of cell aggregates in three-dimensional gels. The anatomical record. Part A, Discoveries in molecular, cellular, and evolutionary biology. 2003;272:497–502. doi: 10.1002/ar.a.10059. [DOI] [PubMed] [Google Scholar]
- Mironov V, et al. Organ printing: tissue spheroids as building blocks. Biomaterials. 2009;30:2164–2174. doi: 10.1016/j.biomaterials.2008.12.084. [DOI] [PMC free article] [PubMed] [Google Scholar]
- Raimondi MT, et al. Two-photon laser polymerization: from fundamentals to biomedical application in tissue engineering and regenerative medicine. Journal of applied biomaterials. 2012;10:56–66. doi: 10.5301/JABFM.2012.9278. [DOI] [PubMed] [Google Scholar]
- Miller JS, et al. Rapid casting of patterned vascular networks for perfusable engineered three-dimensional tissues. Nature. 2012;11:768–774. doi: 10.1038/nmat3357. [DOI] [PMC free article] [PubMed] [Google Scholar]
- Billiet T, Vandenhaute M, Schelfhout J, Van Vlierberghe S, Dubruel P. A review of trends and limitations in hydrogel-rapid prototyping for tissue engineering. Biomaterials. 2012;33:6020–6041. doi: 10.1016/j.biomaterials.2012.04.050. [DOI] [PubMed] [Google Scholar]
- Murphy SV, Skardal A, Atala A. Evaluation of hydrogels for bio-printing applications. Journal of biomedical materials research. Part A. 2013;101:272–284. doi: 10.1002/jbm.a.34326. [DOI] [PubMed] [Google Scholar]
- He J, Li D, Liu Y, Gong H, Lu B. Indirect fabrication of microstructured chitosan-gelatin scaffolds using rapid prototyping. Virtual and Physical Prototyping. 2008;3:159–166. [Google Scholar]
- Sachlos E, Reis N, Ainsley C, Derby B, Czernuszka JT. Novel collagen scaffolds with predefined internal morphology made by solid freeform fabrication. Biomaterials. 2003;24:1487–1497. doi: 10.1016/s0142-9612(02)00528-8. [DOI] [PubMed] [Google Scholar]
- Lee W, et al. On-demand three-dimensional freeform fabrication of multi-layered hydrogel scaffold with fluidic channels. Biotechnology and bioengineering. 2010;105:1178–1186. doi: 10.1002/bit.22613. [DOI] [PubMed] [Google Scholar]
- Turturro M, Christenson M, Larson J, Papavasiliou G. Matrix metalloproteinase (MMP) sensitive PEG diacrylate (PEGDA) hydrogels with spatial variations in matrix properties direct vascular cell invasion. J. Tissue. 2012;6:302–302. [Google Scholar]
- Butterworth A, Garcia MDL, Beebe D. Photopolymerized poly(ethylene) glycol diacrylate (PEGDA) microfluidic devices. Roy. Soc. Ch. 2005. pp. 4–6.
- Shachar M, Tsur-Gang O, Dvir T, Leor J, Cohen S. The effect of immobilized RGD peptide in alginate scaffolds on cardiac tissue engineering. Acta biomaterialia. 2011;7:152–162. doi: 10.1016/j.actbio.2010.07.034. [DOI] [PubMed] [Google Scholar]
- Jeon O, Bouhadir KH, Mansour JM, Alsberg E. Photocrosslinked alginate hydrogels with tunable biodegradation rates and mechanical properties. Biomaterials. 2009;30:2724–2734. doi: 10.1016/j.biomaterials.2009.01.034. [DOI] [PubMed] [Google Scholar]
- Mauck RL, et al. Functional tissue engineering of articular cartilage through dynamic loading of chondrocyte-seeded agarose gels. J. Biomech. Eng-T Asme. 2000;122:252–260. doi: 10.1115/1.429656. [DOI] [PubMed] [Google Scholar]
- D'Arrigo G, et al. Hyaluronic acid methacrylate derivatives and calcium alginate interpenetrated hydrogel networks for biomedical applications: physico-chemical characterization and protein release. Colloid Polym. Sci. 2012;290:1575–1582. [Google Scholar]
- Pescosolido L, et al. Hyaluronic Acid and Dextran-Based Semi-IPN Hydrogels as Biomaterials for Bioprinting. Biomacromolecules. 2011;12:1831–1838. doi: 10.1021/bm200178w. [DOI] [PubMed] [Google Scholar]
- Guo Y, et al. Hydrogels of collagen/chondroitin sulfate/hyaluronan interpenetrating polymer network for cartilage tissue engineering. J. Mater. Sci-Mater. M. 2012;23:2267–2279. doi: 10.1007/s10856-012-4684-5. [DOI] [PubMed] [Google Scholar]


