Abstract
Transgenic mouse technology is a powerful method for studying gene function and creating animal models of human diseases. Currently, the most widely used method for generating transgenic mice is the pronuclear microinjection method. In this method, a transgenic DNA construct is physically microinjected into the pronucleus of a fertilized egg. The injected embryos are subsequently transferred into the oviducts of pseudopregnant surrogate mothers. A portion of the mice born to these surrogate mothers will harbor the injected foreign gene in their genomes. These procedures are technically challenging for most biomedical researchers. Inappropriate experimental procedures or suboptimal equipment setup can substantially reduce the efficiency of transgenic mouse production. In this chapter, we describe in detail our microinjection setup as well as our standard microinjection and oviduct transfer procedures.
Keywords: Microinjection, Pronuclear, Transgenic, Embryo transfer
1 Introduction
The first germline-transmissible transgenic mouse line was produced by infecting mouse embryos with Moloney leukemia virus [1] . Several years later, the significantly more efficient pronuclear microinjection method was developed [2–6]. The essence of this method is to physically inject exogenous DNA into the pronuclei of fertilized eggs by using pulled glass needles. Like most, if not all, cell types, the eggs are capable of integrating foreign DNA molecules into their genomes at random positions. The microinjected eggs are then implanted into the oviducts of pseudopregnant foster mothers where they can develop into viable individuals. The successful development of the pronuclear microinjection method is a perfect example of the integration of two areas of scientific research: culturing and manipulation of mammalian embryos, including microinjection technology [7], and recombinant DNA technology, which emerged in the 1970s and made it possible to isolate and recombine specific genes for generating transgenic constructs.
During the past three decades, several alternative methods have also been developed for producing transgenic animals, including sperm-mediated transgenesis, embryonic stem (ES) cell and chimeric mouse approaches (similar to generation of knockout mice), somatic cell nuclear transfer (animal cloning), and retroviral transduction. In recent years, the lentiviral transduction method has increasingly been used for transgenic animal production [8]. Lentivirus is highly efficient at transducing early embryos. Compared with the pronuclear injection method, it not only increases the efficiency of transgenesis, but it is also technically less challenging, although the viral particles may still need to be microinjected into the perivitelline space, the empty space between the egg plasma membrane and the zona pellucida. However, the lentiviral method also has disadvantages. For example, the lentiviral vector can only accept transgenes that are 10 kb or smaller [9], whereas there is essentially no limit on the size of the DNA fragment that can be microinjected. Lentiviral procedures also usually need to be carried out at a higher biosafety level, due to the virus's potential to infect human and other animals. Cloning transgenes into the lentivector and producing high-titer viral particles require more work and expertise than making DNA constructs for microinjection. The high transduction efficiency of lentivirus often leads to multiple copies of the transgene being inserted into multiple genomic loci. This is advantageous if a large number of founder lines are preferred, because these multiple insertion sites can be segregated into multiple transgenic lines by breeding. However, if only a few transgenic lines are needed, the extra breeding and genotyping required for separating these multiple insertion sites are often burdensome. Thus, for generating transgenic mice using standard strains, the pronuclear microinjection method has remained the workhorse in most transgenic laboratories and core facilities.
2 Materials
2.1 Mice
Ten B6CBAF1 (The Jackson Laboratory, Bar Harbor, ME) stud males, 2–12 months old, individually caged.
Twenty to fifty B6CBAF1 (The Jackson Laboratory) female mice, 1–3 months old, up to five mice per cage.
Twenty C57BL/6 (The Jackson Laboratory) stud males, 2–12 months old, individually caged.
Fifty to one hundred C57BL/6 (The Jackson Laboratory) females, 1–4 months old, up to five mice per cage.
Twenty vasectomized Swiss Webster (Taconic, Hudson, NY) male mice, 2–12 months old, individually caged. The vasectomy procedure is performed by Taconic for a reasonable fee.
Fifty to one hundred Swiss Webster (Taconic) females, 1.5–4 months old, up to five mice per cage.
See Note 1 for mouse strain selection and Note 2 for animal room environmental effects.
2.2 Equipment
2.2.1 Microinjection Setup
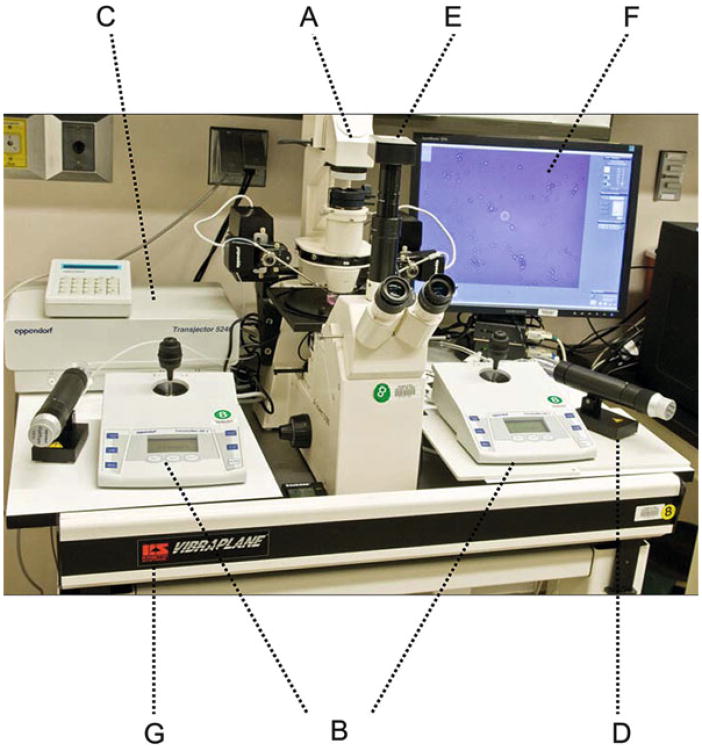
As shown in Fig. 1, the microinjection system consists of the following components:
Fig. 1.
Micromanipulation system. The microinjection setup consists of the following components: (A) Zeiss Axiovert S100 inverted microscope with ×5, ×10, ×20, and ×40 objective lenses. (B) A pair of Eppendorf TransferMan NK-2 micromanipulators for moving the microinjection needle and holding pipette. (C) An Eppendorf Transjector (Model 5246) for delivering controlled air pressure to the microinjection needle. (D) A mineral oil- filled Eppendorf CellTram Vario for controlling the pressure of the holding pipette. (E) An optional digital video camera. (F) Video monitor. (G) An air table for reducing vibration
Zeiss Axiovert S100 inverted microscope with 5×, 10×, 20×, and 40× objectives, for pronuclear microinjection.
Two Eppendorf TransferMan NK-2 micromanipulators.
Eppendorf Transjector (Model 5246).
Eppendorf CellTram Vario.
Vibraplane airtable (RS Kinetic Systems, Lockport, IL).
(Optional): A digital video camera and computer system for demonstration and recording.
2.2.2 Pipette Puller and Injection Needles
A Sutter P-97 horizontal pipette puller (Sutter Instrument Co., Novato, CA). For pulling pronuclear microinjection needles, our settings are as follows: heat = 590, pull = 65, vel = 50, and time = 100.
Glass capillary tubing for pulling microinjection needles: Borosil, 1.0 mm OD × 0.75 mm ID with omega dot fiber for rapid fill (FHC, Inc., Bowdoinham, ME, Cat: 30-30-0).
2.2.3 Stereo Microscope
Zeiss Stemi SV11 or Nikon SMZ1500 stereo microscopes are used for embryo collection and embryo transfer procedures. These microscopes are equipped with both top and bottom light sources. The Nikon SMZ1500 has higher magnification power (15× zoom), which is preferable for preselecting zygotes with clear pronuclei for microinjection.
2.2.4 CO2 Incubator
Sanyo Scientific (Model MCO-17AI) CO2 incubators are used for embryo culture. They are normally set at 37 °C, 6 % CO2, and humidified by a pan containing distilled water.
2.2.5 Sterilizers
A Harvey SterileMax table-top autoclave machine (Thermo Scientific, Waltham, MA) for sterilizing surgical instruments.
A Germinator 500 hot beads sterilizer (CellPoint Scientific, Inc., Rockville, MD) is used to sterilize instruments between animals when more than one animal is used during a session.
2.3 Tools and Supplies
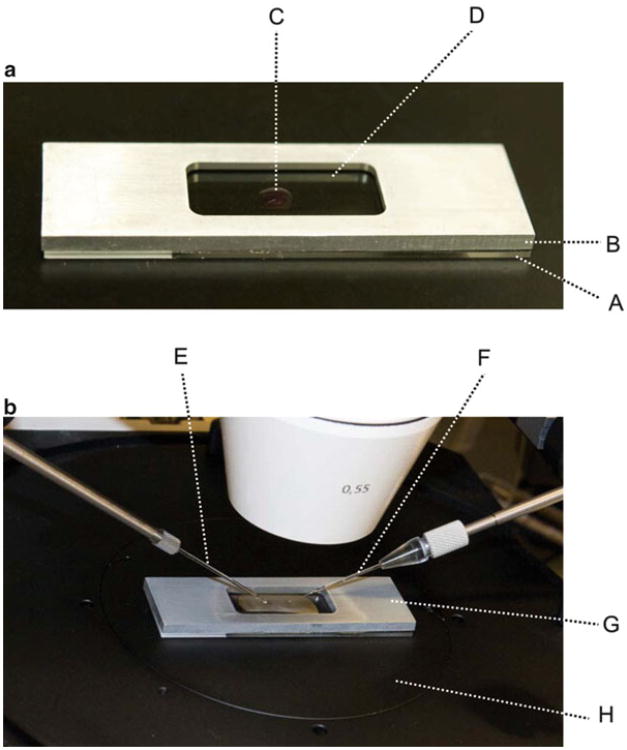
Microinjection chamber (see Note 3): As shown in Fig. 2, the microinjection chamber is made by attaching a standard histological glass slide to a 2-mm-thick custom-made aluminum frame using rubber cement.
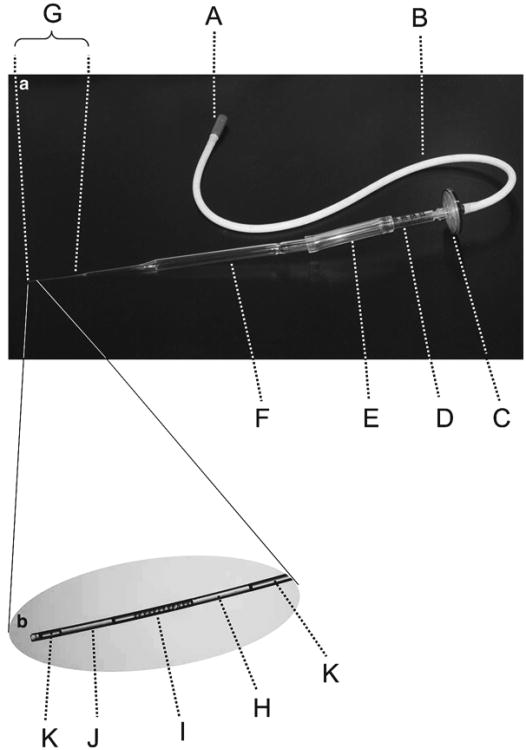
Embryo transfer pipette: As shown in Fig. 3, the embryo transfer pipette is assembled by connecting the following components: mouthpiece and rubber aspirator tubing (Sigma, St. Louis, MO, Cat: A5177-5EA), long-tipped glass Pasteur pipette (PGC Scientifics, Gaithersburg, MD, Cat: 71–5215), 25-mm disposable syringe filter (Millipore, Carrigtwohill, Ireland, Cat: SLGS0250S), 1-ml disposable syringe (PGC Scientifics, Cat: 79-4205-03), and a segment of flexible plastic tubing (inner diameter: ¼ in., Nalgene Labware, Vernon Hills, IL, Cat: 8007-0060).
Hair clipper (Wahl Model 8980 Pet Trimmer, Sterling, IL).
Wound clip applier (Roboz Surgical Instrument Company, Rockville, MD, Cat: RS-9260).
Suturing needle holder (Roboz, Cat: RS-7910).
Holding pipette for microinjection: Eppendorf VacuTip (Cat: 5175 108.000).
5-0 Vicryl suture (Ethicon, Inc., Somerville, NJ).
29 Gauge × ½ in. 0.3-ml insulin syringe, 28 Ga × ½ in. 1.0-ml insulin syringe, and 26 Ga hypodermic needles (Becton Dickinson, Franklin Lakes, NJ).
Thermojet infrared heating lamp (Bel-Art Products, Pequannock, NJ).
T/Pump heating water blanket (GayMar Industries, Orchard Park, NY).
Betadine (Povidone-Iodine Swabsticks from Medline Industries, Mundelein, IL).
Micro dissecting scissors (Roboz, Cat: RS-5882).
Operating scissors (Roboz, Cat: RS-6752).
Iris forceps (Roboz, Cat: RS-5130).
Micro dissecting tweezers #5 (Roboz, Cat: RS-4905).
Dieffenbach micro clamp (Roboz, Cat: RS-7422).
Surgical instruments sterilization tray (Roboz, Cat: RS-9902).
Microloader pipette tips (Eppendorf, Cat: 022351656).
Alcohol swab (The Kendall Co., Mans field, MA).
Sterile surgical gloves (Ansell Healthcare, Inc., Dothan).
Fig. 2.
Microinjection chamber. (a) The injection chamber is made by attaching a standard histological glass slide (A) to a 2-mm-thick custom-made aluminum frame (B) using rubber cement. The rectangular hole in the center of the aluminum frame is about 10 × 30 mm. Before microinjection, 4 μl of M2 medium (C) is added to the center of the chamber and then quickly covered with mineral oil (D). (b) Setting up the injection chamber on the microscope stage. (E) Holding pipette; (F) microinjection needle; (G) injection chamber; (H) microscope stage
Fig. 3.
Embryo transfer pipette. (a) The mouth-controlled embryo transfer pipette is constructed by sequential connection of the following components: (A) plastic mouthpiece; (B) flexible rubber tubing; (C) disk filter to prevent transfer of liquid between the culture dish and the mouth; (D) segment of a 1-ml disposable syringe; (E) segment of flexible plastic tubing; (F) long-tipped Pasteur pipette with a drawn-out tip of 90–150 μm in diameter (G). (b) Loading embryos for oviduct transfer. A small air bubble (H) is first drawn into the tip of the Pasteur pipette; then, embryos with minimal M2 medium (I) are drawn in; next, a second small air bubble (J) is drawn in. On either side of the two air bubbles, the pipette is filled with M2 medium (K)
2.4 Media and Chemicals
M2 culture medium (Millipore, Temecula, CA; Cat: MR-015-D).
M16 culture medium (Millipore, Cat: MR-010-D).
Avertin solution (see Note 4): Dissolve 5.0 g of 2,2,2-tribromoethanol (Aldrich, Milwaukee, WI) in 5 ml tert-amyl alcohol (Aldrich). It may be necessary to warm the solution to 50 °C to achieve complete dissolution. Add 195 ml of isotonic saline (0.9 % NaCl solution) to make a 2.5 % solution. Filter the final solution using a sterile disposable 0.22 μm filter bottle. Aliquot the solution into 5-ml tubes and store the tubes at −20 °C in the dark.
Pregnant mare's serum gonadotropin (PMS, Sigma, Cat: G4877).
Human chorionic gonadotropin (hCG, Sigma, Cat: C1063).
Hyaluronidase (Sigma, Cat: H3506-100 mg). Concentrated solution (10×) is prepared by dissolving the entire bottle (100 mg) in 20 ml M2 medium. Filter through a 0.22-μm filter, aliquot into microcentrifuge tubes, and store at −20 °C in the dark.
Embryo culture-tested mineral oil (Sigma, Cat: M8410).
0.25 % Bupivacaine (Hospira, Lake Forest, IL).
3 Methods
3.1 Zygote Collection
Three days prior to the scheduled microinjection, inject (i.p.) each egg donor mouse with 5 units of PMS. Skip this step if superovulation is not performed, such as when using C57BL/6 mice as egg donors.
Two days (44–48 h) later, inject (i.p.) each of the PMS-injected mice with 5 units of hCG. Immediately after the injection, set up each female mouse with an individually caged stud male for mating. When C56BL/6 mice are used, skip the PMS and hCG injections. Instead, select females which are in estrus and directly set up matings with stud males. Estrus females can be selected from a pool of breeding age animals. A swollen and reddish genital area is a good indication that the female is in estrus. Because a mouse's estrous cycle is 4–5 days, in theory, about 20 % of the females should be in estrus at any given date.
The next morning, check the females for vaginal plugs. Euthanize plugged females with CO2 and then cut open the abdominal cavity with a pair of sharp scissors. Dissect out both oviducts from each female using scissors and a pair of microdissecting tweezers. To avoid damaging the oviducts, the ovary as well as a small piece of uterine horn can also be dissected out.
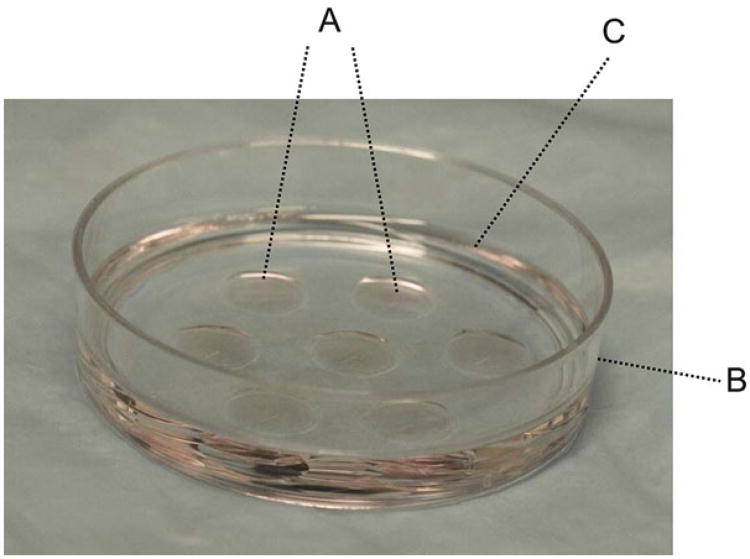
Place the dissected tissues in a 35-mm culture dish containing M2 medium. Under a stereo microscope, clean up the oviducts by removing excess fat, the ovary, and the uterine horn. Place the cleaned oviducts into the M2 drop culture dish (see Fig. 4 for setting up drop culture dishes). Three or four oviducts can be placed in the same M2 drop.
Under the stereo microscope, the ampulla, which is the swollen and translucent segment of the oviducts, usually can be found a few millimeters from the infundibulum, which is the upper end (next to the ovary) of the oviduct. A cumulus mass containing several eggs surrounded by follicular cells is usually visible in the ampulla. Using a 29-gauge insulin needle, tear open the ampulla to allow the cumulus mass to extrude spontaneously into the media. Discard the oviduct tissue. After releasing the cumulus masses from all oviducts, add 5 μl of 10× hyaluronidase solution to each M2 drop. Gently shake the dish and then incubate at room temperature for a few minutes to allow the hyaluronidase to digest the sticky materials, and remove the follicle cells from the eggs. Pick up the eggs using an embryo transfer pipette and wash them through three M2 drops to remove residual hyaluronidase. The eggs can be stored in an M2 drop in a 37 °C CO2 incubator for several hours. Normally we isolate eggs in the morning and perform microinjection in the afternoon.
Fig. 4.
Drop culture dishes. M2 or M16 drop culture dishes are prepared by quickly adding six or seven 45- μl medium drops (A) into a 60-mm tissue culture dish (B). Then, embryo-tested mineral oil (C) is immediately poured into the dish, so that the medium drops are completely covered with mineral oil (see Note 8)
3.2 Pronuclear Microinjection
Centrifuge the transgenic DNA solution (1.5 μg/ml) for 5 min at 14,000 × g in a microcentrifuge to pellet any possible particles that may clog the injection needle. Use a 1–10 μl pipet-man and an Eppendorf microloader tip to deliver 2–3 μl of transgenic DNA solution into the barrel of a microinjection needle through the open (back) end (see Note 5). The filament inside the needle will facilitate transporting the DNA solution to the needle tip through capillary action.
Add 4 μl of M2 medium into the center of the injection chamber. Immediately cover the M2 drop with mineral oil. Place the injection chamber onto the microscope stage, and lower the tip of both the holding pipette and injection needle into the M2 drop (Fig. 2b). Under the microscope, break open the tip of the microinjection needle by hitting the needle tip against the holding pipette.
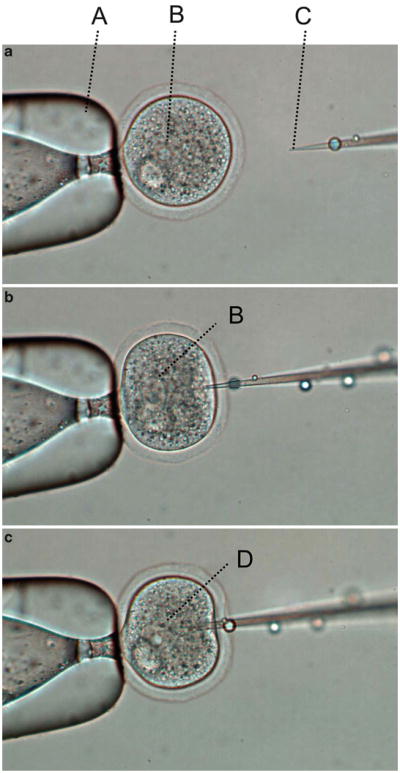
Transfer 20–30 zygotes into the M2 drop in the injection chamber. Moving the tip of the holding pipette to the vicinity of an egg, turn the CellTram Vario counterclockwise until the egg is firmly grasped by the holding pipette (see Note 6). Focus the microscope on one of the two pronuclei. Use the NK2 micromanipulator to align the microinjection needle next to the pronucleus. It is important to position the needle tip in the same focal plane as the pronucleus to be microinjected. With a quick and smooth forward motion, insert the needle into the pronucleus. Sometimes the needle has to pass through the entire nucleus in order to penetrate the plasma membrane and nuclear envelope. When the needle tip is inside the pronucleus, push the foot peddle of the Transjector to inject the DNA solution. It is very important to adjust and optimize the microscope, so that the expansion of the pronucleus is clearly visible when the DNA solution is injected into it (Fig. 5). Since the needle tip opening varies from needle to needle, it is necessary to adjust the pressure setting of the Transjector for each needle. We normally set the constant pressure (Po), which is continuously applied to prevent M2 medium from being drawn into the needle by capillary action, in the range of 20–60 PSI, and set the injection pressure (Pi), which is applied only when the foot peddle is pressed, in the range of 50–200 PSI. Settings above or below these ranges usually indicate that the needle opening is too small or too large, respectively. After injection, the egg is transferred to a different area using the holding pipette to separate it from the uninjected eggs (see Note 7). When all eggs in the chamber are injected, they are transferred out of the chamber and placed in a drop of M16 (see Note 8) in the CO2 incubator. Then, a new batch of eggs is transferred to the injection chamber for the next round of microinjection. After all the eggs are injected, they are washed through two or three M16 drops and then cultured in M16 medium overnight to allow them to develop into 2-cell stage embryos.
Fig. 5.
Pronuclear microinjection. (a) A zygote is first grabbed by the holding pipette (A). The focus of the microscope is adjusted so that one of the two pronuclei (B) is in sharp focus. Next, the micromanipulator is adjusted to raise or lower the microinjection needle so that the tip of the needle (C) is in the same focal plan as the pronucleus. (b) The needle is inserted into the zygote with a quick motion. (c) When the needle tip is inside the pronucleus, the foot peddle of the Transjector is pushed to deliver DNA solution into the nucleus. A sudden expansion of the nuclear envelope (D) is an indication that the embryo has been successfully micro-injected. Then, the needle is gently but quickly withdrawn
3.3 Oviduct Transfer (See Note 9 for Timing of Embryo Transfer)
On the day of microinjection, estrus Swiss Webster females are selected and set up with vasectomized male mice for mating (see Subheading 3.1, step 2, for the selection method).
The next morning, check the mice for vaginal plugs. The plugged mice can be used as recipient mothers for embryo transfer.
Examine the microinjected embryos using a stereo microscope. Count the number of embryos that have reached the 2-cell stage of development. Transfer these 2-cell embryos into a M2 drop.
Anesthetize the recipient mothers by injecting (i.p.) 2.5 % Avertin solution at a dose of 0.017 ml/g of body weight. While waiting for the injected mice to succumb (usually a few minutes), load the embryo transfer pipette with 13 embryos. Because the embryos are barely visible in the transfer pipette, as shown in Fig. 3b, two air bubbles are sucked into the transfer pipette to mark the boundaries of the suspended embryos.
Five minutes after the Avertin injection, check the depth of anesthesia by gently pinching one of the hind paws. If the animal can still respond to this gentle pinch, a supplemental dose of Avertin should be injected. Normally the supplementary dose is approximately a third of the original dose. After the animal is fully anesthetized, hair is removed from a generous area on the dorsal lumbar back using a small hair clipper. The clipped area is disinfected utilizing alternating applications of Betadine and 70 % alcohol.
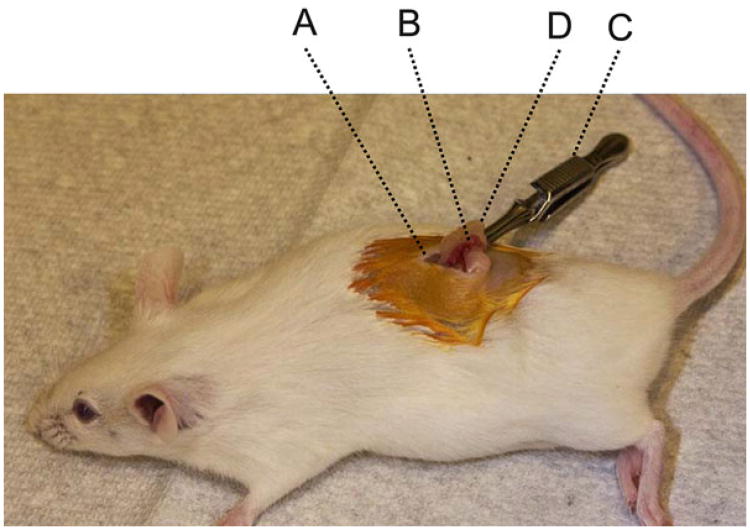
Using dissecting scissors, cut a dorsal midline incision (∼1 cm long) in the cleaned skin area (Fig. 6). Because mouse skin is only loosely connected to the body wall, the midline incision can be moved with a pair of iris forceps to either side of the paralumbar to find the ovary and associated fat pad, which are vaguely visible through the muscular body wall because they are paler than the surrounding internal organs. A 5–10-mm incision is made in the body wall by first making a small cut and then extending it using the back of the scissors' blades.
Grasp the fat pad that is associated with the ovary with a pair of iris forceps and gently pull out the fat pad, the ovary, the oviduct, and a segment of the uterine horn through the incision. Clamp the fat pad with a Dieffenbach clip to hold the organs in place. Under the dissecting microscope, find the oviduct and ampulla. Use a 29-gauge needle to punch a small hole in the oviduct wall between the ampulla and the ovary. Carefully insert the tip of the transfer pipette into the hole with the pipette opening pointing toward the ampulla. Gently blow into the mouthpiece to expel the two air bubbles and the embryos sandwiched between them. The presence of two air bubbles in the ampulla is a good indication that all embryos have been successfully implanted.
Remove the Dieffenbach clip and carefully push the reproductive organs back into the abdominal cavity. Close the abdominal wall with a cruciate suture utilizing absorbable 5-0 Vicryl suture. Drop one or two drops of 0.25 % bupivacaine solution on the muscle at the surgical site using a 26-gauge needle. Bupivacaine solution is a long-lasting local anesthetic for reducing pain at the surgical site.
For two-sided transfer, move the skin incision to the other side of the mouse, and transfer another 13 embryos into the other oviducts following the same procedure described in steps 6–8.
Close the skin incision with stainless steel surgical wound clips. Place the mice in a pre-warmed mouse cage placed on a circulating water blanket or under a carefully adjusted infrared heating lamp. Normally, the mice will wake 30–60 min post-Avertin injection. They can then be returned to the animal room.
Wound clips are removed 10–14 days after surgery. Pups developed from injected embryos will be born about 19 days after the embryo transfer procedure. The offspring will be weaned when they are 18–21 days old. At weaning, ear-tags are applied and the tail tips are clipped for identification and genotyping.
Fig. 6.
Oviduct transfer surgical site. A midline incision (A) is made in the dorsal lumbar area. Then, the reproductive organs (including ovary, oviduct, and a segment of the uterine horn) are exteriorized through a small cut in the body wall (B). These organs are fixed in place by using a Dieffenbach clip (C) clamped to the fat pad (D) associated with the reproductive organs
4 Notes
-
Mouse strains: Transgenic mice have been successfully generated using a variety of mouse strains. Generally, outbred strains, such as CD-1 and Swiss Webster, and hybrid strains, such as B6CBAF1, are very efficient, partly because they show good hormone-induced superovulation to yield a large number of injectable zygotes, and partly because hybrid embryos often can tolerate more trauma caused by the microinjection procedures. However, the undefined genetic backgrounds of these strains have greatly limited their usefulness for many transgenic studies. On the other hand, most inbred strains are inefficient for producing transgenic mice. FVB is an excellent inbred strain for generating transgenic mice [10], but it is not widely used in biomedical research. The C57BL/6 strain is often desired for many areas of research, including lipoprotein metabolism and atherosclerosis. It is significantly more susceptible to atherosclerosis than other mouse strains, and therefore many existing knockout and overexpression models, such as the standard atherogenic apoE-KO and LDLr-KO mice from The Jackson Laboratory, are already in a C57BL/6 background. However, C57BL/6 mice are not ideal for pronuclear microinjection. Many researchers superovulate C57BL/6 mice, but in our hands, their superovulatory response to hormone treatment is very inconsistent. When they do respond, we find that the zygotes collected from superovulated females do not survive the microinjection procedure as well as zygotes harvested from naturally mated females. Therefore, we only use natural matings for collecting C57BL/6 eggs. Normally, we can collect four to eight injectable zygotes from each female. Despite this relatively low efficiency, we still routinely generate transgenic mice using the C57BL/6J inbred strain. Compared with the time-consuming and expensive backcrossing, the extra effort upfront is well worth it.
For outbred and hybrid mouse strains, the optimal age for superovulation is 4–7 weeks. For C57BL/6J females, 3–4 weeks of age is best for superovulation, but we prefer to use older (5–10 weeks) females for natural mating. For stud and vasectomized males, we use 2–12-month-old males.
Animal room environmental effects: The environmental conditions of the animal room can dramatically influence the outcome of transgenic animal production. Most animal facilities have strict rules to regulate the temperature, light/dark cycle, noise level, and humidity to levels that far exceed the conditions for human living (hotels, homes, and working places). However, these strict rules do not automatically eliminate all the adverse conditions that interfere with mouse reproduction. Some mechanical and human errors are inevitable. For examples, someone may forget to turn off the blower or lights of the changing hood during the night, or the automatic light/dark control may be improperly set. Currently, racks with ventilation for each individual cage are increasingly being used. While they are useful for reducing cross-contamination among different animals, they also introduce more variables among different cages. Setting the air exchange rate too high not only increases noise and vibration but also reduces humidity in the cages because of the increased airflow. An inappropriate light/dark cycle, suboptimal humidity, and noise can significantly reduce both the number of zygotes harvested from each plugged female and the percentage of injected embryos that result in live births. Under certain unfavorable environments, even late-gestation embryos may be absorbed in utero. When the efficiency of transgenic mouse production is less than optimal, the housing environment is certainly worth careful checking.
We use a custom-made injection chamber for pronuclear microinjection because, for most microscopes, plastic tissue culture dishes are not optically acceptable for clearly visualizing pronuclei using DIC imaging. Dishes with a glass cover slip bottom (designed for confocal imaging) can be used, but the rim of the dish sometimes restricts the holding pipette and injection needle from accessing the dish at a small angle relative to the microscope stage. It should be mentioned that DIC imaging is possible for plastic dishes on some of the latest generation of inverted microscopes.
Avertin is an old-fashioned but very effective anesthetic. The solution is easy to make and stable when stored in the dark at −20 °C. However, some batches of this chemical may have adverse effect on animals. Therefore, it is important to test each new batch on several control animals to make sure it does not cause any health problems. Since the drug's adverse effects may take several days to show up, the test animals should be kept in the standard environment for 2–3 weeks. Ketamine (Ketaset)-xylazine (Rompun) mixture is a reliable and easy-to-use anesthetic for embryo transfer procedures, but ketamine is a controlled substance, which requires a drug lock box as well as a detailed log sheet for recording the amount used on each day in the United States.
We always use freshly pulled needles to perform microinjection. Old needles tend to collect dust and become sticky.
When using the Eppendorf CellTram Vario for controlling the pressure inside the holding pipette, the entire piston and attached tubing need to be completely filled with mineral oil. Any air bubbles will significantly reduce its controllability. AirTram from Eppendorf is more convenient because it does not need to be filled with oil, but its control is less precise.
When moving the embryos around the microinjection chamber, it is much easier to move the microscope stage, instead of moving the joystick of the holding pipette. When moving the stage, the holding pipette and microinjection needle will remain aligned to each other, and stay at the center of the field of view.
M2 medium can be used outside of CO2 incubators because it contains HEPES buffer. However, the correct pH of M16 medium is dependent on the 5–6 % CO2 in the incubator. Therefore, M16 medium needs to be equilibrated in the CO2 incubator for several hours before using. When setting up drop culture dishes, it is important to cover the M16 drops with mineral oil very quickly because the small drops of medium can lose CO2 and evaporate very quickly, which could lead to improper pH and ionic strength. Also, the mineral oil can hinder gas exchange in the CO2 incubator, and therefore we often equilibrate the M16 drop culture dishes overnight before use.
We prefer to perform oviduct transfer the day after microinjection mainly because of convenience. Culturing embryos overnight is a convenient stop point for a very busy microinjection day. Of course, the microinjected zygotes can be implanted immediately after microinjection. In this case, the pseudopregnant foster mothers need to be prepared 1 day earlier than is described in the protocol. Occasionally, a shortage of pseudo-pregnant foster mothers occurs on the planned embryo transfer date. Under this circumstance, embryos can be further cultured for an additional 1 or 2 days in KSOM medium (KSOM medium is preferable to M16 for culturing embryos beyond the 2-cell stage of development). Embryos ranging from the 1-cell stage to the blastocyst stage can be transferred into the oviducts, but do not attempt to put embryos of any stage into the uteri of 0.5- or 1.5-day pregnant foster mothers, because the uteri are not ready to accept embryos yet.
Acknowledgments
This work was supported by the Intramural Research Program of the National Heart, Lung, and Blood Institute.
References
- 1.Jaenisch R. Germ line integration and Mendelian transmission of the exogenous Moloney leukemia virus. Proc Natl Acad Sci USA. 1976;73:1260–1264. doi: 10.1073/pnas.73.4.1260. [DOI] [PMC free article] [PubMed] [Google Scholar]
- 2.Gordon JW, Scangos GA, Plotkin DJ, Barbosa JA, Ruddle FH. Genetic transformation of mouse embryos by microinjection of purified DNA. Proc Natl Acad Sci USA. 1980;77:7380–7384. doi: 10.1073/pnas.77.12.7380. [DOI] [PMC free article] [PubMed] [Google Scholar]
- 3.Brinster RL, Chen HY, Trumbauer M, Senear AW, Warren R, Palmiter RD. Somatic expression of herpes thymidine kinase in mice following injection of a fusion gene into eggs. Cell. 1981;27:223–231. doi: 10.1016/0092-8674(81)90376-7. [DOI] [PMC free article] [PubMed] [Google Scholar]
- 4.Wagner TE, Hoppe PC, Jollick JD, Scholl DR, Hodinka RL, Gault JB. Microinjection of a rabbit beta-globin gene into zygotes and its subsequent expression in adult mice and their offspring. Proc Natl Acad Sci USA. 1981;78:6376–6380. doi: 10.1073/pnas.78.10.6376. [DOI] [PMC free article] [PubMed] [Google Scholar]
- 5.Costantini F, Lacy E. Introduction of a rabbit beta-globin gene into the mouse germ line. Nature. 1981;294:92–94. doi: 10.1038/294092a0. [DOI] [PubMed] [Google Scholar]
- 6.Harbers K, Jahner D, Jaenisch R. Microinjection of cloned retroviral genomes into mouse zygotes: integration and expression in the animal. Nature. 1981;293:540–542. doi: 10.1038/293540a0. [DOI] [PubMed] [Google Scholar]
- 7.Lin TP. Microinjection of mouse eggs. Science. 1966;151:333–337. doi: 10.1126/science.151.3708.333. [DOI] [PubMed] [Google Scholar]
- 8.Lois C, Hong EJ, Pease S, Brown EJ, Baltimore D. Germline transmission and tissue-specific expression of transgenes delivered by lentiviral vectors. Science. 2002;295:868–872. doi: 10.1126/science.1067081. [DOI] [PubMed] [Google Scholar]
- 9.Lois C. Generation of transgenic animals using lentiviral vectors. In: Pease S, Lois C, editors. Mammalian and avian transgenesis—new approaches. Springer; Heidelberg, Germany: 2006. pp. 1–22. [Google Scholar]
- 10.Taketo M, Schroeder AC, Mobraaten LE, Gunning KB, Hanten G, Fox RR, Roderick TH, Stewart CL, Lilly F, Hansen CT, et al. FVB/N: an inbred mouse strain preferable for transgenic analyses. Proc Natl Acad Sci USA. 1991;88:2065–2069. doi: 10.1073/pnas.88.6.2065. [DOI] [PMC free article] [PubMed] [Google Scholar]


