Abstract
The results of combining breast augmentation and mastopexy are less predictable than those associated with mastopexy or augmentation mammoplasty alone. A method of breast skin envelope reduction is presented that allows the surgeon performing mastopexy to preview the final breast shape before committing to skin resection. This method, first described in 1978, has proven to be technically versatile and reproducible, and applicable not only to moderate (second degree) and severe (third degree) ptosis but also to simultaneous breast augmentation and mastopexy. For the combined procedures, the practical strategy proposed is first the implant placement through a periareolar incision, and a vertical transglandular incision, usually submusculofascial; second, restoring the gland anatomy by closing the muscularis and the vertical transglandular incision; third, skin envelope adjustment using the Tailor-Tack maneuver to accurately assure the best position of the nipple-areolar complex on the breast mound; fourth, skin incision, de-epithelialization and undermining; and finally, closure combining the the Purse-String maneuver with the vertical incision.
Keywords: Avoiding misalignment, Practical strategy, Purse-String closure, Tailor-Tack maneuver
Abstract
Les résultats d’une augmentation mammaire combinée à une mastopexie sont moins prévisibles que ceux associés à une mastopexie ou à une augmentation mammaire seules. Une méthode de réduction de l’enveloppe cutanée mammaire est présentée, laquelle permet au chirurgien effectuant la mastopexie de prévisualiser la forme finale du sein avant de procéder à la résection cutanée. Il est démontré que cette méthode, décrite pour la première fois en 1978, est techniquement polyvalente et reproductible, et qu’elle s’applique non seulement aux ptoses moyenne (deuxième degré) et grave (troisième degré), mais également à l’augmentation mammaire associée à la mastopexie. Dans le cadre des interventions combinées, la stratégie proposée consiste, premièrement, à placer l’implant par incision périaréolaire et incision transglandulaire verticale, généralement submusculofasciale. Deuxièmement, il faut restaurer l’anatomie glandulaire en fermant la musculeuse et l’incision transglandulaire verticale. Troisièmement, il faut rajuster l’enveloppe cutanée au moyen de points tailleur afin de garantir la meilleure position possible du complexe mamelon-aréole sur le monticule mammaire. Quatrièmement, il faut procéder à l’incision cutanée, à la désépithélisation et au décollement. Enfin, il faut effectuée la manœuvre de Purs-String combinée à l’incision verticale.
MASTOPEXY ALONE – USING THE TAILOR-TACK MANEUVER
When starting practice in 1972, I became frustrated with the existing mastopexy techniques, which required patterns or complex preoperative designs, and my Tailor-Tack previewing method of breast skin envelope reduction evolved (1). This proved to be a logical method for accurately planning the skin envelope resection in patients with second and third degree mammary ptosis (Figure 1, left). The preoperative markings are verified intraoperatively by tacking the closure with temporary sutures and then excising the skin accordingly. The surgeon thus has the opportunity to preview the finished product before the cutting surgery begins. This method helps eliminate errors in the nipple/areolar placement and is particularly helpful to the surgeon whose experience in mastopexy is limited.
Figure 1).

The initial results of Tailor-Tack mastopexy (alone) are dramatic and are best sustained with the smaller volume mastopexy, as shown preoperatively (above left) and fifteen months postoperatively (above right).
Preoperative markings
The patient is initially marked in the upright position, defining the midline, the inframammary fold, and the meridian of each breast from the mid-clavicle down to the nipple and across the inframammary crease (Figure 2). The ideal position for the nipple is marked on both breasts at a point immediately cephalad to the projection of the inframammary fold onto the anterior surface of the breast, and a measured distance from the suprasternal notch on either side, (this rarely being less than 21 cm). The new nipple site forms the apex of the triangle that extends downward for 7 or 8 cm on either side of the areola, usually with a base breadth of 7 cm or less (Figure 2, inset). The medial and axillary extensions are marked from the lateral and medial base of this triangle, joining the inframammary fold to outline the smallest possible extensions to be excised (Figure 3).
Figure 2).
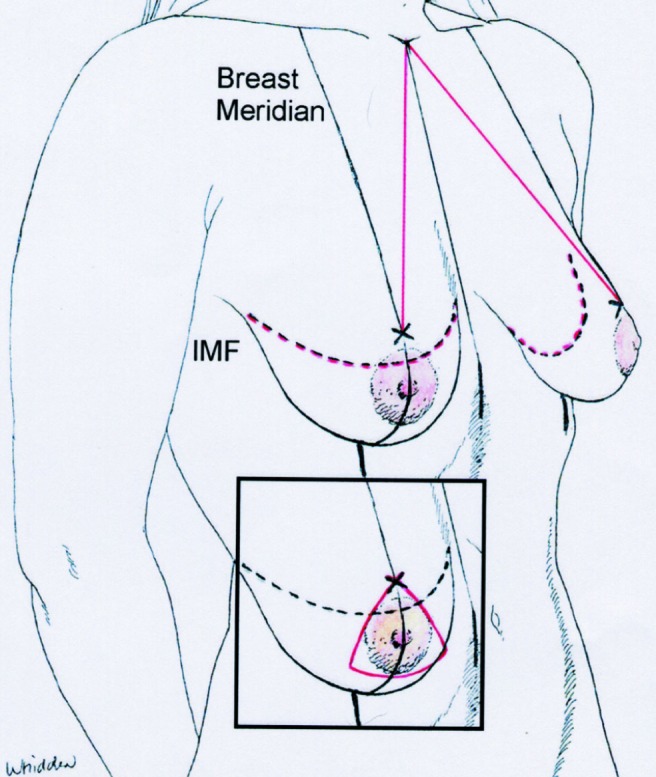
With the patient upright, the ventral midline, the inframammary fold, and the meridian of each breast is marked, and the ideal position for the nipple is marked (x). The new nipple site forms the apex of the estimated excisional triangle (inset).
Figure 3).
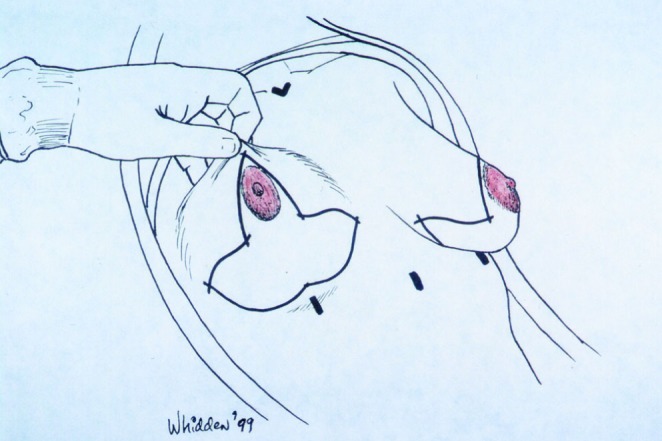
The medial and lateral extensions join the inframammary fold lines with this resulting pattern, with the patient reclining at 45 degrees
Intraoperative markings (the Tailor-Tack maneuver)
The patient is then anaesthetized on the operating table. In the semi-sitting position, the extra skin is invaginated vertically and horizontally, and fixed with an anchor suture (Figure 4). Then the skin is invaginated vertically, from a point immediately above the nipple to the inframammary fold, holding it with a series of ‘tacking’ skin stitches, drawing the lax skin toward the breast meridian.
Figure 4).
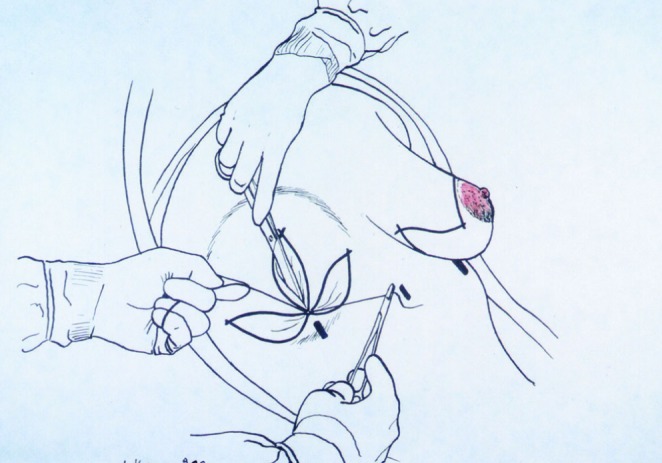
In the semi-sitting position, the skin is first invaginated vertically from a point immediately above the nipple to the inframammary fold, holding it with a series of ‘tacking’ skin stitches, drawing the lax skin toward the midline
Next, the skin is invaginated horizontally (Figure 5), holding it with ‘tacking’ sutures in a position so that the breast achieves a pleasing shape while using the shortest possible medial and axillary extensions. The identical procedure is carried out bilaterally.
Figure 5).
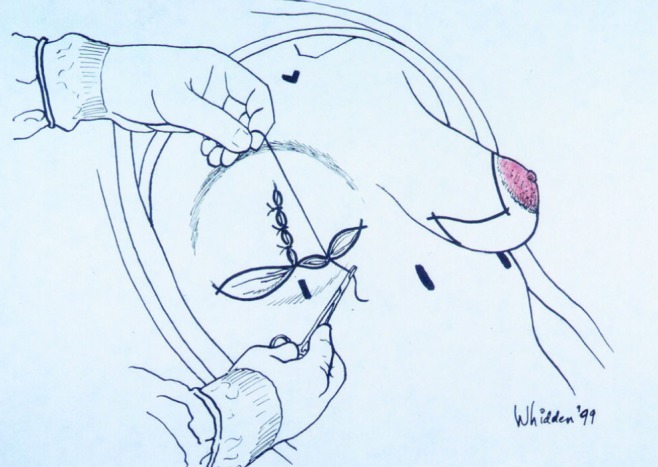
Next, the skin is invaginated horizontally from the midpoint to the inframammary fold lines, medially and laterally. ‘Tacking’ stitches hold the breast in the position that achieves the desired shape, using the shortest possible medial and axillary extensions
Symmetry of the new nipple site is confirmed using a suture strung from the sternal notch to the breast meridian on either side, and this distance is recorded (varying from 19 to 24 cm, averaging 22 cm) (Figure 6).
Figure 6).
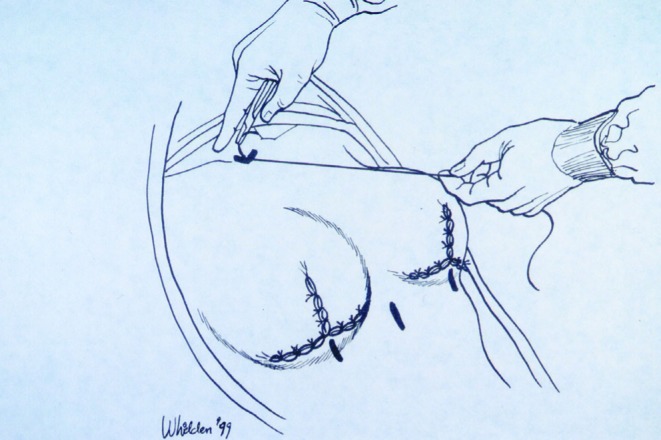
Symmetry of the new nipple site is confirmed, using a suture strung from the sternal notch to the breast meridian on either side and this distance is recorded (varying from 19 to 24 cm, averaging 22 cm)
The new areolar margin is marked (Figure 7A) with a methylene blue-rimmed medicine glass (or with an areolar marker), then the edges of the four quadrants are tattooed into the skin with a methylene blue-tipped needle.
Figure 7A).
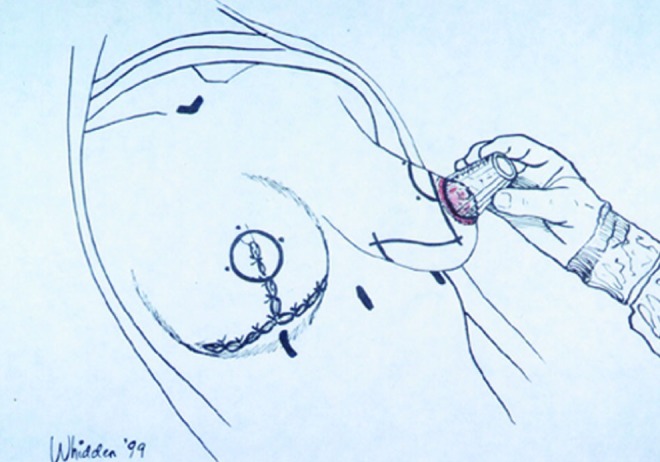
The new areolar margin is marked, then the edges of the four quadrants are tattooed into the skin with a methylene blue-tipped needle. The ‘tacking’ sutures are adjusted by adding new ones or releasing them until the desired shape is achieved; then the stitch marks are joined by methylene blue lines, after which the ‘tacking’ sutures are removed
The tacking sutures are adjusted by adding new ones or releasing them until the desired shape and symmetry are achieved. With this accomplished, the stitch marks are joined by methylene blue lines, after which the ‘tacking’ sutures are removed. The medicine glass is rimmed with methylene blue and applied centrally over the slightly tensed existing areola, and again the four quadrants are tattooed along this marked ring (Figure 7B).
Figure 7B).
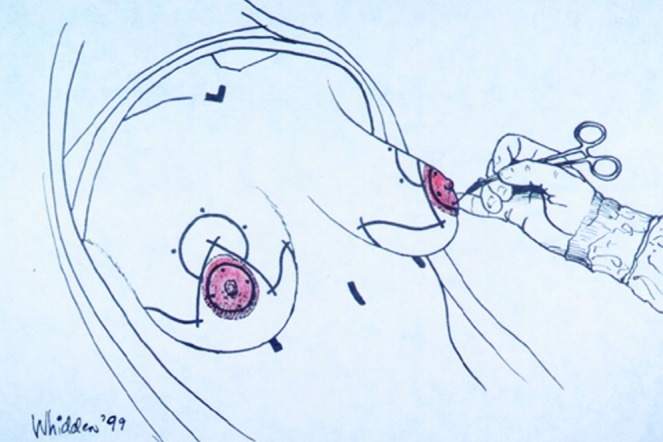
The medicine glass is again rimmed with methylene blue and applied centrally over the slightly tensed existing areola, and the four quadrants of the areola are tattooed along this marked ring. This maneuver produces a Wise pattern, tailored specifically to this breast. De-epithelialization is completed with little or no undermining necessary
Surgical technique
This maneuver produces a Wise pattern, tailored specifically to each breast, which is then de-epithelialized with little or no undermining necessary. Cutting through the deep dermis inferiorly (Figure 8) will release the areola to allow cephalad movement without tension. The gland is released from the deep fascia, from the inframammary fold, cephalad to the level of the third rib in the midline. The lower pole is infolded vertically, and then rotated superiorly under the breast mound (Figure 9A) to achieve projection and upper pole fullness. Periareolar closure is achieved with a purse-string suture of 3-0 Gore-Tex placed within the rim of the de-epithelialized periphery, which is drawn into an areolar window of 4 to 4.5 cm in diameter (Figure 9B).
Figure 8).
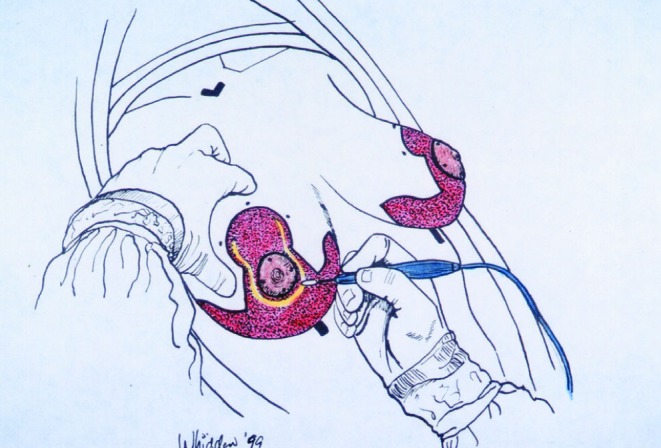
Cutting through the deep dermis inferiorly will release the areola to allow caphalad movement without tension
Figure 9).
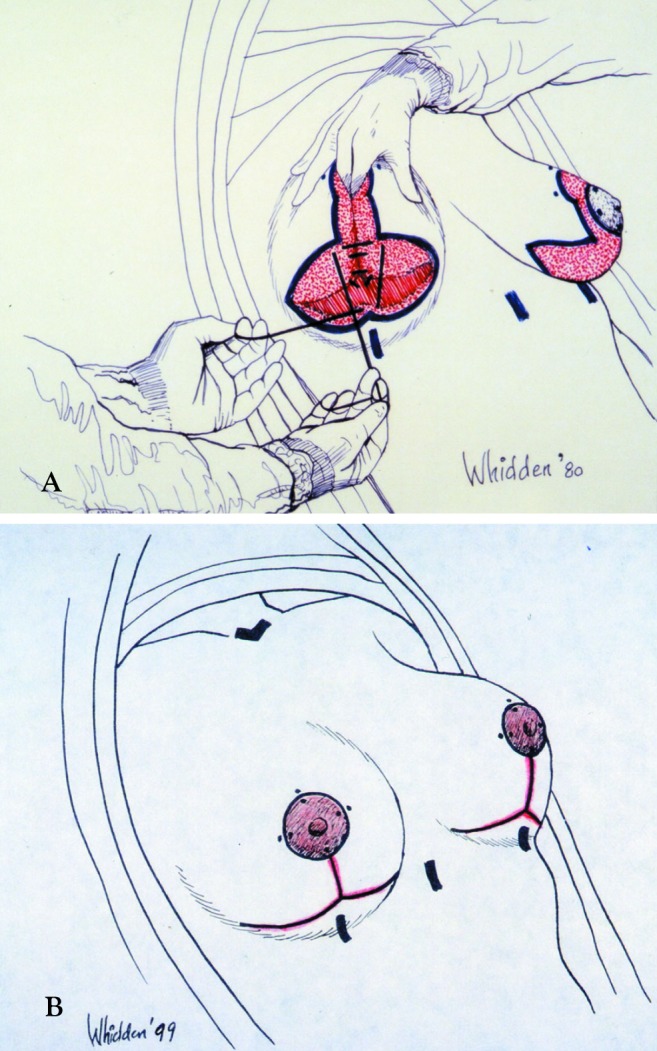
(A) The gland is released from the deep fascia just above the inframammary fold. Release continues cephalad to the level of the third rib in the mid-mammary line. The lower pole is infolded vertically, then rotated superiorly under the breast mound to achieve projection (B) and upper pole fullness
Results
The initial results are dramatic and are best sustained with the smaller volume mastopexy (Figure 1, left and right). The technique is particularly useful in the aesthetic management of the breast following implant removal or with third degree mammary ptosis (eg, after massive weight loss).
SIMULTANEOUS BREAST AUGMENTATION AND MASTOPEXY
Many of the patients that I see in my practice today requesting ‘breast lift’ come with breast augmentation as their primary objective. Often these patients will receive the ‘lift’ they desire from breast augmentation alone. The remainder will require breast augmentation in conjunction with periareolar ‘purse-string’ mastopexy (2–4), vertical closure mastopexy (5,6), or with inverted T-closure mastopexy (1,7).
If there is any doubt about the advisability of breast augmentation and/or one of the mastopexy procedures, I recommend the staging of these procedures depending upon the primary goal of the patient. For patients where the mastopexy is the major concern, and there is some doubt about the implant placement, the mastopexy is performed first and the implant placed later. For patients in whom the implant is the primary goal, and there is doubt about the necessity for a mastopexy, I place the implant first and perform the mastopexy later.
Breast augmentation alone: No mastopexy is required for the majority of patients seeking breast augmentation, when the nipple is above the inframammary fold preoperatively and there is minimal glandular ptosis (less than 2 cm of breast overhanging the inframammary fold). Placement of the implant alone in these patients will keep the nipple in the center of the breast mound and adequately fill out the breast skin envelope (Figure 10).
Breast augmentation with periareolar ‘purse-string’ mastopexy: A periareolar mastopexy is indicated if the nipple sits on the anterior surface of the breast but lies at the level of the inframammary fold or just below it (Figure 11), and/or if reduction of the areolar size is desirable. A simultaneous breast augmentation with periareolar mastopexy should be considered for a patient with mild second-degree ptosis (no more than 4 cm of glandular ptosis), to tighten the breast skin envelope.
Breast augmentation with skin and gland tailoring mastoplexy, using the Tailor-Tack maneuver: The more aggressive mastopexy (vertical incision, or inverted T incision mastopexy) is indicated with third degree ptosis and here the preoperative markings can be modified intraoperatively using the Tailor-Tack maneuver after the implant has been placed and the muscle and gland have been closed (Figure 12).
Figure 10).

When the nipple is above the inframammary fold, and there is minimal glandular ptosis (above left), implant placement alone (above right) will keep the nipple in the center of the breast mound and adequately fill out the breast skin envelope
Figure 11).

Preoperative appearance (left) of this 35-year-old gravida III woman, showing third degree ptosis with severe glandular ptosis (more than 4 cm), and the postoperative appearance (right) sixteen months after simultaneous breast augmentation and periareolar mastopexy
Figure 12).

Preoperative appearance (left) of this 36-year-old woman, and her appearance (right) following implant removal and vertical incision mastopexy.
Surgical technique
Breast augmentation with periareolar ‘purse-string’ mastopexy:
Preoperative planning begins (Figure 2), as always, by defining the ventral midline, the breast meridian, the inframammary fold and the new nipple site (see preoperative markings section). The planned skin excision is in the shape of an oval (Figure 13), with the long axis in the vertical dimension, extending above, from a point 2 cm cephalad to the new nipple site, to a point below, skirting the inferior areolar margin at a point less than 6 cm from the inframammary fold, and just skirting the existing areolar margin medially and laterally, the dimensions of the oval rarely exceeding 6×9 cm.
Figure 13).
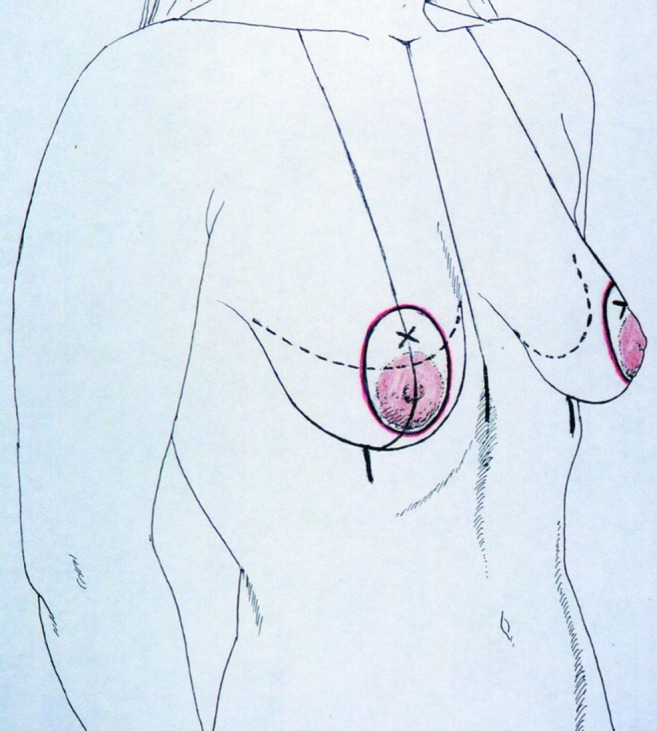
The planned skin excision is oval-shaped, with the long axis in the vertical dimension, extending above, from a point 2 cm cephalad to the new nipple site, to a point below, skirting the inferior areolar margin at a point less than 6 cm from the inframammary fold
The desired areolar diameter is marked with tension (usually at 4 cm) and the breast is augmented through an incision along the margin of the original areola. A vertical transglandular incision is carried down to the muscularis. These fibers are split in their direction and a submusculofascial pocket is dissected. The implant is placed and the muscularis is closed, as is the vertical transglandular incision, restoring the anatomy. Only then is de-epithelialization of the skin around the areola and undermining carried out. The use of a permanent blocking suture as a cerclage around the areola (1) has enabled periareolar mastopexy to be performed with a greater area of skin excision than what was previously considered safe.
Breast augmentation with skin tailoring mastopexy:
With the more aggressive mastopexy, the preoperative planning proceeds as always (Figure 2) (See preoperative markings section). The skin incision is made through the areolar margin, and the transglandular incision and submusculofascial space allow the implant placement. The intraoperative Tailor-Tack markings are made. In the semi-sitting position, the skin is invaginated vertically and the tacking sutures applied (see intraoperative markings section). At this point, the application of the Tailor-Tack maneuver is fundamental to insuring symmetry.
The areolar window is then marked (Figure 14, left), and the tacking sutures are released and the existing areola is marked (Figure 14, right). De-epithelialization within the confirmed pattern is now completed (Figure 15, right). Limited skin undermining is often helpful, and occasionally glandular remodeling will be performed in the lower pole by plicating along a vertical seam to increase the breast cone. The procedure is concluded by first closing the vertical incision (Figure 15, left) and finally closing the areolar window with a purse-string suture in-setting the areola. A conservative ‘dog-ear’excision transversely just above the IMF is frequently necessary, and a transverse limb excision may be indicated with larger skin redundancies.
Figure 14).
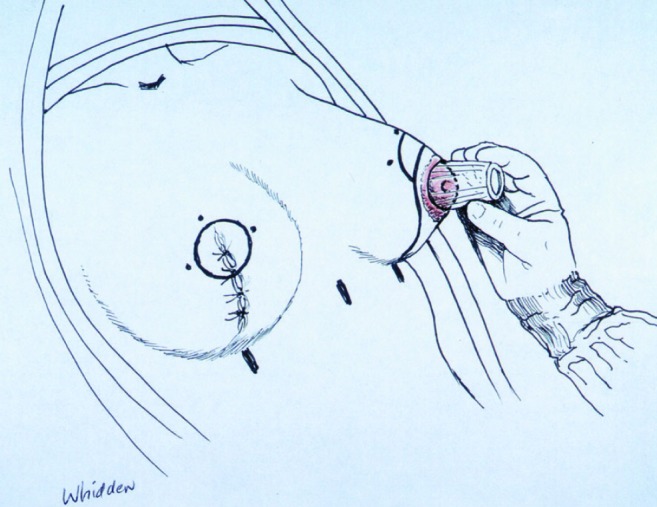
The areolar window is then marked (above left), and the ‘tacking’ sutures released and the existing areola is marked (above right)
Figure 15).
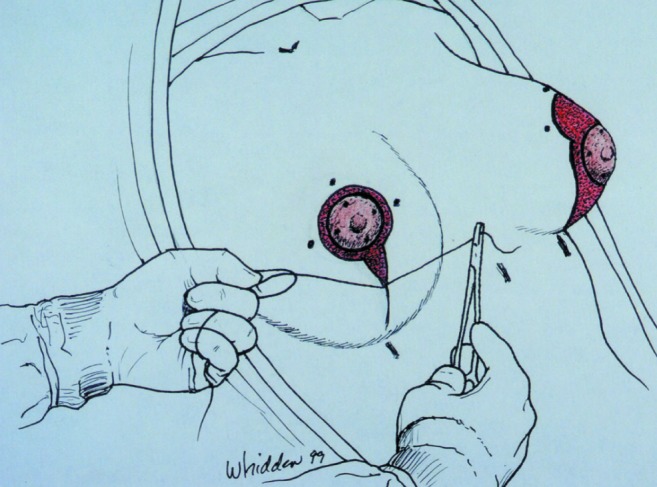
After tattooing the quadrants of the areolar window and the existing areola, de-epithelialization within the confirmed pattern (above right) is completed. The vertical incision is closed with interrupted subcuticular sutures (above left), and lastly, the areolar window is drawn into a diameter of 4 cm with a purse-string suture, insetting the areola.
DISCUSSION
Regardless of which technique is used to perform the mastopexy, it is important to constantly reassess the relationship between the implant and the nipple, and the nipple to the breast, to reduce the likelihood of misalignment. For this reason, the implant is placed first and the breast anatomy restored, and then the patient is placed in the upright position to reassess the relationship between the breast, the nipple and the implant, before skin envelope excision and mastopexy closure are completed.
The results of combining breast augmentation and mastopexy are less predictable than those associated with mastopexy or augmentation alone. With these combined procedures, disappointment with respect to the final nipple position, scar position, implant position or breast shape may occur. Patients are warned beforehand of the possibility of a secondary procedure becoming necessary as healing progresses.
After more than 500 simultaneous breast augmentations with mastopexy, I consistently use the Tailor-Tack maneuver as it is the best method of preventing misalignment and of achieving symmetry.
REFERENCES
- 1.Whidden PG. The Tailor-Tack mastopexy. Plast Reconstr Surg. 1978;62:347. doi: 10.1097/00006534-197809000-00002. [DOI] [PubMed] [Google Scholar]
- 2.Benelli LC. A new periareolar mammoplasty: The “Round Block” Technique. Aesthetic Plast Surg. 1990;14:93. doi: 10.1007/BF01578332. [DOI] [PubMed] [Google Scholar]
- 3.Peled IJ, Zagher U, Wexler MR. Purse-String Suture for Reduction and Closure of skin defects. An Plast Surg. 1985;14:465. doi: 10.1097/00000637-198505000-00012. [DOI] [PubMed] [Google Scholar]
- 4.Spear SL, Beckenstein M. Periareolar Approach to Augmentation mastopexy. In: Spear SL, editor. Surgery of the Breast: Principles and Art. Philadelphia: Lippincott-Raven; 1998. [Google Scholar]
- 5.Marchac D, Olarte G. Reduction mammoplasty and correction of ptosis with a short inframammary scar. Plast Reconstr Surg. 1982;69:45. [PubMed] [Google Scholar]
- 6.Hammond DC. Short scar periareolar inferior pedicle reduction (SPAIR) Mammoplasty. Plast Reconstr Surg. 1999;103:890. doi: 10.1007/3-540-27218-6_6. [DOI] [PubMed] [Google Scholar]
- 7.Regnault P. Breast ptosis: Definition and Treatment. Clin Plast Surg. 1976;3:193. [PubMed] [Google Scholar]


