Abstract
The present work presents an improved method to align the measurement scale mark in an immersion hydrometer calibration system of CENAM, the National Metrology Institute (NMI) of Mexico, The proposed method uses a vision system to align the scale mark of the hydrometer to the surface of the liquid where it is immersed by implementing image processing algorithms. This approach reduces the variability in the apparent mass determination during the hydrostatic weighing in the calibration process, therefore decreasing the relative uncertainty of calibration.
Keywords: hydrometer calibration, image processing, Cuckow's method
1. Introduction
Hydrometers are widely used instruments in industry to measure the density of liquids. Depending on the application, the hydrometer may change its name, i.e., alcoholmeter to measure the percent of alcohol in breweries [1–3]; Brix hydrometer [4], to measure the percent of sugar in sugar cane solutions; lactometers, to determine the fat content from milk density [5] and API hydrometers or thermo-hygrometers [6], but in the end, no matter in which units the hydrometer is graduated, it measures the density of a liquid [7]. These instruments are generally manufactured in glass, having two main parts: the body, sometimes with a bulb and a hydrometer stem. The body has a cylindrical shape with a load in the bottom; the hydrometer stem is a thin hollow tube attached to the upper portion of the body. A paper with a graduated scale is fixed inside the hydrometer stem. The hydrometer floats vertically on the liquid where it is immersed by means of the Archimedes' principle; the density of the liquid is the reading of the scale mark at the surface level of the liquid.
Cuckow's method is used for the calibration of hydrometers [8]. It consists in obtaining the mass of the hydrometer both in air and when it is submerged to a desired point of its scale mark, in a liquid of known density (hydrostatic weighing).
One of the difficulties in calibration by Cuckow's method, when the hydrometer is immersed in the liquid of known density, is how to align the desired scale mark of the hydrometer with the liquid surface because of the meniscus formed around the hydrometer stem caused by the surface tension of the liquid. This alignment depends on the skill of the metrologist, giving rise to human errors that have a direct impact in the best estimate and in the uncertainty of the calibration result. Previous work has been done in order to minimize this source of error by means of semi-automated [9] or automated [10,11] systems based on image processing acquisition.
A methodology based on a vision system and image processing algorithm developed at CENAM is proposed to improve both the alignment of the desired scale mark at the same level of the surface liquid, and the resolution of the hydrometer during its calibration. Experimental results show the improvement to the calibration of hydrometers with the vision system alignment method vs. the traditional alignment method, i.e., with the naked eye or with a magnifying glass. Also, key and supplementary international comparisons have been carried out to validate the methodology proposed in this work.
2. Hydrometer Calibration System
The system that has been developed in CENAM for hydrometers calibration, includes a thermostatic bath with an external temperature controller, a glass vessel to contain the reference liquid, a platinum resistance thermometer to measure the temperature of the liquid, an hygro-thermometer, a barometer to obtain the density of air, and a set of mass standards and a weighing instrument (balance) capable to perform hydrostatic weightings, as can be seen on Figure 1.
Figure 1.
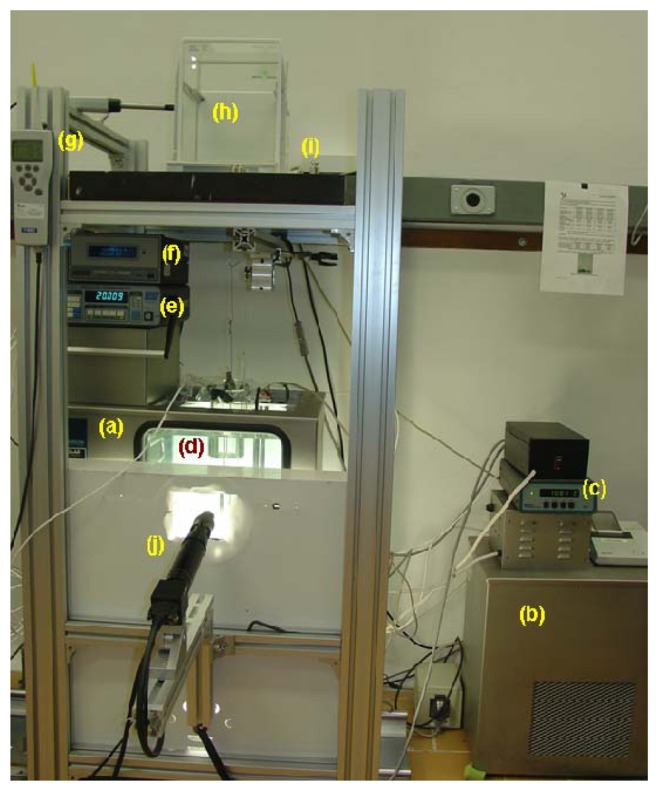
Hydrometer Calibration System: (a) thermostatic bath; (b) external cooler; (c) external temperature controller; (d) glass vessel containing the reference liquid; (e) thermometer for measuring the liquid temperature; (f) barometer; (g) thermo-hygrometer; (h) weighing instrument (balance); (i) mass standards.
Usually, hydrometers are calibrated at three or four graduation marks of the scale and for each of them the correction Cρn can be calculated as Cρn = ρx − ρn, where ρx is the density of the liquid in which the hydrometer would freely float at the scale mark ρn [12]. Hence, the measurand in hydrometers calibration is the correction Cρn [13].
The mathematical model employed in hydrometer calibration (Cuckow's Method) to obtain ρx is:
| (1) |
with:
| (2) |
| (3) |
| (4) |
where:
| ρx | density of the hydrometer at selected scale mark x. |
| ρL | density of reference liquid. |
| ρa1 | density of air during mass determination of hydrometer in air (ma). |
| ma | mass of the hydrometer in air. |
| mL | apparent mass of hydrometer immersed in the liquid up to scale mark x. |
| g | acceleration due to local gravity. |
| π | Pi value = 3.14159265. |
| D | diameter of the hydrometer stem at the selected scale mark x. |
| γx | surface tension coefficient of the liquid where hydrometer is used. |
| γL | surface tension coefficient of reference liquid. |
| α | thermal expansion coefficient of hydrometer (usually glass). |
| tL | temperature of reference liquid. |
| t0 | nominal temperature value of hydrometer's scale. |
| εd | error due to hydrometer's resolution. |
| mp1 | mass standard used during mass determination of hydrometer in air. |
| mp2 | mass standard used during apparent mass determination of hydrometer immersed in liquid. |
| ρp1 | density of mass standard used during mass determination of hydrometer in air. |
| ρp2 | density of mass standard used during apparent mass determination of hydrometer immersed in liquid. |
| ρa2 | density of air during apparent mass determination of hydrometer in liquid (mL). |
| Δm1 | mass difference during weighings in air. |
| Δm2 | mass difference during weighings in liquid. |
| Cg | gravity correction due to difference in centre of mass. |
| εd(bal) | error due to resolution of the balance. |
| ∂g/∂h | vertical gravity gradient. |
To obtain the mass both in air and in liquid of the hydrometer, the simple substitution method is used; the mass ma for weightings in air, and apparent mass mL, when the hydrometer is immersed in the liquid, are compared against mass standards using the balance as a comparator. The alignment of the desired point of scale mark at the horizontal level of the reference liquid is a difficult task, because the meniscus formed around the hydrometer stem due to the surface tension of the liquid hides the scale mark. The operator performs manually this alignment using a magnifying lens and reading the scale mark below the surface of the liquid, introducing human errors depending on the operator's skill, sight and experience. The contribution to the uncertainty due to repeatability in the apparent mass determination in the liquid Δm2 is highly significant.
2.1. The Vision System
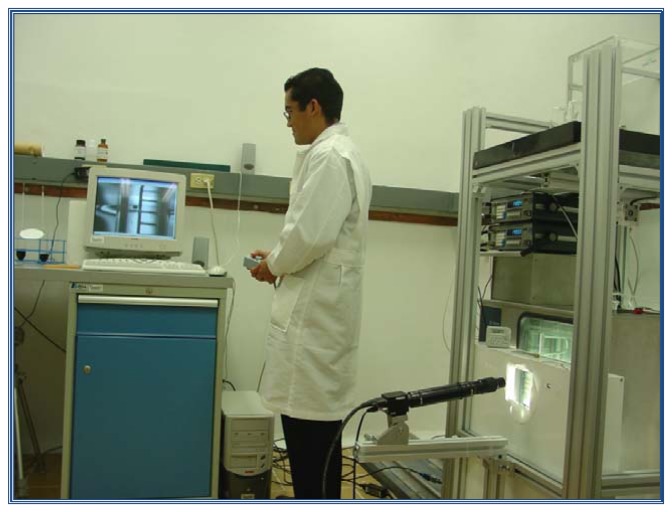
In order to reduce this human error, the vision system which is shown in Figure 2 was adapted to the actual hydrostatic weighing system consisting of a high resolution (1,300 H × 1,030 V pixels) PULNIX TM-1320-15CL monochromatic CCD camera (Pulnix Imaging Products, Sunnyvale, CA, USA), a lens array, an 8-bits NI-PCI-1428 frame grabber camera link (National Instruments, Austin, TX, USA) and a light source. Also, a glass sinker controlled by a stepper motor was installed to adjust the level of the reference liquid. The level of the liquid will rise (or fall) when the sinker is immersed (or emerged) in the liquid. The motorized-sinker is used for the finest adjustment of the scale mark to the surface of the liquid.
Figure 2.
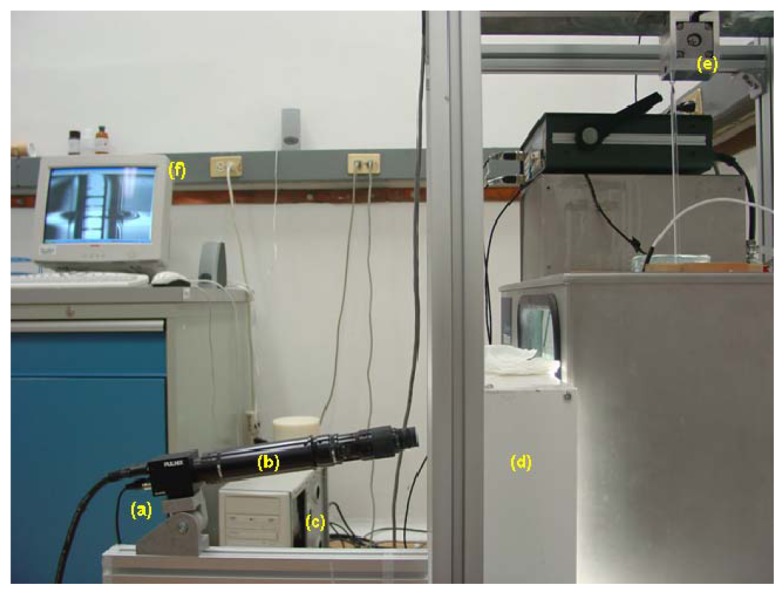
Vision system adapted to the hydrometers calibration: (a) camera; (b) lens array; (c) frame grabber installed in the PC; (d) light source; (e) motorized-sinker; (f) image displayed in the monitor of the scale marks of the hydrometer immersed in liquid.
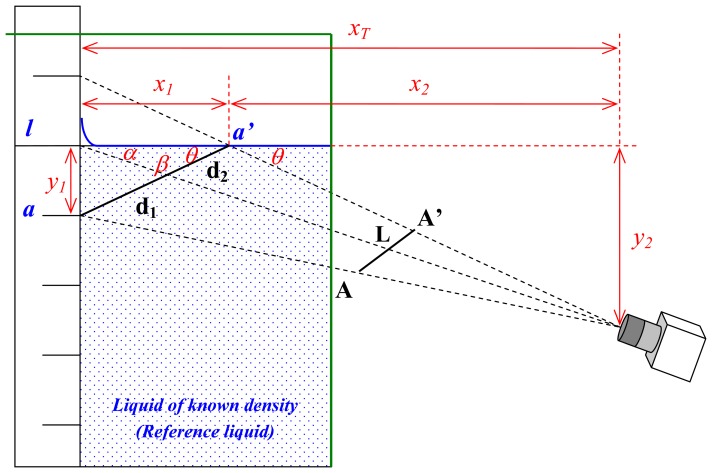
By using the vision system, it is possible to acquire images of the scale mark of the hydrometer at the level of the liquid; the frame grabber converts the images from an analog signal to digital format for future image processing. The camera is located at an angle θ below the horizontal level of the liquid, as can be seen on the scheme presented on Figure 3, so the target mark L can be seen. The mark of the scale below the target mark A is reflected on the surface of the liquid, so there is a virtual image of marks A and A'. The alignment of L at the surface level is accomplished when the distance in pixels between A and L and that between L and A' is the same at the image plane. However, due to the position of the camera, corrections of these two distances should be made [9]. The marks L, A and A' on the hydrometer scale will be presented later, in the alignment using image processing section.
Figure 3.
Scheme based on the pin-hole camera model approach to obtain the relation between d1 and d2 (K value).
In order to obtain the relation K between the distances from A to L (d1) and form L to A' (d2) a pin-hole camera model approach has been employed as shown in Figure 3. The relation between d1 and d2 is as follows:
| (5) |
K is obtained by means of the following equation:
| (6) |
with:
| (7) |
| (8) |
| (9) |
| (10) |
The known values that can be measured are the horizontal distance from the hydrometer stem to the camera (xT), the vertical distance (y1) between two consecutive marks of the hydrometer (usually the mark to be aligned and the mark below immersed in the liquid), and the vertical distance from the liquid surface to the camera (y2).
2.2. Image Processing Algorithm
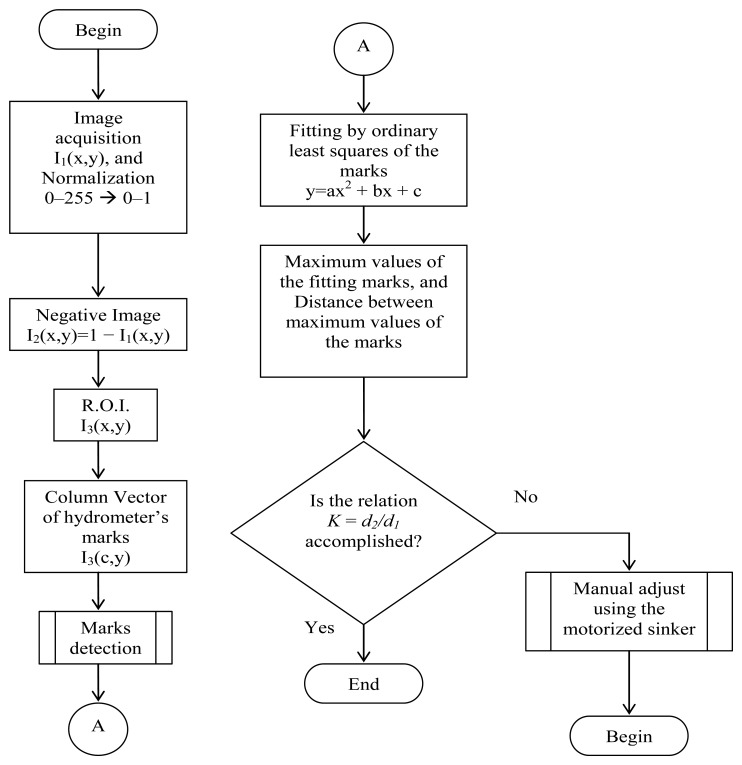
The step by step procedure of the image processing algorithm developed to perform the alignment of the hydrometer's calibration scale mark at the surface level of the reference liquid is shown in Figure 4.
Figure 4.
Image processing algorithm flowchart.
Once the image I1(x,y) is obtained, a pre-processing procedure is performed by normalizing the gray levels from integer values of 0–255 to double floating point values in the range of 0–1, and inverting the normalized image (negative image) by applying the following equation:
| (11) |
From I2(x,y) the region of interest (ROI), which includes the calibration mark, the mark below the reference mark and its reflection on the surface of the liquid, is selected. Afterwards, a procedure to detect the three marks is applied to a column vector of the ROI, which includes a noise reduction subroutine, where information of pixel position against gray level is relevant. A plot of the data obtained after this procedure shows that each scale mark can be approximate to a second order equation by ordinary least square fitting. The pixel position at maximum gray level for each mark is obtained: p1 for the pixel position of the mark below the calibration mark, p2 for the pixel position of the calibration mark, and p3 for the virtual image (the reflection) of the mark below the reference mark. Then, the distance d1 and d2 are calculated using the values p1, p2 and p3 as follows:
| (12) |
| (13) |
with d1 and d2 the K relation is calculated. If the calculated K value is not equal to the expected K value, the motorized sinker is used to adjust the liquid level so the value of d2 changes until the K value is obtained, due to the fact that d1 remains equal.
3. Experimental Section
The majority of primary metrology laboratories around the world use the Cuckow method to calibrate the immersion hydrometer, due to the fact that its main advantage is the use of only a standard liquid of known density to calibrate the equipment for any measurement interval.
The procedure described in previous section proposed that an alignment mark in the hydrometer scale can be calibrated utilizing digital image processing, which considers that the criterion values Kcalc and Kmeas are equal within a confidence interval.
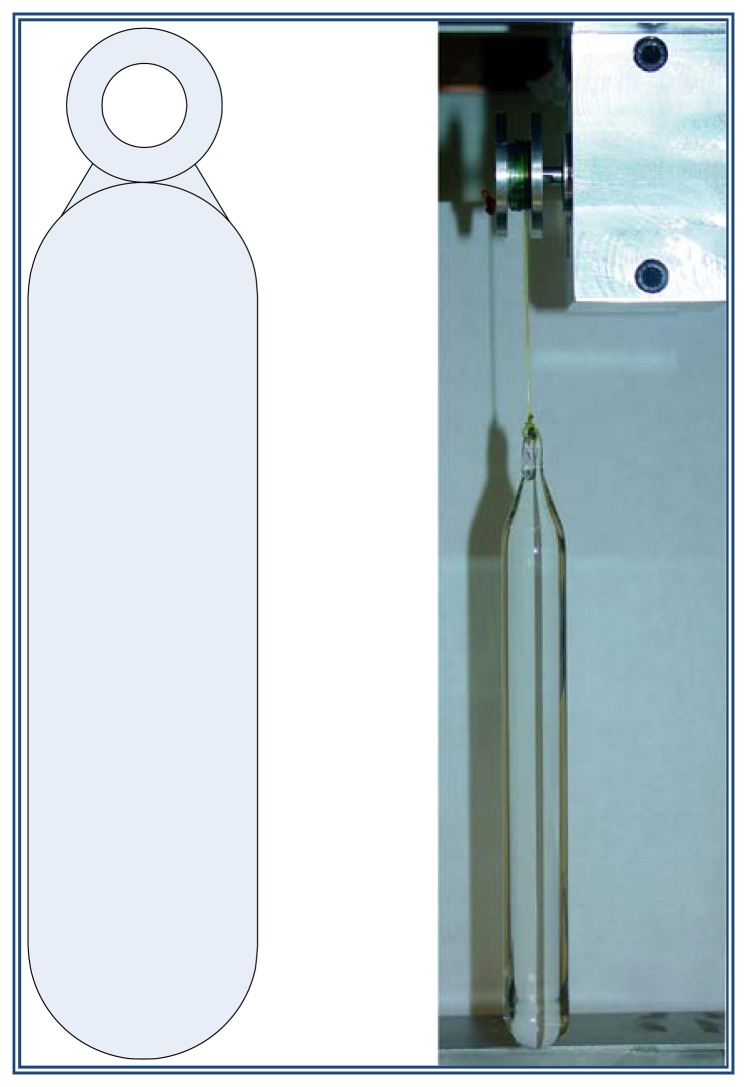
In case that the alignment doesn't occur, it is necessary to immerse or emerge the hydrometer shaft as required in the reference liquid. This occurs by the use of a “sinker” made of a material which does not react chemically with the reference liquid, because if this occurs its density value could change. To avoid the, the material chosen to fabricate the “sinker” was solid borosilicate. The sinker's dimensions are 172.75 mm long and 177.0 mm in diameter. In addition, the sinker has an eyelet so it can be hung. Figure 5 shows a photograph of the sinker.
Figure 5.
Sinker tied to a stepper motor.
3.1. Adjustment in the Liquid Level Using a Motorized Sinker
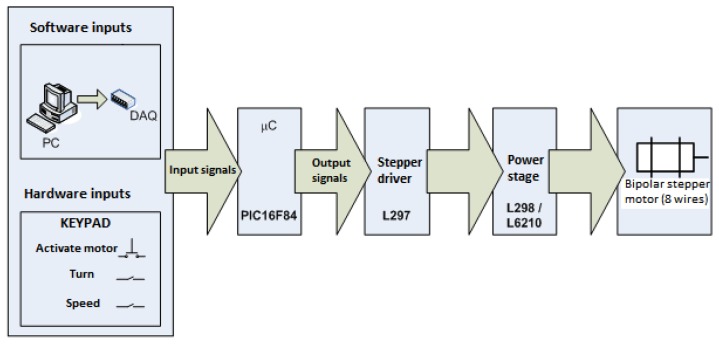
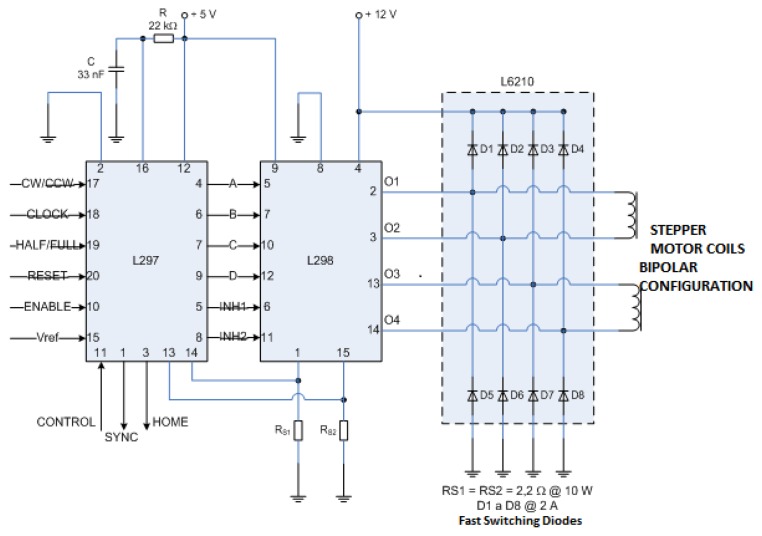
The sinker of Figure 5 is utilized to vary the liquid level by immersion. This solid is held by the grommet with a nylon thread which is wound on the pulley of a stepper motor whose movement is manually controlled using a keypad. To control the stepper motor movement, an open loop controller was implemented in the electronic circuit as shown in the block diagram of Figure 6.
Figure 6.
Open loop controller of the stepper motor.
The stepper motor is a brushless synchronous electric motor with the ability to divide a full rotation into a large number of steps. Each step represents a small discrete angular movement. The advantage of this motor is that it can be used for position control without feedback. For controlling movement of the stepper motor a PIC16F84A microcontroller (Microchip Technology, Inc., Chandler, AZ, USA) was selected. This microcontroller satisfies the needs for this application. The microcontroller has two ports that can be configured as either inputs or outputs. For this application five pins of port A were configured as an input and the eight pins of port B were configured as an output.
Both ports handle incoming and outgoing digital Transistor-Transistor Logic (TTL) signals. To send digital signals from the microcontroller, we designed an electronic circuit, which can receive digital signals produced by a keypad (hardware) or by sending digital signals from an acquisition card data (DAQ) installed in a personal computer (PC).
Signals from the keypad are sent to the port A of the microcontroller, which are processed by the algorithm programmed into its memory and making decisions to enable or disable the output signals through the pins of port B.
The output signals of the microcontroller are sent to an L297 integrated circuit (STMicroelectronics, Geneva, Switzerland) which works as a driver or interpreter between microcontroller and the power to move the stepper motor. The L297 has the ability to “translate” the digital input signals in the correct sequence of pulses required to be sent to the power amplifier (L298 and L6210 integrated circuits, STMicroelectronics) to properly energize the motor windings and get their movement.
The L297 circuit has as an additional function of cutting the dual PWM circuit which serves to regulate the current flowing through the motor windings.
The circuit L297 is connected to a L298 integrated circuit, which internally has a dual H-bridge transistors designed for higher voltage and current values of electrical current through their TTL digital inputs, it can handle inductive loads such as solenoids, relays, DC motors and stepper motors. The emitters of the transistors of the lower H-bridge are connected together and the respective output terminal is used for connecting an external resistor to sense the current flowing through the coil (RS1 and RS2). It uses a separate power supply for making that the circuit logic works at a lower DC voltage. It also has two pins to enable operation of each of the H-bridges. So the motor windings are discharged rapidly during the transition from one sequence to the next to energize, it uses a Schottky fast recovery diode array type capable of maintain peak currents up to 2 A, the diode array is encapsulated in the integrated circuit L6210. Figure 7 shows the connection diagram of integrated circuits L297, L298 and L6210 to the motor windings. The stepper motor used to move the sinker is an Applied Motion brand HT17-075 (Applied Motion Products, Watsonville, CA, USA) model with a resolution of 1.8° per step.
Figure 7.
Connection diagram between the L297, L298 and the stepper motor windings.
To carry out the rise and fall of the shaft of the hydrometer immersed in reference liquid, the borosilicate sinker is also immersed in the liquid. The upper end of the sinker is attached through its eyelet with hemp yarn which is wound on a pulley fixed to the shaft of the stepper motor. The motor, when rotated clockwise (CW), causes the sinker go down and soak in the liquid causing the liquid level rise due to the volume of liquid displaced by the sinker gradual immersion, the resulting effect is also the shaft becomes immersed into the liquid. Conversely, when the motor rotates counterclockwise (CCW), the sinker rises and reference fluid emerges causing the fluid level down and making the hydrometer shaft also remove reference fluid.
3.2. Experimentation
For the hydrometer calibration, once the mass in the air is measured and the points of the scale to be calibrated are selected, the hydrometer is immersed in the reference liquid. Previously, the fluid temperature is set and control referenced to the same temperature specified in the hydrometer scale. For the immersion in the liquid, the hydrometer is held in the highest part of the shaft, which is fixed to a device that serves as a mechanical suspension whose length can be adjusted manually, then, it can be hanged beneath the weighing pan of the balance. During of immersion of the hydrometer in the reference liquid, it should be avoided getting wet the stem above the first calibration point, which is the lowest point in the scale. It must be left two hours for thermal stabilization before starting the measurements.
After the thermal stabilization period, adjustment in the suspension height must be carried out to manually locate by sight the point of the hydrometer scale at the same level of the liquid. From here, a vision system operates, which is adjusted by zooming and focus to see on the images three interest marks labeled as A, L and A'.
Later, a program acquires an image from the vision system, select the region of interest (ROI) covering the three marks of the hydrometer. Then a column vector is selected at the center of the ROI to detect the marks, and a least squares fitting is performed to fit a parabola of the marks; by doing this, the maximum points of the parabolas select the maximum can be used to measure the distances among them, to get the Kmeas value and compare it with the Kcalc value. In case that these values are not equal, the keypad is used to move the sinker immerse in the liquid on the adequate direction to adjust the liquid level, achieving that the d2 distance change in respect to the position of mark A' (reflection of the mark A of the liquid surface).
To demonstrate the difference in the alignment process using the traditional method against the method with the vision system and the impact it has on the calibration uncertainty, a calibration was conducted with two hydrometers with different metrological characteristics, the first one is a high accuracy hydrometer and the second one is a medium accuracy hydrometer. Both hydrometers are commonly used in the industry for determining the density of liquids and are presented in Figure 8.
Figure 8.
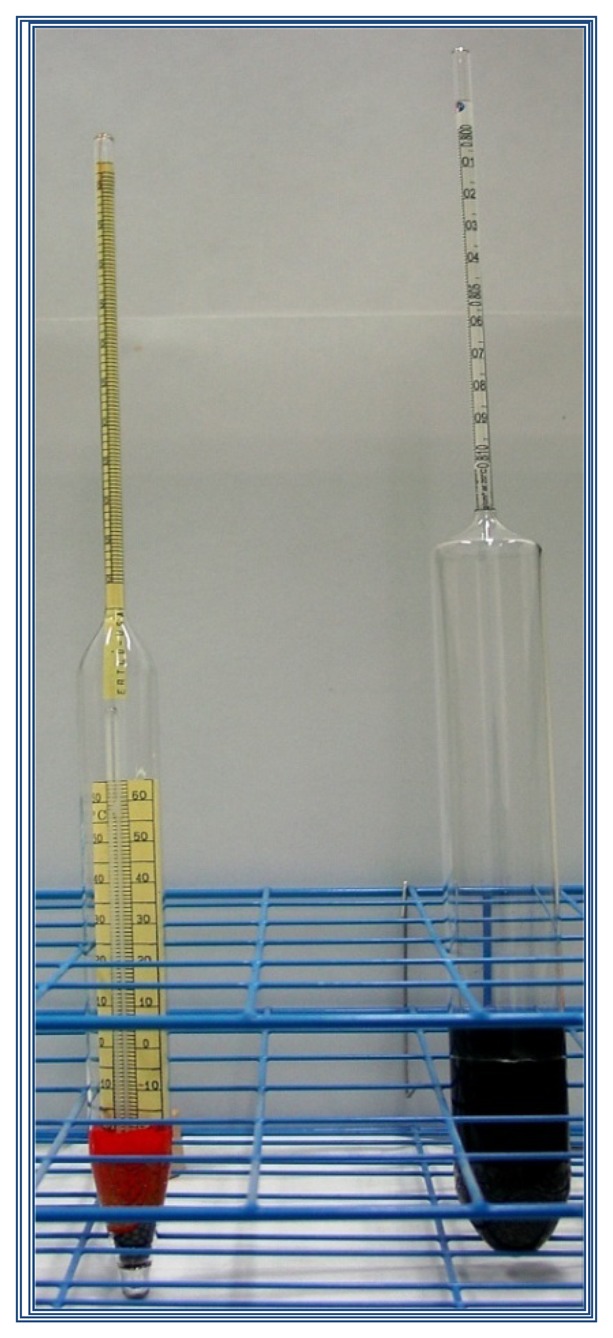
Hydrometers used in the experimentation.
Both hydrometers were calibrated at the midpoint of the scale, using two methodologies: the traditional calibration method (visual alignment), and calibration by the vision system method (semi-automatic alignment) [10,12].
Traditional calibration. The first calibration was done with the old method, i.e., using a magnifying glass and left to the judgment of metrologist to mark the location of the scale to calibrate the reference surface of the liquid. This procedure is carried out as can be observed on Figure 9.
Figure 9.
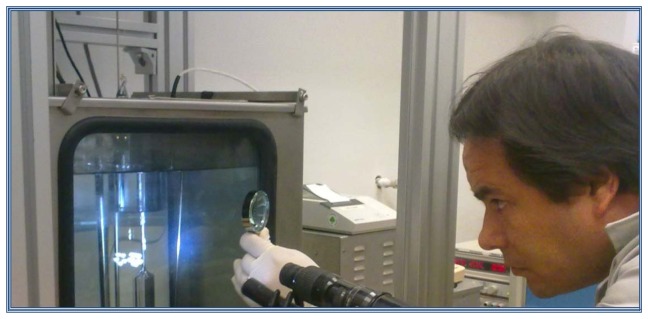
Traditional hydrometer calibration process.
Calibration with the Vision System. The second calibration was performed using the vision system and image processing algorithm explained in previous sections and it can be observed on Figure 10.
Figure 10.
Calibration using the vision system.
During the traditional calibration method, images of the hydrometer immersed in reference liquid were taken with the vision system, and once the metrologist considered it under assessment, the calibration mark was aligned to the level of the liquid surface. These images are analyzed using the same algorithm to determine the distances between the marks of interest and get Kmeas factor value. Tables 1 and 2 show the characteristics of the hydrometers that were calibrated using both methods:
Table 1.
Characteristics of the high accuracy immersion hydrometer.
| Parameter | Value |
|---|---|
| Company: | Steevenson Reevs, LTD. |
| Serial number: | 06/801004 |
| Measurement interval: | 800 kg/m3 a 810 kg/m3 |
| Scale division (d): | 0.1 kg/m3 |
| Calibration point (ρn): | 805 kg/m3 |
| Surface tension of the liquid which is normally used (γx): | 25 mN/m |
| Diameter of the shaft (D): | 4.60 mm |
| Reference temperature (tref): | 20 °C |

| |
Table 2.
Characteristics of the medium accuracy immersion hydrometer.
| Parameter | Value |
|---|---|
| Company: | Ertco–USA |
| Serial number: | 08482 |
| Measurement interval: | 1,000 kg/m3 a 1,050 kg/m3 |
| Scale division (d): | 0.5 kg/m3 |
| Calibration point (ρn): | 1025 kg/m3 |
| Surface tension of the liquid which is normally used (γx): | 72 mN/m |
| Diameter of the shaft (D): | 5.25 mm |
| Reference temperature (tref): | 20 °C |

| |
For both high and medium accuracy hydrometers the calibration using the vision system the Kcalc was determined with the approximation of the system presented in Figure 3, measuring the distances xT, y1 and y2, and using Equations (6, 7, 8, 9, 10). The results are presented in Tables 3 and 4.
Table 3.
Kcalc for the high accuracy hydrometer.
| Parameter | Value |
|---|---|
| Distance between the marks in the hydrometer scale (y1): | 1.2 mm |
| Vertical distance from the liquid's surface to the camera (y2): | 18 mm |
| Horizontal from the hydrometer to the camera (xT): | 315 mm |
| Calculated K value (Kcalc): | 0.94 |
Table 4.
Kcalc for the medium accuracy hydrometer.
| Parameter | Value |
|---|---|
| Distance between the marks in the hydrometer scale (y1): | 1.3 mm |
| Vertical distance from the liquid's surface to the camera (y2): | 37 mm |
| Horizontal from the hydrometer to the camera (xT): | 315 mm |
| Calculated K value (Kcalc): | 0.97 |
The Kcalc values have an associated uncertainty of 0.03 with a coverage factor of k = 2. This value is estimated applying the Guide to the expression of Uncertainty in Measurement (GUM) [14] to the mathematical models of Equations (6–10) in the pinhole model approach.
3.3. Results
In Section 2 was explained that the measurand in hydrometers calibration is the correction in the mark of its scale, Cρn. Cuckow's method requires two measurements of the hydrometer; the first is the mass determination in air ma, and the second is the mass determination in the liquid mL when the hydrometer is immersed in the reference liquid until the calibration point of its scale.
The results of the measurements made to both hydrometers consider the next parameters: determination of the air mass ma, determination of the liquid mass mL, correction of the calibration scale point Cρn, its uncertainty u(Cρn ), and finally the alignment using the proposed image processing algorithm.
The vision system and image processing algorithm developed in this work are used to align the mark on the hydrometer scale at the reference liquid surface during the determination of the mass in the liquid mL.
For calibration of each hydrometer, six AB weighing cycles scheme were performed using the calibrated set of weights and the weighing instrument (balance) as mass comparator to determine the mass in air ma and the mass when the hydrometer is immersed in the liquid reference mL. A represents the mass value of the calibrated weights, and B represents the sample, that is, the hydrometer. The measurements for the determination of the mass in the air for both hydrometers are presented in Table 5.
Table 5.
Mass in air of the calibrated hydrometers. The ma value includes the air pressure corrections and calibration standards. It includes the standard deviation σma of the ma measurements.
| Hydrometer 06/801004 (High Accuracy) | Hydrometer 08482 (Medium Accuracy) | ||||
|---|---|---|---|---|---|
|
|
|
||||
| Mass in the Air | Mass in the Air | ||||
| B Hydrometer | A Standard | B Hydrometer | A Standard | ||
| l1 | 110.6582g | 110.0000g | l1 | 61.8539g | 110.0000g |
| l2 | 110.6569g | 110.0001g | l2 | 61.8547g | 110.0001g |
| l3 | 110.6572g | 110.0003g | l3 | 61.8542g | 110.0003g |
| l4 | 110.6582g | 110.0001g | l4 | 61.8539g | 110.0001g |
| l5 | 110.6569g | 110.0002g | l5 | 61.8547g | 110.0002g |
| l6 | 110.6572g | 110.0001g | l6 | 61.8542g | 110.0001g |
| ma | 110.644400g | 110644.00mg | ma | 61.84661g | 110644.00mg |
| σ ma | 0.00065g | 0.65mg | σ ma | 0.00036g | 0.65mg |
As in the determination of the mass in air, the mass when the hydrometer is immersed in the reference liquid mL is obtained by comparison against standard weights performing six AB weighing cycles. Table 6 presents the measurements performed with the balance to get the mL value and its standard deviation σmL for the high accuracy hydrometer (d = 0.1 kg/m3). On the left side of Table 5, the values obtained with the traditional alignment method are shown, and on the right side, the values obtained with the vision system are shown.
Table 6.
Mass in the liquid of the high accuracy hydrometer. The mL values include the air pressure corrections and the calibrated standards. It includes the standard deviation σmL of the mL measurements.
| Hydrometer 06/801004 (High Accuracy) | Hydrometer 08482 (Medium Accuracy) | ||||
|---|---|---|---|---|---|
|
|
|
||||
| Traditional Method Mass in the Liquid at Point 805 kg/m3 | Method Using the Vision System Mass in the Liquid at Point 805 kg/m3 | ||||
| B Hydrometer | A Standard | B Hydrometer | A Standard | ||
| l1 | 5.0147g | 5.0001g | l1 | 5.0149g | 5.0001g |
| l2 | 5.0138g | 5.0000g | l2 | 5.0148g | 4.9999g |
| l3 | 5.0116g | 5.0001g | l3 | 5.0150g | 5.0000g |
| l4 | 5.0150g | 5.0003g | l4 | 5.0150g | 4.9999g |
| l5 | 5.0126g | 5.0002g | l5 | 5.0149g | 4.9999g |
| l6 | 5.0164g | 5.0003g | l6 | 5.0149g | 5.0000g |
| mL | 5.01324g | 5013.24mg | mL | 5.01434g | 5014.34mg |
| σ mL | 0.00168g | 1.68mg | σ mL | 0.00011g | 0.11mg |
For the hydrometer of medium accuracy (d = 0.5 kg/m3) the measurements and results of mL and σmL using both traditional and vision system alignment methods are shown in Table 7.
Table 7.
Mass in the liquid of the medium accuracy hydrometer. The mL values include the air pressure corrections and the calibrated standards. It includes the standard deviation σmL of the mL measurements.
| Hydrometer 08482 (Medium Accuracy) | Hydrometer 08482 (Medium Accuracy) | ||||
|---|---|---|---|---|---|
|
|
|
||||
| Traditional Method Mass in the Liquid at Point 1,025 kg/m3 | Method Using the Vision System Mass in the Liquid at Point 1,025 kg/m3 | ||||
| B Hydrometer | A Standard | B Hydrometer | A Standard | ||
| l1 | 15.4332g | 15.0001g | l1 | 15.4367g | 15.0003g |
| l2 | 15.4425g | 15.0000g | l2 | 15.4368g | 15.0002g |
| l3 | 15.4317g | 15.0001g | l3 | 15.4367g | 15.0004g |
| l4 | 15.4268g | 15.0001g | l4 | 15.4366g | 15.0003g |
| l5 | 15.4219g | 15.0002g | l5 | 15.4367g | 15.0003g |
| l6 | 15.4440g | 15.0003g | l6 | 15.4368g | 15.0004g |
| mL | 15.43122g | 15431.22mg | mL | 15. 43459g | 15434.59mg |
| σ mL | 0.00868g | 8.68mg | σ mL | 0.00012g | 0.12mg |
From the measurement it can be seen that for the case of the high-accuracy hydrometer, the standard deviation obtained with the traditional alignment method is approximately 15 times the standard deviation obtained with the alignment method of the vision system and image processing algorithm; in the case of the medium accuracy hydrometer is about 71 times greater.
On Table 8 the results of calibration of the high accuracy hydrometer are presented (d = 0.1 kg/m3) at the point ρn = 805 kg/m3, the values were obtained with both the traditional and the vision system alignment methods.
Table 8.
Calibration results of the high accuracy hydrometer.
| Method | Nominal Value ρn | Density ρx | Correction Cρn | Unc. (k=2) U (Cρn) |
|---|---|---|---|---|
| Traditional | 805 | 805.034 kg/m3 | 0.034 kg/m3 | 0.067 kg/m3 |
| Vision System | 805 | 805.041 kg/m3 | 0.041 kg/m3 | 0.034 kg/m3 |
Hydrometer 06/801004.
Table 9 show the results of the calibration with both traditional and vision system alignment methods for the calibration point ρn = 1,025 kg/m3 from the medium accuracy hydrometer (d = 0.5 kg/m3).
Table 9.
Calibration results of the medium accuracy hydrometer.
| Method | Nominal Value ρn | Density ρx | Correction Cρn | Unc. (k=2) U (Cρn) |
|---|---|---|---|---|
| Traditional | 1025 | 1024.947 kg/m3 | −0.053 kg/m3 | 0.339 kg/m3 |
| Vision System | 1025 | 1025.024 kg/m3 | 0.024 kg/m3 | 0.088 kg/m3 |
Hydrometer 08482.
3.3.1. Uncertainty Budget
As was explained in Section 2, the measurand in the calibration of hydrometers is the correction Cρn that must be applied to the selected calibration point ρn of the hydrometer scale. This correction is obtained using Equation (14):
| (14) |
where ρx is the liquid density where the hydrometer freely float immersed at the mark ρn, also, the ρx value is obtained by calibration using the Cuckow's method given by Equation (15):
| (15) |
Applying the GUM method [12] (see Equation (18)), the uncertainty of the correction of the hydrometer immersed at the scale mark ρn is:
| (16) |
Due to the fact that ρn is a constant value (that is a nominal value from the scale point of the hydrometer under calibration, a constant value has no uncertainty) then the correction uncertainty is reduced to:
| (17) |
According to the GUM and applying the uncertainty propagation law to the mathematical model of Equation (15), the correction uncertainty is:
| (18) |
where:
is the sensitivity coefficient of the input quantity xi
u (xi) is the uncertainty of the input quantity xi
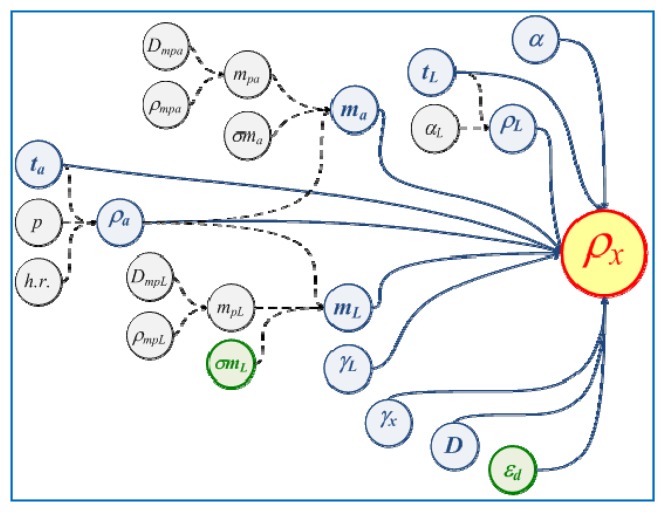
The input quantities xi for ρx are shown in Figure 11.
Figure 11.
Tree diagram of the uncertainty contributions in the calibration of immersion hydrometers by Cuckow's method.
It can be observed from Figure 11 that the input values depend on other secondary variables like the reference liquid density ρL, depends on the thermal expansion coefficient of the liquid αL and of the temperature of the liquid tL. Also in Figure 11, the main variables are distinguished with circles and blue font and the secondary variables in circles and black font. Secondary variables are described as:
| αL: | Thermal expansion coefficient of the reference fluid (pentadecane). |
| mpa: | Mass of the standards used to determine the air mass in the hydrometer, ma. |
| σma: | Standard deviation of the measurements to get the mass in the air. |
| ρmpa: | Density of mass standards used to determine ma |
| Dmpa: | Drift of mass standards used to determine ma |
| mpL: | Mass of the standards used to obtain the mass in the hydrometer's liquid, mL |
| ρmpL: | Mass standards density used in determine mL |
| DmpL: | Drift of mass standards used to determine mL |
| p: | Air barometic pressure during the calibration |
| h.r.: | Air relative humidity during the calibration |
The uncertainty contributions εd and σmL are distinguished in green font in Figure 11, those contributions corresponds to the scale division error or hydrometer resolution and also to the standard deviation in the measurements to obtain the mass of the hydrometer immersed in the liquid until the calibration point of the stem ρn. These contributions are reduced significantly by using the vision system and the calibration mark alignment algorithm introduced in this work. Table 10 shows the uncertainty budget calibration with the traditional alignment method, and Table 11 shows the uncertainty budget calibration using the vision system method together with the image processing algorithm. Both calibrations were applied to the high accuracy hydrometer (d = 0.1 kg/m3).
Table 10.
Uncertainty budget − Traditional method − d = 0.1 kg/m3.
| Uncertainty budget−Traditional Method | |||||
|---|---|---|---|---|---|
|
| |||||
| Ci | Std. Unc. | Contrib. (kg/m3) | Variance (kg2/m3) | % | |
| δρx/δρL= | 1.047412213 | 1.06E–02 | 0.0111 | 1.240E–04 | 10.91 |
| δρx/δρa1= | −0.047412447 | ||||
| δρx/δma= | −344.8652533 | ||||
| δρx/δmL= | 7609.201784 | ||||
| δρx/δtL= | 0.007970273 | 0.01 | 0.0001 | 6.353E–09 | 0.00 |
| δρx/δta= | 1.92822E–05 | 0.2 | 0.0000 | 1.487E–11 | 0.00 |
| δρx/δγL= | −11.73150782 | 1.05E–03 | −0.0123 | 1.517E–04 | 13.35 |
| δρx/δd= | −1 | 0.028867513 | −0.0289 | 8.33E–04 | 73.32 |
| δma/δmp1= | 0.999879272 | 3.35E–08 | 0.0000 | 1.334E–10 | 0.00 |
| δma/δρa1= | −0.00001396 | 0.00077023 | 0.0000 | 1.334E–09 | 0.00 |
| δma/δρp1= | 1.69E–09 | 79.31 | 0.0000 | 2.125E–09 | 0.00 |
| δma/δΔm1= | 1 | 2.64155E–07 | −0.0001 | 8.299E–09 | 0.00 |
| δma/δd= | −1 | 2.88675E–08 | 0.0000 | 9.911E–11 | 0.00 |
| δmL/δmp2= | 0.999879272 | 4.50E–08 | 0.0003 | 1.172E–07 | 0.01 |
| δmL/δρa2= | −0.000000621 | 0.000762157 | 0.0000 | 2.006E–09 | 0.00 |
| δmL/δρp2= | 7.309775E–11 | 80.52 | 0.0000 | 2.006E–09 | 0.00 |
| δmL/δΔm2= | 1 | 6.86254E–07 | 0.0052 | 2.727E–05 | 2.40 |
| δmL/δd= | −1 | 2.88675E–08 | −0.0002 | 4.825E–08 | 0.00 |
| δmliq/δCg= | 1 | ||||
| δCg/δΔh= | −1.57757E–09 | 0.01 | 0.0000 | 1.441E–14 | 0.00 |
| Unc. (k=2) | 0.067 kg/m3 | ||||
Table 11.
Uncertainty budget − Vision System method − d = 0.1 kg/m3.
| Uncertainty budget-Vision System | |||||
|---|---|---|---|---|---|
|
| |||||
| Ci | Std. Unc. | Contrib. (kg/m3) | Variance (kg2/m3) | % | |
| δρx/δρL= | 1.047423126 | 1.06E–02 | 0.0111 | 1.240E–04 | 43.60 |
| δρx/δρa1= | −0.047412335 | ||||
| δρx/δma= | −344.9478424 | ||||
| δρx/δmL= | 7609.353397 | ||||
| δρx/δtL= | 0.007970356 | 0.01 | 0.0001 | 6.353E–09 | 0.00 |
| δρx/δta= | 1.92823E−05 | 0.2 | 0.0000 | 1.487E–11 | 0.00 |
| δρx/δγL= | −11.73174157 | 1.05E–03 | −0.0123 | 1.517E–04 | 53.36 |
| δρx/δd= | −1 | 0.002886751 | −0.0029 | 8.333E–06 | 2.93 |
| δma/δmp1= | 0.999879272 | 3.35E–08 | 0.0000 | 1.335E–10 | 0.00 |
| δma/δρa1= | −0.00001396 | 0.00077023 | 0.0000 | 1.334E–09 | 0.00 |
| δma/δρp1= | 1.69E−09 | 79.31 | 0.0000 | 2.126E–09 | 0.00 |
| δma/δΔm1= | 1 | 2.64155E–07 | −0.0001 | 8.303E–09 | 0.00 |
| δma/δd= | −1 | 2.88675E–08 | 0.0000 | 9.916E–11 | 0.00 |
| δmL/δmp2= | 0.999879272 | 4.50E–08 | 0.0003 | 1.172E–07 | 0.04 |
| δmL/δρa2= | −0.000000621 | 0.000762481 | 0.0000 | 1.298E–11 | 0.00 |
| δmL/δρp2= | 7.30987E–11 | 80.52 | 0.0000 | 2.006E–09 | 0.00 |
| δmL/δΔm2= | 1 | 4.40959E–08 | 0.0003 | 1.126E–07 | 0.04 |
| δmL/δd= | −1 | 2.88675E–08 | −0.0002 | 4.825E–08 | 0.02 |
| δmliq/δCg= | 1 | ||||
| δCg/δΔh= | −1.57757E–09 | 0.01 | 0.0000 | 1.441E–14 | 0.00 |
| Unc. (k = 2) | 0.034 kg/m3 | ||||
The same procedure was applied for the medium accuracy hydrometer (d = 0.5 kg/m3). Results for the uncertainty budget calibration with the traditional alignment method are shown in Table 12. The uncertainty budget calibration using the vision system method together with the image processing algorithm is shown in Table 13.
Table 12.
Uncertainty budget − Traditional method − d = 0.5 kg/m3.
| Uncertainty budget-Traditional Method | |||||
|---|---|---|---|---|---|
|
| |||||
| Ci | Std. Unc. | Contrib. (kg/m3) | Variance (kg2/m3) | % | |
| δρx/δρL= | 1.333875213 | 1.06E–02 | 0.0142 | 2.011E–04 | 0.70 |
| δρx/δρa1= | −0.333877216 | ||||
| δρx/δma= | −5523.532137 | ||||
| δρx/δmL= | 22039.93249 | ||||
| δρx/δtL= | 0.01015011 | 0.01 | 0.0001 | 1.030E–08 | 0.00 |
| δρx/δta= | 2.19729E–05 | 0.2 | 0.0000 | 1.931E–11 | 0.00 |
| δρx/δγL= | −37.16576354 | 1.05E–03 | −0.0390 | 1.523E–03 | 5.31 |
| δρx/δd= | −1 | 0.144337567 | −0.1443 | 2.083E–02 | 72.70 |
| δma/δmp1= | 0.99987947 | 3.35E–08 | −0.0002 | 3.423E–08 | 0.00 |
| δma/δρa1= | −0.000007858 | 0.00077029 | −0.0003 | 6.614E–08 | 0.00 |
| δma/δρp1= | 9.47E–10 | 78.90 | −0.0004 | 1.704E–07 | 0.00 |
| δma/δΔm1= | 1 | 1.47573E–07 | −0.0008 | 6.644E–07 | 0.00 |
| δma/δd= | −1 | 2.88675E–08 | 0.0002 | 2.542E–08 | 0.00 |
| δmL/δmp2= | 0.999880825 | 4.50E–08 | 0.0010 | 9.843E–07 | 0.04 |
| δmL/δρa2= | −0.000001881 | 0.000769758 | 0.0000 | 1.018E–09 | 0.00 |
| δmL/δρp2= | 2.24168E–10 | 79.74 | 0.0004 | 1.552E–07 | 0.00 |
| δmL/δΔm2= | 1 | 3.54287E–06 | 0.0781 | 6.097E–03 | 21.28 |
| δmL/δd= | −1 | 2.88675E–08 | −0.0006 | 4.048E–07 | 0.00 |
| δmliq/δCg= | 1 | ||||
| δCg/δΔh= | −4.73272E–09 | 0.01 | 0.0000 | 1.088E–12 | 0.00 |
| Unc. (k=2) | 0.339 kg/m3 | ||||
Table 13.
Uncertainty budget – Vision System method – d = 0.5 kg/m3.
| Uncertainty budget-Vision System | |||||
|---|---|---|---|---|---|
|
| |||||
| Ci | Std. Unc. | Contrib. (kg/m3) | Variance (kg2/m3) | % | |
| δρx/δρL= | 1.333976871 | 1.06E–02 | 0.0142 | 2.011E–04 | 10.38 |
| δρx/δρa1= | −0.333978901 | ||||
| δρx/δma= | −5525.645555 | ||||
| δρx/δmL= | 22043.33278 | ||||
| δρx/δtL= | 0.010150884 | 0.01 | 0.0001 | 1.030E–08 | 0.00 |
| δρx/δta= | 2.19739E–05 | 0.2 | 0.0000 | 1.931E–11 | 0.00 |
| δρx/δγL= | −37.17149742 | 1.05E–03 | −0.0390 | 1.523E–03 | 78.66 |
| δρx/δd= | −1 | 0.014433757 | −0.0144 | 2.083E–04 | 10.76 |
| δma/δmp1= | 0.99987947 | 3.35E–08 | −0.0002 | 3.426E–08 | 0.00 |
| δma/δρa1= | −0.000007858 | 0.00077029 | −0.0003 | 6.618E–08 | 0.00 |
| δma/δρp1= | 9.47E–10 | 78.90 | −0.0004 | 1.705E–07 | 0.01 |
| δma/δΔm1= | 1 | 1.47573E–07 | −0.0008 | 6.649E–07 | 0.03 |
| δma/δd= | −1 | 2.88675E–08 | 0.0002 | 2.544E–08 | 0.00 |
| δmL/δmp2= | 0.999880819 | 4.50E–08 | 0.0010 | 9.837E–07 | 0.05 |
| δmL/δρa2= | −0.000001881 | 0.000769742 | 0.0000 | 1.019E–09 | 0.00 |
| δmL/δρp2= | 2.2418E–10 | 79.74 | 0.0004 | 1.553E–07 | 0.01 |
| δmL/δΔm2= | 1 | 5.47723E–08 | 0.0012 | 1.458E–06 | 0.08 |
| δmL/δd= | −1 | 2.88675E–08 | −0.0006 | 4.049E–07 | 0.00 |
| δmliq/δCg= | 1 | ||||
| δCg/δΔh= | −4.73272E–09 | 0.01 | 0.0000 | 1.088E–12 | 0.00 |
| Unc. (k=2) | 0.088 kg/m3 | ||||
Considering the uncertainty budgets shown in Tables 10, 11, 12 and 13, it can be observed that during the calibration of both hydrometers by the traditional method, the alignment “by eye” of the metrologist, at the scale mark of the hydrometer under calibration at the level of the liquid's surface, could not allow us to obtain a better hydrometer resolution, therefore the hydrometer resolution is equal to its scale division. The contribution of the uncertainty by the error due to the resolution εd is in this case the dominant uncertainty contribution. It follows that if the hydrometer has a larger scale division (which results in a less accurate hydrometer), then the dominant uncertainty of the hydrometer calibration will be limited by its scale division, as long as the alignment process is done “by eye”.
Putting aside the contribution due to the resolution εd, other dominant sources of uncertainty in the hydrometer calibration with the traditional alignment method are the standard deviation of mass determination in the liquid σmL, the reference liquid surface tension γL and the density of the reference liquid ρL.
On the other hand, using the vision system and an image processing algorithm to align the mark on the scale to the liquid level, the uncertainty due to the resolution could decrease, because the vision system provides images of the hydrometer immersed in the liquid of such amplitude that divides the scale significantly by about 10 times or more the hydrometer scale division. In this case, resolution was considered as one tenth of the hydrometer scale division. A smaller value has no impact on the combined uncertainty. Also, the contribution due to the standard deviation of the measurements to obtain the mass in the liquid is reduced significantly because the alignment process is repeatable and reproducible, obtaining values of σmL less than 1 mg while the traditional method (by eye), σmL could take values until 10 mg.
3.4. Alignment Using Image Processing
The image processing algorithm to obtain the alignment of the mark in the calibration scale is presented step by step.
Step 1. Image acquisition with the vision system
Here, the image is 1,026 × 1,288 pixels, whose values are between 0 and 255 (grayscale).
Step 2. Image normalization
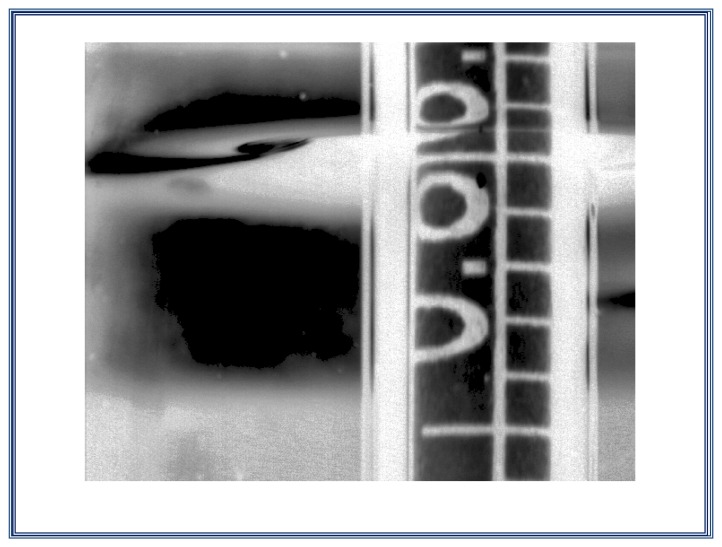
Considering the image in previous step, the image is normalized to take double precision floating point format values between 0 and 1 for the grayscale, as can be seen on Figure 12.
Figure 12.
Acquisition and normalization of the image taken with the vision system.
Step 3. Negative image
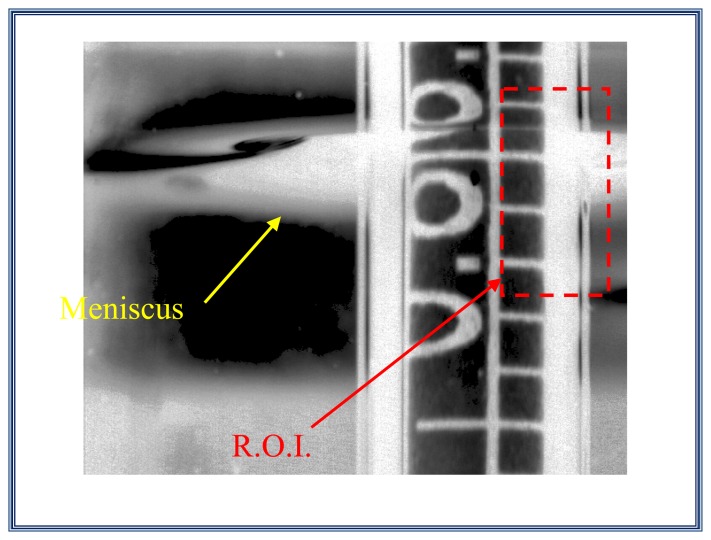
In this step the negative of the normalized image is obtained, in this way, the scale marks, originally black, are displayed in white. This is to approximate a concave downward parabola. Mathematically, a gray level 0 in the original picture, which represents the black color becomes 1 (white on the inverted image) and vice versa. Each original gray level becomes its complement in the negative. The negative image is shown in Figure 13.
Figure 13.
Negative image.
Step 4. Search the region of interest ROI
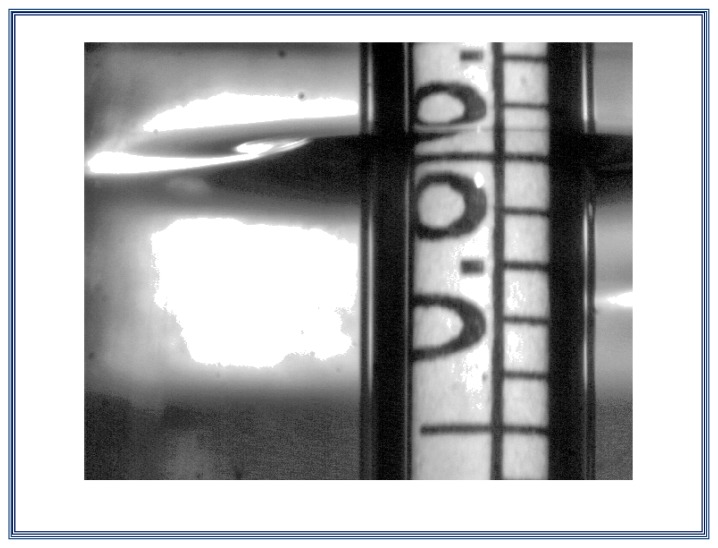
In this section, we look for the three marks of scale hydrometer immersed in the liquid; these marks are easy to find by locating the ellipse that is adjacent to the hydrometer shaft (this ellipse is the base of the meniscus that the liquid form around the hydrometer shaft), as can be seen on Figure 14.
Figure 14.
Region of interest (R.O.I.)
Step 5. Column vector selection
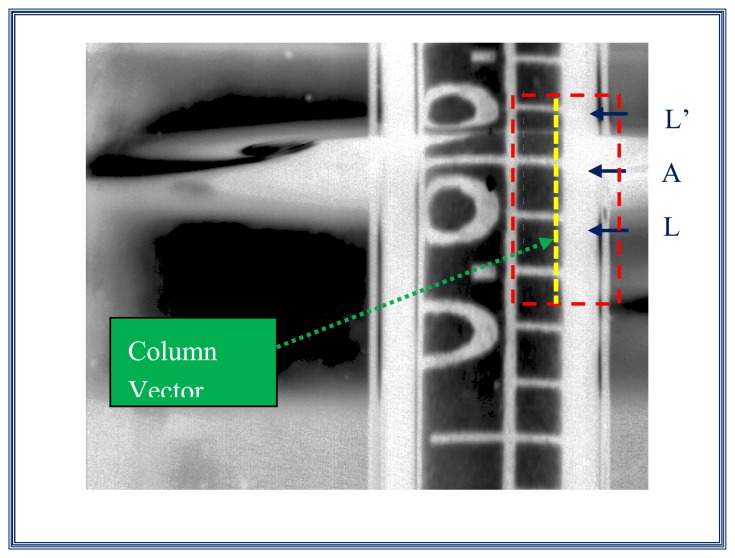
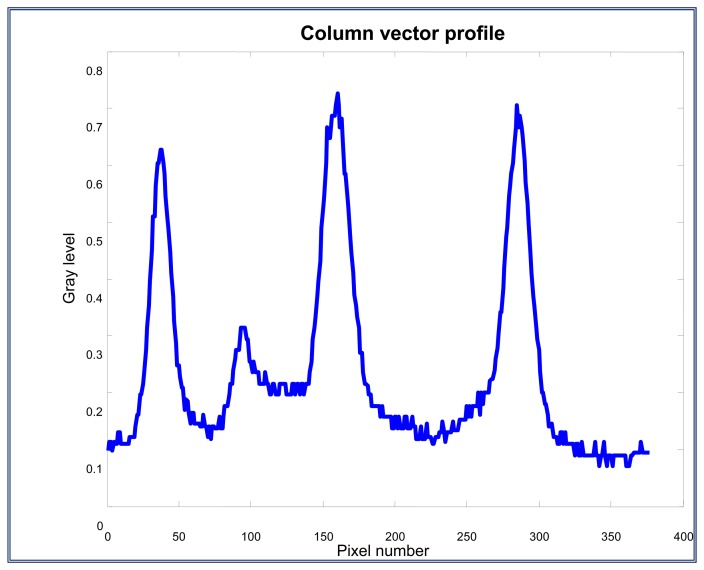
Here, a column vector is selected. This vector contains the information of the three interest marks, L-A-L'. This vector represents the profile or the gray level of the column vector selected and is shown on Figure 15. The profile which includes the interest marks is plotted on Figure 16.
Figure 15.
Column vector that contains the three interest marks L-A-L'.
Figure 16.
Column vector profile that contains the interest marks.
Step 6. Mark detection
Step 6.1. Column vector filtering
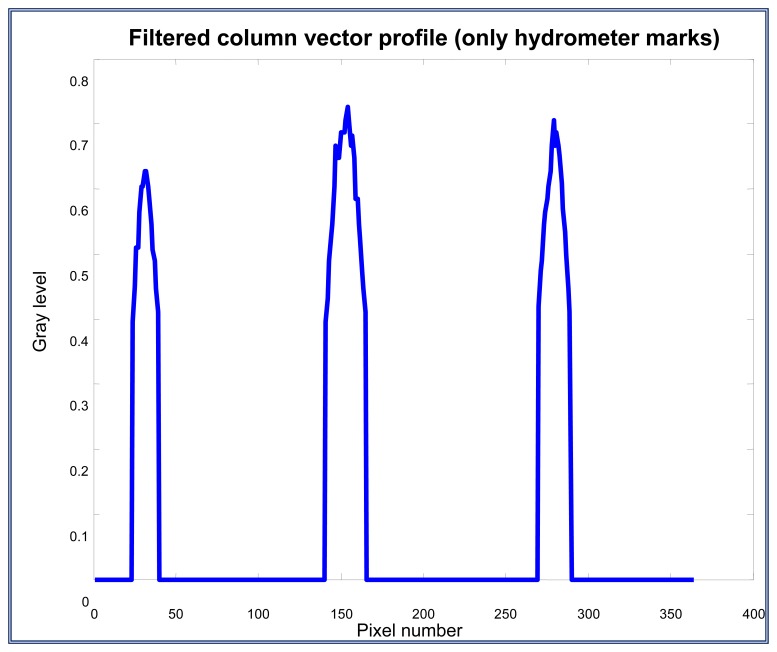
In this process, the column vector is filtered to eliminate noise and leave the information of the three marks only; this is done by applying an appropriate threshold level to get the column vector without noise (generally 0.5 or 0.6). After applying the vector filtering, the profile which includes only the interest marks is shown on Figure 17.
Figure 17.
Filtered column vector profile with a 0.6 threshold.
Step 6.2. Mark separation and least square adjustment of each mark
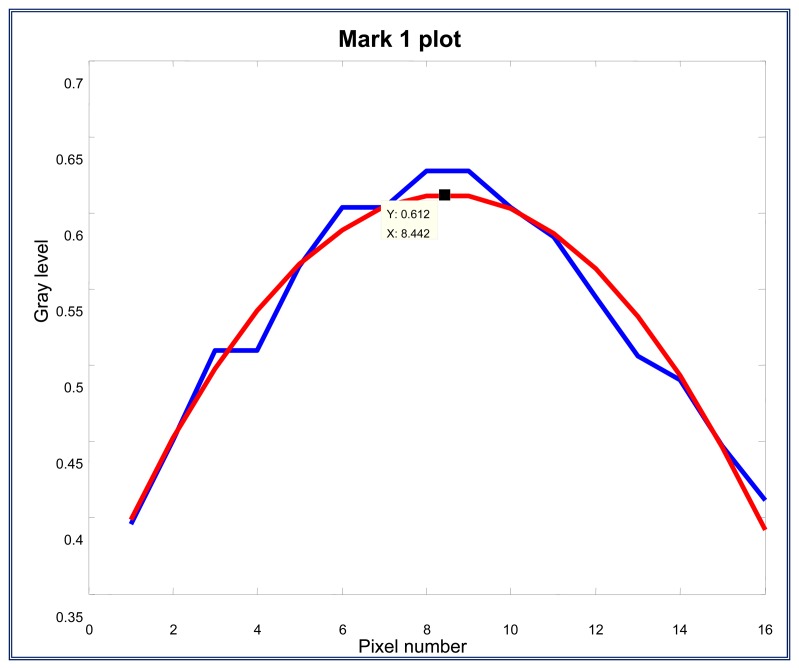
Here, each mark is isolated from the filtered column vector to apply the least square adjustment and fit to a second order polynomial, y = a0 + a1x +a2x2. After the least square adjustment and fitting, the maximum and minimum values of each parabola are determined. In Figure 18, the blue line represents the information of the mark and the least square fitting can be observed on the red line, the second order polynomial equation and the maximum point of each parabola are calculated:
Figure 18.
Mark adjustment by using a least square fitting, where y = 0.337528 + 0.065020x − 0.003851x2; xmax = 8.4423; ymax = 0.6120.
Mark adjustment by using a least square fitting, where y = 0.337528 + 0.065020x − 0.003851x2; xmax = 8.4423; ymax = 0.6120.
The same procedure is applied to marks 2 and 3. For the second mark, the calculated values are given by; y=0.340576+0.055549x − 0.002146x2; xmax=12.9452; ymax=0.7001
For the third mark, the calculated values are given by y = 0.343213 + 0.061910x − 0.002943x2; xmax = 10.5190; ymax = 0.6688.
Step 7. Distances d1 and d2 measurement (in pixels)
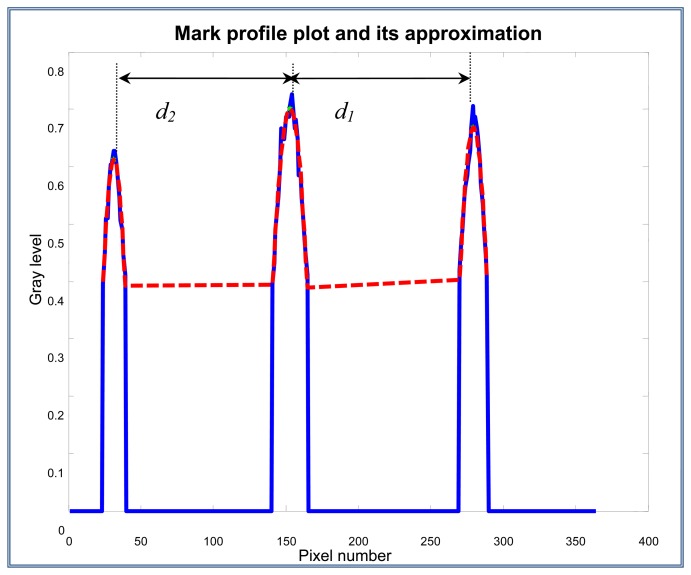
Once the parabolas and its maximum values are obtained, the distance d1 is measured (this distance is equal to the distance from the mark A to the mark L), and the distance d2 (distance from mark A to mark L'). The distances are considered from the maximum points of the parabolas which were obtained from the gray levels of the filtered column vector. The distances d1 and d2 are shown on Figure 19.
Figure 19.
Distance measurement d1 and d2, and Kmeas estimation. d2 = 121.50 pixels; d1 = 126.57 pixels; Kmeas = d2/d1 = 0.96.
Step 8. Kmeas determination
Kmeas = d2/d1 = (121.50/126.57) = 0.959 9
Step 9. Kcalc and Kmeas values comparison
Kcalc = 0.96 ± 0.03 (k = 2) (k = 2 represents a confidence level of approximately 95.45% in the uncertainty level from the best estimated Kcalc value) and Kmeas = 0.96, therefore, it can be stated that mark A (corresponding to the mark under calibration, ρn) is aligned to the same level than the liquid surface, because Kmeas is inside the confidence interval Kcalc.
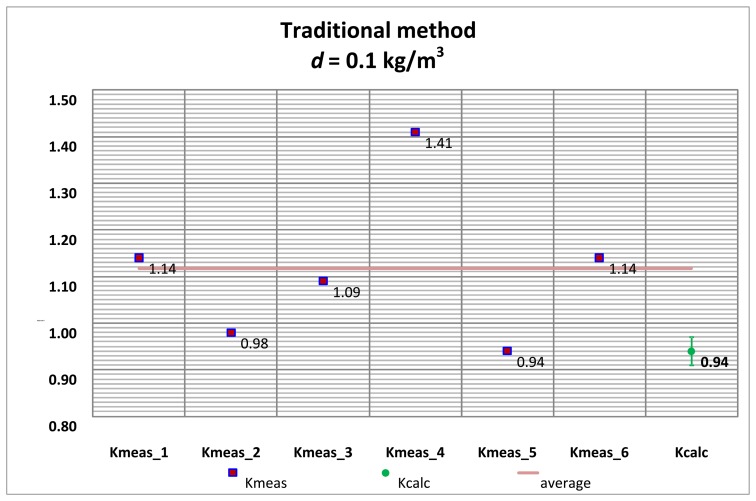
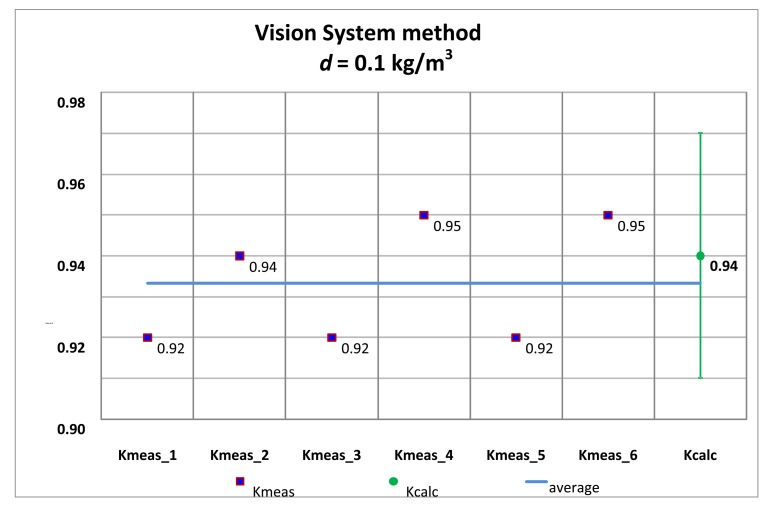
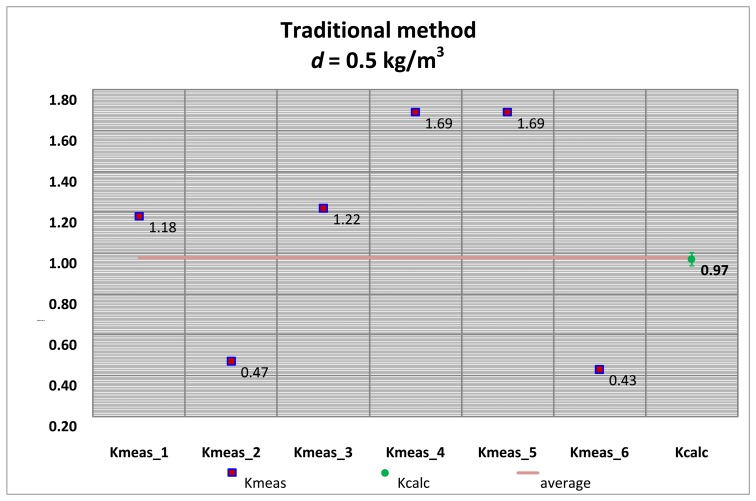
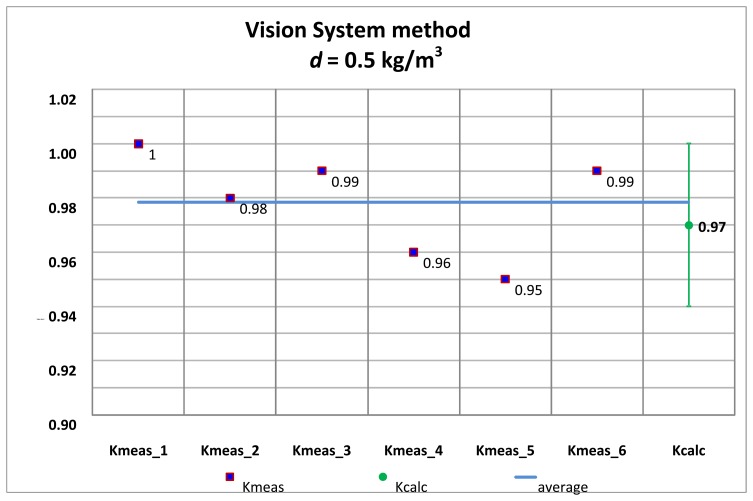
Several tests with its corresponding alignments were carried out, and the summary of the Kmeas values are shown by applying the traditional alignment method and the vision system method.
The Kmeas values for each alignment method are compared with the Kcalc values obtained with the pinhole model approach, for both the high accuracy hydrometer (d = 0.1 kg/m3) as well as the medium accuracy hydrometer (d = 0.5 kg/m3) shown in Tables 1 and 2.
Figures 20 and 21 correspond to the 0.1 kg/m3 hydrometer and Figures 22 and 23 correspond to the 0.5 kg/m3 hydrometer. Uncertainty bars of Kcalc are equivalent to a 0.03 value with a coverage factor of k = 2 for a normal probability distribution.
Figure 20.
Kmeas values. High accuracy hydrometer. Traditional alignment.
Figure 21.
Kmeas values. High accuracy hydrometer. Vision system alignment.
Figure 22.
Kmeas values. Medium accuracy hydrometer. Traditional alignment.
Figure 23.
Kmeas values. Medium accuracy hydrometer. Vision system alignment.
4. Results and Discussion
From Tables 5 and 6, the values of standard deviation in the determination of the mass in the liquid σmL were 0.12 mg by using the vision system for the alignment of the mark, which in comparison with the traditional alignment system, in the case of the high accuracy hydrometer is 15 times lower, and for the medium accuracy hydrometer is 72 times lower. In the uncertainty budgets the percentage contribution due to this component was reduced from 2.4% to 0.04% in the case of the high accuracy hydrometer calibration (see Tables 10 and 11), and from 21.28% to 0.08% in the case of the medium accuracy hydrometer (see Tables 12 and 13). From the above, it is concluded that the methodology developed in this work to align the mark on the scale calibration of immersion hydrometers at the same level of the surface of the liquid of known density using the vision system and the digital image processing algorithm was able to improve the measurement system, reducing by more than one order the standard uncertainty due to the repeatability of the mass determination in the liquid, mL.
Moreover, the contribution to the uncertainty due to the resolution of the immersion hydrometer was also reduced significantly, since the conventional alignment method and the resolution of the hydrometer is limited to the division of its scale, so the standard uncertainty error due to the resolution εd is equal to , by considering a uniform probability distribution. The hydrometer scale division can be divided into ten units or more, since the amplification of the marks of hydrometer that is achieved with the vision system significantly distinguishes a better resolution compared to the scale division of the hydrometer.
For the case of hydrometers calibrated in this work, the contribution to the standard uncertainty due to the resolution of high accuracy hydrometer, whose scale division is 0.1 kg/m3, was reduced from 73.32% to a 2.93% (see Tables 10 and 11), while for medium accuracy hydrometer with a scale division equal to 0.5 kg/m3, this contribution was reduced from 72.70% to a 10.76% (see Tables 12 and 13).
In the calibration method of alignment by the vision system, the resolution was taken as one tenth of the hydrometer scale division. A smaller value has no significant impact to the combined uncertainty of calibration which could have many effects in the uncertainty budget [15–19].
Since 2004 the automation or semi-automation of hydrometer calibration has been implemented in other national metrology institutes (NMIs), some of them based on image processing techniques [9–11]. The methodology exposed in this work is based on the approach of Lorefice and Malengo [9] however the vision system exposed in this work has a better spatial resolution, for example, the CCD camera of [9] is 604 H × 576 V pixels whereas CENAM CCD camera is 1,300 H × 1,030 V pixels. Digital images acquired with CENAM vision system allowed us to reduce the resolution of the hydrometer scale division from d to d/10 or better during the calibration, reducing considerably the uncertainty contribution due to the resolution of hydrometer, this point is not addressed in [9–11]. Moreover, the image processing algorithm for the detection of marks, the perspective errors, and the criteria for the alignment of the scale mark under calibration at the level of the surface liquid are different to the approaches of [9–11]; for example, Lee et al. [10] performed a binary threshold on the acquired image of the hydrometer stem and the alignment criteria is to locate the scale mark under calibration in line with the major axis of an ellipse that represents the meniscus formed around the stem in the acquired image. Another remarkable difference is the mechanical system employed to align the hydrometer scale mark to the liquid surface: the CENAM system uses a small motorized sinker allowing a well-controlled and soft adjustment of the level of the liquid without turbulence when the sinker is immersed. Other systems perform the adjustment of the mark by moving the whole system: thermostatic bath, the liquid container and CCD camera.
In metrology, it is mandatory to validate either a new measurement method or a modification with an already validated method [20,21]. In order to validate the methodology proposed in this work based on the aligning mark immersion hydrometer scale under calibration with the vision system and the algorithm of digital image processing [22], two international comparisons in the calibration immersion of hydrometers were carried out.
The first international comparison, identified as SIM.M.D-K4 “Comparison on the calibration of density hydrometers”, is a key comparison among national metrology institutes that are members of the Inter-American Metrology System (SIM). In this comparison, CENAM was the pilot laboratory. Other participant countries were: Jamaica, Panama, Chile, Bolivia, Peru, Ecuador, Brazil, Argentina, Costa Rica, Uruguay, Colombia, United States of America and Canada [21]. The second international comparison, identified as SIM.M.D-S1. “Comparison of the calibration of hydrometers for liquid density determination (bilateral CENAM-INRIM) Supplementary Inter-American Metrology System Comparison (SIM)”, was a bilateral comparison between CENAM-Mexico and Istituto Nazionale di Metrología di Ricerca Metrologica (INRIM)-Italy [23], and was organized to see the degree of equivalence on the hydrometer calibration between both countries. In both international comparisons, CENAM obtained satisfactory results.
Finally, the methodology proposed in this work for the alignment of the calibration scale mark with the vision system and the image processing technique helps to reduce the relative combined uncertainty calibration of hydrometers from 10−4 to 10−5.
Conflicts of Interest
The authors declare no conflict of interest.
References
- 1.ISO-4805 Laboratory Glassware—Thermo-Alcoholometers and Alcohol-Thermohydrometers. International Organization for Standardization; Geneva, Switzerland: 1982. [Google Scholar]
- 2.ISO-4801 Glass Alcoholometers and Alcohol Hydrometers not Incorporating a Thermometer. International Organization for Standardization; Geneva, Switzerland: 1979. [Google Scholar]
- 3.OIML R44 Alcoholometers and Alcohol Hydrometers and Thermometers for Use in Alcoholometry. Organisation Internationale de Métrologie Légale; Paris, France: 1985. [Google Scholar]
- 4.IS-7324 Indian Standard Specification for Brix Hydrometers. Bureau of Indian Standards; New Delhi, India: 1983. [Google Scholar]
- 5.ISO-2449 Milk and Liquid Milk Products–Density Hydrometers for Use in Products with a Surface Tension of Approximately 45 mN/m. International Organization for Standardization; Geneva, Switzerland: 1974. [Google Scholar]
- 6.ISO-3993 Liquefied Petroleum Gas and Light Hydrocarbons–Determination of Density or Relative Density–Preasure Hydrometer Method. International Organization for Standardization; Geneva, Switzerland: 1984. [Google Scholar]
- 7.Gupta S.V. Practical density measurement and hydrometry. Meas. Sci. Technol. 2003;14:153. doi: 10.1088/0957-0233/14/1/701. [DOI] [Google Scholar]
- 8.Cuckow F.W. A new method of high accuracy for the calibration of reference standard hydrometers. J. Soc. Chem. Ind. 1949;68:44–49. [Google Scholar]
- 9.Lorefice S., Malengo A. An image processing approach to calibration of hydrometers. Metrologia. 2004;41:L7–L10. [Google Scholar]
- 10.Lee Y.J., Chang K.H., Chon J.C., Oh C.Y. Automatic alignment method for calibration of hydrometers. Metrologia. 2004;41 doi: 10.1088/0026-1394/41/2/S11. [DOI] [Google Scholar]
- 11.Aguilera J., Wright J. D., Bean Vern E. Hydrometer calibration by hydrostatic weighing with automated liquid surface positioning. Meas. Sci. Technol. 2008 doi: 10.1088/0957-0233_/19/1/015104. [DOI] [Google Scholar]
- 12.Lorefice S., Malengo A. Calibration of hydrometers. Meas. Sci. Technol. 2006;17:2560. [Google Scholar]
- 13.BIPM, IEC, IFCC, ILAC, ISO, IUPAC, IUPAP and OIML JCGM 200: 2012 International Vocabulary of Metrology–Basic and General Concepts and Associated Terms (VIM) Bureau International des Poids et Mesures; Sèvres Cedex France: 2012. [Google Scholar]
- 14.BIPM, IEC, IFCC, ILAC, ISO, IUPAC, IUPAP and OIML JCGM-100: 2008 Evaluation of Measurement Data–Guide to the Expression of Uncertainty in Measurement. Bureau International des Poids et Mesures; Sèvres Cedex France: 2008. [Google Scholar]
- 15.Valcu A. Calibration of nonautomatic weighing instruments. Measurements. 2007;1:2. [Google Scholar]
- 16.Tasic T., Grottker U. An overview of guidance documents for software in metrological applications. Comput. Stand. Interf. 2006;28:256–269. [Google Scholar]
- 17.Heinonen M., Sampo S. The effect of density gradients on hydrometers. Measur. Sci. Technol. 2003;14 doi: 10.1088/0957-0233/14/5/313. [DOI] [Google Scholar]
- 18.Peña L.M., Becerra L.O. Evaluation of the Uncertainty due to Instability of the Measurement Standards Involved in a Measurement Process. Proceedings of National Conference of Standards Laboratories International Workshop and Symposium; San Antonio, TX, USA. July 26 2009. [Google Scholar]
- 19.Picard A., Davis R.S., Gläser M., Fujii K. Revised formula for the density of moist air (CIPM-2007) Metrologia. 2008;45 doi: 10.1088/0026-1394/45/2/004. [DOI] [Google Scholar]
- 20.Lorefice S., Heinonen M., Madec T. Bilateral comparisons of hydrometer calibrations between the IMGC-LNE and the IMGC-MIKES. Metrologia. 2000;37 doi: 10.1088/0026-1394/37/2/6. [DOI] [Google Scholar]
- 21.Becerra L.O. Final report of comparison of the calibrations of hydrometers for liquid density determination between SIM laboratories: SIM.M.D-K4. Metrologia. 2009;46:1–51. [Google Scholar]
- 22.Peña L.M., Pedraza J.C., Becerra L.O., Galvan C.A. A New Image Processing System for Hydrometers Calibration Developed at CENAM. Proceedings of the 20th TC3, 3er TC16 and 1st TC22 International Conference, Cultivating Metrological Knowledge (IMEKO); Mérida, Yucatran, México. 27 November 2007. [Google Scholar]
- 23.Becerra L.O., Lorefice S. Report of the bilateral comparison of the calibrations of hydrometers for liquid density determination between CENAM–Mexico and INRIM–Italy: SIM.M.D-S1. Metrologia. 2009;46 doi: 10.1088/0026-1394/46/1A/07006. [DOI] [Google Scholar]


