

Abstract
DiOlistic labeling utilizes a particle-mediated delivery system to incorporate dye into cells. Because of its random nature, this technique generates sparse fluorescent labeling which is well suited for the study of neuronal dendritic branching and dendritic spine morphology. DiOlistics is a quick, reliable and nontoxic method that can be used in combination with other techniques such as immunostaining, biolistic DNA transfection, and retrograde tracing. In this article, we describe the methods for diOlistic labeling of neurons from rodent brain slices using DiI and the imaging of neuronal and synaptic morphology using confocal microscopy.
Keywords: Gene gun, Dendritic spine, Dendrite branching, Neuronal morphology, DiI, Mouse brain, Confocal microscopy, Ballistics, Perfusion
1. Introduction
DiOlistics uses a gene gun to introduce fluorescent dyes into cells which then get incorporated into the cytoplasm or the plasma membrane. This technique most commonly uses DiI (1-1′-dioctade-cyl-3,3,3′,3′-tetramethylindocarbocyanineperchlorate), alipophilic dye that will partition in and diffuse through the cell membrane providing a well-defined outline of neuronal processes which is ideal for high resolution confocal imaging.
The primary application of this technique has been the study of neuronal morphology in the central nervous system, but it can be applied to a variety of cell types, from living or fixed tissues, as well as in diverse species such as rodents, primates, and zebrafish (1–3). Another advantage of diOlistics is that it can be used in animals of all ages, making it suitable for developmental studies, as well as a complement to behavioral assays in adult or aged animals. DiOlistics is a versatile labeling technique that can be used in combination with immunostaining, to identify subpopulations of cells (4–7). Additionally, the technique can be used in combination with biolistic particle-mediated DNA delivery, and/or retrograde tracing for circuit mapping or cell identification (2, 8, 9).
The procedures of the technique are described in detail in the following sections. First, trans-cardiac perfusion is used for efficient fixation of the brain and all other tissues. Fixed brains are then sliced into sections. Bullets are prepared by coating tungsten beads with DiI and a gene gun is used to shoot the fluorescent bullets onto the brain slices, sparsely labeling cells within minutes. Incorporating immunostaining is an optional step described here and recently, improvements have been suggested for the combination of the methods (9, 10). After mounting the sections, images of fluorescently labeled neurons are acquired using confocal microscopy for detailed analysis of dendrite and spine morphology.
2. Materials
Prepare all solutions using ultrapure water and analytical grade reagents. Prepare and store all reagents at room temperature, unless indicated otherwise. Follow all waste disposal regulations when discarding waste materials.
2.1. Bullet Materials
Tungsten Beads, 1.7 μm diameter (Bio-Rad, Hercules, CA, USA). To prepare aliquots, suspend 6 g tungsten beads into 2 mL methylene chloride. Vortex to create a homogenous solution and pipette 100 μL of bead solution into individual eppendorf tubes resulting in 300 mg aliquots. Store at room temperature until needed in step 3.1.1 (see Note 1).
DiI (Invitrogen, Carlsbad, CA, USA).
Tefzel bullet tubing (Bio-Rad).
Polyvinylpyrrolidone (PVP): Prepare 10 mL of 10 mg/mL PVP solution dissolved in deionized water.
Tubing Prep Station (Bio-Rad) connected to a nitrogen tank.
12 mL Syringe with tubing adaptor, made of flexible tubing with slightly larger diameter than Teflez tubing.
Tubing cutter (Bio-Rad).
2.2. Perfusion Materials
Ketamine/xylazine anesthetic cocktail: 100 mg/mL ketamine and 20 mg/mL xylazine.
Butterfly needle with blunted tip. Use a Dremel-like tool to smooth the pointed tip of the needle.
Pump or gravity system used for perfusion.
Scissors.
Chilled container.
2.3. Solutions
Phosphate Buffer Solution (PBS): 137 mM NaCl, 2.7 mM KCl, 10 mM Na2HPO4O, 2 mM KH2PO4O. To make 1 L, add 8 g NaCl, 200 mg KCl, 1.44 g Na2HPO4O, and 240 mg KH2PO4O to H2O. Use NaOH to adjust pH to 7.2–7.4.
Fixative Solution: 4% (w/v) paraformaldehyde and 4% (w/v) sucrose in PBS. Weigh paraformaldehyde under the chemical hood and mix ingredients in a large beaker. Heat and stir to solubilize, but do not boil. If needed, add NaOH pellets to solubilize and bring to pH neutral once in solution. Filter before using. Good for about 3 weeks if stored at 4°C.
Sucrose solutions: 15% and 30% (w/v) sucrose in PBS.
Permeabilization solution: 0.01% (v/v) Triton X-100 in PBS.
Blocking solution: 10% (v/v) goat serum, 0.01% (v/v) Triton X-100 in PBS.
2.4. Shooting and Mounting Materials
Vibratome.
24-Well plate.
Paintbrush.
Gene Gun and accessories (Fig. 1): o-rings, barrel liner, diffusion screens, cartridge holders, cartridge extractor tool (Bio-Rad). Modify diffusion screens (see Note 2) by removing the radial poles with pliers as shown in Fig. 2.
Isopore membrane filter paper 3.0 μm pore size (Millipore, Billerica, MA, USA).
Helium gas tank.
ProLong Gold Antifade mounting medium (Invitrogen).
Slides: 25 mm × 75 mm × 1 mm and coverslips: 18 mm × 18 mm × 1 mm.
Nail polish.
Fig. 1.
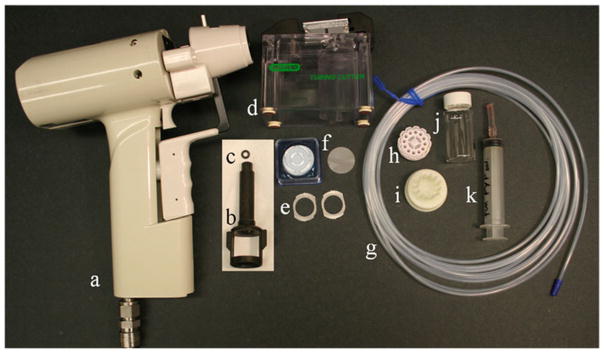
Shooting Materials: (a) Gene gun, (b) Barrel liner, (c) O-ring, (d) Tubing cutter, (e) Modified diffusion screens, (f) Isopore membrane filter paper picture with box, (g) Teflez tubing, (h) Cartridge holder, (i) Cartridge extractor tool, (j) Scintillation vial, (k) Syringe with tubing adapter.
Fig. 2.
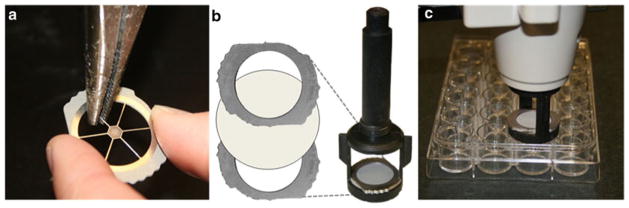
(a) Diffusion screens are modified by removing the radial poles with pliers. (b) A filter membrane should be placed between two diffusion screens and then inserted at the bottom of the barrel liner, twisting to ensure a secure fit. (c) When shooting, the barrel liner should be centered on the well and pressed flat onto the well plate.
2.5. Evaluation Materials
Rocking platform.
Primary and fluorescence-conjugated secondary antibody.
Confocal microscope equipped with a 561 nm laser (LSM 520 META, Zeiss, Germany).
3. Methods
3.1. Preparing DiI/Tungsten Bead Bullets
Resuspend a 300 mg tungsten aliquot in 300μL of methylene chloride. This amount will be enough for 3 sets of bullets. Mix well by sonicate for 3 min to disrupt any bead clumps.
Pipette 100 μl of the tungsten bead solution on glass side.
Combine 13.5 mg DiI with 450 μL of methylene chloride for a final concentration of 3 mg/100 μL.
Coat beads with dye by pipetting on top of the beads a 100 μl of DiI solution. Mix thoroughly using pipette tip until methylene chloride evaporates and beads turn light grey.
Place on a piece of wax-coated weigh paper under the glass slide and use a razor blade to scrape beads off the glass slide and dice into a fine powder.
Scrape beads onto weigh paper and funnel beads into a 15 mL conical tube.
Add 3 mL of water and sonicate in water bath for 10–30 min (see Note 3).
Cut Teflez tubing slightly longer than the length of the tubing prep station. Use a 12 mL syringe with tubing adaptor to pass the PVP solution through the Teflez tubing and then expel it out. Reuse solution to coat more tubing if several batches of bullets are prepared simultaneously and discard PVP solution after use.
Vortex the beads at a low speed to produce a homogenous solution and simultaneously use the syringe to pull the bead solution through the tubing so beads are evenly distributed throughout the tubing (see Note 4).
Feed the tubing through the prep station and wait about 1 min to allow the beads to settle. Use the syringe to gently remove the water so that only the beads remain (see Note 5).
Spin the tubing in the prep station and dry with nitrogen gas until water droplets are no longer visible, approximately 10–20 min.
Cut bullets with tubing cutter into 13 mm bullets and store in a container, such as a scintillation vial. Wrap vials in foil to protect from light. Bullets can be prepared in advanced and stored for several months.
3.2. Trans-Cardiac Fixation and Brain Extraction
This procedure is preferred when possible because it allows for reliable and efficient fixation. Alternatively, a block of fresh tissue can be fixed before or after slicing (3).
Anesthetize the mouse with an intra-peritoneal injection of ketamine/xylazine solution (0.1 mL/20 g mouse) (see Note 6).
Make a sagittal incision along the midline exposing the liver and the chest. Cut through the diaphragm and ribs, along the sternum toward the mouse’s left side. Clamp sternum with hemostats and flip above the mouse’s head to hold chest cavity open, exposing the heart.
Using a small scissor, make a small incision into the left ventricle and insert a butterfly needle with blunted tip (see Note 7).
Use a small scissor to cut the vein coming into the right atrium (see Note 8).
Perfuse 10–15 mL of cold PBS at a speed of 2.5 mL/min (see Note 9). A pump or gravity can be used in this step.
Perfuse about 20 mL of paraformaldehyde solution at a speed of 2.5 mL/min. Once the animal is stiff, stop perfusion (see Note 10).
Decapitate the mouse and gently remove the brain.
Place brain in chilled container (e.g., glass scintillation tube) with 10–20 mL 4% paraformaldehyde solution for 30 min (see Note 11) on ice.
Wash in PBS for 5 min on ice, three times.
Incubate brains for 10 min in 15% sucrose solution followed by 10 min in 30% sucrose solution to improve neuronal morphology (see Note 12).
Keep at 4°C in container filled with PBS until needed.
3.3. Cutting the Brain Slices
Glue the brain to a vibratome platform to allow brain sectioning at the desired orientation. The orientation should be determined based on the region of interest and the morphology of the cells.
Add cold PBS to cover the brain and keep solution and chamber on ice (see Note 13).
Cut sections of 200–300 μm thickness with a sharp blade.
Transfer slices with a brush to individual wells of a 24-well plate containing PBS (see Note 14).
3.4. DiI Staining
Remove PBS from wells and place slices in the center of the wells using a paintbrush.
Prepare gene gun: Load bullets into cartridge holder, assemble diffusion screens and filter paper into the barrel liner (Fig. 2) and insert both into gene gun (see Note 15).
Press the barrel liner flat onto the surface of the 24-well plate (Fig. 2) and shoot once in each well at 120–180 psi helium gas pressure (see Note 16).
Quickly wash slices with PBS, two times. For the third wash, cover slices with foil and place on a rocking platform for 30 min.
Mount slices: Gently place slice on glass slide and add 8–10 μL ProLong Gold Antifade mounting media on top avoiding air bubbles. Carefully place a coverslip over the slice and leave at room temperature overnight for mounting media to dry (see Note 17).
Seal edges of the coverslip with nail polish after mounting media has dried. Then, store slides at 4°C (see Note 18).
3.5. Immunostaining
Immunostaining is an optional addition to this method and, when used, it should be performed after DiI shooting and before mounting (see Note 19).
Permeabilization: Incubate slices in permeabilization solution (300–500 μL per well) for 15 min at room temperature (see Note 20).
Blocking: Incubate slices in blocking solution for 30 min at room temperature on a rocking platform.
Primary antibody: Dissolve primary antibody in blocking solution (e.g., 1:1,000) and incubate slices in 300–500 μL per well for 1–2 h on a rocking platform (see Note 21).
Wash slices with PBS for 5–15 min, three times on a rocking platform.
Secondary antibody: Dissolve fluorescence-conjugated secondary antibody in blocking solution (e.g., 1:1,000) and incubate slices in 300–500 μL per well for 30 min on a rocking platform.
Wash slices with PBS for 5 min, four times on a rocking platform.
Mount slices as described in the “DiI staining” section.
3.6. Confocal Microscopy
A confocal microscope equipped with a 561 nm laser (LSM 520 META, Zeiss, Germany) is used to visualize fluorescent labeling (Fig. 3).
Fig. 3.

(a) Confocal image of a labeled medium spiny neuron of the mouse nucleus accumbens obtained with a 20× objective. The high intensity of the fluorescent labeling and the low background is suitable for the study of dendritic branching and neuronal morphology. (b) Confocal image of a labeled tertiary dendrite obtained with a 63× objective, displaying the diverse morphology of dendritic spines.
Acquire images (512 × 512 pixels, 8 bit) by averaging two frames at a speed of 7 (scale 0–10).
Set pinhole size at 1Airy Unit (AU) for each objective. The size in microns will vary depending on the objective and wavelength.
Adjust the detector’s gain to achieve saturation only in the brightest pixels. In this case, the detector’s gain was set around 700. The use of digital gain and offsets is not recommended; increase laser power instead if needed.
To capture the entire cell morphology, acquire a z-stack of images with a 20× objective (air, NA= 0.8). Pinhole size is 2.0 μm and z-stack interval is set to 1.4 μm (0.7 times the pinhole size). Recommended laser power is 4–15%, but optimal power might vary depending on the microscope and the fluorescence intensity.
To image dendrites, a 63× objective (water, NA= 1.2) is recommended and a digital zoom of 2 can be added. Pinhole size of 1AU is 1.0 μm and z-stacks of images are collected at a 0.7 μm interval. Recommended laser power is 40% but optimal power might vary with the microscope and fluorescence intensity (see Note 22).
Acknowledgments
We would like to thank Fumi Ono’s laboratory for providing access to his confocal microscope. Our research is funded by the intramural program of NIAAA and NINDS.
Footnotes
The optimal diameter of the tungsten bead depends on the size of the targeted cell soma. In this particular case, we use 1.7 μm diameter beads for striatal medium spiny neurons which have a cell body size of 15–20 μm. Smaller cells might require smaller diameter beads such as 1.1 μm.
In this method, diffusion screens are only used to hold the isopore membrane filter. The membrane is the primary diffuser of tungsten beads and also a filter of bead clumps.
Dicing dye-coated beads with a razor and sonication are used to minimize the formation of bead clumps that can commonly occur due to the lipophilic properties of the dye, which would create large fluorescent areas and disrupt the sparse labeling of individual neurons.
Try to minimize the number of air bubbles in the tubing to ensure coated beads are evenly distributed.
If beads are being removed with the water, wait longer for the beads to settle and remove the water more slowly.
Another anesthetic can be used ensuring mouse is unresponsive to tail pinch before proceeding.
Blunting the butterfly needle prevents unwanted punctures in the heart.
This will allow for the drainage of blood and perfused solutions.
During this stage, the liver should turn from dark red to pale pink and the fluid drainage should run clear. If this is not happening, the butterfly needle may need adjusting and/or PBS may need to be perfused for a longer period of time.
When perfusing multiple animals, rinse the tubing with PBS before beginning the next perfusion.
Do not fix for a longer period of time because it will affect labeling. Over-fixation will disrupt the cell membrane integrity causing DiI to leak out of the cell.
Another option is to incubate with 30% sucrose solution overnight at 4°C.
Keeping solution cold and the chamber on ice will keep the brain firm for more even slicing. In addition, because the tissue is mildly fixed, keeping it cool will maintain the integrity of the slices.
When deciding the appropriate thickness of the slice, it is best to ensure all neuronal processes are intact. When processes are cut, dye will leak out of the cell, making imaging more difficult. It is important to consider the morphology of cells you are labeling. For example, when labeling multipolar cells, thicker slices should be considered to minimize the number of dendrites cut. Furthermore, due to short fixation time, slices thinner than 150 μm may be soft and difficult to handle.
Make sure that the barrel liner has the rubber o-ring in the back. The o-ring makes a tight seal with the gene gun and results in more consistent helium pressure during shooting.
It is important to keep the same side of the slice that was shot facing up throughout the process. This will ensure that labeled neurons will be within focal distance of the objective. Objectives with high magnification and numerical aperture are ideal for fluorescent confocal imaging, but have a short focal distance, which limits the depth that can be imaged.
It is best to mount slices on the same day, as the integrity of the slices might not be well maintained overnight.
Slides can be used at least 6 months to a year if stored in the dark at 4°C. DiI is light sensitive and long-term exposure to light will cause the fluorescence to fade.
Recently, two modifications have been suggested to this procedure which includes the use of a cholesterol-specific detergent, digitonin (8), and the use of a DiI derivative, Cell Tracker CM-DiI (10).
Do not use higher concentrations of detergent as this will dissolve DiI and significantly reduce the fluorescent staining. Try to minimize the time in detergent as extensive incubations will also reduce the DiI labeling. If extended incubations are necessary, keep in PBS rather than in blocking solution.
If overnight incubations are necessary, remove detergent from blocking solution.
When studying dendritic spine density and morphology, we recommend systematic sampling of dendrite order (primary, secondary, tertiary, etc.) because spine density might vary across different order dendrites. For example, image collection might be restricted to tertiary dendrites. The total number of images collected will depend on the experimental requirements and the degree of variability within a neuron, and across neurons and animals.
References
- 1.Connaughton VP, Graham D, Nelson R. Identification and morphological classification of horizontal, bipolar, and amacrine cells within the zebrafish retina. J Comp Neurol. 2004;477:371–385. doi: 10.1002/cne.20261. [DOI] [PubMed] [Google Scholar]
- 2.O’Brien J, Lummis SC. Biolistic and diolistic transfection: using the gene gun to deliver DNA and lipophilic dyes into mammalian cells. Methods. 2004;33:121–125. doi: 10.1016/j.ymeth.2003.11.010. [DOI] [PubMed] [Google Scholar]
- 3.Seabold GK, et al. DiOLISTIC labeling of neurons from rodent and non-human primate brain slices. J Vis Exp. 2010;41 doi: 10.3791/2081. [DOI] [PMC free article] [PubMed] [Google Scholar]
- 4.Dobi A, et al. Cocaine-induced plasticity in the nucleus accumbens is cell specific and develops without prolonged withdrawal. J Neurosci. 2011;31:1895–1904. doi: 10.1523/JNEUROSCI.5375-10.2011. [DOI] [PMC free article] [PubMed] [Google Scholar]
- 5.Grutzendler J, Tsai J, Gan WB. Rapid labeling of neuronal populations by ballistic delivery of fluorescent dyes. Methods. 2003;30:79–85. doi: 10.1016/s1046-2023(03)00009-4. [DOI] [PubMed] [Google Scholar]
- 6.Kim Y, et al. Methylphenidate-induced dendritic spine formation and DeltaFosB expression in nucleus accumbens. Proc Natl Acad Sci U S A. 2009;106:2915–2920. doi: 10.1073/pnas.0813179106. [DOI] [PMC free article] [PubMed] [Google Scholar]
- 7.Lee KW, et al. Cocaine-induced dendritic spine formation in D1 and D2 dopamine receptor-containing medium spiny neurons in nucleus accumbens. Proc Natl Acad Sci U S A. 2006;103:3399–3404. doi: 10.1073/pnas.0511244103. [DOI] [PMC free article] [PubMed] [Google Scholar]
- 8.Matsubayashi Y, Iwai L, Kawasaki H. Fluorescent double-labeling with carbocyanine neuronal tracing and immunohistochemistry using a cholesterol-specific detergent digitonin. J Neurosci Methods. 2008;174:71–81. doi: 10.1016/j.jneumeth.2008.07.003. [DOI] [PubMed] [Google Scholar]
- 9.Neely MD, Stanwood GD, Deutch AY. Combination of diOlistic labeling with retrograde tract tracing and immunohistochemistry. J Neurosci Methods. 2009;184:332–336. doi: 10.1016/j.jneumeth.2009.08.016. [DOI] [PMC free article] [PubMed] [Google Scholar]
- 10.Staffend NA, Meisel RL. DiOlistic labeling of neurons in tissue slices: a qualitative and quantitative analysis of methodological variations. Front Neuroanat. 2011;5:14. doi: 10.3389/fnana.2011.00014. [DOI] [PMC free article] [PubMed] [Google Scholar]