

Abstract
Oligopaint probes are fluorescently-labeled, single-stranded DNA oligonucleotides that can be used to visualize genomic regions ranging in size from tens of kilobases to many megabases. This unit details how Oligopaint probes can be synthesized using basic molecular biological techniques as well as provides protocols for FISH, 3D-FISH, and sample preparation.
Keywords: Oligopaint, oligonucleotide, complex DNA library, FISH
INTRODUCTION
The availability of inexpensive DNA oligonucleotide (oligo) libraries containing hundreds to hundreds of thousands of unique oligo species has enabled technological advances in areas such as cytogenetics and the study of nuclear biology. In particular, these libraries can serve as a renewable source of probes for fluorescence in situ hybridization (FISH) and allow researchers to precisely define the sequences to be targeted by the probes. This unit details a strategy that applies a few standard molecular biological protocols to complex libraries of ssDNA oligos in order to produce short, single-stranded, highly efficient Oligopaint FISH probes that label >90% of nuclei in fixed tissue culture cells (Beliveau et al., 2012). Probe generation can be accomplished in a matter of days and at a cost that is below that of commercially available bacterial artificial chromosome (BAC) -based probes (Beliveau et al., 2012). Oligopaint probes can target regions ranging in size from tens of kilobases to many megabases, can be made strand-specific, and can be bioinformatically designed to produce customizable patterns, such as multicolor banding.
Basic Protocol 1 presents the strategy for synthesizing Oligopaint probes, while Basic Protocol 2 details a streamlined protocol for using Oligopaint probes to label interphase and mitotic chromosomes in tissue culture cells. Alternate Protocol 2 describes a strategy for 3D-FISH (Lanzuolo et al., 2007; Cremer et al., 2008), which avoids high-temperature steps in order to better preserve the three-dimensional morphology of nuclei, while Alternate Protocol 3 describes a strategy for labeling metaphase chromosomes. Finally, Support Protocol 2 addresses the preparation of sample slides for use with Basic Protocol 2 and Support Protocol 2.
BASIC PROTOCOL 1
Generation of single-stranded Oligopaint FISH probes from a complex DNA library
Oligopaint FISH probes are produced by a series of standard molecular biological techniques, including PCR, DNA precipitation, and gel electrophoresis, and the protocol presented below describes the entire process, starting with the incorporation of fluorescent labels during PCR and finishing with the quantification of the purified ssDNA probe. For a discussion of some of the considerations in probe design, see Critical Parameters. This probe synthesis protocol uses the strategy described by Beliveau et al. (2012), in which a nicking endonuclease recognition sequence (e.g. 5'…GCAATG…3' for Nb.BsrDI) is included in every molecule of the ssDNA library (see Figure 1) to facilitate the isolation of single-stranded probe molecules after the conversion of the library to dsDNA by PCR amplification. Note that while Figure 1 of Beliveau et al. (2012) illustrates the use of a single nicking endonuclease site, it is also possible to include two distinct nicking endonuclease sites (e.g Nb.BsrDI and Nb.BsmI, Figure 1 of this publication) such that either strand of the dsDNA duplex can be used to generate FISH probe.
Figure 1. Library design using the Oligopaints strategy.
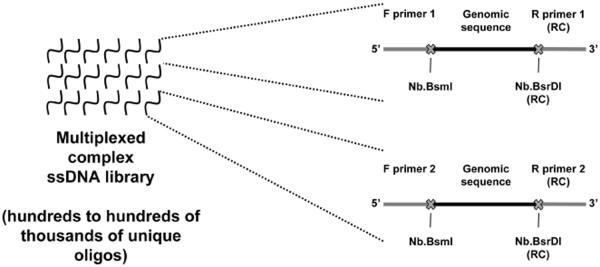
Each synthetic ssDNA library may contain hundreds to hundreds of thousands or more unique oligo species and can contain multiple distinct Oligopaint probes through the use of multiple primer pairs. This figure diagrams the structure of two oligos from different probe sets in a hypothetical library: an oligo belonging to a probe that can be amplified using primer pair 1 (top left) and an oligo belonging to a probe that can be amplified using primer pair 2 (bottom left). Both oligos contain, in 5' to 3' order, the sequence of the forward primer, genomic sequence, and then the reverse complement (RC) of the reverse primer. The sites for two nicking endonucleases, Nb.BsmI and Nb.BsrDI, are placed between the primer sequences and the genomic sequences. The use of two nicking endonuclease sites in the library molecules allows for the production of strand specific probes: amplification with a labeled F primer and digestion with Nb.BsrDI will yield probe targeting the reverse complement of the genomic sequence encoded in the ssDNA molecules of the library, whereas amplification with a labeled R primer and digestion with Nb.BsmI will yield probe targeting the genomic sequence encoded in the ssDNA molecules of the library. The use of two nicking endonuclease sites, instead of one, is an update of the strategy presented in Figure 1 of Beliveau et al. (2012).
Materials
10X Taq DNA polymerase buffer
10 mM dNTP mix
200 μM fluorophore-labeled “Forward” primer
200 μM unlabeled “Reverse” primer
20 pg/μl complex DNA library
5 U/μl Taq DNA polymerase
Molecular-biology grade water
100% ethanol
20 mg/ml molecular biology grade glycogen
4M ammonium acetate solution in distilled, deionized water (ddH2O)
70% (vol/vol) ethanol solution in ddH2O
10X Nb.BsrDI enzyme buffer
10 U/μl Nb.BsrDI enzyme
1X Tris-Borate-EDTA (TBE) buffer (see recipe)
15% TBE + 7 M Urea denaturing polyacrylamide gel
Low molecular weight DNA ladder
2X TBE + urea gel loading buffer containing xylene cyanol FF and bromophenol blue 10 mg/ml ethidium bromide solution in molecular biology grade water 0.4 M ammonium acetate solution in ddH2O
0.2 ml thin wall strip tubes or thin wall 96-well plate
50 ml conical tube
2.0 ml microcentrifuge tubes
15 ml conical tube
Programmable thermocycler
Benchtop vortexer
Refrigerated centrifuge
Adjustable heat block
Gel box and power supply
Ethidium bromide staining dish
Benchtop orbital shaker
UV box
Heated vortexer or shaking incubator
Spectrophotometer
NOTE: Add 100-fold more template if using raw ssDNA library (i.e. direct from manufacturer, never amplified via PCR) as many of the raw oligos may not be suitable templates for amplification. Raw libraries can be amplified using unlabeled “F” and “R” primers and purified using a PCR-cleanup kit in order to provide a greater amount of template material for labeling PCRs.
-
Set up a PCR master mix using the component ratios listed below and aliquot into 0.2 ml thin wall strip tubes or a thin wall 96-well plate. Do not add more than 100 μl of master mix per tube/well.
1X PCR master mix
10 μl 10X Taq DNA polymerase buffer
2 μl 10 mM dNTP mix
0.5 μl 200 μM fluorophore-labeled “Forward” primer
0.5 μl 200 μM unlabeled “Reverse” primer
1 μl 20 pg/μl complex DNA library
1 μl 5 U/μl Taq DNA polymerase
85 μl molecular biology grade water
The scale of the PCR reaction should correlate with the desired number of FISH assays. In an efficient probe preparation, ≥20% of fluorescently-labeled primer added to the PCR reaction will be recovered as ssDNA FISH probe. Thus, a 10 ml PCR reaction using 10,000 pmol of labeled primer can be expected to produce 2,000 pmol of FISH probe, or 100 20 pmol FISH assays.
NOTE: The proofreading 3' -> 5' exonuclease activity of some high-fidelity thermostable DNA polymerases can lead to DNA degradation in subsequent steps. A phenol-chloroform extraction is recommended after the PCR is completed if your polymerase has strong exonuclease activity. This extraction is not necessary for most standard polymerases.
-
Transfer the PCR reactions to a programmable thermocycler and run the following program:
Labeling PCR program
95°C 5 minutes
95°C 30 seconds
60°C 30 seconds
72°C 15 seconds
Repeat steps 2–4 42X (43 total cycles)
72°C 5 minutes
End
This program assumes a primer TM of ~60°C for both primers; raise or lower the annealing temperature accordingly if necessary.
-
Pool the cycled PCR reactions in a 50 ml conical tube.
To accelerate this step for large volumes, extract the PCR reaction using a multichannel pipette and transfer to a disposable reagent reservoir in a PCR or tissue culture hood.
Set up a DNA precipitation in the 50 ml falcon containing the PCR product: for every 600 μl of PCR reaction, add 2 μl 20 mg/ml glycogen, 65 μl 4M ammonium acetate, and 1350 μl ice-cold 100% ethanol. Vortex vigorously and aliquot into 2.0 ml microcentrifuge tubes.
-
Incubate the precipitations at −80°C for 35 minutes or for >2 hours at −20°C.
Precipitations can be left at −20°C overnight or indefinitely; this step represents a convenient stopping point.
-
Spin the precipitation at max speed for 1 hour at 4°C in a refrigerated centrifuge.
The precipitation can also been spun at room temperature if a refrigerated centrifuge is not available.
-
Carefully aspirate off the 100% ethanol using a vacuum trap or micropipette.
A prominent pellet should be visible after the spin. Depending on the fluorophore used, the pellet may appear colored.
Add 1350 μl ice-cold 70% to each tube, taking care not to disturb the pellet.
Spin the precipitation at max speed for 30 minutes at 4°C in a refrigerated centrifuge.
Carefully aspirate off the 70% ethanol using a vacuum trap or micropipette.
Air dry the pellets by placing open tubes onto a 42°C heat block for 15 minutes.
-
Add 60 μl of molecular biology grade water to each pellet. Incubate for 30 minutes at 37°C to resuspend. Vortex each tube after the 37°C incubation, then spin briefly in a microcentrifuge.
Shaking at 1400 rpm in a heated vortexer will speed up the resuspension.
This step represents a convenient stopping point – samples can be left at 4°C for several weeks or frozen at −20°C and left indefinitely.
-
Set up a nicking endonuclease digestion: for every 60 μl of precipitated PCR product, add 7.5 μl 10X nicking enzyme buffer and 7.5 μl 10 U/μl Nb.BsrDI. Aliquot the digestion into 0.2 ml thin wall strip tubes or a thin wall 96-well plate. Do not add more than 25 μl of master mix per tube/well.
Incubating the digestion in a single 0.6 ml thin wall tube or 1.7 ml microcentrifuge tube may result in reduced nicking efficiency.
-
Incubate the digestion for 4 hours at 65°C in a programmable thermocycler, then heat-inactivate the enzyme by incubating for 20 minutes at 80°C.
Incubating for >4 hours at 65°C is not recommended as it may result in star activity. While Nb.BsrDI and Nb.BsmI require incubation at 65°C, other nicking enzymes may require incubation at 37°C.
-
Pool the digestion reaction in a 15 ml conical tube. Set up a DNA precipitation: for every 600 μl of digestion reaction, add 2 μl 20 mg/ml glycogen, 65 μl 4M ammonium acetate, and 1350 μl ice-cold 100% ethanol. Vortex vigorously and aliquot into 2.0 ml microcentrifuge tubes.
Molecular biology grade water can be used to adjust the volume of the pooled digestion reaction to a balanced number of 2.0 ml microcentrifuge tubes (e.g. a multiple of two or three) if desired. The DNA will be very concentrated at this step; a precipitate may form as soon as the digestion is mixed with 100% ethanol.
-
Incubate the precipitations at −80°C for 35 minutes or for >2 hours at −20°C.
Precipitations can be left at −20°C overnight or indefinitely; this step represents a convenient stopping point.
-
Spin the precipitation at max speed for 1 hour at 4°C in a refrigerated centrifuge.
The precipitation can also been spun at room temperature if a refrigerated centrifuge is not available.
-
Carefully aspirate off the 100% ethanol using a vacuum trap or micropipette.
A very large pellet should be visible after the spin. Depending on the fluorophore used, the pellet may appear colored.
Add 1350 μl ice-cold 70% to each tube, taking care not to disturb the pellet.
Spin the precipitation at max speed for 30 minutes at 4°C in a refrigerated centrifuge.
Carefully aspirate off the 70% ethanol using a vacuum trap or micropipette.
Air dry the pellets by placing open tubes onto a 42°C heat block for 15 minutes.
-
Add 40 μl of molecular biology grade water to each pellet. Incubate for 30 minutes at 37°C to resuspend. Vortex each tube after the 37°C incubation, then spin briefly in a microcentrifuge.
Shaking at 1400 rpm in a heated vortexer will speed up the resuspension.
Step 24 can be started during the 37°C incubation.
-
Pre-run a 15% TBE-Urea polyacrylamide gel in pre-warmed (to ~60 °C) 1X TBE at constant wattage for at least 30 minutes. Use a wattage that maintains a buffer temperature of 55°C – 60°C.
It is essential that the gel is sufficiently hot to prevent the renaturation of the nicked DNA. Renaturation will result in the appearance of slow-migrating smears in the gel.
Caution: the gel casing may crack if the temperature is too high.
While the gel is pre-running, mix the resuspended precipitation products 1:1 with 2X TBE-urea gel loading buffer and aliquot into 0.2 ml thin wall strip tubes. Load one gel well volume (e.g. 40 μl) per tube. Also mix an aliquot of low molecular weight DNA ladder 1:1 with 2X TBE-urea gel loading buffer and load into a 0.2 ml thin wall strip tube.
Denature the samples for 5' at 95°C in a programmable thermocycler, then transfer directly to ice.
Rinse each gel well with 1X TBE (from the gel box) using a 1000 μl micropipette to blast out any urea that may have settled in the well prior to loading the samples.
-
Load the samples and run at the same constant wattage as the pre-run (again maintaining temperature of 55°C – 60°C) until the bromophenol blue marker dye is near the bottom of the gel (~15–20 minutes for an 8.7 cm gel).
The labeled ssDNA product of interest will essentially co-migrate with the xylene cyanol FF marker dye, running slightly slower. Prominent colored bands may be visible depending on the fluorophore used.
Carefully remove the gel from its casing and add to a staining dish containing 50 ml of 0.6 μg/ml ethidium bromide solution (3 μl of 10 mg/ml ethidium bromine solution in 50 ml ddH2O).
Stain the gel for 5 minutes with gentle mixing on a benchtop orbital shaker.
Pour off the ethidium bromide stain and add 50 ml of ddH2O. De-stain for 5 minutes with gentle mixing on a benchtop orbital shaker.
-
Pour off the de-stain ddH2O and add a small amount of fresh ddH2O to the dish.
The fresh ddH2O makes it easier to remove the gel from the dish. Don't worry about adding too much.
At this point, the gel can be imaged on a gel-doc or UV scanner prior to the gel extraction step.
Prepare a 2.0 ml microcentrifuge tube containing 600 μl of 0.4 M ammonium acetate for each gel lane loaded.
-
Image the gel on a UV box. The ssDNA product of interest is 59 bases long. Excise the bands of interest and transfer to them to the microcentrifuge tubes prepared in step 33 (one gel slice/tube).
Some fluorophores may slightly alter the migration of the ssDNA relative to the DNA ladder. Three prominent bands are expected: one containing unlabeled strand and any un-nicked labeled DNA resulting from incomplete digestion; a faster migrating band containing the labeled probe DNA; the fastest migrating band containing the unincorporated primer sequences and the unlabeled fragment released by the nicking reaction.
Note: The final labeled ssDNA fragment of interest reported in Beliveau et al. (2012) is 53 bases long, while the fragment described here is 59 bases. The difference in length is the result of the inclusion of an additional 6-base nicking endonuclease recognition site that allows the isolation of either strand of the duplex produced by PCR (see Figure 1).
Incubate the gel slices overnight at 55°C in a heated vortexer at max speed (if available) or a shaking incubator at ≥300 rpm.
The next day, spin the tubes containing the gel slices for 5 minutes at max speed in a microcentrifuge.
-
Collect the supernatant from each tube, leaving the gel slice behind, and transfer to a fresh 2.0 ml microcentrifuge tube.
The gel slices can be incubated at 55°C with shaking in an additional 600 μl of 0.4 M ammonium acetate to recover any product not eluted by the first overnight incubation if desired.
Set up a DNA precipitation: add 13.5 μl 20 mg/ml glycogen and 1350 μl ice-cold 100% ethanol to each 2.0 ml tube. Vortex vigorously to mix.
-
Incubate the precipitations at −80°C for 35 minutes or for >2 hours at −20°C.
Precipitations can be left at −20°C overnight or indefinitely; this step represents a convenient stopping point.
-
Spin the precipitation at max speed for 1 hour at 4°C in a refrigerated centrifuge.
The precipitation can also been spun at room temperature if a refrigerated centrifuge is not available.
-
Carefully aspirate off the 100% ethanol using a vacuum trap or micropipette.
A prominent pellet should be visible after the spin. Depending on the fluorophore used, the pellet may appear colored.
Add 1350 μl ice-cold 70% to each tube, taking care not to disturb the pellet.
Spin the precipitation at max speed for 30 minutes at 4°C in a refrigerated centrifuge.
Carefully aspirate off the 70% ethanol using a vacuum trap or micropipette.
Air dry the pellets by placing open tubes onto a 42°C heat block for 15 minutes.
-
Add 10 μl of molecular biology grade water to each pellet. Incubate for 60 minutes at 37°C to resuspend. Vortex each tube after the 37°C incubation, then spin briefly in a microcentrifuge.
Shaking at 1400 rpm in a heated vortexer will speed up the resuspension.
-
Quantify the amount of ssDNA FISH probe using a spectrophotometer.
The concentration of the ssDNA FISH probe can be inferred by measuring the absorbance of light at 260 nm (A260). Remember to use the ssDNA absorbance unit of 37 μg/ml, not the 50 μg/ml absorbance unit of dsDNA.
It is also important to note that some fluorophores, particularly those in the blue to green portion of the visible spectrum, absorb light at 260 nm. Thus, to get an accurate DNA concentration, a Correction Factor (CF) may need to be used. CF is defined as A260 free dye/Amax free dye, or the fluorophore's absorbance as a free dye at 260 nm divided by the fluorophore's absorbance as a free dye at its absorbance maximum (i.e. excitation wavelength). Therefore, the corrected DNA absorbance is expressed as ADNA = A260 − (Amax * CF), where A260 is the absorbance of the solution at 260 nm and Amax is the absorbance of the solution at the absorbance max of the fluorophore.
Probe preparations can be stored at 4°C for several weeks or −20°C indefinitely. Aliquot large preparations before freezing to minimize the number of times the probe is freeze-thawed.
BASIC PROTOCOL 2 (optional)
Interphase FISH using Oligopaint probes
Oligopaint probes label interphase nuclei extremely efficiently. This section details a fast FISH protocol optimized for labeling chromosomal DNA in fixed tissue culture cells. Alternate Protocol 2 describes a modified 3D-FISH (Lanzuolo et al., 2007; Cremer et al., 2008) version of this basic protocol in which the temperature is never raised above 78°C, and Alternate Protocol 3 presents a modified protocol for applying FISH with Oligopaint probes to metaphase chromosome preparations.
Materials
Fixed interphase cells adhered to a glass microscope slide (see Support Protocol 2) 4X SSCT (see recipe)
Formamide (store at 4°C, away from light)
2X hybridization cocktail (see recipe)
10 mg/ml RNase A
Oligopaint probe (see Basic Protocol 1)
1.7 ml microcentrifuge tubes
22 × 22 mm #1.5 coverslips
Rubber cement
2X SSCT (see recipe)
0.2X SSC (see recipe)
Anti-fade mounting media with DAPI
22 × 30 mm #1.5 coverslips
Nail polish
100 ml graduated cylinder
Plastic paraffin film
Glass `Coplin' slide staining jars
Adjustable temperature water bath (x2)
Anodized aluminum heat block
Forceps
Benchtop vortexer
Benchtop microcentrifuge
Hybridization chamber (see step 15)
Heated incubator
Epifluorescent or confocal microscope
Prepare 100 ml of 2X SSCT + 50% formamide by adding 50 ml of 4X SSCT and 50 ml of formamide to a 100 ml graduated cylinder. Seal the top of the cylinder with plastic paraffin film and invert several times to mix.
-
Add 50 ml of 2X SSCT + 50% formamide per jar to two `Coplin' glass slide staining jars. Place each Coplin jar in a separate temperature-adjustable water bath at room temperature.
Caution: do not place a room temperature Coplin jar directly into a hot water bath, as this may weaken the Coplin jar or cause it to break instantly.
Heat one water bath to 60°C and the other to 92°C. Also place an anodized aluminum block into the bath to be set to 92°C and adjust the water level such that all but about 1 cm of the block is submerged. Allow the sample slides to warm from 4°C to room temperature while the water baths heat up.
Transfer the sample slides into the Coplin jar containing 2X SSCT + 50% formamide at 92°C using forceps and incubate for 2.5 minutes.
Transfer the slides into the Coplin jar containing 2X SSCT + 50% formamide at 60°C using forceps and incubate for 20 minutes.
-
While the slides are incubating at 60°C, prepare a hybridization master mix. For each sample, add 12.5 μl of 2X hybridization cocktail (Reagents and Solutions), 12.5 μl of formamide, and 1 μl of 10 mg/ml RNase. For each sample, aliquot 26 μl of hybridization master mix into a 1.7 μl microcentrifuge tube.
The 2X hybridization cocktail is very viscous and can be difficult to pipette. Removing 1–2 cm from the end of a plastic pipette tip with scissors or a razor blade will make this step easier. If available, a positive-displacement pipette simplifies the pipetting.
-
Add the Oligopaint probe to each microcentrifuge tube containing hybridization master mix. 20 – 30 pmol of Oligopaint probe is typically sufficient to produce strong staining in fixed tissue culture cells; 10-fold more probe is recommended for tissue sections and whole mount tissues.
The amount of probe needed to produce strong signal may need to be determined empirically for each type of sample. See the Critical Parameters section for further discussion of this issue.
Try to keep the volume of probe added as small as possible - i.e. use concentrated stocks of probe. Dilute probes can be concentrated by lyophilization or salt-ethanol precipitation followed by resuspension in a reduced volume. Adding ≤ ~4 μl of probe per sample is recommended.
Mix the contents of each microcentrifuge tube by vortexing and spin down briefly in a benchtop microcentrifuge to collect the hybridization mix. Protect the hybridization mixes from light be covering the tubes with foil or placing them in a drawer until the slides are ready.
-
After the 20 minute incubation at 60°C is finished, carefully remove the slides from the Coplin jar in the water bath using forceps. Partially dry the sample slides by tapping the thin edge of the slides against a paper towel, then place the slides into an empty Coplin jar.
Take care that the slide surface containing the sample never comes into direct contact with the paper towel, as the paper towel can introduce unwelcome debris.
-
Place a 22 × 22 mm coverslip onto a dry paper towel and pipette the hybridization mix directly onto the coverslip.
The final hybridization mix will be less viscous than the 2X hybridization cocktail and can be pipetted using a standard micropipette with standard tips. Take care to avoid air bubbles when pipetting.
Gently invert the sample slide onto the coverslip such that the sample (typically visible as a cloudy circle) is placed in direct contact with the hybridization mix. Do not press the slide down against the coverslip as this will result in the ejection of hybridization mix onto the paper towel.
-
Turn the slide over so the coverslip is on the upward-facing side of the slide. Seal the coverslip onto the slide by adding a layer of rubber cement around the edges of the coverslip.
Do not worry about adding too much rubber cement as it is easily removed after the denaturation and hybridization steps. It is essential that the perimeter of the coverslip be completely covered by rubber cement, else the hybridization mix may leak or evaporate during the denaturation or hybridization step.
-
Allow the rubber cement to dry for 5 minutes.
The slides can be placed inside a box or in a drawer during this incubation to protect them from light.
-
Denature each slide by placing it coverslip-side up on the top of the submerged anodized aluminum block in the 92°C water bath for 2.5 minutes.
Take care not to let the slides sit on the block for longer than 2.5 minutes as the sample may begin to be destroyed by extended high-temperature treatment. If the size of the water bath and the number of aluminum blocks available permits it, several samples can be denatured in parallel.
-
Transfer the denatured slide to a humidified hybridization chamber and allow the hybridization reaction to occur overnight (>14 hours) at 42°C in a heated incubator.
A humidified hybridization chamber can be assembled from a plastic chamber with a lid (e.g. a plastic Tupperware container or an empty pipette tips box), damp paper towels, and a plastic rest for the slides (to keep them from sitting directly on the damp paper towels) such as a reagent reservoir or few pieces of a cut serological pipette. The chamber does not need to be airtight and preferably will have the lid only loosely attached to allow for air exchange when placed in the heated incubator.
-
The next day, add 50 ml of 2X SSCT to a Coplin jar. Place the Coplin jar in a water bath and heat to 60°C.
If your anti-fade mounting media is stored at −20°C, remove it from the freezer at this point and allow it to warm to room temperature.
-
Carefully remove the rubber cement and coverslips from the sample slides and transfer to the Coplin jar containing 2X SSCT in the 60°C water bath. Incubate for 15 minutes at 60°C.
The coverslip can often by removed by gently sliding it along the surface of the slide towards the edge using a gloved finger. If the coverslip does not move readily, remove the rubber cement with fine forceps while applying gentle pressure to the center of the coverslip. In both methods, it is essential to avoid violently prying the coverslip upwards (this often occurs when just one edge is freed from rubber cement but its parallel edge is still covered), as this will result in the stretching/shearing of chromosomal DNA.
-
Transfer the slides to a Coplin jar containing 50 ml of 2X SSCT and incubate for 10 minutes at room temperature.
The Coplin jar can be covered with foil or placed in a drawer to protect the samples from light.
-
Transfer the slides to a Coplin jar containing 50 ml of 0.2X SSC and incubate for 10 minutes at room temperature.
The Coplin jar can be covered with foil or placed in a drawer to protect the samples from light.
Remove the slides from the 0.2X SSC Coplin jar and partially dry the slides by tapping the thin edge of the slides against a paper towel, then placing the slides into an empty Coplin jar.
Place a 30 × 22 mm coverslip onto a dry paper towel and pipette 12.5 μl of anti-fade mounting media containing DAPI onto the center of the coverslip. Take care to avoid air bubbles.
-
Gently invert the sample slide onto the coverslip such that the sample (typically visible as a cloudy circle) is placed in direct contact with the mounting media. Press down gently but firmly to eject excess mounting media.
The coverslip should be immobile to the touch, being held in place by a thin monolayer of mounting media. If the coverslip is still loose, move the inverted slide + coverslip to another spot on the paper towel and repeat. Take care not to press too firmly as the slide may break.
Turn the slide over so the coverslip is on the upward-facing side of the slide. Seal the coverslip onto the slide by adding a layer of nail polish around the edges of the coverslip.
Allow at least 30 minutes for the nail polish to dry before imaging the slides. The FISH can be visualized using an epifluorescent or confocal microscope.
ALTERNATE PROTOCOL 2 (optional)
Fast 3D-FISH using Oligopaint probes
This section presents a relatively quick 3D-FISH (Lanzuolo et al., 2007; Cremer et al., 2008) protocol that avoids using high-temperature treatments in order to better preserve the nuclear morphology of samples. This protocol is similar to Basic Protocol 2, but contains additional pre-hybridization steps to improve sample permeability.
Additional Materials
1X PBS (see recipe)
1X PBST (see recipe)
1X PBS + 0.5% (vol/vol) Triton-X100
0.1 N HCl
-
Heat one water bath to 60°C and the other to 78°C. Place a Coplin jar containing 50 ml of 2X SSCT + 50% formamide (Basic Protocol 2 steps 1–2) into the 60°C bath and place an anodized aluminum block into the 78°C bath and adjust the water level such that all but about 1 cm of the block is submerged. Allow the sample slides to warm from 4°C to room temperature while the water baths heat up.
Note: unless otherwise indicated, perform all of the following incubations at room temperature.
Transfer the sample slides using forceps to a Coplin jar containing 50 ml of 1X PBS and incubate for 1 minute.
Transfer the sample slides to a Coplin jar containing 50 ml of 1X PBST and incubate for 1 minute.
Transfer the sample slides to a Coplin jar containing 50 ml of 1X PBS + 0.5% (vol/vol) Triton-X100 (250 μl in 50 ml) and incubate for 10 minutes.
Transfer the sample slides to a Coplin jar containing 50 ml of 1X PBST and incubate for 2 minutes.
Transfer the sample slides to a Coplin jar containing 50 ml of 0.1 N HCl (625 μl 8N HCl in 50 ml ddH2O) and incubate for 5 minutes.
Transfer the sample slides to a Coplin jar containing 50 ml of 2X SSCT and incubate for 1 minute.
Transfer the sample slides to a Coplin jar containing 50 ml of 2X SSCT and incubate for 2 minutes.
Transfer the sample slides to a Coplin jar containing 50 ml of 2X SSCT and incubate for 2 minutes.
Transfer the sample slides to a Coplin jar containing 50 ml of 2X SSCT + 50% formamide and incubate for 5 minutes.
Transfer the sample slides to the Coplin jar containing 50 ml of 2X SSCT + 50% formamide in the 60°C water bath and incubate for 20 minutes.
Follow Steps 6–24 of Basic Protocol 2 exactly as written, except denaturing at 78°C for 2.5 minutes in Step 14.
ALTERNATE PROTOCOL 3
Metaphase FISH with Oligopaint probes
Metaphase FISH with Oligopaint probes calls for a slightly modified protocol that uses different denaturation conditions and includes a progressive ethanol dehydration prior to probe addition.
Additional Materials
Sample slide containing spread mitotic chromosomes
70% (vol/vol) ethanol in ddH2O
90% (vol/vol) ethanol in ddH2O
100% (vol/vol) ethanol
-
Place a Coplin jar containing 50 ml of 2X SSCT + 70% (vol/vol) formamide in a water bath and warm to 70°C.
50 ml of 2X SSCT + 70% (vol/vol) formamide can be made by combining 35 ml formamide, 12.5 ml 8X SSCT (Reagents and Solutions), and 2.5 ml ddH2O.
While the water bath is heating up, allow sample slides to warm to room temperature.
Denature the samples by incubating them in the Coplin jar containing 2X SSCT + 70% formamide at 70°C for 1.5 minutes.
Transfer the samples to a Coplin jar containing ice cold 70% ethanol and incubate at room temperature for 5 minutes.
Transfer the samples to a Coplin jar containing ice cold 90% ethanol and incubate at room temperature for 5 minutes.
Transfer the samples to a Coplin jar containing ice cold 100% ethanol and incubate at room temperature for 5 minutes.
-
Air dry the samples face up on a paper towel at room temperature (1-2 minutes).
The sample slides can be placed inside a box or drawer to protect them from floating dust.
Prepare hybridization mix as directed in Steps 6-8 of Basic Protocol 2.
Add the hybridization mix to the sample slides and seal with rubber cement as directed in Steps 10-12 of Basic Protocol 2.
Transfer the sample slides to a humidified hybridization chamber and allow the hybridization reaction to occur overnight (>14 hours) at 37°C in a heated incubator.
Follow steps 16-24 of Basic Protocol 2.
SUPPORT PROTOCOL 2 (optional)
Preparing tissue culture cells for interphase FISH
Tissue culture cells provide a convenient substrate for interphase FISH. This section describes a standard protocol for creating FISH sample slides from a suspension of adherent or semi-adherent cells.
Additional Materials
0.01% (vol/vol) poly-L-Lysine solution in ddH2O
1×10⁵ - 1×10⁶ cells/ml cell suspension
1X PBS + 4% (vol/vol) paraformaldehyde (see recipe)
25 × 75 × 1 mm glass microscope slides
Lint-free paper towels (e.g. Kimwipes)
Plastic Coplin staining jar
-
Cell culture incubator
Note: All steps are performed at room temperature unless otherwise indicated
-
Use a lint-free paper towel soaked in 100% ethanol to clean each slide
This step is recommended for all slides, even those advertised as “pre-cleaned” by their manufacturer, and is intended to remove microscopic dust and debris from the slides.
Allow the slides to air dry.
-
Prepare 50 ml of 0.01% (vol/vol) poly-L-Lysine solution in ddH2O (5 ml 0.1% stock + 45 ml ddH2O) and add to a plastic Coplin jar.
A glass Coplin jar can be used here, but its insides will be coated by the poly-L-lysine solution as well.
-
Allow the slides to air dry.
This step can be sped up using the airflow of a tissue culture hood.
-
Prepare a suspension of 1×10⁵ - 1×10⁶ cells/ml in complete growth media.
This density works for most cell lines but can be adjusted if necessary.
Use a micropipette to place 100 μl of cell suspension roughly in the center of a poly-L-lysine-treated slide.
-
Allow the cells to adhere for 1.5 - 3 hours in a cell culture incubator.
Large Petri dishes and metal trays covered with aluminum foil are convenient vessels to hold the slides. If working with mammalian cells, be sure to allow for gas exchange between the slides and the atmosphere of the incubator.
Transfer the slides to a Coplin jar containing 50 ml of 1X PBS and incubate for 1 minute.
Transfer the slides to a Coplin jar containing 40 ml of 1X PBS + 4% (vol/vol) paraformaldehyde and incubate for 10 minutes.
Transfer the slides to a Coplin jar containing 50 ml of 1X PBS and incubate for 1 minute.
Transfer the slides to a Coplin jar containing 50 ml of 2X SSCT and incubate for 5 minutes.
Transfer the slides to a Coplin jar containing 50 ml of 2X SSCT + 50% formamide (25 ml 4X SSCT + 25 ml formamide) and incubate for 5 minutes.
-
Transfer the slides to a Coplin jar containing 50 ml of 2X SSCT + 50% formamide and transfer to 4°C for storage.
Slides should be used within 2 weeks of creation. Screw-top Coplin jars are convenient for storing slides; paraffin film can be used to seal the top of standard Coplin jars if screw-top jars are not available.
REAGENTS AND SOLUTIONS
Note ddH2O refers to deoinized, distilled water.
2X hybridization cocktail
For 10 ml: add 4 ml 50% (wt/vol) dextran sulfate solution (in ddH2O), 2 ml 20X SSC, and 4 ml ddH2O. Store at room temperature.
1X PBS
Dilute 10X PBS (see recipe) 1:10 in ddH2O. Store at room temperature.
10X PBS
Prepare a 1 L 10X PBS stock solution: dissolve 80 g NaCl, 2 g KCl, 14.4 g Na2HPO4, and 2.4 g KH2PO4 in 800 ml ddH2O. Adjust pH to 7.4 using HCl, and then add ddH2O to 1 L. Store at room temperature.
1X PBS + 4% (vol/vol) paraformaldehyde
For 40 ml: combine 4 ml 10X PBS, 26 ml ddH2O, and 10 ml of 16% (wt/vol) paraformaldehyde solution (made with ddH2O). Make fresh and store at 4°C for up to one week.
1X PBST
For 1 L: combine 100 ml 10X PBS, 899 ml ddH2O, and 1 ml Tween-20. Store at room temperature.
0.2X SSC
For 1 L: combine 20 ml 20X SSC and 980 ml ddH2O. Store at room temperature.
20X SSC
For 1 L: dissolve 175.3 g of NaCl and 88.2 g of sodium citrate in 800 ml of ddH2O. Adjust the pH to 7.0 with 1M HCl, and then add ddH2O to 1 L. Store at room temperature.
2X SSCT
For 1 L: combine 200 ml 20X SSC, 799 ml ddH2O, and 1 ml Tween-20. Store at room temperature.
4X SSCT
For 1 L: combine 400 ml 20X SSC, 598 ml ddH2O, and 2 ml Tween-20. Store at room temperature.
8X SSCT
For 1 L: combine 800 ml 20X SSC, 196 ml ddH2O, and 4 ml Tween-20. Store at room temperature.
1X TBE
Prepare 1L of a 5X stock solution: dissolve 54 g of Tris base, 27.5 g of boric acid, and 20 ml 0.5 M Ethylenediaminetetraacetic acid (EDTA) pH 8.0 in ddH2O. Dilute the 5X stock 1:5 in ddH2O to make 1X. Store at room temperature.
COMMENTARY
Background Information
FISH is an adaptation of a nucleic acid in situ hybridization method that was developed by Pardue and Gall (Pardue and Gall, 1969) and used radiolabeled probes (Bauman et al., 1980; Pinkel et al., 1986; reviewed in: Levsky and Singer, 2003; Volpi and Bridger, 2008; Itzkovitz and van Oudenaarden, 2011). It is a powerful tool for studying chromosome structure and position as well as gene expression, as it can be used to interrogate both DNA and RNA molecules. It is informative at the single-cell level and can be combined with other single-cell imaging methods, such as the immufluorescent detection of proteins.
FISH probes have typically been derived from flow-sorted chromosomes or genomic inserts subcloned into vectors, such as plasmids, cosmids, and BACs. These chromosomes and inserts can be labeled via the incorporation of fluorophore- or hapten-conjugated dNTPs in enzymatic nick-translation or PCR reactions, producing ~100 bp dsDNA (Lichter et al., 1988). Because the starting material can contain sequences that are highly repeated in the genome, the resulting probes often need to be used in the presence of unlabeled repetitive DNA so as to minimize background signal due to off-target hybridization (Landegent et al., 1987).
Synthetic nucleic acid oligos, including DNA, RNA, peptide nucleic acid (PNA), and locked nucleic acid (LNA) oligos, have also been used as FISH probes (Larsson et al., 1988; Landsdorp et al., 1996; O'Keefe, Warburton, and Matera, 1996; Silahtaroglu, Tommerup, and Vissing, 2003). Such oligo probes have typically been used to detect RNA molecules (Femino et al., 1998; Player et al., 2001; Raj et al., 2008) or to visualize DNA targets that facilitate signal detection because they are internally repetitive (Dernburg et al., 1996). In these situations, the number of oligo species in a probe has hovered in the range of ~1 to 50.
Excitingly, recent technological advances permitting the parallel synthesis of hundreds to hundreds of thousands of oligo species have enabled several new methods for generating oligo-based FISH probes. One family of these methods uses synthetic oligos containing genomic sequence as PCR primers to amplify fragments of genomic sequence in parallel reactions (Martinez et al., 2006; Navin et al., 2006; Lamb et al., 2007; Bienko et al., 2013). Other methods encode the entirety of the genomic region to be targeted in a library of oligos and, therefore, permit the pool of oligos to be used directly as a FISH probe, if fluorescent label is added during synthesis of the library (Boyle et al., 2011), or, if the genomic sequences are flanked by primers, enable the pool to become a renewable resource that can be amplified in the presence of fluorescent label to generate dsDNA (Yamada et al., 2011; Beliveau et al., 2012) or ssDNA (Beliveau et al., 2012) probes. Note that the use of primers that have been synthesized to contain precisely positioned fluorophores (e.g., 5' labeled primers) will produce probes with uniform specific activities of fluorescence (Beliveau et al., 2012). The strategy of Beliveau et al., 2012, which produces Oligopaints, is compatible with many standard molecular biological protocols and can be used to generate a variety of probe structures (see Beliveau et al., 2012 Fig. S12). In this unit, we detail the version that produces probes which are short (e.g. 59 bases) and single-stranded, features that likely enhance the diffusion of probes into samples as well as increase the efficiency of hybridization. The strand-specific nature of Oligopaints will also aid in the design of experiments that target RNA molecules or must distinguish one strand of DNA from the other.
Critical Parameters
Probe design
In general, targeting genomic regions with >500-1000 probes, where each oligo carries one fluorophore, is sufficient to produce a strong signal. The number of oligo species required to produce a robust FISH signal may, however, vary depending on the genomic target and the type of sample (e.g., cell culture or tissue sample) being interrogated. If the region of interest (e.g. a gene body) is too small to accommodate the desired number of probe oligos, researchers may wish to extend the target into flanking sequences. In cases where extending the target is not desirable, users may wish to consider methods for amplifying signals, such as placing a hapten (e.g. biotin or digoxigenin) on the primer and then visualizing the FISH using antibodies that target the hapten. The design of probes for RNA FISH may also vary greatly depending on the target; interested readers are encouraged to read the discussion of this topic in Itzkovitz and van Oudenaarden (2011).
Reagent Quality
The generation of Oligopaint probes using the method outlined in this unit relies heavily on two enzymatic steps – PCR and digestion with a nicking endonuclease. It is important to monitor the quality of the reagents used in these steps, as one bad tube of enzyme, buffer, or stock of molecular biology grade water can destroy an entire preparation. Some general guidelines for handling these reagents are listed below:
Take care to store enzymes at the temperature recommended by their manufacturer (typically −20°C) and always store the enzymes in a cooler/caddy when they are not in a freezer.
Avoid repeated freeze/thaw cycles. Using a laboratory grade marker, place a dot on the top of the tube each time it has been thawed to keep track of the number of times a tube has been freeze/thawed. Aliquot larger stocks if necessary.
Only use molecular biology grade water in enzymatic reactions; make 15 ml aliquots by decanting from the stock bottle into conical tubes in a tissue culture or PCR hood to avoid having debris fall into the stock bottle. Date each aliquot and use within 2 weeks of opening for the first time.
Physical Mixing of Reactions
Our protocol for generating Oligopaints requires that commonly used molecular biological techniques be performed at scales that may be significantly larger than is customary for many users. As such, we emphasize the importance of vortexing large master mixes (e.g. for PCR, DNA precipitation, nicking endonuclease digestion) enough to ensure homogeneity. In our hands, master mixes containing thermostable DNA polymerase and the Nb.BsrDI and Nb.BsmI nicking enzymes are robust to repeated (e.g. 3–5X) 10–15 second full-speed vortex pulses.
Running Gels under Denaturing Conditions
It is critical to run the denaturing gel at a temperature that will maintain separation of the desired labeled ssDNA probe molecules from their complement (~55–60°C, for the conditions described in the protocol above). Note that a given probe molecule will have partial complementarity to many DNA molecules after denaturation by virtue of the retained primer sequence; thus, partial reannealing may occur even between molecules that have heterologous genomic sequence inserts. If the gel is not sufficiently hot, slow-migrating smears may be present above both the band of the desired ssDNA product and the band of the full length uncut strands. Note that a labeled ssDNA fragment can still be successfully purified if it has migrated far enough from the smeared DNA to allow for its unambiguous isolation.
Probe concentration
While Oligopaint probes tend to work robustly at oligo concentrations of 800 nM or higher (20+ pmol per 25 μl hybridization reaction) for tissue culture cells, users are encouraged to determine the optimal concentration for their specific needs via a concentration curve. For example, increasing the concentration of probe in the hybridization reaction may be necessary should an 800nM concentration of Oligopaint probes be insufficient to produce a strong signal. As for tissue samples, increasing the concentration of probe by up to 10-fold or more may be necessary, with the optimal concentration likely to vary depending on the sample type and target.
Conditions for hybridization and washes
The hybridization and wash conditions can be altered to optimize the performance of the FISH probes. Both hybridization temperature and wash conditions can impact the signal:noise of the FISH (see Beliveau et al., 2012 Fig. S6, S8). For example, higher hybridization temperatures or higher temperatures in the first wash may reduce the background signal. The length of the hybridization step can also be important; >14 hours is recommended, and >24 hours can be tried for probes that do not produce strong signals after 14 hours. The signal:noise of the FISH can also be adjusted by increasing the number of high temperature wash steps (e.g. 2x 15' 60°C 2X SSCT), increasing the temperature of the first wash (e.g. 70°C SSCT), or adding formamide to the first wash step (e.g. instead 15' 37°C 2X SSCT + 50% (vol/vol) formamide instead of 15' 60°C 2X SSCT).
Sample Permeability for FISH
Some samples may require permeablization steps beyond the pre-hybridization treatments included in Basic Protocol 2. Common options include incubation in detergents such as tween-20 or triton X-100, treatment with proteases such as pepsin and proteinase K, treatment with HCl, flash-freezes in liquid nitrogen, and fixation in 3:1 (vol/vol) methanol:acetic acid instead of paraformaldehyde (Lanzuolo et al., 2007; Cremer et al., 2008). For samples that do not work readily in Basic Protocol 2, users can try performing Steps 1–11 of Alternate Protocol 2 and then following Steps 6–24 of Basic Protocol 2.
Anticipated Results
A successful Oligopaint probe preparation typically converts 20–30% of the labeled primer into purified ssDNA FISH probe. This yield should be reasonably consistent across different preparations of the same Oligopaint probe as well as preparations of distinct Oligopaint probes, and, in our hands, appears to be largely insensitive to the specific fluorophores we have used (Alexa405, 6-FAM, Alexa488, atto550, Cy3, TYE563, atto565, Cy5, atto647N, Alexa647, TYE665, Cy5.5).
FISH performed according to Basic Protocol 2 with a probe complexity of 1000 oligos or more and a total oligo concentration of 800 nM should produce a signal in the nucleus of >90% and often close to 100% of tissue culture cells. FISH efficiency may vary depending on the genomic target, the complexity and concentration of the probe, and the nature of the sample.
Time Considerations
Oligopaint probe preparations can be completed in as few as three days or spread over the course of a week.
Preparing sample slides according the Alternate Protocol 2 takes approximately 3–4 hours.
FISH with Oligopaint probes takes approximately 4 hours spread over two days: two hours on the first day to perform the pre-hybridization and denaturation steps and set up the overnight hybridization, and two hours on the following day to perform the wash steps, mount the slides, and perform microscopy.
Figure 2. examples of FISH with Oligopaint probes.
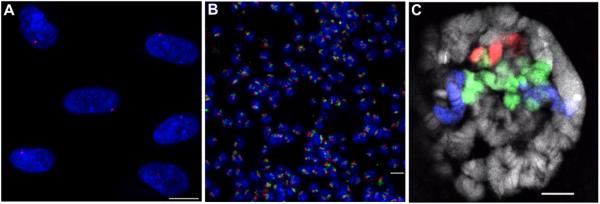
(A) FISH using an Oligopaint probe composed of 20,020 oligos targeting a 2.5 Mb region on human chromosome X (Xq13.1) in diploid (XY) MRC-5 cells. Hybridization was carried out according to Basic Protocol 2 in a 25 μl volume using 35 pmol of probe (Cy3, red) produced using Basic Protocol 1. DNA is stained with DAPI (blue). (B) Two-color FISH on a field of tetraploid Drosophila Kc167 cells using two Oligopaint probes targeting the right arm of chromosome 2: one composed of 25,000 oligos targeting a 2.7 Mb region (50D1-53D7), and another composed of 50,000 oligos - half targeting a 3 Mb region (41E3-44C4) and the other half targeting a 2.6 Mb region (58D2-60D14). The hybridization was carried out according to Basic Protocol 2 in a 25 μl volume using 5 pmol of the first probe (Cy3, red) and 2.5 pmol of the second probe (Cy5, green), both produced using Basic Protocol 1. (C) Three-color FISH performed on Drosophila salivary polytene chromosomes with the two Oligopaint probes used in (B) plus an additional Oligopaint probe that also targets the right arm of chromosome 2 and is composed of 105,000 oligos - half targeting a 5.6 Mb region (44C4-50C9) and the other half targeting a 5.5 Mb region (53C9-58B6). The hybridization was carried out according to Beliveau et al. (2012) in a 25 μl volume using 20 pmol of each of the three probes labeled with TYE563 (red), TYE665 (blue), and 6-FAM (green), respectively, all produced using Basic Protocol 1. DNA is stained with DAPI (gray). Images represent confocal maximum Z projections (A, B) or a single confocal XY plane (C). Scale bars: 10 μM.
ACKNOWLEDGMENTS
The writing of this unit was aided by critical discussions with several members of the C.-tingWu laboratory: Frederic Bantignies, E. Joyce, T.N. Senaratne, M. Hannan, C. Fonseka, R. McCole, and S. Nguyen. We also benefited from valuable conservations with A. Boettiger, J.Moffit, R. Jungmann, T. Schmidt, C. Kim-Kiselak, S. Elledge, R. Kingston, and D. Moazed. The development of Oligopaints was supported by a National Institutes of Health (NIH)/National Institute of General Medical Sciences Grant (1R01GM085169) and PioneerAward, aBroad Institute Scientific Planning and Allocation of Resources Committee (SPARC) Award, and a Cox Program Award from Harvard Medical School.
Footnotes
KEY REFERENCE (optional)
Beliveau et al. (2012). See above.
Introduces the Oligopaint FISH method and demonstrates its efficacy in tissue culture cells and tissue specimens.
INTERNET RESOURCES (optional)
http://genetics.med.harvard.edu/oligopaints/
The Oligopaints website contains additional protocols, information about the location of probe sequences in several eukaryotic organisms, and scripts + documentation to assist users in the computational design of Oligopaint probes.
LITERATURE CITED
- Bauman JG, Wiegant J, Borst P, van Duijn P. A new method for fluorescence microscopical localization of specific DNA sequences by in situ hybridization of flurochromelabelled RNA. Exp Cell Res. 1980;128:485–490. doi: 10.1016/0014-4827(80)90087-7. [DOI] [PubMed] [Google Scholar]
- Beliveau BJ, Joyce EF, Apostolopoulos NA, Yilmaz F, Fonseka CY, McCole RB, Li JB, Senaratne TN, Williams BR, Rouillard JM, Wu CT. Versatile design and synthesis platform for visualizing genomes with Oligopaint FISH probes. Proc Natl Acad Sci USA. 2012;109:21301–2130. doi: 10.1073/pnas.1213818110. [DOI] [PMC free article] [PubMed] [Google Scholar]
- Bienko M, Crosetto N, Teytelman L, Klemm S, Itzkovitz S, van Oudenaarden A. A versatile genome-scale PCR-based pipeline for high-definition DNA FISH. Nat Methods. 2013;10:122–124. doi: 10.1038/nmeth.2306. [DOI] [PMC free article] [PubMed] [Google Scholar]
- Boyle S, Rodesch MJ, Halvensleben HA, Jeddeloh JA, Bickmore WA. Fluorescence in situ hybridization with high-complexity repeat-free oligonucleotide probes generated by massively parallel synthesis. Chromosome Res. 2011;19:901–909. doi: 10.1007/s10577-011-9245-0. [DOI] [PMC free article] [PubMed] [Google Scholar]
- Cremer M, Gasser F, Lanctôt C, Müller S, Neusser M, Zinner R, Solovei I, Cremer T. Multicolor 3D fluorescence in situ hybridization for imaging interphase chromosomes. Methods Mol Biol. 2008;463:205–239. doi: 10.1007/978-1-59745-406-3_15. [DOI] [PubMed] [Google Scholar]
- Dernburg AF, Broman KW, Fung JC, Marshall WF, Phillips J, Agard DA, Sedat JW. Perturbation of nuclear architecture by long-distance chromosome interactions. Cell. 1996;85:745–759. doi: 10.1016/s0092-8674(00)81240-4. [DOI] [PubMed] [Google Scholar]
- Femino AM, Fay FS, Fogarty K, Singer RH. Visualization of single RNA transcripts in situ. Science. 1998;280:585–590. doi: 10.1126/science.280.5363.585. [DOI] [PubMed] [Google Scholar]
- Itzkovitz S, van Oudenaarden A. Validating transcripts with probes and imaging technology. Nat Methods. 2011;8:S12–S19. doi: 10.1038/nmeth.1573. [DOI] [PMC free article] [PubMed] [Google Scholar]
- Lamb JC, Danilova T, Bauer MJ, Meyer JM, Holland JJ, Jensen MD, Birchler JA. Single-gene detection and karyotyping using small- target fluorescence in situ hybridization on maize somatic chromosomes. Genetics. 2007;175:1047–1058. doi: 10.1534/genetics.106.065573. [DOI] [PMC free article] [PubMed] [Google Scholar]
- Landegent JE, Jansen in de Wal N, Dirks RW, Baao F, van der Ploeg M. Use of whole cosmid cloned genomic sequences for chromosomal localization by non-radioactive in situ hybridization. Human Genet. 1987;77:366–370. doi: 10.1007/BF00291428. [DOI] [PubMed] [Google Scholar]
- Landsdorp PM, Verwoerd NP, van de Rijke FM, Dragowska V, Little MT, Dirks RW, Raap AK, Tanke HJ. Heterogeneity in telomere length of human chromosomes. Human Mol Genet. 1996;5:685–691. doi: 10.1093/hmg/5.5.685. [DOI] [PubMed] [Google Scholar]
- Lanzuolo C, Roure V, Dekker J, Bantignies F, Orlando V. Polycomb response elements mediate the formation of chromosome higher-order structures in the bithorax complex. Nat Cell Biol. 2007;9:1167–1174. doi: 10.1038/ncb1637. [DOI] [PubMed] [Google Scholar]
- Larsson LI, Christensen T, Dalbøge H. Detection of proopiomelanocortin mRNA by in situ hybridization, using a biotinylated oligodeoxynucleotide probe and avidinalkaline phosphatase histochemistry. Histochemistry. 1988;89:109–116. doi: 10.1007/BF00489913. [DOI] [PubMed] [Google Scholar]
- Levsky JM, Singer RH. Fluorescence in situ hybridization: Past, present and future. J Cell Sci. 2003;116:2833–2838. doi: 10.1242/jcs.00633. [DOI] [PubMed] [Google Scholar]
- Lichter P, Cremer T, Borden J, Manuelidis L, Ward DC. Delineation of individual human chromosomes in metaphase and interphase cells by in situ suppression hybridization using recombinant DNA libraries. Hum Genet. 1988;80:224–234. doi: 10.1007/BF01790090. [DOI] [PubMed] [Google Scholar]
- Martinez AM, Colomb S, Déjardin J, Bantignies F, Cavalli G. Polycomb group-dependent Cyclin A repression in Drosophila. Genes Dev. 2006;20:501–513. doi: 10.1101/gad.357106. [DOI] [PMC free article] [PubMed] [Google Scholar]
- Navin N, Grubor V, Hicks J, Leibu E, Thomas E, Troge J, Riggs M, Lundin P, Månér S, Sebat J, Zetterberg A, Wigler M. PROBER: oligonucleotide FISH probe design software. Bioinformatics. 2006;22:2437–2438. doi: 10.1093/bioinformatics/btl273. [DOI] [PubMed] [Google Scholar]
- O'Keefe CL, Warburton PE, Matera AG. Oligonucleotide probes for alpha satellite DNA variants can distinguish homologous chromosomes by FISH. Human Mol Genet. 1996;5:1793–1799. doi: 10.1093/hmg/5.11.1793. [DOI] [PubMed] [Google Scholar]
- Pardue ML, Gall JG. Molecular hybridization of radioactive DNA to the DNA of cytological preparations. Proc Natl Acad Sci USA. 1969;64:600–604. doi: 10.1073/pnas.64.2.600. [DOI] [PMC free article] [PubMed] [Google Scholar]
- Pinkel D, Straume T, Gray JW. Cytogenetic analysis using quantitative, high-sensitivity, fluorescence hybridization. Proc Natl Acad Sci USA. 1986;83:2934–2938. doi: 10.1073/pnas.83.9.2934. [DOI] [PMC free article] [PubMed] [Google Scholar]
- Player AN, Shen LP, Kenny D, Antao VP, Kolberg JA. Single-copy gene detection using branched DNA (bDNA) in situ hybridization. J. Histochem Cytochem. 2001;49:603–612. doi: 10.1177/002215540104900507. [DOI] [PubMed] [Google Scholar]
- Raj A, van den Bogaard P, Rifkin SA, van Oudenaarden A, Tyagi S. Imaging individual mRNA molecules using multiple singly-labeled probes. Nat Methods. 2008;5:877–879. doi: 10.1038/nmeth.1253. [DOI] [PMC free article] [PubMed] [Google Scholar]
- Silahtaroglu AN, Tommerup N, Vissing H. FISHing with locked nucleic acids (LNA): Evaluation of different LNA/DNA mixmers. Mol Cell Probes. 2003;17:165–169. doi: 10.1016/s0890-8508(03)00048-3. [DOI] [PubMed] [Google Scholar]
- Volpi EV, Bridger JM. FISH glossary: An overview of the fluorescence in situ hybridization technique. Biotechniques. 2008;45:385–386. 388, 390. doi: 10.2144/000112811. passim. [DOI] [PubMed] [Google Scholar]
- Yamada NA, Rector LS, Tsang P, Carr E, Scheffer A, Sederberg MC, Aston ME, Ach RA, Taslenko A, Sampras N, Peter B, Bruhn L, Brothman AR. Visualization of fine-scale genomic structure by oligonucleotide-based high-resolution FISH. Cytogenet Genome Res. 2011;132:248–254. doi: 10.1159/000322717. [DOI] [PubMed] [Google Scholar]