Abstract
The image quality management of bone mineral density (BMD) is the responsibility and duty of radio-technologists who carry out examinations. However, inaccurate conclusions due to the lack of understanding and ignorance regarding the methodology of image quality management can be a fatal error to patients. The accuracy and precision of BMD measurement must be maintained at the highest level so that actual biological changes can be detected with even slight changes in BMD. Accuracy and precision should be continuously preserved for image quality of machines. Those factors will contribute to ensure the reliability of BMD examination. The enforcement of proper quality control of radiologists performing BMD inspections which brings about the durability extensions of equipment and accurate results of calculations will help the assurance of reliable inspections.
Keywords: Bone density, Densitometry, Dual-energy X-ray absorptiometry, Precision, Quality control
INTRODUCTION
Dual energy X-ray absorptiometry (DXA),[1] which is considered the most proper standard device for diagnosing osteoporosis, is the most commonly used due to its high accuracy and precision. In general, this device assesses bone mineral density (BMD) by examining the spine and femur. In addition, BMD examination using DXA is not a single-time examination, but requires follow-up for assessing BMD change or drug efficacy. Although BMD-measuring device requires higher precision than other medical devices, however, a further strict precision is required for the follow-up of osteoporotic patients as the range of BMD change is very narrow in osteoporotic patients.[2] Therefore, for the reproducibility of the examination, the quality control (QC) of DXA and precision test of radio-technologists should be accurately performed before applying examination results to treatment.
For the maintenance of the consistency of BMD measurement, the QC of BMD measurement is essential.[3,4,5] Accordingly, the QC of BMD measurement using DXA is performed for minimizing the error range of precision and accuracy. For this end, error ranges from patient's condition, measuring device, and radio-technologist's experience should be minimized via quality control. QC is divided into device inspection and the assessment of radio-technologist's expertise. In the QC of device, it is very important to detect whether BMD value has been changed because BMD value could be changed depending on device condition. Daily QC is adequate for inspecting device condition on the same day, but inadequate for assessing the tendency of BMD change. Thus, changes in BMD value should be followed-up weekly and monthly. For the assessment of radio-technologist's precision (reproducibility), it is important to assess if radio-technologists conduct the examination or data analysis in a consistent manner. In other words, when the examination is repeatedly conducted on the same patient, the result should be same. Thus, adequate training and experience are required by radio-technologists for BMD examination. Accordingly, the QC of radio-technologist's precision is required, in which standard examination and analysis protocols are prepared to maintain the consistency of examination and data analysis conducted by radio-technologists. This paper reviews the methods of QC based on the International Society for Clinical Densitometry (ISCD) recommendation.
1. QC of DXA
The QC of DXA varies depending on the features of each device manufactured by different companies. In daily QC which is conducted before BMD examination on a daily basis, a proper phantom, suitable for each device should be used. In addition, mechanical malfunction, radiation quality, absorption coefficient and tissue-equivalent materials are checked and calibrated. Only when the calibrated value is within the normal range, BMD examination can be conducted. As it is, however, not easy to detect the abnormality of BMD measurement, the tendency of the measured BMD values should be followed-up for maintaining the consistency of accuracy and precision unless malfunctioning is obviously found.
1) Selection of proper phantom
Each phantom, recommended by device manufacturers, has its own features. In the case of Hologic, their device itself adjusts radiation quality, absorption coefficient and tissue-equivalent materials so that correction is made during the scanning of lumbar phantom for examining the tendency of BMD values. On the other hand, in the case of GE, their device adjusts radiation quality, absorption coefficient and tissue-equivalent materials using a block phantom and follows-up BMD values using a lumbar phantom. Therefore, in daily quality control, device-specified phantom should be used and various ranges of BMD should be measured using a general phantom to follow-up the tendency of the measured BMD values. General phantoms include European Spine Phantom (ESP) and Bona Fide Spine Phantom (BFP) (Fig. 1).
Fig. 1.

General phantoms and scan images. (A) The European Spine Phantom (ESP; QRM GmbH Dorfstrasse 4. 91096, Möhrendorf, Germany). (B) ESP scan image. (C) Bio-imaging bone fide spine phantom (BFP; Bio-Imaging Technologies Inc., Newtown, PA, USA). (D) BFP scan image.
2) Management of single device
After device installation, baseline BMD and intra system least significant change (LSC) should be set. According to the ISCD recommendation, the mean of BMD values, measured at the same location 20 times or measured daily for 20 days using a general phantom should be set as the baseline BMD and the control limit of upper and lower ranges should be set as baseline BMD±1.5%. Based on the range set, a pre-test is conducted daily or twice or more per week using a general phantom before actual use. The result of the test is presented in Shewhart chart or cumulative sum control chart (CUSUM), and assessed according to the corresponding rule in order to detect the shift or drift of BMD value.[6] The QC of BMD measuring device should be maintained at the highest condition for detecting delicate change and performed after calibration upon the translocation or installation of the device.[7,8,9,10,11,12,13]
3) Cross calibration
Cross calibration should be performed upon device replacement or the management of two or more devices. In the case of the replacement of device manufactured by the same company, cross calibration is conducted by a single radio-technologist, in which BMD is measured using the existing and replaced devices 10 times respectively to obtain mean BMD values and the mean BMD values are compared. If the mean BMD values are within the normal range, and their difference is within 1%, data before replacement can be used. However, if the difference is beyond 1%, calibration should be performed again to set the difference within 1%. In the case of the replacement of devices manufactured by different companies, if precision test has been conducted on the existing device, 30 patients should undergo scanning once using the existing device and then undergo scanning twice using the replaced device within 60 days after replacement. That is, those 30 patients undergo scanning three times, once using the existing device and twice using the replaced device. On the other hand, if precision test has not been conducted on the existing device, 30 patients should undergo scanning twice using the existing device and then undergo scanning twice using the replaced device within 60 days after replacement. That is, those 30 patients undergo scanning four times twice using the existing device and twice using the replaced device. Lumbar and proximal femur, which are commonly examined in clinical practices, are used as examination sites. Quantitative comparison of two devices can be performed by exanimation site via cross calibration. If cross calibration has not been conducted, previous scanning information cannot be directly compared with new information. In addition, if cross calibration has been improperly conducted, quantitative comparison between previous and new information cannot be performed. For the comparison of two devices, a calibration formula between the two devices is obtained using LSC and via regression analysis and then applied to obtain BMD values. Formula derivation is performed using a cross-calibration calculation tool provided by the ISCD.
4) DXA upgrade
If software replacement is required due to DXA system upgrade, reasons for upgrade, change of boundary detecting algorithm, change of output system and the upgrade and characteristics of standard database should be inspected. In general, in the case of system upgrade, BMD is not affected though T-score and Z-score are affected. Thus, mean BMD before and after replacement should be compared and region of interest (ROI) change should be examined to ensure result consistency.
2. Measuring method and management of radio-technologist's precision
In general, radio-technologist's precision is independently affected by factors including patient's movement, foreign materials, physical status, patient's location and scan analysis. In relation to significant factors that affect the overall precision of DXA, patients and radio-technologists are more important than the variability of the device. In the use of DXA, which is considered the most precise quantitative measurement in clinical practices, a precision test is performed. Precision, refers to the degree of obtaining consistent BMD from the same patient via repeated measurement for a short time, is an essential factor to determine whether the measured value means actual biological change or just error. As the variation of precision occurs even if the measurement is performed by the same person using the same device, re-measurement technique, via which variation range is calculated using statistics, is essentially required to minimize variation. Hospitals that conduct BMD examination should keep their own precision data for precision test.[14,15]
1) Assessment of radio-technologist's precision
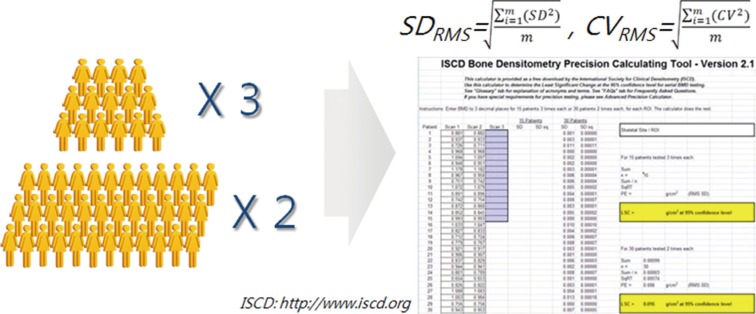
Assessment of radio-technologist's precision is performed after radio-technologists receive training repeatedly, through which radio-technologists conduct patient posturing, device manipulation and result analysis in a consistent manner and after they take practices on 100 patients. If sufficiently experienced, BMD measurement is performed on minimum 30 patients twice for each patient, or on 15 patients three times for each patient. And then precision error is calculated.[14] Patients should get off the device after first measurement and undergo second measurement after getting on the device again during BMD measurement in order to accurately assess measurement error. Short-term precision is measured within 2 weeks-one month and measurement error is obtained from each examination site including the spine and femur. In addition, if two or more radio-technologists participate in the measurement, data of precision error should be obtained from individual radio-technologists and the precision error of each hospital is defined as the mean of the data.[14] For the analysis of the obtained data, table of precision error calculation, which is an excel file, can be downloaded from the ISCD homepage[16] and precision error can be easily calculated by inputting the measured data Figure 2.
Fig. 2.
Precision test method.
If the calculated value is deviated from the acceptable range below, the measurement should be performed again after re-training.
- Lumbar-spine: 1.9% (LSC=5.3%)
- Total Hip: 1.8% (LSC=5.0%)
- Femur neck: 2.5% (LSC=6.9%)
The sum of precision errors of radio-technologists is the precision error of the corresponding hospital. Short-term precision error, coefficient of variation (CV) is obtained by dividing standard deviation by mean and then multiply 100%.[17] Precision error should be set using subjects whose age is similar to that of patients as much as possible. The assessment of precision error is performed by referring to the ISCD recommendation. If precision error is, however, deviated from the acceptable range, it should be measured again after re-training. It is important to understand that precision assessment is a process that is commonly conducted. It should be conducted in accordance with radiological regulations and after receiving patient's consent. It is unnecessary to repeatedly conduct precision assessment unless software and hardware of the system, or radio-technologist's skill is changed.[15,17] However, precision assessment could be independently conducted to determine whether additional training of BMD measurement is required.[18]
2) Main factors that affect precision test
Proper positioning of patient's posture and scan analysis are the most important factors in precision assessment. Common factors causing the change of lumbar scanning include improper posture, acquisition of incomplete images of Lumbar1-4, change of spinal level, and improper setting of lumbar interval. In the scanning of proximal femur, factors such as improper rotation, improper positioning of legs, change of target size, and improper targeting of femoral neck cause the change. In addition, it is important to compare the interest site of the spine and femur as having the same size in scanning analysis. To do so, it is important to maintain patient's posture consistently. If rotation and location are inconsistent, improper setting of interest site or boundary commonly occurs.
3) Determination of LSC
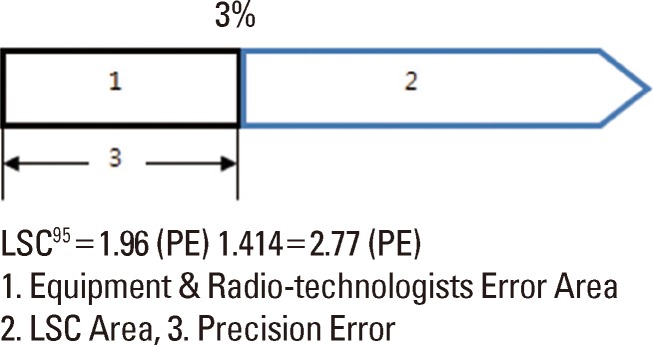
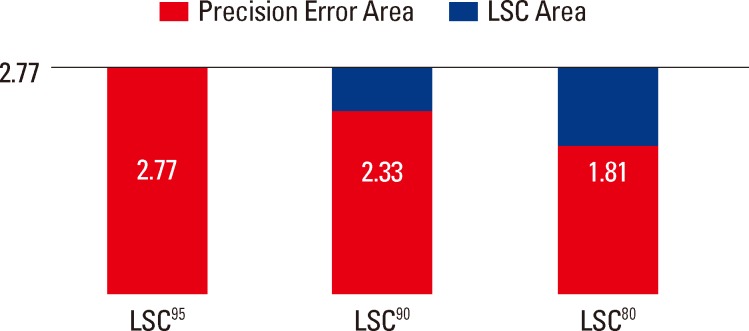
If the precision of the interest site of a certain bone has been identified, the nest step is to determine whether the degree of BMD change reflects biological significance. This is called LSC. Confidence interval (CI) should be statistically selected in order to determine LSC. Ninety-five percent confidence level is ideally used, but 80% confidence level is also used in some clinical practices. According to the recent ISCD recommendation, 95% confidence level is recommended, in which LSC is calculated by multiplying 2.77 to precision error (Fig. 3, 4).[2,19]
Fig. 3.

Calculation of least significant change (LSC) at 95% confidence level (in case of device error: 1%, operator error: 1%).
Fig. 4.
Variation of precision error according to confidence level.
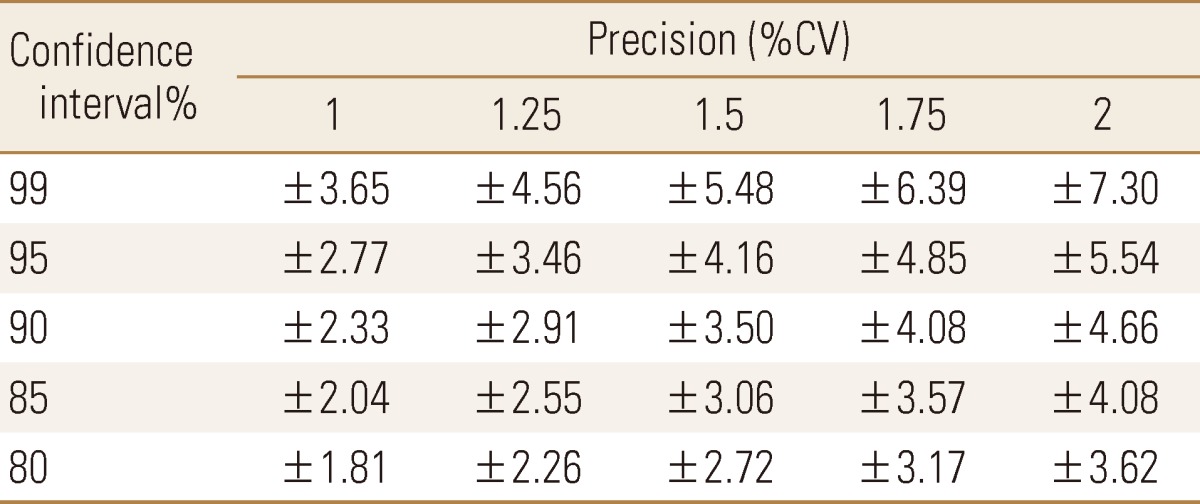
Table 1 presents %CV that represents BMD changes according to precision by CI after initial and follow-up examinations.
Table 1.
Percent coefficient of variation (%CV) according to precision by confidence interval

%CV, percent coefficient of variation.
CONCLUSION
Proper QC should be performed to provide reliability to BMD examination by conducting the examination based on the BMD change and stability of patients. Thus, QC of measuring devices and precision test of radio-technologists are mandatorily required. In addition, the maintenance of dedicated working system and the regular operation of educational programs are also required for the acquisition of examination and analysis skills by radio-technologists and for the maintenance of expertise.
Footnotes
No potential conflict of interest relevant to this article was reported.
References
- 1.Lenchik L, Leib ES, Hamdy RC, et al. Executive summary International Society for Clinical Densitometry position development conference Denver, Colorado July 20-22, 2001. J Clin Densitom. 2002;5:S1–S3. doi: 10.1385/jcd:5:3s:s01. [DOI] [PubMed] [Google Scholar]
- 2.Kim DY. Clinical application of bone mineral density measurement. Korean J Nucl Med. 2004;38:275–281. [Google Scholar]
- 3.Faulkner KG, McClung MR. Quality control of DXA instruments in multicenter trials. Osteoporos Int. 1995;5:218–227. doi: 10.1007/BF01774010. [DOI] [PubMed] [Google Scholar]
- 4.Fuerst TP. Quality control of dual X-ray absorptiometry systems. In: Gould RG, Boone JM, editors. RSNA categorical course in physics. Oak Brook, IL: Radiological Society of North America; 1996. pp. 67–76. [Google Scholar]
- 5.Blunt BA, Jones D, Svensen RK, et al. Good clinical practice and audits for dual X-ray absorptiometry and X-ray imaging laboratories and quality assurance centers involved in clinical drug trials, private practice, and research. J Clin Densitom. 1998;1:323–337. doi: 10.1385/jcd:1:4:323. [DOI] [PubMed] [Google Scholar]
- 6.Orwoll ES, Oviatt SK The Nafarelin/Bone Study Group. Longitudinal precision of dual-energy x-ray absorptiometry in a multicenter study. J Bone Miner Res. 1991;6:191–197. doi: 10.1002/jbmr.5650060213. [DOI] [PubMed] [Google Scholar]
- 7.Montgomery DC. Introduction to statistical quality control. 3rd ed. New York, NY: John Wiley & Sons; 1996. [Google Scholar]
- 8.Orwoll ES, Oviatt SK, Biddle JA. Precision of dual-energy x-ray absorptiometry: development of quality control rules and their application in longitudinal studies. J Bone Miner Res. 1993;8:693–699. doi: 10.1002/jbmr.5650080607. [DOI] [PubMed] [Google Scholar]
- 9.Lu Y, Mathur AK, Blunt BA, et al. Dual X-ray absorptiometry quality control: comparison of visual examination and process-control charts. J Bone Miner Res. 1996;11:626–637. doi: 10.1002/jbmr.5650110510. [DOI] [PubMed] [Google Scholar]
- 10.Faulkner KG, Gluer CC, Estilo M, et al. Cross-calibration of DXA equipment: upgrading from a Hologic QDR 1000/W to a QDR 2000. Calcif Tissue Int. 1993;52:79–84. doi: 10.1007/BF00308312. [DOI] [PubMed] [Google Scholar]
- 11.British Standards Institution. Guide to data analysis and quality control using cusum techniques: BS 5703. London, UK: British Standards Institution; 1980. [Google Scholar]
- 12.Pearson D, Cawte SA. Long-term quality control of DXA: a comparison of Shewhart rules and Cusum charts. Osteoporos Int. 1997;7:338–343. doi: 10.1007/BF01623774. [DOI] [PubMed] [Google Scholar]
- 13.Garland SW, Lees B, Stevenson JC. DXA longitudinal quality control: a comparison of inbuilt quality assurance, visual inspection, multi-rule Shewhart charts and Cusumanalysis. Osteoporos Int. 1997;7:231–237. doi: 10.1007/BF01622294. [DOI] [PubMed] [Google Scholar]
- 14.Bonnick SL, Johnston CC, Jr, Kleerekoper M, et al. Importance of precision in bone density measurements. J Clin Densitom. 2001;4:105–110. doi: 10.1385/jcd:4:2:105. [DOI] [PubMed] [Google Scholar]
- 15.The Writing Group for the ISCD Position Development Conference. Technical standardization for dual-energy x-ray absorptiometry. J Clin Densitom. 2004;7:27–36. doi: 10.1385/jcd:7:1:27. [DOI] [PubMed] [Google Scholar]
- 16.The International Society for Clinical Densitometry. The precision calculating tool. 2013. [cited by 2013 January 1]. Available from: http://www.iscd.org/
- 17.Gluer CC, Blake G, Lu Y, et al. Accurate assessment of precision errors: how to measure the reproducibility of bone densitometry techniques. Osteoporos Int. 1995;5:262–270. doi: 10.1007/BF01774016. [DOI] [PubMed] [Google Scholar]
- 18.Miller PD, Bonmick SL. Clinical application of bone densitometry. In: Falus MJ, editor. Primer in the metabolic bone diseases and disorders of mineral metabolism. 4th ed. Philadelphia, PA: Lippincott Williams and Wilkins; 1999. p. 158. [Google Scholar]
- 19.Lenchik L, Kiebzak GM, Blunt BA. What is the role of serial bone mineral density measurements in patient management? J Clin Densitom. 2002;5:S29–S38. doi: 10.1385/jcd:5:3s:s29. [DOI] [PubMed] [Google Scholar]


