Abstract
This chapter highlights key fundamentals relevant to post-procurement tissue handling of materials obtains by aspiration and/or biopsy and details the subtle techniques that can significantly impact patient management and practice patterns. A basic knowledge of tissue handling and processing is imperative for endosonographers who attempt to achieve a greater than 95% diagnostic accuracy with their tissue-acquisition procedures.
Keywords: Ancillary testing, cell block, core tissue, direct smears, endoscopic ultrasound, fine-needle aspiration, tissue handling
INTRODUCTION
Endoscopic ultrasound-guided fine-needle aspiration (EUS-FNA) has become the preferred minimally invasive method for the evaluation of solid lesions in the gastrointestinal (GI) tract and adjacent organs. The success of this technique is largely dependent upon the skill and experience of the endosonographer,[1] as well as the proficiency and experience of the cytopathologist evaluating the specimen.[2] The presence of on-site cytopathology undoubtedly increases the diagnostic accuracy of EUS-FNA.[3] However, the benefit of on-site cytopathology is more than just onsite assessment of specimen adequacy, but minimizing the artifacts of improper tissue handling and collection, reducing the number of passes needed, and determining whether additional samples will be required to perform ancillary studies.[3,4] The latter point has become particularly significant, as these samples are often the only tissue-based proof of malignancy and immunohistochemical and molecular analysis are necessary to permit optimal and/or personalized therapy and management.
Despite the benefits that rapid evaluation and early clinical management can have on patient care, on-site cytopathology evaluation is not widely available. The time commitment, cost, and low compensation of the cytopathologist and/or cytotechnologist have led to specimen handling and collection being performed by endoscopy suite nurses, technologists and endosonographers. In an attempt to obtain histologic material, particularly when on-site evaluation is not available, EUS-FNA/FNA biopsy (EUS-FNA/FNAB) and/or core needle biopsy (CNB) have been utilized. However, regardless of the modality used, the sample obtained will be limited in volume. Therefore, if functioning independently on any level, the endosonographer must be aware of the basic techniques for tissue handling and processing, in order to optimize cellular yield.
This chapter will outline in detail
Sample handling and preparation
The difference between CNB and FNA/FNAB processing and
How the tissue type and handling affects diagnostic accuracy.
THE SAMPLE
Irrespective of the needle or method used to obtain material, one must be aware that tissue can be obtained, yet not be diagnostic. Therefore, accessing whether diagnostic material is obtained in the sample is imperative. Depending upon the method in which “tissue” is obtained, determines how the specimen is processed. While subsequent sections will delineate the processing method, it is important to explain some key differences in sampling and tissue-acquisition.
FNA
For EUS purposes, FNA is sampling of tissue using a 22G or smaller. More recently 25G needles are being used to obtain samples from various organ sites.[5,6,7] The advantages of using such thin needles are
Diagnostic material can be obtained
In a minimally invasive manner
With few to no procedural/post-procedural complications.
FNAB
In comparison, FNAB is performed with the intention of procuring tissue that has retained architecture (i.e., tissue fragments) for histological analysis. Larger bore needles (19G) have been utilized to obtain such samples. However, the inherent rigidity of the standard 19G has restricted it usage to primarily transgastric tissue-acquisition. More recently, the flexible 19G has allowed for transduodenal sampling of pancreatic head and uncinate lesions. Studies have shown that histologic “core-like” tissue can be obtained using larger FNA needles.[8] However, these samples are typically bloodier and the needles may be associated with greater tissue trauma. This type of sampling often provides excellent material for ancillary studies.
NEEDLE CORE BIOPSY
Advances in EUS have allowed acquisition of core biopsy samples with needle size as small as 25G, 22G and 19G.[8,9] The benefits of using this modality are (i) core biopsies with retained architecture and less tissue fragmentation, are obtained, (ii) reduced number of passes are needed to obtain a diagnosis and (iii) it renders histologic tissue that general surgical pathologists may be more comfortable with providing a diagnosis. This modality, however, has a wide range of specimen adequacy, the needles are more expensive and the likelihood of morbidity and adverse events are greater.[10,11]
Key points
The modality chosen will often dictate the amount and type of tissue obtained. The operator must determine if FNA is sufficient for diagnostic accuracy or if FNAB/CNB is needed.
Core-like material with retained histology can be obtained with larger aspiration needles and core biopsy needles. However, this material may contain blood and GI contaminant.
Some attempt to obtain the benefits of both modalities (FNA and FNAB) by using them in conjunction.
FNA PREREQUISITES
Before handling the specimen, the endosonographer must have a protocol for preparation. This is usually determined by whether on-site cytopathology laboratory assistance is available for rapid interpretation or if a diagnosis will be given from the laboratory after complete cytologic processing. Sometimes the laboratory is not in close proximity to the procedural area and the endosonographer may function independently until laboratory support arrives. Even in large academic centers where cytopathology assistance is readily available, the FNA procedure can occur when the laboratory is not operational and support in turn inaccessible. Therefore, if functioning independently on any level, the endosonographer must be aware of the necessary supplies and equipment needed for proper handling of the cellular materials obtained [Figure 1].
Figure 1.
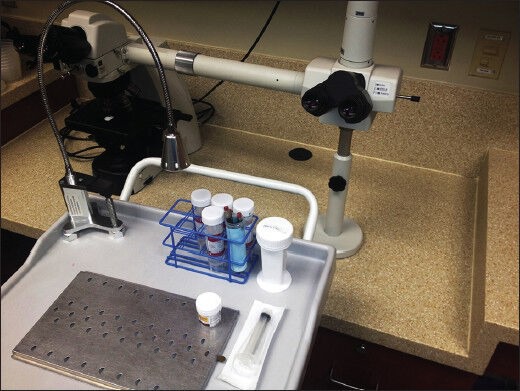
The procedural suite often has an area dedicated to specimen handling. This workspace usually consists of a table or mobile cart with a smearing and staining setup, collection tubes with storage media/preservatives and a microscope for preliminary evaluation
CYTOLOGY
The aspirate
The aspirated material can be processed as direct smears, collected in a preservative solution or media for later processing, or both. The endosonographer's goal should be to obtain representative material in an optimum state for microscopic examination. If direct smears are going to be prepared in the procedural suite, the factors involved in the success of optimal tissue handling are
Experience,
Smearing technique,
Appropriate number of slides,
Appropriate fixation and
Evaluation.
Experience
Experience has shown that bloody, dilute and mucoid samples can all make it difficult for untrained personnel to prepare adequate smears. Personnel who do not routinely make smears may encounter difficulties in preparing smears from these aspirates. To ensure proper handling and processing of the aspirated material, one must recognize that smearing is a well-crafted technique and should be performed by personnel who have acquired the skill. If trained properly, a technician or endoscopy nurse can prepare direct smears and crudely gauge whether cellular material is present by gross visual assessment.[12,13]
Smear technique
Direct smears are made by gently spreading the material on the slide utilizing a spreader slide to create a single layer of cells with minimal to no distortion. The significance of correct smearing cannot be overemphasized, as smearing error leads to tissue loss, artifacts, and interpretation difficulties [Figure 2]. Below is a basic procedure for making direct smears.
Figure 2.
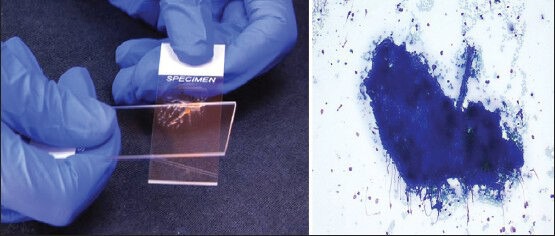
Incomplete smearing of the slide resulted in thick tissue fragments too dense to evaluate
Once the slide is labeled appropriately, place the beveled edge of the needle downward in close proximity to the frosted (labeled) end. A smearing slide can be placed at a 45° angle to minimize splatter.
Express the aspirated material using the stylet, only allowing one drop of material to be placed onto the slide.
Place additional drops of material onto slides as needed; a minimum of two slides per pass is recommended.
A second slide will be used as a spreader slide to make the smear. The spreader slide is placed firmly over the droplet in a perpendicular direction, which will cause the droplet to spread out slightly by capillary action.
While firmly holding the spreader slide down, gently pull it in a downward motion along the length of the slide. Do not attempt to separate the slides during the smearing process.
Repeat steps 4 and 5 on the additional slides that contain droplets.
Any additional material can be placed in collection fluid (medium or fixative) for further analysis.
Care should be taken to avoid the use of force while making smears as it may lead to shearing and crushing of cells, which may impede diagnostic interpretation.
Appropriate number of slides
A minimum of two slides per pass is recommended, this allows for diagnostic material to be present on more than one slide (as a slide can be lost or damaged), and for processing and evaluation using different fixations or stains (e.g., Papanicolaou [Pap] or Romanowsky). Making more than three slides per pass potentially wastes diagnostic material that can be collected for cell block preparation or flow cytometry. If needed, the material collected in media or fixative can also be used to make cytospin smears and/or even more direct smears. Likewise, if diagnostic sufficiency or interpretation suggests enough material is present (≥3 slides) on the first pass, subsequent material can be aspirated solely for collection. As dividing the material, may lead to insufficient material for immunohistochemical, molecular, or flow cytometric analysis.
Appropriate fixation
Wet fixation
As the name implies, wet fixation is fixation that musts occur while the slide is still damp. This can be accomplished by directly immersing the slides in 95% ethanol, or by spraying the smeared slides using alcohol-based spray fixatives. Some prefer to place alcohol onto the slides in a horizontal plane, to reduce the possibility of loss of material from immersion. Typically, wet fixed smear preparations are subsequently stained using Pap stain in the laboratory. The Pap stain is preferred by many pathologists because of its near transparency, allowing for the nuclear features, chromatin pattern, and thicker tissue fragments to be visualized. However, the independent endosonographer must be aware that if air-drying of the cells occurs prior to wet fixation, this will result in poor staining of the cells by this method, possibly compromising the diagnosis.
Dry fixation
The air-dried preparation requires immediate drying of the cytologic smears. Drying can occur by briskly waving the smeared slides or using the hair-dryer at a distance with no heat. Usually these slides are stained utilizing Romanowsky-type stains (e.g., Diff-Quik, three step stain, etc.). The Romanowsky-type staining kits consist of a fixative (typically methanol), an acidophilic dye for cytoplasmic staining and a basophilic dye for nuclear staining. These Romanowsky-type stains tend to better highlight cytoplasmic features and extracellular substances, compared with the Pap stain. Staining of incompletely dried smears will lead to uneven staining and loss of crisp cytomorphologic detail.
The choice of fixation method used is based on institutional preferences and operator experience. A list of common fixatives can be found in Table 1. Fixatives are cytotoxic and care must be taken when using these solutions. Regardless of the type of fixative or technique used, if performed correctly, cytologic details should be visualized with minimal artifact.
Table 1.
Commonly used fixatives and associated benefits

Evaluation
Gross visual assessment of smears: To minimize the procedural time, the cytotechnologist or cytopathologist often microscopically examine the slide that grossly appears to be more cellular first, in an effort to provide the diagnosis more rapidly, reduce the number of passes and allow for any additional material to be collected for cell block. However, the value of gross assessment is often not explicitly stated as the cytologist ultimately uses microscopy while in the procedural suite to determine adequacy. However, a few studies have suggested that the gross assessment of smears may be useful for non-cytology-trained practitioners when on-site evaluation is not available.[10,11]
Visual inspection of the slide can be performed easily and quickly. As the aspirated material is expressed from the needle onto the slide, a crude analysis of the (i) color, (ii) consistency, (iii) content of the drop can be made. Colors that are typically observed from specimens obtained by EUS-FNA are: straw-colored, tan-pink, red, chocolate-colored and whitish-yellowish tinted material. This typically corresponds to cyst fluid, tissue fragments, blood, old blood, and necrosis/abscess, respectively [Figure 3]. In addition, as the material is expressed observations can be made regarding the viscosity and consistency of the material. Determination of the whether the sample is gelatinous, mucoid, turbid, or watery can be easily performed. Moreover, the independent practitioner can observe the content of the drop and visually assess if there is tissue in the drop; often described as fragments of material lighter in color than blood. Gross visual assessment cannot definitively confirm if you have lesional material. However, it can be a useful tool in creating a pathologic differential; see Table 2. In other words, if gelatinous, sticky material is expressed from a lesion that appears to be cystic by endoscopic imaging, the endosonographer should feel confident lesional material has been obtained. Likewise, if the same material is expressed from the needle while attempting to aspirate material from a solid lesion, the practitioner should be concerned about GI mucin contaminant.
Figure 3.
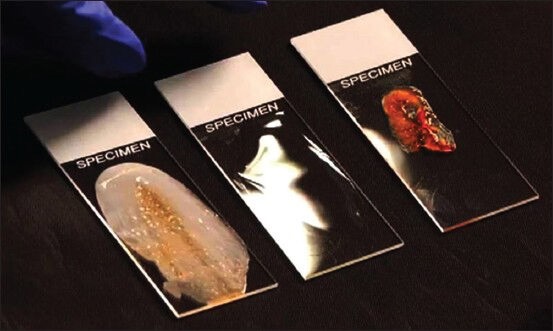
Gross assessment of three different smears shows white-yellowish granular material consistent with necrosis or abscess, clear watery cyst fluid, and thick mucoid blood-tinged material with a core-like fragment
Table 2.
Gross visual assessment can be a useful tool in creating a pathologic differential, especially when combing the clinical history and endoscopic ultrasound imaging findings

The volume of material collected, in addition to the color, consistency and content, also serves as a crude assessment of cellularity. Attempts should be made through an ample number of passes to avoid paucicellular aspirates for cell block.
Cell block
Collection of material for cell block preparation is a useful technique to increase the diagnostic accuracy of EUS-FNA. It is suggested that the cell block should always be utilized in conjunction with analysis of smears and other cytologic preparations, particularly when on-site evaluation is not available. Many outside of the cytopathology laboratory grapple with a pragmatic understanding of the cell block. In the most simplistic terms, the cell block links the cytologic smears to histology by displaying tissue fragments in an architectural pattern and hence recapitulates morphology noted on surgical pathology tissue sections.
A cell block utilizes the residual aspirate in the needle (whether single cells or small tissue fragments), additional aspirated passes, and material trapped in blood clot for histological evaluation. The combined material collected in fluid is centrifuged, the supernatant removed, and the pellet is subsequently bonded to form a tissue fragment. Bonding agents such as plasma-thrombin, histogel and albumin have been used to secure the pellet. An alternative method to pellet formation is Cellient technology, a completely automated cell block system, which uses a vacuum and membrane filtration to collect the material in a cohesive manner. Regardless of the method, once the material is pooled, it is then embedded in paraffin, sectioned, and stained.
CORE
Core tissue can be obtained using FNAB needles or core needles. However, the operator should be aware that the material obtained transluminally will often be a composite of blood, GI contaminant, and possibly lesional material. Moreover, the “worm” or “core-like” aspirates are typically semisolid and easily friable, unlike percutaneous breast or liver cores that maintain better specimen integrity. Therefore, if cores are going to be procured for tissue evaluation, tips for improving diagnostic accuracy and optimal tissue handling are
Gross visual assessment
Specimen handling
Appropriate number of cores and
Appropriate fixation.
Gross visual assessment
If possible, cores should be visually assessed to evaluate for tissue [Figure 4]. The independent endosonographer can evaluate the core as it is expressed from the needle into the specimen collection vial. However, with bloody cores, the fluid may quickly become dark and opaque obscuring visual assessment. This can be overcome by placing the core material onto a slide for quick visual inspection prior to placing into a collection vial. Akin to direct smears, tissue should be tan-pink to orange, usually easily distinguishable from blood. Likewise, the consistency can be firm and rubbery to soft and gelatinous or bloody.
Figure 4.
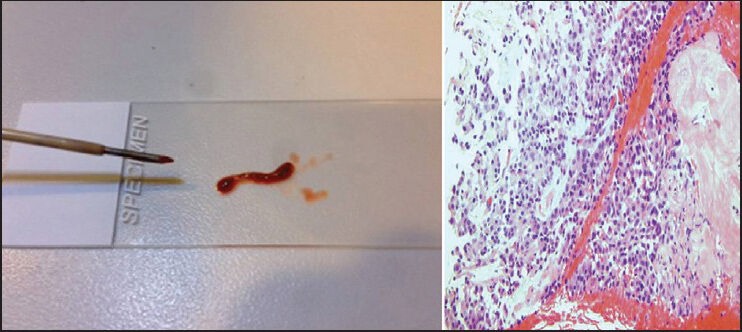
Bloody “worm-like” core tissue with a central tan-yellow area. Subsequently, the hematoxylin and eosin stained slide showed a neuroendocrine tumor with hemorrhage and necrosis
Specimen handling
Touch prep
To confirm diagnostic adequacy while in the procedural suite, touch preps can be performed on the cores. Touch preparations are smears made by gently touching the core to a clean slide in several different locations or sliding the core tissue against the slide [Figure 5]. These maneuvers allow for the superficial cells to be transferred to the slide while preserving the core for formalin fixation and histological processing. It is key to remember that the cellularity in touch preparations will be dependent upon the type of lesion (stromal lesions are less yielding) and the force applied to the cores when sliding along or touching the glass slides. The touch prep smears can be subsequently placed in alcohol or air-dried for Romanowsky-type rapid staining.
Figure 5.
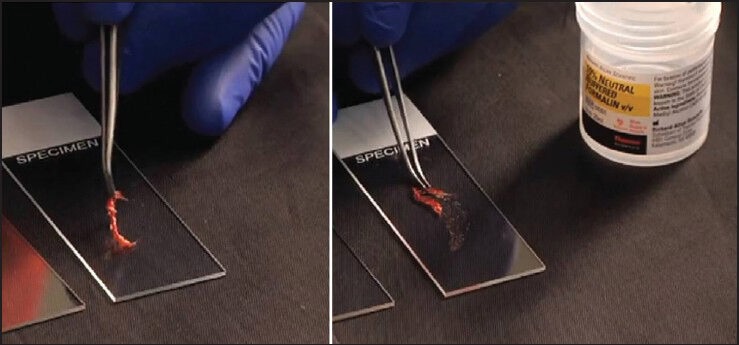
Core tissue being placed on the slide and slid along the length of the slide using forceps, allowing for the superficial cells to adhere to the slide and the core is subsequently placed in formalin
Bloody specimens
One of the caveats of using FNAB and core biopsy needles is the tendency to cause greater tissue damage and consequently bloody samples. Attempting to smear these bloody samples often leads to tissue fragment trapped in clot, visually obscuring the material, and rendering the slide useless. A good way to handled semi-solid hemorrhagic tissue is as follows:
Examine the material while on a slide and see if any solid components are present.
Isolate the solid component(s) and if “core-like” place in formalin for histological processing (If touch preps are desired, transfer the solid tissue to another clean slide for touching or sliding and subsequently place the solid tissue in formalin)
The remaining softer tissue can be placed in fixative for cell block preparation.
Number of cores
As previously mentioned, transluminal cores are typically heterogeneous and gross visual assessment is not as accurate as on-site cytopathology. Therefore, the independent endosonographer must insure enough material, for diagnostic purposes, has been procured regardless of the needle used. As molecular therapeutic options are increasing, the demand for molecular testing of small specimens has also increased. The endoscopist must be familiar with the criteria for suitability because testing procedures, assay methodologies and laboratory capabilities vary. If sampling a lymph node of a patient with an undiagnosed lung mass, it is no longer acceptable to stop at a diagnosis of non-small cell carcinoma. Staining must be performed to determine if the malignancy is squamous cell or adenocarcinoma and if adenocarcinoma epidermal growth factor receptor, anaplastic lymphoma kinase-1, and KRAS mutational analysis may need to be performed. However, if the patient has a known history of lung cancer, less tissue may be required. Therefore, the burden of procuring enough tissue and some knowledge of ancillary testing requirements is incumbent upon the endosonographer if on-site cytopathology is not available.
Appropriate fixation
Depending on the unique established protocol set up at the EUS center in alignment with the cytopathology laboratory, handling of the core specimen can vary. In general, many cores lend to relatively easy interpretation such as breast, prostate, or liver. However, many surgical pathologists struggle with evaluating limited pancreatic core tissue. The diagnosis of a well-differentiated pancreatic adenocarcinoma on resection can be fraught with difficulty, particularly when trying to distinguish from pancreatitis. Therefore, trying to render a diagnosis on a pancreatic core fragment independent of the cytological preparations (direct smears, brushings, etc.) is oftentimes impossible. This frequently leads to an “insufficient for diagnosis” surgical report. It would be better if the pancreatic core tissue were examined along with the cytology. Some have suggested either placing the core in formalin or having it read by the cytopathologist or placing it in solution for cell block to ensure it is being evaluated with the cytology. Cores of spindle cell lesions, neuroendocrine tumors and metastatic malignancies are not as difficult to interpret solely on histopathology.
BOTH
Sometimes lesions are encountered that are difficult to get adequate material utilizing only one needle or technique. Whether it's needle failure, procedural complications, bleeding or other causes, the type of needle used and the manner of specimen handling may need to change leading to FNA and FNAB/CNB samples. In addition, if on-site cytopathology is present, it may be conveyed that even though diagnostic material is present on FNA, tissue with retained architecture is needed for staging (e.g., primary pancreatic lymphoma). Therefore, a core needs to be obtained. On the other hand, if a core needle is used on a sclerotic lesion all that may be procured is fibrotic stroma. Accordingly, the cytopathologist may suggest after evaluating the touch preps that a thin needle aspiration may be better to dislodge possibly malignant cells trapped in the lesion.
In summary, the key to increasing the diagnostic accuracy for independent endosonographers who do not have cytopathology assistance for evaluation is understanding the basics of proper tissue handling and the techniques utilized to determine sufficiency whether performing FNA or FNAB.
Footnotes
Source of Support: Nil.
Conflict of Interest: None declared.
REFERENCES
- 1.Eloubeidi MA, Tamhane A. EUS-guided FNA of solid pancreatic masses: A learning curve with 300 consecutive procedures. Gastrointest Endosc. 2005;61:700–8. doi: 10.1016/s0016-5107(05)00363-9. [DOI] [PubMed] [Google Scholar]
- 2.Eltoum IA, Chhieng DC, Jhala D, et al. Cumulative sum procedure in evaluation of EUS-guided FNA cytology: The learning curve and diagnostic performance beyond sensitivity and specificity. Cytopathology. 2007;18:143–50. doi: 10.1111/j.1365-2303.2007.00433.x. [DOI] [PubMed] [Google Scholar]
- 3.Hébert-Magee S, Bae S, Varadarajulu S, et al. The presence of a cytopathologist increases the diagnostic accuracy of endoscopic ultrasound-guided fine needle aspiration cytology for pancreatic adenocarcinoma: A meta-analysis. Cytopathology. 2013;24:159–71. doi: 10.1111/cyt.12071. [DOI] [PMC free article] [PubMed] [Google Scholar]
- 4.Schmidt RL, Witt BL, Matynia AP, et al. Rapid on-site evaluation increases endoscopic ultrasound-guided fine-needle aspiration adequacy for pancreatic lesions. Dig Dis Sci. 2013;58:872–82. doi: 10.1007/s10620-012-2411-1. [DOI] [PubMed] [Google Scholar]
- 5.Bang JY, Hebert-Magee S, Trevino J, et al. Randomized trial comparing the 22-gauge aspiration and 22-gauge biopsy needles for EUS-guided sampling of solid pancreatic mass lesions. Gastrointest Endosc. 2012;76:321–7. doi: 10.1016/j.gie.2012.03.1392. [DOI] [PMC free article] [PubMed] [Google Scholar]
- 6.Lee JH, Stewart J, Ross WA, et al. Blinded prospective comparison of the performance of 22-gauge and 25-gauge needles in endoscopic ultrasound-guided fine needle aspiration of the pancreas and peri-pancreatic lesions. Dig Dis Sci. 2009;54:2274–81. doi: 10.1007/s10620-009-0906-1. [DOI] [PubMed] [Google Scholar]
- 7.Vilmann P, Săftoiu A, Hollerbach S, et al. Multicenter randomized controlled trial comparing the performance of 22 gauge versus 25 gauge EUS-FNA needles in solid masses. Scand J Gastroenterol. 2013;48:877–83. doi: 10.3109/00365521.2013.799222. [DOI] [PubMed] [Google Scholar]
- 8.Varadarajulu S, Bang JY, Hebert-Magee S. Assessment of the technical performance of the flexible 19-gauge EUS-FNA needle. Gastrointest Endosc. 2012;76:336–43. doi: 10.1016/j.gie.2012.04.455. [DOI] [PubMed] [Google Scholar]
- 9.Varadarajulu S, Fraig M, Schmulewitz N, et al. Comparison of EUS-guided 19-gauge Trucut needle biopsy with EUS-guided fine-needle aspiration. Endoscopy. 2004;36:397–401. doi: 10.1055/s-2004-814316. [DOI] [PubMed] [Google Scholar]
- 10.Thomas T, Kaye PV, Ragunath K, et al. Efficacy, safety, and predictive factors for a positive yield of EUS-guided Trucut biopsy: A large tertiary referral center experience. Am J Gastroenterol. 2009;104:584–91. doi: 10.1038/ajg.2008.97. [DOI] [PubMed] [Google Scholar]
- 11.Levy MJ, Wiersema MJ. EUS-guided Trucut biopsy. Gastrointest Endosc. 2005;62:417–26. doi: 10.1016/j.gie.2005.04.044. [DOI] [PubMed] [Google Scholar]
- 12.Nguyen YP, Maple JT, Zhang Q, et al. Reliability of gross visual assessment of specimen adequacy during EUS-guided FNA of pancreatic masses. Gastrointest Endosc. 2009;69:1264–70. doi: 10.1016/j.gie.2008.08.030. [DOI] [PubMed] [Google Scholar]
- 13.Mayall F, Cormack A, Slater S, et al. The utility of assessing the gross appearances of FNA specimens. Cytopathology. 2010;21:395–7. doi: 10.1111/j.1365-2303.2009.00733.x. [DOI] [PubMed] [Google Scholar]


