Abstract
The static analysis of tumor tissues at a single, terminal endpoint has been the mainstay of studies in mouse models of cancer. However, with the development of model systems that reproduce the intra- and inter-tumoral heterogeneity of human tumors, such studies are limited by the need for large numbers of animals to overcome increased intra-group variance. The shortcomings of a single-timepoint approach to molecular analysis are especially apparent in the context of therapeutic studies in which the dynamic response to treatment is of particular consequence. In order to mitigate the effects of intertumoral heterogeneity, multiple tissue samples may be harvested from the same tumor at different timepoints through the use of surgical biopsies. For abdominal tumors, pre-procedure imaging may be utilized to assess the suitability of tumors for biopsy. Sterile surgical techniques are utilized to access the abdominal cavity, and customized instruments facilitate the immobilization and retrieval of tissue samples from hard or fibrous tumors. Thermo-regulation, hemostasis, and wound closure techniques are critical to successful surgical outcomes, while appropriate anesthetic, analgesic, and post-operative recovery regimens are important for maintenance of animal welfare. Using a mouse model of pancreatic ductal adenocarcinoma, we present a comprehensive protocol suitable for the routine acquisition of abdominal tumor biopsies.
Materials
Note: This protocol uses the KrasLSL.G12D/+;p53R172H/+;PdxCre (KPC) model of pancreatic ductal adenocarcinoma as an example for demonstration purposes. Before using this protocol, it is important to become familiar with several concepts pertaining to the biopsy surgery, including anesthesia and tumor localization (see Discussion for further detail).
Equipment
Imaging instrumentation for pre-procedure assessment
VisualSonics Vevo 2100 high resolution ultrasound with Color Doppler feature
Equipment for surgical procedure
Surgical suite (see description below)
Biopsy forceps (see below)
Isoflurane anesthesia vaporizer and manifold (e.g. VetEquip RC2 anesthesia system)
Anesthesia induction chamber fitted with a waste-gas scavenging system
Scale for weighing mice
Surgical platform incorporating thermoregulated heating element
Biometric system for real-time monitoring of animal vital signs (heart rate, respiration rate, core body temperature, pulse oximetry)
Charcoal filters appropriate for isoflurane anesthesia waste gas scavenging
Handheld animal clippers with a fine blade
Handheld vacuum cleaner
Dry heat bead sterilizer
Heated recovery cage
Scalpel (No. 15 blade)
Micro dissecting scissors (e.g. Roboz Instruments RS-5880)
Micro dissecting forceps (e.g. Roboz Instruments RS-8254)
Micro dissecting retractors (e.g. Roboz Instruments RS-6510)
Micro biopsy punch (e.g. Zivic Instruments PUN2000 (2mm diameter))
Glass plate
Needle holder scissors (e.g. Roboz Instruments RS-7880)
Surgical wound clip applicator (e.g. Reflex applicator and staples)
Fabrication of Biopsy Forceps
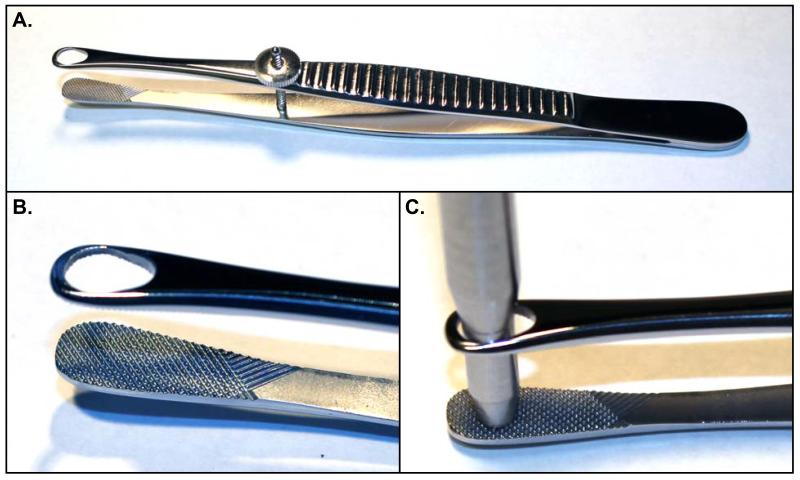
Micro biopsy forceps are a custom-made surgical instrument constructed for the purpose of firmly clamping the tumor while allowing extraction of a cylindrical core biopsy with a small diameter biopsy punch (Figure 1). The instrument may be fabricated in a machine shop, or modified from a commercially available Singley organ holding forceps (e.g. Roboz Instruments RS-5255). Two modifications are made to the Singley forceps. First the aperture on one side of the forceps is filled in or replaced with a flat, finely serrated plate. This allows the forceps to grip the tumor firmly and provides a cutting surface for the biopsy punch to abut. Second, the aperture on the other side of the forceps is slightly enlarged to permit the passage of a 3mm (inner) diameter biopsy punch. The adjustment screw holds grip tension, thus allowing for greater mobility of the surgeon’s off-hand.
Figure 1. Design of Biopsy Forceps.
(A) Biopsy forceps based on a Singley Organ-holding Forceps, with filled in aperture on one side (arrow) and enlarged aperture on the other side (*). (B) Detail of gripping surface and aperture on biopsy forceps. (C) Demonstration of 3mm punch biopsy tool passing through open aperture of Biopsy forceps.
Design of the surgical suite
The space requirements for a surgical suite are not large, but the physical layout does require careful organization. We suggest a total five stations be set up. First, the “Pre-procedure station” houses mice prior to the start of the procedure. Second, an anesthetic “Induction station” includes materials for the initial administration anesthesia to the animal (anesthetic gas induction box or materials for injectable anesthetics). Third, the “Prep station” includes materials for fur removal (clippers and handheld vacuum) and application of disinfectant surgical scrub. Fourth, the “Surgical station” includes a heated platform and bright lights as well as access to an array of sterile surgical implements. Finally, the “Recovery station” includes a heated, cage with clean, dry bedding for post-procedure recovery.
Reagents
Isoflurane anesthetic
Medical air or oxygen supply
Ophthalmic ointment
Iodine disinfectant solution (Povidone)
70% Ethanol
Sterile normal saline
Gelfoam® absorbable gelatin compressed sponge (Pfizer)
5-0 [silk / gut] suture with needle
Buprenorphine
Surgical tool cleaning formula (detergent or Haemosol®)
Powder-free surgical gloves
Gauze sponges
Sterile cotton tip applicators
Kimwipes® (Kimtech)
Microcentrifuge tubes or cryo tubes for samples
5mL syringe
1mL syringe
27G needle
Methods
Advance Preparation
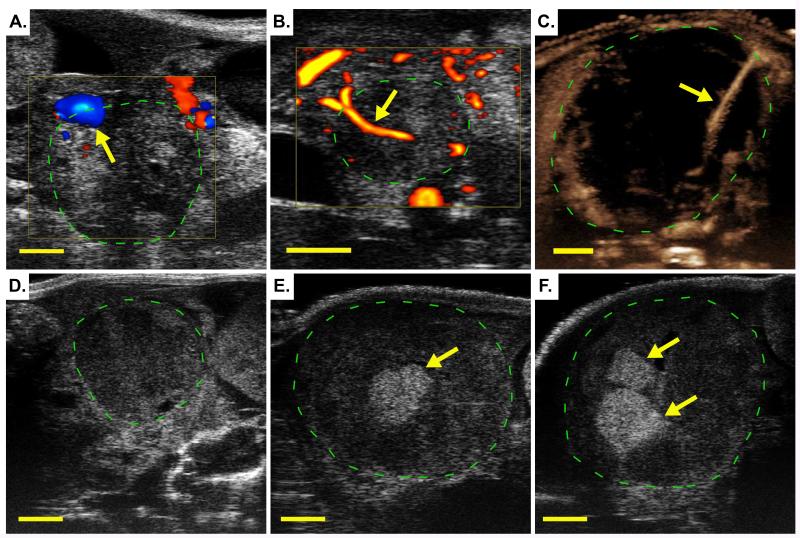
Evaluate tumor location and anatomy. At the most basic level, this may be accomplished through manual palpation. If available, pre-procedure imaging can provide valuable information on the peri-tumoral anatomy and local vascularization (see Chapter 18 and Figure 2A-C). Imaging may also be used to evaluate the location of the biopsy following recovery of the animal from surgery (Figure 2D-F). See Discussion for additional information.
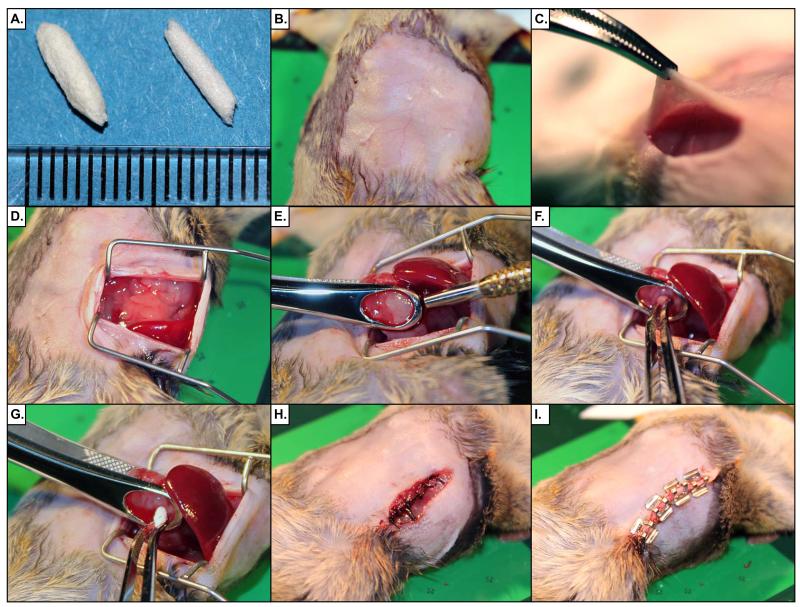
Prepare coagulant plugs. Gelfoam® absorbable gelatin compressed sponge (Pfizer) is a coagulant material that quickly stops bleeding and is effective for filling the space remaining after a tumor biopsy. Prepare Gelfoam plugs in advance of the surgical procedure. This step should be performed in a Class II Biological Safety cabinet, wearing fresh, sterile gloves, and keeping sterile technique at all times. Begin by cutting Gelfoam sponge into strips 20mm × 5mm strips. Fold each strip in half longitudinally (to 10mm length) and gently twist between thumb and index finger to form a tight cylindrical plug (Figure 3A). Store plugs in individual sterile sachets. Do not autoclave the Gelfoam plugs or expose them to chemical disinfectant as this will compromise their integrity.
Wash, autoclave and heat-bead sterilize all surgical tools prior to use.
For the surgical procedure, wear sterile surgical gloves (powder free), mask, hair net, and gown.
Load a 5mL syringe with sterile saline for wound bathing.
Buprenorphine is a controlled substance and will require appropriate federal and state licenses to purchase. In advance of the procedure, prepare a working stock of 0.03mg/mL buprenorphine by adding 1mL vial of 0.3mg/mL buprenorphine to 9mL sterile isotonic saline. Administration dose is 0.1mg/kg (or 120μL of 0.03mg/mL preparation per 25g of mouse). Load a 1mL syringe (27G needle) with appropriate volume of buprenorphine preparation.
Figure 2. Ultrasound Imaging Techniques for Pre-procedure Screening and Post-operative Monitoring.
In each panel, a pancreatic ductal adenocarcinoma arising in a KPC mouse is imaged using a Vevo 2100 high resolution ultrasound (green hashed circle). (A) Color Doppler ultrasound imaging of a pancreatic tumor arising in a KPC mouse. Arrow indicates location of a large blood vessel on the periphery of the tumor. An approach to the tumor that avoids this vessel may make the acquisition of a biopsy feasible in this case. (B) Power Doppler ultrasound imaging identifies a moderately sized blood vessel (arrow) completely encased by the tumor, precluding retrieval of a biopsy. (C) Non-linear contrast ultrasound is used to highlight the presence of a small blood vessel (arrow) in an otherwise poorly perfused tumor. This tumor may be operable if care is taken to avoid this vessel. (D-F) show a series of three B-mode high resolution ultrasound images: taken prior to surgery on Day 0 (D), following a first biopsy surgery on Day 5 (E), and following a second biopsy surgery on Day 11 (F). Arrows indicate the hyperechoic (bright) signal from the Gelfoam® plug at the site of each biopsy.
Figure 3. Demonstration of Abdominal Laparotomy Procedure.
(A) Rolled Gelfoam® plugs are shown with a mm scale. Plugs are used to fill the biopsy wound and encourage clotting. (B) The surgical site is prepared by removing fur and disinfection with surgical scrub. (C) A 15mm incision is made in the skin, followed by a 12mm incision in the abdominal wall. (D) Retractors are inserted into the abdomen to create an operative field. (E) The tumor is isolated and clamped in the biopsy forceps, taking care not to rupture an nearby vessels. The biopsy punch tool is then passed through the tumor to the back plate of the biopsy forceps to cut a cylinder of tumor tissue. (F) The biopsy core is removed with a pair of forceps. (G) A Gelfoam® plug is inserted into the wound left from the biopsy. (H) The abdominal wall is sutured with 5-0 silk. (I) The skin incision is repaired with surgical staples.
Animal Preparation
Pre-fill a sealed anesthesia induction chamber with 2% isoflurane in air (or oxygen).
Place animal in the induction chamber until animal shows no gross movement except for steady respiration. Confirm adequate anesthesia using the footpad reflex test.
Following initial induction, reduce isoflurane concentration to 1.5%. Closely monitor the animal at all times and adjust isoflurane concentration as needed to maintain an appropriate plane of anesthesia. As the animal is moved between stations (Induction, Prep, or Surgical), make certain to activate delivery of isoflurane to each new station and discontinue delivery of isoflurane to unused stations.
Move animal to the Prep station. Using fine clippers, carefully shave fur from a large field surrounding the planned incision site. Depilatory cream may optionally be applied for complete removal of fur. For a tail of pancreas tumor, clip the animal’s left lateral abdominal area, from hip joint to armpit. After completion, use a handheld vacuum cleaner to collect and remove shaved fur from the Prep station, to minimize the spread of dander.
Apply a small amount of ophthalmic ointment to each eye to prevent dehydration.
Connect biometric monitoring equipment to animal. This can include a rectal thermometer or thermocouple for core body temperature monitoring, pulse oximetry using a footpad clip sensor and/or ECG measurement via footpad electrode connections.
Gently palpate the abdomen to confirm location of the tumor and refine the location of incision site.
Prepare the left flank of the animal for surgery with a scrub using disinfectant (e.g chlorhexidine or an iodophor such as Povidone™) applied with a soaked gauze or cotton tip applicator, followed by a similarly applied 70% alcohol scrub. Repeat the disinfectant/alcohol scrub procedure. The scrub process should always begin at the incision line and move outward to the shaved edge. Do not go over the incision site with the same scrub.
Surgery
Administer 0.1mg/kg of 0.03mg/mL buprenorphine IP [or SQ] as post-operative analgesic. Pre-emptive administration will give the agent time to take affect prior to the animal’s recovery.
Use a scalpel or micro dissecting scissors to make a 15mm longitudinal skin incision on animals left flank centered on latitude closest to main tumor mass as determined by imaging and palpation (Figure 3B).
Gently blunt dissect subcutaneous fascia with scissors / forceps.
Use a scalpel or micro dissecting scissors to make a 12mm longitudinal peritoneal incision within area revealed by skin incision.
Use cotton tip applicators soaked in sterile saline to sponge and clean any minor wound bleeding.
Insert retractors into wound and expand wound edges outward to form peritoneal opening ~10mm wide (Figure 3D).
Use micro dissecting forceps to carefully locate tumor within abdomen.
Isolate tumor from surrounding organs and tissues taking care to avoid tearing or rupturing connected tissues and vessels.
Expose tumor via peritoneal opening and identify target biopsy aperture (Figure 3E). Take care to displace the tumor mass as little as possible during this procedure.
Use biopsy forceps to clamp tumor by axes of target core with forceps aperture around one pole and forceps plate at opposite pole. Tighten forceps screw to hold tumor firmly in place (Figure 3F).
Insert biopsy punch through forceps aperture and push through with gentle twisting until tool passes through the tumor to the forceps plate.
Twist biopsy punch against forceps plate to cut through distal edge of tumor core.
Remove biopsy punch and retrieve core tissue sample (Figure 3G). Use a razor blade or scalpel blade on a glass plate to cut sample as required. Treat sample as per required collection method (formalin, liquid nitrogen, OCT, RNALater, etc).
Using micro dissecting forceps, insert Gelfoam plug into biopsy cavity (Figure 3H). Hold in place until Gelfoam has expanded to fill cavity. Add further Gelfoam plugs if necessary. Use a sterile saline-soaked cotton tip applicator to apply pressure through the aperture of the biopsy forceps to staunch bleeding.
Gently loosen biopsy forceps screw while continuing to apply pressure with cotton tip applicator until excessive bleeding has stopped and tumor can be fully released.
Use sterile gauze sponges to swab the peritoneal area to remove excess blood. Bathe area in saline. Repeat swab.
Release retractors and gently replace tumor within abdominal space.
Using needle holder scissors, suture peritoneal incision closed with 5-0 [silk].
Suture [or wound clip] skin incision closed. Clean wound area with sterile saline and then swab with iodine solution.
Remove and clean biometric monitoring devices.
Remove animal from operating stage and lay on right flank on gauze in clean, heated recovery cage without other animals.
Post-Operative care
Monitor animal closely and continuously until it regains consciousness and begins walking. Monitor for signs of respiratory distress (cyanosis, irregular or labored breathing).
Administer 0.5mL IP saline if animal has lost significant blood during surgery or if it shows signs of dehydration post-recovery.
Following initial recovery, monitor the animal frequently over successive days.
Continue post-operative analgesia as advised by veterinary staff. A typical regimen is 0.1mg/kg buprenorphine, administered subcutaneously every 12 hours for at least two days. Alternatively, 5mg/kg Carprofen may be administered daily, subcutaneously.
Troubleshooting
Problem: Difficulty in maintaining hemostasis
The blood vessels surrounding a tumor are often very delicate and prone to rupture. Blood loss is the greatest risk in carrying out the surgical procedure.
Solution
Care should be taken in accessing the tumor. Avoid sharp dissection of connective tissue surrounding the tumor; if access is difficult, try when possible to blunt dissection techniques. Attempt to displace the tumor from its native site as little as possible. Although Figure 3 shows complete externalization of the tumor, it is not always necessary to do this. If it is possible to gain clear access to the tumor without externalizing, this may be preferable.
Problem: Difficulty in maintaining body temperature during surgery
Thermoregulation is also a significant risk during any rodent surgical procedure.
Solution
Use of a surgical platform that incorporates a temperature-controlled heating element allows for careful control of intraoperative body temperature. Make certain that the recovery cage is also appropriately warmed.
Discussion
Translational cancer research is focused on the biology of tumors are they are perturbed by therapeutic agents. The dynamic response of tumors in the minutes, hours, days, and months after treatment provides important information about drug metabolism, mechanisms of action, determinants of primary drug sensitivity, and avenues of acquired drug resistance. One approach to studying these changes is to treat cohorts of animals with agents and controls in parallel and then collect tissues at a single, terminal timepoint. However, this single-timepoint approach is predicated on the idea that the tumors arising in different animals are sufficiently similar that an effect between groups can be confidently detected with a manageable number of mice. In practice, the intertumoral heterogeneity apparent in most models is sufficiently high that only large effect sizes can be detected this way. Despite the uniformity of initiating mutations in a given cancer GEMM, secondary mutations will be acquired during tumor evolution that lead to at least some level of heterogeneity. Moreover, in certain models, particularly those incorporating engineered mutations that incur genomic instability (such as telomerase knockout or point-mutations in p53), inter- and intra-tumoral heterogeneity can be extremely high, making single-timepoint approaches impractical.
One way to mitigate the effects of inter-tumoral heterogeneity is to retrieve tissue samples from one tumor at multiple timepoints. For shallow tumors such as those of the skin or mammary glands, surgical procedures to acquire tissue samples are relatively minor. Conversely, tumors arising in the thoracic cavity or in the central nervous system are extremely challenging to access in a survival setting. However, for tumors in the abdominal cavity, tumor biopsies may be efficiently acquired by laparotomy, thereby enabling a full range of paired-sample study structures. The surgical approach taken to acquire tumor biopsies from different organs will vary in relation to the local tissue anatomy, local vascular anatomy, and with regard to the physiology of the organ.
Case study: the KPC model of pancreatic ductal adenocarcinoma
Some of the many considerations in designing a surgical approach for a specific tumor are illustrated here using the specific example of pancreatic tumors arising in the K-rasLSL.G12D/+; p53LSL.R172H/+; Pdx1Cretg/+ (KPC) mouse model (Hingorani et al. 2005). This widely used model typically develops one or two discrete pancreatic tumors in the context of a pre-neoplastic pancreas. The suitability of pancreatic tumors for surgical biopsy is largely dependent upon their precise location within the pancreas and their relationship to the surrounding vasculature and viscera. For example, tumors located in the head of the pancreas (HOP, on the animal’s right side near the proximal duodenum) are often very difficult to biopsy due to their involvement with the duodenum, gall bladder, biliary tree, bowels, and/or retro-peritoneal wall. Furthermore, these tumors are often situated near major vessels such as the aorta and vena cava, frequently invade around these structures. Apart from the challenge of isolating the tumor from these structures without tissue damage, identification of a suitable biopsy through the entire diameter of the tumor that avoids all major vessels can also be difficult. In contrast, tumors located in the tail of the pancreas (TOP, located near the spleen and left kidney) are often more amenable to surgical biopsy since this region of the pancreas is typically free of direct communication with other organs or major vessels. Although proximity to intestinal loops, the spleen, the left kidney and left uterine horn can complicate access, tumor isolation and core identification is significantly easier than for HOP lesions.
Evaluation of tumor location and vascularity
A detailed understanding of the local tissue anatomy surrounding the site of tumor development and relevant vascular anatomy is required to plan a successful biopsy procedure. Some organs (liver, kidneys, adrenals, spleen, and ovaries) are relatively accessible, requiring only an appropriately situated peritoneal incision. However, deep organs such as the pancreas, prostate, and abdominal lymph nodes, necessitate additional effort to access. Moreover, the anatomy of the tumor in relation to the remaining normal tissue of an organ also bears consideration. Tumors that extend into the lumen of an organ, such as the intestines, stomach, or bladder, are particularly challenging to access due to the need to maintain organ function and integrity. Finally, the vascular anatomy of the tumor has a critical impact on surgical outcome. Tumors often recruit new blood vessels from surrounding tissues or invade existing vessels. A poorly planned biopsy risks damage to these vessels and exsanguination.
The risk of damaging tissues and vessels can be mitigated through pre-procedure imaging with a functional imaging modality that can identify vasculature. For pancreatic tumors, high resolution ultrasound is a useful and accessible anatomical imaging technology [for detailed protocol, see (Sastra and Olive 2013)]. Several types of functional ultrasound can provide additional information about blood flow. Color Doppler ultrasound is sensitive to the velocity and direction of blood flow, with red color indicating movement towards the transducer and blue color indicating flow away from the transducer (Figure 2A). Power Doppler does not indicate directionality, but is more sensitive to smaller blood vessels (Figure 2B). In addition, contrast agents such as microbubbles (gas-filled liposomes) may be utilized to further highlight blood flow. Non-linear contrast ultrasound allows detection of contrast agents with little background signal from tissues and is the most sensitive of the three techniques (Figure 2C) for identifying small blood vessels and quantifying tissue perfusion. Together, these three technologies have proven useful for the identification of relevant vessels during pre-procedure screening.
Mouse Anesthesia
We strongly encourage the use of isoflurane gas as an anesthetic agent. Isoflurane is very well-tolerated by mice. As a gas, it rapidly enters the system, resulting in quick induction upon exposure and a rapid recovery upon removal. The continuous administration of a rapidly cleared agent allows for much more subtle control of plane of anesthesia compared to injected agents. Use of isoflurane anesthetic requires attention to the design of both the gas delivery system and waste removal system. Isoflurane is a liquid at room temperature that is vaporized into a mixture with air or oxygen. Ideally, the surgical suite will have three stations that require anesthesia: an induction box for initial delivery of isoflurane to the mice, a prep station where the mice are shaved and prepared for the procedure, and the surgical station where procedures are carried out. A fourth station for post-operative recovery is also necessary, but does not require access to anesthesia. In order to accommodate the need for anesthesia at multiple stations, we recommend the use of a vaporizer and anesthesia system with multiple independent circuits such that gas flow can be readily manipulated to each site (for example, the VetEquip RC2 system). At each station, passive scavenging may be achieved through the use of charcoal canisters.
The sensitivity of different mice to anesthetics will range considerably based on variables such as strain background, age, and health status; tumor-bearing mice often have increased sensitivity to isofluorane. As a general guide, initial induction should be performed with 2% isoflurane gas, followed by maintenance at 1.5%. However, some animals will require as much as 2.75% isoflurane for induction or as low as 1% for maintenance. At all times, plane of anesthesia should be monitored through a combination of biophysical monitoring (pulse, heart rate, oximetry), through foot pinch test, and through direct observation of the animal. Veterinary staff should be consulted for appropriate training in the use of isoflurane anesthesia.
Outcome
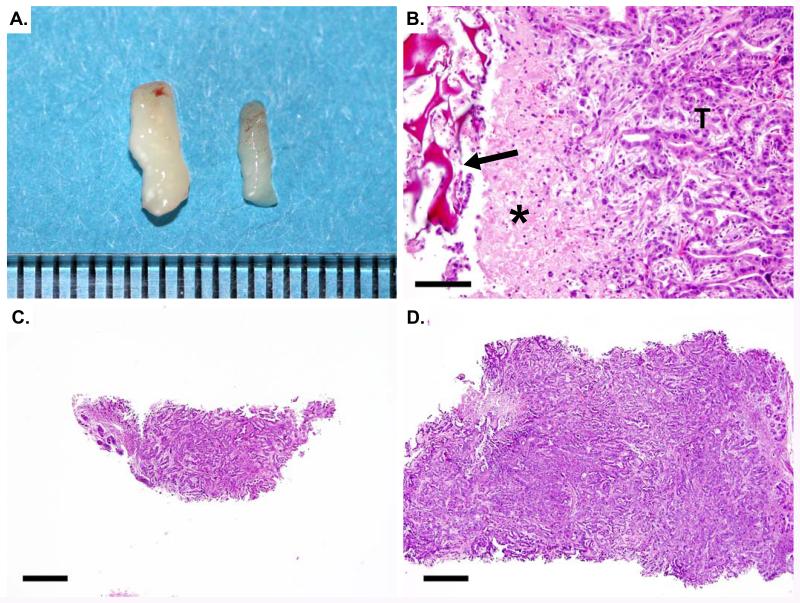
Using the technique described above, core biopsies up to 3mm in diameter may be acquired from mouse abdominal tumors, yielding up to 20mg of tissue (Figure 4A). Samples may be divided longitudinally in order to provide half for histopathology (Figure 4B,C) and the remainder for other molecular biology assays. The use of this biopsy surgery protocol enables the utilization of powerful paired-sample study structures that has the potential to significantly decrease the number of samples necessary to achieve appropriate statistical power. The Gelfoam® plug inserted into the tumor is slowly absorbed over time. However, if it is still present at subsequent necropsy, the material may be sectioned and is easily identified histologically (Figure 4D). Local inflammation may be apparent immediately adjacent to the plug should be taken into consideration when acquiring necropsy tissue samples for subsequent analyses. A vehicle-treated group should be included in all pharmacodynamic studies utilizing this protocol in order to account for changes in the tumor during growth and the potential inflammatory effects of the biopsy surgery
Figure 4. Biopsy samples may be sectioned for histology.
(A) 1.5mm and a 3mm biopsy cores are shown with a mm scale. (B) Hematoxylin and eosin (H&E) stained section from a tumor that previously underwent biopsy. The Gelfoam® plug is visible (arrow) as a deep red-staining, sponge-like structure. Inflammatory cells (asterisk) accumulate immediately adjacent to the plug. Pancreatic ductal adenocarcinoma is apparent on the right (T). (C) H&E stained section of a 1.5mm biopsy core. Bar= 500μm. (D) H&E stained section of a 3mm biopsy core. Bar= 500μm.
References
- Hingorani SR, Wang L, Multani AS, Combs C, Deramaudt TB, Hruban RH, Rustgi AK, Chang S, Tuveson DA. Trp53R172H and KrasG12D cooperate to promote chromosomal instability and widely metastatic pancreatic ductal adenocarcinoma in mice. Cancer Cell. 2005;7:469–483. doi: 10.1016/j.ccr.2005.04.023. [DOI] [PubMed] [Google Scholar]
- Sastra SA, Olive KP. Quantification of murine pancreatic tumors by high-resolution ultrasound. Methods Mol Biol. 2013;980:249–266. doi: 10.1007/978-1-62703-287-2_13. [DOI] [PMC free article] [PubMed] [Google Scholar]


