Abstract
Expression of functional, recombinant mammalian proteins often requires expression in mammalian cells (see Single Cell Cloning of a Stable Mammalian Cell Line). If the expressed protein needs to be made frequently, it can be best to generate a stable cell line instead of performing repeated transient transfections into mammalian cells. Here, we describe a method to generate stable cell lines via electroporation followed by selection steps.
This protocol will be limited to the CHO dhfr– Urlaub et al. (1983) and LEC1 cell lines, which in our experience perform the best with this method.
1. THEORY
Electroporation is a popular technique to introduce foreign DNA into host cells. The DNA enters the cells following a quick electric pulse that generates temporary openings in the cell membrane. After electroporation, selection steps must be followed to allow for cells containing only the target DNA to grow.
While outside the scope of this protocol, we have listed some other cell lines and appropriate selection markers in Table 17.1. Stable cell lines also can be generated by other transfection methods (e.g., using lipid-like transfection reagents or calcium phosphate transfection. See also Rapid creation of stable mammalian cell lines for regulated expression of proteins using the Gateway® Recombination Cloning Technology and Flp-In T-REx® lines) followed by appropriate selection steps.
Table 17.1.
Summary of selection method
| Cell type | Transfection method | Selection markers | Round 1 selection | Days until die-off begins | Round 2 selection |
|---|---|---|---|---|---|
| CHO dhfr– | Electroporation | pSV2-dhfr | Alpha MEM, 5% D-FBS | 12–14 | Alpha MEM, 5% D-FBS, MTX (0.1–0.4 mM) |
| LEC1 | Electroporation | pcDNA3.1, pSV2-dhfr | Alpha MEM, 5% FBS, 0.5 mg ml−1 geneticin | 15–17 | Alpha MEM, 5% D-FBS, MTX (0.025–0.1 mM) |
| HEK 293 GnTi- | PEI | pcDNA3.1 | DMEM:F12, 5% FBS, 2 mg ml−1 geneticin | 7–10 | N/A |
| CHO-S | PEI | pcDNA3.1 | DMEM:F12, 5% FBS, 0.5 mg ml−1 geneticin | 7–10 | N/A |
Two different selection methods are described here for the first round of selection immediately following electroporation. The first selection method relies on co-transfection with the pcDNA3.1 vector, which carries the neo gene that confers resistance to geneticin, an aminoglycoside antibiotic (Southern and Berg, 1982). It is generally not necessary for the gene of interest and the selectable marker to be on the same plasmid. Positively transfected cells are selected by growth in the presence of geneticin. The second selection method relies on dihydrofolate reductase (DHFR) activity (Wigler et al., 1980) and its inhibitor methotrexate (MTX). DHFR selection works best with the cells lacking DHFR activity, such as CHO dhfr–. But cells having wild-type DHFR activity can also be selected with high MTX concentrations (Table 17.1). The DHFR/MTX selection step can be repeated with higher concentrations of MTX until a desirable level of protein expression is achieved.
Stable cell lines often lose their protein expression with time as a result of a heterogeneity in the transfected population of cells. A more homogeneous population of cells can be obtained by limiting dilution cloning or picking individual colonies of drug-resistant cells.
2. EQUIPMENT
Laminar flow hood
CO2 incubator
Centrifuge
Electroporator (BIO-RAD Gene Pulser II)
Sterile 2 mm gap cuvettes
Water bath (37 °C)
Inverted microscope
Hemacytometer
0.22-μm sterile filters
T75 tissue culture flasks
Sterile 50-ml polypropylene conical tubes
Sterile 1.5-ml polypropylene tubes
Sterile 150-mm tissue culture dishes
Sterile 100-mm tissue culture dishes 24-well tissue culture plates
Sterile pregreased glass cloning cylinders (Sigma C1059)
Sterile pipette tips
Sterile disposable pipettes
3. MATERIALS
Plasmid DNA expressing gene of interest
Cell line (CHO dhfr–, LEC1) (ATCC)
Fetal bovine serum (FBS, Invitrogen)
Dialysed FBS (D-FBS, Invitrogen)
Geneticin® (Invitrogen)
Methotrexate (MTX, Sigma)
Hanks Balanced Salt Solution (HBSS w/o Ca, Mg; Invitrogen 14170)
HT supplement, 100× (Invitrogen)
TrypLE™ Express (Invitrogen)
MEM α (containing Earl’s Salts and L-glutamine, but no ribonucleosides, deoxyribonucleosides, NaCO3; Invitrogen 12000)
DMEM/F12 (with L-glutamine, but no HEPES, NaHCO3; Invitrogen 12500)
Freestyle™ 293 medium (Invitrogen 12338-026)
Hybridoma SFM (Invitrogen 12045)
pcDNA 3.1 (Invitrogen)
-
pSV2-dhfr (ATCC)
Note Some of the stock solutions come with the pH indicator phenol red. This supplement does not affect the application and might be useful if the researcher wishes to visualize any pH changes that can occur in the solutions over time. In the case of non-CO2 incubators (e.g., when scaling-up the production of adherent cells in roller bottles), HEPES-buffered media can be used to keep the pH stable.Note Catalog numbers are from the US website of Invitrogen and may differ on other local websites.
3.1. Solutions & Buffers
Step 2 Lec1 Growth Medium: Alpha MEM + 5% FBS
| Add 50 ml FBS to 1 l of Alpha MEM |
CHO dhfr– Growth Medium: Alpha MEM + 5% FBS + HT solution
| Add 50 ml FBS and 10 ml of 100× HT solution to 1 l of Alpha MEM |
Steps 4–6 50 mg ml−1 Geneticin® (active)
| Add enough active Geneticin to 50 ml of water to make a 50 mg ml−1 stock solution. Each lot of Geneticin will have a different active concentration. For example, if a 5 g bottle of Geneticin has an active concentration of 750 μg mg−1 of powder, it contains an active weight of 3.75 g Geneticin. Therefore dissolve the 5 g of powder in 75 ml of water to obtain an active concentration of 50 mg ml−1. Mix to dissolve, pass through a 0.2 mm filter to sterilize, and dispense aliquots into sterile tubes. Store short term at 4 °C or long term at −20 °C |
Lec1 Selection Medium
| Add 50 ml FBS and 10 ml of 50 mg ml−1 Geneticin to 1 l of Alpha MEM |
CHO dhfr– Selection Medium
| Add 50 ml D-FBS to 1 l of Alpha MEM |
Step 6 30 mM MTX
| Component | Final Concentration | Stock | Amount |
|---|---|---|---|
| Methotrexate | 30 mM | 0.136 g | |
| Alpha MEM | 9.5 ml | ||
| NaOH | 50 mM | 1 M | 0.5 ml |
Mix well until MTX is dissolved and pass through a 0.2 μm filter to sterilize. Store in sterile aliquots at −20 −C
1 mM MTX
| Add 33.3 μl of 30 mM MTX to 1 ml Alpha MEM |
MTX selection concentrations
| Component | Final concentration | Stock | Amount |
|---|---|---|---|
| MTX | 25 nM | 1 mM | 12.5 μl |
| MTX | 50 nM | 1 mM | 25 μl |
| MTX | 75 nM | 1 mM | 37.5 μl |
| MTX | 100 nM | 1 mM | 50 μl |
| MTX | 200 nM | 1 mM | 100 μl |
| MTX | 300 nM | 1 mM | 150 μl |
| MTX | 400 nM | 1 mM | 200 μl |
| MTX | 500 nM | 1 mM | 250 μl |
| MTX | 1 μM | 1 mM | 500 μl |
Add the indicated amount of MTX to 500 ml Alpha MEM containing 5% FBS
4. PROTOCOL
4.1. Preparation
Before transfection, sterile high-quality DNA must be prepared. The vector containing the appropriate expression promoter (see Molecular Cloning) and the gene of interest should be transformed into a recA- strain of E. coli (see Transformation of Chemically Competent E. coli or Transformation of E. coli via electroporation) and then the plasmid DNA isolated (see Isolation of plasmid DNA from bacteria). Commercially available, endotoxin-free kits for large-scale plasmid DNA isolation produce sufficiently high-quality DNA. High-quality DNA is characterized as having an OD260/280 ratio between 1.88 and 1.92, an OD260/230 ratio of 2.1–2.2, and a concentration above 0.5 mg ml−1 (see Explanatory Chapter: Nucleic Acid Concentration Determination).
All steps are carried out using sterile technique in a laminar flow hood. Solutions should be sterile filtered through 0.22-μm filters. All plastic and glassware, if not purchased as sterile, should be autoclaved twice. Cell growth media are warmed to 37 °C prior to contact with cells. Before electroporating, cells should have undergone at least five passages from thawing. Grow LEC1 or CHO dhfr– cells to 80% confluency in a T75 flask. One T75 flask at 80% confluence yields enough cells for 1–2 electroporations. No residual trypsin can be present during electroporation.
4.2. Duration
| Preparation | 1 week |
|---|---|
| Protocol | ~1–3 months |
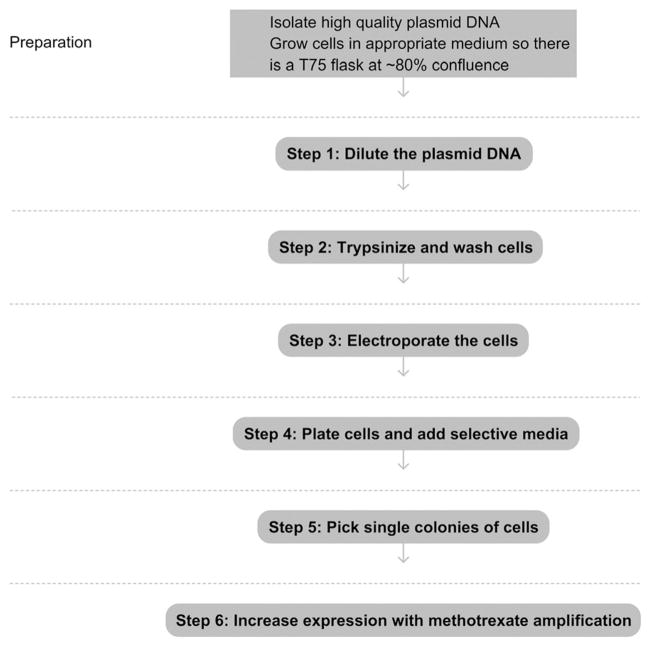
See Fig. 17.1 for the complete protocol, including preparation.
Figure 17.1.
Flowchart of the complete protocol, including preparation.
5. STEP 1 DILUTE PLASMID DNA
5.1. Overview
The proper amount of each high-quality plasmid DNA is diluted into the appropriate media for electroporation.
5.2. Duration
5 min
-
1.1
In a sterile tube, combine 5 μg pcDNA3.1, 5 μg pSV2-dhfr, and 100 μg of the expression plasmid containing the gene of interest.
-
1.2
Adjust the final volume to 0.2 ml with HBSS.
-
1.3
Incubate at room temperature while preparing cells.
5.3. Tip
These plasmids contain the selection markers for LEC1 cells. See Table 17.1 for the selection markers for other cell lines.
5.4. Tip
The total volume of the plasmid DNA mixture must be <0.1 ml, (i.e., half of the final volume). If the volume in Step 1.1 is larger than 0.1 ml, the electroporation efficiency will decrease. If this occurs, increase the starting concentrations of each DNA stock.
See Fig. 17.2 for the flowchart of Step 1.
Figure 17.2.

Flowchart of Step 1.
6. STEP 2 PREPARE CELLS FOR ELECTROPORATION
6.1. Overview
Cells are trypsinized from a T75 flask, counted, and then washed into the appropriate media for electroporation.
6.2. Duration
30 min
-
2.1
Aspirate the media from the flask.
-
2.2
Add 4 ml TrypLE™ Express.
-
2.3
Lay flask flat to ensure that the entire surface is covered with the liquid and incubate for 1 min at room temperature.
-
2.4
Remove TrypLE™ Express solution.
-
2.5
View cells under microscope and wait until cells have released from the bottom of flask, appearing round in the microscope.
-
2.6
Immediately add 20 ml of the appropriate growth media to the flask (Table 17.2).
-
2.7
Pipette gently up and down against the cell growth surface of the flask to resuspend cells.
-
2.8
Transfer cell suspension to a 50-ml conical centrifuge tube.
-
2.9
Aliquot a small amount of suspension and count the number of cells using a hemacytometer.
-
2.10
Centrifuge the cell suspension at 200×g for 5 min at room temperature.
-
2.11
Aspirate the supernatant.
-
2.12
Add 20 ml HBSS to wash the cells. Gently pipette up and down to resuspend the cell pellet.
-
2.13
Centrifuge the cell suspension at 200×g for 5 min at room temperature. Aspirate the supernatant.
-
2.14
Add HBBS so that the final cell concentration is 20×106 cells ml−1.
-
2.15
Gently resuspend the cell pellet with serological pipette.
Table 17.2.
Cell lines and growth conditions
| Cell line | Ideal growth condition | Optimal media | Cell source |
|---|---|---|---|
| HEK293S Gnti- | Suspension | Freestyle293 ‘completed’ | ATCC CRL3022 |
| HEK293S Gnti- | Adherent | DMEM/F12, 5% FBS | ATCC CRL3022 |
| HEK293T/17 | Adherent | DMEM/F12, 5% FBS | ATCC CRL11268 |
| CHO-S | Suspension | Hybridoma, 1% FBS | INVITROGEN R800-07 |
| CHO-S | Adherent | DMEM/F12, 5% FBS | INVITROGEN R800-07 |
| CHO dhfr– | Adherent | Alpha MEM, 5% FBS, HT | ATCC CRL-9096 |
| LEC1 | Adherent | Alpha MEM, 5% FBS | ATCC CRL-1735 |
| COS7 | Adherent | DMEM/F12, 5% FBS | ATCC CRL1651 |
6.3. Tip
Adding the growth media at Step 2.6 serves to inactivate the enzyme in TrypLE™ Express.
6.4. Tip
All traces of trypsin must be removed prior to electroporation or the efficiency will be negatively affected. Do not skip the wash steps.
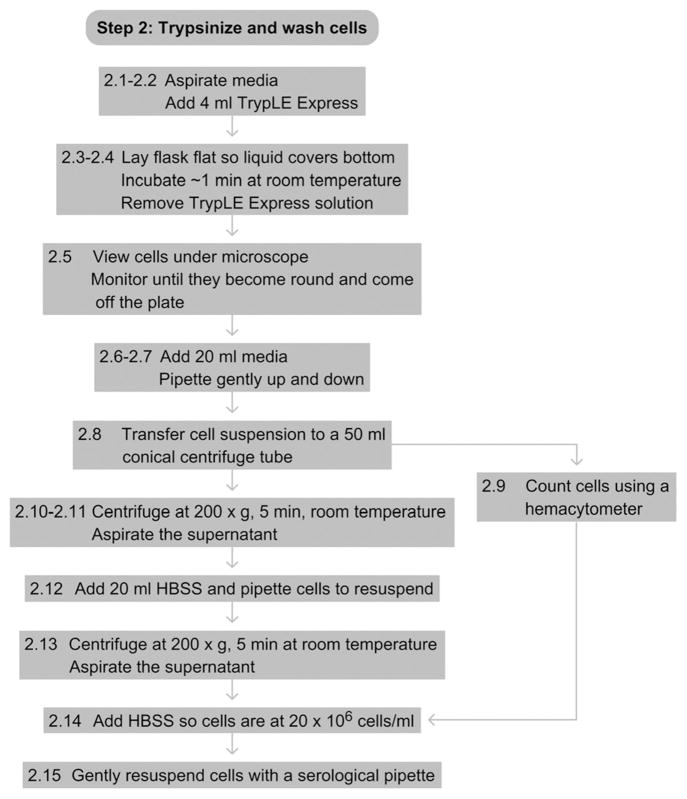
See Fig. 17.3 for the flowchart of Step 2.
Figure 17.3.
Flowchart of Step 2.
7. STEP 3 ELECTROPORATE THE CELLS
7.1. Overview
Cells are transfected using an electroporation device.
7.2. Duration
1–2 min
-
3.1
Add 0.2 ml of the cell suspension (from Step 2.15) to the diluted DNA (from Step 1.3).
-
3.2
Mix gently and transfer the mixture to a 2-mm sterile electroporation cuvette.
-
3.3
Cap the cuvette and transfer to the electroporator.
-
3.4
Electroporate cells according to the manufacturer’s instructions.
7.3. Tip
If multiple samples are being processed, place the cell/DNA mixture in the cuvette on ice until all samples are ready to electroporate.
7.4. Tip
We find the optimal settings for CHO dhfr– cells and LEC1 cells to be at high capacitance, 0.174 kV, and 400 μF. These variables may need to be optimized for each cell line.
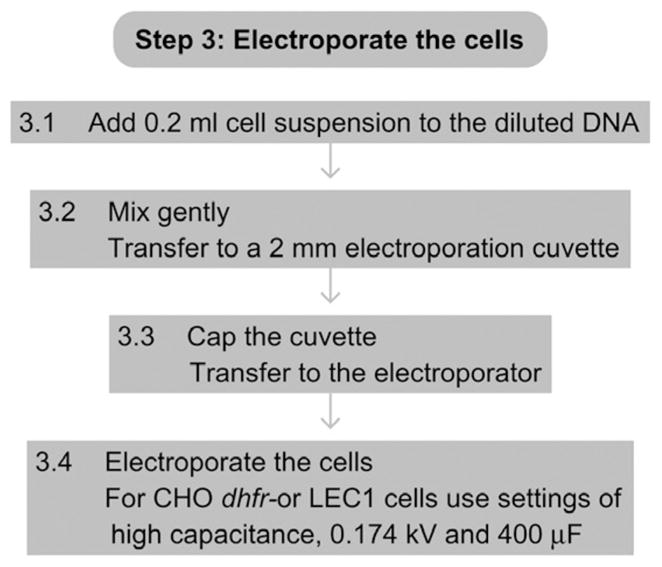
See Fig. 17.4 for the flowchart of Step 3.
Figure 17.4.
Flowchart of Step 3.
8. STEP 4 PLATING ELECTROPORATED CELLS
8.1. Overview
Electroporated cells are plated into first selection medium and returned to the incubator. Untransfected cells typically start to die off between day 12 and day 17 in culture.
8.2. Duration
20 min
12–17 days for cells to die off and resistant cells to grow.
-
4.1
Transfer the cells to a fresh sterile 1.5-ml microcentrifuge tube.
-
4.2
Adjust the total cell volume to 1 ml with HBSS and mix gently.
-
4.3
Transfer 0.1 ml of the cell suspension to a 150-mm dish containing 25 ml of appropriate round 1 selection medium (Table 17.1).
-
4.4
Place the dish in a CO2 incubator at 37 °C.
-
4.5
Seven days after electroporation, aspirate media from the cells and refeed with 25 ml of the appropriate round 1 selection medium.
-
4.6
Aspirate and add fresh selection media every 3–4 days until there is an obvious die-off of cells as judged by the disappearance of the monolayer of cells. Viable cells will remain in selected areas, giving the appearance of individual colonies.
8.3. Tip
If all cells die or none of the cells dies, then either the quality of cells or DNA is nonideal. Thaw and culture new cells and/or prepare a higher quality batch of DNA.
8.4. Tip
Die-off is usually observed between 14 and 17 days after electroporation but that varies for different cell lines. See Table 1 for approximate times for several cell lines.
8.5. Tip
Multiple 150-mm dishes can be prepared by plating different amounts of the cell/DNA mix. We usually plate 0.10, 0.15, 0.25, and 0.5 ml of the cell/DNA suspension, respectively, into four separate dishes containing 25 ml each of the appropriate first round selection media.
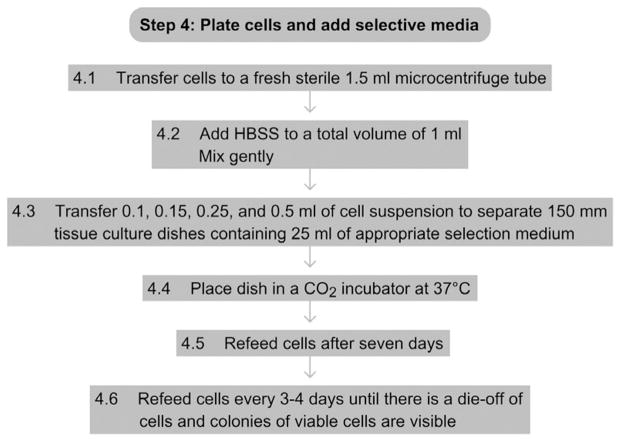
See Fig. 17.5 for the flowchart of Step 4.
Figure 17.5.
Flowchart of Step 4.
9. STEP 5 PICKING SINGLE COLONIES OF CELLS
9.1. Overview
After most cells die off, single colonies of transfected cells are isolated.
9.2. Duration
20 min active, plus time for cells to grow
-
5.1
With media still in the dish, carefully hold it above eye level and note visible colonies. They appear as round opaque areas against a clear background.
-
5.2
Mark a circle around each colony on the bottom of the dish with a black marker. Do not circle colonies that are too close together, or the cloning rings will not be able to fit around a single colony. Choose at least 24 colonies per transfection plate.
-
5.3
View the cells under the microscope to confirm that the areas you have circled are colonies of viable cells.
-
5.4
Carefully tilt the dish and remove all media with a pipette.
-
5.5
Using forceps, grease a cloning ring and place it around a colony, so as to make a well around each colony.
-
5.6
Pipette 0.2 ml TrypLE™ Express into each cloning ring.
-
5.7
Cover the plate and place on microscope stage.
-
5.8
Watch for cells to round up and pull away from the plate. They will become round and highly refractile. This usually takes 30–60 s.
-
5.9
Return plate to hood. Using a pipette, gently remove TrypLE™ Express from all 24 cloning rings.
-
5.10
Add 0.2 ml appropriate cell selection medium to six rings. The remaining rings remain empty.
-
5.11
Beginning with the first cylinder containing selection medium, gently pipette up and down to dislodge the cells from the surface.
-
5.12
Transfer the cell suspension to one well of a 24-well dish containing 1 ml of the appropriate selection media.
-
5.13
Transfer the cells from the next five rings containing selection media.
-
5.14
Add 0.2 ml media to another six cloning rings and transfer cells. Continue until the cells have been removed from all 24 cloning rings and transferred to a well of the 24-well plate.
-
5.15
Put the 24-well plate in the CO2 incubator. Replace the appropriate selection media every 3 days. Assay for expression of your protein when the cells are 100% confluent.
-
5.16
Choose at least three of the highest expressing colonies. Expand cells for freezing stocks and for growth in a T75 flask to be used in a second round of selection with methotrexate.
9.3. Tip
Try to transfer the cells from all 24 cloning rings within 20 min to avoid cell death due to long exposure to TrypLE™ Express or due to drying out. Alternatively, you can begin by filling all 24 cloning rings with appropriate selection media. Proceed to remove media from 6 wells and treat them with TrypLE™Express. Resuspend each well in selection media and transfer each into a separate well of a 24-well plate containing 1 ml appropriate selection media. Repeat for the next group of 6 wells until all 24 wells are collected.
9.4. Tip
Dispense 1 ml of the appropriate selection media in each well of a 24-well plate prior to placing the cloning rings on the transfected plate.
9.5. Tip
At this stage, if the level of protein expression is satisfactory, no further selection is needed and the stable cell line can be used for protein production.
9.6. Tip
Once the cells in the 24-well plate are growing, the 150 mm master plate on which the cloning rings were placed can be discarded.
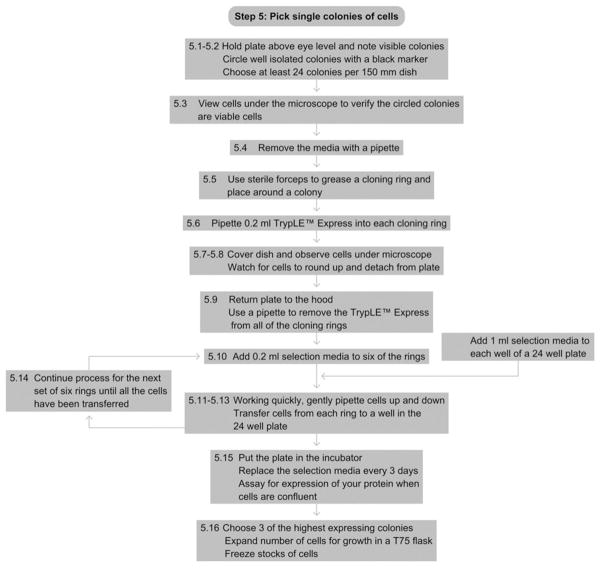
See Fig. 17.6 for the flowchart of Step 5.
Figure 17.6.
Flowchart of Step 5.
10. STEP 6 METHOTREXATE AMPLIFICATION
10.1. Overview
For cells transfected with the pSV2-dhfr vector, target protein expression can be increased with further rounds of methotrexate selection.
10.2. Duration
Variable (weeks)
-
6.1
Grow the three highest expressing colonies in a T75 flask until they are 80% confluent.
-
6.2
Trypsinize and count the cells.
-
6.3
Resuspend the cells at a concentration of 1×10⁶ cells ml−1 in second round selection media without MTX (Table 17.1).
-
6.4
Prepare four 100-mm plates by adding 10 ml of second round selection media containing MTX spanning the concentration range of MTX suggested in Table 17.1.
-
6.5
Add 0.3 ml of cell suspension to each plate.
-
6.6
Gently swirl the plate to evenly distribute the cells.
-
6.7
Return dishes to the incubator and grow for 3 days.
-
6.8
Remove media from plate and replace with 10 ml of fresh second round selection media with MTX. Change the media every 3 days until cells die off. Typical times are listed in Table 17.1.
-
6.9
After most of the cells have died and colonies are visible, pick colonies as before.
-
6.10
Assay for the best expressing clones as appropriate for your protein of interest.
-
6.11
Expand and freeze the three highest expressing colonies.
10.3. Tip
Each cell type and expressed protein will have different optimal MTX concentrations. We typically plate cells at four concentrations of MTX and pick colonies from each concentration.
10.4. Tip
If no amplification is seen at the first round of MTX selection, MTX selection can be stopped.
10.5. Tip
Several vials (at least three) of positive clones should be frozen at each round of MTX selection.
10.6. Tip
If the first round of MTX selection results in colonies with higher levels of protein expression, two more rounds of MTX selection can be performed. Each round should be performed at four concentrations of MTX but using MTX concentrations that are two- to tenfold higher than those used in the previous round of selection.
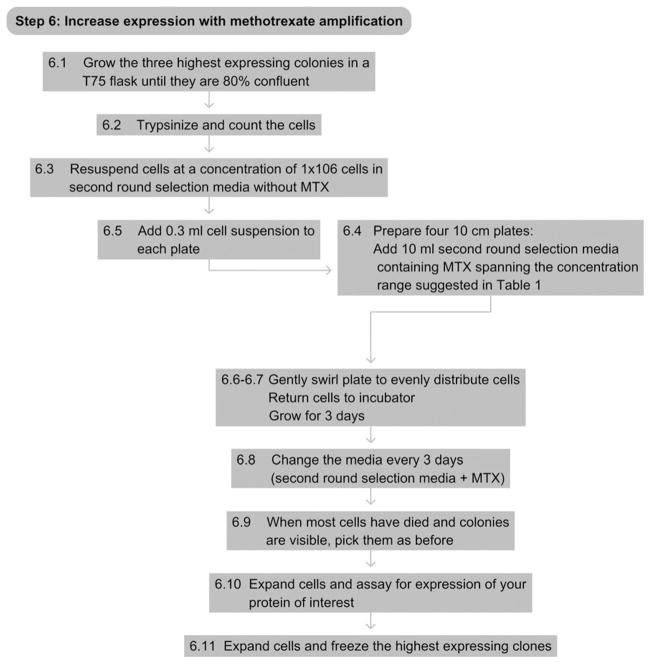
See Fig. 17.7 for the flowchart of Step 6.
Figure 17.7.
Flowchart of Step 6.
Footnotes
Referenced Protocols in Methods Navigator
Single Cell Cloning of a Stable Mammalian Cell Line
Rapid creation of stable mammalian cell lines for regulated expression of proteins using the Gateway® Recombination Cloning Technology and Flp-In T-REx® lines
Molecular Cloning
Transformation of Chemically Competent E. coli
Transformation of E. coli via electroporation
Isolation of plasmid DNA from bacteria
Explanatory Chapter: Nucleic Acid Concentration Determination
Referenced Literature
- Urlaub G, et al. Deletion of the diploid dihydrofolate reductase locus from cultured mammalian cells. Cell. 1983;33(2):405–412. doi: 10.1016/0092-8674(83)90422-1. [DOI] [PubMed] [Google Scholar]
- Southern PJ, Berg P. Transformation of mammalian cells to antibiotic resistance with a bacterial gene under control of the SV40 early region promoter. Journal of Molecular and Applied Genetics. 1982;1(4):327–341. [PubMed] [Google Scholar]
- Wigler M, et al. Transformation of mammalian cells with an amplifiable dominant-acting gene. Proceedings of the National Academy of Sciences of the United States of America. 1980;77(6):3567–3570. doi: 10.1073/pnas.77.6.3567. [DOI] [PMC free article] [PubMed] [Google Scholar]


