

Abstract
The flatworm Schmidtea mediterranea is an emerging model species in such fields as stem-cell biology, regeneration, and evolutionary biology. Excellent molecular tools have been developed for S. mediterranea, but ultrastructural techniques have received far less attention. Processing specimens for histology and transmission electron microscopy is notoriously idiosyncratic for particular species or specimen types. Unfortunately however, most methods for S. mediterranea described in the literature lack numerous essential details, and those few that do provide them rely on specialized equipment that may not be readily available. Here we present an optimized protocol for ultrastructural preparation of S. mediterranea. The protocol can be completed in six days, much of which is “hands-off” time. To aid with troubleshooting, we also illustrate the significant effects of seemingly minor variations in fixative, buffer concentration, and dehydration steps. This procedure will be useful for all planarian researchers, particularly those with relatively little experience in tissue processing.
INTRODUCTION
The community of researchers studying the planarian flatworm Schmidtea mediterranea is growing rapidly, due to the appeal of this species as a model organism in such fields as stem-cell biology, regeneration research, and evolutionary biology. Several excellent genomic, bioinformatic, and molecular tools have been developed for this species, greatly enhancing its utility as a model organism1–6. On the other hand, high-quality histological and ultrastructural information is sparse for this and related species, though such data are essential to further our understanding of development, homeostasis, and regeneration in normal and manipulated worms. Unfortunately, with few exceptions7,8, journal space limitations appear to have constrained the description of methods used to prepare planarians for histological or electron microscopic examination. To the extent that published methods have been described, however, it is clear that there is little consensus about optimal ultrastructural techniques for S. mediterranea (see Supplementary Table 1 for a summary of methods described in the literature since 2010). As we have learned from experience, this leaves would-be planarian histologists or cytologists to face a great deal of unnecessary trial-and-error in their efforts to optimize conditions for these animals, which are not well preserved by standard methods used for traditional model species.
We are aware of only two reports in the literature that provide detailed methods for preparing planarians for analysis by transmission electron microscopy (TEM). One of these, by Salvenmoser et al.7, demonstrates superb tissue preservation in several species of worm using a high-pressure freezing/freeze substitution (HPF-FS) approach to fixation. However, even though this technique has been used to produce beautiful results in asexual S. mediterranea9,10, relatively few researchers have easy access to the specialized (and expensive) equipment it requires. Furthermore, the HPF-FS approach is restricted to smaller specimens (<200 μm in depth)11 which may preclude its use with larger planarians, such as sexually mature S. mediterranea. Salvenmoser and colleagues do also describe techniques for chemical fixation that work nicely with some planarians, but not all – particularly not larger freshwater species. Indeed, we have not been able to obtain satisfactory results with S. mediterranea using their procedures. A more recent technique described by Rompolas and colleagues8 is part of a larger collection of protocols for studying cilia in S. mediterranea. Understandably, given that cilia in this species are found only on epithelia in the body wall and pharynx, they provide no information about the quality of preservation of deeper tissues obtained with this technique. Additionally, their technique is specifically tailored for use with a particular model of microwave tissue processor, which will not necessarily be available in individual labs or institutional core facilities.
The protocol provided here is intended for planarian researchers who want to add high-resolution, bright-field histology or transmission electron microscopy to their “toolkits,” regardless of their previous experience. The procedure we describe is based on chemical fixation and covers the fixation and embedding of specimens in epoxy (Epon-Araldite) resin, which subsequently can be sectioned and stained for histological or ultrastructural analysis. The protocol is, however, easily adaptable for use with other resins such as methacrylates, which are more suitable for histochemistry, immunostaining, or in situ hybridization12. We have successfully used this protocol in previous work with S. mediterranea12–14 and another freshwater planarian, Procotyla fluviatilis15. Additionally, the fixation steps of the protocol serve as our starting point for preparation of specimens for scanning electron microscopy (SEM)15.
The main advantages of our method are its simplicity and its utility for both superficial and deep tissues, even in large specimens, as no specialized items of equipment are required. One limitation of our approach is the time required for processing of samples: 2–3 days for fixation and embedding, plus a further 3 days for resin curing, though much of this time is “hands-off”. This is less time than required for freeze substitution, but slower than microwave processing, which permits completion of fixation and embedding in a single day. Another limitation is that the preservation of ultrastructure obtained via chemical fixation is more prone to minor fixation artefacts than well-optimized HPF-FS approaches16. However, as described above, cryofixation techniques7 have tradeoffs of their own, and in our experience chemical fixation is quite adequate for most applications.
EXPERIMENTAL DESIGN
This protocol describes the processing of flatworms, from fixation to embedding in epoxy resin (plastic). These are the aspects of histological and ultrastructural work that require adaptation for a particular species or type of specimen. Once material is embedded in plastic blocks, the techniques for cutting, collecting, staining, and observing sections are much the same as they would be for any plastic-embedded organism. Excellent guides for these steps are available elsewhere17–22.
As is typical for plastic-embedding procedures, our protocol involves four broad phases: (1) primary, and (2) secondary fixation of the specimen to preserve its fine structure; (3) dehydration of the specimen to permit infiltration with (hydrophobic) plastic resin; and finally, (4) infiltrating and embedding the specimen in resin. A basic understanding of the issues involved at each stage is very helpful for dealing with problems that arise, or modifying the technique. (Some troubleshooting is probably inevitable, even with a robust protocol to follow.) For this reason, we begin by discussing at some length the rationale underlying our protocol and the process of optimizing it:
Primary Fixation - formulation of the fixative: of all the steps in tissue processing, primary fixation arguably involves the greatest number of variables, and hence, the greatest number of potential pitfalls. Optimal fixation requires careful attention to a number of details, in particular fixative agents and buffer concentration.
Aldehyde fixative agents - Glutaraldehyde and Formaldehyde
No other chemical fixative rivals glutaraldehyde’s capacity to crosslink proteins irreversibly into a stable network that preserves fine-structural features23–25. However, glutaraldehyde does have its limitations – among them, relatively slow penetration of tissues. Although formaldehyde is a weaker crosslinking agent than glutaraldehyde, it penetrates more rapidly and is believed to help stabilize deeper tissues until they can be fixed more permanently by glutaraldehyde 26–30. In recent ultrastructural work with S. mediterranea, most researchers have used glutaraldehyde as the sole primary fixative (Supplementary Table 1), but we have found that the aldehyde mixture produces noticeably better results than glutaraldehyde alone at the ultrastructural level, particularly for mitochondria. (See Figure 1 – compare the specimen fixed in a mixture of both aldehydes in panel d, to those fixed in parallel but with glutaraldehyde alone in panels e-h).
Figure 1. Good fixation requires fresh glutaraldehyde and formaldehyde.

This figure compares specimens fixed under different conditions, but processed in parallel. They represent findings of two independent experiments, conducted with sexual and asexual strains, respectively. In each experiment, five worms were processed per fixation condition. Of these, at least two specimens were chosen for sectioning and imaging, by an investigator who was not involved in the processing steps. The distinctive features of each condition noted below were apparent in all sections of all specimens from that condition, unless otherwise noted. a-c: light micrographs of semi-thin (0.5 μm) cross-sections through large specimens of S. mediterranea. Sections were stained for 30 s with 1% (wt/vol) toluidine blue O in 1% (wt/vol) borax. (a) Specimen fixed with primary fixative as described in the Procedure, using fresh aldehydes. Histological sections stained with toluidine blue in this way are more than adequate to describe tissue architecture at sub-micron resolution. (b,c) Specimens (asexual [b] and sexual [c]) fixed with primary fixative lacking formaldehyde, i.e., with 2.5% (vol/vol) glutaraldehyde alone. Using glutaraldehyde as the sole primary fixative preserves tissue well enough that, and under the light-microscope, specimens are essentially indistinguishable from those fixed with a mixture of glutaraldehyde and formaldehyde. Insets show magnified portions of the digestive tract, with dark blue secretory granules and phagosomes and greenish-blue lipid droplets. (d-h) Transmission electron micrographs of thin (70nm) sections, stained 2 min with lead citrate51. (d) Cytoplasm of a phagocytic enterocyte near the lumen of a sexual worm fixed as described in (a). When the primary fixative includes both 2.5% (v/v) glutaraldehyde and 2% (w/v) formaldehyde, as in this case, mitochondria are consistently intact and well preserved in all sections and tissue types, as evident here. (e-h) Transmission electron micrographs of specimens fixed with glutaraldehyde as the sole primary fixative, as in (b). Mitochondria in such specimens are often swollen or ruptured – to the extent that most fields of view exhibit at least one such mitochondrion (arrowheads). Such artefacts occur in diverse tissue types, in both sexual and asexual worms. (e) Transverse section of a peripheral nerve in a sexual worm. (f) Pharyngeal parenchmya of an asexual worm. (g) Developing spermatid in a sexual worm. (h) Cytoplasm of phagocytic enterocytes near the lumen of the gastrovascular cavity of an asexual worm. Abbreviations: t – testis, ld – lipid droplets, sd – sperm duct, ovi – oviduct, vnc – ventral nerve cord, lu – lumen of intestine. Scale bars: a-c: 100 μm; d-h: 500 nm.
To obtain good results with aldehyde fixatives, it is important to be aware of some aspects of their chemistry. First, in aqueous solution, glutaraldehyde spontaneously forms a variety of cyclic and polymeric derivatives, particularly at warm temperatures and neutral-to-alkaline pH26,31. Polymerized glutaraldehyde penetrates tissues even less readily than monomeric glutaraldehyde32, which may result in poor fixation of deep tissues. The practical implications of glutaraldehyde’s self-reactivity have been noted emphatically before33, but they are worth re-stating: one should purchase only distilled glutaraldehyde, store it cold (i.e., at −20°C), and dispose of it after the manufacturer’s suggested expiry date. (For examples of results we have obtained with aged glutaraldehyde, see Supplementary Figure 1.) Because of glutaraldehyde’s tendency to polymerize at neutral pH, buffered fixative solutions should not be prepared in large batches for storage and re-use.
Second, commercial preparations of “formalin” contain undesirable additives such as methanol, Therefore, these should not be used as a source of formaldehyde for electron microscopy. Instead, suitably pure solutions can be obtained by purchasing ampules of EM-grade, methanol-free stocks, or prepared fresh by the hydrolysis (depolymerization) of paraformaldehyde in hot, mildly alkaline solution27.
Buffer vehicle and concentration
Good ultrastructural preservation depends on the fixative’s pH and osmolarity, particularly during primary fixation. We use sodium cacodylate as a buffer, for both primary and secondary fixation. Although phosphate buffers are less toxic than cacodylate (which is an arsenic compound) and are often used successfully for ultrastructural fixation, they are prone to forming precipitates with divalent cations. Classic EM techniques manuals strongly recommend adding calcium chloride to fixative buffers as a membrane-stabilizing agent16,33. Therefore, we have been inclined to use cacodylate rather than phosphate, although the latter may well give acceptable results. An added advantage of cacodylate is the general inhibitory effect of arsenic compounds on metabolic processes, which may help to reduce autolytic processes during fixation34.
Fixative osmolarity is primarily determined by the concentration of buffer salts, as aldehyde fixative agents themselves have little osmotic effect26,30. Therefore buffer concentration is a critical (but often underappreciated) variable affecting fixation quality. Recently published articles on S. mediterranea almost universally report using 0.1 M buffer solutions with 2.5% (v/v) or higher glutaraldehyde (Supplementary Table 1) despite some recommendations to use lower buffer concentrations when fixing freshwater planarians7,35. In our experience, however, 0.1 M cacodylate buffer is far too hypertonic for optimal tissue preservation. Figure 2 demonstrates that optimal fixation requires a buffer concentration closer to 50 mM; even fixatives buffered with 77.5 mM sodium cacodylate are sufficiently hypertonic to alter dramatically the structure of surface and deep tissues. When washing specimens after fixation, we increase the buffer concentration somewhat, a practice that has been suggested to compensate for the reduced osmolarity of the (glutaraldehyde-free) wash buffer23.
Figure 2. Mildly hypertonic buffers cause pronounced osmotic shrinkage during fixation.

Images are electron micrographs of 70 nm sections, stained with lead citrate51, except for e and f, which are light micrographs of 0.5 μm sections stained with 1% (wt/vol) toluidine blue in 1% (wt/vol) borax. Comparisons between fixation conditions in this figure are based on the experiments described in Figure 1 (between specimens processed in parallel). a: Testis wall from a specimen fixed using EM buffer (54 mM sodium cacodylate). Lumen (lu) with spermatids (sp) on the left, external muscle (m) to lower right. Cells are closely apposed (sc: spermatocytes; sg: spermatogonium) with spermatocytes partly enveloped by thin processes of unidentified somatic cells (white arrowheads). (b) Specimens processed in parallel, but fixed in a primary fixative containing 77.5 mM cacodylate as a buffer, exhibit osmotic shrinkage of cells, disrupting the normal close associations between them. This is an extreme example, in which the walls of a testis (green shading, w) are severely disrupted. (lu – lumen; mes – surrounding mesenchyme). (c,d) In specimens fixed with 54 mM cacodylate, cells of the gut are also closely apposed. (c) Contacting surfaces of goblet cells (go) with proteinaceous granules (pg) and phagocytes (phg) are uninterrupted. (d) In-folded and interlaced basal membranes of gut phagocytes, in contact with a basal lamina (bl); mus – muscle fibres; ld – lipid droplet. Note the lack of spaces between folds and projections of the phagocyte membranes. (e,f) Light micrographs of 0.5 μm cross-sections through the digestive tracts of independently processed sexual (e) and asexual worms (f), fixed in hypertonic (77.5 mM) cacodylate buffer. Separations between goblet cells and surrounding phagocytes are common (red arrows) and readily apparent even by light microscopy. Intracellular vacuoles are highly dilated (*). Lipid droplets stain a greenish colour and tend to be found toward the basal domains of gut phagocytes. (g) Transmission electron micrograph of a thin section adjacent to the boxed region shown in (f), showing a basal portion of the gut. Even in this region, which appears mildly affected at the light-microscopic level (f), there are clear separations and spaces (*) between processes and folds of the cells. Arrowheads indicate the basal lamina, for orientation. Scale bars – a: 5 μm; b: 20 μm; c: 1 μm; d, e: 2 μm; f, g: 50 μm; h: 2 μm.
Secondary Fixation (Osmication): lipid-rich structures (including membranes) are not well preserved by aldehydes, necessitating a secondary fixation step, for which osmium tetroxide (OsO4) is the fixative of choice25. Stabilization of lipids by OsO4 also results in localized deposition of reduced osmium, an electron-scattering element that enhances the contrast of such structures under the electron microscope. Osmium tetroxide can also help to stabilize proteins, but it is important to realize that this effect reverses with prolonged incubation, leading to hydrolysis and extraction of proteins in subsequent washes and dehydration steps26,27. Therefore, although osmium is a slowly penetrating fixative that requires time to reach the interior of a specimen, secondary fixation should not be allowed to continue for too long, as this will counteract the work previously done by the primary fixative.
Secondary fixation is less critical for specimens that are to be used exclusively for light microscopy, as membranes are too thin to be resolved by light microscopes. In fact, given that osmication may interfere with some histological and cytochemical stains36, it may be best to omit these steps for histochemical studies. However, if sections are to be stained only with a general-overview stain such as toluidine blue, then secondary fixation remains worthwhile, as S. mediterranea and related flatworms possess an abundance of large lipid droplets in their digestive systems (Figures 1a–c, and 2f–g). Unless such structures are well fixed, they will be extracted during subsequent dehydration steps, which could in principle cause distortion of surrounding tissues.
In our previously published studies involving TEM12,14,15, we have included an additional incubation with uranyl acetate following secondary fixation, for additional fixation and contrasting30. However, our protocol as described here provides excellent fixation and sufficient contrast without any use of uranium salts. Thus, it seems preferable to omit such steps, due to the radioactivity and toxicity of uranium.
Dehydration: embedding specimens in an epoxy resin requires the removal of water, as epoxies are not water-miscible. Our protocol follows a fairly standard version of this process, using a graded series of ethanol solutions, followed by acetone. Because dehydrating solvents are less polar than water, they tend to extract lipids from specimens. The challenge in dehydration, then, is to ensure thorough removal of water, while minimizing extraction of lipids. As such, it would appear sensible to minimize the time that specimens spend in dehydrating media, and also conduct dehydration at low temperatures30,37.
Few TEM studies of planarians provide details about incubation times or temperatures used for dehydration (see Supplementary Table 1) but of those that do, mostly mention rapid and/or cold techniques10,38 or warn against dehydration at ambient temperature7. Additionally, one of us (JLB) has successfully used a rapid, cold procedure for processing annelid worms39,40. We therefore began our trials with S. mediterranea by dehydrating specimens through a graded series of ethanol dilutions, over 10 minutes at −20°C. Surprisingly, we found that this rapid, cold initial dehydration led to greater extraction of the contents of lipid droplets than a more gradual procedure carried out at room temperature, described in the detailed protocol that follows. Figure 3 illustrates the extraction of lipids from specimens initially dehydrated by the rapid, cold technique (compare with specimens in Figures 1, 2 and 4, which were dehydrated in parallel by the longer, room-temperature method).
Figure 3. Artefacts not caused by fixation.

(a) Light micrograph of 0.5 μm cross-section (ph: pharynx) through an asexual worm. Dehydration of specimens by the “rapid, cold” schedule described in the Experimental design section results in undesirable extraction of lipids from specimens. This effect is most noticeable in the lipid droplets that are abundant in the digestive tract of the worm, giving it a frothy appearance. (In the comparative experiments described in Figure 1, all specimens dehydrated by the rapid cold method exhibited such features). The large space indicated by an asterisk is the gut lumen, the wall of which was ruptured by mechanical damage, rather than fixation or dehydration – see c and d, which illustrate the blue- and red-boxed regions, respectively. (b) Transmission electron micrograph of a 70 nm section, adjacent to area enclosed by black box in (a). At this magnification, a thin rim of unextracted lipids, stained dark by OsO4, can be seen. Inset shows lipid droplets in a similar region of the digestive tract, from a specimen dehydrated by the gradual, room-temperature method described in the main protocol. All specimens dehydrated gradually at room temperature exhibited such full droplets – see Figures 1a-c. Arrows indicate some of the many phagosomes present (phg). The apparent shrinkage or condensation of electron-dense materials evident in larger phagosomes was found in similar structures in all worms, and is not due to the dehydration process used here. (c, d) Mechanical damage: partial tearing of the surface layer of the pharyngeal cavity. A thin layer of epithelial tissue normally covers the lumenal surface of the body wall around this cavity. In this specimen, such tissue is present over the dorsal surface of the cavity (panel c, white arrowheads), but missing from the lateral surface (panel d, black arrowheads). Some tissues underlying the surface layer also appear to have been torn away, such as part of the gut epithelium (panel a, *). This suggests mechanical damage to the specimen, likely during primary fixation at the cutting step (Step 5). Scale bars – a: 100 μm; b (full panel and inset): 10 μm; c, d: 25 μm.
Figure 4. Preservation of internal structures.

Transmission electron micrographs (b-d, f-l) and light micrographs (a,e) of specimens processed according to the main protocol (see Procedure). TEMs are of 70 nm sections, stained 2 min with lead citrate51, while light micrographs are of 0.5 μm sections stained with toluidine blue. (a) Light micrograph of a testis. The left-hand (ventral) region of the testis lumen (lu) is filled with developing spermatids (st). Within the testis wall, spermatogonia are visible as deep-blue (basophilic) cells with diffuse chromatin (e.g. white arrowhead). Spermatocytes (arrows) have less-basophilic cytoplasm and meiotic chromatin. (b) Transmission electron micrograph of large Golgi complex in developing spermatid. (c) Transmission electron micrograph of basal complex of biflagellate sperm, and basal plaque in the sperm nucleus (arrowhead).52 (d) Transmission electron micrograph of spermatogonium bounded by the small box in (a), showing a chromatoid body within an invagination of the nucleus (*). Inset shows cross-sectional profiles of microtubules within this cell. (e) Light micrograph of 0.5 μm cross section stained with toluidine blue, showing part of the ciliated ventral epidermis (ep), body-wall musculature (mus) and mesenchyme (mes). One of the paired ventral nerve cords is visible (vnc) along with parts of a transverse commissure (co, arrows). (f) Electron micrograph showing a region of the commissure from a thin section adjacent to the boxed region in (e). The boxed region surrounds part of an axon shown at higher magnification in panel (g) with arrowheads indicating axoplasmic microtubules. Several granules typical of different parenchymal cells are also visible in panel (f). Those indicated by white arrowheads, with amorphous “blotchy” contents are derived directly from dilated regions of rough endoplasmic reticulum in their respective cells. (h) An example of such granule-producing rough endoplasmic reticulum. (i) Adherens junctions between apical domains of gut phagocytes. Inset shows the same region at lower magnification. (j) Protonephridial flame cell, with inner ciliated chamber and fenestrae (arrow). (k) Muscle (mus) and nervous tissue in the pharynx, with axons cut transversely (ax). Inset shows magnified view of boxed region, with microtubules arrayed peripherally in the axoplasm. (l) Microvillus on the outer epithelium of the pharynx. Actin microfilaments are visible in the microvillus and underlying cortical cytoplasm. Scale bars – a: 25 μm; b: 500 nm; c: 200 nm; d: 1 μm; e: 100 μm; f: 10 μm; g: 250 nm; h: 1 μm; i: 100 nm (1 μm for inset); j: 1 μm; k: 2 μm (200 nm for inset); l: 200 nm.
Infiltration, Embedding, and Curing: in order for specimens to be sectioned, they must be infiltrated with a medium that can be solidified, embedding the tissue in a supportive matrix. The medium used can be a frozen aqueous solution (for cryosectioning), molten wax that is allowed to cool and crystallize (for traditional paraffin sectioning) or an organic resin that is solidified by polymerization or curing (crosslinking) to form plastic. All three media have their advantages in certain applications, but plastic resins are the only choice for routine transmission electron microscopy, as waxes cannot withstand the electron beam, and cryosections are only stable in specialized electron microscopes with ultra-cold specimen chambers.
There are several types of plastic resin, but two in particular are widely used: methacrylates and epoxies. Methacrylates are more permeable to most stains than epoxies, and in some cases (methyl and butyl methacrylates) can even be removed from sections after they have been cut and collected on glass slides36,41–44. For these reasons, methacrylates are generally preferable for light-microscopic histochemical and immunohistochemical studies, where stainability and permeability to enzymes and immunological reagents is critical. Epoxy resins, on the other hand, have superior sectioning properties, crosslink with and preserve tissue components, and are far more stable than methacrylates under bombardment by high-energy electrons18,45. Thus, epoxies are the resins of choice for routine TEM studies. Although less permeable to most stains than methacrylate sections, semi-thin epoxy sections mounted on microscope slides can readily be stained with a handful of agents, including toluidine blue. Thus, epoxy resins can still be very useful for light-microscopic histology, particularly when high-resolution structural information (rather than obtaining data on chemical composition) is the primary goal.
The protocol given here uses a mixture of two epoxy resins: Epon 812 (more precisely, EMbed 812) and Araldite 502. Such mixtures combine the beneficial characteristics of each individual resin, and thus are more commonly used than single resin components18,46. Spurr’s resin is a popular alternative to Epon and/or Araldite, preferable in some applications for its lower viscosity and superior ability to penetrate tissues – particularly for specimens with cell walls, such as fungi, plants, and bacteria22. Epon/Araldite mixtures, however, are less volatile and toxic than Spurr’s, generate superior contrast for TEM imaging, and are adequately fluid and penetrative for use with animal tissue22,37.
MATERIALS
REAGENTS
S. mediterranea strains: sexual-strain (hermaphroditic)47, maintained in 0.75X Montjuic salts (see Reagent setup); asexual-strain48, maintained in 1X Montjuic salts
Sodium chloride (NaCl) (e.g. Fisher, cat. no. S271)
Sodium bicarbonate (NaHCO3) (e.g. EMD Millipore, cat. no. SX0320)
Potassium chloride (KCl) (e.g. Fisher, cat. no. P217)
Magnesium chloride, hexahydrate (MgCl2) (e.g. Fisher, cat. no. BP214)
Magnesium sulfate, anhydrous (MgSO4) (e.g. Fisher, cat. no. M65)
Calcium chloride (CaCl2), dihydrate (e.g. Sigma-Aldrich, cat. no. 223506)
Double-distilled or (preferably) ultrapure water (generated in-house or purchased, e.g. Sigma-Aldrich, cat. no. 38796)
200 mM sodium cacodylate buffer, pH 7.4 (Polysciences, cat. no. 18661)
25% vol/vol glutaraldehyde, vacuum-distilled (Polysciences, cat. no. 01909)
16% wt/vol formaldehyde, methanol-free, ultra-pure (Polysciences, cat. no. 18814)
4% wt/vol osmium tetroxide solution (aqueous) (Polysciences, cat. no. 0972C)
Absolute ethanol (200 proof) (Decon, cat. no. 2701)
Acetone, histological grade (Sigma-Aldrich, cat. no. 534064)
Molecular sieves, 4Å, 4–8 mesh beads (Sigma-Aldrich, cat. no. 208590)
EMbed 812 (substitute for Epon 812; EMS, cat. no. 14900)
Araldite 502 (EMS, cat. no. 10900)
Dodecenyl succinic anhydride (DDSA) (EMS, cat. no. 13710)
Benzyldimethylamine (BDMA) (EMS, cat. no. 11400)
EQUIPMENT
60 mm Petri dishes (Fisher, cat. no. 08-757-13A)
35 mm Petri dishes (Fisher, cat. no. 08-757-11YZ)
Feather disposable scalpels, no. 15 (EMS, cat. no. 72042-15)
Glass sample bottles with plastic snap cap, 4 ml (EMS, cat. no. 64250)
Flat embedding mold, 24 cavities (Ted Pella, cat. no. 105)
BEEM embedding capsules, Size 00 (Polysciences, cat. no. 00224)
6” wooden applicator sticks (Fisher, cat. no. 2980102)
60 ml disposable polypropylene syringe (Becton Dickinson, cat. no. BD309653)
30 ml disposable polypropylene syringe (Becton Dickinson, cat. no. BD301033)
3 ml disposable polypropylene syringe (Becton Dickinson, cat. no. BD309585)
250 ml disposable beakers (Fisher, cat. no. 01-291-5)
2 one-litre glass bottles, for anhydrous solvents (e.g. Fisher, cat no. FB800-1000)
Stereomicroscope (e.g. Leica MZ series)
Orbital shaker (e.g. Corning, cat. no 6780FP)
Disposable Pasteur pipettes (e.g. Fisher, cat. no. 13-711-9AM
24-well tissue culture plate (e.g. Corning, C353047
Rocking platform (e.g. Clay Adams, cat. no. 421105)
Oven, adjustable between 60°C and 200°C (e.g. Fisher Isotemp Model 630G)
Desiccator (for cooling molecular sieves) (e.g. Fisherbrand, cat. no. 08-615B)
REAGENT SETUP
CRITICAL All solutions should be freshly prepared, unless otherwise noted.
5X Montjuic Salts (for worm culture49; 1.6 mM NaCl, 1 mM CaCl2, 1 mM MgSO4, 0.1 mM MgCl2, 0.1 mM KCl, 1.2 mM NaHCO3)
Prepare a 5 M stock solution of NaCl, and 1 M stock solutions of CaCl2, MgSO4, MgCl2, and KCl in ultrapure water. To make 1 L of 5X salt solution, add 1.6 mL NaCl stock, 1 ml each of CaCl2 and MgSO4 stocks, and 0.1 ml each of MgCl2 and KCl stocks to 900 ml ultrapure water. Add 0.504 g of NaHCO3 and dissolve with stirring. Adjust pH to 7.00, and volume to 1 L. Dilute this stock solution to 1X or 0.75X, for culture of asexual or sexual strains of S. mediterranea, respectively.
EM buffer (70 mM sodium cacodylate; 1 mM CaCl2, pH 7.4)
Combine 35 ml of 0.2 M sodium cacodylate (pH 7.4) with 0.1 ml of 1 M CaCl2, and add ultrapure water up to a volume of 100 ml. Unused EM buffer can be stored at 4°C for several months. CAUTION: Cacodylate is an arsenic compound. Wear personal protective equipment (gloves, lab coat, safety glasses) and handle it under a fume hood. Cacodylate waste must be collected and disposed of according to the chemical waste management practices of your institution. CRITICAL STEP: The 200 mM cacodylate buffer used in this recipe can be prepared from scratch using cacodylic acid and/or sodium cacodylate, rather than purchasing a premade solution. Note, however, that buffers prepared by dissolving 200 mmol/l cacodylic acid and adjusting pH with 186 mmol/l NaOH (or by directly dissolving a mixture of 14 mmol/l cacodylic acid and 186 mmol/l cacodylate salt) will have a lower osmolarity than buffer prepared by dissolving 200 mmol/l cacodylate salt and adjusting pH with 14 mmol/l HCl. The difference is small, but potentially significant.
Primary fixative (2% wt/vol formaldehyde, 2.5% vol/vol glutaraldehyde, 54.2 mM cacodylate, 0.78 mM CaCl2, pH 7.4)
To 15.5 ml EM buffer, add 2.5 ml of 16% (wt/vol) formaldehyde and 2 ml of 25% (vol/vol) glutaraldehyde to. Prepare 20 mL of fixative (sufficient for 6 specimen vials). Prepare the fixative fresh on the day of fixation, and keep at 4°C until ready to use. CAUTION: Formaldehyde and glutaraldehyde are volatile and highly toxic. Wear personal protective equipment, and handle them under a fume hood. Waste fixative and wash solutions must be collected and disposed of according to the chemical waste management practices of your institution.
Osmium tetroxide (secondary fixative) (1% wt/vol OsO4, 52.5 mM cacodylate, 0.75 mM CaCl2, pH 7.4)
To make 20 ml (sufficient for at least 10 specimen vials) combine 5 ml of 4% OsO4 stock solution with 15 ml of EM Buffer. Solution should be protected from light by wrapping the tube in aluminum foil. Unused 4% stock can be aliquoted and stored at −20 °C, provided that the container forms an airtight seal. CAUTION: Osmium tetroxide is volatile and highly toxic – eyes and mucous membranes are particularly vulnerable. OsO4 is volatile enough to escape all but the most tightly capped vials, and vapours will blacken the insides of containers and freezers. Wear personal protective equipment, including nitrile gloves (OsO4 will penetrate latex) and handle solutions only under a fume hood. Osmium waste (including post-osmication buffer washes) should be collected into a glass bottle half-filled with corn oil, to reduce residual OsO4 to non-volatile compounds. The resulting slurry must be disposed of according to the chemical waste management practices of your institution.
Dehydrating solvents
Absolute ethanol (200 Proof) and pure acetone are somewhat hygroscopic. To ensure that these solvents remain anhydrous, add 4A molecular sieves to form a layer at least 5 cm thick in a clean one-liter glass bottle. Fill the bottle with solvent, tightly cap it, and swirl vigorously. Let it sit for 24 hours before using. Only the volume above the molecular sieves layer should be used, to avoid aspirating sieve dust along with solvent. The bottle can be refilled three times with solvent. The beads should be regenerated after the third refill has been used, by baking at 200 °C for 48 hours, then cooling in a desiccator. CAUTION: Alcohol and acetone are highly flammable, toxic, vapours, and may be irritating. Avoid sources of open flame, and use normal caution appropriate for controlled substances.
Epon/Araldite resin mixture46
Measure the following ingredients into a disposable beaker, either volumetrically using 60, 30, and 3 ml syringes, or by mass. (Except for BDMA, the components are too viscous for easy pipetting.)
| Araldite 502 | 15 ml (16.95 g @1.13 g/ml) |
| EMbed 812 (Epon 812) | 25 ml (28.25 g @1.13 g/ml) |
| dodecenyl succinic anhydride (DDSA) | 55 ml (55.28 g @1.005 g/ml) |
Stir thoroughly, then add:
| benzyldimethylamine (BDMA) | 3 ml (measure volumetrically) |
Again, stir thoroughly. The resin mixture will change color from pale yellow to orange. Once the mixture looks absolutely uniform, let it sit until no bubbles remain. Prepare sufficient resin for the whole procedure (about 8 ml per specimen vial), to ensure that all solutions used for infiltration and embedding draw from a consistent batch. The resin mixture will gradually harden in a temperature-dependent fashion; therefore, any that will not be used within a few hours should be stored in the fridge, where it will remain useable for up to 2 days. CRITICAL STEP: Allow cooled resin containers to warm to room temperature prior to opening, to avoid condensation of water inside the container. CAUTION: Epon and Araldite are toxic (though not as volatile as some epoxy resins), and are known to cause contact sensitivity on skin. The crosslinking agent, DDSA, presents similar hazards. The accelerator, BDMA is volatile, irritating to skin and eyes, and corrosive. Work with all components in a fume hood, wearing appropriate personal protective equipment. For further information, see Table 6.1 (p. 176) in ref 33, regarding the potential hazards of handling epoxy resins. Waste epoxy resin mixture should be allowed to cure before disposal, and disposed of in accordance with institutional regulations.
?TROUBLESHOOTING
Resin/acetone mixtures
The resin mixture is fully miscible with acetone, but very viscous. Combine appropriate amounts (as detailed in the Procedure) of each component in a 15 or 50 ml conical centrifuge tube, and shake vigorously to mix. Prepare fresh.
PROCEDURE
CRITICAL All solutions should be freshly prepared, unless otherwise noted in the Reagent setup.
Primary Fixation - TIMING: 5–6 h
-
1
Transfer worms from their culture vessel into a 60 mm Petri dish with just enough planarian water (Montjuic salts) to cover the animals. Unless there are experimental reasons for using recently fed worms (as in a study of histological changes associated with feeding), we prefer to use worms that have not been fed for 5–7 days. Place the dish with worms on ice until the worms stop moving and stretch. For novices, it is best to work with a single worm at a time.
CRITICAL STEP: Prolonged exposure to cold may kill S. mediterranea. If you will be processing several worms, take care to avoid chilling any individual prior to fixation for more than 15 min.
?TROUBLESHOOTING
-
2
Once animals are still and stretched, gradually aspirate all of the water.
CRITICAL STEP: Do not move the dish, or aspirate water too quickly, to prevent startling the worms – they will react by contracting.
-
3
With the dish still on ice, gently and slowly flood the animals with sufficient primary fixative (~ 5 mL, see Reagent Setup) to cover them fully. Carefully swirl the dish, or gently move the worm around it, to prevent the worm from sticking to the bottom. If the worms startle upon addition of fixative, they should relax and extend again within a few seconds, as they die. CAUTION: Formaldehyde, glutaraldehyde and cacodylate are volatile and toxic. Work in a fume hood with appropriate personal protective wear, and dispose of all solutions and contaminated pipettes, tips, dishes and vials according to institutional regulations.
-
4
Allow the worm to fix in the dish without disturbance for 10 – 20 minutes. The shorter time is sufficient for worms up to 8 mm long; add roughly 1 minute per millimeter of length above 8 mm.
-
5
If the worm is large (>5 mm in length) cut it into pieces 3–4 mm in length. (Cutting large worms prior to fixation may initiate a wound response that perturbs local tissues. The initial fixation of worms described in the previous step avoids this response, and ensures that the full cut surface will be open to penetration by fixative. Use a scalpel with a rounded end, and cut across the worm with a rocking “guillotine” motion (illustrated in Supplementary Figure 2a).
CRITICAL STEP: Work with a stereomicroscope to aid precision. At this stage, the internal tissues of the worm will still be quite fluid, and compression of the worm’s body will squeeze the parenchymal tissue, potentially altering the associations of internal organs and tissues.
CRITICAL STEP Avoid sawing or lateral movements of the scalpel, as these can pull on tissues and cause tearing at sites distant from the cut (see Fig 3c, d).
-
6
Immediately after cutting, transfer worm pieces into 4 ml glass sample bottles containing 3 ml of pre-chilled primary fixative, on ice. If specimens have been cut into pieces that will need to be distinguished later, use separate vials for each body region, as secondary fixation (osmication) of the specimens will turn them entirely black; it is very difficult to distinguish between heads and tails after osmication.
-
7
Allow the specimens to fix at 4°C (in a refrigerator, cold room, or on ice) for 4 h, with gentle agitation (~100 rpm) on an orbital shaker.
-
8
Wash the specimens by aspirating the primary fixative with a disposable Pasteur pipette, and replacing it with ample (2–3 ml) non-chilled EM buffer. Incubate 10 min on an orbital shaker set to ~100 rpm. Repeat this step, for a total of two 10-minute washes.
CAUTION: The cacodylate in the EM buffer is toxic. Use the same precautions as with primary fixatives.
Secondary Fixation - TIMING: 2 h
-
9
Replace the EM buffer with the secondary fixative (OsO4 solution). Incubate 90 min on ice, protected from light, with gentle agitation (~100 rpm). Specimens will turn solid black – this is normal, and an indication that the osmium tetroxide is performing as expected.
CAUTION: The Secondary fixative contains osmium tetroxide (OsO4), which is highly toxic and volatile. Osmium vapours will damage tissue – particularly mucous membranes and eyes – on contact. Conduct all manipulations and incubations in a fume hood, wearing personal protective equipment. Osmium tetroxide vapours will also coat equipment surfaces, leaving a black residue as the osmium is reduced. Waste solutions of OsO4 should be pipetted into a container half-filled with corn oil, to reduce the compound to metallic osmium, which is safer to store and dispose of (again, according to institutional regulations). Contaminated pipettes or tips should be disposed of in a suitable lidded waste container (e.g. a wide-mouth polyethylene tub).
TROUBLESHOOTING
-
10
Wash the specimens with EM buffer twice for 10 minutes, as described in step 8. CRITICAL STEP: Specimens will be brittle and prone to crumbling if pressed or squeezed after this step; avoid touching them directly or pipetting them vigorously during subsequent manipulations.
CAUTION: Continue to use appropriate precautions for working with OsO4 when working with and disposing of the washing buffer.
Dehydration and transitioning to resin-miscible solvent
TIMING: 3 h - overnight
-
11
Dehydration of specimens. Aspirate the solutions from the vials with a disposable Pasteur pipette, and replace with ~3 mL of the next solution. All incubations should be conducted at room temperature as follows: 15 min in 20% (v/v) ethanol (dispose of this wash in the OsO4 waste), followed by 15 min in 40% (v/v) ethanol, 15 min in 60% (v/v) ethanol, 15 min in 80% (v/v) ethanol and 2 x 30 min in absolute (200 proof) ethanol.
CRITICAL STEP: The absolute ethanol used in the final two incubations should be anhydrous (see Reagent setup) but it is not necessary to use anhydrous alcohol to prepare the dilution series (20%, 40%, 60% and 80%) leading up to absolute ethanol. Trace amounts of water in the stock ethanol used to prepare the dilutions will be negligible, relative to the amount of water added for dilution.
PAUSE POINT: specimens may be stored in absolute ethanol for up to a week at −20°C.
-
12
(Optional) If you paused the protocol by storing specimens at −20°C, they should be allowed to warm to room temperature, to prevent condensation of water inside the vials. Then, to ensure the specimens are not contaminated by water, proceed with two 30-minute incubations in absolute ethanol.
-
13
Transition the specimens into acetone by incubating them 15 min in a 1:1 mixture of absolute ethanol and anhydrous acetone (prepare fresh) and 2 x 10 min in anhydrous acetone.
Infiltration, Embedding and Curing
TIMING: 12 h (24 h with optional overnight pause)
-
14
Incubate the specimens in 2–3 ml per vial of the following resin mixture/acetone solutions (including BDMA in the resin mixture, see Reagent Setup), 1 hour per solution, at room temperature, on an orbital shaker at ~100 rpm, as follows: 3 volumes acetone:1 volume resin mixture, followed by 2 volumes acetone:1 volume resin mixture, 1 volume acetone:1 volume resin mixture, 1 volume acetone:2 volumes resin mixture, and finally 1 volume acetone:3 volumes resin mixture.
PAUSE POINT: After the final incubation samples may be left overnight at room temperature, without adverse consequences.
?TROUBLESHOOTING
-
15
Carefully transfer the specimens into wells of a 24-well tissue-culture plate, each containing at least 1 mL of resin mixture. Use a wide-bore pipette (e.g., a Pasteur pipette with part of the tip cut off) and be careful to avoid carrying over any more resin/acetone mixture than necessary. We prefer using disposable plasticware, as washing and re-using materials that have contained resin is impractical. The resin mixture (without acetone) will not etch polystyrene.
-
16
Allow the specimens to infiltrate for about 6 h at room temperature, with gentle rocking. (If a rocking platform is unavailable, an orbital shaker set at ~40–50 rpm will serve.) Specimens will slowly sink to the bottom of the wells as they infiltrate. The resin will gradually thicken at room temperature, so we advise against continuing this step for too long (i.e., do not leave overnight).
Placing specimens in molds
TIMING: 2–5 min per specimen
-
17
Fill embedding molds with resin mixture. We add paper specimen labels to the molds at this point, submerging them to the bottom of a flat mold prior to putting specimens into the molds. Use labels printed with pencil or laser-printer/photocopier tonier, as ink will be dissolved by the resin.
-
18
Whittle the tip of a wooden applicator stick to make a flat, blunt end – similar to, but a bit thinner than, the fat end of a flat toothpick (Supplementary Figure 2b).
-
19
Use the applicator stick like a mini-spatula, to coax a specimen (step 16) to the surface of the resin. From there, the specimen can be picked up in a small droplet on the end of the spatula. To minimize carryover of residual acetone that may remain in the infiltration resin, transfer this drop onto a clean square of Parafilm as an intermediate step, then use a corner of the applicator stick to pick the specimen in a minimal amount of resin.
-
20
To transfer the specimen to an embedding mold, touch the surface of the resin in the mold with the specimen on the tip of the applicator stick. The specimen should sink into the resin.
-
21
Orient the specimen as desired. Orienting the specimen in such a way that its dorsal and ventral surfaces are not parallel to the bottom of the mold is very difficult, but clever techniques for accomplishing precise orientation have been described in the literature.22,50 ?TROUBLESHOOTING
Curing of resin
TIMING – 72 h
-
22
Repeat steps 19–21 with the remaining specimens, then place the mold(s) on a level surface in an incubator or oven set at 60°C.
-
23
Allow the resin to cure for 72 hours, to ensure it has fully hardened. Err on the side of longer curing times, rather than briefer. We find blocks to be a bit soft after 48h, whereas longer periods of curing (4–5 d) do not result in brittleness. After removing the molds from the oven, the blocks may be slightly flexible while they are warm, but should feel hard as glass once they have cooled to room temperature (they aren’t actually hard as glass, but they should feel that way).
?TROUBLESHOOTING
?TROUBLESHOOTING
Troubleshooting advice can be found in Table 1
Table 1.
Troubleshooting table
| Step | Problem | Possible Reason(s) | Solution |
|---|---|---|---|
| Reagent Setup: resin mixture | Resin components cannot be stirred to form a homogeneous mixture | The viscosity of resin components, particularly Araldite 502, can pose problems for mixing by stirring. | Use half the amounts of all components listed, and dispense them into a 50 ml conical centrifuge tube. Cap tube, and shake vigorously. Don’t worry about bubble formation, but allow bubbles to dissipate before use. Warm individual resin components to 60°C, prior to mixing (this will reduce their viscosity)30. |
| 1 | Worms contract excessively or curl when submerged in fixative | Worms insufficiently chilled prior to fixation | Allow worms to cool a few minutes longer prior to fixation. |
| 9 | Specimens do not completely blacken during secondary fixation | Osmium tetroxide solution is old or weak. | Use a fresh vial of OsO4; fresh OsO4 should be pale yellow, not clear or (worse) brown-black. Check that OsO4 is not past its expiry date. Try OsO4 from a different lot number or supplier. |
| 14 | Acetone and resin do not mix uniformly, or mixture is cloudy. | Acetone is contaminated with water. | Store acetone over molecular sieves, and ensure that sieves have been regenerated as described in Reagent Setup. |
| 21 | Specimens cannot be oriented as desired in embedding molds | Even the most viscous epoxy resins are too fluid for specimen to remain in an unstable orientation, unsupported. | Use flat embedding molds, rather than capsules Pre-embed specimens in agarose after secondary fixation22, and trim agarose block so that it settles in desired orientation in the mold After the resin has cured, cut out a piece of the block containing the specimen, and glue it to another block in the desired orientation, using 5-minute epoxy glue. |
| 23 | Resin fails to cure, or remains soft. | Carryover of acetone from infiltration steps (20–22) One or more resin components have degraded. BDMA not used in sufficient quantity. Oven/incubator temperature too low. Insufficient time allowed for resin to cure. |
Ensure that infiltration solutions are completely aspirated between steps. Use fresh resin components. BDMA is often most effective at concentrations of 3% (v/v) or more. Workers accustomed to working with other accelerators should not balk at adding so much BDMA. Test that oven/incubator reliably holds at a steady 60°C. Allow resin to cure at 60°C for at least 72 h. |
| Problems observed after completion of the protocol | Soft spots within specimen in block, or holes in sections. | Incomplete infiltration, due to: | |
| Water contamination in dehydrating solvents | Ethanol and acetone used in final dehydration (steps 11–13) should be stored over active molecular sieves. | ||
| Incomplete dehydration of specimens (steps 11–13) | In step 12 add a third 30 min-incubation in fresh absolute ethanol. | ||
| Insufficient time for infiltration with resin | Lengthen infiltration incubations in step 14 to 75 min each and/or use the overnight infiltration option for the 3:1 resin:acetone (step 14). | ||
| Tissue in sections appears to be mechanically damaged. | Tearing or crushing when cutting a large worm into smaller pieces (step 5) | Ensure scalpel blade is fresh and sharp; wipe with tissue between cuts Use “guillotine” rocking motion to cut (Supplementary Figure 2a). |
|
| Rough handling of brittle specimen after secondary fixation (steps 11 – end) | Avoid directly touching specimens after secondary fixation. | ||
| Sections were cut from a location too close to the cut surface, in a worm piece (during microtomy, after completion of the protocol) | Cutting the worms in step 5 will inevitably damage tissue near the cut sites. Prior to cutting sections on the microtome, trim the block at least 50–100 μm beyond the cut surface, to ensure you are sectioning undamaged tissue. | ||
| Poor fixation | Aged fixative components (Supplementary Figure 1) | Use fresh fixatives, or try a different supplier, or different lot from the same supplier. | |
| Homemade solutions (e.g. cacodylate buffer or formaldehyde) behave differently than commercially available solutions used by authors. | Test commercially available solutions for efficacy, or assay slight modifications of homemade solutions. See the note on buffer preparation and osmolarity under EM buffer in the Reagent Setup section. | ||
| Suboptimal buffer conditions – pH or osmolarity. | Check that buffer is near pH 7 or slightly higher. Adjust buffer concentration. For example, if cells appear shrunken (Figure 2), try reducing the cacodylate concentration in the EM buffer from 70 to 60 mM. |
||
| Specimens too large for fixatives to penetrate and act on tissue. | Cut specimens into smaller pieces. Alternatively, try extending the primary fixation time by 1h, and re-assess results. Check for penetration of OsO4 to centre of specimen by looking for blackening throughout specimen, and extend time for secondary fixation to 2h if fixative has not fully penetrated. |
||
| Insufficient contrast of features when observed by TEM. | En bloc staining or post-staining of specimens not done, or insufficient. | Try staining specimens en bloc with uranyl acetate, e.g. add 2% (wt/vol) uranyl acetate to the 20% (vol/vol) ethanol dilution used for dehydration, and extend this step to 2–3h. Post-stain sections on grids with lead salts. We routinely use fresh lead citrate, as described by Venable and Coggeshall.51 |
TIMING
Steps 1–8, Primary fixation: 5–6 h
Steps 9–10, Secondary fixation: 2 h
Steps 11–13, Dehydration and transitioning to resin-miscible solvent: 3 h - overnight
Steps 14–16, Infiltration, Embedding and Curing: 12 h (can be paused overnight, mid-way through)
Steps 17–21, Placing specimens in molds: 2 – 5 min per specimen.
Steps 22–23, Curing of resin: 72 h
The total time required, including the two overnight pauses, is 6 days.
ANTICIPATED RESULTS
Fixation should preserve ultrastructural details from the surface to the interior of the worm. Well-fixed specimens should be free from artefactual spaces or cavities, with cells in epithelia closely apposed to each other. Membranes should exhibit no discontinuities, and mitochondria should be intact and free of swellings. Lipid droplets should be full and of uniform density. Examples of various tissue types and organs fixed by our procedure are shown in Figures 1a, d; 2a, d, e; 4 and 5 (see below).
Figure 5. The dorsal body wall.

Transmission electron micrographs of specimens processed according to the main protocol (see Procedure). (a) Cross-section through the dorsal body wall of a sexual worm (lm & cm – longitudinal and circular muscle layers; pg – pigment granules; bl – basal lamina underlying the dorsal epidermis; en – nuclei of epithelial cells). Large rhabdites (mucus granules) in the dorsal epidermis often discharge their contents as a reaction to the stress of fixation (*) distorting the surrounding epidermis. (b) Magnified view of the sub-epidermal basal lamina (bl) and layers of circular muscle (cm) in the dorsal body wall. (c) Dorsal epidermal cells with intact rhabdites (*). Scale bars – a: 10 μm; b: 1 μm; c: 5 μ.
Even the best chemical fixation is not entirely without flaws. Compared to fixation by high-pressure freezing followed by freeze substitution, membranes of chemically fixed specimens tend to be less smooth7,16. One particular difficulty in S. mediterranea is the dorsal epidermis, due to its large mucous-filled rhabdoids. These granules discharge explosively, and may do so in response to the stress of being immersed in fixative, resulting in distortion of the epidermis (Figure 5). In any given specimen, however, at least some regions of the dorsal epidermis are likely to remain in good condition.
Supplementary Material
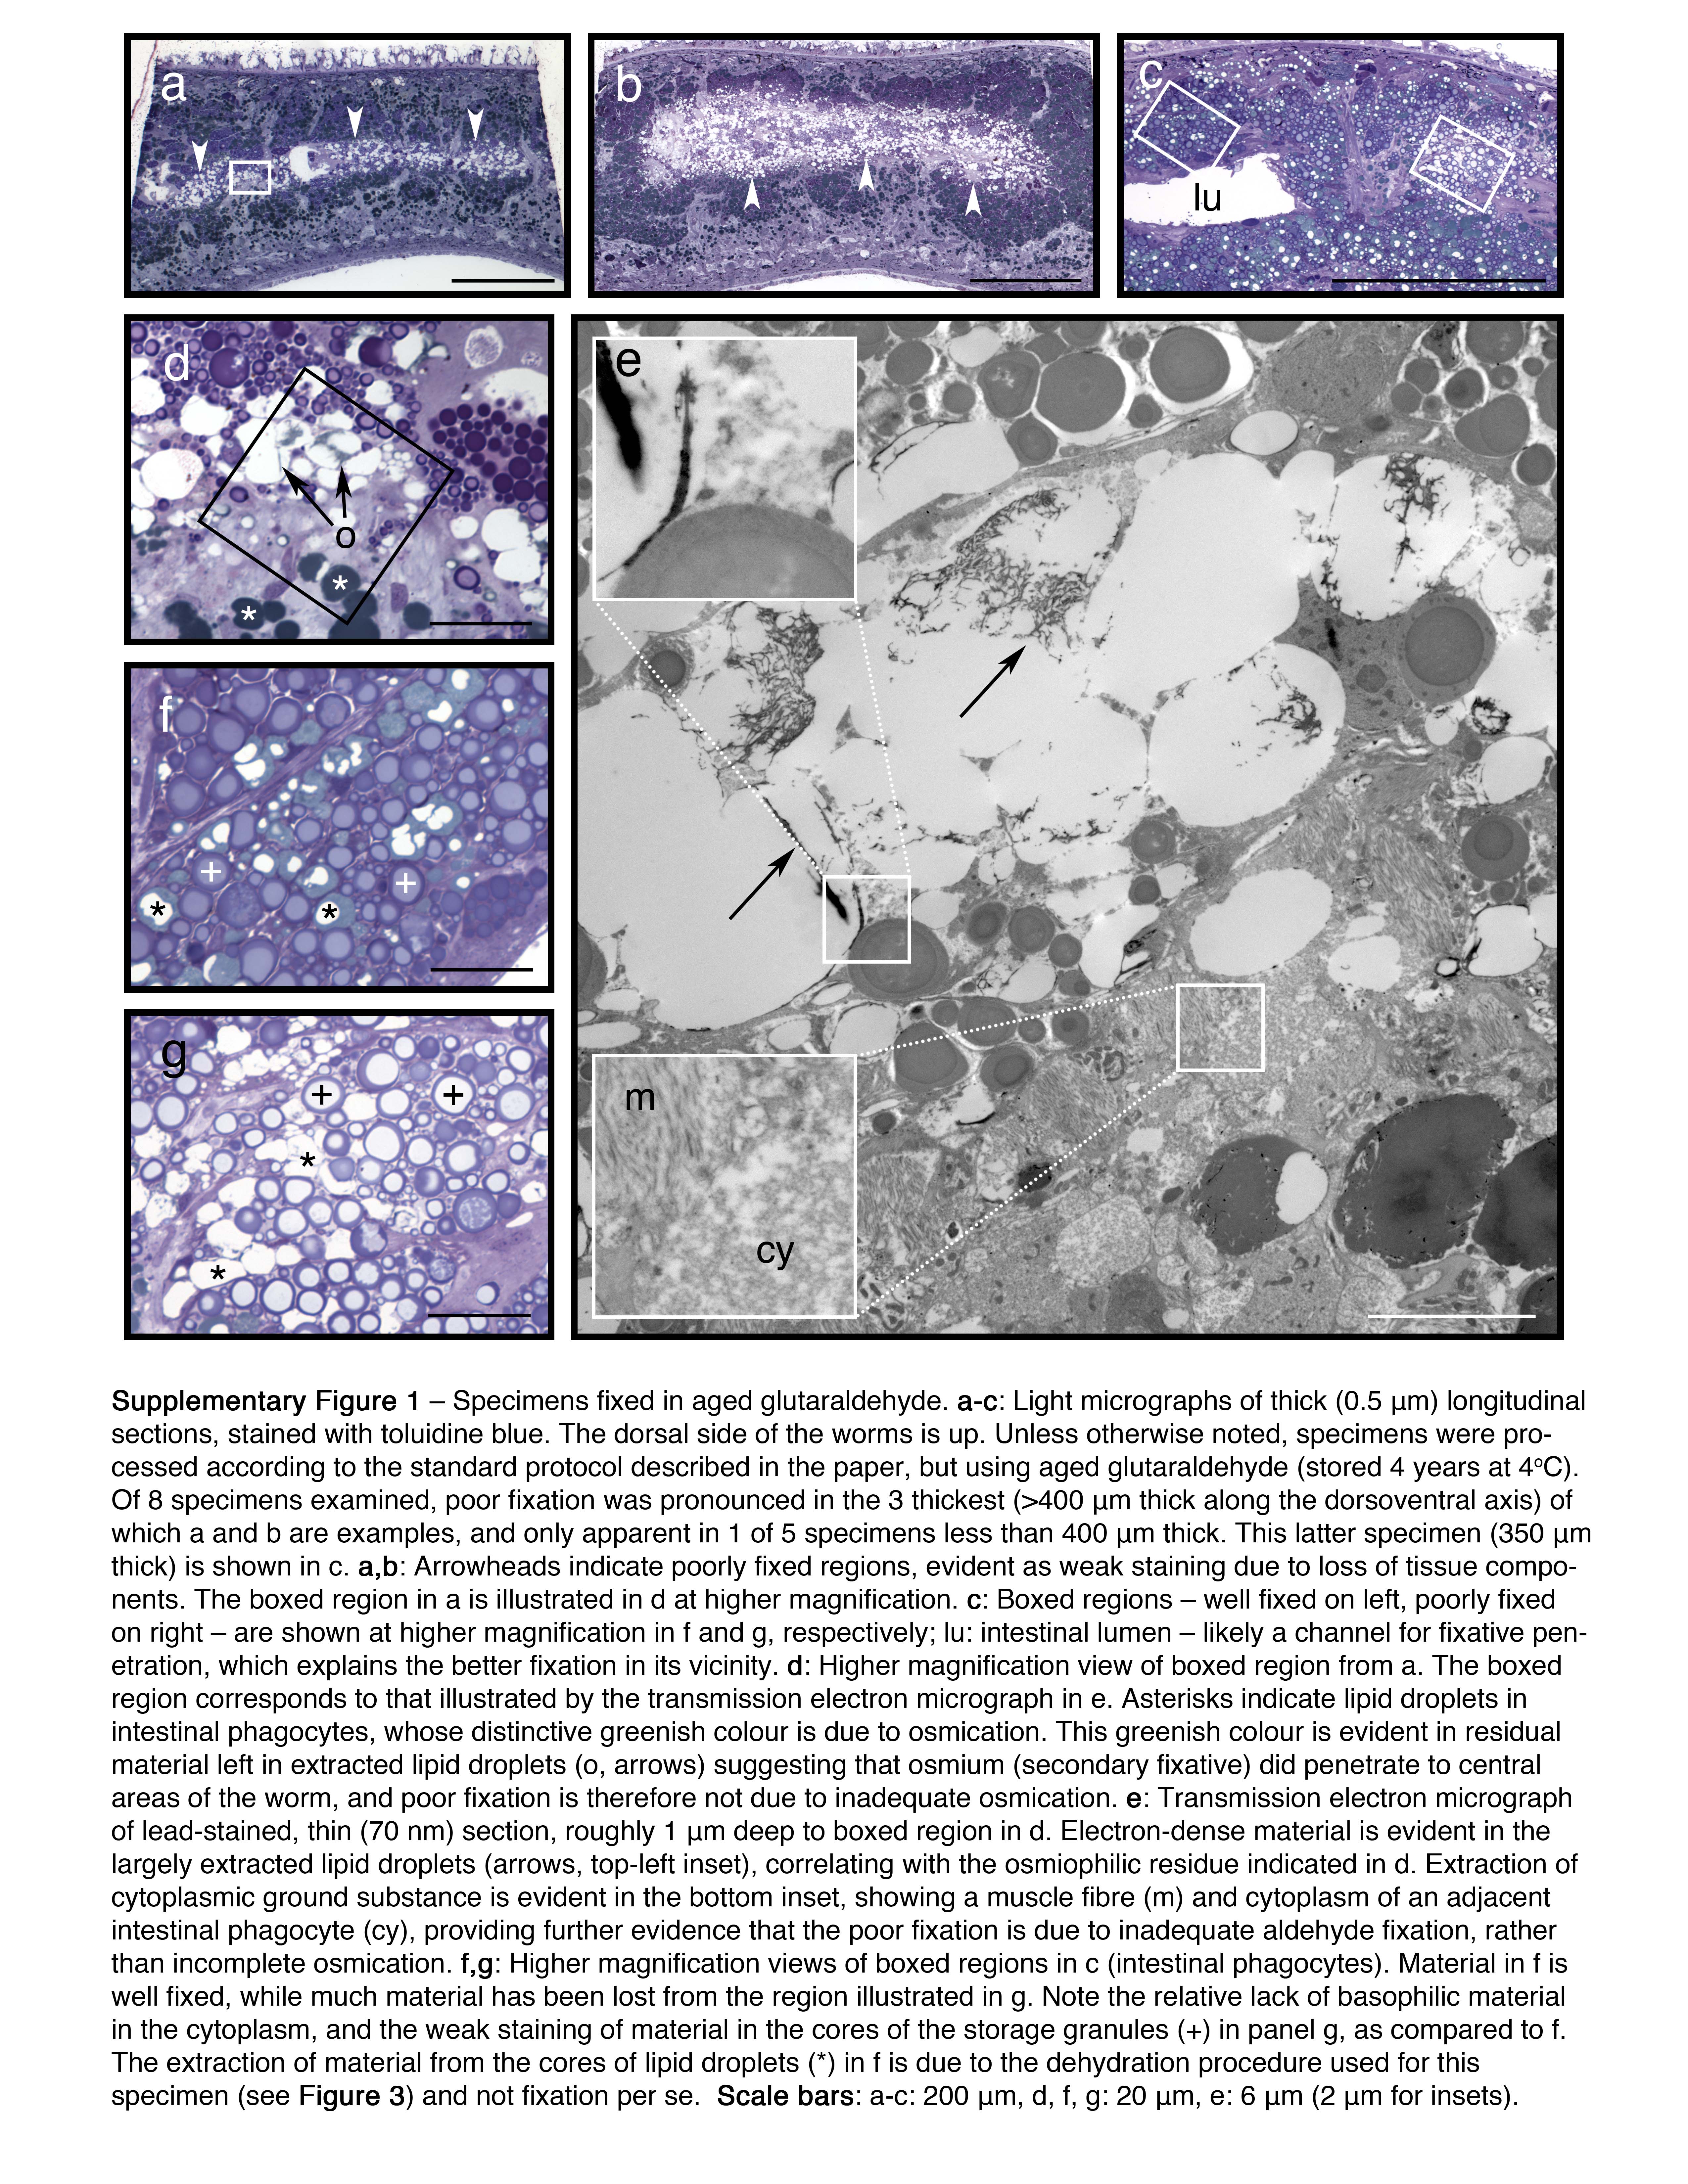
a-c: Light micrographs of thick (0.5 mm) longitudinal sections, stained with toluidine blue. The dorsal side of the worms is up. Unless otherwise noted, specimens were processed according to the standard protocol described in the paper, but using aged glutaraldehyde (stored 4 years at 4°C). Of 8 specimens examined, poor fixation was pronounced in the 3 thickest (>400 mm thick along the dorsoventral axis) of which a and b are examples, and only apparent in 1 of 5 specimens less than 400 mm thick. This latter specimen (350 mm thick) is shown in c. a,b: Arrowheads indicate poorly fixed regions, evident as weak staining due to loss of tissue components. The boxed region in a is illustrated in d at higher magnification. c: Boxed regions – well fixed on left, poorly fixed on right – are shown at higher magnification in f and g, respectively; lu: intestinal lumen – likely a channel for fixative penetration, which explains the better fixation in its vicinity. d: Higher magnification view of boxed region from a. The boxed region corresponds to that illustrated by the transmission electron micrograph in e. Asterisks indicate lipid droplets in intestinal phagocytes, whose distinctive greenish colour is due to osmication. This greenish colour is evident in residual material left in extracted lipid droplets (o, arrows) suggesting that osmium (secondary fixative) did penetrate to central areas of the worm, and poor fixation is therefore not due to inadequate osmication. e: Transmission electron micrograph of lead-stained, thin (70 nm) section, roughly 1 mm deep to boxed region in d. Electron-dense material is evident in the largely extracted lipid droplets (arrows, top-left inset), correlating with the osmiophilic residue indicated in d. Extraction of cytoplasmic ground substance is evident in the bottom inset, showing a muscle fibre (m) and cytoplasm of an adjacent intestinal phagocyte (cy), providing further evidence that the poor fixation is due to inadequate aldehyde fixation, rather than incomplete osmication. f,g: Higher magnification views of boxed regions in c (intestinal phagocytes). Material in f is well fixed, while much material has been lost from the region illustrated in g. Note the relative lack of basophilic material in the cytoplasm, and the weak staining of material in the cores of the storage granules (+) in panel g, as compared to f. The extraction of material from the cores of lipid droplets (*) in f is due to the dehydration procedure used for this specimen (see Figure 3) and not fixation per se. Scale bars: a-c: 200 mm, d, f, g: 20 mm, e: 6 mm (2 mm for insets).
a: To minimize physical damage to worms in step 5, they should be cut after a brief initial fixation using a rocking “guillotine” motion using a scalpel with a rounded end. The rocking motion initiates cutting of tissue at the thinnest point of the worm’s body, and reduces compression by minimizing the diameter of the worm in contact with the blade at any time. b: Drawing of one end of a wooden applicator stick. To produce a mini-spatula as described in step 18, carve one end of the stick into a thin, flat surface by whittling as indicated by the dashed lines in this image.
*Not including articles by authors of the current paper. This summary also does not include information about conditions used for dehydration, infiltration or embedding, as these were explicitly specified in only 2 of the 9 papers listed (refs 6 and 9). Abbreviations: ns – not specified; PBS – phosphate-buffered saline; caco – sodium cacodylate; G – glutaraldehyde; F – formaldehyde (from paraformaldehyde); RT – room temperature; o/n – overnight; UAc – uranyl acetate; mw – incubation in microwave tissue processor, specified in reference.
†In cases where distinct buffers were used as vehicles for primary (aldehyde-based) and secondary (osmium-based) fixatives, these are specified here. The terminal number in the description refers to the buffer’s pH, where specified.
Acknowledgments
We thank Lou-Ann Miller (Materials Research Laboratory) and Scott Robinson (Imaging Technology Group, Beckman Institute) at the University of Illinois, and André Dufresne (Department of Biological Sciences) at the University of Manitoba, for maintenance of the transmission electron microscope facilities used by the authors. This work was supported by Canadian Mennonite University (Dean’s Research Fund and Faculty Research Grant to JLB) and the National Institutes of Health (R01 HD043403 to PAN). PAN is an investigator of the Howard Hughes Medical Institute.
Footnotes
AUTHOR CONTRIBUTION STATEMENTS
All authors helped to conceive the project. APV optimized the protocol, and prepared most of the specimen blocks from which the images in this paper were obtained. JLB sectioned and imaged the specimens, and drafted the manuscript. All authors helped to revise the manuscript, and approved the final version.
COMPETING FINANCIAL INTERESTS
The authors declare no competing interests.
Contributor Information
John L. Brubacher, Faculty of Humanities and Sciences, Canadian Mennonite University, 500 Shaftesbury Blvd, Winnipeg, MB, Canada, R3P 2N2.
Ana P. Vieira, Howard Hughes Medical Institute and Department of Cell and Developmental Biology, University of Illinois at Urbana-Champaign, 601 S. Goodwin Ave, Urbana, IL, 61801
Phillip A. Newmark, Howard Hughes Medical Institute and Department of Cell and Developmental Biology, University of Illinois at Urbana-Champaign, 601 S. Goodwin Ave, Urbana, IL, 61801
References
- 1.Newmark PA, Reddien PW, Cebrià F, Sánchez Alvarado A. Ingestion of bacterially expressed double-stranded RNA inhibits gene expression in planarians. Proc Natl Acad Sci U S A. 2003;100 (Suppl 1):11861–11865. doi: 10.1073/pnas.1834205100. [DOI] [PMC free article] [PubMed] [Google Scholar]
- 2.Hayashi T, Asami M, Higuchi S, Shibata N, Agata K. Isolation of planarian X-ray-sensitive stem cells by fluorescence-activated cell sorting. Dev Growth Differ. 2006;48:371–380. doi: 10.1111/j.1440-169X.2006.00876.x. [DOI] [PubMed] [Google Scholar]
- 3.Robb SMC, Ross E, Sánchez Alvarado A. SmedGD: the Schmidtea mediterranea genome database. Nucleic Acids Res. 2008;36:D599–606. doi: 10.1093/nar/gkm684. [DOI] [PMC free article] [PubMed] [Google Scholar]
- 4.Adamidi C, et al. De novo assembly and validation of planaria transcriptome by massive parallel sequencing and shotgun proteomics. Genome Res. 2011;21:1193–1200. doi: 10.1101/gr.113779.110. [DOI] [PMC free article] [PubMed] [Google Scholar]
- 5.King RS, Newmark P. A In situ hybridization protocol for enhanced detection of gene expression in the planarian Schmidtea mediterranea. BMC Dev Biol. 2013;13:8. doi: 10.1186/1471-213X-13-8. [DOI] [PMC free article] [PubMed] [Google Scholar]
- 6.Rouhana L, et al. RNA interference by feeding in vitro-synthesized double-stranded RNA to planarians: methodology and dynamics. Dev Dyn. 2013;242:718–730. doi: 10.1002/dvdy.23950. [DOI] [PMC free article] [PubMed] [Google Scholar]
- 7.Salvenmoser W, Egger B, Achatz JG, Ladurner P, Hess MW. Electron microscopy of flatworms: standard and cryo-preparation methods. Methods Cell Biol. 2010;96:307–330. doi: 10.1016/S0091-679X(10)96014-7. [DOI] [PubMed] [Google Scholar]
- 8.Rompolas P, Azimzadeh J, Marshall WF, King SM. Analysis of ciliary assembly and function in planaria. Methods Enzymol. 2013;525:245–264. doi: 10.1016/B978-0-12-397944-5.00012-2. [DOI] [PubMed] [Google Scholar]
- 9.Pellettieri J, et al. Cell death and tissue remodeling in planarian regeneration. Dev Biol. 2010;338:76–85. doi: 10.1016/j.ydbio.2009.09.015. [DOI] [PMC free article] [PubMed] [Google Scholar]
- 10.Rink JC, Vu HTK, Alvarado AS. The maintenance and regeneration of the planarian excretory system are regulated by EGFR signaling. Development. 2011;138:3769–3780. doi: 10.1242/dev.066852. [DOI] [PMC free article] [PubMed] [Google Scholar]
- 11.Hurbain I, Sachse M. The future is cold: cryo-preparation methods for transmission electron microscopy of cells. Biol Cell. 2011;103:405–420. doi: 10.1042/BC20110015. [DOI] [PubMed] [Google Scholar]
- 12.Rouhana L, Vieira AP, Roberts-Galbraith RH, Newmark PA. PRMT5 and the role of symmetrical dimethylarginine in chromatoid bodies of planarian stem cells. Development. 2012;139:1083–1094. doi: 10.1242/dev.076182. [DOI] [PMC free article] [PubMed] [Google Scholar]
- 13.Forsthoefel DJ, et al. An RNAi screen reveals intestinal regulators of branching morphogenesis, differentiation, and stem cell proliferation in planarians. Dev Cell. 2012;23:691–704. doi: 10.1016/j.devcel.2012.09.008. [DOI] [PMC free article] [PubMed] [Google Scholar]
- 14.Chong T, Collins JJ, Brubacher JL, Zarkower D, Newmark PA. A sex-specific transcription factor controls male identity in a simultaneous hermaphrodite. Nat Commun. 2013;4:1814. doi: 10.1038/ncomms2811. [DOI] [PMC free article] [PubMed] [Google Scholar]
- 15.Sikes JM, Newmark PA. Restoration of anterior regeneration in a planarian with limited regenerative ability. Nature. 2013;500:77–80. doi: 10.1038/nature12403. [DOI] [PMC free article] [PubMed] [Google Scholar]
- 16.Bowers B, Maser M. Artifacts in fixation for biological electron microscopy. In: Crang RFE, Klomparens KL, editors. Artifacts in Biological Electron Microscopy. New York: Plenum Press; 1988. [Google Scholar]
- 17.Reid N. Ultramicrotomy. North-Holland/American Elsevier; Amsterdam/New York: 1975. [Google Scholar]
- 18.Hayat MA. Principles and Techniques of Electron Microscopy: Biological Applications. Macmillan; Basingstoke UK: 1989. [Google Scholar]
- 19.Bozzola JJ. Electron Microscopy: Principles and Techniques for Biologists. Jones and Bartlett; Sudbury MA: 1999. [Google Scholar]
- 20.Dykstra MJ, Reuss LE. Biological Electron Microscopy: Theory, Techniques, and Troubleshooting. Kluwer Academic/Plenum Publishers; New York: 2003. [Google Scholar]
- 21.Graham L, Orenstein JM. Processing tissue and cells for transmission electron microscopy in diagnostic pathology and research. Nat Protoc. 2007;2:2439–2450. doi: 10.1038/nprot.2007.304. [DOI] [PMC free article] [PubMed] [Google Scholar]
- 22.Wu S, Baskin TI, Gallagher KL. Mechanical fixation techniques for processing and orienting delicate samples, such as the root of Arabidopsis thaliana, for light or electron microscopy. Nat Protoc. 2012;7:1113–1124. doi: 10.1038/nprot.2012.056. [DOI] [PubMed] [Google Scholar]
- 23.Hayat MA. Glutaraldehyde: Role in electron microscopy. Micron Microsc Acta. 1986;17:115–135. [Google Scholar]
- 24.Richards FM, Knowles JR. Glutaraldehyde as a protein cross-linkage reagent. J Mol Biol. 1968;37:231–233. doi: 10.1016/0022-2836(68)90086-7. [DOI] [PubMed] [Google Scholar]
- 25.Sabatini DD, Bensch K, Barnett RJ. Cytochemistry and electron microscopy: the preservation of cellular ultrastructure and enzymatic activity by aldehyde fixation. J Cell Biol. 1963;17:19–58. doi: 10.1083/jcb.17.1.19. [DOI] [PMC free article] [PubMed] [Google Scholar]
- 26.Hayat MA. Fixation for Electron Microscopy. Academic Press; New York: 1981. [Google Scholar]
- 27.Kiernan JA. Histological and Histochemical Methods: Theory and Practice. Scion Publishing; Bloxham UK: 2008. [Google Scholar]
- 28.Karnovsky MJ. A formaldehyde-glutaraldehyde fixative of high osmolality for use in electron microscopy. J Cell Biol. 1965;27:137A. [Google Scholar]
- 29.Karnovsky MJ. The ultrastructural basis of capillary permeability studied with peroxidase as a tracer. J Cell Biol. 1967;35:213–236. doi: 10.1083/jcb.35.1.213. [DOI] [PMC free article] [PubMed] [Google Scholar]
- 30.Glauert AM, Lewis PR. Biological Specimen Preparation for Transmission Electron Microscopy. Princeton University Press; Princeton NJ: 1998. [Google Scholar]
- 31.Migneault I, Dartiguenave C, Bertrand MJ, Waldron KC. Glutaraldehyde: behavior in aqueous solution, reaction with proteins, and application to enzyme crosslinking. BioTechniques. 2004;37:790–796. 798–802. doi: 10.2144/04375RV01. [DOI] [PubMed] [Google Scholar]
- 32.Kirkeby S, Moe D, Jakobsen P, Rømert P, Matthiessen ME. Polymeric aldehyde preparations: Their chemistry and fixation capacity. Micron Microsc Acta. 1989;20:217–221. [Google Scholar]
- 33.Prentø P. Glutaraldehyde for electron microscopy: a practical investigation of commercial glutaraldehydes and glutaraldehyde-storage conditions. Histochem J. 1995;27:906–913. [PubMed] [Google Scholar]
- 34.Ruzin SE. Plant Microtechnique and Microscopy. Oxford University Press; New York: 1999. [Google Scholar]
- 35.Gremigni V, Falleni A. Ultrastructural features of cocoon-shell globules in the vitelline cells of neoophoran platyhelminths. Hydrobiologia. 1991;227:105–111. [Google Scholar]
- 36.Litwin JA. Light microscopic histochemistry on plastic sections. Prog Histochem Cytochem. 1985;16:1–84. doi: 10.1016/s0079-6336(85)80001-2. [DOI] [PubMed] [Google Scholar]
- 37.Sanderson JB. Biological Microtechnique. BIOS Scientific; Oxford UK: 1994. [Google Scholar]
- 38.Salvetti A, et al. DjPum, a homologue of Drosophila pumilio, is essential to planarian stem cell maintenance. Development. 2005;132:1863–1874. doi: 10.1242/dev.01785. [DOI] [PubMed] [Google Scholar]
- 39.Brubacher JL, Huebner E. Development of polarized female germline cysts in the polychaete, Ophryotrocha labronica. J Morphol. 2009;270:413–429. doi: 10.1002/jmor.10687. [DOI] [PubMed] [Google Scholar]
- 40.Brubacher JL, Huebner E. Evolution and development of polarized germ cell cysts: new insights from a polychaete worm, Ophryotrocha labronica. Dev Biol. 2011;357:96–107. doi: 10.1016/j.ydbio.2011.06.026. [DOI] [PubMed] [Google Scholar]
- 41.Cole MB, Jr, Ellinger J. Glycol methacrylate in light microscopy: nucleic acid cytochemistry. J Microsc. 1981;123:75–88. doi: 10.1111/j.1365-2818.1981.tb01281.x. [DOI] [PubMed] [Google Scholar]
- 42.Horobin RW. Staining plastic sections: a review of problems, explanations and possible solutions. J Microsc. 1983;131:173–186. [PubMed] [Google Scholar]
- 43.Yang R, Davies CM, Archer CW, Richards RG. Immunohistochemistry of matrix markers in Technovit 9100 New-embedded undecalcified bone sections. Eur Cell Mater. 2003;6:57–71. doi: 10.22203/ecm.v006a06. [DOI] [PubMed] [Google Scholar]
- 44.Singhrao SK, Müller CT, Gilbert SJ, Duance VC, Archer CW. An immunofluorescence method for postembedded tissue in the acrylic resin Technovit 9100 New using fluorescein isothiocyanate secondary detection. Microsc Res Tech. 2009;72:501–506. doi: 10.1002/jemt.20705. [DOI] [PubMed] [Google Scholar]
- 45.Finck H. Epoxy resins in electron microscopy. J Biophys Biochem Cytol. 1960;7:27–30. doi: 10.1083/jcb.7.1.27. [DOI] [PMC free article] [PubMed] [Google Scholar]
- 46.Mollenhauer HH. Plastic embedding mixtures for use in electron microscopy. Stain Technol. 1964;39:111–114. [PubMed] [Google Scholar]
- 47.Zayas RM, et al. The planarian Schmidtea mediterranea as a model for epigenetic germ cell specification: analysis of ESTs from the hermaphroditic strain. Proc Natl Acad Sci USA. 2005;102:18491–18496. doi: 10.1073/pnas.0509507102. [DOI] [PMC free article] [PubMed] [Google Scholar]
- 48.Sánchez Alvarado A, Newmark PA, Robb SM, Juste R. The Schmidtea mediterranea database as a molecular resource for studying platyhelminthes, stem cells and regeneration. Development. 2002;129:5659–5665. doi: 10.1242/dev.00167. [DOI] [PubMed] [Google Scholar]
- 49.Cebrià F, Newmark PA. Planarian homologs of netrin and netrin receptor are required for proper regeneration of the central nervous system and the maintenance of nervous system architecture. Development. 2005;132:3691–3703. doi: 10.1242/dev.01941. [DOI] [PubMed] [Google Scholar]
- 50.Van der Wal UP, Dohmen MR. A method for the orientation of small and delicate objects in embedding media for light and electron microscopy. Stain Technol. 1978;53:56–58. [PubMed] [Google Scholar]
- 51.Venable JH, Coggeshall R. A simplified lead citrate stain for use in electron microscopy. J Cell Biol. 1965;25:407–408. doi: 10.1083/jcb.25.2.407. [DOI] [PMC free article] [PubMed] [Google Scholar]
- 52.Franquinet R, Lender T. Quelques aspects ultrastructuraux de la spermiogenèse chez Polycelis tenuis et Polycelis nigra (planaires) Z Mikrosk-Anat Forsch. 1972;86:481–495. [PubMed] [Google Scholar]
Associated Data
This section collects any data citations, data availability statements, or supplementary materials included in this article.
Supplementary Materials
a-c: Light micrographs of thick (0.5 mm) longitudinal sections, stained with toluidine blue. The dorsal side of the worms is up. Unless otherwise noted, specimens were processed according to the standard protocol described in the paper, but using aged glutaraldehyde (stored 4 years at 4°C). Of 8 specimens examined, poor fixation was pronounced in the 3 thickest (>400 mm thick along the dorsoventral axis) of which a and b are examples, and only apparent in 1 of 5 specimens less than 400 mm thick. This latter specimen (350 mm thick) is shown in c. a,b: Arrowheads indicate poorly fixed regions, evident as weak staining due to loss of tissue components. The boxed region in a is illustrated in d at higher magnification. c: Boxed regions – well fixed on left, poorly fixed on right – are shown at higher magnification in f and g, respectively; lu: intestinal lumen – likely a channel for fixative penetration, which explains the better fixation in its vicinity. d: Higher magnification view of boxed region from a. The boxed region corresponds to that illustrated by the transmission electron micrograph in e. Asterisks indicate lipid droplets in intestinal phagocytes, whose distinctive greenish colour is due to osmication. This greenish colour is evident in residual material left in extracted lipid droplets (o, arrows) suggesting that osmium (secondary fixative) did penetrate to central areas of the worm, and poor fixation is therefore not due to inadequate osmication. e: Transmission electron micrograph of lead-stained, thin (70 nm) section, roughly 1 mm deep to boxed region in d. Electron-dense material is evident in the largely extracted lipid droplets (arrows, top-left inset), correlating with the osmiophilic residue indicated in d. Extraction of cytoplasmic ground substance is evident in the bottom inset, showing a muscle fibre (m) and cytoplasm of an adjacent intestinal phagocyte (cy), providing further evidence that the poor fixation is due to inadequate aldehyde fixation, rather than incomplete osmication. f,g: Higher magnification views of boxed regions in c (intestinal phagocytes). Material in f is well fixed, while much material has been lost from the region illustrated in g. Note the relative lack of basophilic material in the cytoplasm, and the weak staining of material in the cores of the storage granules (+) in panel g, as compared to f. The extraction of material from the cores of lipid droplets (*) in f is due to the dehydration procedure used for this specimen (see Figure 3) and not fixation per se. Scale bars: a-c: 200 mm, d, f, g: 20 mm, e: 6 mm (2 mm for insets).
a: To minimize physical damage to worms in step 5, they should be cut after a brief initial fixation using a rocking “guillotine” motion using a scalpel with a rounded end. The rocking motion initiates cutting of tissue at the thinnest point of the worm’s body, and reduces compression by minimizing the diameter of the worm in contact with the blade at any time. b: Drawing of one end of a wooden applicator stick. To produce a mini-spatula as described in step 18, carve one end of the stick into a thin, flat surface by whittling as indicated by the dashed lines in this image.
*Not including articles by authors of the current paper. This summary also does not include information about conditions used for dehydration, infiltration or embedding, as these were explicitly specified in only 2 of the 9 papers listed (refs 6 and 9). Abbreviations: ns – not specified; PBS – phosphate-buffered saline; caco – sodium cacodylate; G – glutaraldehyde; F – formaldehyde (from paraformaldehyde); RT – room temperature; o/n – overnight; UAc – uranyl acetate; mw – incubation in microwave tissue processor, specified in reference.
†In cases where distinct buffers were used as vehicles for primary (aldehyde-based) and secondary (osmium-based) fixatives, these are specified here. The terminal number in the description refers to the buffer’s pH, where specified.