Abstract
Peritoneal dialysis (PD) catheters can be placed by interventional radiologists, an approach that might offer scheduling efficiencies, cost-effectiveness, and a minimally invasive procedure. In the United States, changes in the dialysis reimbursement structure by the Centers for Medicare and Medicaid Services are expected to result in the increased use of PD, a less costly dialysis modality that offers patients the opportunity to receive dialysis in the home setting and to have more independence for travel and work schedules, and that preserves vascular access for future dialysis options. Placement of PD catheters by interventional radiologists might therefore be increasingly requested by nephrology practices, given that recent publications have demonstrated the favorable impact on PD practices of an interventional radiology PD placement capability.
Earlier reports of interventional radiology PD catheter placement came from single-center practices with smaller reported experiences. The need for a larger consensus document that attempts to establish best demonstrated practices for radiologists is evident. The radiologists submitting this consensus document represent a combined experience of more than 1000 PD catheter placements. The authors submit these consensus-proposed best demonstrated practices for placement of PD catheters by interventional radiologists under ultrasonographic and fluoroscopic guidance. This technique might allow for expeditious placement of permanent PD catheters in late-referred patients with end-stage renal disease, thus facilitating urgent-start PD and avoiding the need for temporary vascular access catheters.
Keywords: Technique, catheter placement, fluoroscopy, ultrasonography, interventional radiology, percutaneous placement
In the United States, more than 25 000 patients are currently treated with peritoneal dialysis (PD) for end-stage renal disease (1). As a home dialysis modality, PD can afford patients unique lifestyle benefits, allowing for greater ease of travel and work, and for lower dialysis costs. Recent reimbursement changes by the Centers for Medicare and Medicaid Services (CMS) have increased the dialysis provider’s reimbursement for PD, and this change in dialysis financing is expected to result in increased utilization of PD in the United States (2).
Peritoneal dialysis catheters can be placed by a variety of percutaneous and surgical techniques, but currently, in the United States, placement is most commonly performed by surgeons (3). Placement by the laparotomic and basic laparoscopic techniques has resulted in a 2-year patency rate of 82% - 87% (4). Recent surgical advances in laparoscopy have improved the PD catheter placement technique through a combination of rectus sheath tunneling of the catheter before entering the abdominal cavity and of adhesiolysis and omentopexy if required. These advanced laparoscopic techniques have been reported to provide a 5-year patency rate of 96% - 99% (5).
Despite the improved results with newer surgical approaches, many institutions have suboptimal access to surgical PD catheter placement, obstacles related to operating room scheduling or other operational inefficiencies that can make surgical PD catheter placement problematic. Placement of the PD catheter by interventional radiology (IR) is increasingly described and provides a cost-effective approach to percutaneous, minimally invasive catheter placement (6-8). Use of ultrasonographic and fluoroscopic guidance has made this procedure safe and cost-effective—and thus a reasonable alternative to traditional surgical catheter placement. Technical success and patency rates for IR-placed catheters appear to be equivalent to those for catheters placed by laparoscopy (9).
The existing literature describing IR placement of PD catheters consists of reports from individual institutions. Increasing discussion, collaboration, and consensus among interventional radiologists about best demonstrated practices for PD catheter placement is required. To address that need, our consensus document describes best current practice for the placement of PD catheters by interventional radiologists. The IR physicians submitting this paper represent a cumulative experience of more than 1000 IR-placed PD catheters, and the working group has contributed to a best-practice template aimed at achieving successful catheter placements. The technical aspects detailed in this report are believed to represent the key steps for establishment of a high-volume IR-based PD catheter placement program, and additional technical comments not presented in previous publications are provided to explain pre- and post-procedure care and to better describe the roles of ultrasonography and fluoroscopy in PD catheter placement.
Methods
Pre-procedure Preparation
A history and physical examination are performed to uncover known conditions—such as hernias, presence of abdominal mesh, organomegaly, prior kidney transplantation, or past abdominal surgeries—that might complicate placement. If the patient is on anticoagulants, they are held 5 days before the procedure.
In nonurgent placements, bowel preparation is recommended to reduce colonic distension and postoperative constipation that might affect catheter function. On the night before the procedure, an enema could be administered, with the usual precautions to avoid phosphate- or magnesium-containing enemas in patients with advanced kidney disease. Bisacodyl suppositories could substitute for enemas. If patients have chronic constipation, oral laxatives could also be administered several days before the procedure. Post-procedure instructions to avoid constipation are also delivered.
Because conscious sedation will be administered, the patient is kept fasting for at least 6 hours before the procedure. Signed consent for PD catheter placement is obtained from the patient after information has been communicated about the procedure: its benefits, risks, and possible alternatives; and the option to choose not to proceed. Pre-procedure antibiotics are administered intravenously: either cefazolin 1000 mg or vancomycin 1000 mg if the patient is allergic to cephalosporin or penicillin (10). The antibiotics are administered 1 hour before the procedure. The patient is asked to fully empty the bladder, and if the patient has bladder dysfunction, a Foley catheter can be used to ensure more complete bladder drainage.
Abdominal Site Marking: Marking of the entry and exit sites for the catheter is performed in the pre-procedure area. Site marking can be performed using a nonsterile double-cuff PD catheter or a commercially available stencil. The belt line is noted in sitting and standing position while the patient is fully dressed.
With the patient in recumbent position, the upper border of the PD catheter curl is aligned to the upper border of the symphysis pubis. The location of the catheter curl in relation to the symphysis pubis is an important determination, because catheters that extend too deep into the pelvis might create infusion or drain pain during PD exchanges.
After the catheter curl is aligned with the symphysis pubis, the catheter length from the curled end to the deep rectus polyester fiber cuff determines the entry site location on the skin, which should be 2 - 4 cm lateral to the midline. The exit site is then marked on the skin such that the superficial cuff within the subcutaneous tunnel is at least 2 - 4 cm away from the exit site (Figure 1).
Figure 1 —
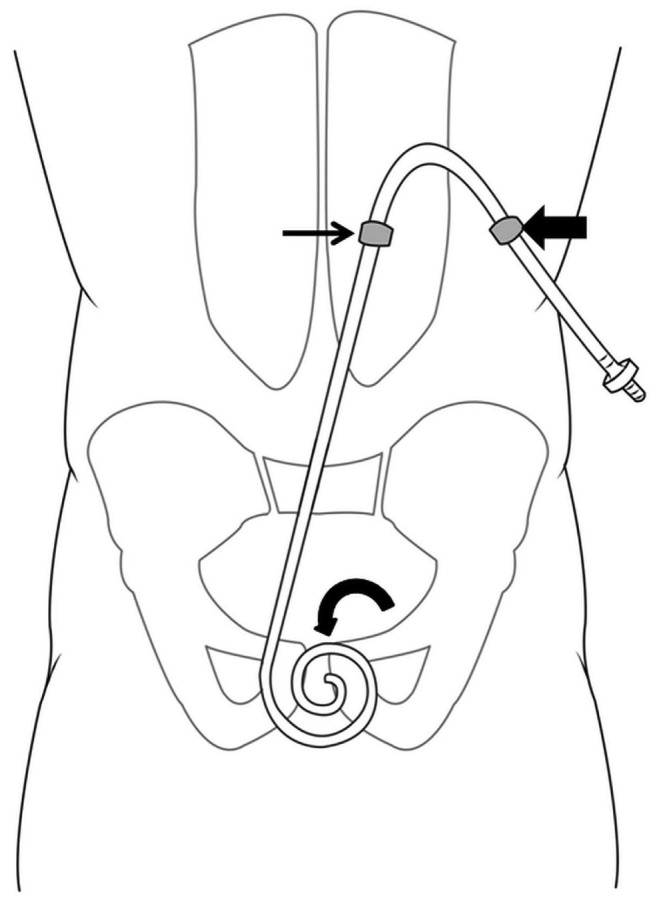
Diagram for the technique of abdominal site marking. The location of the catheter curl in relation to the symphysis pubis is an important determination, because catheters that extend too deep into the pelvis might produce infusion or drain pain during peritoneal dialysis (PD) exchanges. When marking the entry site (small arrow) and exit site (large arrow), it is essential to align the upper border of the PD catheter curl with the upper border of the symphysis pubis (curved arrow).
In an obese patient, there might be substantial movement of the abdominal pannus, and so bone landmarks (such as the iliac crest) and marking in the upright position so that the pannus is dependent can assist in catheter localization. Bone landmarks remain consistent in regard to localization of the entry site; skin landmarks on the obese pannus can move substantially, potentially rendering such landmarks problematic. There is no consensus on left- or right-side catheter placement.
Catheter Selection: The variety of body configurations in patients has resulted in modification of the standard Tenckhoff catheter in terms of length and presence of a pre-formed bend (swan neck) in the subcutaneous section of the catheter to assist in creation of a downward-facing exit site and in avoiding the beltline. The chosen catheter design should allow for pelvic location of the distal catheter (keeping it out of reach of omentum) and for an appropriate exit location that is easily accessible for the patient and away from belt line or skin creases and folds.
Three standard variations of the Tenckhoff catheter are the straight inter-cuff segment, the pre-formed bend between cuffs (swan-neck design), and the modular (2-piece) extended system to produce an upper abdominal or chest exit site location. The literature is not consistent with respect to the superiority of either configuration (straight versus swan-neck configuration). However, it is more appropriate to use pre-formed bend configurations in patients who wear their belt above the umbilicus, because the pre-formed bend allows for the exit site to fall below the belt line.
For an average-sized patient, a 57-cm straight double-cuff curled catheter (Covidien, Mansfield, MA; Medcomp, Harleysville, PA; or Medigroup, Oswego, IL, USA) or a 62.5-cm swan-neck design (Covidien) can be chosen. There is no consensus in the literature concerning the superiority of any particular catheter design and length; further research is needed to resolve this issue. However, we feel that the swan-neck design aids in orienting the catheter caudally into the pelvis. The curled distal portion of the catheter adds additional mass to encourage the distal catheter to remain low in the pelvis, helping to prevent cephalad migration of the distal end of the catheter. The curled tubing and numerous inflow-outflow holes diffuse dialysate gently into and out of the patient.
The two catheter cuffs are anchored pre-peritoneally and subcutaneously. The pre-peritoneal cuff (deep cuff) is anchored within the anterior rectus sheath to reduce the possibility of dialysate leakage from the peritoneal cavity. The subcutaneous cuff (superficial cuff) is placed deep subcutaneously about 2-4 cm from the exit site to avoid cuff infection or extrusion. Both cuffs anchor the catheter through tissue ingrowth and serve as a barrier to infection.
The catheter is prepared by being placed into a surgical bowl filled with saline. The polyester fiber cuffs are manually compressed to extrude any trapped air that might inhibit tissue ingrowth.
Catheter Placement Procedure
Intra-procedure Preparation and Monitoring: The patient is placed supine on the angiographic table in the procedure room, and preliminary ultrasonography of the abdomen is performed to help determine the safest puncture site (entry site) and to plan for the subcutaneous tunnel and catheter exit site. The puncture site is defined as the site of the initial needle stick, but because of caudal angling of the needle, the entry site into the abdomen is 2 - 3 cm inferior. The subcutaneous tunnel is defined as the tunnel through which the catheter will be passed under the skin. The exit site is defined as the site on the skin where the catheter will exit from the subcutaneous tunnel.
The safest puncture site should be determined by grayscale ultrasonography, Doppler ultrasonography, and fluoroscopy. To minimize the risk of inadvertent bowel puncture, preliminary grayscale ultrasonography is used to determine the site on the anterior abdominal wall that has no bowel loops underneath or that has the maximum separation between the anterior abdominal wall and the bowel loops.
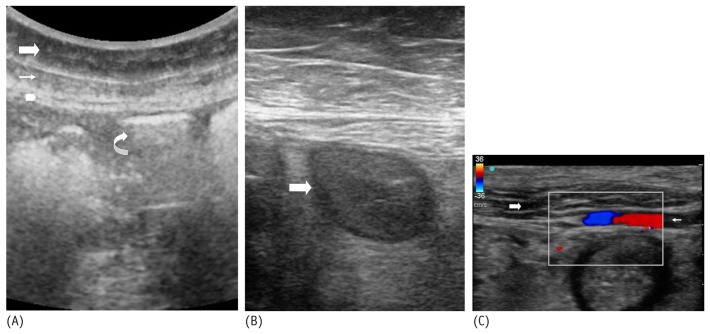
On grayscale ultrasonography, the subcutaneous tissue is visualized as a superficial hypoechoic band, and the rectus abdominis muscle is visualized as a deeper hypoechoic band with linear high specular echoes [Figure 2(A)]. The parietal peritoneum is visualized as a thin echogenic linear streak just posterior to the rectus abdominis muscle [Figure 2(A)]. The air-filled bowel loops demonstrate a ring-down artifact caused by air [Figure 2(A)]; fluid-filled bowel loops will appear hypoechoic [Figure 2(B)]. Air- and fluid-filled bowel loops both might demonstrate motion on real-time ultrasonography, confirming their nature. Color Doppler or power Doppler ultrasonography can then be used to confirm the absence of any large arteries (mainly the inferior epigastric artery and its branches) coursing through or deep to the anterior abdominal wall [Figure 2(C)]. If arteries are present, a different puncture site should be sought so as to avoid transection of the arteries, which can result in abdominal wall or intra-abdominal hematoma.
Figure 2 —
Grayscale ultrasonography image shows the various layers of the anterior abdominal wall. The subcutaneous fat appears as a superficial hypoechoic band (large arrow). The rectus abdominis muscle appears as a deeper hypoechoic structure with linear high specular echoes (small arrow). The peritoneum appears as a thin linear hyperechoic streak deep to the rectus abdominis muscle (arrowhead). The air-filled bowel loops demonstrate ring-down artifact caused by air (curved arrow). (B) Grayscale ultrasonography image shows fluid-filled bowel loops, which appear hypoechoic (arrow). (C) Color Doppler ultrasonography image shows the inferior epigastric artery (small arrow) coursing through the rectus abdominis muscle (large arrow).
For placement of the catheter, a site in the mid-rectus abdominis muscle rather than its thinner lateral or medial aspects is preferred, given that one of the catheter cuffs will be implanted in the muscle. In our experience, scanning for a safe puncture site that is 2 - 4 cm lateral and superior to the umbilicus is usually optimal. By fluoroscopy, the puncture site is slightly lateral to the lateral margin of the vertebral bodies. The subcutaneous tunnel usually makes a gentle lateral and inferior course to the exit site, which is lateral and inferior to the initial puncture site. All planned sites should be marked with a pen.
The hair on the anterior abdominal wall in the involved area is then shaved. Shaving with a razor is considered to create a higher risk for subsequent infection, and so medical-grade hair clippers are used for shaving. The abdomen is then prepped with an antiseptic scrub and sterilely draped to provide exposure to the initial puncture site and the expected exit site.
Mild or moderate sedation is given using intravenous midazolam hydrochloride and fentanyl citrate. Vital signs (pulse, blood pressure, oxygen saturation) and bedside electrocardiography are continuously monitored during the procedure by the operating physician and a dedicated nurse. Anesthesiology assistance is not routinely required, but can be considered in the case of patients who require continuous positive airway pressure ventilation or who are on chronic narcotics. Patients who require continuous positive airway pressure should bring their own home device to the procedure.
The safest initial puncture site is again confirmed by ultrasonography. Local anesthesia using 1% lidocaine is infiltrated within the skin and the subcutaneous and deep tissues of the anterior abdominal wall at the anticipated puncture site.
Ultrasound Guidance: As mentioned, ultrasound guidance may be used in all or select cases for the initial puncture to ensure safe entry into the peritoneal cavity. The use of grayscale and Doppler ultrasonography allows for visualization and avoidance of bowel and vascular structures such as the inferior epigastric artery. A 21-gauge micropuncture needle (Stiffen microintroducer kit: Galt Medical Corp, Garland, TX, USA) is typically used. Alternatively, a blunt-tip needle such as an 18-gauge Hawkins-Adkins needle (Cook Medical, Bloomington, IN, USA) or a Veress-type needle can be used. The Veress-type needle has a spring-loaded blunt forward end that can be used to minimize bowel injury.
Under ultrasound guidance, the needle is advanced in a caudal direction toward the pelvis at a 45-degree angle from the skin surface and slightly laterally (Figure 3). Taking a caudal and lateral tract through the rectus sheath helps to direct the catheter in the caudal direction, which, in the surgical literature, has been associated with less cephalic catheter migration (5). In case the tip of the needle is not clearly seen in the ultrasound images, the distance between the skin surface and the peritoneum can be measured using ultrasonography and then marked on the needle to act as a guide for needle penetration into the peritoneal cavity.
Figure 3 —
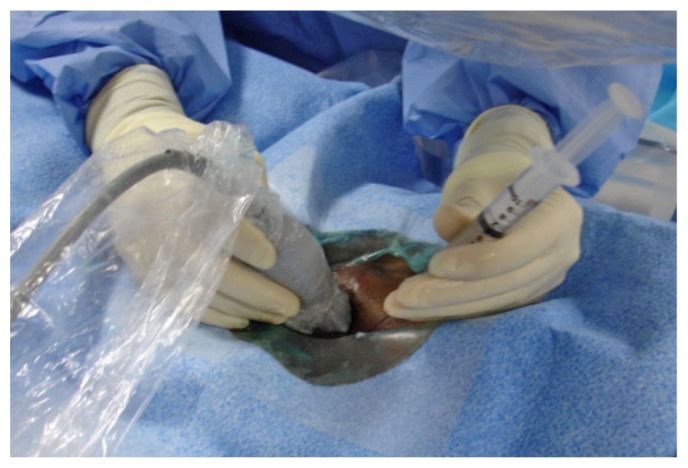
A 21-gauge micropuncture needle is advanced in a caudal direction toward the pelvis at a 45-degree angle from the skin surface under ultrasonography guidance.
A 22-gauge, 15-cm Chiba needle (Cook Medical) can be used in an obese patient if the micropuncture needle is too short. In obese patients, the linear high-frequency ultrasound probe can be used initially to assess for nearby arterial vessels. Then, if the linear probe cannot provide visualization, the curved low-frequency probe can be used if needed to assess for the needle passing into the peritoneal cavity.
The parietal peritoneal layer is well innervated, and the patient usually experiences transient discomfort as the needle traverses the parietal peritoneum.
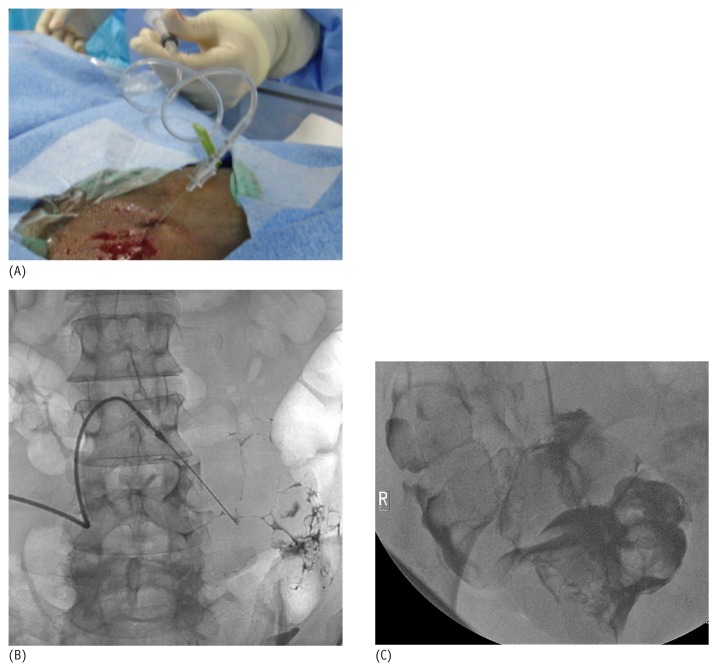
Fluoroscopic Guidance: After ultrasound-guided entry into the peritoneal cavity, approximately 3 - 5 mL of nonionic contrast material can be injected and visualized under fluoroscopy [Figure 4(A)]. The free spread of contrast material around the bowel loops confirms successful entry into the peritoneal cavity [Figure 4(B)]. Contrast outlining the mucosal folds of the small bowel or the colonic haustra indicates inadvertent puncture of bowel [Figure 4(C)].
Figure 4 —
(A) The small 21-gauge introducer needle is connected through a connection tube to a syringe filled with nonionic contrast. (B) Fluoroscopic image after injection of 5 mL nonionic contrast into the peritoneal cavity. Free spread of the contrast material outlines the outer surface of the bowel loops and confirms successful entry into the peritoneal cavity. (C) Fluoroscopic image after injection of 5 mL nonionic contrast demonstrates contrast outlining the colonic haustra, indicating inadvertent colonic puncture.
If bowel perforation occurs, the procedure is terminated to avoid catheter infection and peritonitis. The patient can be managed conservatively or treated with oral ciprofloxacin 500 mg twice daily for 2 weeks, after which the patient can return for a second attempt.
After visual confirmation of successful entry into the peritoneal cavity, a 0.018-in. nitinol wire that accompanies the original micro-introducer kit is threaded into the peritoneal cavity (Figure 5). With the nitinol wire in place, the 21-gauge needle is then exchanged over the nitinol wire for the 4 or 5-French microsheath included in the micro-introducer kit (Figure 6). Alternatively, an AccuStick set (Boston Scientific, Natick, MA, USA) for needle access with a 5-French catheter can be used to negotiate into the deep pelvis.
Figure 5 —
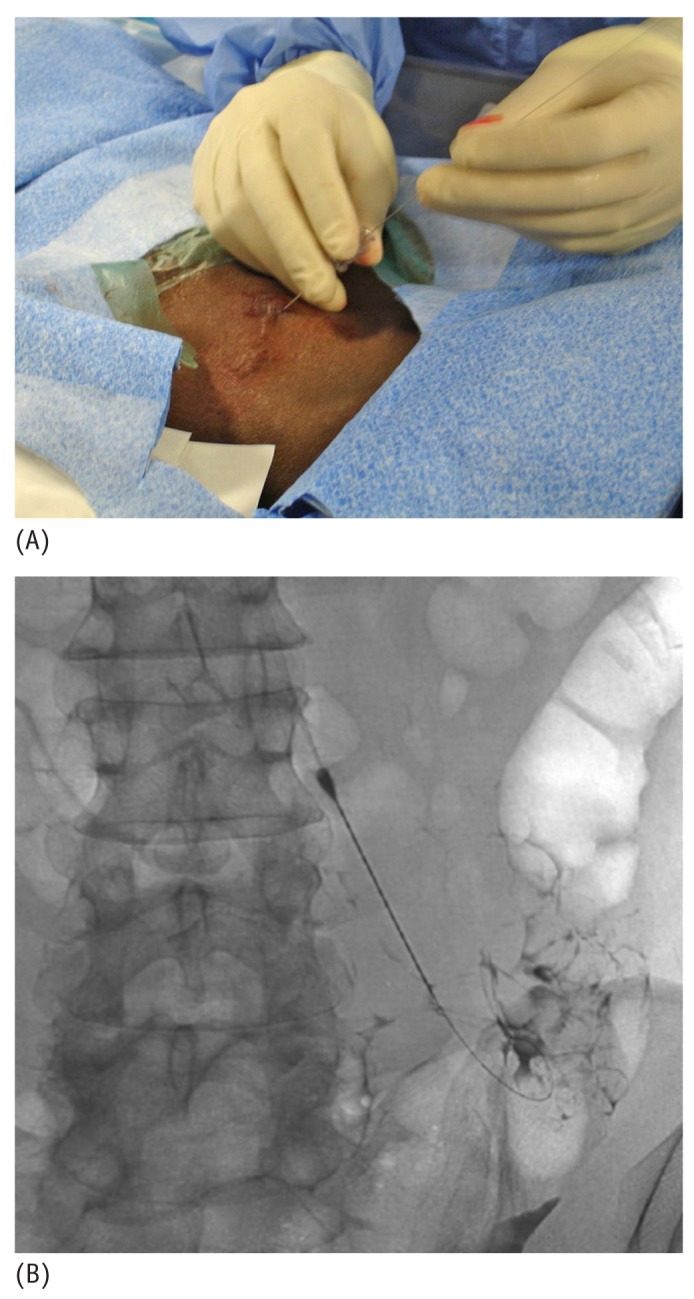
(A) A 0.018-inch nitinol wire is threaded through the introducer needle into the peritoneal cavity. (B) Fluoroscopic image shows the wire in the peritoneal cavity directed caudally towards the pelvis.
Figure 6 —
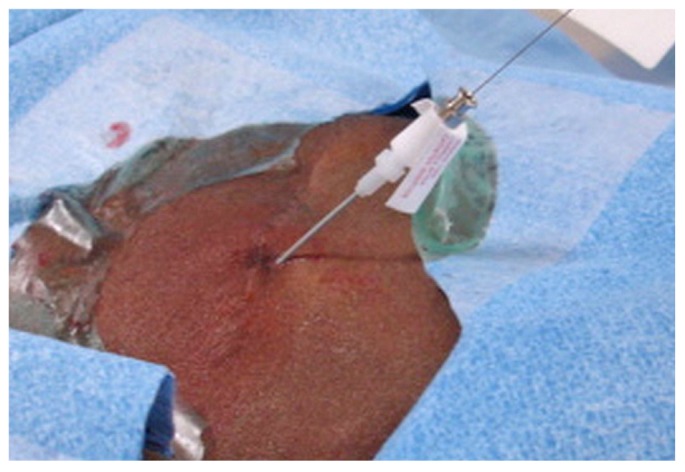
A 4-French micro-sheath is introduced over the nitinol wire.
The wire and inner stiffener of the sheath are then removed, and contrast may again be injected through the sheath to confirm that the sheath is in the peritoneal cavity. A 0.035-in. guide wire (Glide Wire Stiff Shaft: Terumo, Tokyo, Japan; Bentson Wire: Cook Medical) is advanced through the sheath and directed toward the pelvis under fluoroscopic guidance (Figure 7). During advancement, the stiff guide wire or the Bentson Wire with floppy distal tip is negotiated through the path of least resistance around bowel and omentum to reach the pelvis. Alternatively, when a larger-bore needle (Veress type) is used for entry, a 0.035-in. guide wire can be directly introduced.
Figure 7 —
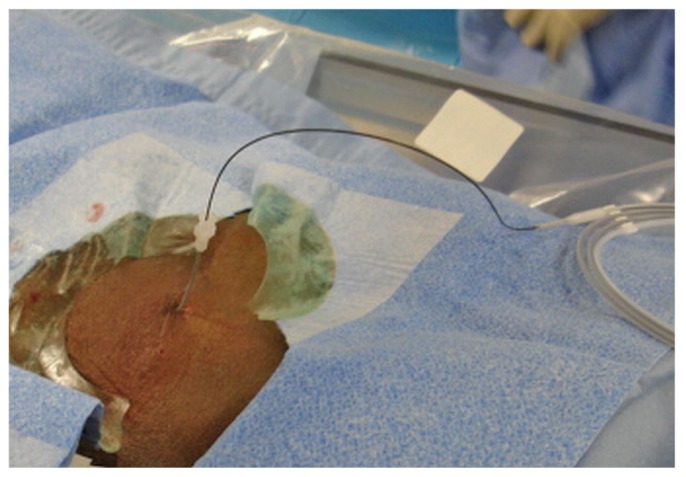
A 0.035-inch stiff glide wire is introduced through the micro-sheath and directed toward the pelvis.
The 0.035-in. wire is ideal because it allows for manipulation around the bowel and is stiff enough to permit catheter traction during final placement. If advancement of the wire down to the pelvic cavity is difficult or problematic because of adhesions from prior surgery, a 4- or 5-French Bernstein or KMP catheter (Slip-Cath Beacon Tip: Cook Medical), together with the stiff guide wire can be used to negotiate a route down into the pelvic cavity. The 4-French microsheath is then exchanged over the wire for a 6-French introducer sheath (Pinnacle: Terumo; Figure 8). Contrast can again be injected through the sidearm of the introducer sheath to confirm the location of the sheath in the peritoneal cavity.
Figure 8 —
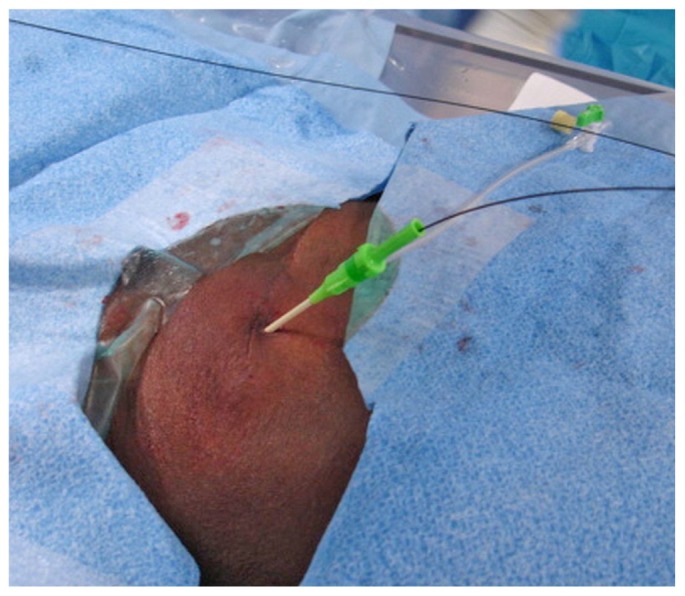
A 6-French introducer sheath is placed over the stiff glide wire.
A 2-cm to 4-cm incision is made at the entry site of the introducer sheath, and blunt dissection down to the rectus abdominis muscle is made using a finger or curved hemostat (Figure 9). To separate the bowel loops and facilitate passage of the catheter into the peritoneum, 300 - 1000 mL of normal saline can be infused through the sidearm of the introducer sheath (Figure 10).
Figure 9 —
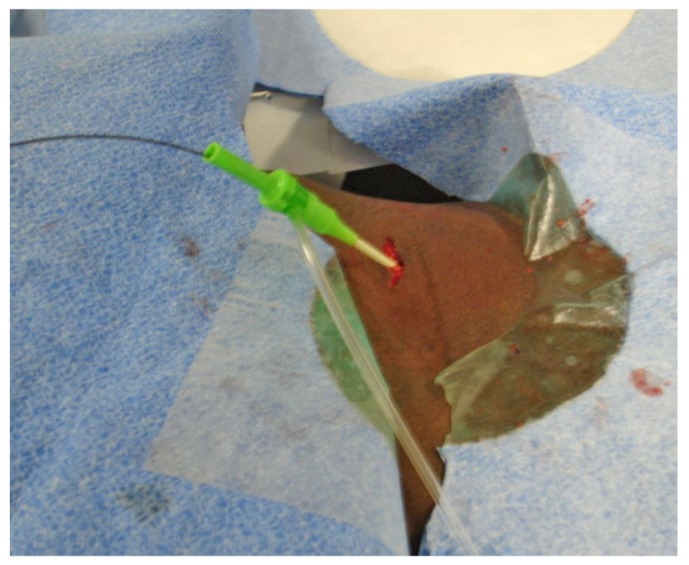
A 2-cm incision is made at the site of entry of the introducer sheath, and then blunt dissection is performed down to the rectus abdominis muscle.
Figure 10 —
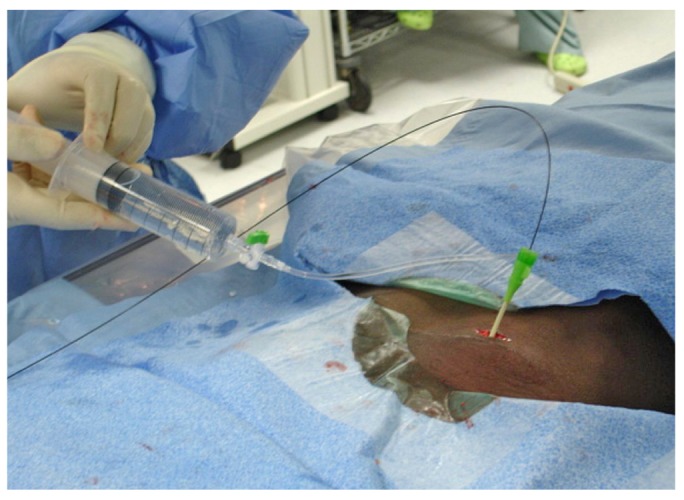
Normal saline is infused through the sidearm of the introducer sheath.
The sheath is then removed, and the tract is serially dilated over the wire with an 8-French, a 12-French, and then a 14-French dilator (hydrophilic coated dilator: Cook Medical; Figure 11). Dilatation should occur under fluoroscopic visualization, and the dilators should be directed caudally toward the pelvic cavity in the same direction as the original needlestick so as to avoid the wire and dilator being pushed into the subcutaneous tissue superficial to the rectus abdominis muscle, rather than through the muscle into the peritoneal cavity.
Figure 11 —
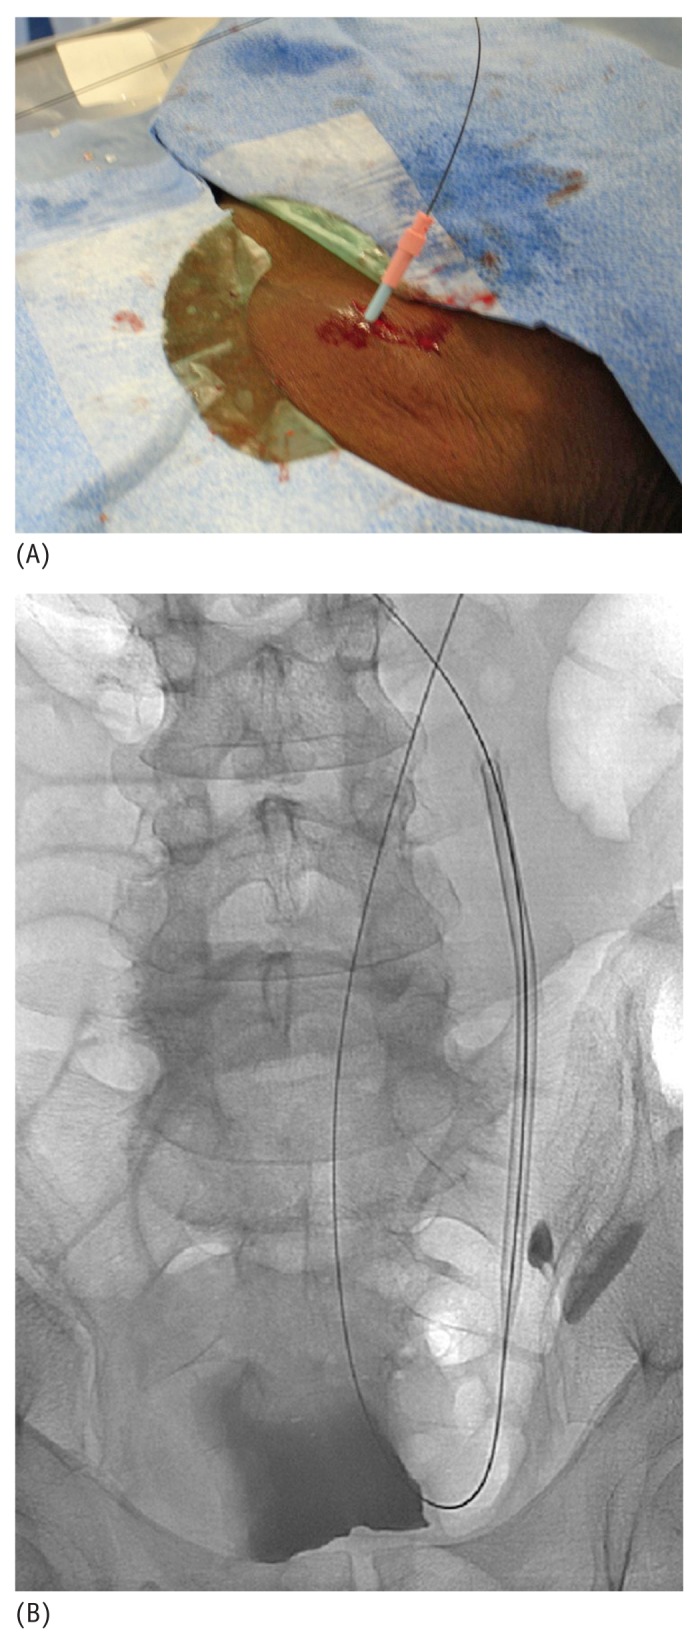
(A) Photographic and (B) fluoroscopic images of the dilatation of the tract using a 12-French hydrophilic dilator over the stiff glide wire.
Some operators do not perform serial dilation, theoretically to create a tighter seal around the catheter and to minimize leakage. Further research is needed to reconcile the dilation and no dilation options.
With or without serial dilation, a 16-French, 15-cm pull-apart sheath (typically included in the peritoneal catheter kit) is advanced into the peritoneal cavity over the wire in the deep pelvic direction (Figure 12).
Figure 12 —
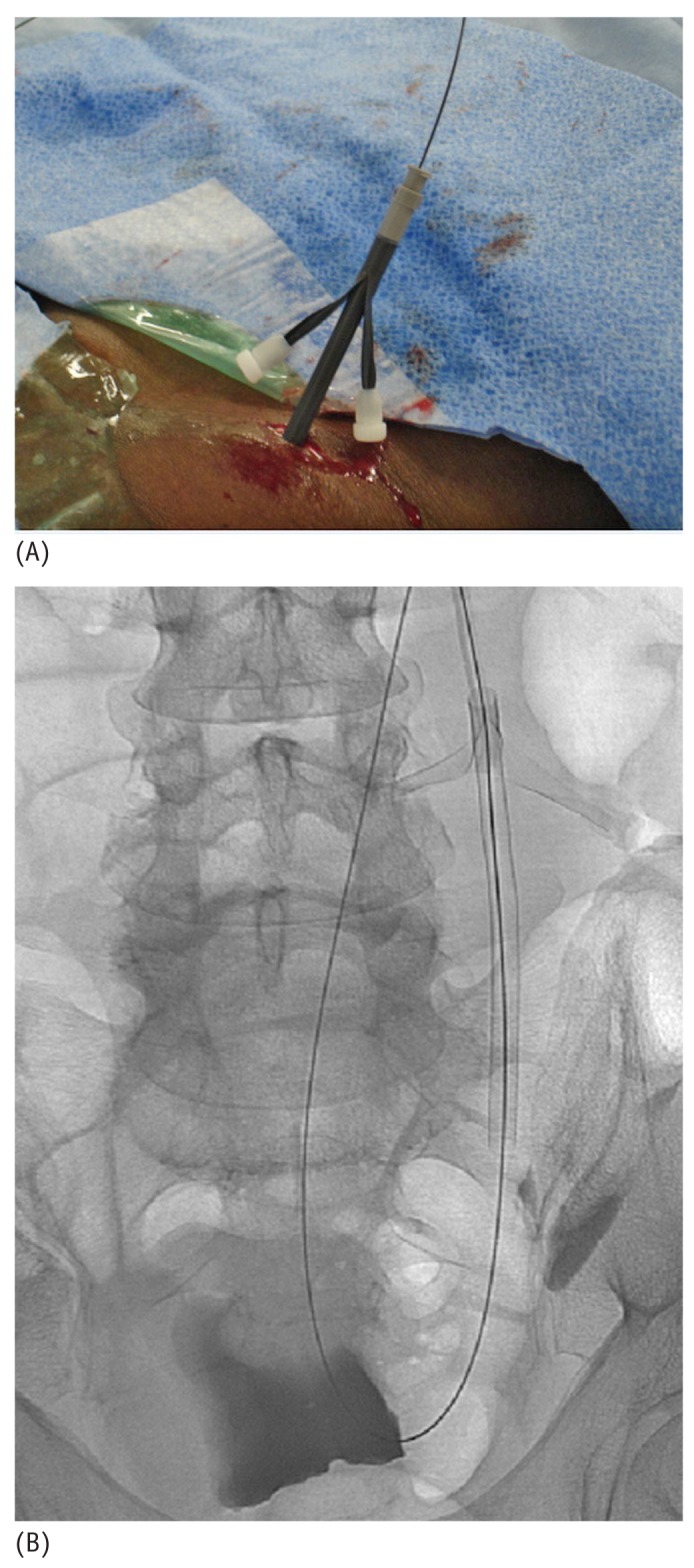
(A) Photographic and (B) fluoroscopic images of a 16-French pull-apart sheath being placed over the stiff glide wire.
The dialysis catheter is then removed from the saline bowl, and after the inner dilator of the sheath has been removed, the curled end of the catheter is advanced over the guide wire within the pull-apart sheath (Figure 13). Catheters have a radio-opaque strip that helps in visually orienting the catheter so as to maintain straight alignment (avoiding twisting) during advancement over the wire. The catheter is advanced until the deep polyester fiber cuff reaches the surface of the rectus abdominis muscle. At this point, the catheter and the sheath are advanced together for 1 cm over the stiff guide wire to ensure that the deep cuff is located within the substance of the rectus abdominis muscle.
Figure 13 —
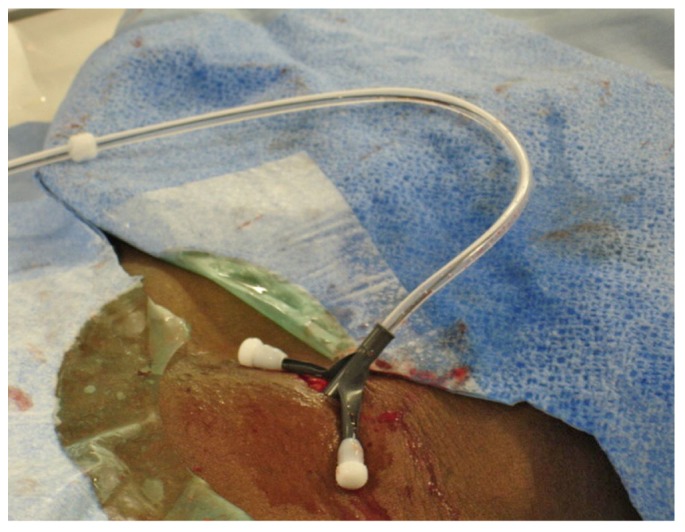
The dialysis catheter is advanced over the stiff glide wire within the pull-apart sheath after removal of the inner sheath dilator.
The next step might require coordination between the primary operating interventionalist and an assistant.
To keep the deep cuff inside the substance of the rectus abdominis muscle, the pull-apart sheath is split and pulled upward by the assistant, while the primary interventionalist uses a curved hemostat or large DeBakey forceps without teeth to apply downward pressure on the peritoneal catheter, holding only the cuff and not the catheter (Figure 14). The deep cuff is typically not sutured into the rectus; however, if urgent-start dialysis is planned, the deep polyester fiber cuff can be sutured to the rectus fascia using 4-0 absorbable suture (Vicryl: Ethicon, San Angelo, TX, USA) (10). Care should be taken to ensure that the suture needle does not puncture the catheter.
Figure 14 —
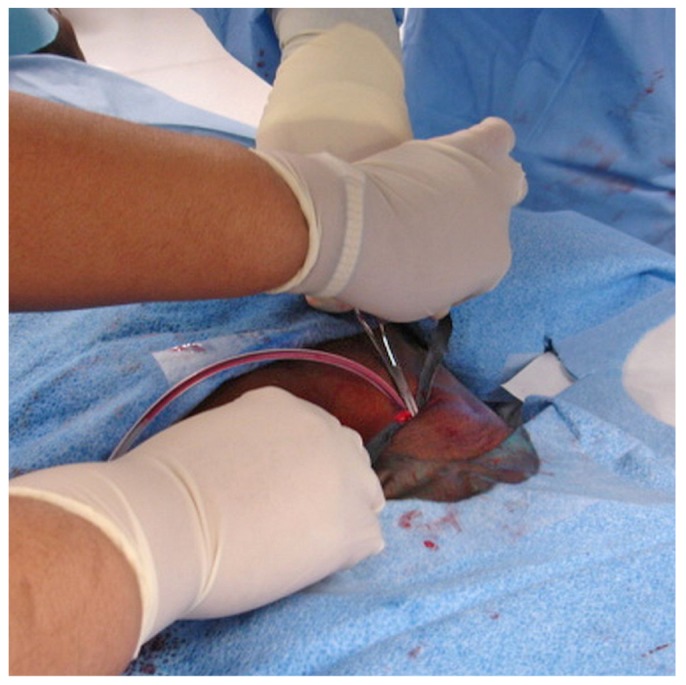
The pull-apart sheath is split and pulled upward by the assistant while the primary interventionalist applies downward pressure on the peritoneal catheter. A curved hemostat is used to keep the deep cuff inside the substance of the rectus abdominis muscle.
The catheter exit site is then anesthetized with 1% lidocaine. The exit site is typically 4 cm lateral and inferior to the original peritoneal entry site. It is important that the catheter, exiting the skin, should be directed in a downward and lateral position to prevent water, perspiration, bacteria, and skin debris from pooling in the exit site at the skin-catheter interface (10). To reduce the chance of subsequent cuff extrusion, the exit site is also chosen so that the superficial cuff is at least 2 - 4 cm away from the skin exit site. A small 5-mm incision is made at the planned exit site, easily performed as a stab incision with a 12 F scalpel. The subcutaneous tissue between the planned exit site and the initial peritoneal entry site, where the catheter will be tunneled, is then also anesthetized with 1% lidocaine.
The proximal end of the catheter is then attached to a tunneling stylet such as the Schon tunneling trochar (Angiodynamics, Queensbury, NY, USA) or the tunneler that is included in the catheter kit. The catheter is tunneled toward the exit site in a gentle lateral-then-inferior arc while manual massage is applied to the tissue overlying the catheter, if needed, to ensure that the catheter extends along the tunnel without kinking. The catheter is brought out of the exit site, leaving the superficial cuff 2 - 4 cm away from the skin exit site. Caution should be exercised during the tunneling process to avoid displacement of the deep polyester fiber cuff from the rectus abdominis muscle.
The catheter adapter, included in the catheter kit, is attached to the outer end of the catheter and 10 mL of nonionic contrast can be injected through the catheter under fluoroscopic visualization to exclude any kink in the subcutaneous catheter tunnel or at the peritoneal entry site, and to confirm the proper location of the curled distal tip within the pelvic portion of the peritoneal cavity (Figure 15).
Figure 15 —
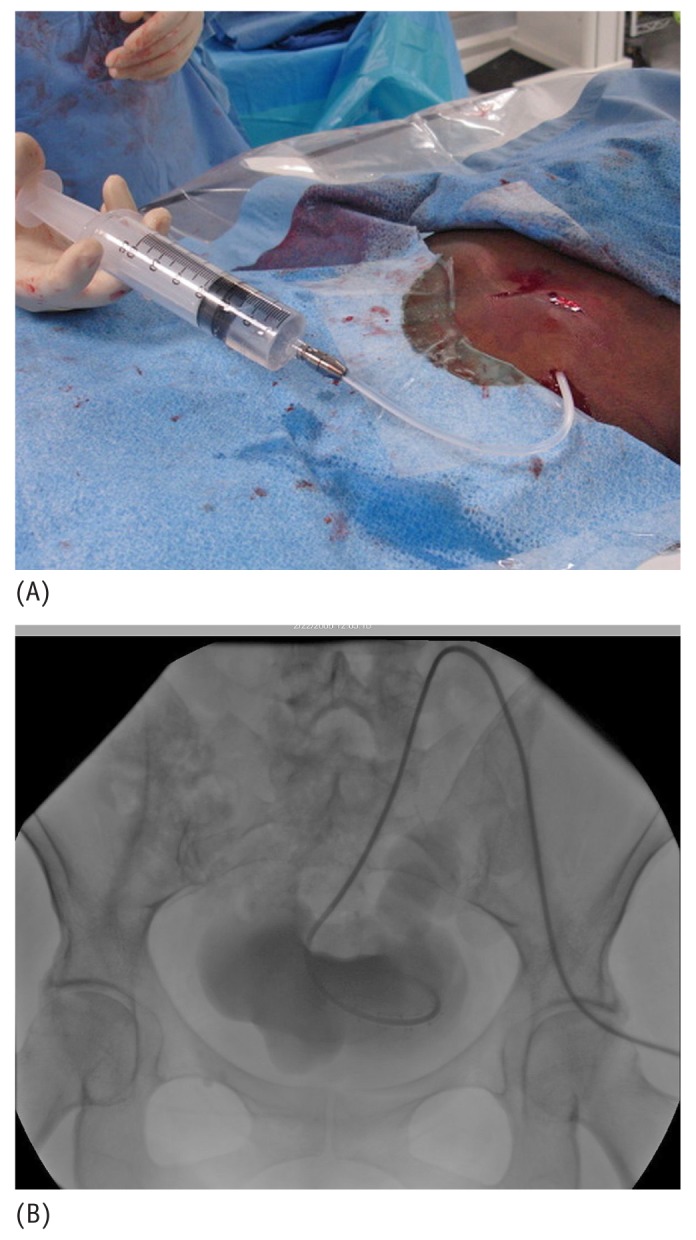
(A) Photographic and (B) fluoroscopic images show nonionic contrast injected through the catheter under fluoroscopic visualization to exclude any catheter kinking in the subcutaneous tunnel or peritoneal entry site, and to confirm the proper location of the curled distal tip within the pelvic portion of the peritoneal cavity.
The catheter should then be tested for functional patency by infusion of up to1 L normal saline to demonstrate free fluid inflow and drainage. A portion of the infused normal saline might be retained in the peritoneal cavity because of the patient’s recumbent position, with pooling of fluid in the deep pelvic gutter. A less time-consuming alternative is to use a single 20-mL infusion of fluid, followed by inspection of the fluid column within the catheter, observing for respiratory variation. If drained fluid is blood-tinged, additional flushing can be performed until the drainage is clear. A post-placement fluoroscopic image is taken to document the final intra-abdominal catheter location.
Incision Closure and Dressing: The entrance incision is closed in 2 layers. The subcutaneous tissue is closed and sutured with 2-0 Vicryl absorbable suture, and then skin closure is performed using 4-0 absorbable suture (Monocryl: Ethicon). Alternatively, the subcutaneous tissue is closed with one layer of 3-0 Monocryl interrupted sutures, and topical skin adhesive (Dermabond: Ethicon) is used for skin closure. Sutures are explicitly avoided at the exit site to avoid infection or tissue necrosis.
An extension catheter, which serves as the transfer set for the dialysis solution provider, is attached to the adapter to close the catheter system and maintain sterile distal capping of the catheter (Figure 16). The catheter and transfer set are entirely covered with gauze and then with a transparent semi-occlusive dressing (Tegaderm: 3M Health Care, St. Paul, MN, USA). The gauze underneath the transparent dressing is important to absorb any moisture and to prevent contact between the catheter and the dressing, which might lead to catheter dislodgement when the dressing is removed before a dialysis session. If the PD catheter is to be used acutely, the transfer set can be excluded from the dressing to allow for easy access to the transfer set cap and to facilitate connection to the dialysate bag or cycler.
Figure 16 —
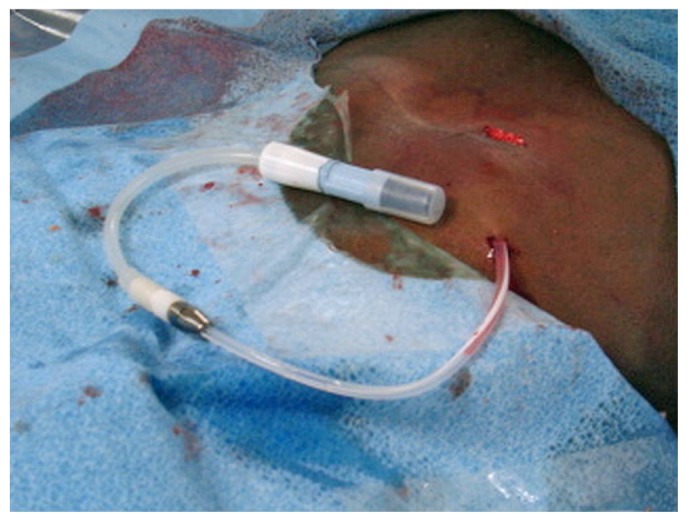
The transfer set (Baxter Healthcare Corporation, Deerfield, IL, USA) is connected to a titanium adapter.
The gauze and dressing initially placed during the procedure should be exchanged at 7 days by a health care provider observing sterile technique and wearing a mask and sterile gloves. The new sterile gauze and semi-occlusive Tegaderm dressing should be reapplied using the technique already described and should be kept in place for an additional 7 days (11). Ideally, this dressing change should be performed by an experienced PD nurse. The catheter exit site and incision are cleaned only with normal saline. Betadine and hydrogen peroxide solutions should be avoided because of their cytotoxicity.
After 2 weeks, exit-site care by the patient can be initiated using prophylaxis with mupirocin cream or gentamicin (12,13). Immersion bathing is prohibited for 21 days; sponge baths are permitted. The exit site should be kept dry until complete healing, which typically occurs after 21 days. Heavy lifting (more than 5 kg) should be avoided for 4 weeks after the procedure to prevent dislodgment of the deep cuff from the rectus abdominis muscle.
Discussion
In developing countries, the socioeconomic status of patients and the accessibility of the medical system, medical insurance, and equipment have favored PD over hemodialysis (HD). In certain countries—such as Hong Kong, where PD is the dominant dialysis modality and 80% of the end-stage renal disease population is on PD therapy—PD outcomes appear to be similar to or even better than HD outcomes (14,15). Many studies have shown an early survival advantage for PD over HD in the first 2 years of therapy, with equivalent outcomes to 5 years (16-20). Moreover, although overall survival on dialysis therapy has been improving over time, Mehrotra et al. dispelled the perception that increasing age, comorbid conditions, and body mass index of the dialysis population are contraindications to PD use (21).
Placement of the PD catheter can be performed in the operating room by surgeons or in radiology suites and outpatient procedure centers using minimally-invasive techniques. Surgical placement has evolved from simple open laparotomy to basic and advanced laparoscopic techniques that include tunneling of catheter segments within the rectus muscle sheath, adhesiolysis, and omentopexy (5). Percutaneous techniques have included blind placement using a rigid trochar or a modified Seldinger technique, and the use of a peritoneoscope (3). The Seldinger technique has evolved to include initial ultrasound guidance for the introducer needle and subsequent fluoroscopic guidance for guidewire placement and catheter positioning (6). Successful catheter placement has been described with all the foregoing techniques, and ultimate outcomes may largely depend on the experience and skill of the operator.
Placement of the PD catheter by interventional radiologists has been advocated as a cost-effective, efficient, and safe procedure (22). Placement of the catheter by IR allows for certain operational efficiencies by avoiding the need for an initial surgical consultation, operating room scheduling, recovery room time, and involvement of an anesthesiologist. It also offers reduced hospital costs, because the procedure can be performed on an outpatient basis, thereby reducing the hospital stay. It also obviates the need for preoperative anesthesia evaluation and work-up.
The procedure still carries the risk of tunnel infection and peritonitis, bowel perforation, major and minor leaks, and primary catheter dysfunction (23). However, several publications reporting on catheter outcomes have documented similar outcomes for catheters placed by traditional surgical techniques and by IR using fluoroscopic imaging techniques. Recently, Voss and colleagues (24) reported on 113 catheter insertions randomly assigned to laparoscopic placement under general anesthesia by a surgeon or to fluoroscopy-guided placement under local anesthesia by an interventional radiologist. The endpoint was a composite: complication-free survival (including all mechanical and infectious complications) by day 365. The authors also assessed the occurrence of catheter removal, death from any cause, pain during the procedure, time required for the procedure, time required in the procedure room, length of admission, and direct hospital costs. Complication-free catheter survival was reported to be superior in the IR group compared with the surgical group. Hospital costs were significantly reduced in the IR group. The authors concluded that PD catheter placement by IR was a clinically non-inferior and cost-effective alternative to traditional surgical catheter placement.
Rosenthal and colleagues (25) compared 1-year outcomes for 52 fluoroscopically placed and 49 surgically placed catheters. Although the differences in complication rates between the two techniques did not reach statistical significance, a trend toward greater leakage, malfunction, malposition, and bleeding was noted in the surgical group. Additional reports suggest equivalency of outcomes for the traditional surgical and percutaneous techniques (26,27). Only the newer (and less utilized) advanced laparoscopic placement techniques appear to have outcomes superior to those reported for fluoroscopically placed catheters (4).
Placement of PD catheters by IR can often be obtained on an urgent basis in the late-referred chronic kidney disease patient. Typically, late-referred patients, even those felt to be suitable for PD, are initiated on HD with a temporary vascular access because of an inability to obtain an urgent surgical PD catheter placement. Temporary vascular catheters are associated with a high risk of bacteremia, sepsis, hospitalization, and replacement because of nonfunction (28). In the late-referred patient, initiating dialysis with a PD catheter can allow for a single procedure to suffice for short- and long-term access. Radiologic placement of an urgent PD catheter in late-referred patients was recently described in a publication from University of Southern California, Los Angeles County General hospital (23). In that publication, Ghaffari described an urgent-start PD program created as a quality improvement pathway to assist in avoiding the use of temporary vascular-access catheters in patients presenting with advanced chronic kidney disease and deemed to be suitable PD candidates. An increasing number of urgent-start PD programs have been created in the United States in an attempt to reduce the number of temporary vascular catheter placements in patients felt to be PD candidates. In developing countries, the unavailability of ultrasonography and fluoroscopy machines, which are sometimes operated by different specialties, and the unavailability of an aseptic environment in which to perform PD catheter placement represent a huge challenge to the interventional radiologist and may hinder the development of urgent-start PD programs.
Earlier reports on PD catheter placements by IR come from single centers (6,7). Other single-center reports describe IR repositioning of migrated and dysfunctional PD catheters (29,30). Increasing the involvement of IR in PD catheter placement might offer a cost-effective approach to management of PD patients. Our report combines the knowledge of 5 interventional radiologists from across the United States who have extensive experience in the placement of PD catheters. Pooled experiences were integrated into a consensus document that the authors believe could be representative of current best practices for PD catheter placement by IR. These general approaches to initial patient evaluation, catheter selection, catheter site marking, and placement technique are described with particular attention to use of ultrasound guidance to confirm access to the peritoneum and fluoroscopic guidance to confirm placement of the distal catheter into the pelvis.
Several issues and technical variations that might have an effect on clinical outcome could not be resolved by the authors or existing publications. Whether IR catheter placement on the left or right side of the abdomen affords greater technical success is unknown. The catheter side and exit site are currently determined according to patient preference, anatomic landmarks, or operator preference more than according to current outcomes data. Additionally, no consensus could be reached on catheter length: some operators use a 57-cm length; others, a 62.5-cm length. Further research is required into outcomes based on catheter length. Variations in the device used for needle access to the peritoneum, followed by sheath placement over a wire, were noted and can be considered technically equivocal in allowing for an eventual Seldinger technique of catheter placement and subsequent tunneling through the subcutaneous tissue. Use of contrast injections can help in catheter localization, but use of contrast at various steps in the placement process was variable. Infusion of heparinized saline as a catheter locking solution was performed by some, but not all, operators. Normal saline flushes after catheter placement to ensure proper function of the catheter were performed using various volumes of saline, with no consensus on the amount infused. However, post-placement catheter care was consistent with published guidelines (11).
Summary
This report represents a multicenter consensus protocol for current perceived best practices in the insertion of PD catheters by IR. Placement of the PD catheter by interventional radiologists is a cost-effective, minimally-invasive alternative to traditional surgical placement in the operating room under general anesthesia. In many centers, this alternative might offer a more expeditious way to schedule and place PD access. Placement by IR under ultrasonographic and fluoroscopic guidance offers enhanced safety and confirmation of catheter placement into the pelvis. In the late-referred end-stage renal disease patient, catheter placement by IR might allow for urgent initiation of PD and avoidance of temporary vascular access catheters.
Disclosures
SG is an employee of Baxter Healthcare Corporation, and AKAA is a consultant for Baxter Healthcare Corporation. All other authors have no financial conflicts of interest to declare.
References
- 1. United States, Department of Health and Human Services, National Institutes of Health, National Institute of Diabetes and Digestive and Kidney Diseases, US Renal Data System (USRDS). USRDS 2010 Annual Data Report: Atlas of Chronic Kidney Disease and End-Stage Renal Disease in the United States. Bethesda, MD: USRDS; 2010. [Google Scholar]
- 2. Golper TA, Guest S, Glickman JD, Turk J, Pulliam JP. Home dialysis in the new USA bundled payment plan: implications and impact. Perit Dial Int 2011; 31:12–16 [DOI] [PubMed] [Google Scholar]
- 3. Ash SR. Chronic peritoneal dialysis catheters: overview of design, placement, and removal procedures. Semin Dial 2003; 16:323–34 [DOI] [PubMed] [Google Scholar]
- 4. Crabtree JH, Fishman A. A laparoscopic method for optimal peritoneal dialysis access. Am J Surg 2005; 71:135–43 [DOI] [PubMed] [Google Scholar]
- 5. Crabtree JH, Burchette RJ. Effective use of laparoscopy for long-term peritoneal dialysis access. Am J Surg 2009; 198:135–41 [DOI] [PubMed] [Google Scholar]
- 6. Abdel-Aal AK, Gaddikeri S, Saddekni S. Technique of peritoneal catheter placement under fluoroscopic guidance. Radiol Res Pract 2011; 2011:141707 [DOI] [PMC free article] [PubMed] [Google Scholar]
- 7. Reddy C, Dybbro PE, Guest S. Fluoroscopically guided percutaneous peritoneal dialysis catheter placement: single center experience and review of the literature. Ren Fail 2010; 32:294–9 [DOI] [PubMed] [Google Scholar]
- 8. Savader SJ. Percutaneous radiologic placement of peritoneal dialysis catheters. J Vasc Interv Radiol 1999; 10:249–56 [DOI] [PubMed] [Google Scholar]
- 9. Savader SJ, Geschwind JF, Lund GB, Scheel PJ. Percutaneous radiologic placement of peritoneal dialysis catheters: long-term results. J Vasc Interv Radiol 2000; 11:965–70 [DOI] [PubMed] [Google Scholar]
- 10. Crabtree JH, Burchette RJ. Prospective comparison of downward and lateral peritoneal dialysis catheter tunnel-tract and exit-site directions. Perit Dial Int 2006; 26:677–83 [PubMed] [Google Scholar]
- 11. Dombros N, Dratwa M, Feriani M, Gokal R, Heimbürger O, Krediet R, et al. on behalf of the EBPG Expert Group on Peritoneal Dialysis. European best practice guidelines for peritoneal dialysis. 3 Peritoneal access. Nephrol Dial Transplant 2005; 20(Suppl 9):ix8–ix12 [DOI] [PubMed] [Google Scholar]
- 12. Bernardini J, Bender F, Florio T, Sloand J, Palmmontalbano L, Fried L, et al. Randomized, double-blind trial of antibiotic exit site cream for prevention of exit site infection in peritoneal dialysis patients. J Am Soc Nephrol 2005; 16: 539–45 [DOI] [PubMed] [Google Scholar]
- 13. Piraino B, Bernardini J, Brown E, Figueiredo A, Johnson DW, Lye WC, et al. ISPD position statement on reducing the risks of peritoneal dialysis-related infections. Perit Dial Int 2011; 31:614–30 [DOI] [PubMed] [Google Scholar]
- 14. Yu AW, Chau KF, Ho YW, Li PK. Development of the “peritoneal dialysis first” model in Hong Kong. Perit Dial Int 2007; 27(suppl 2):S53–5 [PubMed] [Google Scholar]
- 15. Li PK, Szeto CC. Success of the peritoneal dialysis programme in Hong Kong. Nephrol Dial Transplant 2008; 23:1475–8 [DOI] [PubMed] [Google Scholar]
- 16. Vonesh EF, Snyder JJ, Foley RN, Collins AJ. The differential impact of risk factors on mortality in hemodialysis and peritoneal dialysis. Kidney Int 2004; 66:2398–401 [DOI] [PubMed] [Google Scholar]
- 17. Heaf JG, Lokkegaard H, Madsen M. Initial survival advantage of peritoneal dialysis relative to hemodialysis. Nephrol Dial Transplant 2002; 17:112–17 [DOI] [PubMed] [Google Scholar]
- 18. Fenton SS, Schaubel DE, Desmeules M, Morrison HI, Mao Y, Copleston P, et al. Hemodialysis versus peritoneal dialysis: a comparison of adjusted mortality rates. Am J Kidney Dis 1997; 30:334–42 [DOI] [PubMed] [Google Scholar]
- 19. Jaar BG, Coresh J, Plantinga LC, Fink NE, Klag MG, Levey AS, et al. Comparing the risk for death with peritoneal dialysis and hemodialysis in a national cohort of patients with chronic kidney disease. Ann Intern Med 2005; 143:174–83 [DOI] [PubMed] [Google Scholar]
- 20. Weinhandl ED, Foley RN, Gilbertson DT, Arneson TJ, Snyder JJ, Collins AJ. Propensity-matched mortality comparison of incident hemodialysis and peritoneal dialysis patients. J Am Soc Nephrol 2010; 21:499–506 [DOI] [PMC free article] [PubMed] [Google Scholar]
- 21. Mehrotra R, Kermah D, Fried L, Kalantar-Zadeh K, Khawar O, Norris K, et al. Chronic peritoneal dialysis in the United States: declining utilization despite improving outcomes. J Am Soc Nephrol 2007; 18:2781–8 [DOI] [PubMed] [Google Scholar]
- 22. Brunier G, Hiller JA, Drayton S, Pugash RA, Tobe SW. A change to radiological peritoneal dialysis catheter insertion: three-month outcomes. Perit Dial Int 2010; 30:528–33 [DOI] [PubMed] [Google Scholar]
- 23. Ghaffari A. Urgent-start peritoneal dialysis: a quality improvement report. Am J Kidney Dis 2012; 59:400–8 [DOI] [PubMed] [Google Scholar]
- 24. Voss D, Hawkins S, Poole G, Marshall M. Radiological versus surgical implantation of first catheter for peritoneal dialysis: a randomized non-inferiority trial. Nephrol Dial Transplant 2012; 27:4196–204 [DOI] [PubMed] [Google Scholar]
- 25. Rosenthal MA, Yang PS, Liu IA, Sim JJ, Kujubu DA, Rasgon SA, et al. Comparison of outcomes of peritoneal dialysis catheters placed by the fluoroscopically guided percutaneous method versus directly visualized surgical method. J Vasc Interv Radiol 2008; 19:1202–7 [DOI] [PubMed] [Google Scholar]
- 26. Medani S, Shantier M, Hussein W, Wall C, Mellotte G. A comparative analysis of percutaneous and open surgical techniques for peritoneal catheter placement. Perit Dial Int 2012; 32:628–35 [DOI] [PMC free article] [PubMed] [Google Scholar]
- 27. Georgiades CS, Geschwind JF. Percutaneous peritoneal dialysis catheter placement for the management of end-stage renal disease: technique and comparison with the surgical approach. Tech Vasc Interv Radiol 2002; 5:103–7 [DOI] [PubMed] [Google Scholar]
- 28. Vats HS. Complications of catheters: tunneled and nontunneled. Adv Chronic Kidney Dis 2012; 19:188–194 [DOI] [PubMed] [Google Scholar]
- 29. Miller M, McCormick B, Lavoie S, Biyani M, Zimmerman D. Fluoroscopic manipulation of peritoneal dialysis catheters: outcomes and factors associated with successful manipulation. Clin J Am Soc Nephrol 2012; 7:795–800 [DOI] [PMC free article] [PubMed] [Google Scholar]
- 30. Savader SJ, Lund G, Scheel PJ, Prescott C, Feeley N, Singh H, et al. Guide wire directed manipulation of malfunctioning peritoneal dialysis catheters: a critical analysis. J Vasc Inter Radiol 1997; 8:957–63 [DOI] [PubMed] [Google Scholar]


