

Abstract
Quantitative single-cell time-lapse microscopy is a powerful method for analyzing gene circuit dynamics and heterogeneous cell behavior. We describe the application of this method to imaging bacteria by using an automated microscopy system. This protocol has been used to analyze sporulation and competence differentiation in Bacillus subtilis, and to quantify gene regulation and its fluctuations in individual Escherichia coli cells. The protocol involves seeding and growing bacteria on small agarose pads and imaging the resulting microcolonies. Images are then reviewed and analyzed using our laboratory's custom MATLAB analysis code, which segments and tracks cells in a frame-to-frame method. This process yields quantitative expression data on cell lineages, which can illustrate dynamic expression profiles and facilitate mathematical models of gene circuits. With fast-growing bacteria, such as E. coli or B. subtilis, image acquisition can be completed in 1 d, with an additional 1–2 d for progressing through the analysis procedure.
Introduction
Numerous gene expression assays have been developed in biology; however, quantitative fluorescence time-lapse microscopy (QFTM) is the only current method for monitoring gene expression in single cells through time. It is becoming clear that this level of analysis is required to understand the mechanism, dynamics and function of bacterial gene circuits. Individual bacterial cells can display great variability in gene expression, even in an isogenic population under uniform environmental conditions1. This phenotypic heterogeneity can be functional2,3. For example, cell populations can ‘bet-hedge’ against future unpredictable environmental changes by ensuring that not all cells exist in the same transcriptional state4–6. Cell lysate- or population-based methods for measuring gene expression or other cellular activity ‘average out’ responses and overlook these behaviors7,8.
The development of genetically encoded fluorescent proteins (FPs), such as green fluorescent protein (GFP)9,10, has enabled researchers to monitor gene expression successfully at the single-cell level with high temporal resolution. FPs are ideal for reporting on promoter activity or, as protein fusions, providing information on protein concentration or localization. Their toxicity to cells is generally low, which allows researchers to use them under a wide range of environmental conditions without affecting the response under study. Notably, spectral variants of GFP11–13 allow researchers to use multiple reporters simultaneously within the same cell, facilitating the study of genes and proteins connected in the same network14–16.
Our laboratory's early efforts at acquiring QFTM data sets were labor intensive, requiring the researcher to continuously focus on the same cells, correct for stage movement and acquire the images manually for hours at a time17. The development of automated computer control of autofocus, stage and imaging devices increased the speed of imaging during experiments, facilitating comparisons between different strains and conditions. This innovation enabled us to characterize synthetic and natural genetic networks, how they behave and what elements are integral to their behavior14–21. Recently, the development of fast, accurate, continuous-focusing modules from major microscope manufacturers has further increased our throughput of data acquisition.
For the protocol described here, we focus on the imaging of bacteria under agarose pads and the analysis of the resulting images using our laboratory's custom MATLAB code14,17. The growth of bacteria in this protocol is readily achieved with general laboratory supplies, in contrast to microfluidic growth chambers22 that require specialized equipment. We have successfully performed time-lapse fluorescence microscopy with E. coli and B. subtilis using this method15,18–21. Other laboratories have imaged other bacterial species successfully6,23, and thus the method described below should work for other microbial organisms as well, with some adaptation. The equipment list below describes our laboratory's imaging system, but many other imaging setups would perform adequately (see Experimental design). More generally, other microbial organisms may require other equipment to maintain growth conditions, such as an additional chamber to control atmospheric conditions.
The slide preparation technique used in this protocol is our preferred method of growing bacteria for QFTM. With small agarose pads, several independent strains or conditions can be tested in the same experiment. The pad thickness allows for sufficient air exchange while providing enough medium for near–steady-state conditions. In addition, as the top of the pad is accessible, small-molecule inducers or chemical perturbations can be added easily as the bacteria are growing. Other slide preparation protocols have been developed in other laboratories6,24; however, the overall concept is very similar. In some instances, small differences in protocol can influence cell growth. Thus, it may be prudent to try a different slide preparation if bacterial growth proves to be extremely difficult.
With a pad-based protocol, there are some limitations. Apart from adding inducers/chemicals to the pad, it is challenging to change cell conditions arbitrarily without additional equipment. Robert et al.25 used a hybrid microfluidic device coupled with an agarose pad to change conditions quickly and precisely. Commercial microfluidic systems exist (CellASIC) that restrict cell movement, such as the agarose pad, and also allow for rapid medium exchange. Finally, as all these protocols rely on microcolony growth, tracking of cell lineages for arbitrarily long timescales is not practically possible because the microcolony grows beyond the camera imaging area. The Jun laboratory has overcome this limitation with a custom microfluidic system22; however, the creation of such chambers may be difficult for many research groups.
We have generated a free, publically available MATLAB analysis package, Schnitzcells, which was specifically designed to analyze QFTM gene expression data from bacteria; however, there are other software packages that are similarly designed and which may contain different functionalities that are beneficial for specific applications. For example, MicrobeTracker26 (Emonet Lab, Yale) is an analysis package that has built-in functions for finding localized fluorescence. Thus, it may be helpful to try different analysis packages on image data to determine, which is optimal. For this protocol, we recommend using our analysis package, Schnitzcells, which can be found at http://cell.caltech.edu/schnitzcells/, with associated video tutorials and documentation. Schnitzcells was developed initially for analyzing gene expression, and thus this protocol focuses on designing experiments toward that end. More generally, the imaging protocol can be used to generate QFTM data for a variety of purposes, including studying protein localization or tracking morphogenic changes such as bacterial sporulation. Such analysis routines are not included in Schnitzcells, but they can be written and integrated with the package.
Experimental design
Fluorescent reporter design
Before imaging, it is important to carefully design the fluorescent reporter constructs used for the study. Although a full consideration of FPs is beyond the scope of this protocol, it is important to understand the properties necessary to optimize for successfully measuring dynamic multigene expression27,28. In particular, it is desirable to choose FPs with minimal spectral overlap and high photostability. In our laboratory, we typically use Citrine (yellow FP) and Cerulean (cyan FP) to report on different genes of interest because of their nonspectral overlap, their fast maturation and their relative brightness (Citrine especially). We have recently used mCherry (red FP) as a reporter for a housekeeping promoter. This serves a dual purpose: (i) it allows a ratiometric comparison of yellow FP or cyan FP changes relative to a housekeeping gene and (ii) it is expressed in all healthy cells in a homogenous manner, allowing us to segment the cells using this channel. This improves the quality and speed of segmentation compared with the use of phase-contrast images for this purpose.
Another important consideration is whether to use a promoter or a protein fusion reporter. We commonly use promoter-FP fusions to report on gene expression, using optimized ribosome-binding sites to increase reporter expression. For B. subtilis and E. coli, this involves taking a sequence 200–500 bp upstream of the gene of interest (without the endogenous ribosome-binding site) and cloning it 5′ of the chosen FP. These reporters are minimally invasive, as endogenous proteins are not affected directly. Protein-FP fusions are useful if a direct measurement of protein concentration is required. With these constructs, controls that examine fusion protein function are necessary for proper interpretation.
In many cases, integrating the reporter into the chromosome is the most conservative method of measuring gene expression. Chromosomal constructs may be more indicative of endogenous gene expression than multicopy reporter constructs, as plasmid copy number variation is avoided. However, reporter constructs on multicopy plasmids may be desirable, such as when reporter signal is low. In cases in which plasmids are desired or unavoidable, it may be important to consider plasmid copy number in the design stage. Lower-copy plasmids may be less toxic to cells and cause fewer growth effects when multiple constructs are combined.
Other microscopy systems
This protocol can be adapted for other microscopy systems, although loss of throughput and convenience can be major consequences. The use of an upright microscope should present few barriers, as there is no liquid growth medium and the agarose pads adhere to the cover glass quite firmly. The stage insert we designed holds the imaging dish firmly in place without clips or springs, and is fully capable of holding the dish in an inverted position (Fig. 1). A nonmotorized microscope (manual z-axis control) or nonmotorized stage presents an inconvenient barrier, but one that can be overcome with simple, albeit tedious, manual control. For each position, the experimenter would need to center the growing microcolony and ensure precise focus. Precise xy return is not completely necessary, as the software will correct for this, but precise focus is absolutely essential. A series of phase and fluorescence images would need to be taken, without unnecessary fluorescent exposure to the cells. Thus, the use of high-speed shutters (or other light actuation methods) and sensitive CCD cameras cannot be avoided.
Figure 1.
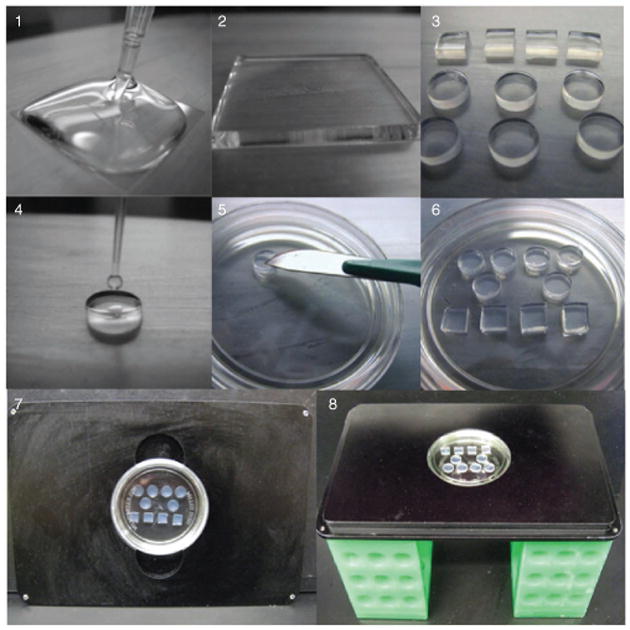
Slide preparation. (1) Melted agarose is pipetted onto a cover glass (22 mm2). (2) Two cover glasses make an agarose ‘sandwich’ of even thickness. (3) Smaller agarose pads are cut from a larger pad. (4) Bacteria are loaded on top of the pads. (5) After drying, pads are flipped and transferred to an imaging dish. (6) Many pads can be loaded on a single dish. (7) After sealing with Parafilm or grease, the dish is placed into a custom stage insert that holds the dish tightly. (8) When manufactured precisely, the stage insert can be turned upside down without the dish falling out, thereby allowing imaging with an upright microscope.
Other bacterial species
Our laboratory has used this protocol most successfully with rod-shaped bacteria, including E. coli and B. subtilis, and we expect that the protocol should allow the imaging of a variety of bacteria. The Schnitzcell analysis software may require some optimization for each experimental system. In particular, altering the segmentation parameters may be necessary for other bacteria.
Controls
Autofluorescence
For each experimental condition, a strain without FP should be imaged under movie conditions to measure each channel's cell autofluorescence. If conditions are consistent from day to day and lamp intensities are corrected for, this control can be performed infrequently to ensure that autofluorescence has not changed. In general, we have found autofluorescence to be more problematic at shorter wavelengths.
Phototoxicity
Growth rate should be compared between micro-colonies growing with and without fluorescent light exposure. If growth impairment is strong, consider reducing exposure time, reducing imaging frequency, optimizing filters or using different reporters.
Maturation time
Maturation times of FPs can be crucial if the experiment calls for measuring fast dynamic events. One simple method of measuring maturation involves the addition of a nonlytic translational inhibitor, such as chloramphenicol, to cells constitutively expressing an FP. Any increase in fluorescence should result from FP maturation, and not additional protein production. By monitoring this increase over time, a working maturation time for each FP can be measured.
Photobleaching
This can be measured with similar techniques. With the addition of a translational inhibitor and after full protein maturation, consecutive fluorescent images can be taken and a photobleaching curve can be measured. Although it is impossible to avoid all photobleaching, the degree to which it is acceptable will depend on the experiment.
Image analysis program design
A basic image analysis program for QTFM should include several features. The software should (i) allow images of different bacteria and sources; (ii) create accurate, robust cell segmentation masks quickly and with limited manual input; (iii) similarly track cells and cell division events; (iv) provide data that are organized and easily plotted; and (v) allow users to customize additional routines for analysis. Schnitzcells accomplishes each of these tasks using a set of sequential functions within the MATLAB environment. Cell segmentation is performed automatically first, and then it is user reviewed. After segmentation, tracking29 is performed similarly through another routine. Image data are then extracted and stored within a single data structure that can then be used for subsequent plots or additional analysis.
Materials
Reagents
Low-melt agarose (EMD OmniPur low-melting agarose, EMD cat. no. 2070)
-
Bacterial medium (specific to bacteria and condition of interest)
▲ CRITICAL We recommend using a defined minimal medium, minimizing autofluorescent compounds in order to maximize reporter signal. In particular, yeast extract should be avoided.
Low-autofluorescence oil (we recommend type DF or FF for Nikon PFS-equipped Ti-E microscopes; for Olympus microscopes, type F oil is recommended)
Cover glass–bottom dishes (we recommend WillCo-dishes, WillCo Wells, http://www.willcowells.com/). Alternatively, a cost-effective solution is to use a large cover glass (e.g., 24 mm × 60 mm), and create a sealed chamber for the agarose pads using a sealant, such as melted wax or any similar compound. Other laboratories use slightly different techniques for making agarose pads6,24, but the concept is similar
Fluorescent beads (Invitrogen, cat. no. T-7281) for correcting for lamp intensity fluctuations
Optional: biopsy punches (Miltex, cat. no. 33-36; these allow for defined-size agarose pads, which allow for adding small-molecule inducers to pads in a reproducible manner)
M9 minimal medium
Spizizen's minimal medium
Equipment
Computer (for control of microscope acquisition, installed with software that can coordinate control of microscope stage, focus, filter wheel, shutters and cameras)
Imaging station (see EQUIPMENT SETUP and Fig. 2)
Scalpels (no. 10 blades preferred)
Cover glass (22 mm2; no. 1 preferred)
Inverted microscope
Motorized filter turret
LambdaLS Xenon light source (300 W, Sutter Instruments)
Liquid light guide (Sutter Instruments)
Coolsnap HQ2 camera (Roper Scientific)
SmartShutter (Sutter Instruments)
Spectrophotometer
MATLAB (MathWorks)
MetaMorph (Molecular Devices)
Andor iQ (Andor Technology)
ImageJ software (http://rsbweb.nih.gov/ij/)
μManager (UCSF)
Motorized xy stage (ASI, cat. no. MS2000)
Antivibration table
Parafilm (Pechiney)
Sealing grease
Figure 2.
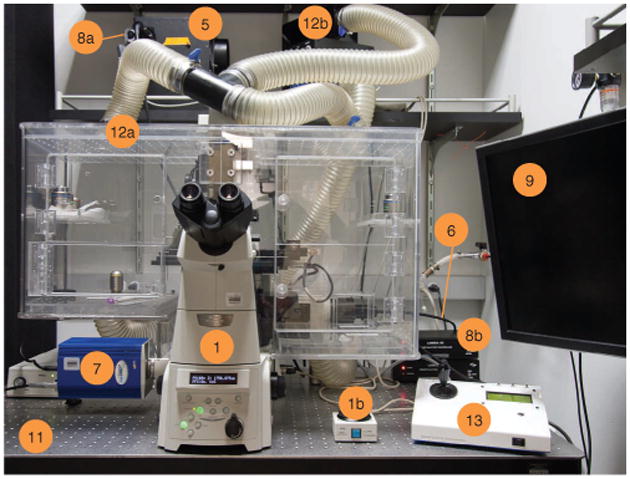
Microscope station for time-lapse microscopy. The numbers correspond to numbers in the EQUIPMENT SETUP list. Some items on the list are not visible and are not numbered. (1) Inverted microscope with motorized Z drive. (1b) Nikon PFS manual controller. (5) Light source for epifluorescence. (6) Liquid light guide. (7) High-resolution, high-sensitivity CCD camera. (8a) Fast epifluorescence shutter. (8b) Shutter controllers. (9) Controlling computer. (11) Antivibration table. (12a,b) Temperature-controlled enclosure (12a) with heater (12b). (13) Motorized xy stage controller.
Reagent Setup
Preparation of agarose pads
To 10 ml of liquid bacterial medium in a 50-ml polypropylene conical tube, add 1.5% (wt/vol) low-melt agarose (0.15 g) and dissolve by microwaving and vortexing carefully. The medium will be specific to each organism used. We have used M9 minimal medium for E. coli and Spizizen's minimal medium30 for B. subtilis, using glucose as the carbon source in both. If the experiment requires addition of compounds to the pad that are heat sensitive, they can be added after the agarose cools but immediately before forming the agarose pads, provided that the volume of the added compounds does not substantially lower the final agarose concentration ▲ CRITICAL Agarose medium should be freshly prepared for each day of data acquisition and should not be reheated from a previously made agarose solution. ▲ CRITICAL Regular agarose is not a suitable substitute for low-melt agarose.
We have found that spreading Parafilm on a flat surface, such as a benchtop or glass surface, is useful as a working surface for manipulating agarose pads. After a few minutes of cooling, pipette 1 ml of agarose onto a 22-mm2 cover glass slide. Immediately after pipetting, place another cover glass on top of the agarose to create an agarose sandwich in between the two slides, avoiding and removing air bubbles. Ideally, the surface tension of the hot agarose mixture will align the cover glasses on top of one another and even out the thickness of the agarose.
Allow the pads to solidify for 45–60 min at room temperature (∼20 °C) before seeding bacteria onto pads (as described in PROCEDURE Step 3). We have found it helpful to cover the agarose with a lid to prevent edge evaporation. This allows us to use agarose pads up to 6 h after casting them. As the pads become older, evaporation will tend to increase background fluorescence of the pads (see Fig. 1 and Supplementary Video 1).
Equipment Setup
Imaging station setup
We understand that the model system described below may not be available, and we have tried to indicate alternatives when possible. The imaging station setup includes the following items; numbers refer to objects in Figure 2.
Inverted microscope equipped with motorized Z drive (1,1b). The motorized Z drive allows the software to implement autofocus algorithms, keeping cells in focus before acquisition. Autofocus routines are included in many acquisition packages, such as the open-source μManager. Optional: microscope may be equipped with a hardware autofocus module, such as Nikon's PFS or Olympus' ZDC.
Phase-contrast optics in order to image nonfluorescent bacteria and to enable autofocus methods that minimize the use of fluorescent channels.
High–numerical-aperture objectives to allow maximal light collection while minimizing phototoxicity and bleaching of cells.
Motorized filter turret to allow automated acquisition of multiple channels. This is necessary if multiple fluorophores are used. Alternatively, a light source equipped with a motorized filter wheel can be combined with multibandpass dichroics and emission filters.
Light source for epifluorescence; we recommend a 300 W LambdaLS Xenon light source (5). Many alternatives exist.
Liquid light guide; this carries epifluorescence illumination into the microscope (6).
High-resolution, high-sensitivity CCD camera, such as a Coolsnap HQ2 (7). For segmentation purposes (in E. coli and B. subtilis), we have found it best to have cameras with pixel sizes close to 6.5 × 6.5 μm2.
Fast epifluorescence shutter (8a), such as a SmartShutter. This model has < 10-ms open/close times, minimizing the additional light exposure that cells receive outside of image acquisition. The shutter controllers are shown in Figure 2 (8b).
Controlling computer, installed with acquisition software and appropriate microscope drivers (9). Many satisfactory choices for acquisition software exist. Our laboratory has used the MetaMorph and Andor iQ commercial software with success. The free open-source acquisition software, μManager, is also highly recommended.
Computer with data analysis software installed. The data analysis package used in our laboratory requires MATLAB with the Image Processing Toolbox. It is recommended that this computer be independent of the controlling computer so as to avoid potential software corruption problems, but this is not necessary.
Antivibration table (11). At ×100 magnification, small vibrations from activity near the microscopy can cause loss of image sharpness.
Temperature-controlled enclosure (12a) with heater (12b). We have had success with temperature enclosures around the microscope, similar to the one depicted here. Other laboratories have reported using enclosures that isolate the stage alone.
Motorized xy stage, such as an ASI MS2000 (13). Many alternatives exist.
Stage inserts specifically designed for cover glass dishes, or other suitable alternatives. Ideally, these stage inserts should hold samples in a level orientation, such that the focus across the visual field is consistent. Our laboratory has custom-machined stage inserts where it is also possible to remove the lid of the sample dish, add a small-molecule inducer to specific pads and replace the lid without disturbing the xy position of each stage position (Fig. 1).
Procedure
Growth of bacteria or microorganism • TIMING 0.5 d (depends on the microorganism)
-
1
Grow overnight cultures of bacteria from permanent or temporary stocks.
▲ CRITICAL STEP We have noticed that, for B. subtilis cultures, growing to saturation in Spizizen's minimal medium30 with glucose gives inconsistent growth results when shifted to movie conditions (solid-phase growth), even when overnight cultures are diluted back and allowed to grow again in the morning. As such, we attempt to avoid growing overnight cultures of B. subtilis past an optical density at 600 nm (OD600) of 0.8.
-
2
Dilute cells into fresh medium in the morning. To do this, use a spectrophotometer to measure the OD600 of the overnight culture and use a dilution ratio that will yield logarithmic-phase culture in the afternoon. For B. subtilis cultures grown in Spizizen's minimal medium, we typically dilute cells into fresh medium to an OD of 0.01 in the morning. If you are growing many different strains, this dilution method will synchronize culture growth and yield cultures with similar ODs (at 600 nm) during growth.
Preparation of agarose pads • TIMING 1 h
-
3
Prepare individual agarose pads (see REAGENT SETUP). Expose a small amount of solidified agarose by sliding the top cover glass away. Cut agarose pads into smaller individual pads with a scalpel or a biopsy punch, creating enough pads for each strain/condition. Use a 6-mm biopsy punch and the agarose pad recipe described above to ensure that each individual pad weighs ∼50 mg; this is helpful if you are planning to add small-molecule inducers in the middle of time-lapse imaging.
▲ CRITICAL STEP It is important that the planar sides of the agarose pads be smooth and not marred from the cutting or other processes. Damage on the imaging side of the agarose surfaces facilitates clustering of bacteria and leads to out-of-focus cells. Damage on the nonimaging side of the agarose pad can cause poor-quality phase-contrast illumination.
Preparation for imaging sample • TIMING 1 h
-
4
Prepare the cultures for seeding on agarose pads. Dilute cells to OD600 0.01 or to another appropriate cell density. For most applications, pipetting cells directly from an OD600 >0.1 will result in cells being too closely spaced on the pad for individual microcolonies to be imaged at ×100 magnification. In some cases, higher cell densities may be more desirable, depending on the system of study.
-
5
Seed bacteria by pipetting diluted samples onto individual agarose pads. For 6-mm circular pads, we have found that pipetting 2.25 μl of cells diluted to an OD600 of 0.01 evenly yields cell densities of approximately one cell per camera visual field.
-
6
‘Dry’ the agarose pads. At room temperature, the pipetted bacterial solution can take 10–15 min to evaporate and absorb into the agarose. Progress can also be checked visually at an angle with reflected light.
▲ CRITICAL STEP If residual liquid is still present on the agarose pads when they are turned, this will promote uneven cell densities and moving cells.
-
7
Flip the agarose pads onto a cover glass–bottom dish, with the bacteria sandwiched between the agarose pads and the cover glass. Transferring the pads from one surface to another can be done with a scalpel. Be careful not to damage agarose surfaces when transferring the samples.
-
8
Seal the cover glass dish with Parafilm or sealing grease. Using sealing grease facilitates removal of the dish cover if small-molecule inducers are added later in the middle of time-lapse.
▲ CRITICAL STEP Improper sealing of the imaging sample will allow the pads to evaporate, often leading to rapid xy movement of the microcolony and poor imaging quality.
-
9
Mount the dish on a stage insert and add oil to the cover glass. Place the sample in the microscope and focus on the cells. Ensure that all electronics and lamps have been powered on, and the computer is ready for data acquisition.
▲ CRITICAL STEP After first mounting the sample and focusing on cells, there will be noticeable focal drift for 10–15 min. If possible, it is advisable to wait 15 min before moving to Step 10.
Time-lapse setup • TIMING 30–60 min
-
10
Lamp intensity fluctuations can change from day to day, making absolute comparisons between data sets on different days difficult. Correct for this by imaging a known fluorescent sample, such as commercial fluorescent beads, and adjusting the exposure times such that the measured fluorescence is the same from the known sample each day.
-
11
By using imaging software, set the stage positions by scanning the agarose pad for healthy cells and recording their positions. All acquisition software should maintain a ‘list’ of recorded stage positions to revisit during time-lapse imaging. Positions should be far enough apart that epifluorescence light from one stage position does not illuminate another, increasing photo-bleaching and phototoxicity. To minimize the problem of pad drift and cells migrating over the course of the movie, it is also helpful to set positions closer to the center of the pad, where the effect of evaporation is lower. In addition, to facilitate downstream analysis through Schnitzcells, it may be helpful to have only one growing microcolony per stage position, if possible.
? TROUBLESHOOTING
-
12
Set the desired imaging channels and parameters, including exposure time and binning. A typical movie will acquire a single fluorescent image for each FP, in addition to a phase-contrast image, for each stage position at every time point. To avoid exciting additional fluorophores within a time point, acquire images starting with longer wavelength excitation light and progressing to shorter wavelengths. If the signal is weak, consider increasing binning levels to 2 × 2.
? TROUBLESHOOTING
-
13
Set the desired imaging interval. This will vary from experiment to experiment. Photobleaching and phototoxicity are the main determinants of how frequently images can be acquired, and they generally must be determined empirically. In general, tracking cell lineages using our MATLAB software minimally requires one frame per cell cycle, but tracking accuracy will be low at this level.
-
14
Enable autofocus routines and other custom routines. During the movie, autofocus should correct for slow focal drift over time. Either software autofocus routines (specific for each acquisition package) should be run at each stage position for each time point, or hardware autofocus should be enabled. In order to correct for xy shifting of the growing microcolony, we have a routine that thresholds on the growing microcolony and changes the stage position so that the growing microcolony is centered.
-
15
Set the total acquisition time. This will also vary depending on the experiment and growth rate of the cells. If starting from the one-to-two cell stage, up to seven generations of growth can be reasonably analyzed (Steps 18–25) until the colony starts to exceed the camera field of view. Acquisition of larger colonies can be useful for checking the qualitative continuity of cellular behavior.
Recording time-lapse movies • TIMING 24 h
-
16
Once all parameters have been defined, begin image acquisition.
▲ CRITICAL STEP Many common problems occur within the first few frames of each movie—it is advisable to monitor the progress of the movie in the early stages.
? TROUBLESHOOTING
-
17
After acquiring the time-lapse images, review the frames in a sequence format to assess the quality of the data. In ImageJ, a sequence of .tiff files can be opened using File→Import→Image Sequence. An ideal time-lapse series is one in which the images are all in focus and the microcolony of interest stays mostly centered.
▲ CRITICAL STEP Consistent sharp focus throughout the movie is essential for quality data analysis.
Data analysis • TIMING 1–2 h per movie
-
18
Our laboratory has developed custom MATLAB software for QFTM images, which can be found at http://cell.caltech.edu/ schnitzcells. A discussion of the general steps to use this software is included below; however, for detailed instructions, please see the website for up-to-date documentation and video tutorials.
-
19
Rename the images. The acquisition file names are unlikely to be in Schnitzcells format, and thus it is necessary to rename the files to start analysis. A MATLAB script called ‘RenameMovie’ is included in the software package; it can be easily adapted to work for each imaging output.
-
20
Segment the cells. Cell segmentation may require some optimization for each experimental system. Broadly, the segmentation routine masks objects in the image and captures all the cells. Other noncell objects may be included, which are then filtered out using specific segmentation parameters. These parameters can be modified within the segmentation routines and optimized for each organism.
-
21
Manually correct segmentation. A final inspection and adjustment of the segmentation will help ensure good cell tracking results.
-
22
Track cell lineages. Tracking connects cells from one frame to the next by minimizing the total sum of the distances between cell positions in consecutive images. When a cell division event is identified, the tracker attempts to connect parent and child cells by minimizing the distances between the two child cells and the distance between the child and parent cells. The tracking routine uses a compiled executable written in C (ref. 29) and tracks cells on the basis of their centroid positions by default. We expect default tracking parameters to work well with a majority of data sets. However, advanced users may adjust tracking parameters by modifying configuration files. Further details can be found at http://cell.caltech.edu/schnitzcells.
-
23
Manually correct tracking. The graphical user interface for manual tracking correction allows the user to see each continuous cell lifetime and quickly correct errors.
-
24
Compile the data. Once cell lineages have been defined, the cell fluorescence can be extracted from the images and stored in a data structure. This structure contains several elements, including mean fluorescence, total fluorescence and the time derivative of fluorescence for each channel. A full description and definition of data elements stored can be found within the function ‘compileschnitz’.
-
25
Analyze the data. Depending on the system and question of interest, the compiled data can then be used to compare responses in different strains or conditions, or it can be analyzed further with additional MATLAB functions.
? TROUBLESHOOTING
Troubleshooting advice can be found in Table 1.
Table 1.
Troubleshooting table.
| Step | Problem | Possible reason | Solution |
|---|---|---|---|
| 11 | Cells are motile | Too much liquid on the pad surface before transferring it to the imaging surface | Wait until the pad surface dries completely after seeding pads |
| Damage to agarose pad | Avoid marring the agarose surface with the pipette tip when seeding bacteria, or with the scalpel when transferring pads to imaging surface | ||
| 12 | Cells are not fluorescent | Reporter not optimal | If necessary, optimize the reporter ribosome-binding site or codon usage. Check a constitutive promoter if you are working with a new fluorescent protein for the first time |
| Low-expressing reporter | If possible, use an alternative reporter or increase the reporter copy number by using a plasmid-based system or by using reporter repeats separated by ribosome-binding sites | ||
| 16 | Cells do not grow, even outside of the acquisition area (field of view) | Old medium | Remake cell medium components from fresh stocks |
| Cell density may have a role in normal growth of some bacteria | Vary the pad cell densities and check if growth improves | ||
| Antibiotic concentration is too high | Unless necessary, we often omit antibiotics in the pad entirely. When this is unavoidable, a decrease in antibiotic concentration may be prudent, especially with minimal defined medium | ||
| Cells grow healthily outside the field of view but grow poorly inside it | Phototoxicity | Reduce the frame frequency or reduce the amount of excitation light | |
| The microcolony shifts very quickly during the course of the movie | Agarose pad evaporation | Ensure that the imaging sample is sealed with either sealing grease or Parafilm | |
| The microcolony shifts gradually during the course of the movie | Slight agarose pad size changes | Some amount of microcolony shift is expected, and it can be minimized by using larger agarose pads and imaging closer to the center of the agarose. A microcolony anti-shifting routine can also be enabled during acquisition | |
| The movie loses focus | Within the first few frames, initial focus drift may exceed the autofocus range | Before starting acquisition, ensure that focus drift is minimized. If this does not fix the problem, increase the autofocus range | |
| If focus is poor throughout the movie, the phase (bright-field) image may be blurry, causing the software autofocus to fail | Ensure a smooth agarose surface for imaging and avoid cells near the edge of the pad where the phase image is not ideal | ||
| Insufficient immersion oil on the underside of imaging dish | Spread enough oil evenly among the pads being imaged |
• TIMING
Steps 1 and 2, Growth of bacteria or microorganism: 0.5 d (depends on microorganism)
Step 3, Preparation of agarose pads: 1 h
Steps 4–9, Preparation of imaging sample: 1 h
Steps 10–15, Time-lapse setup: 30–60 min (depends on number of pads/positions)
Steps 16 and 17, Recording time-lapse movies: 24 h (depends on experiment)
Steps 18–25, Data analysis: 1–2 h per movie (for working through segmentation and tracking on a movie with good focus and sufficient acquisition frequency)
Anticipated Results
Using the above protocol, fluorescent time-lapse images of growing bacterial microcolonies can be readily acquired (Fig. 3a). The use of our laboratory's custom MATLAB software extracts quantitative information from these fluorescent images and allows immediate comparison and plotting of fluorescent channel data, such as that presented in Figure 3b. If the end user is interested in simple comparisons between strains or conditions, the included scripts may be all that is necessary. More generally, with some additional programming, the data can be further analyzed for specific quantitative questions.
Figure 3.
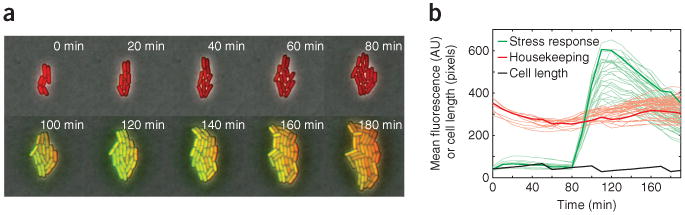
Analysis of time-lapse movie reveals single-cell dynamics of a B. subtilis stress response. (a) Time-lapse mosaic shows the relative fluorescence in both a housekeeping reporter (red) and a stress response reporter (green) in single cells. Time points in minutes are labeled on each frame. A stress is applied at 80 min, activating the response reporter and giving rise to additional green signal, seen in subsequent time points. These images are included as sample data with the Schnitzcells analysis package. (b) Plot generated using Schnitzcells showing the quantification of the stress response (green) and housekeeper (red) reporter. Bold green and black lines emphasize one cell lineage. A division event (shown as a sudden drop in cell length) around 90 min shows cell division continues through the stress response. Additional user-analysis using Schnitzcell output can quantify the timescale, variation and heritability of the response (not shown).
AU, arbitrary units.
Supplementary Material
Acknowledgments
We thank J. Park and additional Elowitz Lab members (former and present) for helpful comments regarding the manuscript. This research was supported by US National Institutes of Health grant R01GM07977, the National Science Foundation CAREER Award 0644463 and the Packard Foundation.
Footnotes
Author Contributions J.W.Y., J.C.W.L. and M.B.E. wrote and developed the protocol. A.A. helped with developing a website and modifying the Schnitzcells software package for public release. N.R., P.S.S. and M.B.E. were major original developers of Schnitzcells, and T.B. and E.M. optimized the tracking algorithm.
Competing Financial Interests The authors declare no competing financial interests.
Note: Supplementary information is available via the HTML version of this article.
Reprints and permissions information is available online at www.nature.com/reprints/index.html.
References
- 1.Elowitz MB, Levine AJ, Siggia ED, Swain PS. Stochastic gene expression in a single cell. Science. 2002;297:1183–1186. doi: 10.1126/science.1070919. [DOI] [PubMed] [Google Scholar]
- 2.Balaban NQ, Merrin J, Chait R, Kowalik L, Leibler S. Bacterial persistence as a phenotypic switch. Science. 2004;305:1622–1625. doi: 10.1126/science.1099390. [DOI] [PubMed] [Google Scholar]
- 3.Ratcliff WC, Denison RF. Individual-level bet hedging in the bacterium Sinorhizobium meliloti. Curr Biol. 2010;20:1740–1744. doi: 10.1016/j.cub.2010.08.036. [DOI] [PubMed] [Google Scholar]
- 4.Thattai M, van Oudenaarden A. Stochastic gene expression in fluctuating environments. Genetics. 2004;167:523–530. doi: 10.1534/genetics.167.1.523. [DOI] [PMC free article] [PubMed] [Google Scholar]
- 5.Kussell E, Leibler S. Phenotypic diversity, population growth, and information in fluctuating environments. Science. 2005;309:2075–2078. doi: 10.1126/science.1114383. [DOI] [PubMed] [Google Scholar]
- 6.Veening JW, et al. Bet-hedging and epigenetic inheritance in bacterial cell development. Proc Natl Acad Sci USA. 2008;105:4393–4398. doi: 10.1073/pnas.0700463105. [DOI] [PMC free article] [PubMed] [Google Scholar]
- 7.Ferrell JE, Jr, Machleder EM. The biochemical basis of an all-or-none cell fate switch in Xenopus oocytes. Science. 1998;280:895–898. doi: 10.1126/science.280.5365.895. [DOI] [PubMed] [Google Scholar]
- 8.Skotheim JM, Di Talia S, Siggia ED, Cross FR. Positive feedback of G1 cyclins ensures coherent cell cycle entry. Nature. 2008;454:291–296. doi: 10.1038/nature07118. [DOI] [PMC free article] [PubMed] [Google Scholar]
- 9.Shimomura O, Johnson FH, Saiga Y. Extraction, purification and properties of aequorin, a bioluminescent protein from the luminous hydromedusan, Aequorea. J Cell Comp Physiol. 1962;59:223–239. doi: 10.1002/jcp.1030590302. [DOI] [PubMed] [Google Scholar]
- 10.Chalfie M, Tu Y, Euskirchen G, Ward WW, Prasher DC. Green fluorescent protein as a marker for gene expression. Science. 1994;263:802–805. doi: 10.1126/science.8303295. [DOI] [PubMed] [Google Scholar]
- 11.Rizzo MA, Springer GH, Granada B, Piston DW. An improved cyan fluorescent protein variant useful for FRET. Nat Biotechnol. 2004;22:445–449. doi: 10.1038/nbt945. [DOI] [PubMed] [Google Scholar]
- 12.Shaner NC, et al. Improved monomeric red, orange and yellow fluorescent proteins derived from Discosoma sp. red fluorescent protein. Nat Biotechnol. 2004;22:1567–1572. doi: 10.1038/nbt1037. [DOI] [PubMed] [Google Scholar]
- 13.Griesbeck O, Baird GS, Campbell RE, Zacharias DA, Tsien RY. Reducing the environmental sensitivity of yellow fluorescent protein. Mechanism and applications. J Biol Chem. 2001;276:29188–29194. doi: 10.1074/jbc.M102815200. [DOI] [PubMed] [Google Scholar]
- 14.Rosenfeld N, Young JW, Alon U, Swain PS, Elowitz MB. Gene regulation at the single-cell level. Science. 2005;307:1962–1965. doi: 10.1126/science.1106914. [DOI] [PubMed] [Google Scholar]
- 15.Dunlop MJ, Cox RS, III, Levine JH, Murray RM, Elowitz MB. Regulatory activity revealed by dynamic correlations in gene expression noise. Nat Genet. 2008;40:1493–1498. doi: 10.1038/ng.281. [DOI] [PMC free article] [PubMed] [Google Scholar]
- 16.Sprinzak D, et al. Cis-interactions between Notch and Delta generate mutually exclusive signalling states. Nature. 2010;465:86–90. doi: 10.1038/nature08959. [DOI] [PMC free article] [PubMed] [Google Scholar]
- 17.Elowitz MB, Leibler S. A synthetic oscillatory network of transcriptional regulators. Nature. 2000;403:335–338. doi: 10.1038/35002125. [DOI] [PubMed] [Google Scholar]
- 18.Rosenfeld N, Young JW, Alon U, Swain PS, Elowitz MB. Accurate prediction of gene feedback circuit behavior from component properties. Mol Syst Biol. 2007;3:143. doi: 10.1038/msb4100185. [DOI] [PMC free article] [PubMed] [Google Scholar]
- 19.Suel GM, Garcia-Ojalvo J, Liberman LM, Elowitz MB. An excitable gene regulatory circuit induces transient cellular differentiation. Nature. 2006;440:545–550. doi: 10.1038/nature04588. [DOI] [PubMed] [Google Scholar]
- 20.Suel GM, Kulkarni RP, Dworkin J, Garcia-Ojalvo J, Elowitz MB. Tunability and noise dependence in differentiation dynamics. Science. 2007;315:1716–1719. doi: 10.1126/science.1137455. [DOI] [PubMed] [Google Scholar]
- 21.Eldar A, et al. Partial penetrance facilitates developmental evolution in bacteria. Nature. 2009;460:510–514. doi: 10.1038/nature08150. [DOI] [PMC free article] [PubMed] [Google Scholar]
- 22.Wang P, et al. Robust growth of Escherichia coli. Curr Biol. 2010;20:1099–1103. doi: 10.1016/j.cub.2010.04.045. [DOI] [PMC free article] [PubMed] [Google Scholar]
- 23.Freed NE, et al. A simple screen to identify promoters conferring high levels of phenotypic noise. PLoS Genet. 2008;4:e1000307. doi: 10.1371/journal.pgen.1000307. [DOI] [PMC free article] [PubMed] [Google Scholar]
- 24.Stewart EJ, Madden R, Paul G, Taddei F. Aging and death in an organism that reproduces by morphologically symmetric division. PLoS Biol. 2005;3:e45. doi: 10.1371/journal.pbio.0030045. [DOI] [PMC free article] [PubMed] [Google Scholar]
- 25.Robert L, et al. Pre-dispositions and epigenetic inheritance in the Escherichia coli lactose operon bistable switch. Mol Syst Biol. 2010;6:357. doi: 10.1038/msb.2010.12. [DOI] [PMC free article] [PubMed] [Google Scholar]
- 26.Sliusarenko O, Heinritz J, Emonet T, Jacobs-Wagner C. High-throughput, subpixel precision analysis of bacterial morphogenesis and intracellular spatio-temporal dynamics. Mol Microbiol. 2011;80:612–627. doi: 10.1111/j.1365-2958.2011.07579.x. [DOI] [PMC free article] [PubMed] [Google Scholar]
- 27.Snapp EL. Fluorescent proteins: a cell biologist's user guide. Trends Cell Biol. 2009;19:649–655. doi: 10.1016/j.tcb.2009.08.002. [DOI] [PMC free article] [PubMed] [Google Scholar]
- 28.Shaner NC, Steinbach PA, Tsien RY. A guide to choosing fluorescent proteins. Nat Methods. 2005;2:905–909. doi: 10.1038/nmeth819. [DOI] [PubMed] [Google Scholar]
- 29.Gor V, Bacarian T, Elowitz M, Mjolsness E. Tracking cell signals in fluorescent images. Computer Vision Methods for Bioinformatics (CVMB) workshop, 2005 IEEE Computer Society Conference on Computer Vision and Pattern Recognition (CVPR); San Diego, California, USA. 2005. [Google Scholar]
- 30.Spizizen J. Transformation of biochemically deficient strains of Bacillus subtilis by deoxyribonucleate. Proc Natl Acad Sci USA. 1958;44:1072–1078. doi: 10.1073/pnas.44.10.1072. [DOI] [PMC free article] [PubMed] [Google Scholar]
Associated Data
This section collects any data citations, data availability statements, or supplementary materials included in this article.