Abstract
Laser-ultrasonics is an attractive and powerful tool for the non-destructive testing and evaluation (NDT&E) of composite materials. Current systems for non-contact detection of ultrasound have relatively low sensitivity compared to contact peizotransducers. They are also expensive, difficult to adjust, and strongly influenced by environmental noise. Moreover, laser-ultrasound (LU) systems typically launch only about 50 firings per second, much slower than the kHz level pulse repetition rate of conventional systems. As demonstrated here, most of these drawbacks can be eliminated by combining a new generation of compact, inexpensive, high repetition rate nanosecond fiber lasers with new developments in fiber telecommunication optics and an optimally designed balanced probe beam detector. In particular, a modified fiber-optic balanced Sagnac interferometer is presented as part of a LU pump–probe system for NDT&E of aircraft composites. The performance of the all-optical system is demonstrated for a number of composite samples with different types and locations of inclusions.
Keywords: Fiber-optic pump–probe system, Laser ultrasound, Composite materials, Optoacoustics, Photoacoustics, NDT&E
1. Introduction
For more than thirty years, optical generation and detection of ultrasound (US) has been used for NDT&E of composite materials. All-optical approaches can produce non-contact systems for US inspection, a clear advantage over more traditional contact methods based on piezoelectric transducers. The history of developments in this area is well described in a series of review articles [1–4], with particular note of the seminal work by J.-P. Monchalin's group [5–8], and some studies on adapting Sagnac interferometry to US detection [9–14]. Alternate optical detectors with sensitivity rivaling the best piezoelectric transducers have also recently been reported by Guo [15–17] and Razansky [18], but these schemes still require immersion. To summarize, there are currently no non-contact techniques for US detection approaching the sensitivity of the best contact detectors. Thus, there is a real opportunity to advance the state of the art in non-contact ultrasound systems by developing low-cost, non-contact optical detectors with sensitivity approaching the best piezoelectric transducers.
Our approach to non-contact LU systems leverages recent progress in fiber and diode laser systems and telecommunication optics, and addresses a number of the limitations of LU systems commonly used for NDT&E of composite materials in the aerospace industry. In particular, our design goals are to:
-
(i)
reduce the footprint of the detection system;
-
(ii)
decrease system cost and complexity;
-
(iii)
increase scan speeds;
-
(iv)
minimize the impact of environmental noise;
-
(v)
provide detection sensitivity comparable to that of piezoelectric transducers.
To meet these goals, high-energy solid-crystal and CO2 lasers cannot be used for optical generation of US because of their low repetition rate (usually less than 100 Hz), bulk, and cost. Instead, we use modern diode-pumped or fiber lasers with a typical pulse energy of ∼1 mJ operating at repetition rates up to 100 kHz. As demonstrated below, they are quite capable of exciting strong acoustic transients by optical absorption at the composite surface; their high repetition rate can dramatically increase scan speed; and their size can dramatically reduce system footprint. In addition, these lasers are much more flexible and relatively inexpensive.
Most non-contact optical detection schemes rely on some form of interferometry. Recent advances in continuous wave (CW) fiber lasers (for highly coherent output) and super luminescent diodes (SLD) can be exploited for more sensitive detection based on optical interferometry. Both sources are low noise, compact, and quite inexpensive. Below we show that an SLD is nearly ideal when a relatively low coherence source is required for interferometry.
Most interferometers are highly sensitive to environmental noise. Thermal fluctuations from any source, such as room temperature shifts or changes in the temperature of the sample surface induced by pumping laser radiation and the laser pump itself, can change resonance conditions in the interferometer cavity. Similarly, vibrations from mechanical and acoustic sources can change resonance conditions. As the resonance moves in wavelength, or reference beam phase, the sensitivity of the detector can be significantly degraded unless an active, robust stabilization system is included to compensate. A number of stabilization algorithms have been developed over the last twenty years depending on the type of interferometer [1–3], but all are relatively slow, cannot provide complete rejection of background noise, and significantly increase the size, complexity, and cost of the interferometer.
For LU inspection of real composite structures used in the aerospace industry, reflections from rough surfaces must be processed effectively. A specific confocal Fabry–Perot interferometer design significantly reduced the influence of the light collection system [5–8]. Other approaches aimed at minimizing the effects of speckle structure include modifications of a Sagnac interferometer [9–14] and interferometer schemes employing photorefractive crystals [6,19–21]. However, the detection sensitivity of all these optical techniques does not approach that of a well-designed, contact piezoelectric transducer. Indeed, there is still need for an LU system with overall sensitivity rivaling the best piezoelectric systems.
To handle rough surfaces and simultaneously minimize the effects of environmental noise, we employed a Sagnac-based interferometer [9–14] measuring vibration speed instead of displacement. This approach has no reference arm, i.e. both interfering beams reflect from the sample surface and, therefore, no stabilization is required. In addition, the differential Sagnac approach is relatively insensitive to the roughness of the sample surface over the extent of the beam probing that surface. This is in stark contrast to an interferometer with a reference arm using a highly coherent source, such as Michelson or conventional Fabry–Perot schemes, in which any surface heterogeneities produce speckle structure in the reflected beam. Most schemes utilizing a reference beam are dramatically affected by speckle structure in the reflected beam and must use only the central speckle for stable operation. This problem can be partially eliminated by finely focusing the probe beam to the sample surface, but it does not help in all cases and creates another problem – fine probe beam focus adjustment. As shown below (see Section 2), our interferometric detector includes focusing of the probe beam onto the sample surface for better light collection from a rough surface. However, since the Sagnac approach does not have a reference arm, the reflected beam mode structure does not influence ultrasound signal characteristics and only changes the overall amplitude of the recorded signal.
Finally, to meet all of our design goals, the interferometric detector must approach the sensitivity of piezoelectric transducers. No matter what modality is used, the fundamental limit on sensitivity is determined by the Johnson–Nyquist noise associated with detection of an acoustic signal over a finite spatial aperture and finite signal bandwidth [2,3,12,22,23]. As will be demonstrated below, the non-contact detector developed for our LU system approaches the Johnson-Nyquist noise limit and is as sensitive as the best acoustic detectors operating over the same detection area and signal bandwidth.
2. Materials and methods
2.1. Samples of fiber reinforced composites
Samples used in this study were provided by Boeing Research & Technology and were typical fiber reinforced graphite-epoxy composites employed in aircraft at Boeing.
During system testing, we scanned a series of samples. Each one could be imaged with high SNR and good visibility of all significant defects. Without loss of generality, here we present results obtained on only three representative samples with artificial inclusions embedded in the structure. All samples (sound speed was measured to be very close to 3000 m/s, volume density is about 1600 kg/m3) were 3.6 mm thick and contained 19 individual layers (i.e. plies). Artificial defects were made from about 20 μm thick brass foil, tape, and polymer foreign materials and were placed at different depths from the surface. Samples differed one from another by the depth of inclusion locations (close to and far from the nominal “front” surface of the sample, and in the middle, corresponding to samples UW-N, UW-F and UW-M). A photograph and diagram of inserted inclusions for sample UW-M are presented in Fig. 1a.
Fig. 1.
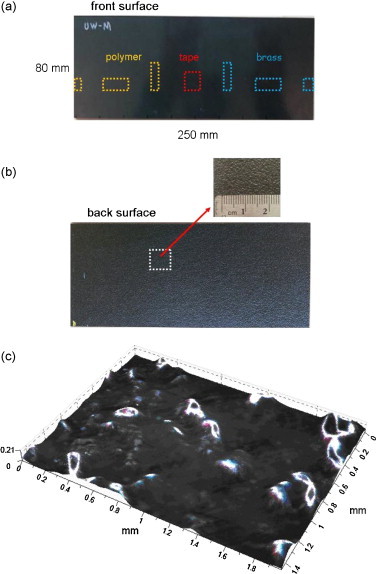
(a) Diagram of the composite sample (UW-M). Dashed rectangles in the upper picture represent the inclusions, their size and location. (b) Photo of the back surface (the enlarged photo indicates sample roughness in the region defined by the white rectangle). (c) Back wall roughness profile measured with a profilometer over a typical small region.
Composite samples were not transparent for both pump and probe light. Analyzing the amplitude and the profile of the generated OA signals, we estimate a light absorption coefficient to be about 200 cm−1 for 1064 nm wavelength.
As noted above, surface roughness is a critically important parameter affecting the sensitivity of interferometry. Clearly, the composite surface is far from mirror-like. The “front” surface was smoother. Based on conventional profilometry, the roughness of this surface (mean height of heterogeneities) is about 4 μm with many relatively flat regions. In contrast, the “back” surface is very rough, as seen in the photo of Fig. 1b and the profilometry image of a small, typical region of this surface in Fig. 1c. The mean height of the roughness profile for the back surface is more than 130 μm and reaches more than 200 μm at some points. Most experiments used the front as the source/detection surface, but some results will also be presented below using the back surface.
2.2. All optical inspection system
Based on the design goals presented in Section 1, the LU inspection system illustrated in Fig. 2a was constructed. Optical generation is driven by a compact, inexpensive fiber laser operating at quite low pulse energies (0.6 mJ) but at very high pulse repetition rates (variable up to 76 kHz) rather than a bulky, high cost, low repetition-rate CO2 or solid crystal laser. Pulsed radiation at a 1064 nm wavelength is delivered to the sample from the optical head of the fiber laser (Model G3, 40 W pulsed fiber laser, spilasers.com). Outgoing collimated radiation is focused to the sample surface using one convex lens (150 mm focal distance) attached to the pump laser head that allows the beam diameter at the sample surface to be easily varied. The laser beam diameter is optimized to reduce acoustic diffraction effects (diffraction length is proportional to the square of the laser beam diameter) while simultaneously producing an optoacoustic (OA) signal of sufficient amplitude (inversely proportional to the square of the laser beam diameter). Thus, the laser beam diameter is chosen to be 1.5 mm for 3 mm thick samples.
Fig. 2.
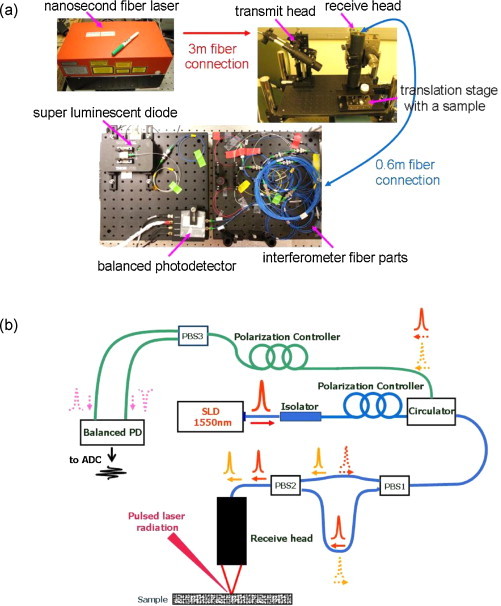
(a) Main components of the all-optical system for NDT&E of composite materials: compact very high repetition rate (up to 76 kHz) fiber laser is in the upper left corner; transmit head connected to the fiber laser with 3 m fiber bundle and receive head connected to the interferometer with PM fiber are in the upper right corner; photo of the modified fiber-optic Sagnac interferometer is in the lower center. (b) Operating principle of the interferometer: probe laser radiation is divided into two beams traveling by different length fibers to form a delay in the forward path; beam polarizations are exchanged after their reflections from the sample under study, forcing the beams to exchange paths back and thereby to interfere. Finally, scattered probe optical radiation is detected with the balanced photodetector.
The output fiber length is 3 m, making delivery of radiation very flexible. The laser source is also very flexible, permitting software control over several key parameters such as pulse duration, pulse energy, and pulse repetition rate. Pulse duration can be set to 10 ns, 30 ns, 60 ns, 120 ns or 250 ns. A 60 ns pulse duration is used to provide an US inspection bandwidth better than 10 MHz. The energy of laser pulses can be varied as well and the maximum is 0.53 mJ for the 60 ns pulse duration. Finally, the pulse repetition rate must be carefully selected based on the mechanical scan rate of the pump laser source. For example, a laser operating at an energy of 0.53 mJ at a 76 kHz pulse repetition rate would burn the sample immediately if it is fixed at a certain position, i.e. without scanning. The safe pulse repetition rate at this laser energy is determined by the heat release process, which for the class of samples used here is ∼500 Hz with no sample scanning. However, the pulse repetition rate can be greatly increased when the sample under study moves, and is limited practically by the maximum translation speed of the scanner. To eliminate potential damage when the scanner was stationary, a USB switch controller (Numato, numato.com) was installed into the system to turn laser firing off immediately after sample translation terminated.
Incident pump-laser pulses are delivered at an oblique angle (∼40° from the sample normal) that allows the probe-laser beam to be focused to the same point on the sample surface. The OA-generated pulse propagates through the sample, partially reflecting off of the composite structure and partially reflecting off of the back wall. All acoustic waves propagating back to the front wall of the sample are detected with the interferometer described below (Section 2.3). Radio frequency (RF) signals output from the interferometer are amplified in the frequency range of 1–10 MHz by the amplifier (Panametrics, Model 5072PR), digitized to 14 bits by the PCI Express3 ADC (GaGe, Model Razor Compuscope RZE-002-300, gage-applied.com) and transferred to the workstation (HP, Model Z820, hp.com) for further signal processing and display. The ADC is triggered by the output of a photodiode (Thorlabs, Model DET 10A, thorlabs.com) detecting a small fraction of the pump laser radiation coupled into it. This approach sets zero time as the moment when the OA pulse was generated at the sample surface and avoids any jitter induced by pulse-to-pulse instability of the laser.
Composite samples are positioned on a 2D translation stage for all imaging studies. The X-axis is driven by a stepper motor controller (Thorlabs, Model LNR50DD) with variable speed control up to 8 mm/s. The sample is moved continuously during scanning, where the maximum travel distance is 50 mm (maximum allowed travel distance for the stage). Position accuracy is also determined by the stage and is better than 2 μm. At each position during scanning, a digital RF A-scan is recorded for every laser firing. Each A-scan corresponds to the distribution of US transients scattered by the composite structure back to the detection point, i.e. along the Z-direction. Sample translation along the X-axis forms a B-scan image corresponding to the distribution of US scatterers in the XZ plane. Single A-scans in a B-scan are stitched together without any beamforming procedure or signal interpolation.
Translation of the sample in the Y-direction is performed manually to acquire a complete 3D data set characterizing the composite sample, and this data set can be used to form C-scan and M-scan movies. Software was developed to integrate this simple scanning system with the LU system and ensure proper synchronization of all components.
We note here that the scanning procedure is not in any way novel, and certainly does not represent the state of the art in composite materials testing. The scanners were selected primarily for their accuracy, not speed, and lower pulse repetition rates are used to match their scan speed. As will be discussed in some detail below, the ultimate scan speed of an LU system is limited by the maximum pulse repetition rate of the pump laser. For the 76 kHz maximum rate of the fiber laser used here, the ultimate scan rate of inspection is much higher than the 8 mm/s limit of the current system.
2.3. Fiber optic interferometer
The optical interferometer is a key component of all LU inspection systems. To meet the design goals presented in Section 1, we have developed a fiber optic, Sagnac-based interferometer with a balanced detection scheme. Below we summarize its main features. More detailed information on interferometer design, its sensitivity, and its overall imaging performance compared to that of a contact ultra-wide band PVDF detector, can be found in a recent paper from our group [24].
2.3.1. Probe beam source
A super luminescent diode (SLD, Thorlabs, Model SLD1550P-A40) is the source of probe radiation. It operates at a center wavelength of 1550 nm with a bandwidth of 60 nm. The center wavelength was chosen to match the communications range and, therefore, take advantage of the most recent developments in fiber-optic components and devices. The output power was proportional to the current applied to the SLD and can be varied up to 40 mW.
The probe laser is partially coherent (coherence length is ∼40 μm). This feature is important because it removes nearly all parasitic interference inside the interferometer due to reflections between connections and, thus, dramatically decreases system noise. On the other hand, a 40 μm coherence length is many times larger than the displacement induced by the US transient at the sample surface.
The output probe radiation is polarized along the slow axis of a polarization maintaining (PM) fiber. An additional polarizer is attached to the SLD to ensure that all probe radiation is linearly polarized. A fiber isolator follows the polarizer to avoid any reflections back to the SLD which could damage the source.
2.3.2. Operating principle
As with all interferometers, a signal is detected by interfering two independent optical beams (see Fig. 2b). The advantage of the Sagnac approach is that no reference beam is required. Both interfering beams come from the reflection of the probe by the sample surface, making the interferometer absolutely stable to any environmental vibrations and temperature fluctuations. In addition, this interferometer does not require feedback, a critically important issue for overall system stability, reliability, and speed. Furthermore, no reference arm makes the Sagnac interferometer relatively insensitive to the speckle structure of the optical probe beam reflected from a rough composite surface (see Fig. 1). Sample roughness, therefore, only influences the probe light power coupled into the interferometer.
To produce two independent beams, laser radiation initially linearly polarized along the slow axis is rotated by 45° using a polarization controller (Thorlabs, Model FPC020) and then divided into two interferometer arms with a polarization beam splitter (PBS1 in the drawing). These two fiber arms have different lengths (0.5 m and 10.5 m, respectively) so that two optical waves appear at the next polarization beam splitter (PBS2) with a fixed delay. This delay determines the maximum detectable frequency of US vibrations and can be easily adjusted by changing the longer fiber to a different length. Matching the fiber length to the desired frequency band (10 MHz in our case) maximizes detection sensitivity.
PBS2 combines the two delayed beams into one fiber, maintaining their polarizations. The collimator (receive head in Fig. 2b) finally focuses the probe radiation onto the sample surface. The design of the receive head is quite simple. It must focus probe radiation to the sample surface and couple backscattered radiation with maximum sensitivity back into the 8 μm PM fiber. Although simple in design, manufacturing of the head (CourierTronics, couriertronics.com) must be very precise. It contains two lenses, one collimates outgoing radiation from the fiber and the other, with a high NA of 0.5, focuses radiation onto the sample. There are a few additional components between the lenses: a wave separator (Altechna, altechna.com) to propagate 1550 nm radiation without distortion and block the pump 1064 nm laser radiation at the same time; and a high aperture (40 mm) quarter wave (QW) plate (Altechna) exchanging the polarization of the two interfering beams after their reflections from the sample surface.
Probe radiation reflected from the sample surface and coupled back to the fiber contains two delayed waves, similar to the conditions for incident illumination, but with exchanged polarizations. The wave that propagated initially through the short arm of the interferometer now propagates through the long arm on the way back, and vice versa for the second interfering beam. The two beams have no delay when they reach PBS1 except for the acoustic vibration induced phase difference, and they finally interfere after being converted to circular polarization states with a fiber polarization controller. The beams are split one last time with PBS3 to dramatically reduce interferometer noise and make the system insensitive to thermal lens [25] effects induced by the pumping laser. When the polarization controller (PBS3 in the drawing) is tuned to act as a perfect quarter wave plate, the two beams have opposite signs in the interference term at the two inputs of a balanced photodetector. Subtraction of the signals within the balanced photodiode (Thorlabs, Model PDB 420C-AC [26]) finally gives a photocurrent that is virtually insensitive to laser induced changes of the sample refractive index, and other stationary polarization insensitive noise. This makes it possible to work with very low light power reflected back by a rough sample surface. Note that the sensitivity of regular (non-avalanche) photodiodes is much less than that of avalanche ones, but they provide much better inherent dynamic range, better than 50 dB [27]. Overall, balanced detection provides sensitivity equivalent to that of avalanche photodiodes, but with much better dynamic range.
As noted above, the Sagnac scheme registers the difference between two surface displacements recorded at close time instants determined by the propagation delay in the long fiber arm relative to the short one. Thus, the interferometer output is proportional to vibration speed or acoustic pressure. This is another advantage over displacement-based interferometers commonly used in NDT&E applications since a derivative (i.e. high pass filter) operation is not required to remove low frequency displacement artifacts from raw spectrometer outputs. This high pass filtering operation, usually implemented in the digital domain, can reduce the SNR of the detected ultrasound signal.
To summarize the operating principle, when there is no pump laser impact at the composite surface, the displacement difference between the two interfering optical beams is zero, and the interferometer records nothing. When pulsed laser radiation generates an OA pulse, however, the interferometer detects the laser induced pressure signal, and all other pressure transients reflected back by the composite structure.
As mentioned above, the proposed Sagnac scheme consists of only fiber components. Most are polarization maintaining and virtually insensitive to both mechanical vibrations applied to the side of the fiber and fiber twisting. This makes interferometer design very flexible because fiber optical elements can be placed on any supporting surface, rather than needing to be solidly attached to an optical table. Once the interferometer has been tuned, there is no need for further tuning or any kind of feedback to stabilize operation. Overall, this is a very rugged design appropriate for typical field operations in the aerospace industry.
Finally, the last key feature of the Sagnac approach is that the detection bandwidth is not limited from below and is limited from above only by the difference in fiber arms of the interferometer determining the maximum operating frequency. Therefore, the maximum detectable frequency can be easily varied by changing the long arm fiber to another length, providing ultra wide-band US detection yet enabling optimal sensitivity over a specified frequency band. In the remainder of the studies reported below, the operating frequency band was chosen to span 1–10 MHz based on the acoustic properties and geometry of the composite materials under investigation.
2.3.3. Impulse response of the Sagnac detector
The optical detector's impulse response was measured by inputting an acoustic pulse with a much broader bandwidth than the detector itself and recording the resultant output. The interrogating pulse was created optoacoustically using a very strong optical absorber, permanent marker ink, painted on the surface of a PMMA plate. Fig. 3a presents the measured impulse response of the optical detector prior to any analog filtering. Clearly, the output has a smooth temporal profile with no sidelobes. Using the full width at half maximum amplitude, the pulse duration, Δt, is 90 ns. This can be easily converted into the equivalent spatial resolution along the propagation direction in a material using the speed of sound in that material.
Fig. 3.
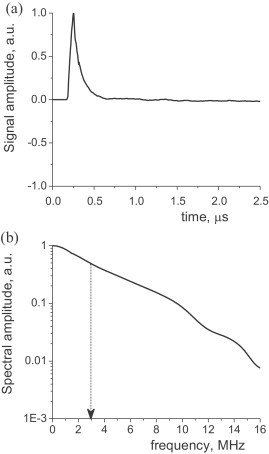
(a) Impulse response of the fiber-optical Sagnac detector; (b) corresponding spectra of the signal above. The characteristic frequency of the whole bandwidth signal is 2.9 MHz (at ½ level – dashed line in (b) but the impulse response remains compact at 95 ns duration).
The transfer function is the Fourier transform of the impulse response, as illustrated in Fig. 3b for the optical detector. Note that the upper frequency roll-off is determined primarily by the length of the long arm fiber in the interferometer and can be easily tuned by changing the length of that fiber. We have limited the acoustic spectrum to about 10 MHz since attenuation in the composite samples used here increases significantly at higher frequencies.
The detector bandwidth, as measured using the spectral width at half maximum amplitude, is 2.9 MHz but results in an impulse response only 95 ns in duration. A typical bipolar ultrasonic pulse produced by a broadband piezoelectric transducer operating at the same characteristic frequency would have a duration about equal to the inverse of the bandwidth, i.e. about 300 ns in this case. The tight impulse response of the optical detector is a significant advantage for NDT&E, typically producing a factor of three improvement in axial resolution compared to equivalent contact piezoelectric transducers.
3. Results
3.1. Recorded A-scan signals and their processing
The reference signal illustrated in Fig. 3a was obtained from an optically flat surface and can be used directly for high resolution imaging without any additional signal processing. An inhomogeneous and rough surface, however, does not produce a stable low frequency signal. This is especially true when there are significant thermal lens effects at a particular point on the rough surface of a composite sample producing a very strong but very low frequency signal [23]. This signal can dominate the dynamic range of the ADC in the signal chain, thereby reducing the overall dynamic range of the system. To overcome this problem, the interferometer output is high pass (HP) filtered (using the 1 MHz Panametrics cutoff limit for the low frequency edge) prior to amplification and digitization. The resulting probe signal passed through the HP analog filter is illustrated in Fig. 4a with the dotted red curve.
Fig. 4.
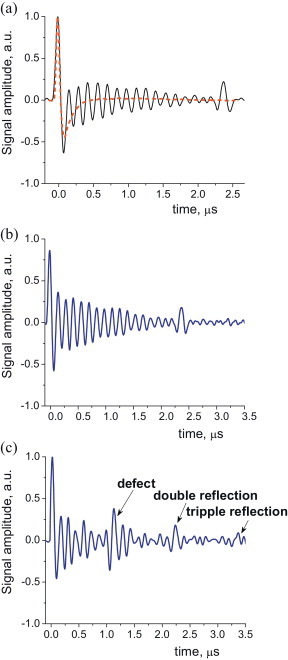
(a) Single shot (without signal averaging) A-scan signal recorded for the composite sample UW-M (black line) and impulse response of the Sagnac interferometer PMMA after applying a bandpass (1 MHz – 10 MHz) filter (red line); (b) the same A-scan after deconvolution (according to Eqs. (1) and (2)) in a region free of defects; and (c) deconvolved A-scan in a region with an inclusion (brass foil).
Using the samples described in Section 2.1, a large collection of A-scans was recorded to further optimize the signal processing path for imaging applications. A typical A-scan signal recorded from a single pump laser firing (i.e. without any averaging) by the Sagnac detector and passed through HP analog filtering is plotted as the black curve in Fig. 4a. It corresponds to a region of the sample UW-M without inclusions. The first positive peak corresponds to the OA signal generated at the front sample surface due to absorption of pulsed laser radiation. The last peak signal arrives at the detection point after the generated signal's reflection from the back wall of the sample. All transients between these two represent reflections from inside the composite structure and form an oscillating periodic signal. Note that the composite samples under study consist of 19 layers which “produce” 18 corresponding US signal maxima.
Raw recorded signals are not ready to be imaged because they have an artificial negative tail following the front surface OA signal (black curve in Fig. 4a) resulting from HP filtering. To recover the full resolving power of the optical detector, a deconvolution procedure is applied to recorded A-scan signals to approach the “ideal” unipolar temporal profile [28,29] as much as possible.
Since the light absorption coefficient of the composite samples under study is more than 200 cm−1 (about 50 μm heat release depth), it is reasonable to assume that the OA signal generated at the front surface of the composite samples has a temporal profile identical to that of the one generated on the surface of the painted PMMA plate. Taking into account the sound speed in the composite of about 3000 m/s, we estimate that the spatial scale corresponding to US signal propagation during the laser pulse duration of 60 ns is equivalent to 180 μm. Thus, the profile of the laser-generated US signal is mostly determined by the laser pulse envelope. Differences in light absorption coefficients and Gruneizen parameters of PMMA and composite materials modulate PA signal amplitudes, but not signal profiles.
HP filtering by the Panametrics amplifier affects the Sagnac impulse response and the composite OA signal in precisely the same way. This means that for all frequencies outside the band of the very low frequency (below a few hundred kHz) instabilities of the composite OA signal, the only difference in its profile compared with the reference is due to scattering by sample heterogeneities. Thus, inverse filtration (or deconvolution) of the A-scan recorded for the composite sample with the reference OA signal can be represented in the frequency domain as:
| (1) |
In Eq. (1), Sprocessed(f) is the spectrum of the resulting deconvolved signal, SHP(f) is the spectrum of the recorded A-scan after analog HP filtering with the Panametrics amplifier, and SRef(f) is the spectrum of the OA reference signal from the PMMA plate. Filter(f) is the spectrum of a bandpass filter designed to remove unwanted very low and very high frequencies. For the results presented below, this filter is defined as:
| (2) |
where f0 = 100 kHz, f1 = 10 MHz, f2/f1 = 1.2. The resulting processed signal is produced by inverse Fourier transformation of Sprocessed(f). The result of this processing for the signal of Fig. 4a is presented in Fig. 4b. Visually perfect reconstruction cannot guarantee full signal recovery, but inverse filtering clearly reduces the negative slope in composite signals and enables full utilization of the dynamic range of the ADC.
Fig. 4c shows a processed Sagnac recording (after applying deconvolution) for a region containing a thin brass foil inclusion in the composite structure. The US reflection from the inclusion is clearly seen, as well as high-order reverberations between the defect and the front surface. The artificial negative slope is well compensated with deconvolution filtering. This procedure is applied to all A-lines used to create the B-scan images shown below.
3.2. B-scan images
3.2.1. Single shot images
Fig. 5 illustrates B-scan images obtained within the defect region of the sample UW-M. Each B-scan consists of 450 A-scans, normalized by their amplitudes at the front surface. Normalization was needed because the light absorption coefficient of the composite sample, local sample roughness, and small displacements of the Sagnac focal point from the sample surface can change from point to point. All of these factors influence only the measured signal amplitude, however, and do not appreciably change its profile.
Fig. 5.
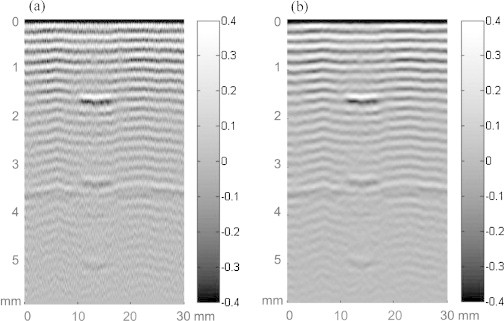
Typical B-scan images obtained with Sagnac interferometer (a) for single-shot regime and (b) after application of 10 A-scan moving average. All A-scan signals were normalized by their maxima prior to forming a B-scan image. Color bars show the distribution of signal amplitude over a linear gray-scale.
The sample was moved at a constant speed of 1 mm/s over a distance of 30 mm in the lateral direction, corresponding to a 66 μm spacing between A-scans. The laser pulse repetition rate was 15 Hz, but could be increased to 1 kHz keeping the same sample translation speed, and ultimately to 76 kHz for applications requiring very fast translation. A single shot (i.e. one laser firing per A-line) image obtained with the Sagnac is presented in Fig. 5a. As seen, the regular layered composite structure is visualized very well along with the well-defined inclusion.
As is evident from Fig. 5, the sensitivity of the Sagnac detector is sufficient for non-contact imaging of the composite materials used in this study even in a single shot regime. The signal to noise ratio (SNR), computed as the ratio of the front wall OA signal to the noise pressure, is about 26 dB, or 14 dB if referenced to the back wall signal. Furthermore, since the pump fiber laser can fire at a very high repetition rate (76 kHz for the current laser), scanning can be performed very quickly while additional signal averaging can be applied. Because the lateral resolution generally cannot be better than the pump laser beam diameter, 1.5 mm in our case, and the scanning step is only 66 μm, a simple moving average filter can be applied in the translation direction. Such processing does not substantially degrade lateral resolution if the averaging region is smaller than 750 μm (half of the laser beam diameter). The Sagnac based B-scan resulting from a moving average of 10 adjacent RF A-scans (i.e. 660 μm averaging window) is illustrated in Fig. 5b. As seen, the SNR is greatly (by times, or 10 dB) increased with this simple processing without any apparent change in spatial resolution. Note that moving average filtering can also be applied in two dimensions for three-dimensional data acquisition.
3.2.2. Different defect locations
As noted above, samples with inclusions placed at different depths were studied. The simplest case in US defectoscopy usually corresponds to a defect located far from sample surfaces (Fig. 5). In contrast, if the defect is located close to the front sample surface, detection and precise localization is sometimes challenging due to insufficient in-depth resolution or a dead zone for US detection in the very near field.
Fig. 6a illustrates the case where a thin brass foil inclusion is positioned only one layer, or 190 μm, below the sample surface. In spite of the modest 2.9 MHz probe signal bandwidth, the defect is imaged very well, demonstrating that the Sagnac in-depth resolution is better than one composite layer. In addition, multiple reverberations of the probe OA signal between the defect and the front sample surface are observed. An important feature of an ultra wideband LU system is that the temporal profile of the probe OA signal coincides with the signal envelope. That is, not only impedance discontinuities can be detected, but the sign of that discontinuity can be identified as well. Therefore, defects with impedance higher than that of the composite should be darker in the B-scan whereas defects with lower acoustic impedance should be brighter for our display format. We did not observe this in Fig. 6a, however, where a white strip above the black colored brass foil is quite evident. In later discussions with the material fabricator we discovered that the brass had not adhered well to the composite matrix for this sample, presumably producing an air gap leading to the bright signal observed in the B-scan.
Fig. 6.
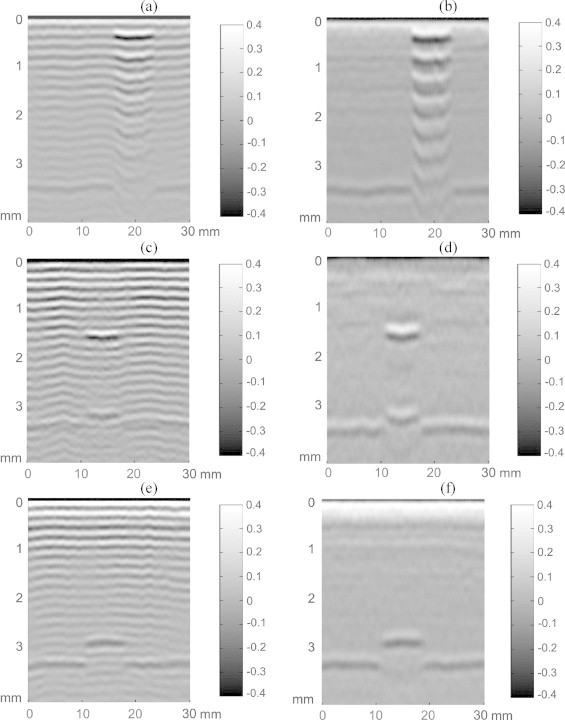
Typical B-scan images obtained with the fiber-optic Sagnac interferometer for different defect locations: (a) close to the front surface, (c) in the middle of the sample, (e) close to the back wall. Panels (b), (d) and (f) are low-pass (Eq. (3)) filtered versions of the images in the left column. Low-pass filtering greatly reduces signals from the regular composite structure and enhances the visibility of surface-like reflections from inclusions and sample boundaries. A moving average over 10 adjacent A-scan was applied to the data set. All A-scan signals were normalized by their maxima prior to forming a B-scan image. Color bars show the distribution of signal amplitude over a linear gray-scale.
Fig. 6c presents the B-scan for the case of a brass foil positioned approximately in the middle of the sample. The signal close to the back sample wall is the second reverberation of the probe OA signal between the defect and the front sample surface. The third reverberation is also clearly seen (Fig. 5b) and not shown here. Higher order reverberations can also be observed if the sampling volume is extended.
The case where the brass foil is located a few layers above the composite back wall is illustrated in Fig. 6d. As seen, it is very clear distinguished from the back sample wall, as the signal reflection from it is totally blocked by the defect. Most probably, this defect was not also perfectly embedded into the composite matrix and a thin air cavity produces the bright strip beyond the brass inclusion.
3.2.3. Low-pass image filtration
For B-scans using the full signal bandwidth, signals associated with the regular composite structure as well as surface-like reflection are well visualized. Note that sometimes signals from an inclusion can be masked by the strong US transients coming from the heterogeneous sample structure. In this section we present the results of a simple processing method to minimize signals from the regular composite structure, enhancing the visibility of surface-like reflections from inclusions and sample surfaces.
Since the spectrum of LU signals is ultra wideband, it can be used to identify signal harmonics characterizing different material structure components. Fig. 7 shows a typical spectrum of an A-scan signal recorded in an area free of defects. A strong narrow pole centered at a frequency of 7.1 MHz is associated with the strongly periodic composite structure. By eliminating this component, signals from the periodic composite structure are deemphasized. A low-pass filter can perform this task but it must be designed to maintain as much of the signal bandwidth as possible and produce a unipolar impulse response. The simplest operation to meet these requirements is to apply a filter to the signal in addition to the filter function described by Eq. (2), changing the characteristic frequencies f1 and f1 so that to f1LP = 5 MHz and f2LP/f1LP = 1.1:
| (3) |
as illustrated in Fig. 7 by the red curve.
Fig. 7.
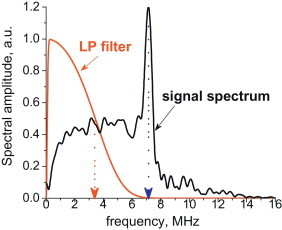
Frequency spectrum of an A-scan signal (black curve). A strong narrow peak at 7.2 MHz corresponds to the regular periodic structure of the composite sample. The low-pass filter function shown in red reduces the structure component of the signal.
The results of applying the LP filter to the data used to produce the left column of B-scans in Fig. 6 are presented on the right side of the same figure. Clearly, the strongly periodic structure signal is mainly removed from all B-scans, and US signal reflections corresponding to the defects are seen more clearly. In addition, large scale structure imperfections which were totally invisible in full bandwidth images are recognizable, demonstrating the power of the wideband LU technique. On the other hand, the axial resolution is degraded, resulting in “blurring” of defect signals and loss of high frequency information. More robust methods that can minimize the periodic structure signal while maintaining more of the overall signal bandwidth will be the subject of future studies.
3.3. LU imaging with very rough sample surface
As noted in Section 1, composite sample roughness is a serious factor dramatically affecting the efficiency of US detection with optical interferometers. In this study, composite samples had surfaces with very different roughnesses. The front surface of all samples had a roughness matching that of factory-made components used in the aerospace industry (Fig. 1a). In contrast, the back surface of all composite samples (see Fig. 1b and c) was extremely rough.
Fig. 8a presents a typical distribution of recorded OA signal amplitudes versus scan distance over a 30 mm segment for the case where the optical pump/probe beams are delivered to the front surface. Small scale amplitude variations are determined by sample roughness whereas long scale variations are related to surface non-flatness altering the position of the probe beam focal spot. Clearly, the amplitude does not change dramatically, and these variations are easily compensated with signal normalization prior to imaging. Signals recorded for the case where optical pump/probe beams are delivered to the back surface are much more variable, as illustrated in the blue curve of Fig. 8b where almost two thirds of detected amplitudes are below the noise level. A full bandwidth B-scan image for this case is presented in Fig. 9a. The defect can be seen, but the image quality is not comparable to that demonstrated earlier. Even with a 30 point moving average filter across A-scans (Fig. 9b), image quality is not fully recovered.
Fig. 8.
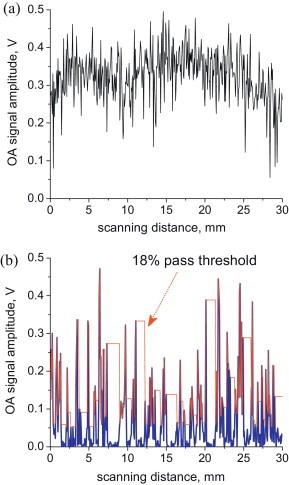
Typical amplitude dependence of the A-scan signal over a 30 mm scan distance for (a) regular front surface and (b) extremely rough back surface (blue curve). The red curve in panel (b) represents an 18% threshold cutoff below which A-scans are ignored and replaced with adjacent ones in B-scan images.
Fig. 9.
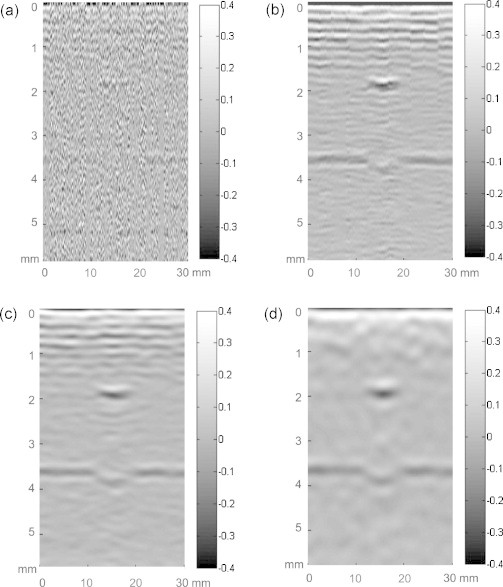
B-scan image acquired with an extremely rough surface (shown in Fig. 1): (a) single shot B-scan; (b) B-scan after application of 30 A-scan moving average; (c) B-scan after application of the 18% cutoff filter and 30 A-scan moving average; (d) B-scan after the 18% cutoff filter, 30 A-scan moving average, and LP filtering. All A-scan signals were normalized by their maxima prior to forming a B-scan image. Color bars show the distribution of signal amplitude over a linear gray-scale.
Although signal quality is significantly degraded for a very rough surface, some simple signal processing can recover most of the information require to make a useable B-scan image with the Sagnac detector even for the very rough surfaces considered here. Roughly one third of the recordings presented in Fig. 8b are above the noise level. An image can be reconstructed using only these signals and ignoring the rest. Using a threshold defined as 18% of the maximum recorded amplitude in the scan, a value derived empirically for this case, an A-scan will either contribute to the B-scan image or be replaced by its nearest neighbor that is above the threshold, as illustrated by the red curve in Fig. 8b. We note that the 18% threshold level was chosen empirically, but that the results presented below are not highly sensitive to the specific choice of this threshold level. B-scans reconstructed with this procedure are illustrated in Fig. 9c for whole bandwidth signals, and in Fig. 9d for LP filtered signals. Clearly, image quality is degraded compared to that in Fig. 6c and d. Nevertheless, the processed image is of sufficient quality to plainly identify the defect. We note again that these results were obtained with an extremely rough surface that would be nearly impossible to probe with speckle sensitive interferometers.
3.4. Complete US data set
As mentioned above, multiple B-scan images were recorded with a step of 0.5 mm in the Y direction. A total of 360 B-scans were recorded to form a 3D data set for all samples under study. These data can be displayed using multiple formats. In Movies 1 and 2, these are presented to illustrate the overall imaging performance of the all-optical, non-contact system.
Each frame in the movie presented in Fig. 9 represents a B-scan slice through the full 3D data set. The upper panel shows the current position of the B-scan imaging plane relative to significant structures within the sample. B-scans movies are shown over the LP filtered (upper B-scan) and whole bandwidth (lower B-scan) formats described earlier for static images (see Fig. 6). Defects of all types (thin brass foil, tape and polymer) are very well visualized. The brass foil definitely exhibits the strongest reflected signals, which are even seen as double and triple reflections in Fig. 5. However, the thin tape inclusion is also well visualized with the non-contact, all-optical system.
When information about the regular composite structure is not required for evaluation, LP filtered images more clearly detect defect locations since periodic signals from the structure that could mask these reflections are virtually eliminated. We note also that artificial flashes appear from time to time in these movies. They correspond to A-scans recorded at points with deep surface scratches, cavities, or bumps that dramatically reduce the magnitude of reflected light that can be delivered to the interferometer. These bad A-scans can be easily identified and removed from B-scans using the processing described above to handle signals from the very rough back surface. In these movies, however, we deliberately kept all raw signals to demonstrate the overall robustness of our LU system.
Movie 1 shows the 3D data set where each frame represents an independent XY plane. In other words, each frame presents the image of heterogeneities in a plane parallel to the front surface (C-scan). There were 800 frames separated by 15 μm, corresponding to each sampling point of the ADC. Using the same display format as the B-scan movies, C-scan movies present both whole bandwidth and LF filtered images. This format can reveal composite structure layer by layer, with the resolution determined by the detection bandwidth. This movie clearly captures the periodic layer pattern of composites and also shows the depth and lateral extent of all defects. It is interesting that LP filtered C-scans clearly exhibit the lateral braiding of composite structure in the near field where the lateral resolution is primarily determined by the detection spot diameter rather than the diameter of the pumping laser beam.
4. Discussion
Detection sensitivity is a key parameter for remote US measurements, because the sensitivity of optical interferometers is usually much smaller than that of piezoelectric transducers. In a companion study [24], we compared contact US measurements using an ultra-wide band PVDF detector made from a 28 μm PVDF film to equivalent measurements using the Sagnac detector. The NEP of the Sagnac scheme was better than 400 Pa. It is about 40 times worse than that of the PVDF transducer (the diameter of the sensitive area is 6 mm) operating in the open-circuit regime [27]. Note, that the sensitivity of wide-band PVDF transducers operating in the open-circuit regime is proportional to the capacitance of the piezo-element [27], i.e. to the surface area. However, wide-aperture transducers are good for inspection of quite thin samples when propagation of ultrasound can be considered in the near field. For thicker boards, spatial averaging over the transducer aperture blurs the image with reduced lateral resolution. Our 7.5 μm diameter non-contact detector is equivalent in SNR to a 1 mm diameter PVDF detector, representing the state of the art in contact wideband detection. Conversely, increasing the detection spot to a few mm in the Sagnac detector would improve SNR for a mirror-like surface, but it is not practical for rough and non-flat composite surfaces.
The absolute sensitivity of any detection scheme can be quantified by comparing the NEP to that of an ideal detector of the same bandwidth and aperture limited only by Johnson–Nyquist (i.e. thermal) noise. The noise power of the Sagnac detector is only 17 times higher than that of an equivalent ideal acoustic detector, representing a detector system noise figure of 12.3 dB (i.e. noise level above the Nyquist thermal noise limit, the ultimate value which cannot be overcome). Moreover, this figure overestimates the noise figure of the interferometer itself since it includes all of the electronics in the signal path. Such a low system noise figure for optical detection from rough composite surfaces reflecting less than 1% of incident light over a 7.5 μm diameter detection aperture should enable non-contact LU inspection systems with exquisite sensitivity and spatial resolution.
The Sagnac approach presented here is particularly appropriate for LU systems performing NDT&E studies on composite materials used in the aerospace industry because of its sensitivity and robustness. The interferometer design overcomes, in part, the limitations of previous ones. A number of issues were addressed in our design to reach the performance level described above. The interferometer is assembled from fiber-optic devices and includes a balanced detection scheme to improve sensitivity. Most components are custom designed and leverage the most recent advances in optical sources and fiber-optic components developed for the optical communications industry. A low coherence SLD in the interferometer greatly minimized the effects of destructive interference within the interferometer itself. We have also optimized all optical elements by maximizing transmission. Thus, using two broadband interfering beams with high intensities reflected from one surface maximizes constructive interference and minimizes noise. Balanced detection also greatly minimizes the effects of low frequency noise from thermal lens effects. Overall, this approach produced a robust interferometer operating at high light intensities but with minimal parasitic noise. The optical fiber providing the delay in the Sagnac was chosen to be 10.5 m to maximize detection sensitivity over a frequency band of ∼10 MHz. Note, that the fiber can be easily switched to another length in this design to maximize transmission in the desired frequency band.
The main problem with LU inspection of composite samples is that the sample surface is quite rough. In this work, we presented results acquired from composite samples with different surface roughness. For surfaces matching normal manufactured quality, the amplitude of detected US signals has a standard deviation of about 20%, as illustrated in Fig. 8a. This variation, however, does not affect the temporal profile of recorded signals and simply changes overall amplitude. Furthermore, it was very surprising that Sagnac detection still works (see Fig. 9) when sample roughness is extremely high with signal amplitude deviations more than 130% of the mean value (see Figs. 1c, d, and 8b). Nevertheless, simply ignoring bad events (in our case, recorded signals with amplitude less than 18% of the maximum) and applying a moving average across 30 adjacent A-scans produced B-scan of sufficient quality to clearly identify a known defect. Future studies will focus on more sophisticated signal processing methods to better recover image quality under these circumstances. Nevertheless, the example presented here of non-contact imaging from a very rough sample surface demonstrates the power, stability, and overall sensitivity of the differential Sagnac approach that is relatively insensitive to speckle and does not require a reference interferometer arm.
A possible challenge of this system for in-field applications is a relatively small depth of field. Since the Sagnac detector is focused, it receives backscattered light only from the focal area of the detector. When the surface is not flat, i.e. surface height is greater than 0.2 mm over the scanning range in the lateral direction, the SNR will degrade, potentially requiring an additional self-positioning tool for the vertical coordinate. Another way to improve the depth of field is increasing the focal length of the lens in the receive head, but decreasing the NA of the lens will definitely affect the amount of collected light and thereby the resulting sensitivity. Optimizing the depth of field for a certain surface roughness will be the focus of future studies.
In future studies, we also plan to exploit the Sagnac detector to evaluate composite material properties using a fully non-contact approach. For example, the ultra-wide bandwidth of the present system can potentially be exploited for non-destructive imaging of material porosity. A high-sensitivity, point-like US detector can also be used in non-contact detection of surface acoustic waves, potentially enabling a wide range of applications [30]. Finally, the detector's small size and high sensitivity may be appropriate for a number of biomedical problems.
5. Conclusions
The performance of a non-contact, all-optical, compact, inexpensive LU system for NDT&E of composite materials has been demonstrated on samples containing a wide range of defects. High resolution images of both the inherent composite structure as well as all inclusions within the sample clearly showed the efficacy of the system. This system was also tested for US signal detection from extremely rough surfaces, and surprisingly showed excellent performance using a simple data processing algorithm. The key component of the system is a modified Sagnac-based fiber optical balanced interferometer, which is quite robust for practical applications – it does not require a reference arm; detects acoustic pressure instead of displacement; does not need adjustment and stabilization; and can be mounted on any surface. It is also quite insensitive to parasitic interferences within the interferometer itself because a short 40 μm coherence length SLD is used as the optical source. The interferometer exhibits very good sensitivity in ultra wide-band US signal detection – noise equivalent pressure is about 400 Pa in the frequency band of 1–10 MHz for US signal detection from rough composite surfaces, representing a noise source only 12.3 dB higher than that of an ideal acoustic detector operating over the same bandwidth and aperture. To our knowledge, this is the best reported sensitivity for a non-contact ultrasonic detector of this dimension.
Conflicts of interest statement
The authors declare that there are no conflicts of interest.
Acknowledgments
The work reported here was supported by a contract between the Boeing Company and the University of Washington (project# 66-1915), a grant from the Joint Center for Aerospace Technology Innovation (project# 06-1041), and the Department of Bioengineering at the University of Washington. We thank Dick Bossi, Jeff Kollgaard, Bill Motzer, and Jill Bingham at the Boeing Company for help with nearly every aspect of this project, and especially for supplying the composite samples.
Biographies

Ivan Pelivanov is the Assistant Professor at the Physics faculty of M.V. Lomonosov Moscow State University and visiting Assistant Professor at the University of Washington (WA, USA). He graduated from the group of Prof. A.A. Karabutov, which is a pioneering and renown team in various physical and biological applications of optoacoustic spectroscopy, and received his Ph.D. degree in 2000. His recent research focuses on designing sensitive wide-band detectors, application of optoacoustic method in NDT & material evaluation, analytic chemistry and in medicine. He is one of the most active members in optoacoustic research for more than a decade.

Takashi Buma received his Ph.D. in Applied Physics from the University of Michigan in 2002. After his postdoctoral work at the Center for Ultrafast Optics at the University of Michigan, he joined the University of Delaware as an Assistant Professor in Electrical and Computer Engineering. He is currently an Assistant Professor in Electrical and Computer Engineering at Union College in Schenectady, New York. His research interests include optoacoustic arrays for ultrasound biomicroscopy, photoacoustic microscopy, optical coherence tomography, and time-domain terahertz imaging. He teaches undergraduate courses in electronics, biomedical instrumentation, and medical imaging.

Jinjun Xia earned his Ph.D. degree in bioengineering from University of Missouri in 2007. Currently, he is working on ultrasound and photoacoustic imaging in Dr. O’Donnell's lab at University of Washington, Seattle, WA. His research interest includes all optical methods for non-contact acoustic wave generation and detection, photoacoustic imaging, optical imaging and light-tissue interaction.

Chen-Wei Wei received the B.S. degree in electrical engineering from National Chiao-Tung University, Hsinchu, Taiwan, in 2003, and the M.S. and Ph.D. degree in electrical engineering from National Taiwan University, Taipei, Taiwan, in 2005 and 2009, respectively. He is currently a postdoctoral in bioengineering at University of Washington, Seattle, USA. His current research interests include new ultrasound and photoacoustic contrast agent and new imaging techniques.

Dr. Matthew O’Donnell has worked at General Electric CRD, the University of Michigan, where he was Chair of the BME Department from 1999 to 2006, and the University of Washington (UW), where he was the Frank and Julie Jungers Dean of Engineering from 2006 to 2012. He is now Professor of Bioengineering at UW. His most recent research has focused on elasticity imaging, optoacoustic arrays, photoacoustic contrast agents, thermal strain imaging, and catheter-based devices. He is a fellow of the IEEE and AIMBE and is a member of the Washington State Academy of Sciences and the National Academy of Engineering.
Footnotes
This is an open-access article distributed under the terms of the Creative Commons Attribution-NonCommercial-No Derivative Works License, which permits non-commercial use, distribution, and reproduction in any medium, provided the original author and source are credited.
Appendix A. Supplementary data
The following are the supplementary data to this article:
Movie representing running B-scan imaging through the composite sample. The upper panel shows the current position of the B-scan imaging plane relative to significant structures within the sample. B-scan panels are shown over the LP filtered (upper movie) and whole bandwidth (lower movie) formats. Each B-scan consists of 450 individual A-scans and there are 360 B-scans spaced by 0.635 mm in the whole scanning region. A moving average over 10 adjacent A-scans has been applied to form each B-scan frame, whereas no smoothing or averaging is performed between neighboring B-scan frames.
C-scan movie sectioning the complete 3D data set by planes parallel to the front surface. Movies are shown in LP filtered (upper panel) and whole bandwidth (lower panel) formats. There were 800 frames separated by 15 μm, corresponding to each sampling point of the ADC. A moving average over 10 adjacent A-scans is applied to each B-scan frame to form the resulting 3D data set for C-scan sectioning.
References
- 1.Monchalin J.-P. IEEE Trans Ultrason Ferroelectr Freq Control – UFFC. 1985;33:485–499. doi: 10.1109/t-uffc.1986.26860. [DOI] [PubMed] [Google Scholar]
- 2.Scruby C.B., Drain L.E. Adam Hilger; Bristol, UK: 1990. Laser-ultrasonics: techniques and applications. [Google Scholar]
- 3.Dewhurst R.J., Shan Q. Meas Sci Technol. 1999;10:R139–R168. [Google Scholar]
- 4.Li H., Wang L. Phys Med Biol. 2009;54:R59–R97. doi: 10.1088/0031-9155/54/19/R01. [DOI] [PMC free article] [PubMed] [Google Scholar]
- 5.Monchalin J.-P. Appl Phys Lett. 1985;47:14–16. [Google Scholar]
- 6.Blouin A., Monchalin J.-P. Appl Phys Lett. 1994;65:932–934. [Google Scholar]
- 7.Blouin A. Rev prog. In: Thompson D.O., Chimenti D.E., editors. QNDE 26. Plenum; New York: 2007. pp. 193–200. [Google Scholar]
- 8.Blouin A, et al., US Patent# 6,813,951 B2 (2004).
- 9.Culshaw B. Meas Sci Technol. 2006;17:R1–R16. [Google Scholar]
- 10.Jang T.S., Lee S.S., Kwon B., Lee W.J., Lee J.J. IEEE Trans Ultrason Ferroelectr Freq Control. 2002;49:767–775. doi: 10.1109/tuffc.2002.1009334. [DOI] [PubMed] [Google Scholar]
- 11.Jang T.S., Lee J.J., Yoon D.J., Lee S.S. Ultrasonics. 2002;40:803–807. doi: 10.1016/s0041-624x(02)00214-7. [DOI] [PubMed] [Google Scholar]
- 12.Tachizaki T., Muroya T., Matsuda O., Sugawara Y., Hurley D.H., Wright O.B. Rev Sci Instrum. 2006;77:043713-1–043713-12. [Google Scholar]
- 13.Fomitchov P.A., Krishnaswamy S., Achenbach J.D. Opt Laser Technol. 1997;29:333–338. [Google Scholar]
- 14.Buma T., O’Donnell M. Appl Phys Lett. 2004;85:6045–6047. [Google Scholar]
- 15.Chao C.-Y., Ashkenazi S., Huang S.-W., O’Donnell M., Guo L.J. IEEE Trans Ultrason Ferroelect Freq Control. 2007;54:957–965. doi: 10.1109/tuffc.2007.341. [DOI] [PubMed] [Google Scholar]
- 16.Hsieh B.-Y., Chen S.-L., Ling T., Guo L.J., Li P.-C. Opt Express. 2012;20:1588–1596. doi: 10.1364/OE.20.001588. [DOI] [PubMed] [Google Scholar]
- 17.Ling T., Chen S.-L., Guo L.J. Opt Express. 2011;19:861–869. doi: 10.1364/OE.19.000861. [DOI] [PMC free article] [PubMed] [Google Scholar]
- 18.Rosenthal A., Razansky D., Ntziachristos V. Opt Express. 2012;20:19016–19029. doi: 10.1364/OE.20.019016. [DOI] [PubMed] [Google Scholar]
- 19.Pouet B.F., Ing R.K., Krishnaswamy S., Royer D. Appl Phys Lett. 1996;69:3782–3784. [Google Scholar]
- 20.Kamshilin A.A., Grachev A.I. Appl Phys Lett. 2002;81:2923–2925. [Google Scholar]
- 21.Zamiri S., Reitinger B., Portenkirchner E., Berer T., Font-Sanchis E., Burgholzer P. Appl Phys B. 2013 [Google Scholar]
- 22.Rousseau G., Gauthier B., Blouin A., Monchalin J.-P. J Biomed Opt. 2012;17:061217-1–061217-7. doi: 10.1117/1.JBO.17.6.061217. [DOI] [PubMed] [Google Scholar]
- 23.Rytov S.M., Kravtsov Yu.A., Tatarskii V.I. Springer-Verlag; Berlin; Berlin: 1989. Principles of statistical radiophysics. [Google Scholar]
- 24.Pelivanov I.M., Buma T., Xia J., Wei C.-W., O’Donnell M. JAP. 2014 (accepted for publication, Article no. JR13-11986R) [Google Scholar]
- 25.Astrath N.G.C., Malacarne1 L.C., Lukasievicz G.V.B., Belancon M.P., Baesso M.L., Joshi P.R. J Appl Phys. 2010;107:083512-1–083512-6. [Google Scholar]
- 26.http://www.thorlabs.us/Thorcat/21600/PDB420C-Manual.pdf
- 27.Oraevsky A.A., Karabutov A.A. Proc SPIE 3916, biomedical optoacoustics. 2000. pp. 228–239. [Google Scholar]
- 28.Gusev V.E., Karabutov A.A. AIP; New York: 1993. Laser optoacoustics. [Google Scholar]
- 29.Karabutov A.A., Savateeva E.V., Podymova N.B., Oraevsky A.A. J Appl Phys. 2000;87:2003. [Google Scholar]
- 30.Hess P. Phys Today. 2002;55:42–47. [Google Scholar]
Associated Data
This section collects any data citations, data availability statements, or supplementary materials included in this article.
Supplementary Materials
Movie representing running B-scan imaging through the composite sample. The upper panel shows the current position of the B-scan imaging plane relative to significant structures within the sample. B-scan panels are shown over the LP filtered (upper movie) and whole bandwidth (lower movie) formats. Each B-scan consists of 450 individual A-scans and there are 360 B-scans spaced by 0.635 mm in the whole scanning region. A moving average over 10 adjacent A-scans has been applied to form each B-scan frame, whereas no smoothing or averaging is performed between neighboring B-scan frames.
C-scan movie sectioning the complete 3D data set by planes parallel to the front surface. Movies are shown in LP filtered (upper panel) and whole bandwidth (lower panel) formats. There were 800 frames separated by 15 μm, corresponding to each sampling point of the ADC. A moving average over 10 adjacent A-scans is applied to each B-scan frame to form the resulting 3D data set for C-scan sectioning.


