Abstract
Reference scanners are used in dental medicine to verify a lot of procedures. The main interest is to verify impression methods as they serve as a base for dental restorations. The current limitation of many reference scanners is the lack of accuracy scanning large objects like full dental arches, or the limited possibility to assess detailed tooth surfaces. A new reference scanner, based on focus variation scanning technique, was evaluated with regards to highest local and general accuracy. A specific scanning protocol was tested to scan original tooth surface from dental impressions. Also, different model materials were verified. The results showed a high scanning accuracy of the reference scanner with a mean deviation of 5.3 ± 1.1 µm for trueness and 1.6 ± 0.6 µm for precision in case of full arch scans. Current dental impression methods showed much higher deviations (trueness: 20.4 ± 2.2 µm, precision: 12.5 ± 2.5 µm) than the internal scanning accuracy of the reference scanner. Smaller objects like single tooth surface can be scanned with an even higher accuracy, enabling the system to assess erosive and abrasive tooth surface loss. The reference scanner can be used to measure differences for a lot of dental research fields. The different magnification levels combined with a high local and general accuracy can be used to assess changes of single teeth or restorations up to full arch changes.
Keywords: Medicine, Issue 86, Laboratories, Dental, Calibration, Technology, Dental impression, Accuracy, Trueness, Precision, Full arch scan, Abrasion
Introduction
Accuracy is a major interest in many fields in dental medicine. Replacing dental hard tissue needs an exact fitting prosthesis to ensure proper function and prevent further destroying the remaining tooth structure1,2. Fixed partial dentures and total prosthesis are especially critical for exact fitting at supporting structures like prepared teeth or implants3. This is why a highly accurate reproduction is needed, especially in the field of dental impressions and dental laboratory workflow. However, other fields of dental treatment also benefit from a true and precise metrical outcome, to verify treatment success and evaluate new treatment strategies, e.g. soft and hard tissue augmentation, erosion and abrasion monitoring, periodontal treatments, and orthodontic treatments4,5. In many of these fields, current validation procedures are linear distance measurements with calipers or microscopes6,7. These methods are limited to only few measuring points and limited information of three-dimensional (3D) changes of the testing area. Newer measuring methods include the optical or radiographic capturing of the entire surface of the test object8,9. Here, the entire surface or volume is measured and displayed as a 3D object on the computer screen. Linear measurements are possible, as well as superimpositions of models from different scan times. With this superimposition, an evaluation of the surface changes at every scan point is possible. This enables the possibility of monitoring a specific area or displaying deformations in all three coordinate axes. Also, volumetric changes can be measured10. The limiting point with these new methods is the accuracy of the scanner, used to capture the test object. None of the changes within the accuracy of the reference scanner can be divided into changes of the test object or scan errors. Scan accuracy is often a value given by the manufacturer derived from scanning small, calibrated objects11. This minimal scan error is different when scanning large objects like a dental arch. Accuracy consists of trueness and precision. Trueness is the deviation of the scanned object from its real geometry. Precision is the deviation between repeated scans (ISO 5725-1). In this study, a new optical reference scanner, based on the focus variation scanning technique, was introduced to scan specimens from single tooth up to full arch models with highest accuracy. This reference scanner was used as a base for several studies, comparing dental impression accuracy from conventional and digital techniques12–14 and for actual projects concerning dental occlusion and abrasion of dental materials. The aim of this study was to provide basic information of the accuracy of the reference scanner and some possibilities to use this device in the field of dental research.
Protocol
1. Specimen Preparation/Base
Apply a flat base around the specimen. Place the specimen on the scanning table. Orientate the occlusal surface to the horizontal plane (Figure 1).
2. Software Analysis
Start the program and then the Laboratory Measurement Module (Figure 2)
Position the specimen at the center of the scanning table.
Choose the correct magnification lens. For large objects, like full arch scans, use the 5X objective.
Move the scan optic by using the 3D mouse until the surface of the specimen is displayed on the live view window (Figure 3).
Use sensor control to set Exposure and Contrast to achieve optimal scanning parameters. For metal surfaces, use an exposure between 400 and 800 µsec and a contrast between 0.3 and 0.8 (Figure 4).
Check image quality by checking the button "Show Image Quality in Live Preview".
Set the correct parameters in the section "Measurement Control". The measurement type is "3D Dataset"; ImageField Type is "General ImageField" (Figure 5).
Click on "New ImageField".
- Define the scan volume. The software needs the bounding coordinates of the measure volume.
- Move the specimen to the highest and lowest scan level and click on "Add Position" at both points. The "Z Range" value shows the actual height of the scan volume (Figure 6).
- Move the specimen to the X-Y boundings of the scan volume. Click on "Add Position" to define X-axis and Y-axis lengths. The dimension of the scan volume is shown at the "Information" tab and should exceed the dimensions of the specimen by 1 cm in the X-axis and Y-axis.
- Check the "Points" number. The software is capable of scanning 100 million surface points in one "ImageField" scan. The actual number of points exceeds this limit. "Decimate" the measure point's number by a "Lateral Downsampling" of the point size.
- Click on "Advanced Settings" (Figure 7).
- Move the "Lateral Downsampling" slider to the right until the "Points" number is reduced below 100 M (Figure 7). Downsampling reduces the lateral resolution of the surface points, resulting in larger pixel size of the scanned object. To ensure optimal scan results, the vertical resolution is increased.
Click on "Start Measurement". This will start the "Preview Mode". The software performs a prescan with the selected X- and Y-axis dimensions.
After the prescan is completed, select the region of interest. This helps to reduce file size and scanning time (Figure 8).
Select all parts of the prescan except the specimen and two measure fields around the specimen, containing the flat base (Figure 9).
Click on "Start" to begin the scan.
Control the scan in the "ImageViewer" using the mouse and press the left mouse button (Figure 10).
Close the window and click on "View Pseudo Color Only".
Click on "Settings" and "Pseudo Coloring", and choose "Repeatability".
Set the "Max." value to 0.2 and click on "Apply Range".
Control the repeatability, it should be equal for areas with the same incline and material. In particular, the base around the specimen should display a homogeneous repeatability (Figure 11).
Click on "Database" and save the scan to the appropriate folder.
Export the scan to different file formats, if needed. Click on "File/Export/3D Data As/…." The protocol can be paused at that point and continued later.
3. Difference Analysis
Use the "3D-Editor" to cut away the base. This area will not be used for the difference analysis.
To compare and analyze two scans, start the "Difference Measurement" software (Figure 12).
Choose the second model to compare.
Click on "Automatic Rough Alignment" to perform a first match of the models.
Click on "Manual Adjustment" and align the models with rotating and moving until they are in the same orientation (Figure 13).
Click on "Automatic Alignment" and "Apply" to start the best fit algorithm for the optimal model matching.
Click on "Differences" to view the difference map of the two matched models.
Select a proper color range to display the deviations (Figure 14). Save the visual deviation pattern as a screenshot for analysis.
Click on "Statistics" to display the statistical values of the differences. Choose 1 µm class size and save histogram data to a text file for statistical comparison (Figure 15).
Representative Results
Figure 16A shows the scan of a gypsum specimen. To verify optimal scan parameters, control the repeatability for the material. A section of the specimen is scanned with different contrast and brightness settings and the repeatability is checked after each scan to find the optimal scan settings. Metal surfaces show the best results with a contrast lower 1.0 and gypsum or resin materials with a higher contrast. Figure 16B shows the repeatability without optimal scanning parameters after the test scan. The sloped cusp surface shows a low repeatability. Figure 16C shows the same surface scanned with optimal contrast and brightness. Figure 17A shows the scan of a dental arch. The steep inclines at the buccal and oral aspects revealed a low repeatability (Figure 17B). The trueness of such a scan is displayed in Figure 17C. A flat base, surrounding the model, significantly increases scanning accuracy, when included in the scan (Figures 17D-17F).
Figure 18 shows the study protocol for verifying scanner accuracy and analyzing the accuracy of a conventional impression method with a vinylsiloxanether material.
Table 1 shows the trueness and Table 2 the precision of master model scans from different x-y-z axis orientations and from a conventional impression method. Scanning from different directions verified the reference scanner accuracy for this specific demand on dental accuracy. It revealed any filter effects of the scanning software. The results showed very low deviation across the entire dental arch. The difference images can be used to visualize the specific limitations of the scanning process. Areas with steep inclines like the palatal aspect of the incisors showed higher local deviations because of a lower scanning quality of the surface (Figure 19).
The deviations caused by different impression methods were significantly higher than the internal accuracy of the reference scanning system. Both trueness and precision were significantly lower with the conventional impression method than with the reference scanner. The difference images showed the deformation of the impression with positive and negative deformations especially towards the distal end of the dental arch (Figure 20A). The digital impression showed a different kind of deviation pattern, with higher deviations especially towards the distal teeth (Figure 20B)
Abrasion of dental materials can be analyzed in the same way, superimposing the tooth surface before and after chewing simulation. Figure 21 shows a test specimen before and after a chewing simulation and their superimposition. Local surface loss was visible in the difference image. Mean vertical loss of height and the volume changes can be measured with the difference analysis software.
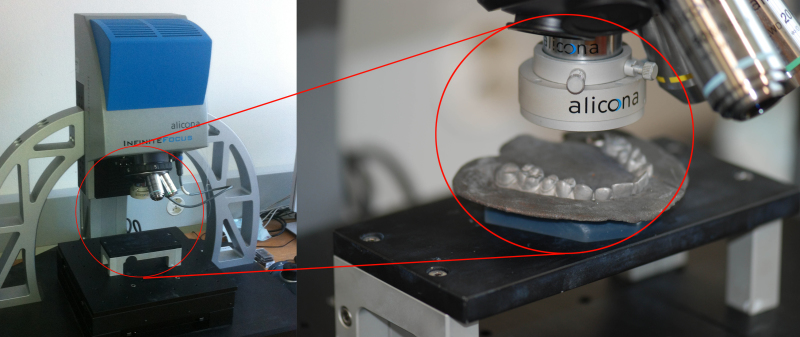 Figure 1: Specimen with a flat base placed on the x-y table of the reference scanner.
Click here to view larger image.
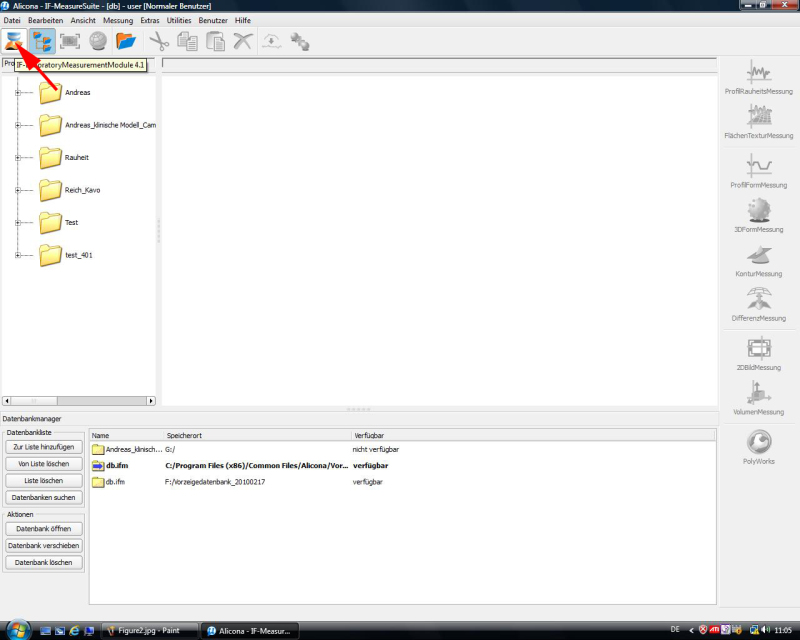 Figure 2:
Start “IF-Laboratory Measurement Module.”
Click here to view larger image.
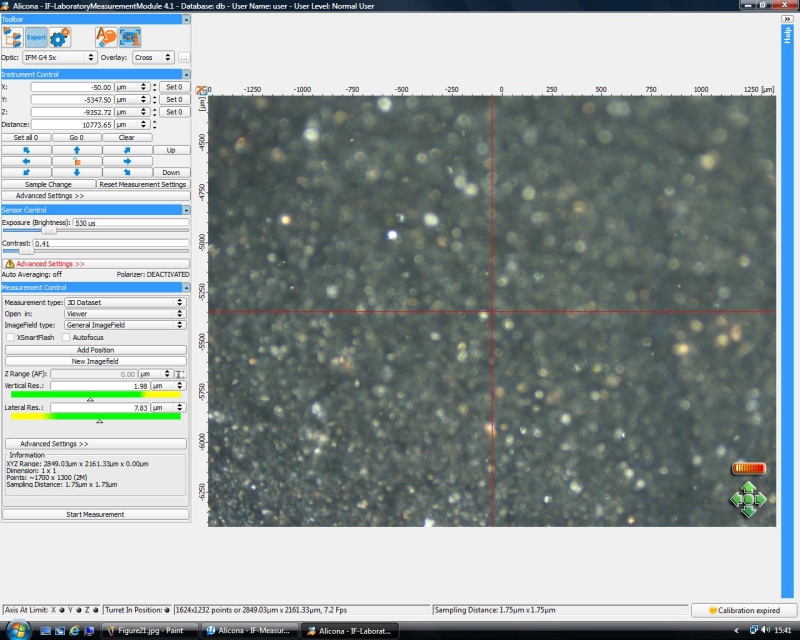 Figure 3:
Adjust z-axis to the base.
Click here to view larger image.
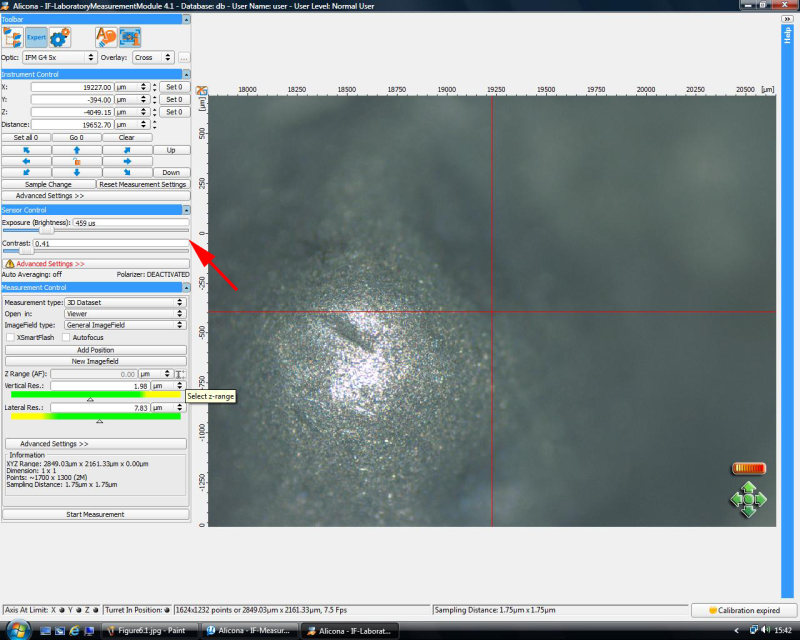 Figure 4:
Adjust “Exposure” and “Contrast.”
Click here to view larger image.
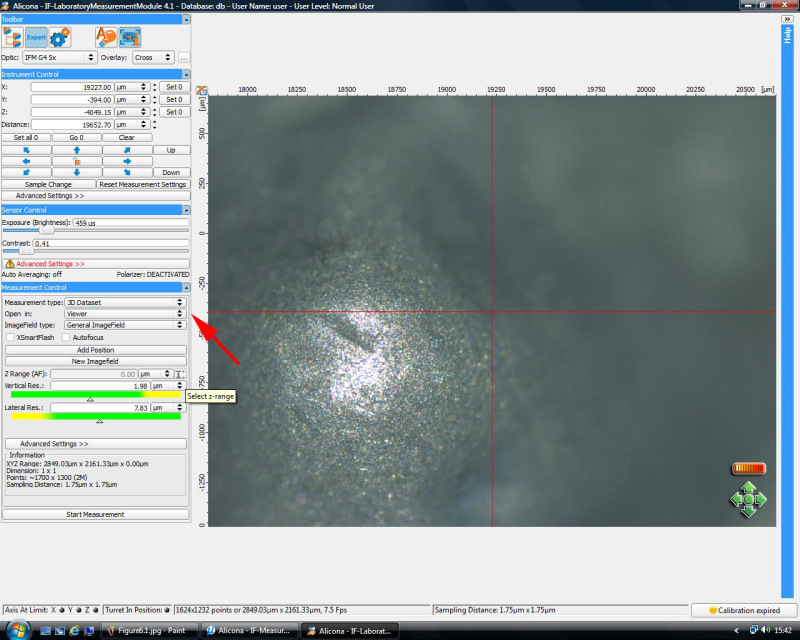 Figure 5:
Define scanning parameters.
Click here to view larger image.
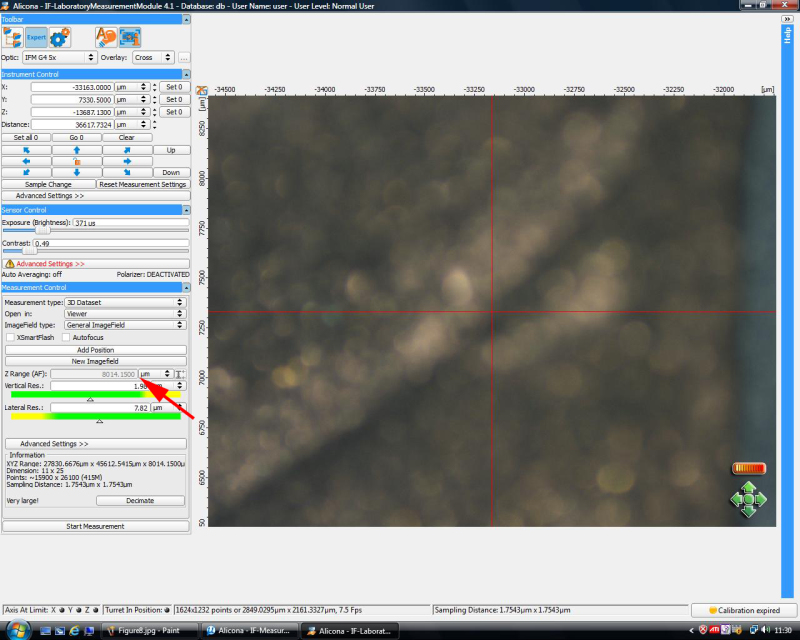 Figure 6:
Define scan volume.
Click here to view larger image.
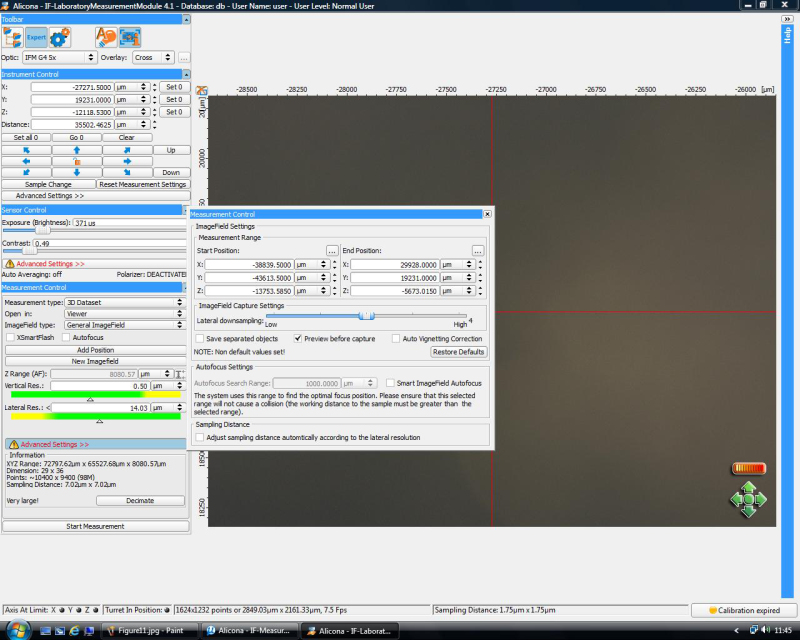 Figure 7: Decimate point size.Click here to view larger image.
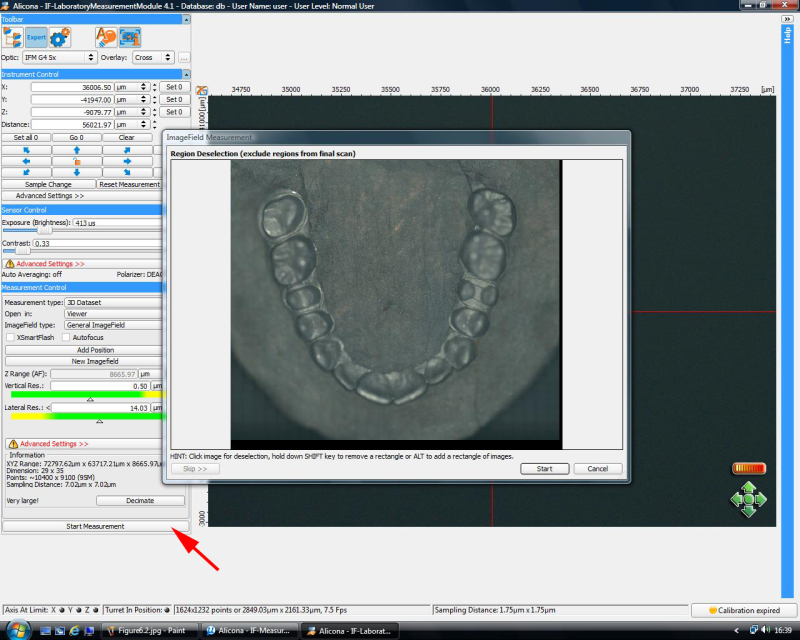 Figure 8: Prescan of the specimen.
Click here to view larger image.
 Figure 9:
Define necessary image fields.
Click here to view larger image.
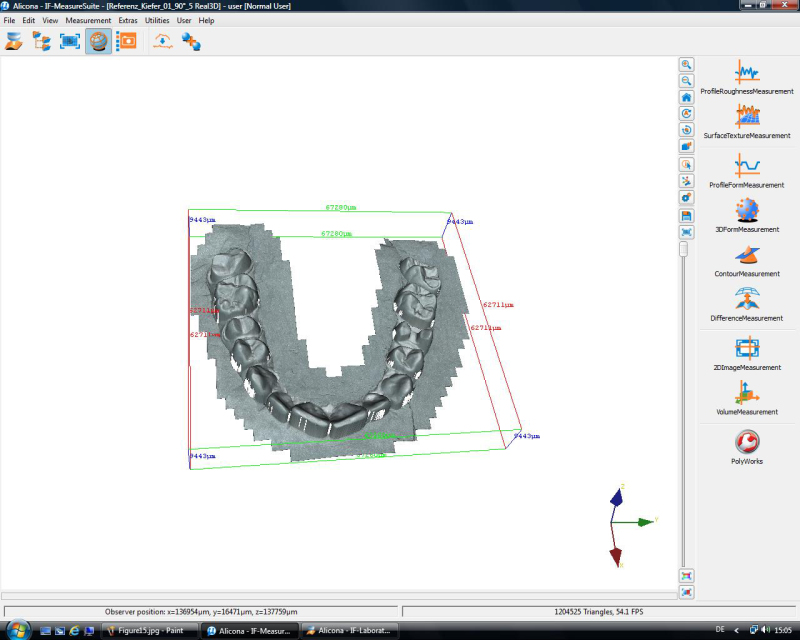 Figure 10:
Control scan.
Click here to view larger image.
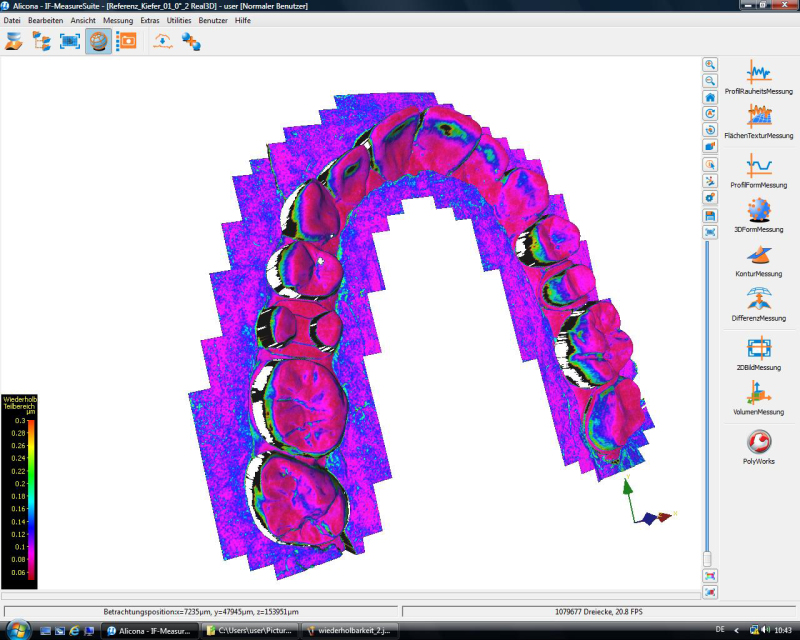 Figure 11:
Control repeatability of the scan.
Click here to view larger image.
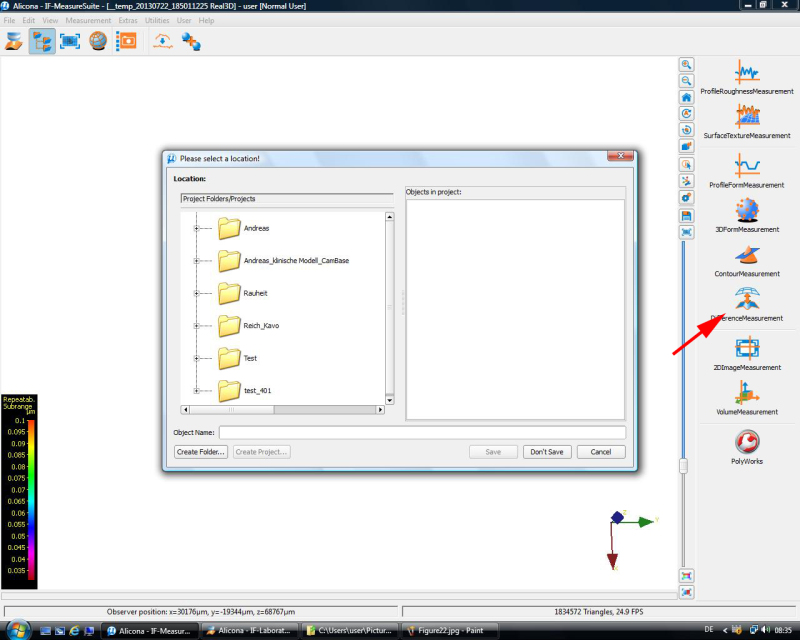 Figure 12:
Load second model scan for difference analysis.
Click here to view larger image.
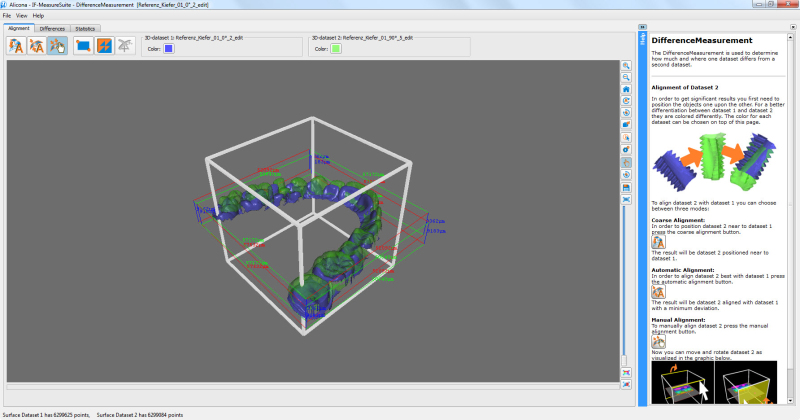 Figure 13:
Manual alignment of two scan datasets before automatic best for registration.
Click here to view larger image.
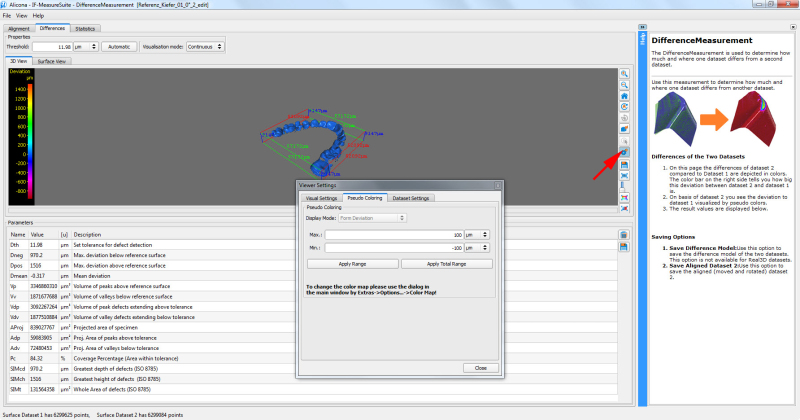 Figure 14: Set scale for visual difference analysis.
Click here to view larger image.
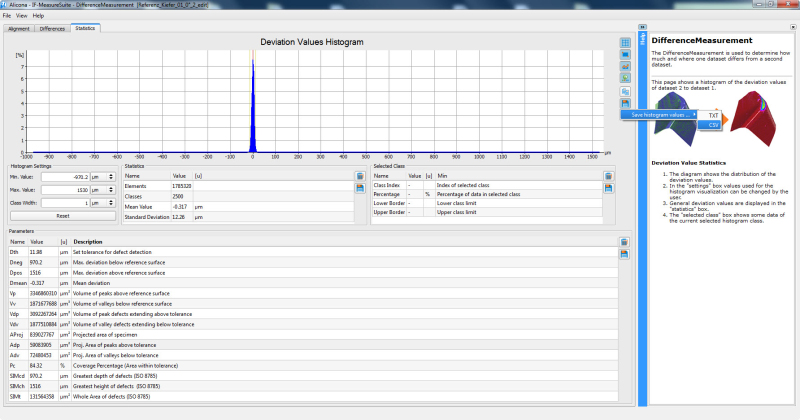 Figure 15:
Display and export statistics file for analysis.
Click here to view larger image.
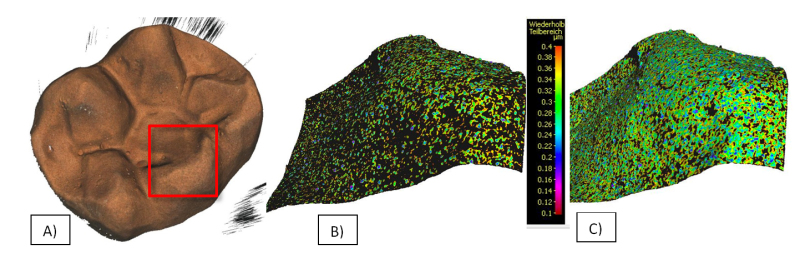 Figure 16:Influence of scan parameters on repeatability. A) Scanned single tooth model for abrasion measurement. The first step for scanning a new material is to find the optimal contrast ratio and brightness to ensure high repeatability for accurate measurements B) Repeatability of a cusp without optimal scan parameters (contrast: 0.25, brightness: 0.8 msec) C) Repeatability of the model surface with optimal scan parameters (contrast 1.3, brightness 1.4 msec). Click here to view larger image.
 Figure 17: Preparing a full arch model scan. A) Scanning without the base B) Repeatability at the model margins is low because of the high angulation of the tooth surface, especially in the anterior region C) The superimposition of different scanning directions shows a deformation of the scan, starting in the anterior region of the model D) Applying a horizontal base around the model with a material of equal light reflection properties E) Scanned model and base show high repeatability all around the scan object F) The superimposition of different scan directions shows only small local deviations but no entire deformation of the scan. Click here to view larger image.
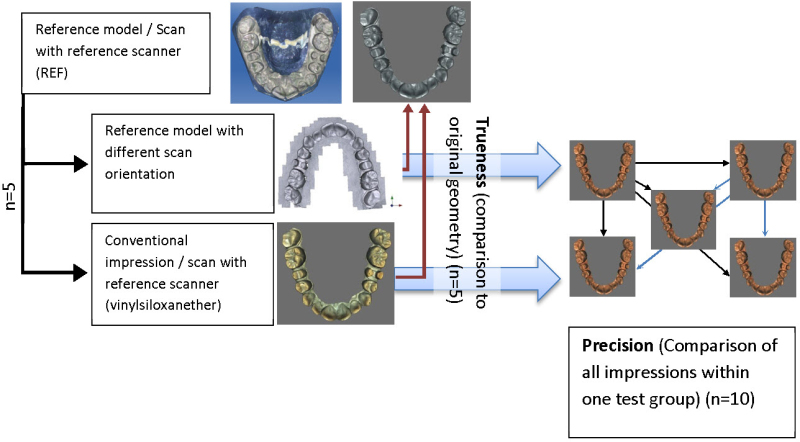 Figure 18:
Protocol for scanner evaluation and accuracy testing for conventional full arch impressions.
Click here to view larger image.
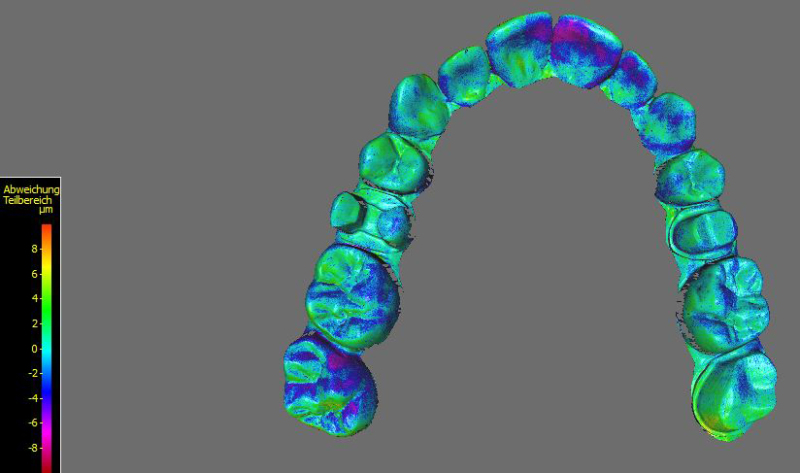 Figure 19:Difference analysis. The software computes the difference between the two surfaces with the signed nearest neighbor method from every surface point, resulting in around six million difference values for each comparison. The difference data can be exported as an Excel file for statistical analysis. Click here to view larger image.
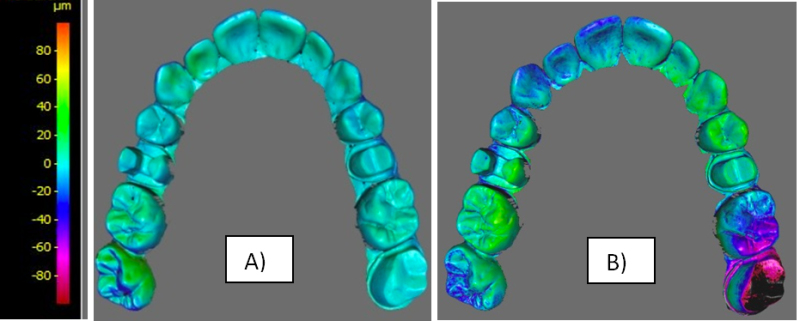 Figure 20:Difference images of different impression methods compared with the master model (Trueness), color graded from -100 µm (purple) to +100 µm (orange). The difference images show different patterns of deviations with different impression materials (A and B) and the use of a digital impression method (C). The three-dimensional evaluation can be used to optimize impression procedures. Click here to view larger image.
 Figure 21: Difference image between a test specimen before and after chewing simulation, color graded from -20 µm (orange) to -500 µm (purple). The high-resolution scan of the tooth surface is used to evaluate the abrasion of different restorative materials with in vivo and in vitro tests. Click here to view larger image.
| Scan 1 | Scan 2 | Scan 3 | Scan 4 | Scan 5 | Mean ±SD | |
| Reference scanner | 5.5 | 6.5 | 5.0 | 6.0 | 5.5 | 5.3 ± 1.1 |
| Conventional impression | 15.5 | 22.0 | 22.5 | 18.0 | 21.5 | 20.4 ± 2.2 |
Table 1:Trueness ([90–10]/2 percentile, mean ± standard deviation, µm) of reference scanner and conventional impression with vinylsiloxanether.
| 1 | 2 | 3 | 4 | 5 | 6 | 7 | 8 | 9 | 10 | ||
| Reference scanner | 0.5 | 1.0 | 1.0 | 2.0 | 2.5 | 2.0 | 2.0 | 1.5 | 2.0 | 1.0 | 1.9 ± 1.3 |
| Conventional impression | 10.5 | 11.0 | 11.0 | 14.5 | 14.5 | 16.5 | 10.0 | 11.0 | 15.5 | 10.5 | 12.5 ± 2.5 |
Table 2:Precision ([90–10]/2 percentile, Mean ± standard deviation, µm) of reference scanner and conventional impression with vinylsiloxanether.
Discussion
Accuracy is a basic demand in dental medicine. The reference scanner is capable of scanning small and large objects with high trueness and precision. With the optimal scanning method, even individual morphological detailed dental surfaces can be scanned with a high resolution and repeatability. With the different magnification levels of the scanner, macro and micro morphological structures can be acquired. It is possible to scan a variety of model materials.
The evaluation of the reference scanner’s accuracy consisted of scans with different model orientations and repeated scans of the same model orientation to reveal scanning and software filtering algorithms12. The accuracy measurement to verify the reference scanner was performed with a stainless steel full arch model derived from a patient’s impression. With this procedure, the deviation of the scanning process itself was quantified and revealed the value of trueness and precision of the reference scanner without prior knowledge of the scanned morphology. In contrast, Coordinate Measuring Machines, or CMM measuring devices, also used for reference measurements, cannot scan detailed tooth structure because of the size of the tipball. With such measuring devices, only few surface points and special geometries can be captured15.
As an advantage, the scan software is capable of displaying the repeatability of every scanned surface point. A low repeatability means a lower scanning accuracy of the surface point. This will not only affect the accuracy of the local area but also the global accuracy of the entire scanned object as the single images are stitched together after the scan. With this feature, an optimal selection of the scanning parameters is possible to ensure optimal scanning results. Additionally, the scanner is adjustable to a huge variety of scanning materials. A rough surface can be scanned with normal light reflection and adjusted contrast and brightness. Surfaces with high reflective properties, e.g. polished metal can be scanned with a polarization filter to avoid irregular reflections and get a clean measurement. For objects with steep inclines, a ring light is preferable to brighten these areas with this additional light source.
A specialty of dental surfaces is the morphology. The specimen ends with steep inclines to the oral and buccal aspect. These regions with low repeatability lead to lower accuracy, especially when stitching large objects together like full dental arch scans. To ensure high accuracy of full dental arch scans, it is necessary surround the model with a flat base. The base material has to have the same scanning parameters as the model material.
With this scanning method, it is possible to compare conventional and digital impressions with the same evaluation method and give a direct comparison. The three-dimensional comparison of the surface with the difference images helps to define the specific errors of every impression method and can be used to improve the quality of the impression by developing an optimal impression procedure. To date, verifications of dental scanners have only been described using small test objects11.
The (90–10)/2 percentile is used to describe the mean deviation of two surfaces. This value describes the maximum distance of 80 percent of the test object surface from the reference model. The highest and lowest 10 percent of the surface are not taken into account because of margin effects and different scan sizes of the models12.
The limitation of the reference scanner is the scanning time. Vital structures and wet specimens cannot be directly scanned with this method. Another limitation is the fixed scanning direction. With a single scan, undercuts cannot be scanned. Scans from different directions could be matched to extend the model. Non-structured materials like resin materials without any filler content cannot be scanned with high accuracy because of their low reflective properties. Such materials need a surface coating, e.g. gold sputtering.
Current results show a great benefit of the reference scanner for evaluating impression accuracy. The 3D comparison provides much more information compared with the simple two-dimensional distance measurements used in many studies3,6,7. The local effects of different impression methods and the origin of deformation can be evaluated, especially with digital impression methods13. The abrasion stability of filling materials can be evaluated using real dental morphologies without geometrical limitations. Future fields of interest will use the precision of dental occlusion, the fit of dental restorations, as well as roughness measurements of computer-aided design/computer-aided manufacturing (CAD/CAM) materials after milling.
Disclosures
The authors declare that they have no competing financial interests or other conflicts of interest.
Acknowledgments
The authors thank the dental technician Nicola Lanfranconi for producing the master reference model and the Alicona Company for their ongoing support with improving the scan software.
References
- Wettstein F, Sailer I, Roos M, Hämmerle CH. Clinical study of the internal gaps of zirconia and metal frameworks for fixed partial dentures. Eur. J. Oral Sci. 2008;116(3):272–279. doi: 10.1111/j.1600-0722.2008.00527.x. [DOI] [PubMed] [Google Scholar]
- Persson AS, Oden A, Andersson M, Sandborgh-Englund G. Digitization of simulated clinical dental impressions: virtual three-dimensional analysis of exactness. Dent. Mater. 2009;25(7):929–936. doi: 10.1016/j.dental.2009.01.100. [DOI] [PubMed] [Google Scholar]
- Del'Acqua MA, Arioli-Filho JN, Compagnoni MA, Mollo F., Jr de A Accuracy of impression and pouring techniques for an implant-supported prosthesis. Int. J. Oral Maxillofac. Implants. 2008;23(2):226–236. [PubMed] [Google Scholar]
- Schneider D, Grunder U, Ender A, Hämmerle CHF, Jung RE. Volume gain and stability of peri-implant tissue following bone and soft tissue augmentation: 1-year results from a prospective cohort study. Clinical Oral Implants Research. 2011;22(1):28–37. doi: 10.1111/j.1600-0501.2010.01987.x. [DOI] [PubMed] [Google Scholar]
- Windisch SI, Jung RE, Sailer I, Studer SP, Ender A, Hämmerle CHF. A new optical method to evaluate three-dimensional volume changes of alveolar contours: a methodological in vitro study. Clinical Oral Implants Research. 2007;18(5):545–551. doi: 10.1111/j.1600-0501.2007.01382.x. [DOI] [PubMed] [Google Scholar]
- Caputi S, Varvara G. Dimensional accuracy of resultant casts made by a monophase, one-step and two-step, and a novel two-step putty/light-body impression technique: an in vitro. 2008;99(4):274–281. doi: 10.1016/S0022-3913(08)60061-X. [DOI] [PubMed] [Google Scholar]
- Hoyos A, Soderholm KJ. Influence of tray rigidity and impression technique on accuracy of polyvinyl siloxane impressions. Int. J. Prosthodont. 2011;24(1):49–54. [PubMed] [Google Scholar]
- Luthardt RG, Kuhmstedt P, Walter MH. A new method for the computer-aided evaluation of three-dimensional changes in gypsum materials. Dent. Mater. 2003;19(1):19–24. doi: 10.1016/s0109-5641(02)00013-1. [DOI] [PubMed] [Google Scholar]
- Mehl A, Ender A, Mörmann W, Attin T. Accuracy testing of a new intraoral 3D camera. International Journal of Computerized Dentistry. 2009;12(1):11–28. [PubMed] [Google Scholar]
- Fickl S, et al. Dimensional changes of the ridge contour after socket preservation and buccal overbuilding: an animal study. J. Clin. Periodontol. 2009;36(5):442–448. doi: 10.1111/j.1600-051X.2009.01381.x. [DOI] [PubMed] [Google Scholar]
- Vlaar ST, vander Zel JM. Accuracy of dental digitizers. Int. Dent. J. 2006;56(5):301–309. doi: 10.1111/j.1875-595x.2006.tb00105.x. [DOI] [PubMed] [Google Scholar]
- Ender A, Mehl A. Accuracy of complete-arch dental impressions: a new method of measuring trueness and precision. 2013;109(2):121–128. doi: 10.1016/S0022-3913(13)60028-1. [DOI] [PubMed] [Google Scholar]
- Ender A, Mehl A. Influence of scanning strategies on the accuracy of digital intraoral scanning systems. Int. J. Comput. Dent. 2013;16(1):11–21. [PubMed] [Google Scholar]
- Ender A, Mehl A. Full arch scans: conventional versus digital impressions--an in-vitro study. Int. J. Comput. Dent. 2011;14(1):11–21. [PubMed] [Google Scholar]
- Meer WJ, Andriessen FS, Wismeijer D, Ren Y. Application of intra-oral dental scanners in the digital workflow of implantology. PLoS One. 2012;7(8) doi: 10.1371/journal.pone.0043312. [DOI] [PMC free article] [PubMed] [Google Scholar]


