Abstract
Polymerization shrinkage of dental resin composites can lead to restoration debonding or cracked tooth tissues in composite-restored teeth. In order to understand where and how shrinkage strain and stress develop in such restored teeth, Digital Image Correlation (DIC) was used to provide a comprehensive view of the displacement and strain distributions within model restorations that had undergone polymerization shrinkage.
Specimens with model cavities were made of cylindrical glass rods with both diameter and length being 10 mm. The dimensions of the mesial-occlusal-distal (MOD) cavity prepared in each specimen measured 3 mm and 2 mm in width and depth, respectively. After filling the cavity with resin composite, the surface under observation was sprayed with first a thin layer of white paint and then fine black charcoal powder to create high-contrast speckles. Pictures of that surface were then taken before curing and 5 min after. Finally, the two pictures were correlated using DIC software to calculate the displacement and strain distributions.
The resin composite shrunk vertically towards the bottom of the cavity, with the top center portion of the restoration having the largest downward displacement. At the same time, it shrunk horizontally towards its vertical midline. Shrinkage of the composite stretched the material in the vicinity of the “tooth-restoration” interface, resulting in cuspal deflections and high tensile strains around the restoration. Material close to the cavity walls or floor had direct strains mostly in the directions perpendicular to the interfaces. Summation of the two direct strain components showed a relatively uniform distribution around the restoration and its magnitude equaled approximately to the volumetric shrinkage strain of the material.
Keywords: Medicine, Issue 89, image processing, computer-assisted, polymer matrix composites, testing of materials (composite materials), dental composite restoration, polymerization shrinkage, digital image correlation, full-field strain measurement, interfacial debonding
Introduction
Resin composites are widely used in restorative dentistry because of their superior aesthetics and handling properties. However, despite being bonded to the tooth tissues, the polymerization shrinkage of resin composites remains a clinical concern as the shrinkage stress developed may cause debonding at the tooth-restoration interface1-2. Consequently, bacteria can invade and reside in the failed areas and result in secondary caries. On the other hand, if the restoration is well bonded to the tooth, the shrinkage stress may cause cracking in the tooth tissues. Either of these failures will jeopardize the service life of the dental restoration, which will be subjected to a large number of cycles of thermal and mechanical loading.
Measurement of polymerization shrinkage strain and stress has thus become indispensable in the development and evaluation of dental resin composites3-4. Various measuring techniques or methods have been developed5-11 with the main purpose of providing a simple setup for measuring the shrinkage behavior of resin composite materials reliably. While the measurements they provide may be sufficient for comparing the shrinkage behaviors of different materials, they do not help in the understanding of how and where shrinkage stress develops in actual restored teeth. Specifically, a question of great interest is how the cavity walls constrain the shrinkage of composites and leads to the creation of shrinkage stress in dental restorations12. Note that, to create shrinkage stress, part of the shrinkage strain of the resin composite has to be converted into tensile elastic strain. It would therefore be useful if this component of the strain in the restoration can be measured. Recently, the optical full-field strain-measuring technique, Digital Image Correlation (DIC), has been applied to the measurement of free shrinkage of resin composites as well as material flow in dental restorations13-15. The basic idea of DIC is to track and correlate visible patterns on the sample surface from sequential images taken during its deformation whereby the displacement and strain fields over that surface can be determined. Full-field measurement is one of the main advantages of the DIC method, which is especially useful in observing non-uniform deformation and strain patterns13. In this study, DIC was used to uncover the strain patterns in dental resin composite restorations, with the aim of understanding the development of shrinkage stress and identifying potential sites for debonding. This information is not directly available in the works cited above14-15, which only measured the displacement of the restoration due to polymerization shrinkage. The measurement was conducted using models that simulated teeth with mesial-occlusal-distal (MOD) tooth cavities as an attempt to replicate the stress or strain in real dental restorations. Although the use of real teeth is more anatomically representative, the disadvantage of that is the significant inherent differences among teeth in anatomy, mechanical properties, degree of hydration as well as invisible internal defects14 that result in large variations in the results. To overcome such a drawback, some studies have tried to standardize tooth samples by grouping them in terms of the buccal size16 or replaced the teeth altogether with models of a surrogate material17. For example, aluminum models which have a similar Young’s modulus to enamel (69 and 83 GPa, respectively) have been employed in shrinkage stress measurement, with the level of shrinkage stress being indicated by the cusp deflection17. In this study, silica glass models (cavities) were used instead because the material also has a similar Young’s modulus (63 GPa) to human enamel and, as it is transparent, any debonding or cracking in the specimens can be readily observed.
Protocol
Note: Three dental resin composites were studied using the glass cavities: Z100, Z250 and LS, as listed in Materials List. Among them, LS is known to be a low-shrinkage resin composite with a volumetric shrinkage of around 1.0%, much lower than those of Z250 and Z100 (~2% and ~2.5%, respectively)18-19. The equipment and other materials used in this study are also given in Materials List.
1. Model Cavity Preparation
Cut a long cylindrical glass rod, 10 mm in diameter, into 10-mm long short rods using a low-speed diamond saw.
Cut a Mesial-Occlusal-Distal (MOD) cavity (Figure 1) measuring 3 mm (width) x 2 mm (depth) in each specimen using an adapted low-speed diamond saw.
Polish down each cylindrical specimen to create a flat surface perpendicular to the length of the cavity, with dimensions as shown in Figure 1. The flat surface allows precise focusing and image calibration on the restoration. Henceforth, it will be called the observation surface.
Prepare three specimens for each of the three materials tested: Z100, Z250 and LS; see Materials table.
2. Cavity Filling with Resin Composite
Apply a thin layer of Ceramic Primer with a brush to silanize all the glass cavity surfaces. This allows bonding between the glass surfaces and the resin composites.
After about 1 min, apply a thin layer of adhesive. Use LS Adhesive system for composite LS and Adper Single Bond Plus for composite Z100 and Z250.
Cure the adhesive with a curing light and duration (10-20 sec) based on the manufacturer’s instructions (Materials table).
Cover all the glass surfaces surrounding the restoration with black tape except the observation surface, as shown in Figure 2. The purpose is to avoid the curing light reaching the resin composite through the surrounding transparent glass, which does not happen in real teeth.
Bulk-fill the cavity with resin composite and scrape off any excess to flatten all the surfaces.
3. Surface Painting
Spray a thin layer of white paint onto the observation surface, which now includes part of the resin composite.
Sprinkle immediately some black fine charcoal powder onto the paint to create high-contrast speckles. The irregular shapes of the speckles will help the DIC software to identify them and track their movements.
4. Sample Mounting, Curing, and Photographing
Referring to Figure 2, place a specimen (E) into the holder (C) and tighten it with a screw (D). Then, place the whole unit at the end of a large horizontal beam.
Secure a CCD camera and a yellow illumination LED light onto the same beam such that they face the observation surface.
Using a stand with adjustable clamps, position the curing light such that its tip is about 1 mm above the sample.
Take a picture of the specimen to provide the reference image prior to curing.
Cure the resin composite for 20 sec.
Take another picture at 5 min after curing.
Place a calibration block at the same position as the observation surface and take a picture. The calibration block contains an array of circular dots with size and spacing precisely known.
5. Image Analysis with DIC Software
Import the two pictures taken for each sample, one before and one after curing, into the DIC software.
Calibrate the dimensions of the images and correct for image distortion using the image of the calibration block. .
Define the area of interest within the observation surface for analysis.
Define the size of the square subset windows as 64 x 64 pixels for the first iteration and 32 x 32 pixels for the second iteration20. Define the overlap as 50%.
Correlate the image taken after curing with the reference image taken before curing to calculate the displacement and strain distributions.
Representative Results
Three specimens were tested for each material. After each test, the specimen was examined by eyes or, if necessary, using a microscope. No apparent debonding at the “tooth-restoration” interface or cracking was found.
The resolution of the pictures was 1,600 x 1,180 pixels with a pixel size of 5.8 mm. With a subset window size of 32 pixels, the spatial resolution of the displacement distributions was around 186 mm.
Figure 3 shows a typical plot of the displacement vectors of a cured restoration made with Z250. Specimens with the other resin composites produced similar displacement plots. It can be seen that the resin composite shrunk towards the bottom of the cavity and the top center portion of the restoration had the largest downward displacement. Such downward displacement gradually reduced with the depth within the restoration. At the same time, the resin composite contracted horizontally towards the vertical midline of the restoration where the horizontal displacement was zero.
The plot of horizontal strain, Figure 4A, shows high tensile strain concentrations along the two vertical “tooth-restoration” interfaces. Similarly, a vertical tensile strain concentration can be seen at the bottom interface in Figure 4B. Within the restoration, the strain was not uniform. Higher horizontal contraction strain was found adjacent to the two vertical side walls as well as at the top of the restoration (Figure 4A), while vertical contraction strain increased gradually along the depth of the cavity (Figure 4B). However, when the two direct strain components were summed together, which is named in-plane total direct strain here, a relatively uniform distribution of contraction strain within the restoration can be seen; see Figure 4C. Similarly, a band of relatively uniform tensile strain concentration can be seen surrounding the restoration.
To evaluate the strain concentration in more details, displacement and strain values were extracted further from the DIC results of a Z250 specimen along a horizontal line at the mid depth of the restoration, as illustrated in Figure 5. The anti-symmetric blue dashed curve shows the horizontal displacement, of which the maximum and minimum values of around 2 mm and 1 mm, respectively, represented the deflections of the left and right cusps. Positive values represented rightward displacements and negative values leftward displacements. Thus, the left cusp moved to the right and the right cusp to the left. There was a sharp increase in displacement at the interfaces on both sides of the cavity, which peaked at a short distance into the restoration. With further increase in distance, the magnitude of the displacements decreased sharply and reached zero at approximately mid width of the cavity, where the plane of anti-symmetry lay. The red solid curve shows the horizontal strain along the same horizontal line. It can be seen that the strain on most of the glass surface was nearly zero. Corresponding to the displacements with peak magnitudes at the interfaces are two tensile strain peaks, with values of about 1.7% and 1.5% on the left and right, respectively. Within the restoration, a relatively constant contraction strain of about 0.5% can be seen.
Figure 6 shows the mean in-plane total direct strain of the three resin composites along the same horizontal line. LS produced the lowest in-plane total contraction strain of approximately 1% in the restoration, followed by Z250 with a value of around 2% and then Z100 with a value of around 2.5%. These in-plane total contraction strains of the three resin composites were approximately equal to their volumetric shrinkage strains18-19. The three tested materials showed similar tensile strain concentrations at the interfaces, these being around 1%.
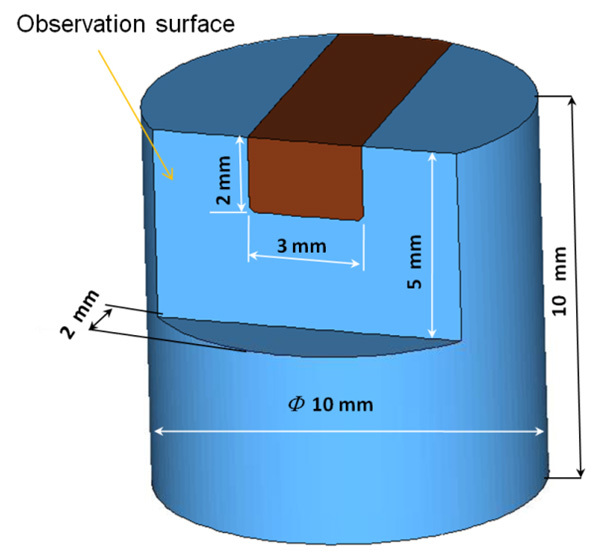 Figure 1. Dimensions of the glass model with a MOD cavity and the observation surface.
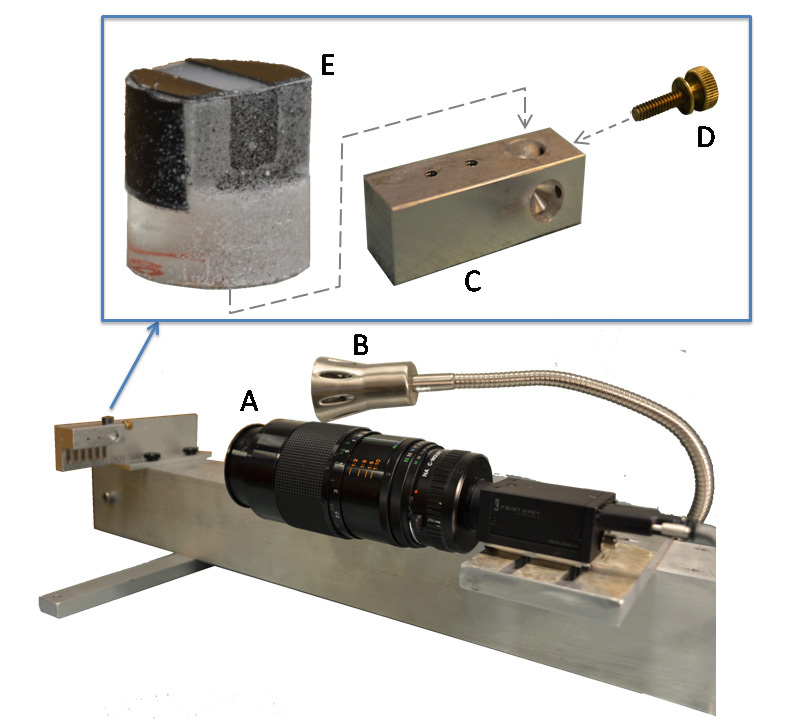 Figure 2. Apparatus for shrinkage strain measurement consisting of: A) CCD camera, B) yellow LED illumination light, C) specimen holder, D) tightening screw, and E) glass cavity specimen.
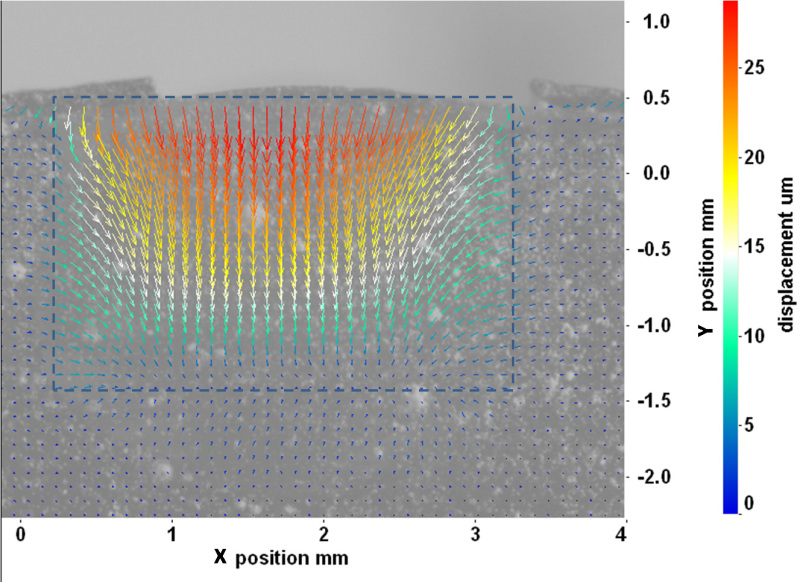 Figure 3. Displacement vectors of a typical specimen filled with Z250 composite. The dashed lines indicate the boundaries of the cavity.
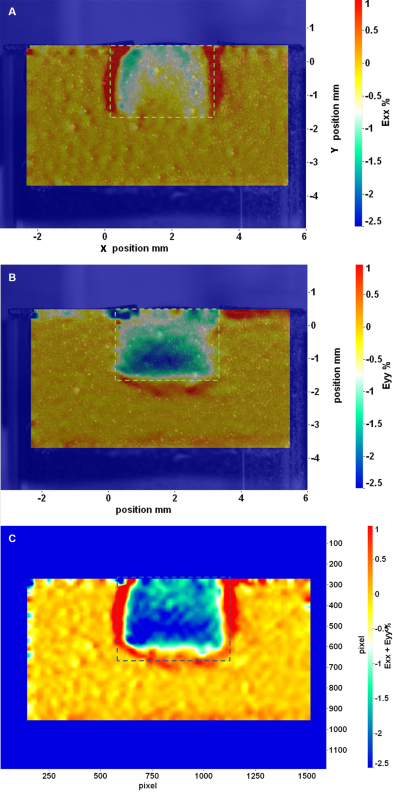 Figure 4. Strain distributions on the observation surface showing contraction strain in the restoration and tensile strain concentration along the “tooth-restoration” interface: A) horizontal strain (Exx); B) vertical strain (Eyy), and C) in-plane total direct strain (Exx + Eyy). The dashed lines indicate the boundaries of the cavity. Please click here to view a larger version of this figure.
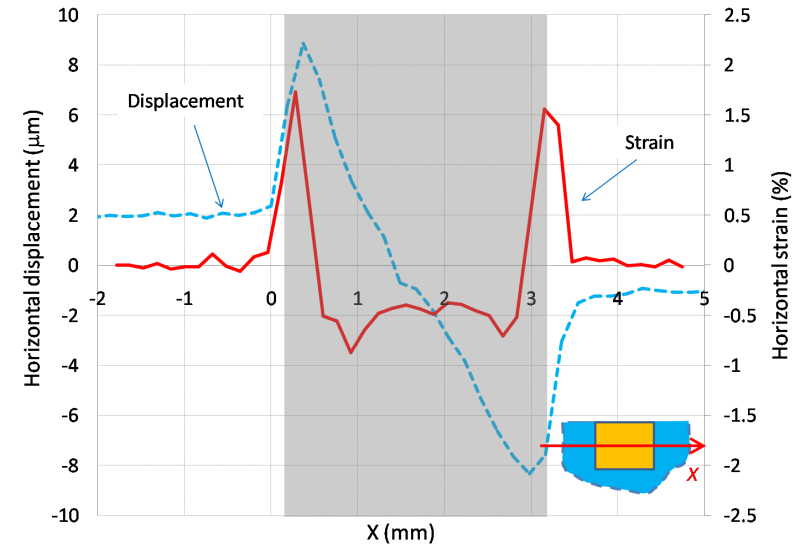 Figure 5. Horizontal displacement and strain along the horizontal line at mid depth of the cavity obtained from a Z250 specimen. The shaded area indicates the position of the cavity.
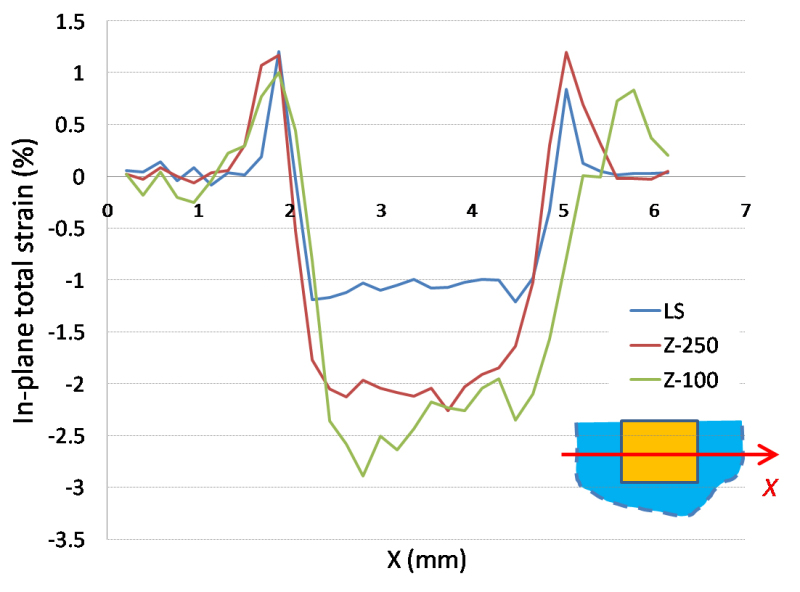 Figure 6. In-plane total direct strain for the three tested composites along the horizontal line at mid cavity depth.
Discussion
The use of glass cavities with the same shape and dimensions for shrinkage strain measurement was to minimize the variation in results due to differences in size, anatomy and material properties of natural human teeth. In addition, the fused silica glass used in this study has a similar Young’s modulus to enamel, making it a suitable simulant material for natural teeth as far as mechanical behavior is concerned21-22. Although in real tooth restorations, the resin composite is mostly bonded to dentin rather than enamel, and there is a difference in stiffness between the two tooth tissues, the strain distribution obtained with a softer tooth model is not expected to be very different in terms of its pattern, even though the values may be different. With the application of a ceramic primer and a proper adhesive, strong bonding between the resin composite and the glass cavity walls was ensured, allowing shrinkage stress to fully develop in the specimen without debonding of the restoration. In fact, the bond strength between the glass and resin composite was believed to be higher than the fracture strength of the glass because cracks had been found in some glass specimens, mostly filled with Z100, when larger cavities were being used. The same observation had been made by other investigators12.
The thin layer of paint sprayed onto the surface of the resin composite could potentially hinder the material’s flow and shrinkage because of its finite stiffness. Therefore, special care was taken to avoid over-painting the resin composite surface. The paint was sprayed gently at a distance from above to allow the mist to fall thinly onto the specimen surface, forming dispersed, rather than lumpy, speckles. The fine charcoal powder that was later sprinkled on also consisted of loose particles that were unlikely to hinder the resin composite’s movement.
The size of the speckles on the observation surface, in conjunction with the subset window size, is important to the accuracy of the DIC result. Some studies concluded that the speckle size should be a few pixels so that the correlation error is low23. In this study, with an image resolution of 5.8 µm, the speckle size should therefore be ~30 µm. This was achieved with the thin layer of white paint and fine carbon powder, as described above. The selection of an appropriate subset window size in this study was made according to references23-24, and a few trials had been performed before the size of 32 x 32 pixels was selected. Larger subset windows help reduce the random errors because they contain more patterns for matching between images, thus effectively reducing the uncertainties in the process23,25. However, the cost of using larger subset windows is the loss of finer details within them. Therefore, as long as the correlation error is acceptable, a small window size is always desired, particularly when the displacement/strain map is highly non-uniform and the local deformation is of interest. The selection of an optimal subset window size is generally determined by experience or through trials and errors. The software Davis 7.2 allows the use of up to two interrogations for a single correlation, which means that a bigger subset window size can be used to first obtain a rough but less noisy displacement field and then a reduced subset window size can be used to give a more detailed but noisier displacement field.
Note that the strain measured in the resin composite was the net strain, which included the elastic strain, creep strain and shrinkage strain. Therefore, the strain pattern in the cured dental restoration strongly depended on the constraint from the cavity walls as well as the shrinkage and flow of the resin composite. On the other hand, the surrounding glass only deformed elastically. The near-zero glass strains were due to its high elastic modulus. Note also that strain is the gradient or rate of change of displacement. Because of the constraint, the material near the interfaces had very limited movement, resulting in rapidly changing displacements and, thus, high strains there. In contrast, large material displacements occurred at the top free surface of the restoration, but with very low strains because of the low displacement gradients. As the gradient of displacement follows the direction of the constraint, the direction of the strain also follows that of the constraint. For example, the strains close to the cavity floor were more in the vertical direction than in the horizontal direction, as shown in Figure 4B, because the constraint was mostly in the vertical direction. On the other hand, the strains close to the side walls were more in the horizontal direction than in the vertical direction, as shown in Figure 4A. Figure 6 shows that the in-plane total direct strains in the restoration for the three tested materials were close to their volumetric shrinkage strains, which implies that the out-of-plane shrinkage strain was nearly zero and the elastic strain was very small. As expected, LS produced the lowest in-plane total contraction strain, followed by Z250 and then Z100 (see Materials table).
Tensile strains were clearly seen along the “tooth-restoration” interfaces. The reason for this was that shrinkage of the resin composite tended to pull material away from the cavity walls and floor. Because the material was constrained, it ended up being stretched, resulting in a tensile strain. However, the magnitude of the tensile strain calculated may not be accurate due to numerical errors in the derivation of strains from a rapidly changing displacement field. In the image correlation analysis, only one displacement vector could be obtained in each subset window. Therefore, the displacement across two adjacent subset windows could appear as a large jump in the displacement curve. When strain was obtained from the differentiation of displacement, these large displacement jumps could give rise to unrealistically high strain values. Further, the strain distribution is expected to be discontinuous across the interfaces because of a mismatch in elastic properties. This is also expected from the abrupt change in the gradient of the displacement at the interfaces. However, as the subsets at the interfaces included both glass and resin composite, the calculated displacements and strains there were averaged values between the two regions, and therefore appeared to be smooth. Linear interpolation between values at neighboring discrete sampling points gave the apparent continuity. Higher-resolution images will be required to improve the accuracy of the strain measurements.
Disclosures
The authors declare that they have no competing financial interests.
Acknowledgments
This study was supported by the Minnesota Dental Research Center for Biomaterials and Biomechanics (MDRCBB).
References
- Palin WM, Fleming GJP, Nathwani H, Burke FJT, Randall RC. In vitro cuspal deflection and microleakage of maxillary premolars restored with novel low-shrink dental composites. Dental Materials. 2005;21:324–335. doi: 10.1016/j.dental.2004.05.005. [DOI] [PubMed] [Google Scholar]
- Li H, Li J, Yun X, Liu X, Fok AS-L. Non-destructive examination of interfacial debonding using acoustic emission. Dental Materials. 2011;27:964–971. doi: 10.1016/j.dental.2011.06.002. [DOI] [PubMed] [Google Scholar]
- Dijken JW, Lindberg A. Clinical effectiveness of a low-shrinkage resin composite: a five-year evaluation. J Adhes Dent. 2009;11:143–148. [PubMed] [Google Scholar]
- Yamazaki PCV, Bedran-Russo AKB, Pereira PNR, Swift EJ. Microleakage Evaluation of a New Low-shrinkage Composite Restorative Material. Operative Dentistry. 2006;31:670–676. doi: 10.2341/05-129. [DOI] [PubMed] [Google Scholar]
- Watts DC, Cash AJ. Determination of polymerization shrinkage kinetics in visible-light-cured materials: methods development. Dental materials : official publication of the Academy of Dental Materials. 1991;7:281–287. doi: 10.1016/S0109-5641(05)80030-2. [DOI] [PubMed] [Google Scholar]
- Gee AJ, Davidson CL, Smith A. A modified dilatometer for continuous recording of volumetric polymerization shrinkage of composite restorative materials. Journal of Dentistry. 1981;9:36–42. doi: 10.1016/0300-5712(81)90033-6. [DOI] [PubMed] [Google Scholar]
- Sakaguchi RL, Sasik CT, Bunczak MA, Douglas WH. Strain gauge method for measuring polymerization contraction of composite restoratives. Journal of Dentistry. 1991;19:312–316. doi: 10.1016/0300-5712(91)90081-9. [DOI] [PubMed] [Google Scholar]
- Fogleman EA, Kelly MT, Grubbs WT. Laser interferometric method for measuring linear polymerization shrinkage in light cured dental restoratives. Dental Materials. 2002;18:324–330. doi: 10.1016/s0109-5641(01)00057-4. [DOI] [PubMed] [Google Scholar]
- Arenas G, Noriega S, Vallo C, Duchowicz R. Polymerization shrinkage of a dental resin composite determined by a fiber optic Fizeau interferometer. Optics Communications. 2007;271:581–586. [Google Scholar]
- Demoli N, et al. Digital interferometry for measuring of the resin composite thickness variation during blue light polymerization. Optics Communications. 2004;231:45–51. [Google Scholar]
- Sharp LJ, Choi IB, Lee TE, Sy A, Suh BI. Volumetric shrinkage of composites using video-imaging. Journal of Dentistry. 2003;31:97–103. doi: 10.1016/s0300-5712(03)00005-8. [DOI] [PubMed] [Google Scholar]
- Feilzer AJ, De Gee AJ, Davidson CL. Setting stress in composite resin in relation to configuration of the restoration. Journal of Dental Research. 1987;66:1636–1639. doi: 10.1177/00220345870660110601. [DOI] [PubMed] [Google Scholar]
- Li J, Fok AS, Satterthwaite J, Watts DC. Measurement of the full-field polymerization shrinkage and depth of cure of dental composites using digital image correlation. Dental Materials. 2009;25 doi: 10.1016/j.dental.2008.11.001. [DOI] [PubMed] [Google Scholar]
- Chuang S-F, Chang C-H, Chen TY-F. Spatially resolved assessments of composite shrinkage in MOD restorations using a digital-image-correlation technique. Dental Materials. 2011;27:134–143. doi: 10.1016/j.dental.2010.09.008. [DOI] [PubMed] [Google Scholar]
- Arakawa A, Morita Y, Uchino M. Polymerization Shrinkage Behavior of Light Cure Resin Composites in Cavities. Journal of Biomechanical Science and Engineering. 2009;4:356–364. [Google Scholar]
- Lee MR, Cho BH, Son HH, Um CM, Lee IB. Influence of cavity dimension and restoration methods on the cusp deflection of premolars in composite restoration. Dental Materials. 2007;23:288–295. doi: 10.1016/j.dental.2006.01.025. [DOI] [PubMed] [Google Scholar]
- Park J, Chang J, Ferracane J, Lee IB. How should composite be layered to reduce shrinkage stress: Incremental or bulk filling. Dental Materials. 2008;24:1501–1505. doi: 10.1016/j.dental.2008.03.013. [DOI] [PubMed] [Google Scholar]
- Weinmann W, Thalacker C, Guggenberger R. Siloranes in dental composites. Dental Materials. 2005;21:68–74. doi: 10.1016/j.dental.2004.10.007. [DOI] [PubMed] [Google Scholar]
- Silikas N, Eliades G, Watts DC. Light intensity effects on resin-composite degree of conversion and shrinkage strain. Dental Materials. 2000;16:292–296. doi: 10.1016/s0109-5641(00)00020-8. [DOI] [PubMed] [Google Scholar]
- Yaofeng S, Pang JHL. Study of optimal subset size in digital image correlation of speckle pattern images. Optics and Lasers in Engineering. 2007;45:967–974. [Google Scholar]
- Versluis A, Tantbirojn D, Pintado MR, DeLong R, Douglas WH. Residual shrinkage stress distributions in molars after composite restoration. Dental Materials. 2004;20:554–564. doi: 10.1016/j.dental.2003.05.007. [DOI] [PubMed] [Google Scholar]
- Sakaguchi RL, Wiltbank BD, Murchison CF. Prediction of composite elastic modulus and polymerization shrinkage by computational micromechanics. Dental Materials. 2004;20:397–401. doi: 10.1016/j.dental.2003.11.003. [DOI] [PubMed] [Google Scholar]
- Lecompte D, Bossuyt S, Cooreman S, Sol H, Vantomme J. SEM Annual Conference and Exposition on Experimental and Applied Mechanics; 2007 June 3-6; Springfield, Massachusetts. 2007. [Google Scholar]
- Huang J, et al. Digital Image Correlation with Self-Adaptive Gaussian Windows. Exp Mech. 2013;53:505–512. [Google Scholar]
- Li J, Lau A, Fok AS. Application of digital image correlation to full-field measurement of shrinkage strain of dental composites. J. Zhejiang Univ. Sci. A. 2013;14:1–10. [Google Scholar]


