Abstract
PURPOSE
This study aimed to evaluate the accuracy of digitizing dental impressions of abutment teeth using a white light scanner and to compare the findings among teeth types.
MATERIALS AND METHODS
To assess precision, impressions of the canine, premolar, and molar prepared to receive all-ceramic crowns were repeatedly scanned to obtain five sets of 3-D data (STL files). Point clouds were compared and error sizes were measured (n=10 per type). Next, to evaluate trueness, impressions of teeth were rotated by 10°-20° and scanned. The obtained data were compared with the first set of data for precision assessment, and the error sizes were measured (n=5 per type). The Kruskal-Wallis test was performed to evaluate precision and trueness among three teeth types, and post-hoc comparisons were performed using the Mann-Whitney U test with Bonferroni correction (α=.05).
RESULTS
Precision discrepancies for the canine, premolar, and molar were 3.7 µm, 3.2 µm, and 7.3 µm, respectively, indicating the poorest precision for the molar (P<.001). Trueness discrepancies for teeth types were 6.2 µm, 11.2 µm, and 21.8 µm, respectively, indicating the poorest trueness for the molar (P=.007).
CONCLUSION
In respect to accuracy the molar showed the largest discrepancies compared with the canine and premolar. Digitizing of dental impressions of abutment teeth using a white light scanner was assessed to be a highly accurate method and provided discrepancy values in a clinically acceptable range. Further study is needed to improve digitizing performance of white light scanning in axial wall.
Keywords: White light scanner, Accuracy, Precision and trueness, Impression scanning, 3D shape data, Point cloud
INTRODUCTION
In the field of dental computer-aided design (CAD)/computer-aided manufacturing (CAM), the use of intraoral digital scanners, which directly scan the oral tissues of patients, is gaining increased attention.1,2 However, the accuracy of three-dimensional shape data obtained using an intraoral scanner may be compromised because of the complex structure of the oral cavity and oral environmental factors such as saliva. To compensate for these drawbacks, scanning of impressions of the oral tissues using an extraoral scanner to obtain accurate three-dimensional shape data is being increasingly used in the clinical setting.3
Currently, two types of extraoral scanners that can scan dental impressions are available: a noncontact type and a contact type. The contact scanner may cause damage or deformation of the impression because of pressure exerted by direct contact of the touch probe with the impression material; furthermore, this scanner has a low relative scan rate. Therefore, this type of scanner was considered to be unsuitable for scanning dental impressions.4 In contrast, the noncontact type has the advantages of no mechanical contact and relatively high scan rates, thus being suitable for dental impression scanning in the current clinical setting.5
Laser scanners use a one-dimensional method of scanning with a line pattern, leading to a high error rate for narrow and deep areas in anterior teeth impressions.6 White light scanners, on the other hand, project a two-dimensional stripe pattern for obtaining three-dimensional data. Compared with the laser scanner, the white light scanner is more accurate and faster in the scanning of plaster models.7,8,9,10 However, there is limited evidence on the accuracy (ISO-5872-1) of white light scanning of dental impressions.
According to the ISO-5872-1 standard, factors predicting the accuracy of white light scanning include trueness and precision.11 Precision is assessed by comparing errors among data sets obtained by repeated scanning,12,13 while trueness is evaluated by comparing errors among data sets obtained by scanning of rotated models.14,15,16
This study aimed to evaluate the accuracy of digitizing dental impressions of abutment teeth using a white light scanner by comparing differences in accuracy among different abutment teeth types and determine suitable reference values for use in the clinical setting.
MATERIALS AND METHODS
The maxillary right canine, first premolar, and first molar on a standard plastic resin model (AG-3, Frasaco GmbH, Germany) of the maxilla were selected and prepared to receive conventional all-ceramic crowns. A CAD/CAM system (Intellifit™ dental restoration system, SensAble Technologies Inc., MA, USA) with a haptic device (SensAble PHANTOM® Desktop™, SensAble Technologies Inc., MA, USA) was used to scan and design abutment tooth shapes. The abutment teeth were prepared by cutting the labial, lingual, and axial walls by 1-1.5 mm and the occlusal and incisal surfaces by 1.5-2 mm. An occlusal convergence of 6° and a cervical chamfer margin that curved or formed by a plane at an obtuse angle to the external surface of a prepared tooth were provided.
Scanned files that obtained from prepared abutment teeth made then into a titanium model used a CAM machine (DT400, Doosan Infracore Co. Ltd, Seoul, South Korea) to achieve a smooth surface and ensure stability during subsequent procedures. Subsequently, impressions of the prepared abutment teeth on the titanium model were made using an extra-light body rubber impression material (Aquasil Ultra, Dentsply, St. York, PA, USA).
Following impression-making, the impressions were scanned using a white light scanner (Identica®, Medit, Korea) for the evaluation of trueness and precision.
First, to evaluate precision, the impression of the maxillary canine was fixed onto the table inside the scanner. Through repeated scanning, five sets of three-dimensional shape data (STL files) were obtained (C_pre1-C_pre5). Similarly, five sets of three-dimensional shape data (STL files) were obtained by repeated scanning of the first premolar (P_pre1-P_pre5) and first molar (M_pre1-M_pre5) impressions.
Then, to confirm trueness, the impression of the maxillary canine was rotated by 10°-20° on the table and scanned to obtain five sets of three-dimensional shape data (STL files; C_tru1-C_tru5). The procedure was repeated for the first premolar (P_tru1-P_tru5) and first molar impressions (M_tru1-tru5).
Before analysis, the images were cropped to eliminate any unnecessary structures and structures beyond the finishing margins.17,18,19,20
Using the three-dimensional shape data obtained for the impressions of each abutment tooth, trueness and precision for each tooth were confirmed as described below.
First, the three-dimensional shape data (STL files) were converted to point clouds (ASCII files) using a Copy CAD7.350 SP3 program (Delcam plc., Birmingham, UK). Then, a report and a color-difference-map were obtained using a PowerInspect2012 (Delcam plc., Birmingham, UK) program that superimposed the three-dimensional shape 1 data (STL files) on 1 point cloud (ASCII files).
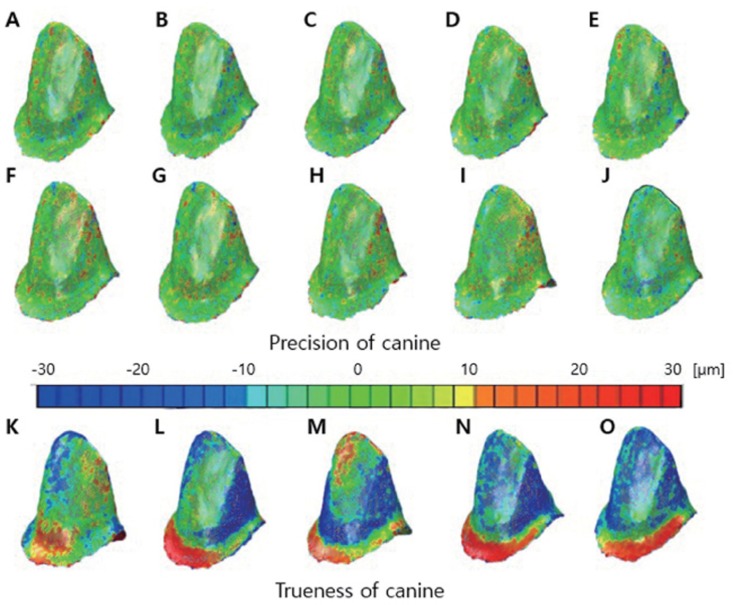
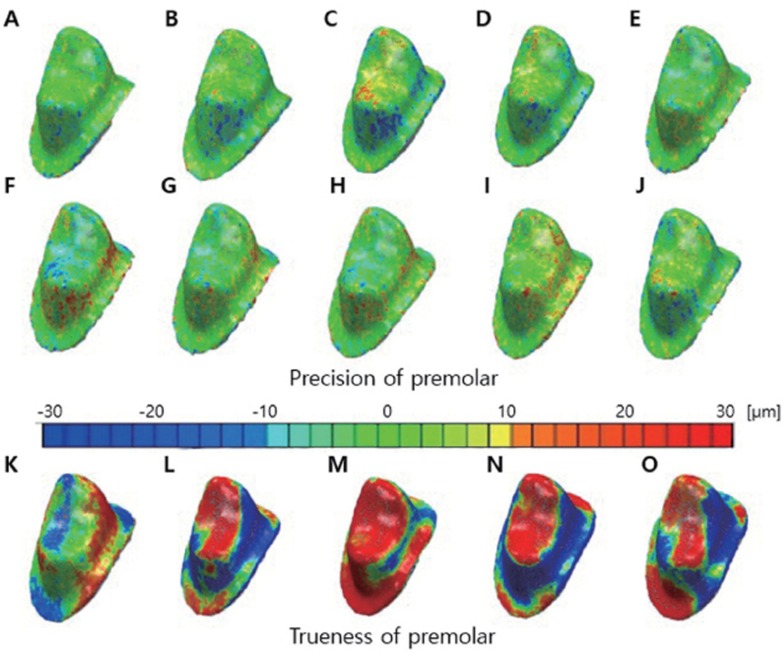
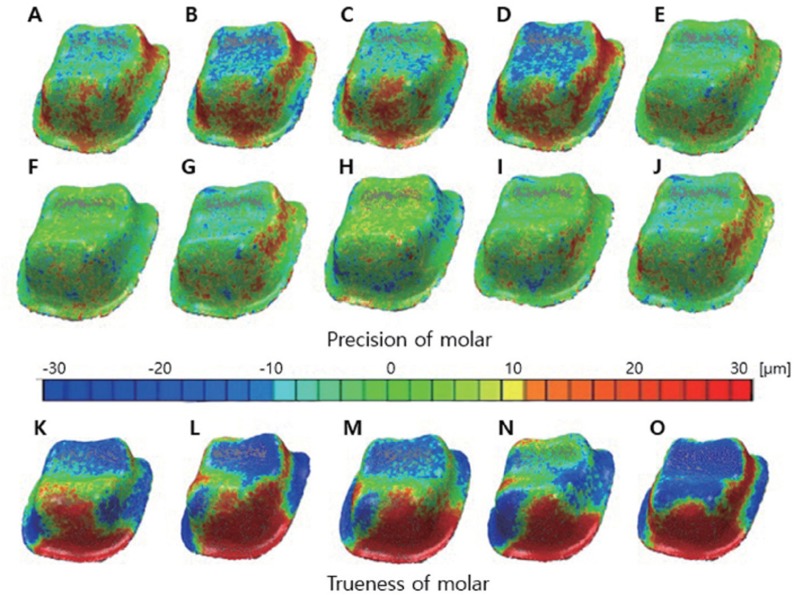
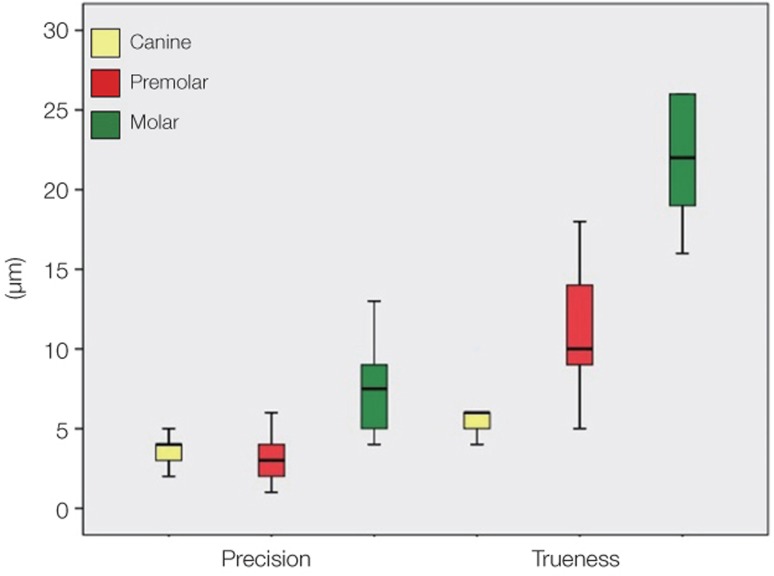
To confirm precision, the point clouds for five scans of each abutment tooth were mutually superimposed on the respective STL files, and the best fit was determined (n=10 per type). Then, a color-difference -map of the projections was obtained (Fig. 1, Fig. 2 and Fig. 3). At this time, the number of points for the canines, first premolars, and first molars were 20637, 21940, and 38801, respectively. After filtering for comparison purposes, the number of points decreased to 2083, 1103, and 1201, respectively (Fig. 4).
Fig. 1.
Precision evaluation for the canine: Ten color-difference maps (A-J) of scans of the canine impression showing fit alignment of digital impression data compared among each other (C_pre1 through C_pre5). Trueness evaluation for the canine: Five color-difference maps (K-O) of scans of the canine impression showing fit alignment of digital impression data compared with the reference model data (C_tru1 to C_tru5). Green represents the exact fit, yellow to red represents a positive discrepancy, and turquoise to blue represents a negative discrepancy.
Fig. 2.
Precision evaluation for the first premolar: Ten color-difference maps (A-J) of scans of the first premolar impression showing fit alignment of digital impression data compared among each other (P_pre1 through P_pre5). Trueness evaluation for the first premolar: Five color-difference maps (K-O) of scans of the first premolar impression showing fit alignment of digital impression data compared with the reference model (P_tru1 to P_tru5). Green represents the exact fit, yellow to red represents a positive discrepancy, and turquoise to blue represents a negative discrepancy.
Fig. 3.
Precision evaluation for the first molar: Ten color-difference maps (A-J) of scans of the first molar impression showing fit alignment of digital impression data compared among each other (M_pre1 through M_pre5). Trueness evaluation for the first molar: Five color-difference maps (K-O) of scans of the first molar impression showing fit alignment of digital impression data compared with the reference model (M_tru1 to M_tru5). Green represents the exact fit, yellow or red represents a positive discrepancy, and turquoise to blue represents a negative discrepancy.
Fig. 4.
Boxplot of discrepancies (precision and trueness) for the digitized impressions of the three types of abutment teeth obtained using a white light scanner: Precision (n=10 per type), trueness (n=5 per type).
To confirm trueness, the scans of the rotated impressions were superimposed onto the initial scans obtained for precision evaluation, the best fit alignment was determined (n=5 per type), and color-difference maps of the projections were created (Fig. 1, Fig. 2 and Fig. 3). After filtering for comparison purposes, data for trueness were obtained for each tooth type (Fig. 4).
The nonparametric Kruskal-Wallis test was used to confirm trueness and precision for the canine, first premolar, and first molar, and post-hoc comparisons were performed using the Mann-Whitney U test with Bonferroni correction (type I error). The significance level for experiment-wise error rate was set at 0.05. All statistical analyses were performed using SPSS version 20.0 (SPSS Inc., Chicago, IL, USA; Table 1).
Table 1.
Comparison of discrepancies in digitized impression models of the maxillary right canine, first premolar, and molar prepared to receive all-ceramic crowns (Unit: µm)

*a & b represent significant differences, with an experiment-wise alpha level of 0.05.
RESULTS
Table 1 illustrates the numerical values of trueness and precision for the digitized impression models of the maxillary right canine, first premolar, and first molar. Precision discrepancies for the first molar, canine, and first premolar were 7.3 µm, 3.7 µm, and 3.2 µm, respectively, with the first molar showing a significantly larger discrepancy compared with the canine and first premolar (P<.001). Trueness discrepancies for the first molar, canine, and first premolar were 21.8 µm, 6.2 µm, and 11.2 µm, respectively, with the first molar showing a significantly larger discrepancy compared with the canine and first premolar (P=.007).
With regard to the color maps, the canines mostly exhibit green color for precision in Fig. 1. With regard to trueness, negative discrepancies are mainly observed for the mesio-distal area in L, M, N, and O in Fig. 1. Similar to the canine, the first premolar mainly appears green for precision in Fig. 2. With regard to trueness, L, M, N, and O show positive discrepancies for the occlusal surface and negative discrepancies in the direction of the long axis of the tooth (Fig. 2).
The first molar mostly appears green for precision in Fig. 3, although negative discrepancies can be observed for the occlusal surface in B and D and positive discrepancies can be observed in the longitudinal axis in A, B, C, and D. With regard to trueness, K, L, M, and O show negative discrepancies for the occlusal surface and positive discrepancies in the longitudinal axis.
DISCUSSION
Following the introduction of scanners in the field of dentistry, the studies showed several limitations with regard to the accuracy of dental impression scanning.21,22 In previous studies, accuracy was evaluated by comparing scanned data for an impression and that for the stone model fabricated from the impression; however, the results were flawed because the error generated during model fabrication was inevitably included in analyses.5,23 Therefore, the plaster model replication step was eliminated in the present study, which involved direct scanning of the impression. Thus, the other source of error was eliminated, allowing direct assessment of the accuracy of the scanned impression.24
The rubber impression material used in this study was vinyl polysiloxane (Dentsply), which was developed and optimized for optical scanning. Use of optimized impression material has been shown to increase the validity of accuracy assessments.25
The concept of trueness and precision was introduced by ISO 5725-1,12 with the goal of ensuring the validity of measurements compliant with the process and experimental design.
Previous studies have shown a 40 µm precision discrepancy in impression scanning of abutment teeth using a contact scanner or laser scanner.5,6,26 Persson et al.6 proposed a standard precision discrepancy of 10 µm, which is considered to be a reliable error level. In the present study, white light scanning of the maxillary right canine, first premolar, and first molar showed smaller discrepancies of 3.2 µm, 3.7 µm, and 7.3 µm, respectively.
On the other hand, trueness discrepancies for the maxillary canine, first premolar, and first molar were 6.2 µm, 11.2 µm, and 21.8 µm, respectively. The canine showed the smallest discrepancy, probably because it has a larger area of inclined axial walls and a smaller angular area compared with the first premolar and molar.27 The molar showed the largest discrepancy, probably because it has the largest angular area and the most number of points in the steep portions of the axial walls.24 However, when compared with the findings of a previous study on the accuracy of impression body scanning, the results of the present study showed a greater level of trueness with less than 40 µm of discrepancy.3,4,6,24
This study has several limitations. First, by using the PowerInspect 2012 program and stacking point cloud and three-dimensional surface models, it is difficult to explain the errors in the best fit alignment process, which minimizes the error between both sets of data. It is difficult to investigate substantial errors in the best fit alignment process or errors in scanning using these models.27
Also, there are errors caused by scattering and irregular reflection of light emitted from the projector during white light scanning. Furthermore, it is difficult to obtain accuracy of scanning in the angular regions of the tooth, which may be the reason for the increased margin of errors in the axial direction of the teeth on the color-difference maps (red and blue). Future studies should consider measures to decrease the error in the best fit alignment process in order to overcome the abovementioned limitations and increase the efficiency of the white light scanner.
CONCLUSION
In respect to accuracy the molar showed the largest discrepancies compared with the canine and premolar. Digitizing of dental impressions of abutment teeth using a white light scanner was assessed to be a highly accurate method and provided discrepancy values in a clinically acceptable range. Further study is needed to improve digitizing performance of white light scanning in axial wall.
Footnotes
This study was supported by an Institute of Health Science Grant, Korea University. The authors appreciate the representatives and staff of Medit Inc. and Delcam plc., Korea for kindly supporting this investigation by providing access to their white light scanner and inspection software, respectively.
References
- 1.Naidu D, Freer TJ. Validity, reliability, and reproducibility of the iOC intraoral scanner: a comparison of tooth widths and Bolton ratios. Am J Orthod Dentofacial Orthop. 2013;144:304–310. doi: 10.1016/j.ajodo.2013.04.011. [DOI] [PubMed] [Google Scholar]
- 2.Flügge TV, Schlager S, Nelson K, Nahles S, Metzger MC. Precision of intraoral digital dental impressions with iTero and extraoral digitization with the iTero and a model scanner. Am J Orthod Dentofacial Orthop. 2013;144:471–478. doi: 10.1016/j.ajodo.2013.04.017. [DOI] [PubMed] [Google Scholar]
- 3.Persson AS, Odén A, Andersson M, Sandborgh-Englund G. Digitization of simulated clinical dental impressions: virtual three-dimensional analysis of exactness. Dent Mater. 2009;25:929–936. doi: 10.1016/j.dental.2009.01.100. [DOI] [PubMed] [Google Scholar]
- 4.Quaas S, Rudolph H, Luthardt RG. Direct mechanical data acquisition of dental impressions for the manufacturing of CAD/CAM restorations. J Dent. 2007;35:903–908. doi: 10.1016/j.jdent.2007.08.008. [DOI] [PubMed] [Google Scholar]
- 5.Persson A, Andersson M, Oden A, Sandborgh-Englund G. A three-dimensional evaluation of a laser scanner and a touchprobe scanner. J Prosthet Dent. 2006;95:194–200. doi: 10.1016/j.prosdent.2006.01.003. [DOI] [PubMed] [Google Scholar]
- 6.Persson AS, Odén A, Andersson M, Sandborgh-Englund G. Digitization of simulated clinical dental impressions: virtual three-dimensional analysis of exactness. Dent Mater. 2009;25:929–936. doi: 10.1016/j.dental.2009.01.100. [DOI] [PubMed] [Google Scholar]
- 7.Schaefer O, Watts DC, Sigusch BW, Kuepper H, Guentsch A. Marginal and internal fit of pressed lithium disilicate partial crowns in vitro: a three-dimensional analysis of accuracy and reproducibility. Dent Mater. 2012;28:320–326. doi: 10.1016/j.dental.2011.12.008. [DOI] [PubMed] [Google Scholar]
- 8.Chang M, Park SC. Automated scanning of dental impressions. Comput Aided Des. 2009;41:404–411. [Google Scholar]
- 9.Brosky ME, Pesun IJ, Lowder PD, Delong R, Hodges JS. Laser digitization of casts to determine the effect of tray selection and cast formation technique on accuracy. J Prosthet Dent. 2002;87:204–209. doi: 10.1067/mpr.2002.121240. [DOI] [PubMed] [Google Scholar]
- 10.Khardekar R, Burton G, McMains S. Finding feasible mold parting directions using graphics hardware. Comput Aided Des. 2006;38:327–341. [Google Scholar]
- 11.Priyadarshi AK, Gupta SK. Geometric algorithms for automated design of multi-piece permanent molds. Comput Aided Des. 2004;36:241–260. [Google Scholar]
- 12.ISO 5725-1:2003. Accuracy (trueness and precision) of measurement methods and results? Part 1: General principles and definitions. Geneva; Swizterland: ISO; 2003. [Google Scholar]
- 13.Hoyos A, Soderholm KJ. Influence of tray rigidity and impression technique on accuracy of polyvinyl siloxane impressions. Int J Prosthodont. 2011;24:49–54. [PubMed] [Google Scholar]
- 14.Ziegler M. Digital impression taking with reproducibly high precision. Int J Comput Dent. 2009;12:159–163. [PubMed] [Google Scholar]
- 15.Chandran DT, Jagger DC, Jagger RG, Barbour ME. Two- and three-dimensional accuracy of dental impression materials: effects of storage time and moisture contamination. Biomed Mater Eng. 2010;20:243–249. doi: 10.3233/BME-2010-0638. [DOI] [PubMed] [Google Scholar]
- 16.Wöstmann B, Rehmann P, Balkenhol M. Accuracy of impressions obtained with dual-arch trays. Int J Prosthodont. 2009;22:158–160. [PubMed] [Google Scholar]
- 17.Alikhasi M, Monzavi A, Bassir SH, Naini RB, Khosronedjad N, Keshavarz S. A comparison of precision of fit, rotational freedom, and torque loss with copy-milled zirconia and prefabricated titanium abutments. Int J Oral Maxillofac Implants. 2013;28:996–1002. doi: 10.11607/jomi.2937. [DOI] [PubMed] [Google Scholar]
- 18.Webber B, McDonald A, Knowles J. An in vitro study of the compressive load at fracture of Procera AllCeram crowns with varying thickness of veneer porcelain. J Prosthet Dent. 2003;89:154–160. doi: 10.1067/mpr.2003.85. [DOI] [PubMed] [Google Scholar]
- 19.Quaas S, Rudolph H, Luthardt RG. Direct mechanical data acquisition of dental impressions for the manufacturing of CAD/CAM restorations. J Dent. 2007;35:903–908. doi: 10.1016/j.jdent.2007.08.008. [DOI] [PubMed] [Google Scholar]
- 20.Luthardt RG, Loos R, Quaas S. Accuracy of intraoral data acquisition in comparison to the conventional impression. Int J Comput Dent. 2005;8:283–294. [PubMed] [Google Scholar]
- 21.Kenyon BJ, Hagge MS, Leknius C, Daniels WC, Weed ST. Dimensional accuracy of 7 die materials. J Prosthodont. 2005;14:25–31. doi: 10.1111/j.1532-849X.2005.00007.x. [DOI] [PubMed] [Google Scholar]
- 22.DeLong R, Heinzen M, Hodges JS, Ko CC, Douglas WH. Accuracy of a system for creating 3D computer models of dental arches. J Dent Res. 2003;82:438–442. doi: 10.1177/154405910308200607. [DOI] [PubMed] [Google Scholar]
- 23.Rudolph H, Luthardt RG, Walter MH. Computer-aided analysis of the influence of digitizing and surfacing on the accuracy in dental CAD/CAM technology. Comput Biol Med. 2007;37:579–587. doi: 10.1016/j.compbiomed.2006.05.006. [DOI] [PubMed] [Google Scholar]
- 24.Jeon JH, Lee KT, Kim HY, Kim JH, Kim WC. White light scanner-based repeatability of 3-dimensional digitizing of silicon rubber abutment teeth impressions. J Adv Prosthodont. 2013;5:452–456. doi: 10.4047/jap.2013.5.4.452. [DOI] [PMC free article] [PubMed] [Google Scholar]
- 25.Persson M, Andersson M, Bergman B. The accuracy of a high-precision digitizer for CAD/CAM of crowns. J Prosthet Dent. 1995;74:223–229. doi: 10.1016/s0022-3913(05)80127-1. [DOI] [PubMed] [Google Scholar]
- 26.Moldovan O, Luthardt RG, Corcodel N, Rudolph H. Three-dimensional fit of CAD/CAM-made zirconia copings. Dent Mater. 2011;27:1273–1278. doi: 10.1016/j.dental.2011.09.006. [DOI] [PubMed] [Google Scholar]
- 27.Persson AS, Andersson M, Odén A, Sandborgh-Englund G. Computer aided analysis of digitized dental stone replicas by dental CAD/CAM technology. Dent Mater. 2008;24:1123–1130. doi: 10.1016/j.dental.2008.01.008. [DOI] [PubMed] [Google Scholar]


