Abstract
The number of physiological investigations in the mouse, mus musculus, has experienced a recent surge, paralleling the growth in methods of genetic targeting for microcircuit dissection and disease modeling. The introduction of optogenetics, for example, has allowed for bidirectional manipulation of genetically-identified neurons, at an unprecedented temporal resolution. To capitalize on these tools and gain insight into dynamic interactions among brain microcircuits, it is essential that one has the ability to record from ensembles of neurons deep within the brain of this small rodent, in both head-fixed and freely behaving preparations. To record from deep structures and distinct cell layers requires a preparation that allows precise advancement of electrodes towards desired brain regions. To record neural ensembles, it is necessary that each electrode be independently movable, allowing the experimenter to resolve individual cells while leaving neighboring electrodes undisturbed. To do both in a freely behaving mouse requires an electrode drive that is lightweight, resilient, and highly customizable for targeting specific brain structures.
A technique for designing and fabricating miniature, ultralight weight, microdrive electrode arrays that are individually customizable and easily assembled from commercially available parts is presented. These devices are easily scalable and can be customized to the structure being targeted; it has been used successfully to record from thalamic and cortical regions in a freely behaving animal during natural behavior.
Keywords: Neuroscience, Issue 91, multi-electrode, micro-drives, electrophysiology, single units, brain circuit recording, deep brain structure
Introduction
Mus musculus has, due to its genetic tractability, quickly become the animal model of choice for physiologists interested in microcircuit-level dissection of genetically-identified neurons and in investigating mouse models of human disease. For example, the recent introduction of causal genetic tools, such as optogenetic and chemical genetic actuators has allowed experimentalists to test the necessity and sufficiency of identified neural circuits in behavior1-4. The wide availability of recombinant transgenic mouse driver lines (Cre-lines), has amplified the experimental ease by which neuron subtypes are targeted, adding to the value of the mouse for these experiments5.
Likewise, genetic screens and genome wide associations of common neurological and psychiatric disorders have facilitated the identification of genetic risk factors for brain illness6,7. These advances, combined with the growing toolbox for genetic manipulation and genome engineering in mice, have made it the organism of choice for modeling human disease. The combination of disease models and causal genetic tools provides an unprecedented opportunity for understanding brain illness and identifying circuit-level targets for interventions.
To fully capitalize on these molecular tools and gain insight into microcircuit function in health and disease, it is essential to couple them with physiological readouts of brain activity. Ideally, the experimenter would be able to monitor a large number of neurons while maintaining the single cell resolution. Extracellular, multi-electrode recordings in freely behaving animals provide such opportunity; however, the use of this technology in the mouse has been limited. To record from small targets (e.g., CA1 layer in the hippocampus), the use of adjustable electrodes is necessary as small movements in recording electrodes following surgical implantation make it impossible to maintain recording stability8,9. Traditionally, the methods that have been employed to move electrodes within the brain impose weight limitations when used in the mouse, making it challenging to couple recording of a large number of neurons with behavior in this organism.
Here, methods are introduced for fabricating miniature, ultra-lightweight, microelectrode arrays that are individually customizable to the brain region being targeted, optogenetics-compatible, and easily assembled from commercially available parts. Each “microdrive” within the multi-electrode “hyperdrive” utilizes a spring-and-screw mechanism to advance the electrode and a plastic rail, built into the hyperdrive body, to counteract torque from the screw. First, the process of designing the hyperdrive bodies and microdrives in a CAD program for 3D printing is described. By designing hyperdrive bodies that are customized for specific structures, it is possible to increase the precision of targeting and to further increase the yield of the preparation. Second, the fabrication process is described in detail, wherein the multi-electrode array is assembled by hand from parts that are commercially available. This technique has been used, successfully, to record from ensembles of neurons in hippocampus, thalamus and cortex in the freely behaving animal during natural foraging and operant tasks.
Protocol
1. Design Intent
Identify the brain region of choice (lateral geniculate nucleus (LGN, visual thalamus)) by scrolling through the sagittal sections of the electronic mouse brain atlas.
At A/P coordinates (-2.3 – -2.7 mm), the LGN is widest. Use this region to design the drive bottom (bottom pieces). NOTE: A total of 8 independently movable electrodes can be used to target LGN (4-6 electrodes will make it to the LGN, 2-4 electrodes are added to offset implantation errors, Figure 1A).
In Solidworks, draw a sketch of the design body (Figure 1B) in the front plane. Click sketch, and then use combination of lines and curves to draw a sketch which will include the contours for the drive base, handles and polyamide half slots, as shown. Ensure that the contour does not contain any open gaps. Then click Exit Sketch.
Next, select both the front and right planes, and click “Create Axis”. Then, create the 3D design body model by rotating the highlighted blue sketch contour (Figure 1B) 360°. In the features menu, click “Revolved Boss/Base”. Choose the midline as the Axis of revolution. In the parameters section, under direction 1 click Blind, and under angle select 360.00 deg. In the selected contours section, ensure that the blue highlighted contour is the one selected.
Create one polyimide half-slot by revolving the red highlighted contours 13° (Figure 1C, top left). Steps are identical to 1.4 above except for the angle specification
Create one drive handles by revolving the green contour 15° (Figure 1C, top right).
Create the second drive handle using the circular pattern function (Figure 1C, bottom left). In the features menu, click “Circular Pattern”. In parameters, choose the midline as axis of revolution. Select 180.00 deg as the angle, and 2 as the number of instances. Ensure that the first handle is selected under “Features to Pattern”.
Create sixteen polyimide half-slots using the circular pattern function (Figure 1C, bottom left). Perform similar motions to 1.7, but select the first polyimide half-slot as the “Features to Pattern”. The angle is 22.5° and the number of instances are 16 (Note: this is just 360° divided by the number of times you want to pattern the feature)
Create a new plane on which to draw the polyimide receptacle. Achieve this by clicking “insert” on the main menu. Click “Reference Geometry”, Select the two sides of polyimide half slots, and then click “Create New Plane”; (Figure 1D, top)
Create the microdrive receptacle (the screw hole, polyimides hole and anti-torque rail (Figure 1D, bottom). Achieve this by creating a sketch that encompasses all these features on the new plane created in 1.9. Note that for the anti-torque rails, define a centerline in between the two sides of the polyamide top slots. Then, draw the anti-torque rails by creating two circles perpendicular to the centerline, whose centers are 1 radius apart, and then trimming the middle contour.
In the Features menu, click on “Extrude Boss/Base” to create the antitorque rail and choose a blind extrude of 10 mm going upwards and 2 mm going downwards. For the screw hole and polyimide hole, click on “Extrude cut”, and choose blind 6mm , and a few mms going upwards for both (Figure 1E, left).
Pattern the micro-drive receptacle 16x, using the center as the axis of revolution (22.5°, 16 instances, equal spacing), (Figure 1E, right)
On the top of the handle, draw a 3 mm x 3 mm box starting at the center tip of the drive handle, facing the central axis. Extrude this 2 mm upwards using the “Extrude Boss” function. Draw circles of 1mm diameter at the locations in which the EIB screws will go on. Afterward, make 1.5 mm “Extrude Cut” to make a hole. Then, pattern the box and hole twice using the Circular Pattern function (Text overlay: 180°, 2 instances, equal spacing, about central axis).
Use the dimensions (in millimeters) in Figure 1F to draw a top piece sketch. Use the “Extrude Boss/Base” to make a 3D model of it. NOTE: After these steps the drive design is complete. The physical drive body is created through the process of stereolithography. There are a number of companies that offer stereolithography printing based on STL files. We recommend services that can print in hard plastic (such as Accura® 55), with a minimum resolution of at least 0.1 mm.
2. Preparation of Hyperdrive Components
Lay out a small piece of double-sided tape on a flat surface and cut the necessary number of 31 G polyimide tubes to approximately 8 centimeters (ID/OD:.0071''/.0116''; Wall: .00225) (Figures 2A - 2B).
Lay out the first layer of guide tubes on the double-sided tape, taking care to place guide tubes as close as possible to one another on the tape. Dab a small amount of thin, cyanoacrylate glue over the layer of polyimides. (Figure 2C)
Quickly lay out a second layer of polyimides (Figure 2D).
Create a fiber optic placeholder using a 26 G cannula. Ensure that this is lubricated using a Teflon based lubricant prior to being incorporated in the assembly (Figure 2E).
Apply a line of epoxy 4-5 mm in length perpendicular to the polyimide bundle (Figure 2F). Once the epoxy has hardened (2-3 hr), remove the tape from the bottom layer and reepoxy the other side. After the epoxy has hardened again, the 26 G cannula can be removed and the construct cut in the middle using a razor blade (Figure 2G), resulting in two polyimide matrices, each of which can be used for one hyperdrive (Figure 2H).
Print out the cone template on a sheet of transparency paper and cut a corresponding sheet of heavy duty aluminum foil (Figures 3A - 3C).
Apply a layer of epoxy to the aluminum foil and quickly apply the transparency paper. Using a heavy object or a wooden dowel, smooth out the epoxy so that it is evenly distributed (Figure 3D).
Cut out the cone template and clamp together using an alligator clip. Finally, use another dab of epoxy to permanently affix the pieces (Figure 3E).
3. Final Assembly of the Microdrive
Attach the EIB to the drive body, and reinsert the 26 G cannula through the polyimide guide tube matrix. Align the polyimide matrix with the drive body using the fiber optic hole in the EIB to ensure that the guide tubes are perpendicular to the EIB and epoxy the matrix to the drive body taking care to ensure that no epoxy flows into the guide tubes or into the drive body (Figures 4A - 4C).
Map each guide tube in the polyimide matrix to a corresponding bracket on the inner wall of the drive body. Slide a small ring of 33 G polyimide over each guide tube and into the bracket and apply a small amount of cyanoacrylate glue to affix each guide tube. (Figures 4D - 4E) Finally, epoxy the whole apparatus to the inner wall of the drive body and cut the polyimides so that they protrude just above the inner lip (Figures 4F - 4G).
Build a microdrive assembly by putting one of the custom-built screws through the center hole of a top piece followed by one of the 5 mm springs. Slide the outer hole of the top piece over one of the rails, and gently drive the screw. Drive the screw until the spring reaches it's minimum compressed length. (Figures 4H - 4I) Repeat this process for each rail/microdrive (Figure 4J).
Turn the drive array upside down and take a picture of the guide tube matrix. This picture will be used to map the location of the guide tube corresponding to each microdrive (Figure 4K).
Insert a polyimide tube (0.005') into each guide tube from the bottom of the drive base. Let the carrier tube extend 1-2 mm from the top of the fully lowered microdrive and record on the photograph the identity of the corresponding micro-drive. (Figures 4L - 4M)
Epoxy the polyimide tube to the microdrive support, taking care not to let epoxy run through the microdrive onto the spring or screw (Figures 4N, 4P - 4Q).
Fully lower all the microdrives. Cut all the polyimide tubes off flush at the bottom of the polyimide matrix (Figure 4O).
Mount the electrode interface board to the drive base using two #00-90 x 3/16’’ screws (Figure 4R). NOTE: At this point the drive array is ready to be loaded with stereotrodes or tetrodes. For details on tetrode construction and loading, please see 10. The printed drive base and the microdrives have been designed in SolidWorks 2011 3D CAD software: please click here to download the SolidWorks file.
After loading, invert the drive and carefully lower the shielding cone over the drive so that only the bottom piece protrudes. Affix the shielding cone by epoxying the cone to the drive body.
After the cone is attached, strip a small length of stainless steel wire (.008'' Bare, .011'' Coated) and pin to the EIB. Scratch the inner, aluminum part of the cone with a needle and ground the steel wire to the cone using silver paint. Once the silver paint has dried, reinforce with a dab of epoxy. Alternatively, the steel wire can directly be attached to the cone with a dab of conductive epoxy (MG Chemicals, Surrey, Canada).
Representative Results
Implant construction is a process that starts with the design of the 3D printed hyperdrive (Figure 1), proceeding to the construction of the bottom piece (Figure 2), the shielding cone (Figure 3), and the final assembly of the hyperdrive, by individual construction of the microdrives (Figure 4). These steps are followed by loading the microdrives with electrodes (please see 10). Following this step, it is possible to use these devices to record from multiple brain regions. In Figure 5, example traces from a simultaneous recording of the lateral geniculate nucleus (LGN) and Hippocampus (HPC) are shown. The stability of the single units shown in Figure 5B has been remarkable, showing consistent waveforms over a course of several days. These neurons were confirmed to be LGN neurons by being responsive to light-emitting diode stimulation, as shown by the peristimulus time histogram (PSTH) in Figure 5C. In this same preparation, HPC local field potential was recorded as a proxy for behavioral state. These traces showed sharp wave ripples (Figure 5D), during behavioral quiescence, consistent with their hippocampal origin.
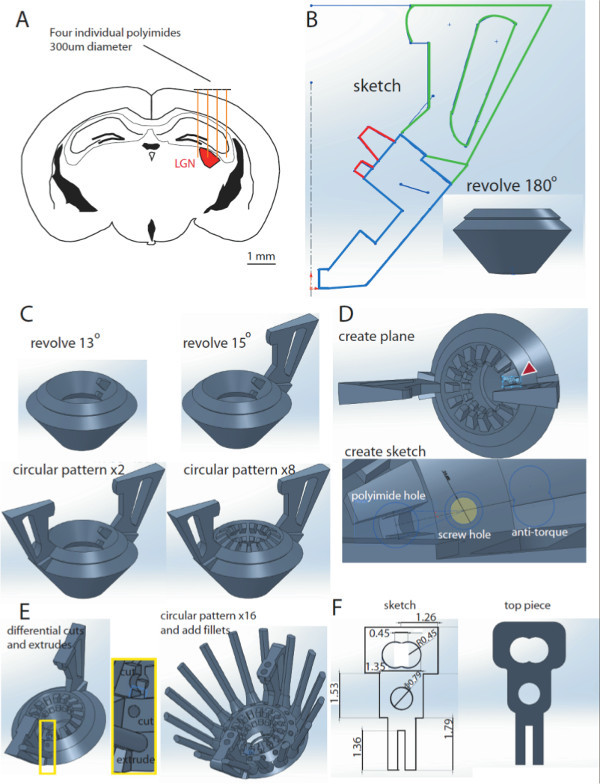 Figure 1. Designing the hyperdrive in Solidworks. A. Schematic of a coronal section of a mouse brain at A/P coordinates -2.3 – -2.7 mm from bregma. Four individual polyimides (300 µm) are drawn above the cortex, illustrating the targeting of the LGN region (red) with electrodes. B. Sketch of the design body. Revolving the blue contour 180° results in a 3D design body model (inset). C. Addition of polyimide slots and drive handles to the design body. Revolving the red highlighted contours in B by 13° results in a polyimide half-slot (top left). One drive handle is added by revolving the green contour in B by 15° (top right). The second handle is added by using the circular pattern function (bottom left). The same function can be used to create the 16 polyimide half slots (bottom right). D. A new plane is added to the design (top), allowing to create a new sketch for the microdrive receptacle, comprised of the screw hole, polyimides hole and antitorque rail (bottom). E. These features will be implemented into the design using the cut and extrude functions and revolved 360° to create 16 receptacles. F. Dimensions of the top piece sketch (left) and the 3D model (right). Please click here to view a larger version of this figure.
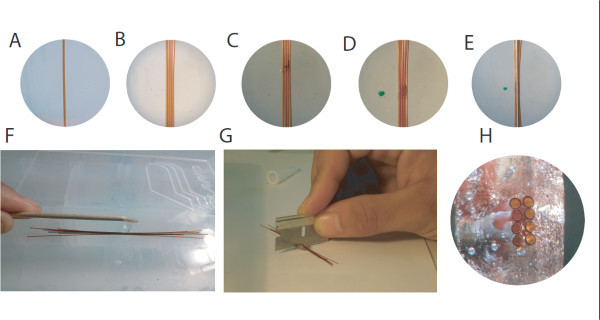 Figure 2. Preparing the bottom piece of the hyperdrive.A. The first polyimide tube is placed onto double-sided tape. B. Subsequent tubes are placed individually, taking care to minimize space between tubes. C. After the first layer is laid out, a thin layer of cyanoacrylate glue is applied D. A second layer of polyimides is added quickly before the glue is dried. E. On top of the polyimides bundle, a 26 G cannula is added as a place holder for the optic fiber. F. The whole construct is securely fixed with a drop of epoxy. G. After removal of the cannula, the construct can be cut in the middle with a razor blade, yielding two identical bottom pieces. H. View on the cut surface of a finished bottom piece, illustrating the two double rows of four polyimides and the hole for the optic fiber. Please click here to view a larger version of this figure.
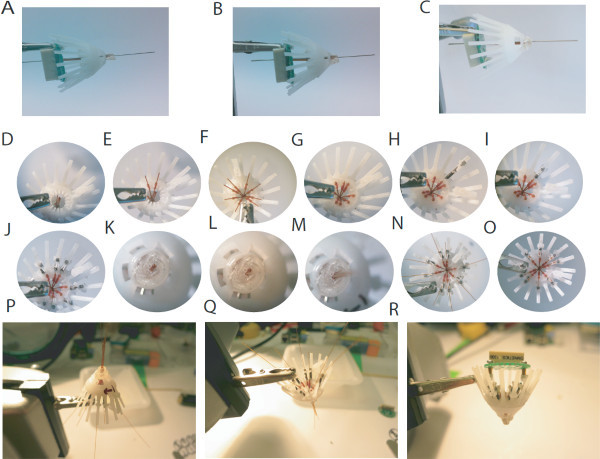 Figure 3. Assembling the hyperdrive.A. The polyimide matrix is inserted into the drive body, and aligned with the electronic interface board (EIB) using the 26 G cannula. B. A small amount of epoxy is used to affix the polyimid matrix to the drive body. C. A second application of epoxy may be necessary, after which excess epoxy should be dremeled away D. Top view on the drive body with the matrix inserted. E. Using a small piece of 33 G polyimide tubing, the outer guide tubes are attached in the corresponding slots of the drive body. F. All outer guide tubes should be mapped to a rail, taking care to minimize tension on the tubes. G. After all outer guide tubes are mapped, they should be secured with epoxy and cut just above the inner lip. H. A microdrive assembly, consisting of a custom-built screw, a 5 mm spring and a top piece should be assembled and placed over a rail corresponding to one of the guide tubes. I. Each microdrive assembly should be carefully screwed into the drive body. J. After assembly, each guide tube should have a corresponding microdrive. K. Bottom view of the polyimide matrix. L - M. Polyimide tubes (0.005') are inserted into each outer guide tube. N. Each inner guide tube should fit snugly into the fork of it's corresponding microdrive. O. The inner polyimide tubes are attached with epoxy to the corresponding microdrive and cut as short as possible. After all inner guide tubes are epoxied, the inner guide tubes protruding from the polyimide-matrix should be cut flush with the matrix lip. P. Inverted macro view of the drive during the inner guide tube loading. Q. Top macro view of the drive during inner guide tube loading. R. Fully assembled hyperdrive with the EIB attached, ready to be loaded with electrodes. Please click here to view a larger version of this figure.
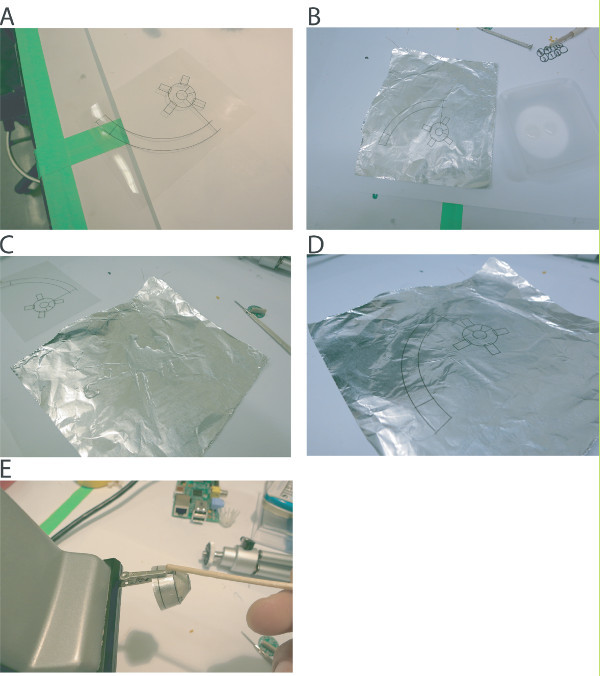 Figure 4. Preparing the shielding cone.A. Cone template printed on transparency paper. B - D. A sheet of aluminum foil is glued to the template using a thin layer of epoxy. E. After cutting out the template, the cone is formed and glued together with epoxy.
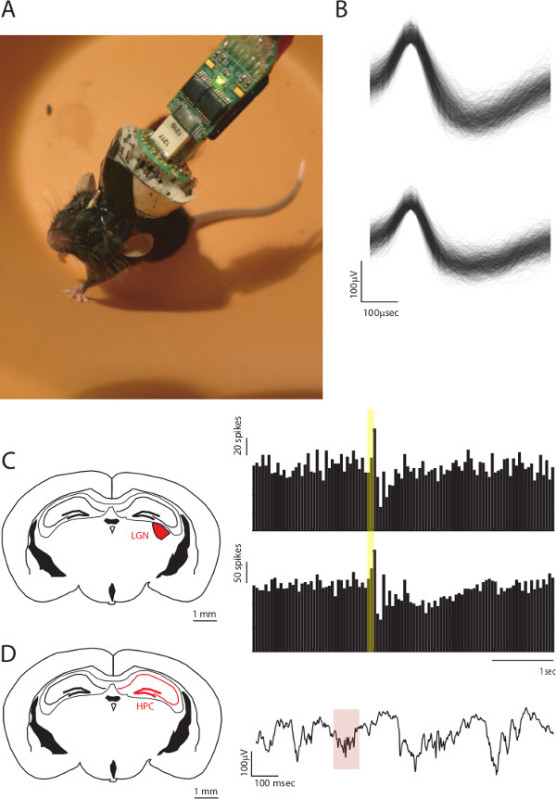 Figure 5. Multi-site recordings using the ultralight-weight hyperdrive.A. Image of a freely behaving mouse with the hyperdrive implanted. B. Examples of two single unit waveforms recordings from this mouse. C. Left, Coronal section of the mouse brain highlighting the lateral geniculate nucleus, where some of the electrodes were lowered. Right, example peristimulus time histograms (PSTHs) of two LGN neurons aligned to visual stimulation (yellow bar). D. Right, coronal section highlighting the hippocampus (HPC), where another set of electrodes were lowered. Right, Example of local field potential recording of a hippocampal ripple (red highlight).
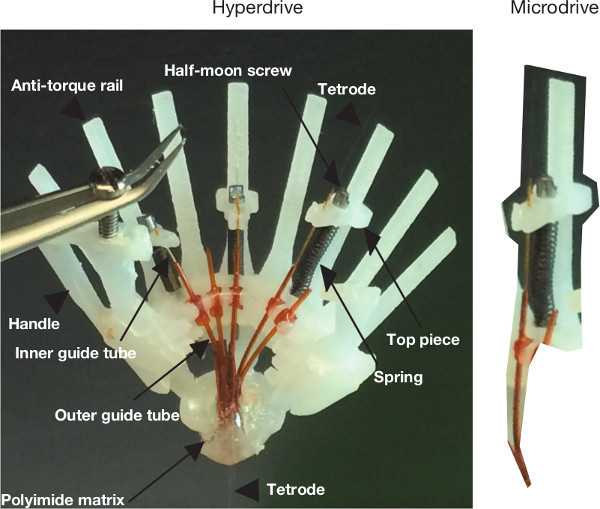 Figure 6. Overview of drive components. (Left) Comprehensive overview of hyperdrive components. (Right) Illustration of na individual microdrive assembly.
Discussion
This protocol outlines the process of constructing an ultra-lightweight microdrive array for targeting a single or multiple brain regions in the mouse. After the final steps of construction, the hyperdrive is ready to be implanted using standard surgical implantation techniques and affixed to the mouse's skull with dental cement. Post implantation, the electrodes can each be advanced independently using a small screwdriver, while the mouse is restrained by hand. The distance per turn that each electrode advances is determined by the pitch of the screw. Using the screws referenced here advances each electrode approximately 150 mm per turn, though half and quarter-turns may be used for greater resolution.
The dimensions of the sketch in Figure 1B determine the overall size of the implant, therefore, an obvious way to scale implants bidirectionally is to change the dimensions on that critical sketch. Additionally, the length of the screws can be extended to target deeper brain structures. We recommend custom made titanium screws, as those are light and less brittle than steel. Note that the antitorque rails need to scale linearly with the screw length, and at this point we have not determined the maximal length at which these structures can be printed. To target multiple brain regions, the shape of the bottom piece can be modified. The addition of known sized washers (thickness 200 µm), could provide spacers needed between polyimides targeting separate brain structures (for example, hippocampus and prefrontal cortex). These could be included in the bottom piece assembly steps, and later cut off after the epoxy hardens.
A big limitation of this design is its dependence on proprietary software (Solidworks in this case). Future development of open source programs that provide user friendly interfaces conducive to designing such equipment with minimal engineering background would be of tremendous benefit to the neuroscience community.
This method provides several advantages over existing methods. First, the design is simple, dependent on very few sketches (Figure 1). Second, it is ultra-light, requiring no dental cement or heavy material to go into its assembly. Overall, it weighs around 1.7 g – almost a third of the weight of commercially available implants of similar functionality. Third, it requires no specialized equipment to make – the implant body can be 3D printed from multiple sources (for example approto.com, but there are several others); the screws can be custom made (for example antrinonline.com); the springs are commercially available (for example leesprings.com); and as a result the entire assembly process can happen in a day. Finally, these implants have been used to record from multiple brain regions during natural foraging, structured behavioral tasks and sleep (Figure 5).
Future applications of this method include implementing its scalability. It is likely that the implant can be bidirectionally scaled simply by changing 1) the size of the sketch in Figure 1B and, 2) the number of microdrive receptacles (Figure 1D) patterned. For example, it can be scaled downwards to record from freely behaving mice early in development, and scaled upwards to record from rats, rabbits, ferrets and perhaps nonhuman primates.
A final word is to remind the reader that critical to successful implementation of the outlined method is to prototype any modifications they implement to .stl design files attached. The reader will notice, for example, that the attached design contains a “figure 8” antitorque rail. This was the best design possible given the limitation of 3D printing, as it is often required that we drill these holes. Having it be a circle, would compromise stability, but having it be a square or an angled shape would limit the ability to fix 3D printing imperfections by drilling.
Disclosures
The authors have nothing to disclose.
Acknowledgments
We thank members of the Wilson lab for their helpful advice on the fabrication method.
This work was supported by the Simons Foundation, a NIH pathway to independence career award from the NINDS and a NARSAD Young Investigator Award (to M.M.H.) as well as grants from the NIH (to M.A.W.).
References
- Boyden ES, Zhang F, Bamberg E, Nagel G, Deisseroth K. Millisecond-timescale, genetically targeted optical control of neural activity. Nat Neurosci. 2005;8:1263–1268. doi: 10.1038/nn1525. [DOI] [PubMed] [Google Scholar]
- Fenno L, Yizhar O, Deisseroth K. The development and application of optogenetics. Annu Rev Neurosci. 2011;34:389–412. doi: 10.1146/annurev-neuro-061010-113817. [DOI] [PMC free article] [PubMed] [Google Scholar]
- Alexander GM, et al. Remote control of neuronal activity in transgenic mice expressing evolved G protein-coupled receptors. Neuron. 2009;63:27–39. doi: 10.1016/j.neuron.2009.06.014. [DOI] [PMC free article] [PubMed] [Google Scholar]
- Halassa MM, et al. Selective optical drive of thalamic reticular nucleus generates thalamic bursts and cortical spindles. Nat Neurosci. 2011;14:1118–1120. doi: 10.1038/nn.2880. [DOI] [PMC free article] [PubMed] [Google Scholar]
- Tsien JZ, et al. Subregion- and cell type-restricted gene knockout in mouse brain. Cell. 1996;87:1317–1326. doi: 10.1016/s0092-8674(00)81826-7. [DOI] [PubMed] [Google Scholar]
- Nestler EJ, Hyman SE. Animal models of neuropsychiatric disorders. Nat Neurosci. 2010;13:1161–1169. doi: 10.1038/nn.2647. [DOI] [PMC free article] [PubMed] [Google Scholar]
- Collins PY, et al. Grand challenges in global mental health. Nature. 2011;475:27–30. doi: 10.1038/475027a. [DOI] [PMC free article] [PubMed] [Google Scholar]
- Wilson MA, McNaughton BL. Dynamics of the hippocampal ensemble code for space. Science. 1993;261:1055–1058. doi: 10.1126/science.8351520. [DOI] [PubMed] [Google Scholar]
- Wilson MA, McNaughton BL. Reactivation of hippocampal ensemble memories during sleep. Science. 1994;265:676–679. doi: 10.1126/science.8036517. [DOI] [PubMed] [Google Scholar]
- Nguyen DP, et al. Micro-drive array for chronic in vivo recording: tetrode assembly. J Vis Exp. 2009. [DOI] [PMC free article] [PubMed]


