Abstract
The learning of transesophageal ultrasound guided fine needle aspiration (FNA) (endoscopic ultrasound-FNA), and endobronchial ultrasound guided transbronchial needle aspiration (endosonography) should be based on the following steps: Acquiring theoretical knowledge, training on simulators, and supervised performance on patients. Each step should be completed by passing a validated exam before proceeding to the next step. This approach will assure basic competency on all levels, and testing also facilitates learning and improves retention. Competence in endosonography can be based on a systematic an easy principle consisting of 2 times six anatomical landmarks.
Keywords: Endosonography, training, technique
INTRODUCTION
Patients with tumors in the lungs and the mediastinum undergo computed tomographic evaluation (computed tomography [CT] scanning) and/or positron emission tomographic (PET) scanning. Unfortunately, these have limited specificity in both diagnosis and staging. Transesophageal ultrasound guided fine needle aspiration (FNA) (endoscopic ultrasound [EUS]-FNA) and endobronchial ultrasound guided transbronchial needle aspiration (EBUS-TBNA) (endosonography) can visualize and provide biopsies from these tumors and other structures that cannot be reached otherwise, and that cannot be correctly diagnosed with CT and PET. However, endosonography is very operator-dependent making it essential to have competent physicians. There is a need for systematic and efficient training and certification in endosonography.
How to learn endosonography
Miller described a four layered pyramid for acquiring competence [Figure 1].[1] The two first steps (“knows” and “knows how”) relate to the theoretical knowledge that should establish a base for practical training and performance. Step 3 (“shows how”) is a performance in a simulated environment, and step 4 (“does”) is the actual performance on patients.
Figure 1.
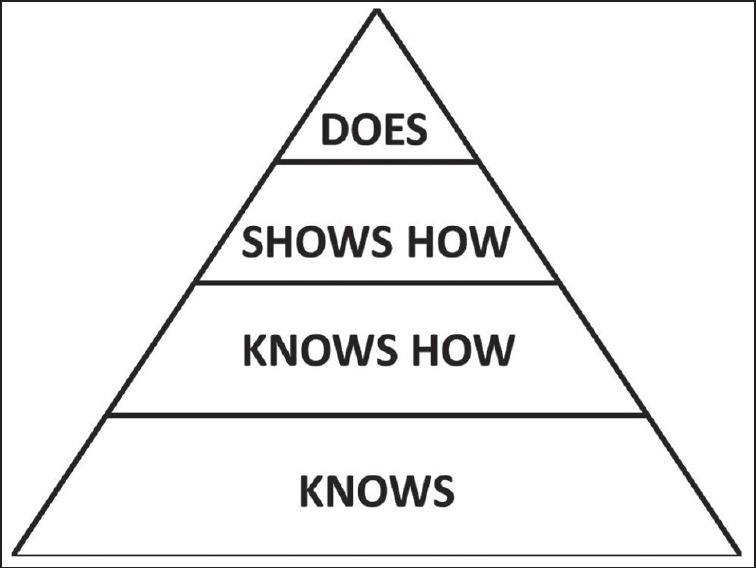
Miller's pyramid
A systematic training program in endosonography should be based on the same steps: Theoretical knowledge, performance on simulators, and supervised performance on patients. Each step should be completed by passing a validated exam before passing on to the next step. This approach will assure basic competency on all levels, and testing also facilitates learning and improves retention.[2]
Theoretical knowledge
The theoretical knowledge is the basis for proceeding to training on simulators and supervised clinical training. The anatomy of the mediastinum, and the theoretical approach to endosonography including indications and contraindications can be learned from textbooks, scientific journals and courses[3,4] (Colella et al. this volume). The acquired knowledge should be tested using a validated theoretical exam, that is, a test based on multiple choice questions.
Simulation-based training
In an era with increased focus on patient safety, it is no longer acceptable to put the burden of initial training on the patients. The initial, steep part of the learning curve could be overcome using simulators. “Large effects for outcomes of knowledge, skills, and behaviors and moderate effects for patient-related outcomes” were found in a systematic review and meta-analysis regarding technology-enhanced simulation-based on 607 papers.[5] Endosonography can be practiced on rubber models, animal organs, live anesthetized animals, and virtual-reality simulators. These methods all seem beneficial, and a study regarding computer simulation and wet lab simulation found both to be effective and complementary.[6,7] Unfortunately, there are no commercially available virtual-reality simulators for practicing EUS-FNA, but it is possible to practice EBUS-TBNA on both the GI Bronch Mentor™ (Simbionix, Cleveland, Ohio, USA) and the AccuTouch Flexible Bronchoscopy Simulator™ (CAE Healthcare, Montreal, Que., Canada). Evidence for construct validity has been found for both simulators, and standardized test including pass/fail-standards has been developed for the GI Bronch Mentor.[8,9] As discussed above such an exam should be passed before proceeding to practicing on patients.
Supervised performance on patients
Not all aspects of the procedure can be practiced on simulators, and no simulator is 100% realistic. Even after passing a simulation-based test the trainee should perform the initial endosonography procedures under supervision — self-learning of endosonography should be discouraged.[10] The number of supervised procedures necessary varies from trainee to trainee. Specific tools for assessment of performance in endosonography could be used for giving feedback and monitoring trainees’ progression,[11,12] and all programs should continuously monitor their outcomes. It is impossible to quote a certain number of performed procedures that will guarantee basic competence in endosonography. Studies on EBUS learning curves have shown that performance of 50 procedures does not ensure basic competency,[13,14] and a study exploring learning curves for EUS for lung cancer staging found that 20 procedures were not enough to ensure basic competency.[15] The above-mentioned assessment tools could be an important help in determining when basic competency is acquired, and the trainee is ready to perform endosonography independently.
Systematic and stepwise approach to endosonography
In learning and performing endosonography three steps should be followed:
“Pattern recognition”: Learn to recognize anatomic landmarks by observing the procedure when performed by an experienced colleague in the clinical setting or on a simulator.
“Handling of the endoscope”: Be able to insert the endoscope and to “produce” the pictures, which is much more difficult than watching an experienced examiner doing the procedure.
“How to take biopsies”: Learn to position the transducer correctly and to use a sheet and the needle.
Pattern recognition
Six landmarks for basic pattern recognition in EUS and EBUS, respectively, are recognized. A more detailed description of anatomical landmarks and borders is found in the International Association for the Study of Lung Cancer staging map.[16]
The six endoscopic ultrasound landmarks are shown in Figures 2 and 3 and are described in Table 1.
Figure 2.
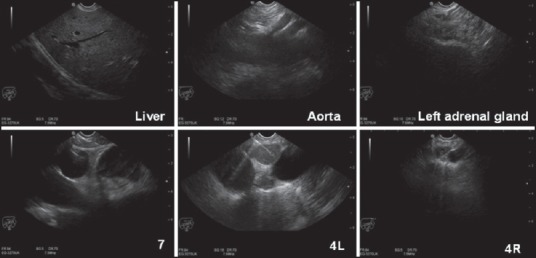
Ultrasound photos of the six endoscopic ultrasound landmarks. Figure 3 and Table 1 for additional details
Figure 3.
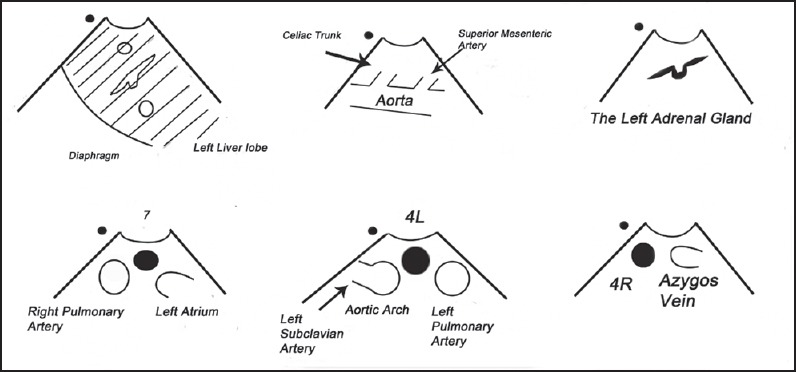
Schematic drawings of the six anatomical landmarks during endoscopic ultrasound
Table 1.
Description of the six anatomical landmarks during EUS
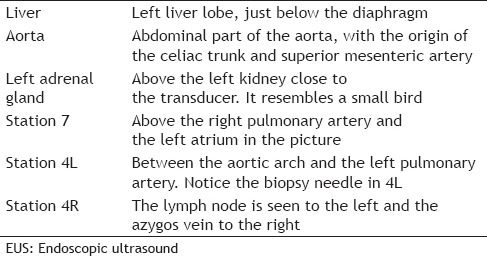
The liver: Introduce the EUS endoscope into the esophagus and go down below the diaphragm. Turn the handle slightly counterclockwise and find the left liver lobe.
Aorta: Turn the endoscope clockwise and find the aorta with the celiac trunk and the superior mesenteric artery.
The left adrenal gland: Turn the endoscope further clockwise and press the big wheel gently till you find the left adrenal gland (it resembles a small bird) close to the upper pole of the left kidney.
Station 7: Retract the endoscope to the mediastinum and find the subcarinal lymph node, station 7, close to the left atrium and the right pulmonary artery.
Station 4L: Retract the endoscope a few centimeters and notice the reflections from the trachea. Turn counterclockwise and station 4L is found between the aortic arch and the left pulmonary artery (the vessels resemble the ears of mickey mouse).
Station 4R: Turn clockwise till you pass the trachea again and find the azygos vein. Retract the endoscope till it disappears into the superior caval vein and search for station 4R. However, it can hide behind the trachea.
The six endobronchial ultrasound landmarks are shown in Figures 4 and 5 and are described in Table 2.
Figure 4.

Ultrasound photos of the six endobronchial ultrasound guided landmarks. Figure 5 and Table 2 for additional details
Figure 5.
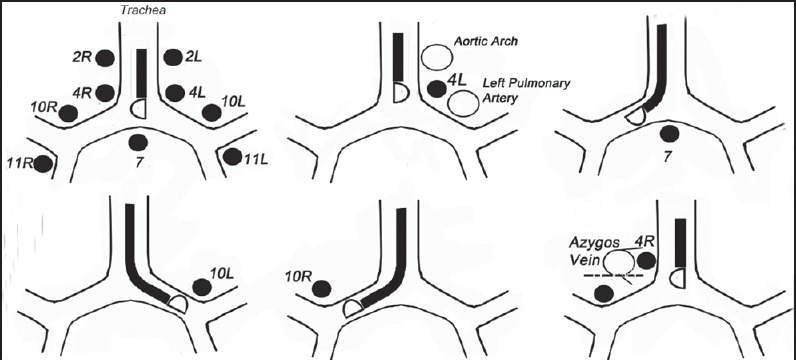
Schematic drawings of the six anatomical landmarks during endobronchial ultrasound guided
Table 2.
Description of the six anatomical landmarks during EBUS
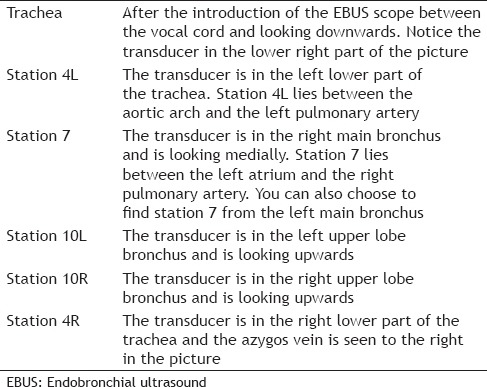
Trachea: This landmark is easy to recognize, when you have first managed to introduce the endoscope.
Station 4L: Turn the endoscope counterclockwise and look for station 4L between the arch of the aorta and the left pulmonary artery. With this position of the transducer, you may also be able to discern station 5 and 6.
Station 7: Is found below the carina with the EBUS scope in the right or the left main bronchus facing medially.
Station 10L: Is found when looking upwards with the transducer in the left upper-lobe bronchus.
Station 10R: Is found when looking upwards with the transducer in the right upper-lobe bronchus. Station 10R lies caudal to the inferior border of the azygos vein close to the right main bronchus.
Station 4R: Look for the azygos vein by turning the transducer to the right in the trachea. The inferior border of the azygos vein marks the inferior border of station 4R.
Handling of the endoscope: tips and tricks
“The dot” shows where the proximal part of the endoscope on the ultrasonic picture is located. It could be located either on the left or the right side [Figure 6].
Figure 6.
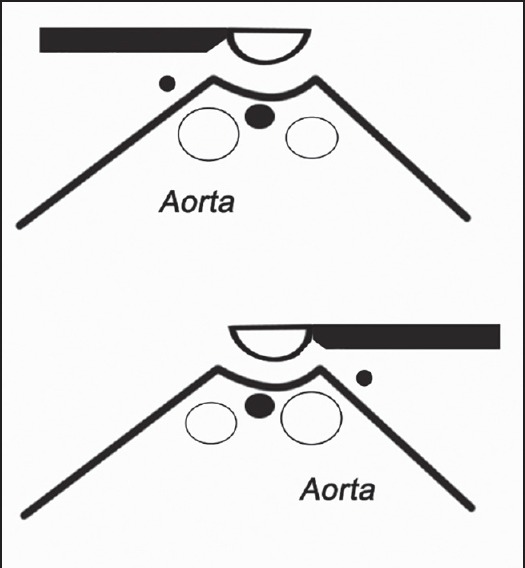
“The dot”
Using the EUS scope, a rotation to the right (clockwise) of the handle moves the transducer to the right side of the body, when the transducer is directed ventrally, that is, is above the diaphragm. A rotation to the right moves the transducer to the left side of the body when the transducer is directed dorsally that is, is below the diaphragm [Figure 7].
Figure 7.
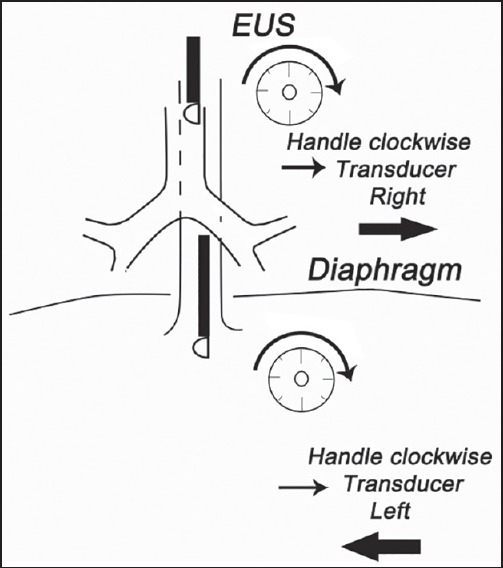
How to handle the EUS scope
All regions should be inspected systematically with a 360° rotation for every 4 cm. Do not overlook any structures near the esophagus or the central airways [Figure 8].
Figure 8.
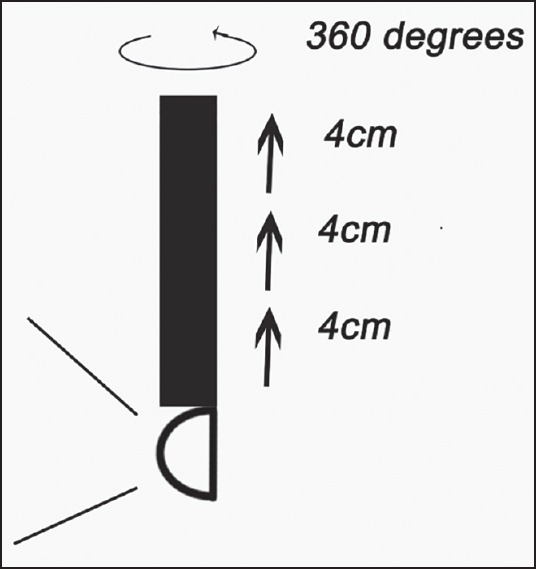
The sistematic inspection with the EUS scope
When performing EBUS, it must be remembered that the view is typically in an oblique direction of 30°, so it can be difficult to get access to the trachea [Figure 9].
Figure 9.
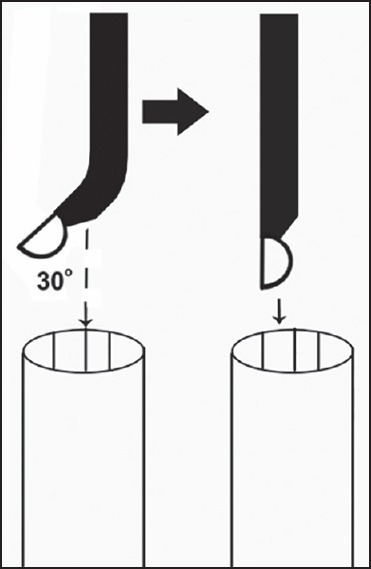
How to access in the trachea with an EBUS scope
How to take biopsies
When the target structure is identified, a biopsy can be taken.
Insert the sheet in the operative channel of the endoscope and lock it
Adjust the sheet with the tip a few millimeters outside the endoscope
Move the needle with the stylet a few millimeters forward
Retract the stylet 1 cm to make the needle sharp
Hit the target
Reinsert the stylet and then remove it
Connect the suction to the needle and move it back and forth
Stop moving needle and cease suction
Retract the needle and make sure the needle is in the upper position
Lock the needle and remove the equipment from the endoscope.
Needles from different companies are slightly different, but the main principles are the same. The most often used needle for both EUS-FNA and EBUS-TBNA is a 22 G needle, but a 19 G needle is also available for EUS-FNA [Figure 10].
Figure 10.
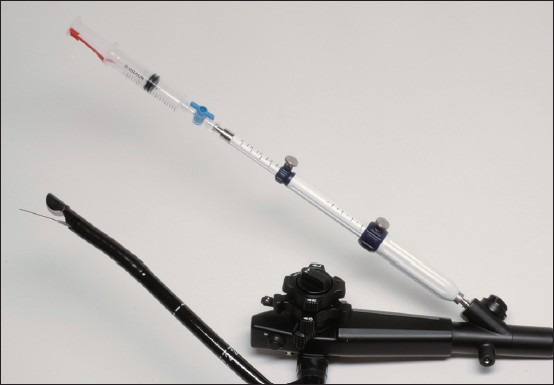
The needle equipment mounted on an EBUS scope
The needle equipment mounted on an EBUS endoscope [Figure 11].
Figure 11.
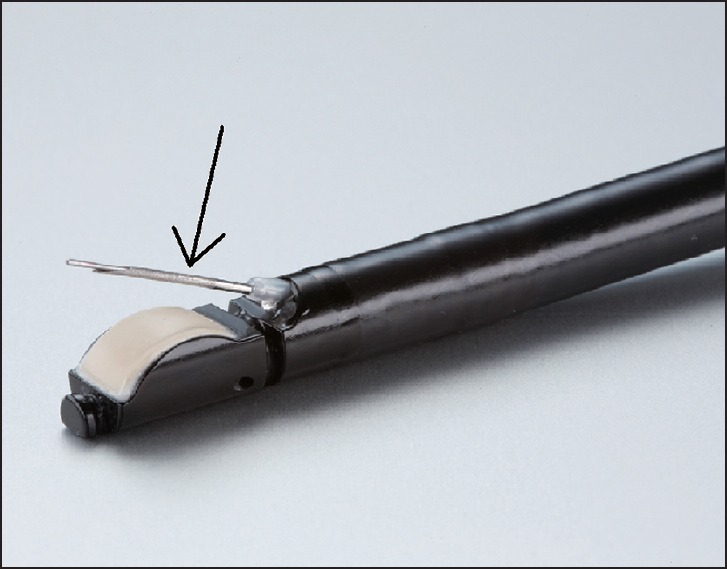
The arrow is pointing at the needle with the stylet inside coming out of the sheet
The arrow is pointing at the needle with the stylet inside coming out of the sheet.
How to handle the biopsy material
Even the most perfect endoscopic procedure could be wasted if the material is handled incorrectly. It is advisable that the operator stays in close touch with the pathologist and others (for example microbiologist) to ensure optimal handling.
How to describe the findings
Finally, when the procedure is finished, a systematic description is mandatory. The 2 times six landmarks have to be recorded and making photos of the findings can be helpful. The appearance of lymph nodes regarding size (short axis), shape (oval or round), margin, echogenicity (homogeneous or heterogeneous), presence of a central hilar structure and hypoechoic areas as a sign of necrosis have to be recorded. This can also to some extent help to predict the probability of malignancy.[17]
CONCLUSION
Endosonography is very dependent on the operator and should be learned and performed in a systematic way.
Footnotes
Source of Support: Nil.
Conflict of Interest: None declared.
REFERENCES
- 1.Miller GE. The assessment of clinical skills/competence/performance. Acad Med. 1990;65:S63–7. doi: 10.1097/00001888-199009000-00045. [DOI] [PubMed] [Google Scholar]
- 2.Kromann CB, Jensen ML, Ringsted C. The effect of testing on skills learning. Med Educ. 2009;43:21–7. doi: 10.1111/j.1365-2923.2008.03245.x. [DOI] [PubMed] [Google Scholar]
- 3.Clementsen P, Annema J, Konge L, et al. Lung cancers and mediastinal tumors. In: Deutsch JC, Banks MR, editors. Gastrointestinal Endoscopy in the Cancer Patient. 1st ed. New Jersey: Wiley-Blackwell; 2013. pp. 345–54. [Google Scholar]
- 4.Vilmann P, Saftoiu A. Endoscopic ultrasound-guided fine needle aspiration biopsy: Equipment and technique. J Gastroenterol Hepatol. 2006;21:1646–55. doi: 10.1111/j.1440-1746.2006.04475.x. [DOI] [PubMed] [Google Scholar]
- 5.Cook DA, Hatala R, Brydges R, et al. Technology-enhanced simulation for health professions education: A systematic review and meta-analysis. JAMA. 2011;306:978–88. doi: 10.1001/jama.2011.1234. [DOI] [PubMed] [Google Scholar]
- 6.Stather DR, MacEachern P, Chee A, et al. Wet laboratory versus computer simulation for learning endobronchial ultrasound: A randomized trial. Can Respir J. 2012;19:325–30. doi: 10.1155/2012/785192. [DOI] [PMC free article] [PubMed] [Google Scholar]
- 7.Stather DR, Lamb CR, Tremblay A. Simulation in flexible bronchoscopy and endobronchial ultrasound: A review. J Bronchology Interv Pulmonol. 2011;18:247–56. doi: 10.1097/LBR.0b013e3182296588. [DOI] [PubMed] [Google Scholar]
- 8.Konge L, Annema J, Clementsen P, et al. Using virtual-reality simulation to assess performance in endobronchial ultrasound. Respiration. 2013;86:59–65. doi: 10.1159/000350428. [DOI] [PubMed] [Google Scholar]
- 9.Stather DR, Maceachern P, Rimmer K, et al. Validation of an endobronchial ultrasound simulator: differentiating operator skill level. Respiration. 2011;81:325–32. doi: 10.1159/000323520. [DOI] [PubMed] [Google Scholar]
- 10.Polkowski M, Larghi A, Weynand B, et al. Learning, techniques, and complications of endoscopic ultrasound (EUS)-guided sampling in gastroenterology: European Society of Gastrointestinal Endoscopy (ESGE) Technical Guideline. Endoscopy. 2012;44:190–206. doi: 10.1055/s-0031-1291543. [DOI] [PubMed] [Google Scholar]
- 11.Konge L, Vilmann P, Clementsen P, et al. Reliable and valid assessment of competence in endoscopic ultrasonography and fine-needle aspiration for mediastinal staging of non-small cell lung cancer. Endoscopy. 2012;44:928–33. doi: 10.1055/s-0032-1309892. [DOI] [PubMed] [Google Scholar]
- 12.Davoudi M, Colt HG, Osann KE, et al. Endobronchial ultrasound skills and tasks assessment tool: Assessing the validity evidence for a test of endobronchial ultrasound-guided transbronchial needle aspiration operator skill. Am J Respir Crit Care Med. 2012;186:773–9. doi: 10.1164/rccm.201111-1968OC. [DOI] [PubMed] [Google Scholar]
- 13.Kemp SV, El Batrawy SH, Harrison RN, et al. Learning curves for endobronchial ultrasound using cusum analysis. Thorax. 2010;65:534–8. doi: 10.1136/thx.2009.127274. [DOI] [PubMed] [Google Scholar]
- 14.Steinfort DP, Hew MJ, Irving LB. Bronchoscopic evaluation of the mediastinum using endobronchial ultrasound: A description of the first 216 cases carried out at an Australian tertiary hospital. Intern Med J. 2011;41:815–24. doi: 10.1111/j.1445-5994.2009.02142.x. [DOI] [PubMed] [Google Scholar]
- 15.Konge L, Annema J, Vilmann P, et al. Transesophageal ultrasonography for lung cancer staging: Learning curves of pulmonologists. J Thorac Oncol. 2013;8:1402–8. doi: 10.1097/JTO.0b013e3182a46bf1. [DOI] [PubMed] [Google Scholar]
- 16.Tournoy KG, Annema JT, Krasnik M, et al. Endoscopic and endobronchial ultrasonography according to the proposed lymph node map definition in the seventh edition of the tumor, node, metastasis classification for lung cancer. J Thorac Oncol. 2009;4:1576–84. doi: 10.1097/JTO.0b013e3181c1274f. [DOI] [PubMed] [Google Scholar]
- 17.Fujiwara T, Yasufuku K, Nakajima T, et al. The utility of sonographic features during endobronchial ultrasound-guided transbronchial needle aspiration for lymph node staging in patients with lung cancer: A standard endobronchial ultrasound image classification system. Chest. 2010;138:641–7. doi: 10.1378/chest.09-2006. [DOI] [PubMed] [Google Scholar]


