Abstract
This protocol outlines a procedure for testing whether two proteins interact. A target protein will be immunoprecipitated using an antibody that recognizes it (or a tagged version of the protein). The immunoprecipitated material will be separated by SDS-PAGE and analyzed by Western blotting to assess the presence of a candidate interacting protein(s).
1. THEORY
This protocol is ideal for testing specific protein–protein interactions. It is necessary to know the potential binding partners and be able to detect those partners by Western blot. Therefore, some prior knowledge of the protein is required for making the most of this technique. However, coimmunoprecipitation with the target protein does not indicate that the two proteins interact directly. Another molecule (protein, DNA, RNA, etc.) may bridge the interaction. Conversely, a positive interaction does provide information that the two proteins are physically connected in some fashion.
If there is little information on the target protein, such as association with a particular cellular pathway that provides clues of potential binding partners, it may be necessary to choose another assay to better evaluate protein–protein interactions. Specifically, mass spectrometry-based proteomics approaches are preferable for identifying unknown interaction partners. However, because the procedure described in this section uses an antibody to pull down the protein of interest, the large amount of IgG present in the resulting eluate would interfere with proteomics approaches such as mass spectrometry to identify interactors. For such mass spectrometry-based analysis, we recommend a different method of protein affinity purification, using selective elution of proteins from TAP or FLAG tag affinity resins (see Affinity Purification of Protein Complexes Using TAP Tags and Affinity Pull-down of Proteins using anti-FLAG M2 Agarose Beads, respectively).
This protocol outlines preparation of lysates from yeast, specifically Saccharomyces cerevisiae and Schizosaccharomyces pombe. Powerful genetic approaches in these yeasts allow easy tests of the requirement(s) for particular protein–protein interactions using lysates from strains containing knock-out mutations or point mutations of the gene of interest. In general, binding conditions can be altered to further characterize any observed interaction, such as adding ethidium bromide to disrupt DNA bridges (Lai and Herr, 1992). Overall, this is a simple but effective technique to address protein–protein interaction and/or to characterize the requirements for specific interactions.
2. EQUIPMENT
Centrifuge (refrigerated)
Microcentrifuge (refrigerated)
End-over-end rotator
Heat block
Bead beater (e.g., BioSpec Mini-beadbeater-8)
Spectrophotometer
SDS-PAGE gel rig
Micropipettors
Pipettor tips
0.5-mm Glass beads (BioSpec)
1.7-ml polypropylene microcentrifuge tubes
1.7-ml low-retention microcentrifuge tubes
2-ml screw-capped microcentrifuge tubes
5-ml polypropylene round-bottom tubes (e.g., Falcon)
21-gauge needles
Disposable cuvettes
3. MATERIALS
HEPES
Magnesium acetate (MgOAc)
EDTA
EGTA
Sodium acetate (NaOAc)
Glycerol
Dithiothreitol (DTT)
Nonidet P40 (NP-40)
Complete EDTA-free Protease Inhibitor Cocktail tablets (Roche)
Phenylmethylsulfonyl fluoride (PMSF)
Protein A-Sepharose (GE Healthcare)
Protein or tag-specific antibody
Bradford reagent
Bromophenol blue
Sodium dodecyl sulfate (SDS)
Tris base
3.1. Solutions & buffers
-
Step 1 2× Lysis buffer
Component Final concentration Stock Amount Na-HEPES, pH 7.5 100 mM 1 M 10 ml NaOAc, pH 7.5 400 mM 3 M 13.3 ml EDTA 2 mM 0.5 M 40 μl EGTA 2 mM 0.5 M 40 μl MgOAc 10 mM 1 M 1 ml Glycerol 10% 50% 20 ml Add water to 100 ml -
1× Lysis buffer
Component Final concentration Stock Amount 2× Lysis Buffer 1× 2× 15 ml NP-40 0.25% 10% 750 ml DTT 3 mM 1 M 100 μl PMSF 1 mM 100 mM 300 μl Protease Inhibitor Cocktail (Roche) 1 tablet Add water to 30 ml -
Step 2 2× SDS Sample buffer
Component Final concentration Stock Amount Tris–HCl, pH 6.8 100 mM 1 M 100 μl SDS 4% 25% 160 μl Glycerol 20% 50% 400 μl DTT 200 mM 1 M 200 μl PMSF 2 mM 100 mM 20 μl Bromophenol blue 0.2% 2 mg Add water to 1 ml -
Step 4 Wash buffer
Component Final concentration Stock Amount 2× Lysis buffer 1× 2× 15 ml NP-40 0.25% 10% 750 ml DTT 3 mM 1 M 100 μl PMSF 1 mM 100 mM 300 μl Add water to 30 ml
4. PROTOCOL
4.1. Duration
| Preparation | About 1 day |
|---|---|
| Protocol | About 4–6 h |
4.2. Preparation
Grow 250 ml of yeast cells to an OD600 = 1–2. Pellet cells and wash once with 1× TBS. For each strain, flash-freeze 0.5 g of cells in each of two 2-ml screw-capped tubes (total of 1 g for each strain). Pellets should be weighed just prior to freezing and the weight of each pellet noted (e.g., 0.46 g) for Step 1.1. Tubes can be stored at −80 °C until ready to start the experiment.
An ‘untagged’ control strain should be included in each set of IPs as a control for background binding. If a tagged version of the protein will be immunoprecipitated, simply include an isogenic strain expressing the protein without the tag. If an antibody to an endogenous protein is being used, then use a strain with a deletion of the gene encoding this protein. In the case that the knockout is inviable or does not exist, it will be necessary to set up a no antibody control to assess background binding by the beads.
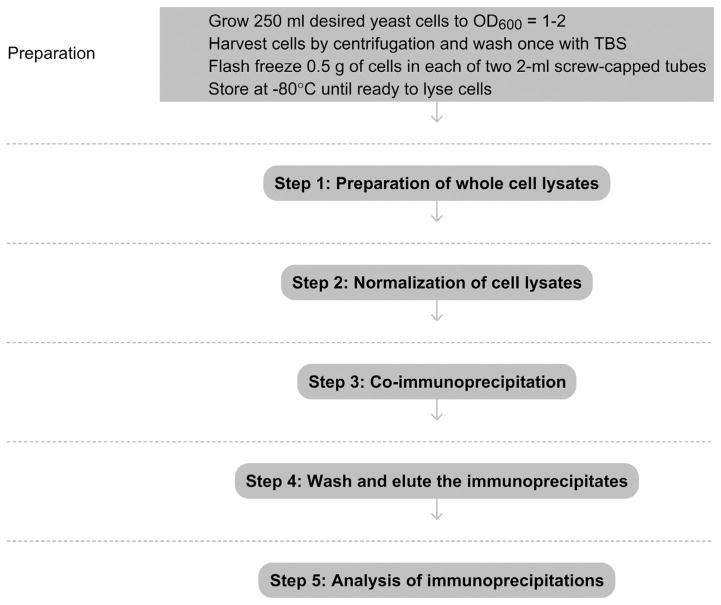
See Fig. 2.1 for the flowchart of the complete protocol.
Figure 2.1.
Flowchart of the complete protocol, including preparation.
5. STEP 1 PREPARATION OF WHOLE CELL LYSATES
5.1. Overview
Preparation of cell lysates to be added to each IP reaction. Cell pellets are thawed, lysed by bead beating, and then cleared by centrifugation to remove cell debris.
5.2. Duration
35 min
-
1.1
To the frozen pellets, add 0.1 ml of ice-cold, freshly prepared 1× Lysis Buffer for each 0.1 g of cells. Thaw the cells by gently flicking and inverting the tubes. Once completely thawed, keep all tubes on ice.
-
1.2
Add 400 μl of 0.5-mm glass beads to each tube. Pulse the tubes in a bead beating instrument (we use a BioSpec Mini-beadbeater-8) for 45 s at homogenizing intensity. Place all tubes on ice for 5 min before a second 45-s pulse. Again, place the tubes on ice.
-
1.3
Puncture the bottom of each tube with a 21-gauge needle. Carefully place each punctured tube into an appropriately sized collection tube, such as a 5-ml polypropylene round-bottom tube.
-
1.4
Spin all samples for 5 min in a refrigerated centrifuge (such as Eppendorf 5702R or Sorvall RC5C) at 200×g.
-
1.5
Gently resuspend the flow-through with a pipettor and transfer the entire volume to a 1.7-ml microcentrifuge tube. The flow-throughs from identical strains can be combined into one microcentrifuge tube.
-
1.6
Spin the tubes in a refrigerated microcentrifuge for 5 min at full speed (~20 000×g).
-
1.7
Pipet the resulting supernatants into clean microcentrifuge tubes. This is the whole cell lysate.
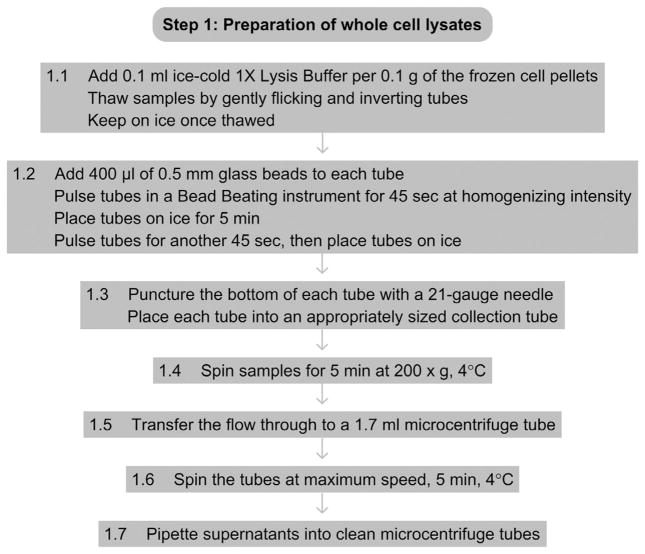
See Fig. 2.2 for the flowchart of Step 1.
Figure 2.2.
Flowchart of Step 1.
6. STEP 2 NORMALIZATION OF CELL LYSATES
6.1. Overview
Cell lysates from Step 1 need to be normalized by protein concentration prior to being used for the IP, to ensure equal amounts of protein are added to each IP sample.
Following Step 1 of this protocol, the resulting protein concentration for each lysate should be around 25–50 mg ml−1. The dilutions and subsequent amounts added to the IP suggested here are based on concentrations in this range.
6.2. Duration
25 min
-
2.1
Prepare the Bradford reagent or equivalent protein concentration assay reagent as described by the manufacturer.
-
2.2
Make a 1:20 dilution of each whole cell lysate obtained in Step 1.7 in water.
-
2.3
Prepare three cuvettes of prepared Bradford or protein assay reagent for each strain and add to each an increasing amount of diluted lysate. For example, add 3 μl, 4 μl, and 5 μl. Also prepare blanks by adding equivalent amounts of lysis buffer diluted 1:20 in water.
-
2.4
Measure the OD595 (or as described for chosen assay reagent) for each sample.
-
2.5
Calculate the relative protein concentration of each sample based on averaged OD595 reading and adjust all samples to the same concentration by adding 1× lysis buffer.
6.3. Tip
Use a dilution factor that is appropriate for the given assay reagent to be used to ensure that OD readings lie within the linear range.
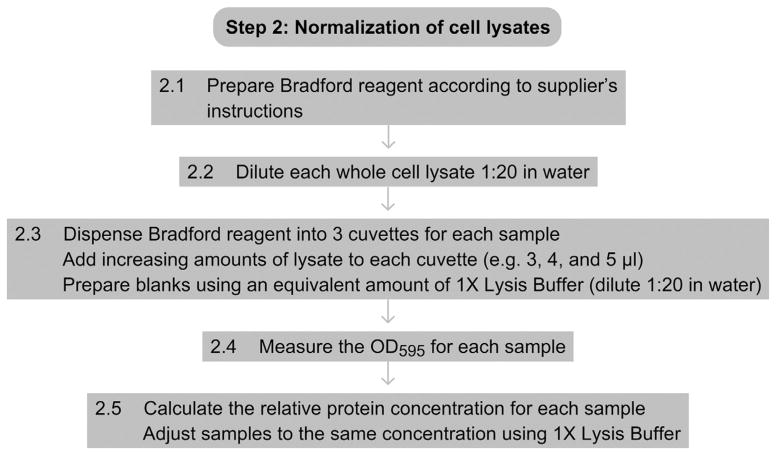
See Fig. 2.3 for the flowchart of Step 2.
Figure 2.3.
Flowchart of Step 2.
7. STEP 3 COIMMUNOPRECIPITATION
7.1. Overview
This is the step in which the cell lysates will be incubated with the antibody and beads to immunoprecipitate the target protein.
7.2. Duration
2 h 20 min
-
3.1
For each immunoprecipitation, remove 30 μl of the 50% slurry of protein A-Sepharose (15 μl of packed beads) and place in a low-retention microcentrifuge tube. Wash the beads 5 times in 1× Lysis Buffer. Gently resuspend the total volume of beads in 1 ml lysis buffer by pipetting. Between each wash, spin the tubes in a microcentrifuge at 500×g for 1 min and carefully remove the wash with a pipettor.
-
3.2
Resuspend the washed beads in 210 μl of 1× Lysis Buffer per IP sample. Add the appropriate amount of antibody for each immunoprecipitation as recommended by the supplier. Mix thoroughly by gently pipetting.
-
3.3
Label a 1.7-ml low-retention microcentrifuge tube for each IP sample. Dispense 200 μl of the bead/antibody slurry into each of the labeled tubes.
-
3.4
Add 500 μl of whole cell lysate to each IP tube (all normalized to the same concentration as described in Step 2). The combined volume of beads and lysate should be 700 μl for each tube. Save the remaining lysate to test protein levels as described in Step 3.6.
-
3.5
Place all samples on an end-over-end rotator (or equivalent) at 4 °C for 2 h.
-
3.6
In a microcentrifuge tube, add 50 μl of freshly prepared 2× Sample Buffer and 50 μl of the normalized lysate used for the IP in Step 3.4. This is the ‘Input’ to be analyzed in Step 5.3.
7.3. Tip
For most antibodies, we use in the range of 2–5 μg per IP.
7.4. Tip
When working with Sepharose or agarose beads, always cut the pipettor tip prior to pipetting the beads. Otherwise, the beads will clog the tip during pipetting, leading to the uptake of more buffer and less beads.
7.5. Tip
Make sure to resuspend the beads before each pipetting to prevent the beads from settling and leading to unequal bead volumes in different IP tubes. To confirm equal bead volumes, the tubes can be spun briefly at 500×g to visually compare packed bead volumes.
7.6. Tip
Be gentle with the Sepharose beads. Never spin the beads at >500×g, and always resuspend the beads by gently pipetting, never vortexing.
7.7. Tip
Using a vacuum aspirator during bead washing can lead to accidental bead loss. Therefore, use a pipettor instead.
7.8. Tip
Prior to Step 1, it is possible to wash the beads and add the antibody to the washed beads, as described in Steps 3.1 and 3.2. The resulting slurry can be placed on an end-over-end rotator at 4 °C during the lysate preparation to prebind the antibody to the protein A-Sepharose. However, because the IgG-protein A interaction is so strong, these interactions will be made quite efficiently during the 2-h binding step of the IP; therefore, prebinding is not required.
7.9. Note
TAP tag constructs used for yeast often include a protein A component. In this case, IgG-Sepharose beads (GE Healthcare) need to be used instead of protein A conjugated beads. In addition, the IP can only be conducted in one direction. For instance, looking for an interaction between a TAP-tagged protein and a Myc-tagged protein can only be done by immunoprecipitating the TAP-tagged protein with IgG. In the other direction, the addition of the anti-Myc antibody will result in the immunoprecipitation of the TAP-tagged protein regardless of its binding to the Myc-tagged protein. Keep this in mind when designing co-IP experiments with protein A-tagged proteins.
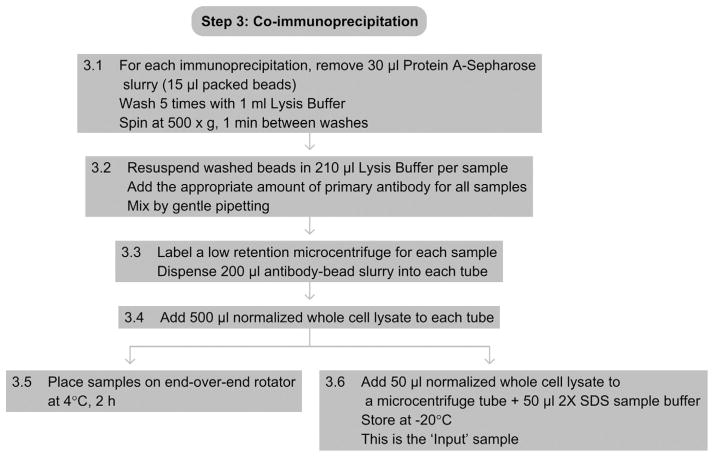
See Fig. 2.4 for the flowchart of Step 3.
Figure 2.4.
Flowchart of Step 3.
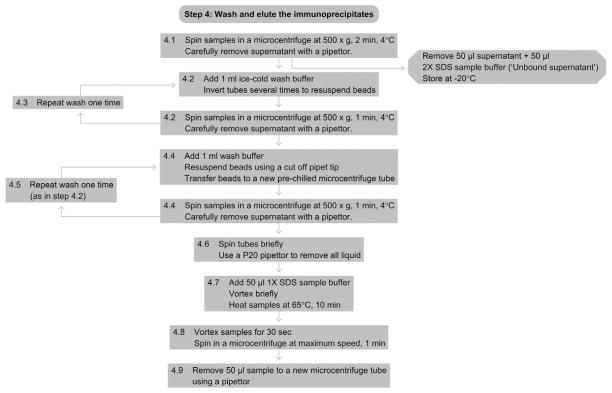
8. STEP 4 WASH AND ELUTE THE IMMUNOPRECIPITATES
8.1. Overview
After the beads have been incubated with the lysate, they are collected and washed 4 times. The immunoprecipitated proteins are eluted in sample buffer.
8.2. Duration
30 min
-
4.1
Spin the samples in a microcentrifuge at 500×g, 4 °C, for 2 min. Gently remove as much of the supernanant as possible with a pipette. Save 50 μl of the supernant and mix with 50 μl of 2× sample buffer (Unbound supernatant). Save aliquots at −20 °C and analyze by Western blotting to assess IP efficiency (see Step 5.3).
-
4.2
Add 1 ml of ice-cold wash buffer to each tube and resuspend all the beads by gently inverting each tube several times. Make sure all the beads have been fully resuspended in the wash buffer. Spin all tubes at 500×g for 1 min in a microcentrifuge at 4 °C. Then gently remove the supernatant with a pipettor.
-
4.3
Repeat wash 1 time.
-
4.4
Add 1 ml of wash buffer to each tube, and with a cut pipette tip, gently resuspend the beads and transfer them to a new, chilled 1.7-ml low-retention tube. Spin all tubes at 500×g for 1 min in a microcentrifuge at 4 °C.
-
4.5
Wash one more time as in Step 4.2.
-
4.6
Spin the tubes again briefly to make sure any excess wash buffer does not remain on the sides of the tubes. Use a P20 pipettor to remove all the excess wash buffer, making sure not to remove any of the beads.
-
4.7
To elute, add 50 μl of 1× SDS Sample Buffer to each tube and vortex briefly. Place all tubes on a heat block at 65 °C, incubate for 10 min.
-
4.8
Vortex each tube for 30 s. Spin the samples in a microcentrifuge at full speed (~20 000×g) for 1 min.
-
4.9
Remove 30 μl from each tube with a pipetor and place in a fresh 1.7-ml tube. These are the eluted IP samples.
8.3. Tip
Proceed through the washes as quickly as possible.
8.4. Tip
It is possible to use a vacuum aspirator to remove all the buffer after each wash, which will decrease background binding. However, to prevent accidental bead loss, attach a 26 5/8-gauge needle (B–D, Sub Q) to the end of the aspirator and hold the flat end of the needle against the side of the tube while aspirating.
See Fig. 2.5 for the flowchart of Step 4.
Figure 2.5.
Flowchart of Step 4.
9. STEP 5 ANALYSIS OF IMMUNOPRECIPITATIONS
9.1. Overview
The immunoprecipitated protein(s) are separated by SDS-PAGE and then analyzed by Western blotting. The ‘Input’ and ‘Unbound supernatant’ samples are included to assess immunoprecipitation efficiency.
9.2. Duration
1–2 days
-
5.1
Pour two polyacrylamide gels and fractionate the samples on them (see One-dimensional SDS-Polyacrylamide Gel Electrophoresis (1D SDS-PAGE)). Transfer the separated proteins to PVDF membranes.
-
5.2
Set up two Western blots, one to look at the protein which was immunoprecipitated, the second to look for the potentially interacting protein (see Western Blotting using Chemiluminescent Substrates). Depending on protein expression level and IP efficiency (see below), the amount of each Input and IP sample to load on the gel will need to be adjusted. The Input samples should have equal amounts of each protein, indicating that equal amounts of protein were used for each IP.
-
5.3
To test the efficiency of the IP, SDS-PAGE, and Western blotting can be performed on the Input samples and an aliquot of the Unbound supernatant (saved in Step 4.1). This allows an assessment of the amount of the target protein that was immunodepleted. Load equal amounts of Input and Unbound lysate samples and compare them by Western blotting. If only a small percentage of the target protein is immunoprecipitated, binding conditions may need to be adjusted. For example, the salt concentration can be increased (up to 500 mM) or decreased (as low as 130 mM).
-
5.4
Further troubleshooting:
In the case that there is a lot of nonspecific background binding, for example, the Western blot reveals that the protein of interest is present in the untagged IP sample, repeat the immunoprecipitation, but perform the wash steps more carefully (see Tips in Step 4). It is also possible to perform more stringent washes by increasing the salt concentration of the wash buffer up to 500 mM.
If the protein of interest does not appear to interact with the target protein, the interaction may be salt-labile and decreasing the salt concentration in the lysis buffer may allow detection of an interaction. Salt concentration can be reduced to between 50 and 130 mM, but this will also increase nonspecific interactions.
For weakly interacting proteins, it may be necessary to perform several immunoprecipitations, varying salt concentration or washes, until optimal conditions are identified.
Footnotes
Referenced Protocols in Methods Navigator
Affinity Purification of Protein Complexes Using TAP Tags.
Affinity Pull-down of Proteins using anti-FLAG M2 Agarose Beads.
One-dimensional SDS-Polyacrylamide Gel Electrophoresis (1D SDS-PAGE).
Western Blotting using Chemiluminescent Substrates.
Referenced Literature
- Lai JS, Herr W. Ethidium bromide provides a simple tool for identifying genuine DNA-independent protein associations. Proceedings of the National Academy of Sciences of the United States of America. 1992;89:6958–6962. doi: 10.1073/pnas.89.15.6958. [DOI] [PMC free article] [PubMed] [Google Scholar]
Related Literature
- Gerace EL, Halic M, Moazed D. The methyltransferase activity of Clr4Suv39h triggers RNAi independently of histone H3K9 methylation. Molecular Cell. 2010 doi: 10.1016/j.molcel.2010.07.017. [DOI] [PMC free article] [PubMed] [Google Scholar]


