

Abstract
The introduction of robotic surgical systems and their integration into minimally invasive procedures have changed the landscape of laparoscopic surgery dramatically. Intuitive Surgical's da Vinci Surgical System was first approved by the Food and Drug Administration for cardiothoracic procedures in the late 1990s. This trend quickly spread through other surgical specialties, with urologists as one of the frontrunners in adoption. Subsequently, pediatric urologists have adopted robot-assisted procedures in selected centers, performing procedures such as pyeloplasty for ureteropelvic junction obstruction, partial and complete nephrectomy, and both intravesical and extravesical ureteral reimplantation. In this article, we will discuss technical considerations related to patient positioning and port placement in pediatric robot-assisted surgery.
Introduction
The introduction of robotic surgical systems and their integration into minimally invasive procedures have changed the landscape of laparoscopic surgery dramatically. Robot-assisted laparoscopic surgery provides high definition three-dimensional visualization and superior articulation of the robotic instrument wrists, thereby maximizing ergonomics. Furthermore, it epitomizes the idea of minimally invasive surgery with its miniaturization and precise movements that ultimately result in smaller incisions, less blood loss and pain, shorter hospital stays, and quicker convalescence.
Despite the steep costs of the technology, adoption in the United States has progressed at a rapid rate, fueled by patient demands and surgeon preferences. Intuitive Surgical's da Vinci Surgical System was first approved by the Food and Drug Administration for cardiothoracic procedures in the late 1990s. This trend quickly spread through other surgical specialties, with urologists as one of the frontrunners in adoption.1,2
Pediatric urologists have adopted robot-assisted procedures in selected centers. Procedures such as pyeloplasty for ureteropelvic junction obstruction, partial and complete nephrectomy, and both intravesical and extravesical ureteral reimplantation for reflux are in practice. Complex procedures have also been reported, such as complete intracorporeal robot-assisted augmentation ileocystoplasty and Mitrofanoff appendicovesicostomy for neurogenic bladder dysfunction by Gundeti and associates.3,4
Many reasons account for the rapid adoption of robot-assisted laparoscopic surgery in the realm of pediatric urology. Reduced perioperative morbidity (less postoperative pain, less blood loss, and shorter hospital stays) as well as improved cosmesis are the main contributors for patients' preferences in undergoing robotic procedures. Surgeon preferences have also contributed to the trend toward minimally invasive surgery. For the surgeon, the robotic console provides maximal comfort in the seated position, three-dimensional visualization of a magnified operative field, increased articulation of robotic instruments, and improved anatomic access into the pelvic region. Combined with the faster recovery time and improved perioperative morbidity patients experience, many advocates for robot-assisted surgery believe the advantages that robot-assisted surgery offers outweigh the costs associated with adoption of the technology as well as the learning curve associated with mastering the skillset.5–7
There are four major factors that contribute to performing successful robot-assisted surgery. These include a good understanding of the procedure, superior surgical skills and training, flawless teamwork, and, most importantly, patient positioning and robotic port placement. The main goals of patient positioning and port placements are maintaining the safety of the patient, avoiding compression injuries, allowing maximum mobility of the robotic arms, and facilitating a smooth and efficient surgery. Pediatric urology groups have previously published articles providing technical guidance for performing successful robot-assisted surgery in the pediatric urology population.8 We will now present our approach to patient positioning and port placement.
Methods
Camera, ports, and instruments
There are currently two sizes of endoscopes on the market—8.5 mm and 12 mm. The previously available 5-mm endoscope has been discontinued because of its inability to allow for three-dimensional binocular vision.
We prefer to use three different types of ports for our robot-assisted surgeries. For the camera, we use a 12-mm blunt tip trocar (Autosuture®, Fig. 1). This consists of a blunt obturator with a balloon and a valve body/cannula assembly. The advantages of using this port are its short intra-abdominal length and superior anchoring to the abdominal wall without the need for suture fixation. For our initial access, we use an open Hassan technique that we think is the safest approach in the pediatric population. For the robotic working arms, we use the da Vinci 8-mm reusable cannulas with disposable seals. In general, we prefer to use the 8-mm blunt obturator; however, when encountering a resilient peritoneum, we may use a disposable 8-mm bladeless obturator (Fig. 2).
FIG. 1.
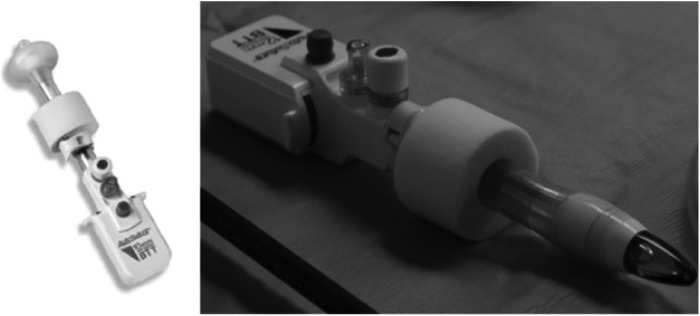
Autosuture® blunt tip trocar (with balloon).
FIG. 2.

daVinci® 8-mm blunt obturator (left); disposable daVinci® 8-mm bladeless obturator (right).
Before port placement, we administer local anesthesia to provide preemptive analgesia and to minimize postoperative pain. We use an empty trocar to create an indentation on the patient's skin and subsequently create an incision across the radius. This allows for snug fitting of the ports and prevents dislodgement and need for retention sutures. When retention sutures are used to secure ports, we found that extra time is spent when the need to change port positions arises.
After the camera port is placed, we place the remaining working ports under direct vision using a 0-degree telescope.9 We prefer to use 5-mm assistant ports for the passage of sutures as well as for providing retraction and suctioning during the procedure. For the novice robotic surgeon, mastery of the tasks performed by the bedside assistant should be the initial stage of learning.
In infants, where space is a challenge, we use a port-in-port technique, to prevent inadvertent injury to intra-abdominal organs and surrounding vascular structures. In this maneuver, we direct the 8- and 5-mm ports into 12-mm camera port on entering the peritoneal cavity. It is prudent while performing this maneuver not to skive the trocar; otherwise, this will create an oblique tract that will restrict robotic arm movements.
Instrumentation on the da Vinci machine allows for a wrist-like seven-degrees-of-freedom, which is particularly helpful for complex laparoscopic maneuvers such as suturing. In addition, because of motion control algorithms, movements of the instrumentation are tremor free. Both 5-mm and 8-mm instruments are available, yet 8 mm is often preferred by the author because of ease of use and geometric limitations of angulation of the 5-mm instruments.
Currently, the 5-mm instruments need an additional 2 cm of intracorporeal working distance over the 8-mm instruments (Figs. 3, 4). The increased distance is a limiting factor in the pediatric population and has discouraged the use of 5-mm instrumentation. The 8-mm instruments include a large needle driver, Maryland bipolar forceps, curved and straight scissors, scalpels, bi- and monopolar cautery instruments, ultrasonic energy instruments, and laser cutters. Appropriate miniaturization of the instrumentation is anticipated in future releases and may facilitate operating in tight anatomic spaces.
FIG. 3A.

8-mm instruments.
FIG. 3B.

5-mm instruments have a longer intracorporeal length.
FIG. 4.
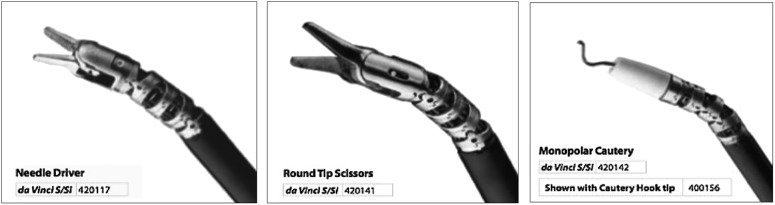
5-mm instruments.
During our robot-assisted procedures, our preference for the left robotic arm is the PreCise™ bipolar forceps, which allows for gentle tissue handling. In addition, we find that these forceps needs less space for working compared with the Maryland bipolar forceps and are less traumatic than the DeBakey forceps. For the right robotic arm instrument, we prefer to use the monopolor curved scissors rather than a hook because the scissors provides better control. Appropriate care should be taken in regard to insulating the scissors because unintentional cauterization of surrounding tissue has occurred without properly insulating the scissors with a rubber sheath.
We suggest using the Black Diamond Micro forceps when handling finer suture materials (5-0 and up) with CV 23 needles to facilitate creation of the anastomosis. The main disadvantage of these forceps is that they do not handle tissue grasping well.
Renal procedures
In renal surgeries such as nephrectomies and pyeloplasties, we begin by placing a beanbag on the surgical table. The upper extent of the beanbag will reach the neck of the patient (Fig. 5). The patient is then placed in a lateral decubitus position, rotated approximately 30 degrees off the vertical plane. The patient is brought toward the edge of the table to allow for unhindered robotic arm movement. Once this is achieved, the bottom arm is placed on an arm board padded with egg crate foams. The upper arm is similarly placed in an airplane position with plenty of foam padding Additional foam padding is used to protect the face from unintentional injury. The patient is secured to the operating table at the level of the lower rib cage and hips using folded surgical blue towels and silk tape. Finally, the table is flexed approximately 15 degrees at the kidney rest (Fig. 6).
FIG. 5.

The upper extent of the bean bag is at the level of the patient's neck.
FIG. 6.

The patient is rotated 30 degrees off the lateral plane. Notice the foam padding protecting the face and extremities.
For the infant patient, there are special considerations (Fig. 7). We use an infant-sized beanbag. A horizontal safety bar is placed above the baby's head to allow drapes and cables to suspend over the infant's head. Clear drapes are used to cover the head of the patient, and all cables should be placed in such a way to avoid resting on the patient. While the lower arm is placed on a heavily padded arm board, the upper arm is allowed to rest on the side of the patient. The infant is then secured to the table with folded blue towels and silk tape at the rib cage and hips.
FIG. 7.

Special considerations for the infant patient. Baby beanbag (top left); horizontal safety bar (top right); clear drapes (bottom left); padding of the infant patient (bottom right).
A urethral catheter and orogastric tube are placed at the start of the procedure. To gain access with the open Hassan technique, we make a semilunar incision at the umbilicus. For the camera port, we use the 12-mm balloon port as described previously. Once pneumoperitoneum is achieved, we then proceed with port site markings. We use the robotic ports to make indentations in the skin at the desired port sites. After local anesthesia is applied, we make skin incisions and proceed with port placement. This method of incision allows for tight fitting of the ports and obviates the need for anchoring the ports to prevent slippage. In addition, it allows for early adjustment of intracorporeal length. We prefer to use 8-mm ports for the robotic arms and a 5-mm port for the assistant. In robotic cystoplasty we use an additional 12-mm assistant port.
We find that port triangulation leads to excessive collision of robotic arms during the procedure. Instead, we use the following approach: The more inferior arm relative to the patient (either left or right, depending on the laterality of the affected kidney) is placed at midline, 8 cm from the camera port. The more superior arm is placed at a 30-degree angle (rotated away from midline toward the affected kidney), 6 cm away from the camera port. Finally, a 5-mm assistant port is placed approximately 6 cm lateral to the camera port, away from the affected kidney.
In infants, because of limited working space, we place ports approximately 3 to 4 cm from each other. All ports are placed in the midline, with the 12-mm camera port by the umbilicus, and the robotic working ports spaced 3 to 4 cm superiorly and inferiorly (Fig. 8). When the ports are placed correctly, they should dangle off the abdominal wall, allowing maximal movement. The 5-mm assistant port is then triangulated from the camera and inferior port, toward the down side of the patient.
FIG. 8.

For the infant patient, all robotic ports are placed along the midline. Blue=8-mm ports; maroon=1-mm camera port; green=5-mm assistant port.
After ports are placed, they should be “burped” to create more working space. In other words, rather than indenting the abdominal wall, the arms should be clutched and the ports lifted away from the abdomen. The ports should be tenting the abdominal wall outward, thereby creating more intra-abdominal space (Fig. 9)
FIG. 9.

The ports are indenting the abdominal wall (top); the ports should be “burped” to allow sufficient intracorporeal working space (bottom).
In terms of intra-abdominal working pressures, we use the following ranges for our pediatric patients: Infants under 2 years of age—8–10 mm Hg; children aged 2 to 10 years—10–12 mm Hg; and adolescents older than 10 years of age—12 mm Hg.
Pelvic procedures
Patient positioning and port placement for pelvic procedures include ureteral reimplantation, creation of continent catheterizable channels, cystoplasty, and bladder neck reconstructive procedures.
The patient is placed in a semilithotomy position (utmost precaution must be exercised to ensure the patient's knees are low lying, so as to prevent collisions with the robotic arms). The patient's arms are tucked to the side. We ensure that the feet are sufficiently padded with egg-crate foams. The hands are padded and placed at the patient's side with palms up to prevent ulnar nerve damage (Fig. 10). The arms are kept in place by plastic sleds with foam padding lining the inside. We use a wide egg-crate pad placed across the chest to secure the patient to the bed. Care should be taken to leave some slack on the chest to allow adequate chest wall movement. Finally, we place a piece of foam on the patient's face to prevent any unintentional damage. As mentioned previously, we avoid using a Mayo stand at the head of the patient because it hinders camera movement. We place the patient in a Trendelenburg position approximately 25 degrees from the horizon. A plastic pouch is clamped to the side of the patient to allow placement of instruments used by the assistant.
FIG. 10.

The patient is placed in a semilithotomy position with arms tucked at the sides.
The first step of port placement begins by identifying the camera port site. This is achieved by measuring at least 10 to 12 cm from the pubic symphysis cranially to achieve a wide field of view of the working space (in children with shorter puboumbilical distance, e.g., kyphoscoliosis, the camera port is moved supraumbilically as shown in Figure 11). For cystoplasty procedures, we also place the camera port in a supraumbilical position. After access achieved by an open Hassan technique, the abdomen is insufflated, and the sites of the working ports are marked. The left arm port is placed 8 cm lateral to the umbilicus while the right arm port is placed approximately 9 cm lateral to the umbilicus. In children with less abdominal surface area, a shorter working distance of 4 to 5 cm is preferred. A 5-mm assistant port is placed in the left upper quadrant, equidistant from the camera and left working port. In a robotic cystoplasty case, a 12-mm port is used instead. In addition, a right lower quadrant 5-mm assistant port is placed for cystoplasty procedures.
FIG. 11.

Port placement for pelvic procedures. An additional 5-mm assistant port shown in green is placed for complex pelvic procedures or cystoplasty procedures.
Room setup
While patient positioning and port placement are two crucial components that need extra attention to ensure a smooth case, other aspects of robot-assisted surgery should not be overlooked. Before starting the procedure, the console settings should be adjusted to allow for maximal ergonomic comfort. The positioning of the robotic console, robot, scrub table, and anesthesia machines should be optimized to ensure the most effective arrangement for seamless work flow.
The schematic of our room setup for renal procedures is illustrated in Figure 12. The assistant uses a small Mayo stand by the patient to hold instruments needing immediate access. After the patient is properly positioned and ports have been placed properly, the robot is ready for docking. The camera arm of the robot is lined up to an imaginary line connecting the umbilical camera port and the expected location of the ureteropelvic junction.
FIG. 12.

Room setup for left-sided renal procedures.
For pelvic procedures, please refer to the illustration in Figure 13. We dock the robot in between the patient's legs, similar to the positioning for robot-assisted prostatectomies.
FIG. 13.

Room setup for pelvic procedures.
Other considerations
Conventional laparoscopy may often be useful after port placement in patients with neurogenic bladder patients who have ventriculoperitoneal shunts or in patients with previous abdominal surgeries who are undergoing urinary tract reconstruction. It facilitates the lysis of adhesions as well as allowing for assessment of appendix length for those who are undergoing reconstructive procedures using the appendix.
Accessories such as needles for hitch stitches, Lapra-Tys and extra robotic instruments and ports should be readily available in the room to minimize waiting time during the procedure. Zero-degree and 30-degree camera lenses should also be available for the duration of the procedure. Most importantly, if you are struggling with the case because of improper selection of port sites, it is important to opt for different sites to proceed with the case safely and effortlessly.
It is imperative to close all ports including the 5-mm ports because these often lead to port site herniations. We routinely close the port sites under direct vision and apply local anesthesia to the port sites for postoperative pain control.
Conclusions
While laparoscopic technical skills are needed for successfully completing robotic procedures, there are many other aspects that need extra attention to ensure a smooth operation. Optimal patient positioning and port placement is to robotic surgery as good operative field exposure is to open surgery. Without good patient positioning and well placed laparoscopic ports, the quality and ease of robot-assisted surgery will definitely become compromised.
Disclosure Statement
Mohan S. Gundeti is proctor and course director for Intuitive Surgical.
References
- 1.Intuitive S. Investor Presentation Q4 2012. October25, 2012
- 2.National Cancer Institute. Tracking the Rise of Robotic Surgery for Prostate Cancer. August9, 2011. Volume 8/Number 16 [Google Scholar]
- 3.Gundeti MS, Eng MK, Reynolds WS, Zagaja GP. Pediatric robotic-assisted laparoscopic augmentation ileocystoplasty and Mitrofanoff appendicovesicostomy: Complete intracorporeal—initial case report. Urology 2008;72:1144–1147 [DOI] [PubMed] [Google Scholar]
- 4.Gundeti MS, Acharya SS, Zagaja GP, Shalhav AL. Paediatric robotic-assisted laparoscopic augmentation ileocystoplasty and Mitrofanoff appendicovesicostomy (RALIMA): Feasibility of an initial experience with the University of Chicago technique. BJU Int 2011;107:962–969 [DOI] [PubMed] [Google Scholar]
- 5.Gundeti MS. Pediatric Robotic and Reconstructive Urology: A Comprehensive Guide. Chichester, West Sussex, UK: Wiley-Blackwell; 2012 [Google Scholar]
- 6.Lee RS, Retik AB, Borer JG, Peters CA. Pediatric robot assisted laparoscopic dismembered pyeloplasty: Comparison with a cohort of open surgery. J Urol 2006;175:683–687 [DOI] [PubMed] [Google Scholar]
- 7.Blinman T. Incisions do not simply sum. Surg Endosc 2010;24:1746–1751 [DOI] [PubMed] [Google Scholar]
- 8.Tomaszewski JJ, Casella DP, Turner RM II, et al. Pediatric laparoscopic and robot-assisted laparoscopic surgery: Technical considerations. J Endourol 2012;26:602–613 [DOI] [PubMed] [Google Scholar]
- 9.Orvieto MA, Large M, Gundeti MS. Robotic paediatric urology. BJU Int 2012;110:2–13 [DOI] [PubMed] [Google Scholar]