Introduction
Since the publication of an introductory article in the Journal of Thoracic Disease and the Chinese version in Journal of Clinical and Pathological Research (1,2), I received many letters inquiring about detailed steps in accessing the multiparameter intelligent monitoring in intensive care-2 (MIMIC-2) database. When I told them there were very good instructions on the website that can guide you accessing the whole database in a step-by-step approach, most of them were still confusing on some technical details. Probably, most of these readers are critical care clinicians who are interested in researches by using this database but they are lack of some basic knowledge of computer science. Therefore, I write this step-by-step guidance on how to access the MIMIC-2 clinical database, assuming that the readers have no knowledge on virtual machine and database management. In the manuscript, I used many figures to illustrate the detailed steps in establishing virtual machine. I hope that interested investigators can access this database freely without cumbering by technical difficulties.
Getting access to MIMIC-2 clinical database
Go to the website by clicking on “https://physionet.org/pnw/login”. Create an account on this page, or login if you have already registered and had an account.
-
Scroll down to select “MIMIC II Clinical Database”. Then you will see two items. If you are authorized users you may enter directly. Otherwise you have to apply for access. You will be directed to complete an on-line training program. After completion of the on-line training course, you will receive a certificate and access to the clinical database. Many clinicians will have no difficulty in this step because there is detailed step-by-step instruction on the website.
Authorized users can enter a web page where you can download the whole database to your own disc. On the top of the webpage, there is a general introduction to the database and two references are provided to cite for authors whose work is based on the database (Figure 1).
Figure 1.
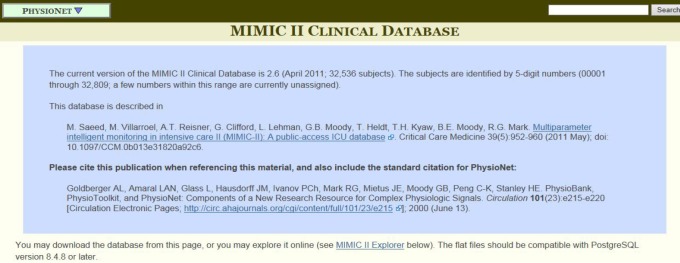
A general introduction to the multiparameter intelligent monitoring in intensive care-2 (MIMIC-2) clinical database.
Obtaining database to your own computer
There are several means to get the clinical database to your computer disc. I would like to use the virtual machine to download it. I have succeeded in obtaining the whole database in both OS X and Windows hosts. I use the software Oracle VM Virtualbox which can be downloaded from https://www.virtualbox.org/wiki/Downloads. Download the appropriate version of Virtualbox (select from OS X, Windows, Linux and Solaris hosts according to your computer operating system).
There is a link to download the file “MIMIC2_VM_v1-disk1.vmdk”. This is the MIMIC II Virtual Machine Encrypted Hard Disk file that is compressed to 4 GiB, and can be expanded to 80 GiB. It takes hours to days to download this file, depending on the transmission rate of your internet.
Launch the VM Virtualbox manager and start a new machine. The name of the new machine can be anything you like and here I name it “MIMIC2”. Choose the type to be Linux and leave the version to be Ubuntu (64 bit may be mandatory since when I used 32 bit in Windows system, the virtual machine cannot be opened) as default. Then click the “next” button.
Set the size of the memory and the default is 512 M. Then click the “next” button.
Choose the disc file “MIMIC2_VM_v1-disk1.vmdk” from directory where you have saved it. Then click the “create” button. The virtual machine is then created. The instruction from the website states the use of MIMIC2_VM_v1.ovf file to start the virtual machine. However, I found the MIMIC2_VM_v1.ovf file was not downloadable and it could not be opened with Oracle VM Virtualbox. By clicking on the downloading link to MIMIC2_VM_v1.ovf, the internet explorer opened a new page with overwhelming computer code. It doesn’t matter. We choose to use the MIMIC2_VM_v1-disk1.vmdk file.
By returning to the starting interface of Oracle VM Virtualbox, you will see on the leftmost column where there appears to be a new icon named “MIMIC2”. It is the virtual machine that we have just created (Figure 2). Enter it by double click this icon.
When prompted for the encryption password, enter the password: 2CIMIM_2v6. The password is case-sensitive (Figure 3).
-
Login and change the mimic2 user password (please note that the encryption password will not be changed). Use the following credentials for the mimic2 user login:
Username: mimic2;
Password: 2CIMIM_2v6.
Figure 2.
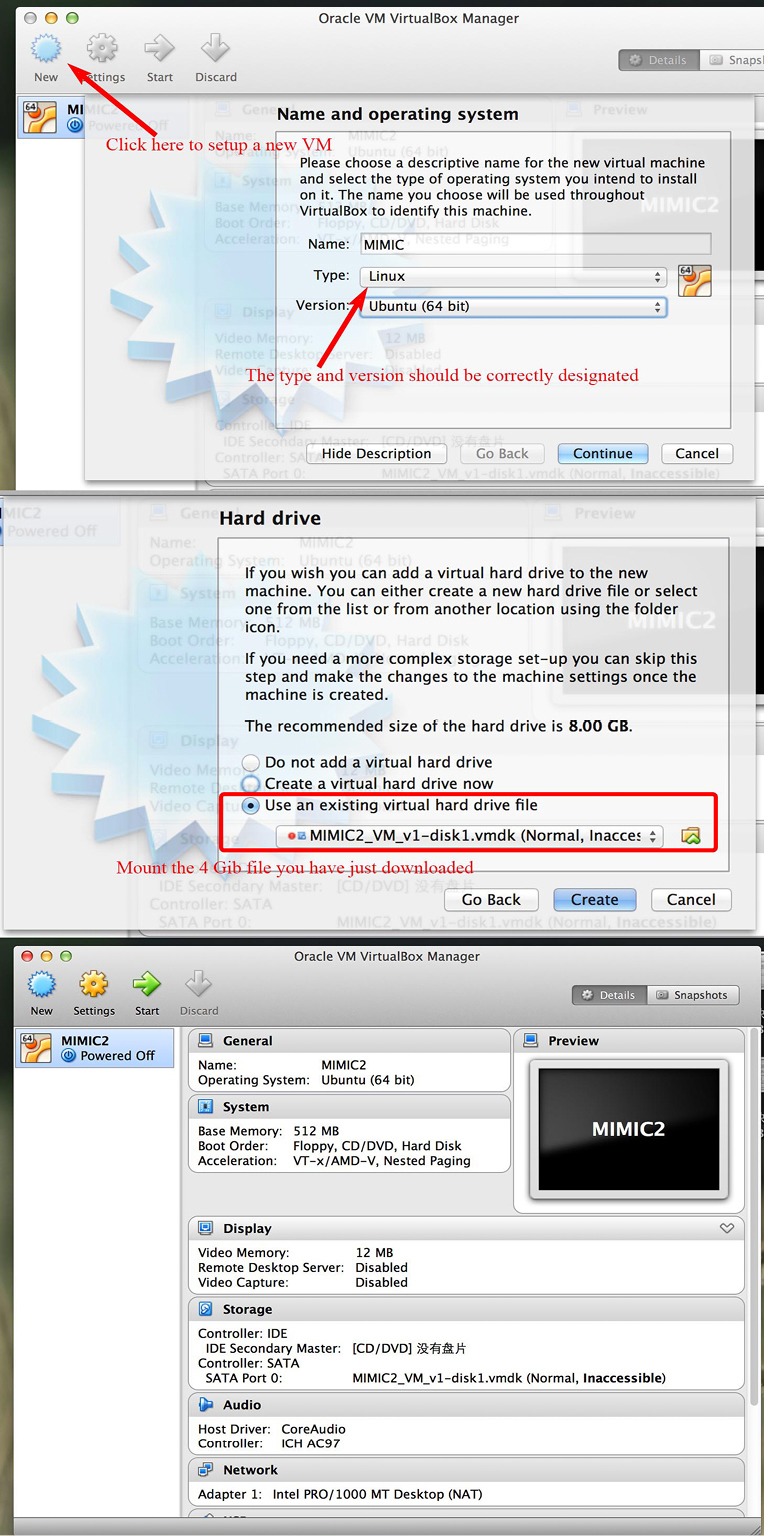
Setup of a virtual machine. MIMIC-2, multiparameter intelligent monitoring in intensive care-2.
Figure 3.

Launching the Ubuntu operating system with password.
Downloading and unpacking the data
The whole process can be found in the website at https://physionet.org/works/MIMICIIClinicalDatabase/files/virtual_machines/MIMIC2_VM_README.txt. I repeated them here to keep the whole process complete. Furthermore, I illustrate each key step with figures to help better understanding for clinicians.
Login into the virtual machine with above username and password. You will see the desktop of the Ubuntu operating system. Open a terminal (click black screen icon on top left of the VM desktop, Figure 4). Type the following command (Figure 5):
Figure 4.
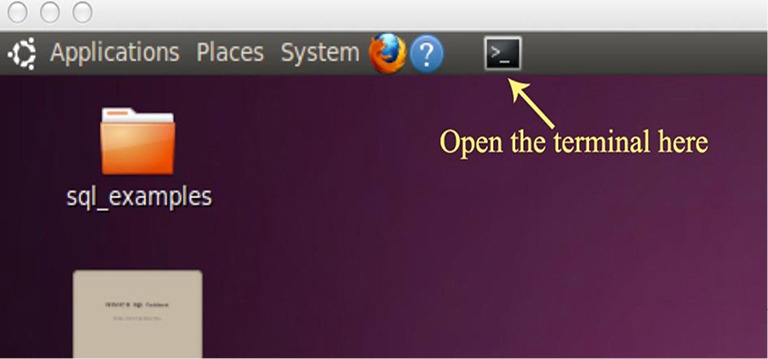
The black screen icon on top left of the VM desktop.
Figure 5.
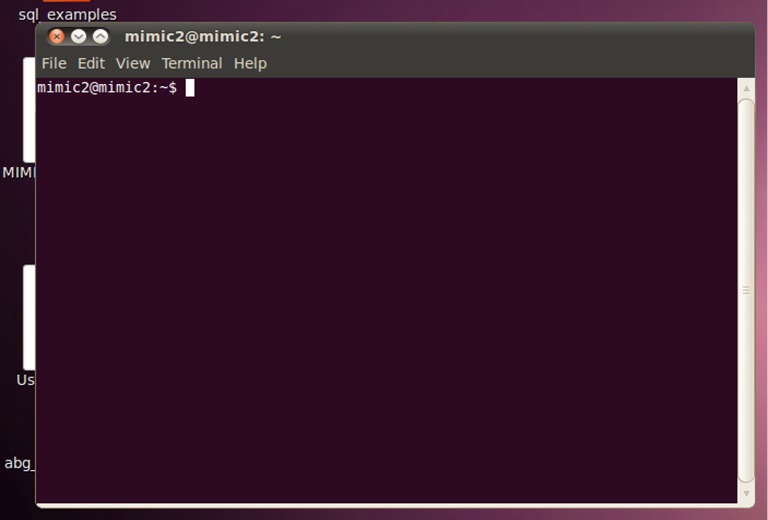
After opening the terminal, this window will pop up where we can type command.
./get_mimic_data.sh –c
Note: this command enables you to connect to PhysioNetWorks using your user name (your registered PhysioNetWorks email address) and password. The entire download process should take a few minutes on a 100 MBps network connection. After completion, the MIMIC II User’s Guide and additional documentation will be automatically installed and you can find them on the desktop.
Installing the database
After the flat files have been downloaded and unpacked in previous steps, you can then proceed to import them into the PostgreSQL database. The downloaded file was stored in the temporary folder. You’d better not to shut down VM between last step and this one. Open a terminal and go to where the flat-file is saved by using cd:
cd /tmp/MIMIC2-Importer-2.6/
Run the importer by entering the following two commands:
sudo./prep.sh
./import.sh
Note: the process takes a long time due to the large file size. Depending on the memory (and disk, and CPU) available in your virtual machine, unpacking and loading each batch of ~1,000 subjects may require between 20 minutes and several hours. This process should not be interrupted until it is finished. Take a cup of coffee during the process, but do not close or shut down the virtual machine until the process is completed.
After confirming the completion of installation, delete the /tmp/MIMIC2-Importer-2.6/ directory by typing:
cd
rm -rf /tmp/MIMIC2-Importer-2.6/
Logging into the database using pgAdmin
The PostgreSQL database in the VM doesn’t use password authentication, it uses identity authentication. To open the pgAdmin III, use the following path (Figure 6): applications- > programming- > pgAdmin III. When you open pgAdmin III, click the plug icon on the left most of the toolbar and open the window for new server registration. The Host should be blank. The Username should be “mimic2”. The “Maintenance DB” should be “MIMIC2” (Figure 7).
Figure 6.
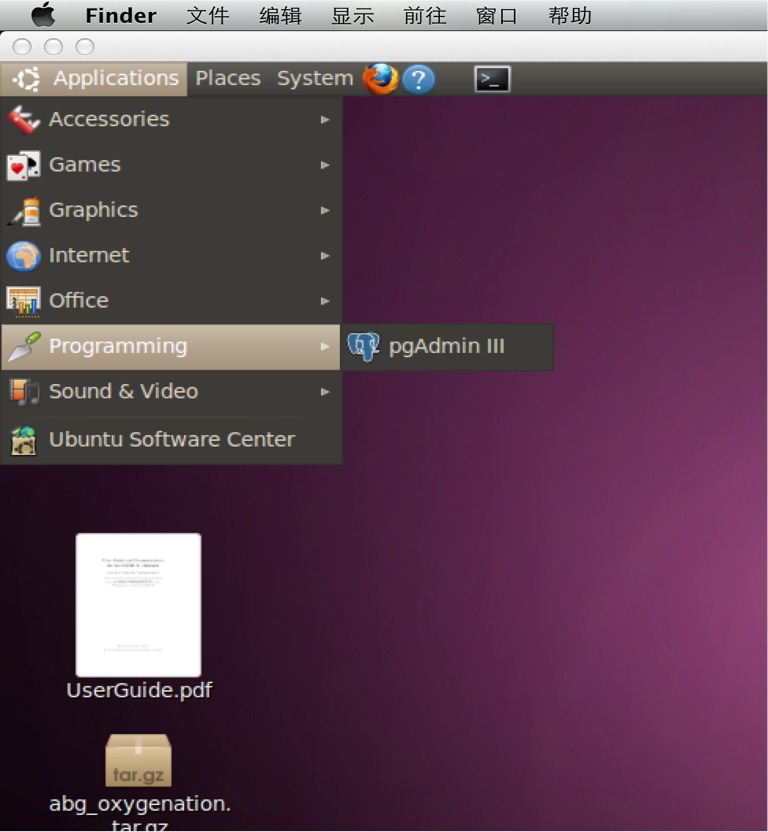
Open the pgAdmin III as illustrated in this figure.
Figure 7.
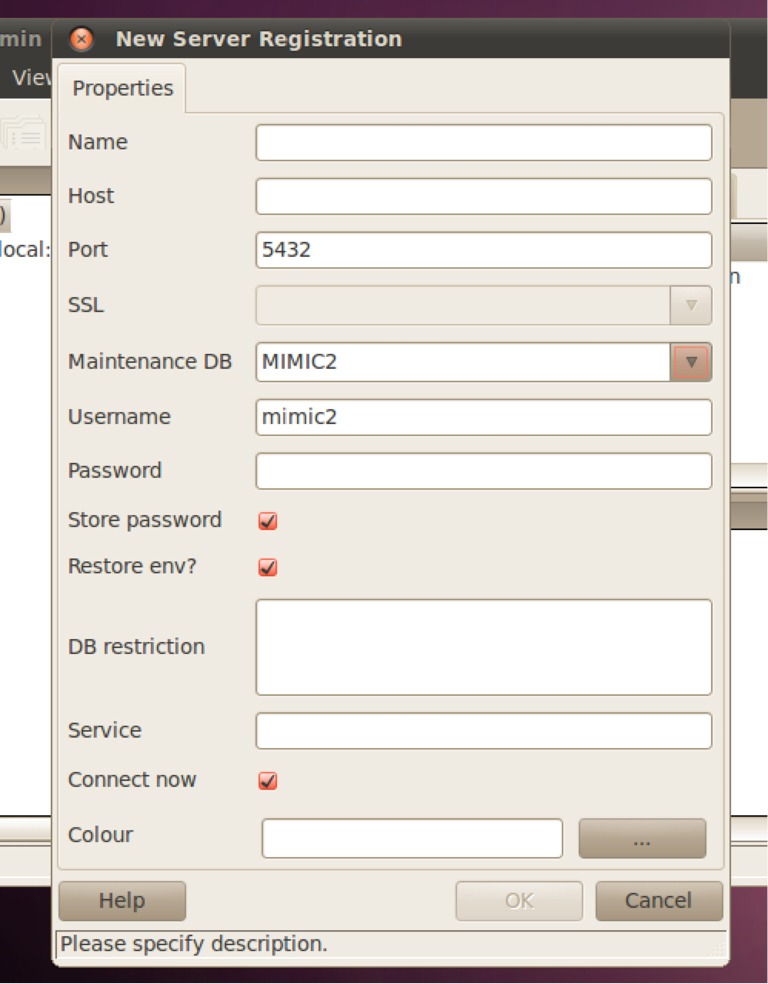
New server registration. The Host should be blank. The Username should be “mimic2”. The “Maintenance DB” should be “MIMIC2”. MIMIC-2, multiparameter intelligent monitoring in intensive care-2.
After registration, you can find the server in the object browser on the left. Expand the schema and you will find there are 38 relational tables in the database (Figure 8). That exactly matches what we can see in the query builder explorer. By clicking on the SQL icon in the toolbar at the top of the window, the interface where you can extract data with SQL is opened. The query language is input at the upper panel and the lower panel displays the result of the query (Figure 9). When you are satisfied with what you have extracted, you can export the file to the virtual machine. Select a pathway to save your data (Figure 10). The exported file can be sent by email and then saved to your computer for further statistical analysis.
Figure 8.
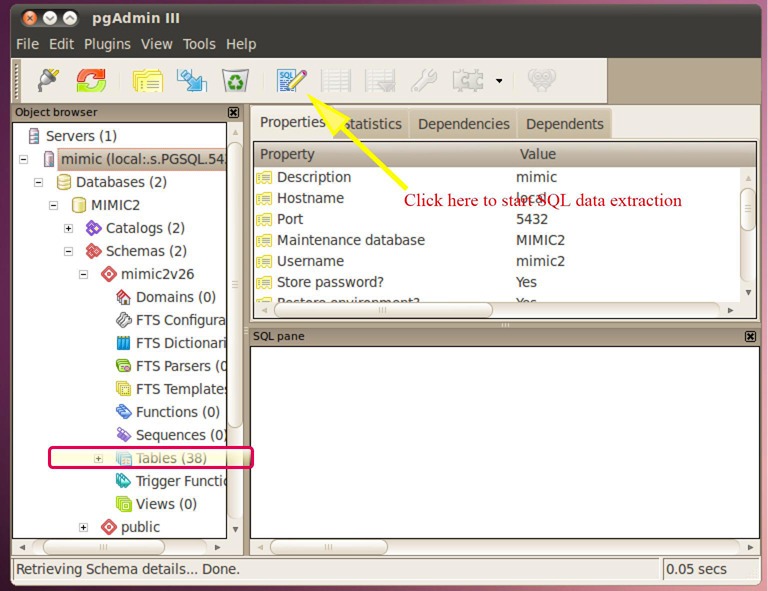
Structure of the MIMIC local server. Expand the schema and you will find there are 38 relational tables in the database, which exactly matches what we can see in the query builder explorer. MIMIC-2, multiparameter intelligent monitoring in intensive care-2.
Figure 9.
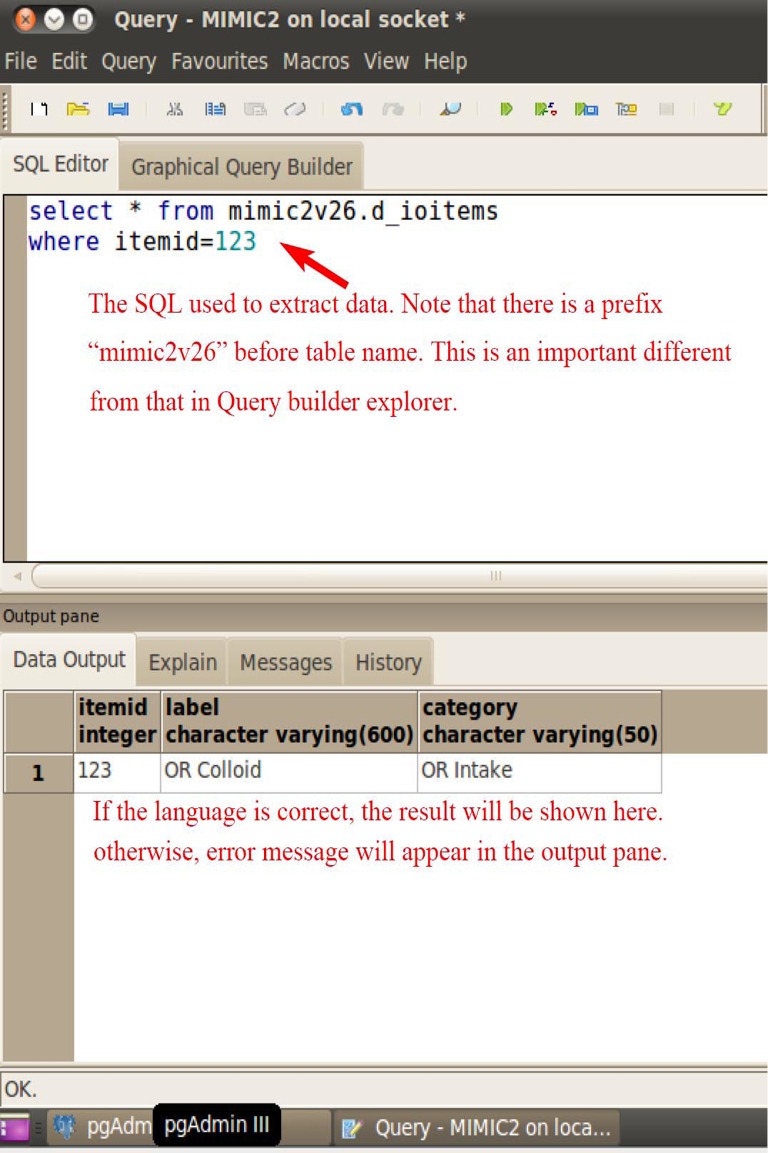
The query language is input at the upper panel and the lower panel displays the result of the query. Make sure that the SQL is exactly correct.
Figure 10.
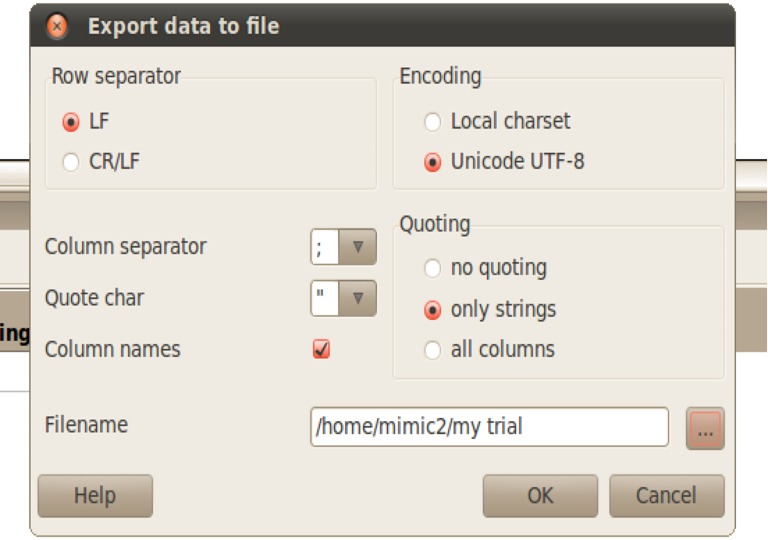
Export data to file. Specify the directory you want to save your data.
Acknowledgements
Disclosure: The author declares no conflict of interest.
References
- 1.Zhang Z.Big data and clinical research: perspective from a clinician. J Thorac Dis 2014;6:1659-64. [DOI] [PMC free article] [PubMed] [Google Scholar]
- 2.Zhang Z.Big data and clinical research. J Clin Pathol Res 2014;34:492-7. [Google Scholar]


