

Abstract
Chromatin immunoprecipitation (ChIP) combined with high-throughput sequencing (ChIP-seq) has become the gold standard for whole-genome mapping of protein-DNA interactions. However, conventional ChIP protocols necessitate the use of large numbers of cells, and library preparation steps associated with current high-throughput sequencing platforms require substantial amounts of DNA; both of these factors preclude the application of ChIP-seq technology to many biologically important but rare cell types. Here we describe a nano-ChIP-seq protocol that combines a high-sensitivity small-scale ChIP assay and a tailored procedure for generating high-throughput sequencing libraries from scarce amounts of ChIP DNA. In terms of the numbers of cells required, the method provides two to three orders of magnitude of improvement over the conventional ChIP-seq method and the entire procedure can be completed within 4 d.
ChIP-Seq is a powerful tool for mapping whole genome histone modifications and transcription factors binding sites (Park 2009). The technique involves (i) immunoprecipitation of genomic fragments based on structural epitopes in the chromatin and (ii) genomic library preparation for high-throughput sequencing to identify enriched genomic regions. Due to inefficiencies at both the immunoprecipitation and library preparation steps, large amounts of starting material is required for ChIP-Seq experiments. Therefore the technology has not been applicable to biologically important but rare cell types such as highly purified progenitors or biopsy samples. Several groups have developed small-scale immunoprecipitation protocols to overcome the challenges due to the inefficiencies at the ChIP step. Although these approaches have successfully shown locus specific analysis by QPCR or genome-wide analysis by promoter arrays (O'Neill, VerMilyea et al. 2006; Acevedo, Iniguez et al. 2007; Attema, Papathanasiou et al. 2007; Dahl and Collas 2007), such assays may not be effective and compatible with high throughput sequencing technologies due to low enrichment of target regions and more importantly low yield of immunoprecipitated DNA. The latter obstacle is especially challenging since protocols for sequencing libraries require relatively large amounts of DNA due to inefficient enzymatic reactions and inherent material loss during purification steps in the protocols. Although direct sequencing has been applied to limited amount of diluted standard ChIP DNA; the method has not been successfully applied to small cell number ChIP experiments and the relevant technologies are not widely available (Goren, Ozsolak et al. 2009). Here, we describe a procedure for performing ChIP-Seq assay in limiting samples. The protocol is focused on one of the dominant short read sequencing platforms, the Illumina Genome Analyzer, reasoning that any innovations could also be adapted for other platforms.
First, we optimized a ChIP assay that effectively enriched target regions in limited numbers of cells. In order to achieve this, we identified reproducible conditions that yielded effective genome fragmentation, minimum sample loss and efficient target enrichments in chromatin pull-down from low numbers of cells. Antibody and bead titration were necessary to reduce background due to non-specific pull-down. DNA yield from a small scale ChIP experiment is too limited (estimated to be 10–50 pg from 10,000 cells with H3K4me3 antibody) to be applicable to conventional sequencing library protocols. To overcome this obstacle, we adapted and further improved a method previously used for array platforms (Lieb, Liu et al. 2001). We allowed for limited amplification of scarce ChIP DNA using custom designed primers that yield compatible fragment ends with Illumina adapters after specific restriction enzyme digestion. By incorporating specific additives and cycling conditions with a polymerase enzyme that is able to amplify GC rich regions, we achieved faithful amplification of limited ChIP DNA. Moreover, we introduced a qPCR validation step using short amplicon primers to provide a general quality control metric for the sequencing libraries, as the scarce ChIP samples cannot themselves be evaluated.
We recently applied this method to generate several chromatin state maps from as little as 10,000 cultured embryonic stem (ES) cells as well as 25,000 FACS-isolated hemotopoietic stem and progenitor cells (HSPC)(Adli, Zhu et al. 2010). The ChIP-seq method presented here should be generally applicable to a number of biologically- and clinically-important, but rare cell models.
MATERIALS
REAGENTS
Formaldehyde (sigma, Cat#: F8775)
Mineral Oil (Sigma, Cat. #: M5904)
Proteinase K (Invitrogen, Cat#. 25530-031)
Protease inhibitor cocktail (Roche, Cat.#: 11836153001):
Phenol:Chloroform:Isoamyl Alchohol (Invitrogen, Cat. #:15593031)
RNAse (Invitrogen, Cat. #:12091-021)
Sequenase Enzyme Kit (Version 2.0, US Biochemical, Cat. #: 70775 dNTP mix (Invitrogen, Cat.#: 18427-013 )
BSA (10 mg/ml , NEB, #B9001S)
DTT (0.1 M stock, Invitrogen, #:Y00147)
Primer 1 (4 μM): 5'-GACATGTATCCGGATGTNNNNNNNNN-3'
ExoSAP-IT (USB, Cat.#:78200)
Phusion Polymerase (NEB, Cat#: F-530L, provided with 100 % DMSO, 5X GC buffer)
Primer 2 (10 μM stock): 5'-GACATGTATCCGGATGT-3’
BciVI Restriction Enzyme (NEB, Cat. #: R0596L)
Agarose (Fisher, Cat #: BP160-500)
Protein A-sepharose beads (Sigma, Cat#: P9424)
PCR purification, Gel extraction and reaction clean up kits (Qiagen, Cat#s: 28006, 28606, 28206)
Glycogen (20μg/μl, Invitrogen, Cat#: 10814-010)
Quant-It dsDNA HS assay kit (Invitrogen, Cat#:Q32851)
EQUIPMENT
0.2 ml PCR tube strips (Eppendorf, Cat. #: 951010022)
1.5 ml tubes low retention tubes (Eppendorf, Cat. #:022431021)
15 ml tubes (BD Falcon cat. no. 352097)
Filtered micropipette tips (Danville Sci., Cat.#s:P1096FR, P1121, P1122, P1126 )
Micropipiettes (1-1000 μl range)
Spin-X wash columns (Costar, Cat#:8160)
Refrigerated microcentrifuge (Eppendorf model 5415R or equivalent)
Minicentrifuge with strip tubes adapter (Fisher Scientific Cat. #:05090-100)
Cold room
Sonicator (Branson 250 Digitial sonifier)
Rotating mixer for 1.5 ml tubes
Vortex mixer
Thermal Cycler (Eppendorf, master cycle gradient or equivalent)
Agarose gel electrophoresis equipment
Qubit Flourometer (Invitrogen, Cat #: 32857)
REAGENTS SET UP
Crosslinking Solution
PBS, 10 % serum, 1 % Formaldehyde.
Note: Always prepare new solution with freshly added Serum and Formaldehyde (27 μl of 37% Folmadeyhde stock solution in 1 ml of PBS will make 1 % formaldehyde).
SDS lysis Buffer
100 mM NaCl, 50 mM Tris-Cl pH 8.1, 5 mM EDTA, 1 % SDS
Note: Freshly add protease inhibitor tablet before use (1 mini tablet/10 ml)
ChIP Dilution Buffer
0.01% SDS, 1.1 % Triton X-100, 1.2mM EDTA, 16.7mM Tris-HCl, pH 8.1, 167mM NaCl.
Note 1: Freshly add protease inhibitor tablet before use (1 mini tablet/10 ml)
Note 2: If histone acetylation is being evaluated, freshly add sodium butyrate (10 mM final concentration) to the buffer.
Low Salt Wash Buffer
0.1% SDS, 1% Triton X-100, 2mM EDTA, 20mM Tris-HCl, pH 8.1, 150mM NaCl)
Lithium Chloride Wash Buffer
0.25M LiCl, 1% NP40, 1% deoxycholate, 1mM EDTA, 10mM Tris-HCl, pH 8.1
TE buffer
10mM Tris-HCl pH 8.0, 1mM EDTA.
ChIP Elution buffer
0.1 M NaHCO3, 1 % SDS, 5 nM DTT.
Note: Each time prepare the buffer with freshly added DTT and heat up to 65 °C before use
PROCEDURE
Chromatin immunoprecipitation (ChIP) from limited numbers of cells
The protocol presented here has been optimized and effectively used for low cell number embryonic stem cells as well as FACS isolated hematopoietic stem and progenitor cells (HSPC). It should be generally applicable to other cell types as well. If the cell type of interest is cultured in the lab, the fixation by formaldehyde and subsequent quenching by Glycine can be performed on the cells grown in their culture media. The following steps assume that 10,000–500,000 cells are isolated from other sources, such as FACS sorting that are freshly pelleted after isolation/purification.
-
1
Prepare a fresh, room temperature crosslinking solution containing 1 % Formaldehyde in Phosphate Buffer Saline (PBS). (27 μl of 37% Formaldehyde stock solution / 1 ml of PBS).
! CAUTION Formaldehyde is harmful if inhaled or absorbed through skin. Waste should be disposed of according to local regulations.
-
2
Resuspend the isolated cell pellet in 1 ml of crosslinking solution and incubate at room temperature for precisely 10 minutes with gentle shaking on horizontal shaker.
-
3
Add 0.125 M final concentration of Glycine to stop fixation (62.5 μl of 2M Glycine / 1 ml PBS) and incubate for 5 minutes at room temp with gentle shaking on horizontal shaker.
-
4
Spin the cells down at room temperature at 1.6xg for 5 min and remove the supernatant
CRITICAL STEP: Addition of serum (10 % v/v) before centrifugation helps in pelleting the cells during centrifugation, hence preventing material loss. The usage of low binding/retention 1.5 ml eppendorf tubes is highly recommended.
! CAUTION The supernatant contains Formaldehyde, which is toxic; therefore it should be disposed of according to local regulations.
-
5
Add 1 ml room temperature PBS containing 10 % serum and mix by rotating 3–4 times.
-
6
Spin the cells down at room temperature at 3000g for 5 min and remove the supernatant.
-
7
Resuspend the cells in 100 ul SDS lysis buffer containing freshly added protease inhibitors. Pipette up and down several times to make sure the pellet is re-suspended.
! CAUTION Protease inhibitor solutions are toxic.
PAUSE POINT: At this step, the cells resuspended in SDS lysis buffer can be immediately flash frozen and stored at −80 °C, if needed.
-
8
Lyse the cells by incubating on ice for 10 minutes with intermittent vortexing.
-
9
Add 650 μl ice cold ChIP Dilution Buffer (CDB) with freshly added protease inhibitors and start the sonication process to get 150–500 bp fragment sizes in average.
CRITICAL STEP: 1) During sonication, make sure that samples are ice cold at all times. Efficient sonication is a critical step in ChIP experiments. Extensive care and optimization will be required for optimal sonication conditions. We used Branson 250 Digital sonifier machine with 0.7 sec “On” and 1.3 sec “Off” pulses at 40% power output. We highly suggest optimizing the sonication conditions before the actual ChIP experiment. The following table is provided as a general reference, however it should be noted that different sonifiers and cell types might require different settings.
When using less than 50,000 cells, it is becoming challenging to monitor the sonication efficiency on the Agarose gel as the total DNA yield falls below the detection limit of Ethidium Bromide gels. If input DNA is too low to visualize on Et-Br agarose gel, we recommend to use PCR based sonication efficiency monitoring described by Dahl & Collas (Dahl and Collas 2008).
| Cell Number | Total sonication Timing (Second) | Conditions (Branson 250 digital) |
|---|---|---|
| 10.000 | 90–115 | 0.7 sec. “ON”, 1.3 sec. “OFF”, 40 % Power |
| 25.000 | 120–150 | 0.7 sec. “ON”, 1.3 sec. “OFF”, 40 % Power |
| 50.000 | 150–180 | 0.7 sec. “ON”, 1.3 sec. “OFF”, 40 % Power |
| 100.000 | 180–210 | 0.7 sec. “ON”, 1.3 sec. “OFF”, 40 % Power |
| 500.000 | 210–240 | 0.7 sec. “ON”, 1.3 sec. “OFF”, 40 % Power |
? TROUBLE SHOOTING
-
10
After sonication, add additional 250 μL CDB containing necessary protease inhibitors. Keep samples on ice at all times.
-
11
Remove ~25 μl aliquot and save it as an “input” whole cell extract (WCE) and store at 4o C until ready for reverse cross-linking (see step 26).
-
12
Add appropriate amount of antibody to 1 ml of chromatin solution and incubate at 4o C in a rotator overnight.
CRITICAL STEP: The concentration of antibody depends on the quality and specificity of the antibody of interest. Use of too much antibody might yield increased background and reduced enrichments and specificity whereas too little antibody might cause reduced sensitivity. The following table is provided as a general reference, however it should be noted that these concentrations are for a well characterized H3 K4me3 antibody that has relatively abundant target regions in the genome.
| Cell Number | Antibody concentration | Bead Volume (bed volume) |
|---|---|---|
| 10,000 | 0.25 μg per 1 ml | 7–10 μl |
| 25,000 | 0.4 μg per 1 ml | 10 μl |
| 500,000 | 1 μg per 1 ml | 20 μl |
| 10,000,000 | 10 μg per 10 ml | 70 μl |
Chromatin Immunoprecipitation: Day 2
-
13 Nex
day, Prepare the Protein-A Sepharose beads. Place a 10ul aliquot of 50 % Protein-A Sepharose bead slurry into a low binding eppendorf tube. Add 1 ml of ice cold CDB, mix well and spin at 1000 g for 30 sec and remove the supernatant. Add another 50 μl of CDB to the washed beads and add the total 60 μl of bead slurry to each overnight immunoprecipitated sample.
CRITICAL STEP: If several samples are processed together, it is recommended to wash the necessary amount of beads together and then distribute equal amounts of beads to each sample.
-
14
Incubate beads with the sample for 1 hr at 4°C while rotating.
ChIP Washes
-
15
Spin the samples down in centrifuge at 1000 g for 30 sec at 4 °C. Aspirate off the supernatant (the unbound fraction / flow through) being sure not to disturb the bead pellet.
CRITICAL STEP: The flow through should be kept at this step and DNA should be isolated to check for sonication efficiency.
-
16
Re-suspend the beads with the DNA-histone-antibody complex in 700 μl of ice cold Low Salt Wash Buffer by adding the solution on top of the beads.
-
17
Transfer everything to a filter column (Spin-X, Cat# 8160) place the column in provided 2 ml eppendorf tube.
-
18
Spin at 1000 g for 1 minute at 4 °C to filter out the wash buffer. Alternatively, the column can also be centrifuged with short pulse at full speed for ~5 sec until all the liquid is filtered out. Discard the flow through, place the column back into the same 2 ml tube and add another 700 μl of Low Salt Immune Complex Wash Buffer on top of the beads, mix thoroughly by inverting the tubes 4–6 times and spin at 1000 g at 4 °C for 1 minute. (2 washes in total).
-
19
Add 700 μl Lithium Chloride wash buffer on top of the beads, mix thoroughly by inverting the tubes 4–6 times and spin at 1000 g at 4 °C for 1 minute. Discard the flow through, place the column back into the same 2 ml tube and add another 700 μl of Lithium Cloride wash buffer on top of the beads, mix thoroughly by inverting the tubes 4–6 times and spin at 1000 g at 4 °C for 1 minute. (2 washes in total).
-
20
Add 700 μl TE buffer on top of the beads, mix thoroughly by inverting the tubes 4–6 times and spin at 1000 g at 4 °C for 1 minute. Discard the flow through, place the column back into the 2 ml tube and add another 700 μl of TE buffer on top of the beads, mix thoroughly by inverting the tubes 4–6 times and spin at 1000 g at 4 °C for 1 minute. (2 washes in total).
ChIP Elution
-
21
Switch column to a new 1.7 ml low retention eppendorf tube. Add 125 μl ChIP Elution buffer with freshly added DTT at 5 nM final concentration (pre-prepare 1 ml Elution buffer with 5 μl from 1 M stock of DTT solution.
-
22
Incubate at 65 °C for 15 minutes.
-
23
Spin at 5000g for 1 minute (Don not change the tubes).
-
24
Add another 125 μl ChIP Elution buffer with freshly added DTT to the same column and incubate at 65 °C for another 15 minutes.
-
25
Spin at 5000 g for 1 minute to obtain total of 250 μl ChIP DNA in Elution buffer.
-
26
To the WCE only, adjust the salt concentration in the WCE (input) by adding add 225 μl CDP, 10 μl of 5M NaCl, 20 μl 10% SDS and 1.25 μl of 1M DTT .
CRITICAL STEP: The enriched samples DO NOT require the addition of these solutions due to the salt concentration in the elution buffer.
-
27
Place a layer of mineral oil (300 μl) over all samples, including the WCE and reverse cross-link by incubating the samples at 65 °C for 5 hours.
CRITICAL STEP: Addition of mineral oil prevents evaporation of samples and hence prevents the material loss by reducing the potential surface area that the sample may contact with.
-
28
After 5 hrs of reverse crosslinking, remove the samples from the heat block and allow them to cool down to room temperature.
-
29
Add 250 μl Proteinase K solution to each sample
CRITICAL STEP: Do not vortex or pipet up and down after the addition of Proteinase K as this might cause non-uniform digestion due to micelle formation.
-
30
Incubate at 37 °C for 2 hr for degradation of proteins.
DNA extraction with Phenol:Chlorform:Isoamyl Alcohol
-
31
Add 500 μl of cold ultra pure phenol:chloroform: isoamyl alcohol to each sample and mix well by vortexing for at least 30 seconds.
-
32
Centrifuge sample at maximum speed for 10 minutes at room temperature.
-
33
Remove top aqueous layer and pipette it into a new tube.
! CAUTION The middle and bottom layers contain mineral oil and phenol chloroform solution. Phenol is highly toxic if it comes in contact with skin or if swallowed. It is harmful if inhaled. Waste should be disposed of according to local regulations.
-
34
Precipitate DNA by adding 1 ml 100 % ethanol, 40 μl of 3M sodium acetate (pH 5.2) and 1 μl of Glycogen (20μg/μl stock). Mix well and incubate overnight at −20 °C.
CRITICAL: Addition of glycogen helps to visualize the pellet.
Chromatin Immunoprecipitation: Day 3
-
35
After overnight incubation, spin the samples at max speed for 20 min at 4 °C. A white pellet should be visible at the bottom of eppendorf tubes.
-
36
Pour off ethanol, being careful not to lose the pellet. Add 1 ml of 70% ethanol and spin at max speed for 10 min.
-
37
Pour off ethanol and pulse spin to concentrate the remaining ethanol in the bottom. Remove the remaining ethanol by pipette.
-
38
Allow pellets to air dry for ~ 30 min.
-
39
Re-suspend the pellet in 30 μl of pure water containing 1 μl of RNase.
-
40
Incubate it at 37°C for 30 min. Vortex it for 10 sec and quick spin the tubes. The samples are now ready for the sequencing library preparation.
CRITICAL STEP The ChIP DNA yield from ~10.000 cells ChIP experiments is very limited (estimated to be around 10–50 pg with a good ChIP grade antibody for a histone mark). Therefore, the ChIP enrichment analysis will be performed on the libraries in the step 51 or 65.
High throughput sequencing library preparation from scarce amount of ChIP DNA
The goal of this procedure is to prepare a genomic library compatible with the Illumina high- throughput-sequencing platform from scarce amount of ChIP-DNA (~10 pg - 1 ng). The protocol consists of three sets of enzymatic reactions. In the first step, Sequenase enzyme is used to extend randomly annealed custom designed primers (Primer 1). During second step, the specific primer (Primer 2) is used to amplify the templates generated in step 1. In the third step, the product from the second step is overnight digested with BciVI restriction enzyme, yielding Illumina adapter compatible 3’-A overhang DNA templates.
CRITICAL STEP: 1) Wear gloves at all times and be careful of contamination as any DNA can be amplified by this protocol. The usage of filtered pipette tips is highly recommended. 2) The primers used here are custom designed to contain (i) hairpin secondary structure to inhibit self annealing and (ii) BciVI restriction enzyme cut site that will generate 3’-A overhang in the template DNA following digestion, which is required for ligation to Illumina adapters. Alternate primers can be designed with different restriction enzyme cut sites; however, the primer concentrations and reaction conditions might need to be re-optimized.
Step 1: Sequenase priming reaction
-
41
Set up the priming reaction and step 1 reaction mix in separate 0.2 ml PCR strip tubes on ice.
CRITICAL STEP 1) we recommend to perform initial optimization and amplification steps on gradient concentrations of “input” DNA. Once effective amplification is obtained from low amount of input DNA, then the protocol can be used to amplify ChIP DNA. 2) The ChIP DNA can be speed vacuumed to obtain 7 μl or part of the 30 μl ChIP DNA can be used. 3) Also set up a negative control reaction containing H2O and an input control reaction with comparable amount of WCE DNA to test for ChIP enrichments. 4) If more than one sample is being processed at the same time, it is recommended to prepare a master mix of the reaction mixes to make sure the homogeneity of reagents distribution between each sample.
| Priming reaction: | |
|---|---|
| ChIP DNA (1–500 pg) | 7 μl |
| 5X Sequenase Buffer | 2 μl |
| Primer 1 (4 μM) | μl |
| TOTAL Volume | 10 μl |
| Step 1 Reaction Mix | |
|---|---|
| 5X Sequenase Buffer | 1 μl |
| dNTP (3mM) | 1.5 μl |
| DTT (0.1 M) | 0.75 μl |
| BSA (10mg/ml) | 1.5 μl |
| Sequenase Enzyme (13 U/μl) | 0.3 μl |
| TOTAL Volume | 5.05 μl |
CRITICAL STEP Make sure that the PCR cycler lid is turned off for the priming reactions, otherwise it won’t work due to Sequenase denaturation!
-
42
Place the tubes containing only priming reaction in a thermal cycler programmed to 98 ° C for 2 min, followed by rapid cooling to 8° C for 3 min. One minute after the block reached 8° C, quickly remove the tubes from thermal cycler, pulse spin in micro-centrifuge to bring down the evaporation and put it on the ice while adding 5.05 μl of the pre-prepared step 1 reaction mix to the sample, mix well by pipeting up and down 5–6 times. Place the tubes back in thermal cycler and gradually ramp up the heat from 8 °C to 37 °C over 8 min. Hold at 37 °C for 8 min (The end of cycle one).
CRITICAL STEP 1) After the addition of step one reaction mix, prepare diluted Sequenase enzyme (1:4 dilution, 3 μl of Enzyme plus 0.9 μl Dilution Buffer provided) while the samples are in the thermal cycler. 2) Do not vortex the sample after addition of the reaction mix or diluted sequenase buffer as this will result in sample loss on the sides of the tube (only pipette up & down 5–6 times). 3) A white precipitate might form due to denaturation of BSA but it should not affect the reaction efficiency.
-
43
Repeat 3 more cycles but instead of reaction mix, now add 1.2 μl of diluted Sequenase enzyme (1:4 dilution) when the thermal block reaches 8 °C.
CRITICAL STEP The Sequenase enzyme is not thermostable, therefore diluted Sequenase enzyme needs to be added to the reaction after each cycle.
| Step 1 thermal cycling conditions | ||
|---|---|---|
| Steps | Temperature | Time |
| 1 | 98 °C | 2 min |
| 2 | 8 °C | 1 min |
| 3 | Sound | *** Add reaction mix |
| 4 | 8 °C | 2 min |
| 5 | 16 °C (Ramp rate: 0.3 °C/sec) * | 1 min |
| 6 | 22 °C (Ramp rate: 0.3 °C/sec) * | 1 min |
| 7 | 28 °C (Ramp rate: 0.3 °C/sec) * | 1 min |
| 8 | 36 °C (Ramp rate: 0.3 °C/sec) * | 30 sec |
| 9 | 36.5 °C (Ramp rate: 0.3 °C/sec) * | 1 min |
| 10 | 37 °C | 8 min |
| 11 | Go to Step 1 | 3 times |
| 12 | 4 °C | Until removed from the cycler |
Add reaction mix in the 1st cycle but diluted Sequenase Enzyme in the remaining 3 cycles
-
44
Remove excess primer 1 by adding 3 μl ExoSAP reagent to each sample.
-
45
Incubate reaction at 37 °C for 15 min and then heat inactivate the ExoSAP by incubating at 80°C for 15 min. It is recommended to carry out this reaction in a thermal cycler.
Step 2: Amplification
-
46
Dilute Step 1 reaction product approximately 4 times by adding 45 μl of H2O.
-
47
In order to use all the ChIP DNA, from step 1, set up 4 parallel PCR amplification reactions in 0.2 ml PCR tubes by using 15 μl of diluted step 1 product as a template. Add the following reagents and mix well by pipeting up and down 5–6 times.
CRITICAL STEP: If more than one sample is being processed, it is recommended to prepare a mastermix.
| Step 2 PCR reaction mix | |
|---|---|
| Step 1 product (diluted) | 15 μl |
| GC reaction Buffer (5X) | 10 μl |
| dNTPs (10 mM) | 2 μl |
| Primer 2 (10 μM) | 1 μl |
| DMSO (100 %) | 1 μl |
| H2O | 20 μl |
| Phusion Enzyme (2 U/ μl) | 1 μl |
| TOTAL Volume | 50 μl |
-
48
Incubate the reactions in a thermal cycler under the following conditions:
Number of cycles Temperature Time 1 98 °C 2 min 15 98 °C 10 sec 45 °C 30 sec 55 °C 30 sec 72 °C 10 sec 1 72 °C 2 min 1 4 °C Until removed from the cycler
CRITICAL STEP 15 cycles might not yield enough DNA to see on the Et-Br Agarose gel. To make sure that the protocol is working, initial optimization reactions can be performed for 25 PCR cycles and ~100 ng DNA can be run on 2 % agarose gel. A smear DNA product should be present between 100 – 700 bp depending on the initial fragment size of starting DNA material. If smear size gets larger, increase the annealing temperature (see Trouble shooting section)
? TROUBLE SHOOTING
-
49
Carry out PCR purification using MinElute columns as suggested by manufacturer. Elute twice (25 μl, followed by 20 μl) with the provided elution buffer to obtain total final volume of ~42 μl.
CRITICAL STEP: Combine the DNA from the 4 paralel PCR reaction at this step. After the addition of Binding buffer, combine all the samples and carry out DNA isolation procedure in the same Minelute column.
-
50
Quantify the amplified DNA by using Quant-IT picogreen assay, as suggested by the manufacturer.
CRITICAL STEP: It is recommended to perform ChIP-QPCR enrichment analysis at this step before performing library preparation. It is necessary to design short amplicon (~90–100 bp) primers to genomic regions known to be enriched for the modification of interest (Positive primer) as well as regions of the genome known to be devoid of modification of interest (Negative primer).
? TROUBLE SHOOTING
Step 3: Restriction and ligation to Illumina adapters
-
51
Set up digestion reaction by adding the following reagents to a 1.5 ml eppendorf tube. Digest overnight at 37 °C.
Step 2 amplification product 42 μl NEB Buffer 4 (10X) 5 μl BciVI Enzyme 3 μl TOTAL Volume 50 μl
Day 4
-
52
The next day, heat inactivate the restriction enzyme by incubating the reaction mix at 65°C for 20 min.
-
53
Clean up the DNA by using the enzymatic reaction clean up kit with Minelute columns as suggested by the manufacturer (Qiagen). MinElute twice (20 μl, then 15 μl) with the provided elution buffer.
CRITICAL STEP: 1) At this step, the amplified DNA fragments will have 3’-A overhangs, which is required for the subsequent Illumina adapter ligation step. As a negative control, an undigested sample can be processed and it should not be able to ligate to the adapters and hence amplify in the step 55. 2) From this point on, adapter ligation, size selection and PCR amplification will be performed according to Illumina’s library preparation method. Please refer to Illumina’s library preparation protocol for further details. Please note the size selection difference.
-
54
Before setting up the adapter ligation reaction, speedvac the eluted BciVI digested DNA to obtain 11.5 μl. Add following reagents and mix well by pipetting.
DNA 11.5 μl Ligation Buffer 15 μl Illumina adapters (1:10 diluted in H2O) 2 μl DNA Ligase 1.5 μl TOTAL Volume 30 μl -
55
Incubate at room temperature (25 °C) for 15 min.
-
56
Clean up the DNA by using enzymatic reaction clean up kit and Minelute columns as suggested by the manufacturer. MinElute twice (20 μl, then 10 μl) with the elution buffer provided.
-
57
Add loading dye and run all DNA on 2 % agarose gel for ~90 min at 120 V.
CRITICAL STEP: Use clean electrophoresis apparatus and run empty lane between each sample to avoid cross-contamination or use one gel per sample.
-
58
Size select the ligated DNA by cutting a gel slice so that it does not contain any un-ligated or self ligated adapters but also short enough to be sequenced. The fragment sizes between 250–600 bp is recommended.
-
59
Purify the DNA from the agarose slice using Qiagen’s Gel Extraction Kit. Elute twice with 25 μl of provided elution buffer each time.
PAUSE POINT: The isolated DNA can be stored at −20 °C and PCR amplification step can be performed the next day.
-
60
Add the following reagents to PCR amplify the size-selected, gel-purified DNA.
PCR reaction mix DNA 23 μl Illumina Primer 1.1 1 μl Illumina Primer 2.1 1 μl Phusion polymerase master Mix (2X) 25 μl TOTAL Volume 50 μl
CRITICAL STEP: Half of the gel-purified DNA can be saved and another round of amplification can be performed if needed.
-
61
Incubate the reactions in a thermal cycler under the following conditions:
Number of cycles Temperature Time 1 98 °C 1 min 17 98 °C 10 sec 65 °C 30 sec 72 °C 30 sec 1 72 °C 5 min 1 4 °C Until removed from the cycler -
62
Perform PCR purification by using the MinElute PCR Purification Kit as suggested by the manufacturer. Elute twice with 20 μl and 12 μl of elution buffer provided with the kit.
-
63
Use 2 μl of the amplified DNA to quantify the concentration by using Quant-IT picogreen assay.
-
64
Run ~80 ng on the gel to make sure that amplified DNA is a smear of fragments between 250 bp and 700bp.
? TROUBLE SHOOTING
-
65
The DNA is now ready for high-throughput sequencing.
TROUBLESHOOTING
| Step | Problem | Possible Reason | Solution |
|---|---|---|---|
| 9 | Big fragments >700 bp or intact genomic DNA after sonication | Lysis was not efficient enough | Make sure to lyse the sample on ice for 10 min. |
| Inefficient sonication | Increase the sonication time in 25 second increments. | ||
| 9 | Fragment size are too small (All less than 200 bp) | The samples are over sonicated | Reduce the sonication time in 25 second increments. |
| 48 | Step1&2 did not amplify anything after 25 cycles | 1st step priming reaction did not work |
|
| 2nd step amplification reaction did not work | Increase the Primer 2 concentration | ||
| 48 | Amplified DNA after Step1&2 runs higher than expected | Samples are under sonicated. | Phusion polymerase is highly processive and tends to better amplify longer fragments. Increase the sonication timing to ensure shorter fragmentation. |
| Fragments are self annealed in the second step |
|
||
| 50 | Amplified ChIP DNA is not enriched | The antibody is not specific | Make sure that the antibody is a validated antibody in a conventional ChIP experiment from large number of cells. |
| Too much background | Increase the washing stringency. After addition of each washing buffer, incubate for 5 min at 4 °C on a rotating platform. | ||
| 64 | Low DNA yield in the Libraries | Inefficient BciVI digestion | Start the digestion with new fresh enzyme |
| High adapter concentration in the ligation step | Decrease the adapter concentration 5 fold (50 fold dilution instead of recommended 10 fold) | ||
| PCR reaction did not work | Double check the reagents and use new PCR mix. | ||
| 64 | Libraries are not enriched by QPCR | ChIP enrichment failed | Assess ChIP enrichment after Step 2 with short amplicon primers by QPCR to make sure ChIP experiment is working. |
| Unspecific DNA amplification | Run ~80 ng of the library DNA on agarose gel and make sure that it contains a smear DNA fragments ranging from 250–700 bp but not a single band |
ANTICIPATED RESULTS
Chromatin immunoprecipitation (Steps 1–23)
The expected yield of DNA from any ChIP experiment highly depends on number of factors; the amount of soluble chromatin, the efficiency of sonication, the specificity of the antibody and the abundance of the target protein. Starting with chromatin from 10,000 cells, it is estimated that an antibody against a relatively abundant histone modification, like trimethylation of histone H3 lysine 4 (H3K4me3), will yield 10–30 pg of DNA. We effectively used this protocol to acquire H3K4me3 chromatin state in as little as 10,000 mES cells. If starting cell number is less than that or the target protein is less abundant in the cells, this protocol may be suboptimal and further optimization may be required.
Due to scarce amount of DNA yield from small number of cells, it is challenging to quantify the DNA concentration and efficiently assess the ChIP enrichments by QPCR. Therefore, we recommend analyzing ChIP enrichments after Step 1 & 2 amplification with short amplicon primers spanning 80–90 bp region of interest.
Step 1 & 2 amplification (Steps 24–32)
Step 1 & 2 priming and amplification steps aim to amplify any trace amount of DNA in a relatively unbiased manner. At the end of step 2, all DNA fragments will have an adapter-like DNA sequences at both ends that also contain the BciVI restriction site. After restriction digest, these fragments will bear 3’-Adenine overhangs, allowing seamless integration into the adapter ligation step of the conventional Illumina library protocol. Starting from ~50 pg of sonicated DNA, step 1 and 2 priming and amplification reactions are estimated to yield 10–50 ng of DNA after 15 cycles of PCR.
Higher PCR cycles (~25 cycle) are recommended during initial optimization of these steps to obtain enough DNA to validate fragment sizes by Ethidium Bromide staining. Running a Step1 & 2 product on a 2 % agarose gel should produce a smear DNA product with fragment sizes ranging 200–700 bp. The exact sizes of fragments depend on the initial sonicated material and should be comparable to it.
Slight shifts in the size of amplified fragments could be observed due to inefficient sonication and the tendency of PCR to better amplify longer fragments. It is therefore important not to start with undersonicated chromatin DNA. Moreover, Some user observed significant increase in the fragment sizes in different PCR thermal cyclers. We think this is due to fragments self annealing and increasing the annealing temperature in the Step 2 PCR conditions can overcome this issue.
We also highly recommend performing a negative control sample containing only water during step 1 & 2 amplifications. The negative control sample might yield some nonspecific products after 25 cycles of PCR due to primer self-annealing, however this product should be significantly less abundant and should also run lower (80–150 bp) on the gel. If excessive amount of nonspecific product is obtained, the primer concentrations should be re-optimized. During the actual protocol, the ExoSAP treatment and low PCR cycle (15 cycle) should minimize the primer self-annealing caused nonspecific product amplification. Starting from 10,000–20,000 cells or ~10–50 pg of ChIP DNA, the Nano-ChIP-Seq protocol presented here should yield approximately 100–200 ng of library DNA.
Figure 1.
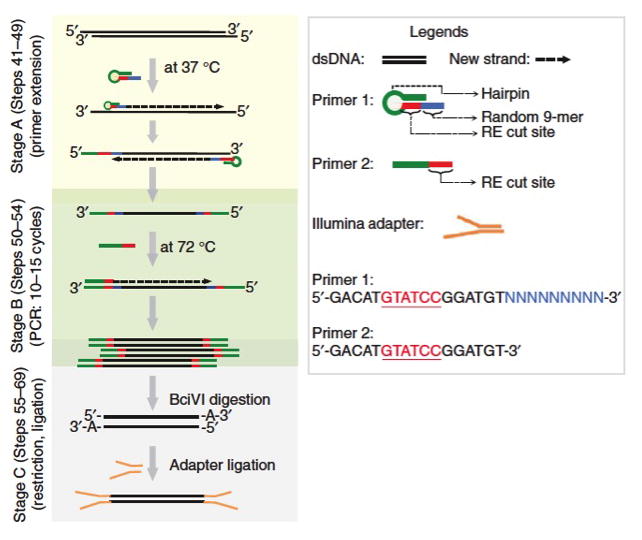
Schematic of nano-ChIP-seq library preparation method. Fragmented ChIP DNA is primed (stage A) with Sequenase enzyme using custom designed primer 1 that contains universal sequence (green), the BciVI restriction site (red) and random 9-mer (blue). Primed ChIP DNA is then amplified using primer 2 that contains the same universal sequence and the restriction site as in primer 1 (stage B). Finally, BciVI digestion of amplified templates generates DNA fragments bearing 3′-A overhangs on both ends that can be ligated with standard Illumina adapters (stage C). RE, restriction enzyme.
Figure 2.
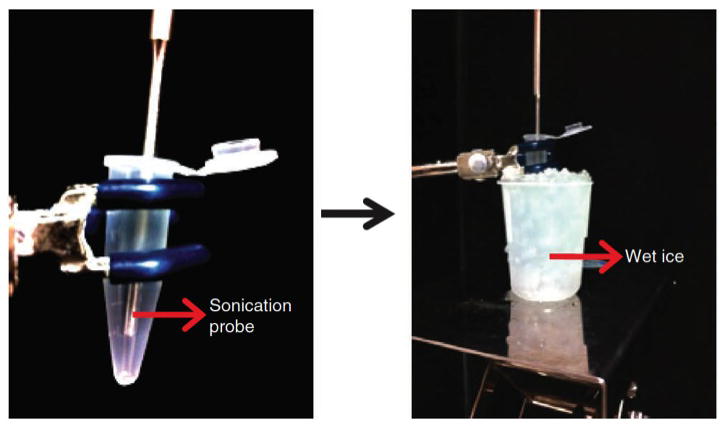
The sonication setup with the Branson 250. The Eppendorf tube is secured with the help of a clamp so that the probe does not touch the side or the bottom of the tube. During sonication, the tube is kept on wet ice to minimize denaturation and dissociation of proteins from chromatin.
References
- Acevedo LG, Iniguez AL, et al. Genome-scale ChIP-chip analysis using 10,000 human cells. Biotechniques. 2007;43(6):791–7. doi: 10.2144/000112625. [DOI] [PMC free article] [PubMed] [Google Scholar]
- Adli M, Zhu J, et al. Genome-wide chromatin maps derived from limited numbers of hematopoietic progenitors. Nat Methods. 2010;7(8):615–8. doi: 10.1038/nmeth.1478. [DOI] [PMC free article] [PubMed] [Google Scholar]
- Attema JL, Papathanasiou P, et al. Epigenetic characterization of hematopoietic stem cell differentiation using miniChIP and bisulfite sequencing analysis. Proc Natl Acad Sci U S A. 2007;104(30):12371–6. doi: 10.1073/pnas.0704468104. [DOI] [PMC free article] [PubMed] [Google Scholar]
- Dahl JA, Collas P. Q2ChIP, a quick and quantitative chromatin immunoprecipitation assay, unravels epigenetic dynamics of developmentally regulated genes in human carcinoma cells. Stem Cells. 2007;25(4):1037–46. doi: 10.1634/stemcells.2006-0430. [DOI] [PubMed] [Google Scholar]
- Dahl JA, Collas P. A rapid micro chromatin immunoprecipitation assay (microChIP) Nat Protoc. 2008;3(6):1032–45. doi: 10.1038/nprot.2008.68. [DOI] [PubMed] [Google Scholar]
- Goren A, Ozsolak F, et al. Chromatin profiling by directly sequencing small quantities of immunoprecipitated DNA. Nat Methods. 2009 doi: 10.1038/nmeth.1404. [DOI] [PMC free article] [PubMed] [Google Scholar]
- Lieb JD, Liu X, et al. Promoter-specific binding of Rap1 revealed by genome-wide maps of protein-DNA association. Nat Genet. 2001;28(4):327–34. doi: 10.1038/ng569. [DOI] [PubMed] [Google Scholar]
- O'Neill LP, VerMilyea MD, et al. Epigenetic characterization of the early embryo with a chromatin immunoprecipitation protocol applicable to small cell populations. Nat Genet. 2006;38(7):835–41. doi: 10.1038/ng1820. [DOI] [PubMed] [Google Scholar]
- Park PJ. ChIP-seq: advantages and challenges of a maturing technology. Nat Rev Genet. 2009 doi: 10.1038/nrg2641. [DOI] [PMC free article] [PubMed] [Google Scholar]