Abstract
Histological evaluation of muscle biopsies has served as an indispensable tool in the understanding of the development and progression of pathology of neuromuscular disorders. However, in order to do so, proper care needs to be taken when excising and preserving tissues to achieve optimal staining. One method of tissue preservation involves fixing tissues in formaldehyde and then embedding them with paraffin wax. This method preserves morphology well and allows for long-term storage at RT but is cumbersome and requires handling of toxic chemicals. Further, formaldehyde fixation results in antigen cross-linking, which necessitates antigen retrieval protocols for effective immunostaining. On the contrary, frozen sectioning does not require fixation and thus retains biological antigen conformation. This method also provides a distinct advantage in quick turn around time, making it especially useful in situations needing quick histological evaluation like intraoperative surgical biopsies. Here we describe the most effective method of preparing muscle biopsies for visualization with different histological and immunological stains.
Keywords: Medicine, Issue 99, skeletal muscle, frozen sections, formaldehyde fixed paraffin embedded sections, cryosectioning, immunohistochemistry, mid belly
Introduction
Examination of muscle histology plays a critical role in the understanding of different types of neuromuscular disorders1-4. When combined with other techniques, it allows researchers to get a better idea of the manifestation and progression of pathology and can also be essential to evaluate the efficacy of a therapeutic intervention5-10. However, to be accurate, the tissues need to be preserved in the proper manner so as to preserve the physiological state immediately before excision. This requires great care during removal, preservation, sectioning, and staining.
Tissues can be prepared in two different ways for light microscopic study. The first method, formalin fixed paraffin embedded (FFPE) sections, requires tissues to be fixed in 10% natural buffered formaldehyde before being embedded with paraffin wax11,12. The fixation step helps to preserve morphology better but also cross links endogenous proteins thus necessitating intricate antigen retrieval procedures for immunostaining and eliminating the possibility of enzymatic staining on such sections12. Frozen sections, on the other hand, do not need to be pre-fixed or processed; therefore, proteins are able to retain native biological conformations13,14. Further, frozen sections also allow for quick turnaround time, which at times is necessary, for example in the intraoperative diagnosis of sarcomas and other surgical biopsies15. However, if not done properly, this method is prone to freeze damage, which introduces changes to muscle architecture making the sections unfit for histological examination. This paper will outline the most effective method to prepare muscle biopsies in order to achieve optimal staining for proper examination.
Protocol
1. Tissue Harvest and Freezing of Muscle Tissues
Euthanize the mouse with an overdose of isoflurane (2-chloro-2-(difluoromethoxy)-1,1,1-trifluoro-ethane). Perform this step in a fume hood and use a secondary containment method such as a desiccator or a bell jar containing a cotton swab soaked in isoflurane.
Confirm death by firmly squeezing footpad. Use a secondary method of euthanasia such as cervical dislocation.
Wet the fur with 70% alcohol to reduce the sticking of loose hair strands on the muscles. Peel the skin off the limb using a fine forceps such as #5.
Carefully separate the muscle of interest (tibialis anterior (TA) in this case) from the bones underneath, starting from the tendon and remove.
Excise the muscle, cover it in OCT (Optimum Cutting Temperature compound), and lay it flat on a labeled disposable freezing mold. Make sure that the muscle is at its normal physiological orientation (head to tail) without stretching. Alternatively, freeze the muscle on small styrofoam squares and pin it using insect pins to ensure the correct length of the muscles.
Chill 2-methylbutane (isopentane) in a steel beaker using liquid nitrogen. This takes on average 3 - 5 min. Keep stirring intermittently until white precipitates start to form on the bottom and walls of the beaker. NOTE: When this occurs, isopentane has reached optimal freezing temperature (-150 °C)
Dip the molds containing muscles in the chilled 2-methylbutane. Freeze small muscles such as the diaphragm and extensor digitorum longus (EDL) for 6 - 12 sec and larger muscles like the gastrocnemius soleus (GS) and triceps for 15 - 20 sec. Do not freeze the muscles for too long as this may lead to cracking.
Transfer the frozen tissues on to dry ice and let the isopentane evaporate (note that this process takes on average around 15 - 20 min). Wrap the tissues in aluminum foil and store them at ultra low temperature (-70 °C to -80 °C) until sectioning.
2. Embedding the Tissues in OCT to Prepare Tissue Block
Transport tissues on dry ice to cyrostat to prevent thawing. Transfer tissue to cryostat chamber (set at -20 to -24 °C to avoid full thawing of tissues) and let them equilibrate for 30 min.
Turn the Peltier bay cooling on. If the cryostat does not have this cooling, use aerosol cooling spray to quickly freeze the OCT. Do not let the muscle thaw at any point during the embedding as this can result in freeze damage.
Add a uniform thin layer of OCT on the specimen disc and let it cool. When most of the OCT is frozen on the bottom while still liquid on the top, insert the tissue at the correct orientation (perpendicular to OCT for transverse sections and parallel to OCT for longitudinal sections). Use aerosol cooling spray to quickly freeze OCT. Touch the unembeded part of the tissue with heat extractor and wait for 45 sec.
Add another thin layer of OCT around the muscle, spray with aerosol cooling spray and extract the heat as in the previous step.
Keep adding OCT in small increments and quickly freeze the OCT using a combination of aerosol cooling spray and heat extractor until the whole muscle is covered.
Put the heat extractor on the top of the tissue block and wait for 5 min.
3. Preparing Sections and Identifying the Sections from Mid-belly Region of the Muscles
Mount the specimen onto the specimen head. Tighten the knob to secure the disc. Make sure that the specimen disc is in good contact with the specimen head.
Adjust the chamber temperature to between -21 and -24 °C and wait until the set temperature is achieved.
Adjust the thickness settings (7 µm); trim the block by advancing or retracting the block using coarse and fine settings.
Collect the sections on pre-warmed positively charged microscope slides by pressing the top of the slide onto the sections, using the attraction between opposite charges to facilitate the adherence of the cut sections to the slide.
Identify the mid-belly sections by measuring cross-sectional area (CSA) of the sections. Do this using imaging software on the computer that is connected to the microscope. NOTE: Phase contrast images are taken and circumference of the entire muscle is measured via a tracing function on the software program. This will yield both CSA as well as minimum ferret diameter (measure of fiber cross-sectional size that is expressed as the smallest distance between two parallel tangents on opposite sides of a particle) measurements. Note: When CSA and minimum ferret diameter measurements begin to plateau, mid belly has been reached.
Inventory and archive the slides at -80 °C for future staining. NOTE: OCT does not need to be removed prior to staining procedures. Once slides are coverslipped, they are ready to be stained immediately.
4. Staining
NOTE: While detailed step-by-step procedures can be found on the product data sheet and should be followed for staining procedures, personal optimization may be required to obtain optimal staining.
Because mounting media (see table) is not miscible with water, dehydrate slides through increasing grades of alcohol (2 min each in 70%, 95%, and 100% ethanol) and clear them with xylene (100% for 5 min) to ensure slides do not become opaque over time.
Coverslip sections and let them dry. Image with microscope equipped with imaging software.
Representative Results
The set-up for harvesting and freezing of tissues can be seen in Figure 1. Excised tissues should be stored on a gauze soaked in PBS to avoid drying (Figure 1A). When tissues are selected to be used for histological analysis they should be dipped in OCT and laid out on cryo mold in the proper orientation and as close to physiological length as possible to ensure accurate morphology (Figure 1B). Slurry of isopentane suitable for tissue freezing can be achieved by cooling isopentane in liquid nitrogen and stirring until small white precipitates appear at the bottom. At this point, the media is suitable for freezing (Figure 1C). Tissues should be frozen from 6-15 sec in chilled isopentane depending on the size/thickness of the tissue (Figure 1D). Following freezing, the muscle will appear chalky white at which point it should be stored on dry ice and later transferred to -80 °C freezer.
Cryostat setting and ingredients required for preparing the muscle block by gradually embedding the tissue in OCT are shown in Figure 2. The Cryostat should be set between -20 and -24 °C (Figure 2A). OCT and Freeze-It should be readily available to create block suitable for sectioning. Inside of cryostat should have small brushes to manipulate and flatten cut sections for slide making as well as tweezers for handling of tissue block because it should never be touched with hands to ensure the tissue remains frozen (Figure 2B). OCT should be added to tissue to create sectioning block but should be immediately frozen with Freeze-It spray and then further cooled with heat-extractor pictured here (Figure 2C). For transverse sections, tissue should be placed on the specimen head so that it is oriented perpendicular to the blade (Figure 2D). Settings should be adjusted to achieve desired section thickness (5-10 μm depending on the tissue).
If frozen correctly the tissue face should be chalky white while a tissue that was frozen improperly or thawed during the mounting process will appear red/pink. Figure 3 shows representative tissues for improperly handled samples (Figure 3A) and properly handled samples (Figure 3B).
The mid belly region is determined by measuring CSA and minimum ferret diameter using a microscope equipped with Phase contrast optics and image analysis software. A representative screenshot of analysis software is shown in Figure 4. Hematoxylin and eosin stained images of a properly frozen and sectioned biopsy along with a freeze damaged biopsy of tibialis anterior (TA) muscles are shown in Figure 5. Sections that are properly processed will have consistent morphology and even staining throughout (Figure 5A). Improperly processed muscles that are freeze damaged or prematurely thawed will appear to have multiple breaks in morphology and have the appearance of “shredded wheat” (Figure 5B). Figure 6 shows humidified chamber for optimal immunostaining. Slides should be covered with parafilm, kept on a wet paper towel, and sealed in a small box to avoid drying of sections during immunostaining. Figure 7 depicts a sample immunohistochemistry slide that has been properly prepared and stained.
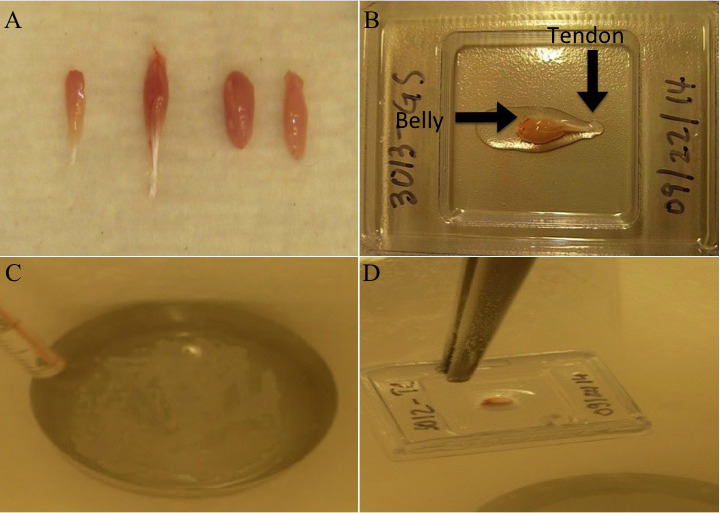 Figure 1. Preparation and set up for proper tissue freezing. (A) Excised tissues should be stored on gauze soaked in PBS. (B) Tissues selectedfor histological analysis dipped in OCT and laid out on cryo mold in the proper orientation (from belly to tendon) and as close to physiological length as possible. (C) Slurry of isopentane suitable for tissue. Note: small white precipitates appear at the bottom. (D) Frozen tissue after dipping in isopentane. Note: chalky white appearance. Please click here to view a larger version of this figure.
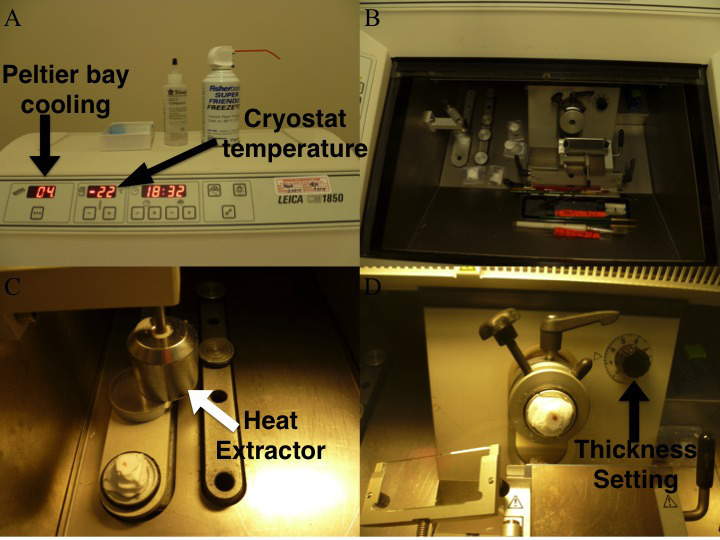 Figure 2. Cryostat settings and ingredients necessary for sectioning. (A) Cryostat set between -20 and -24°C with OCT and aerosol cooling spray readily available. (B) Inside setup of cryostat complete with small brushes to manipulate and flatten cut sections for slide making as well as tweezers for handling of tissue block. (C) Frozen tissue block ready to be cooled with heat extractor (white arrow). (D) Tissue block set on mounting head ready to be cut. Please click here to view a larger version of this figure.
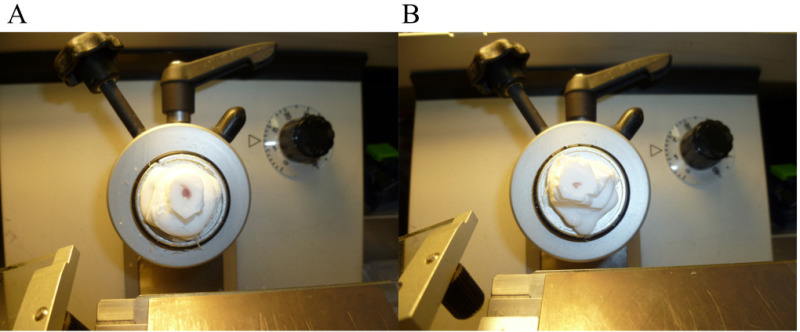 Figure 3. Representative tissues of correctly and incorrectly preserved muscles. (A) Improperly frozen or handled (B) Properly frozen and handled muscle. Please click here to view a larger version of this figure.
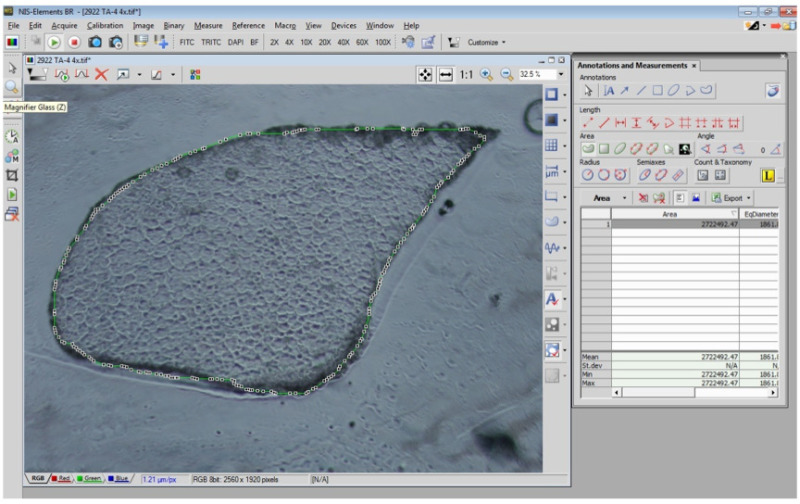 Figure 4. Determination of cross sectional area of TA muscle using Nikon imaging software. Screenshot of phase contrast image of muscle section that has been circled using imagine software for measurement of CSA and min ferret diameter. Please click here to view a larger version of this figure.
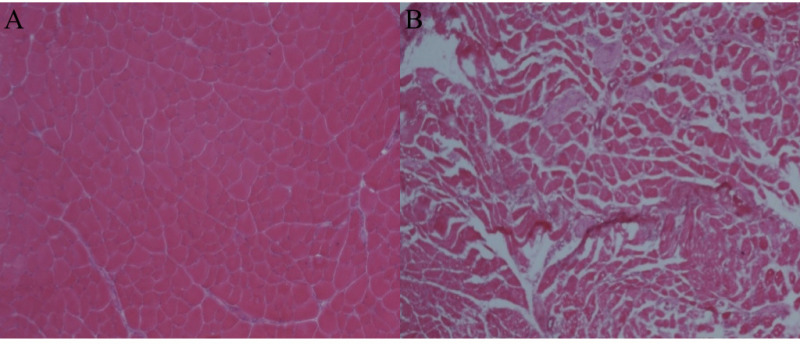 Figure 5. Representative images of properly and improperly prepared H&E stained muscles. (A) Properly processed section. (B) Improperly processed freeze damaged muscle section. Please click here to view a larger version of this figure.
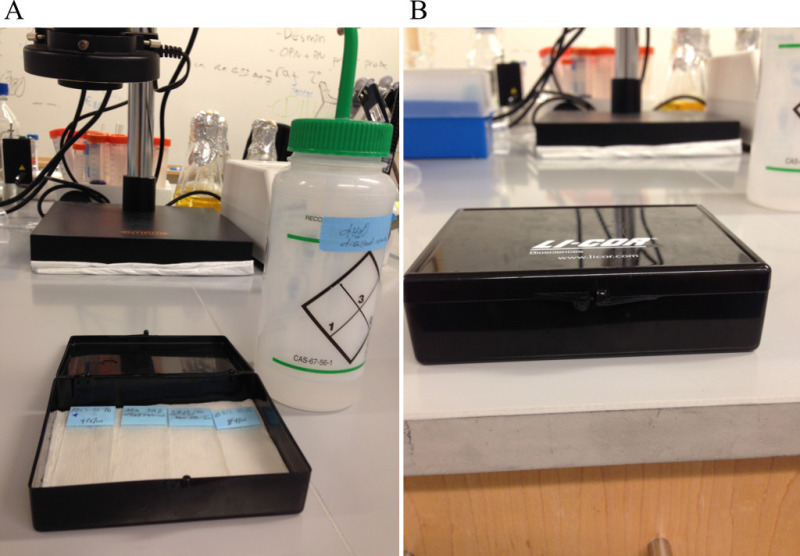 Figure 6.
Humidified chamber suitable for immunostaining.
Please click here to view a larger version of this figure.
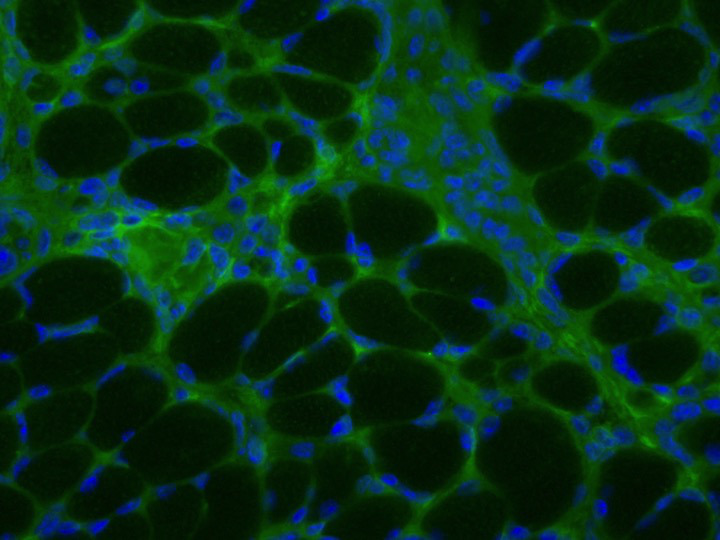 Figure 7. Sample immunohistochemistry slide of properly prepared and stained slide. Slide has been stained with Fibronectin (green) and DAPI (blue). Please click here to view a larger version of this figure.
Discussion
Histology and immunohistochemistry have been used as key tools in understanding the manifestation and progression of pathology in various neuromuscular disorders. Classically, muscle biopsies were first fixed in formaldehyde and then embedded with paraffin wax. While formaldehyde fixation preserves tissue architecture and allows tissue storage and transport at RT, it also inactivates enzymes and crosslinks proteins necessitating further steps to achieve accurate immunostaining. This problem is eliminated with the use of frozen sections but this method presents unique technical challenges in obtaining optimal staining results and accurate interpretation14,15.
Firstly, it is essential that samples be frozen immediately after surgical excision as autolysis and decomposition begin soon after removal from the body. Tissues must also be frozen rapidly and thoroughly for the proper amount of time which varies depending on the size/thickness of the tissue. If this is not done correctly, freeze damage will occur rendering the tissue useless for histological evaluation. Following freezing, tissues must be immediately stored on dry ice and then transferred to an ultra low temperature (-80 °C) freezer until sectioning. It is important to note that tissues should not be removed from the freezer without being on dry ice because freeze-thaw will also damage tissue architecture.
Another note of importance when performing histological analysis is to take care to always analyze the same part of the tissue of interest to ensure uniformity among analysis. This can be done for muscle sections by performing analysis of the midbelly. This is the part of the muscle that is the thickest and therefore will have the largest cross sectional area. In order to ensure that you are indeed sectioning the midbelly, CSA of subsequent sections should be measured using histological imaging software. Measurements should continue to be made until the cross sectional area begins to plateau. Once this occurs, the mid belly has been reached; only this part of the tissue should be used for histological analysis to ensure uniformity among comparisons.
After sectioning has been completed and slides have been prepared, they should be allowed to dry at RT for 1 - 2 hr. Drying allows for proper adherence of the section to the slide and also prevents excess water to crystallize following transfer to -80 °C freezer. It is important to note that slides should also only be handled on dry ice when selecting slides for analysis to prevent freeze-thaw cycles. Once slides have been selected for staining, protocols included with the stain should be followed first on a trial basis until optimal results have been achieved. When performing immunostaining, it is important to make sure slides do not dry throughout the procedure. Drying of slides can result in transient interactions to remain intact following incubation. These interactions cannot be removed during washes and result in nonspecific staining. Drying can be avoided by keeping slides in a humidified atmosphere. Performing incubations with sections covered with parafilm and slides on a moist paper towel sealed in a small slide box is sufficient to ensure slides will not dry at any point during the procedure.
Histology is an essential tool in visualizing morphology and various aspects of pathology. While somewhat trivial, it is of the greatest importance to take great care in the preparation of tissues to be used for histology. From excision to freezing, sectioning and staining, tissues should be handled in a manner that will avoid freeze damage and yield the most accurate images possible. Without proper preservation, the staining will not accurately reflect physiology and therefore lead to misinterpretation.
Disclosures
The authors have nothing to disclose.
Acknowledgments
We would like to thank Alex Miller for manuscript revisions. This work was supported with the research grants awarded to M.G. from Cure CMD, Struggle Against Muscular Dystrophy (SAM) and Muscular Dystrophy Association (218938).
References
- Bonnemann CG, et al. Diagnostic approach to the congenital muscular dystrophies. Neuromuscular disorders : NMD. 2014;24:289–311. doi: 10.1016/j.nmd.2013.12.011. [DOI] [PMC free article] [PubMed] [Google Scholar]
- Caughey JE, Pachomov N. The diaphragm in dystrophia myotonica. J Neurol Neurosurg Psychiatry. 1959;22:311–313. doi: 10.1136/jnnp.22.4.311. [DOI] [PMC free article] [PubMed] [Google Scholar]
- Fetterman GH, Wratney MJ, Donaldson JS, Danowski TS. Muscular dystrophy. I. History, clinical status, muscle strength, and biopsy findings. AMA J Dis Child. 1956;91:326–338. doi: 10.1001/archpedi.1956.02060020328002. [DOI] [PubMed] [Google Scholar]
- Platzer AC, Chase WH. Histologic Alterations in Preclinical Mouse Muscular Dystrophy. The American journal of pathology. 1964;44:931–946. [PMC free article] [PubMed] [Google Scholar]
- Mercuri E, et al. Muscle magnetic resonance imaging involvement in muscular dystrophies with rigidity of the spine. Ann Neurol. 2010;67:201–208. doi: 10.1002/ana.21846. [DOI] [PubMed] [Google Scholar]
- Tasca G, et al. Different molecular signatures in magnetic resonance imaging-staged facioscapulohumeral muscular dystrophy muscles. PloS one. 2012;7:e38779. doi: 10.1371/journal.pone.0038779. [DOI] [PMC free article] [PubMed] [Google Scholar]
- Girgenrath M, Dominov JA, Kostek CA, Miller JB. Inhibition of apoptosis improves outcome in a model of congenital muscular dystrophy. The Journal of clinical investigation. 2004;114:1635–1639. doi: 10.1172/JCI22928. [DOI] [PMC free article] [PubMed] [Google Scholar]
- Kumar A, Yamauchi J, Girgenrath T, Girgenrath M. Muscle-specific expression of insulin-like growth factor 1 improves outcome in Lama2Dy-w mice, a model for congenital muscular dystrophy type 1A. Human molecular genetics. 2011;20:2333–2343. doi: 10.1093/hmg/ddr126. [DOI] [PMC free article] [PubMed] [Google Scholar]
- Mehuron T, et al. Dysregulation of matricellular proteins is an early signature of pathology in laminin-deficient muscular dystrophy. Skeletal muscle. 2014;4:14. doi: 10.1186/2044-5040-4-14. [DOI] [PMC free article] [PubMed] [Google Scholar]
- Yamauchi J, Kumar A, Duarte L, Mehuron T, Girgenrath M. Triggering regeneration and tackling apoptosis: a combinatorial approach to treating congenital muscular dystrophy type 1 A. Human molecular genetics. 2013;22:4306–4317. doi: 10.1093/hmg/ddt280. [DOI] [PubMed] [Google Scholar]
- Sheriffs IN, Rampling D, Smith VV. Paraffin wax embedded muscle is suitable for the diagnosis of muscular dystrophy. Journal of clinical pathology. 2001;54:517–520. doi: 10.1136/jcp.54.7.517. [DOI] [PMC free article] [PubMed] [Google Scholar]
- Fox CH, Johnson FB, Whiting J, Roller PP. Formaldehyde fixation. Journal of Histochemistry & Cytochemistry. 1985;33:845–853. doi: 10.1177/33.8.3894502. [DOI] [PubMed] [Google Scholar]
- Maccarty WC. The Diagnostic Reliability of Frozen Sections. The American journal of pathology. 1929;5:377–380. [PMC free article] [PubMed] [Google Scholar]
- Shi SR, et al. Evaluation of the value of frozen tissue section used as 'gold standard' for immunohistochemistry. Am J Clin Pathol. 2008;129:358–366. doi: 10.1309/7CXUYXT23E5AL8KQ. [DOI] [PubMed] [Google Scholar]
- Turan T, et al. Accuracy of frozen sections for intraoperative diagnosis of complex atypical endometrial hyperplasia. Asian Pacific journal of cancer prevention : APJCP. 2012;13:1953–1956. doi: 10.7314/apjcp.2012.13.5.1953. [DOI] [PubMed] [Google Scholar]


