Abstract
Although the anatomy of the human being has not changed, technical developments in operating materials and methods demand a simultaneous development in operative management. Developments in electronic and optical technologies permit many gynecological operations to be performed laparoscopically. One fundamental distinction between any other operating method and laparoscopy is the hurdle that the initial entry, whether with a needle, cannula, or trocar, is mostly performed blind. However, there is a risk that blind entry may result in vascular or organ damage. One of the difficulties associated with entry complications is that any damage may not be immediately recognized, leading to major abdominal reparative surgery, and at worst, a temporary colostomy. Therefore, the technical and operative quality of laparoscopic surgery begins with port placement and trocars. Visual access systems are available but are not yet widely used. The aim of this review was to introduce the different port placement and trocar systems as well as their correct and professional usage in correlation with the abdominal functional anatomy.
Keywords: Gynecological endoscopy, port placement, entry technique, complication prevention, pneumoperitoneum, functional gynecological anatomy
Introduction
Extra-abdominal relevant anatomy
Anatomical basis: The anterior abdominal wall has four muscles that are penetrated at all entries: rectus abdominis, external obliquus abdominis, internal obliquus abdominis, and transversus abdominis.
Although the penetrating areas are variable in laparoscopy, the usual trocar placement uses similar inserting areas. Therefore, it is obligatory for any surgeon to be experienced in the anatomy of the abdominal wall and its consecutive relevant anatomical structures.
There are no significant vascular structures that need to be respected upon insertion of the subumbilical trocar. Solely, strict attention has to be given to holding to the median line to avoid any accidental damage to paramedian structures.
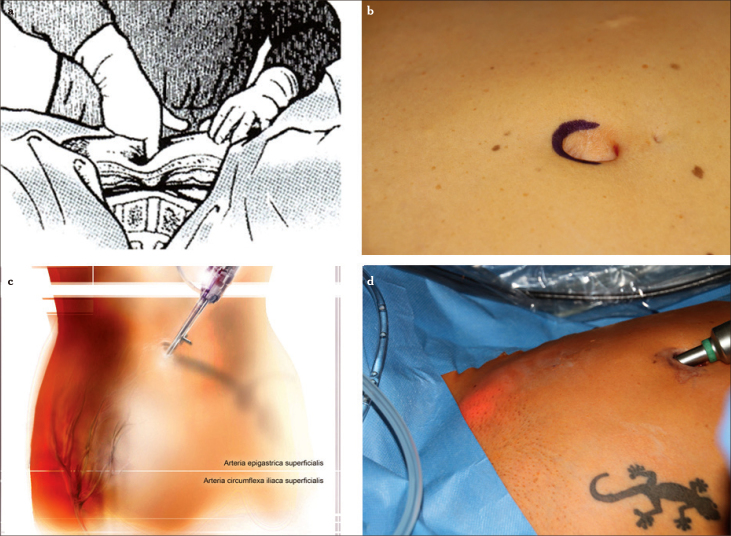
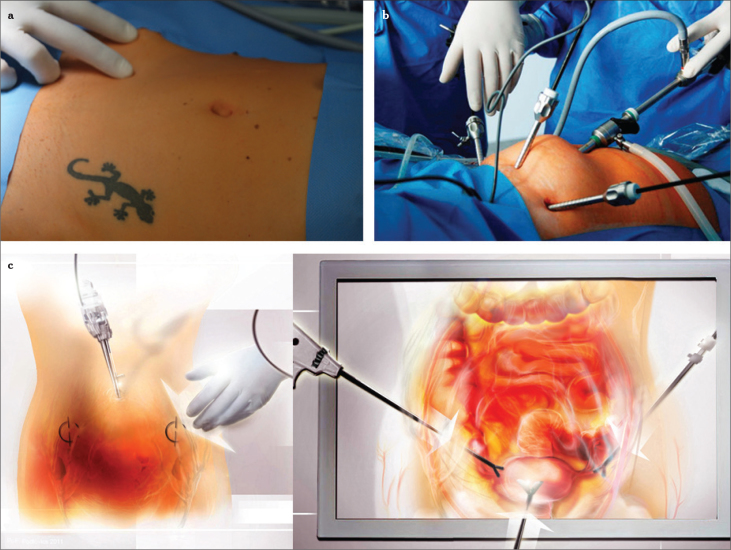
There are two arteries in the superficial abdominal wall that should be visualized. Damage to these arteries should be avoided because even superficial incisions can lead to severe bleeding that requires the conversion from laparoscopy to laparotomy. Both vessels can be visualized by diaphanoscopy (Figures 1–4). Trocar placement is performed, dependent on the corresponding internal site, at a 90° angle to the abdominal wall once the aiming point has been located. The superficial epigastric artery arises from the femoral artery approximately 1 cm below the inguinal ligament through the fascia cribrosa, turns upward in front of the inguinal ligament, and then ascends while spreading out between the two layers of the superficial fascia of the abdominal wall, nearly as far as the umbilicus. The circumflex iliac superficial artery originates from the femoral artery close to the superficial epigastric artery. After perforating the fascia lata, it runs parallel to the inguinal ligament and laterally to the iliac crist while spreading into smaller branches ( 1 ).
Figure 1.
a–d. Typical palpation point in the subumbilical region. The fingertip is pointing to the promontorium. Subumbilical incision and local palpation demonstrate the short distance from the skin to the spine (a), diaphanoscopy illuminates the region of insertion of the ancillary trocars while demarcating the superficial epigastric artery and the circumflex iliac superficial artery (b–d)
Figure 2.
a–c. Point of insertion from the outside (two thumbs medial of the anterior superior spine), at a 90° angle to the surface with penetration of all abdominal wall layers (a), trocar insertion site lateral to the plica umbilicalis lateralis (b), overview after insertion of the laparoscope and three ancillary trocars (c), graphical illustration of (a) and (b)
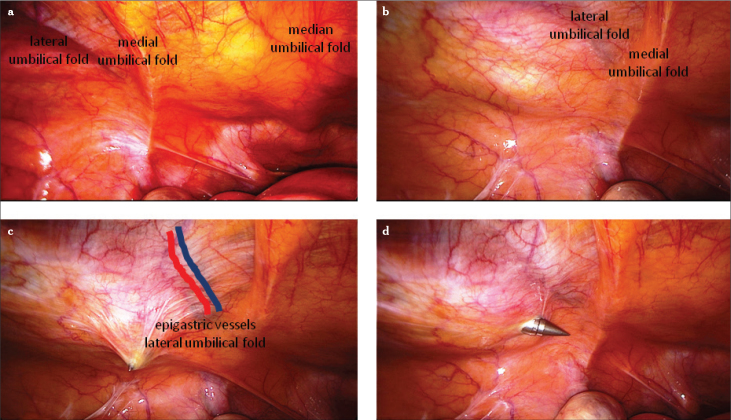
Figure 3.
a–c. Overview of the abdominal wall from the interior (a), the plica umbilicalis mediana contains the obliterated urachus, the plica umbilicalis medialis contains the obliterated umbilical artery, and the plica umbilicalis lateralis contains the inferior epigastric vessels. Palpation with the index finger from the outside under laparoscopic view (b), entry with a sharp trocar strictly lateral to the inferior epigastric vessels (c–d)
Figure 4.
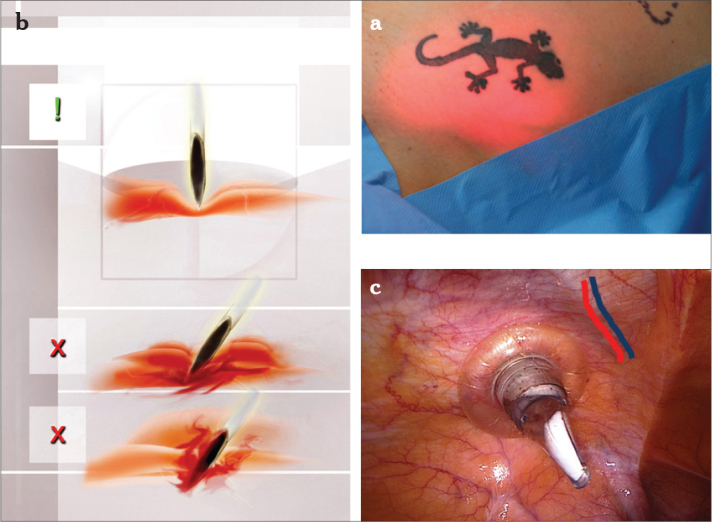
a–c. Diaphanoscopy illuminates the region of insertion of the ancillary trocars while demarcating the superficial epigastric artery and the circumflex iliac superficial artery (a), vision is dependent of the thickness of the abdominal wall. Point of insertion from the outside (two thumbs medial of the anterior superior spine), at a 90° angle to the surface with penetration of all abdominal wall layers. Direct entry of the ancillary trocars can avoid severe bleeding in the subcutaneous tissue (b), single-use trocar is situated strictly lateral to the plica umbilical lateralis and strictly lateral of the inferior epigastric vessels (c)
Places for trocar insertion
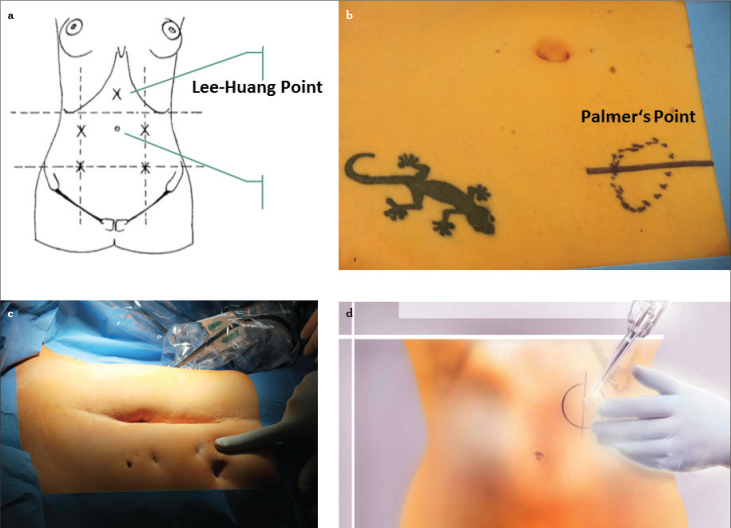
The laparoscope and optic trocar should be inserted, whenever possible, in the subumbilical region using a semilunar or straight incision (Figure 1). Only if trocar placement is not possible, e.g., due to severe adhesions or large intra-abdominal tumors, are alternative entry sites negotiated, e.g., above the umbilicus or Palmer’s point (Figure 5), as a precursor entry site.
Figure 5.
a–d. Depiction of the alternative entry site. For the large uterus, particularly at or above the level of the umbilicus, the Lee-Huang point is recommended for video laparoscopy (a), Palmer’s Point, it is situated in the midclavicular line approximately 3 cm below the costal margin (b–d)
The placement for the working trocars depends on the operation. If the operative focus is located in the pelvis and no large tumor is expected to be touching the umbilical region, the two working trocars can be inserted in the lower abdominal wall in a vessel-free area, as confirmed by diaphanoscopy. Any auxiliary trocar can be placed in the midline suprasymphysically or left of the midline. A maximum distance between the optic trocar and the working trocars should be achieved. Furthermore, the working trocars should not be in a cranial-caudal line but should be slightly shifted. Apart from the obliterated urachus and the bladder in the lower region, no remarkable anatomical structures were found (Figure 6).
Figure 6.
a–d. Entry under view in a case of previous peritonitis after repeated laparotomy, including the left epigastric area (a–d) EndopathTM, or EndotipTM are disposable and reusable entry ports to enter under view (c–d)
Intra-abdominal relevant anatomy through the eye of the trocar
Anatomical landmarks
It is important to identify the different landmarks of the abdominal wall. Beginning in the midline, the plica umbilicalis mediana contains the obliterated urachus and requires no further attention besides a hoisted bladder, e.g., after caesarian section. Moving laterally, the paired plica umbilicalis medialis contains the obliterated umbilicalis artery in the ligamentum umbilicale mediale, which carries fetal blood through the umbilical cord to the placenta before it obliterates after birth and is therefore hazard-free too. The next step leads to the plica umbilicalis lateralis with the integrated vasa epigastrica inferiors. The inferior epigastric artery originates at the inguinal ligament of the external iliac artery. It cuts along the subperitoneal tissue ventrally and then moves upwards in an oblique manner—alongside the medial edge of the anulus inguinalis profundus. Subsequently, it perforates the fascia of the musculus transversus abdominis and climbs upwards between the musculus rectus abdominis and the rectus wall, thereby moving ventrally of the linea arcuata. Above the umbilicus, it divides into many small branches that anastomose with the superior epigastric artery. In contrast to the superficially spreading vascular branches, the inferior epigastric artery cannot be visualized by diaphanoscopy.
Places for trocar insertion
Once the cutaneous region has been determined from the outside with the aid of diaphanoscopy, the safe distance to the plica umbilicalis lateralis can be verified by palpation. The correct point of insertion is generally approximately two thumbs medial of the spina iliaca anterior superior (Figures 2, 3). Being distant to the plica, the trocar is placed at a 90° angle and pushed forward until the tip of the trocar can be seen with the laparoscope and then pushed toward the least delicate organ, which is the uterus (Figure 4) (2, 3).
Different types of ports and trocars
Development of ports and trocars
The word “trocar” is of French origin and is derived from trois (three) + carré (edge). A trocar is a medical instrument with a mostly sharply pointed end, often three-sided, that is used inside a hollow cylinder (cannula) to introduce ports into the abdomen.
Types of ports and trocars
Trocars are available in different sizes, from 3 mm to 12 mm and larger. In standard procedures, the optic trocar is placed in the lower part of the umbilicus, and its size varies depending on the operative procedure. For easy procedures, such as diagnostic laparoscopies or adnectomies, a 5 mm optic trocar is generally sufficient and provides enough light and precision. More pretentious procedures demand a brighter light source and a better picture, which is provided by a 10 mm optic trocar. Standard procedures use two working trocars on each side of the lower abdomen for secondary instruments, and 5 mm ports are generally sufficient. Smaller trocars, up to 3 mm, can be used for unproblematic procedures. Trocar entries for the laparoscope and the instruments can be dilated to 12 mm or larger, e.g., if a morcellator has to be utilized or larger tumors need to be extracted through an endoscopic bag ( 4 ).
Disposable trocars
With the decrease in production costs, disposable trocars have become popular in many countries. The advantage of a disposable material is that the tips are always sharp; therefore, less manual energy is necessary for the trocar insertion. The disadvantages are the higher expenses and the environmental stress.
Reusable trocars
Reusable trocars are available with two different types of inserting tips: pyramidal and conical. Today, the most popular tip is the pyramidal because this tip is sharper than the conical one. Sharpness, therefore, is the most important factor in the closed-entry technique.
In economic terms, reusable trocars seem to be more cost-effective than disposable instruments. However, the disadvantages of reusables are the time required for cleaning and sterilizing and the necessity of frequent sharpening and technical service (4, 5).
Single-site surgery
During the past few years, the field of laparoscopy has undergone several changes, and continuous efforts have been made to improve the morbidity and cosmesis of laparoscopic surgery, with a special focus on the miniaturization of equipment, the evolution of robotic surgical units, and reduction of the port size and number. Laparoendoscopic single-site surgery (LESS) is a term that covers a spectrum of surgical techniques targeted toward performing laparoscopic surgery by consolidating all the ports into only one surgical incision. Although early results are encouraging, this should not disguise the technical difficulties associated with performing a LESS procedure. LESS is challenging due to the lack of port triangulation (which leads to the clashing of laparoscopic instruments), two-dimensional view, poor ergonomic position for the surgeon, and an overall steep learning curve for suturing.
LESS has been utilized to successfully perform a large number of procedures and has also been utilized in general surgery. It was first reported for gynecological procedures in the 1970s for laparoscopic tubal ligations. However, this procedure did not initially gain popularity because of the technical challenges involved. In the last decade, technological advances in flexible optical and coagulation devices have allowed the performance of more advanced procedures, such as total LESS hysterectomy and pelvic/aortic lymphadenectomy. In this period, several reports have been published demonstrating the feasibility and reproducibility of this approach for benign and malignant uterine disease.
The benefits of single-site surgery seem superior to those reported for standard laparoscopy, including faster recovery, lower postoperative analgesic requirements, and better cosmetic results.
Instruments
The single trocar is inserted via a skin incision of approximately 1.5–2 cm within the umbilical scar and may have different numbers and sizes of ports for the insertion of the instruments [Single-port entries: Single Port Laparoscopic System (Covidien; Dublin, Ireland), LESS technique (Olympus Europa; Hamburg, Germany), X-CONE (Karl Storz; Tuttlingen, Germany)].
Special optics dedicated to single-port surgery facilitates an excellent intra-abdominal visualization and ensure no conflict between the camera and the instruments outside the patient. For this purpose, systems with 5 mm HD telescopes, either with a long and flexible external arm and a 30 degree optic or with a flexible internal tip and a 0 degree optic, are available.
The 5-mm working instruments are inserted into the remaining ports. These may include graspers, a bipolar coagulator, cold scissors, a suction/irrigation device, and a multifunctional device which grasps, coagulates, and transects simultaneously.
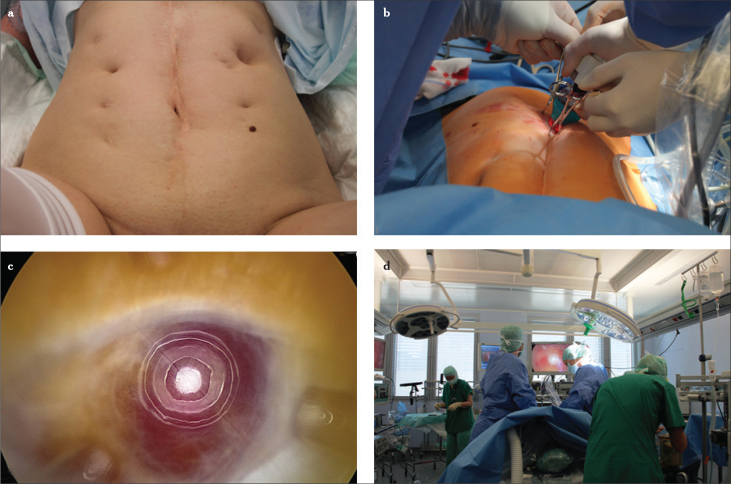
To facilitate surgical maneuvers and prevent clashing between instruments and the surgeon’s hands, the combination of one 33-cm-long instrument with a 43-cm-long straight instrument is recommended. Alternatively, one double-bended and one straight instrument can be adopted (Figure 7).
Figure 7.
a–d. Omega-shape umbilical incision (a), single-site port introduction with the “folded” port-clamping technique using an atraumatic clamp (b), single-port cluster (c), pneumoperitoneum induction after the umbilical placement of the single-site port and positioning of the 12-mm lubricated trocar for the 30-degree scope (d)
Entry techniques
Brief manual of port placement
The technique of entering the abdominal cavity can be separated into three different approaches:
The open technique;
The classical closed technique via a Veress needle;
The modified closed technique via direct trocar insertion.
Most gynecologists use the classical closed-entry technique, whereas most general surgeons still use the open (Hasson) method. Only a minority of surgeons use the modified closed technique.
Creation of the pneumoperitoneum
The most critical moments in laparoscopy, independent of operating competence, are the creation of the pneumoperitoneum and insertion of the primary trocar whether by Veress needle (Figure 8) and trocar insertion under sight or blindly or by minilaparotomy (Hasson technique).
Figure 8.
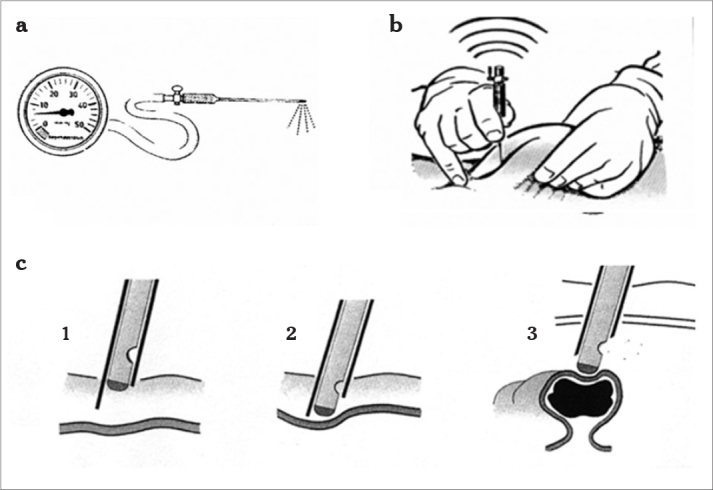
a–c. Veress needle and insufflation pressure (a), lifting of the abdominal wall, insertion angle is 45° (b), entry of the Veress needle through the abdominal wall (c1), the sharp tip penetrates the skin and fascia (c2), after piercing the peritoneum, the blunt tip springs forward due to the release of resistance and thereby avoids organ (bowel) damage (c3)
Patients with a higher than average risk for complications in between the first steps include the following:
- Obese patients. The thicker abdominal wall decreases tactile sensation, and the insertion of the Veress needle is thus more difficult. At minilaparotomy, vision is likewise restricted so that the section is often more than small, and the risk for organ damage and postoperative complications, such as wound infection or hernia formation, is higher because of the limited overview and the larger wound. Once the trocar is inserted, the required insufflation pressure is set.
- Very thin patients. The distance between the umbilicus and the main vessels is no more than 2 cm because the abdominal wall lies very close to the retroperitoneal situated structures. To prevent the wrong insertion angle, the inserting instrument has to be at a 45° angle to the back of the patient and, after elevating the abdominal wall, at a 90° angle to the wall surface. Before needle or trocar insertion, the anatomic route of the major vessels can be identified by palpating the pulse of the vessel track.
- Patients with previous laparoscopies or laparotomies. A history of previous abdominal operations significantly increases the risk for omental or bowel adhesions to the abdominal wall. In the case of scars or a history of previous operations, an alternative entry site or entry method has to be considered (Figures 5, 6).
- Patients with previous failed insufflations. Previous preperitoneal insufflation is associated with an artificial space that extends all the way to the peritoneal cavity and makes the entry for the Veress needle or for any other entry method difficult. An alternative insufflation site should be considered ( 6 ).
Open-entry technique
The open-entry technique was invented by Harrith Hasson in 1974 and is still used extensively worldwide as the direct alternative to the closed-entry technique. The open-entry technique is favored by general surgeons, although its advantages over other entry techniques cannot clearly be proven. This entry technique begins with opening the peritoneal cavity prior to CO2 insufflation. After performing a minilaparotomy in the subumbilical region, the optic trocar is placed intraperitoneally under sight (Figure 6) ( 6–16 ).
Advantages and disadvantages of open laparoscopy (the Hasson technique)
This technique supersedes the blind puncture of the abdominal cavity by either the Veress needle or a sharp trocar.
The open technique is less likely to cause major vessel injury, and if any injury does occur, it is easier to recognize and to repair at the same time. The technique has an equivalent risk of bowel and vessel injury as the closed technique; however, the operative process to dissect the different layers of the abdominal wall can be quite time consuming. Furthermore, open access leads to irritating air leaks because of the large incision, particularly in obese patients. Additionally, because of the larger skin incision and faster surgical preparation, the open technique is associated with a higher rate of wound infection. Several randomized trials and a Cochrane analysis have not indicated a significant safety advantage to either technique (7–11, 17–19).
Closed-entry technique
Veress needle technique and CO2 gas
To insert the Veress needle, the operating table needs to be in a horizontal position. The Trendelenburg tilt is performed after having created the pneumoperitoneum. The most common site for the Veress needle entry is the umbilical area. The skin incision in the lower part of the umbilicus is between 0.5 cm for the use of a 5 mm optic trocar and 1.5 cm for the use of a 10 mm optic trocar. The incision is made horizontally with an 11-scalpel blade after carefully lifting the skin underneath, so that the risk of damaging organs lying under the peritoneum in extremely thin patients is minimized. As the wall layers are at their thinnest at this level, a deep incision might enter the peritoneal cavity. Before incising the skin, it is recommended to palpate the aorta in its course and to identify the iliac bifurcation. This allows the abdomen to be inspected and palpated for any extraordinary masses ( 20 ).
All instruments need to be checked before use. The Veress needle needs to be tested to check that the valve springs and that the gas flow is between 6 and 8 mmHg. A sharp needle with a good spring action is necessary. Disposable needles fulfill these criteria. For the insertion of the primary trocar, the patient is still in the flat position. In this position, the insertion of the primary instrument at a 45° angle toward the uterus is associated with the lowest risk of damaging the major vessels running retroperitoneally downwards. Before inserting the instrument, the abdominal wall is lifted (Figure 8). The abdominal wall can either be lifted medially with one hand or with two hands on both sides depending on the obesity of the patient. In obese patients, the inserting angle is close to 90°, whereas in thin patients, the angle is close to 45°. If the first entry attempt fails, a second attempt is made before choosing an alternative entry site. Before placing the Veress needle, different safety checks should be performed to guarantee the lowest risk of complication:
Needle flow: To ensure flawless insertion of the Veress needle, the manometer should be set to a maximum resistance of 4–6 mm Hg with a gas flow rate of 1 L/min. If the resistance is high, there is some obstruction inside the Veress needle.
Palpation of aorta: If the abdominal aorta can be palpated directly below the umbilicus, the bifurcation must be situated further toward the lower pelvis. It cannot be injured by oblique insertion of the Veress needle. If the bifurcation is felt above the umbilicus, perpendicular insertion after lifting of the anterior abdominal wall is recommended.
Most times, two clicks can be heard. The first click is heard after perforation of the muscle fascia and the second click after perforation of the peritoneum. Three clicks might be heard above the linea arcuata. The proper needle placement is ensured by keeping the Veress needle between the thumb and index finger.
Aspiration test: Injection of 5–10 mL of normal saline solution results in negative aspiration if the Veress needle is correctly placed and blood-tinged aspirate or aspirate with intestinal contents if the needle is placed in a blood vessel or intestine
Hanging drop test and “fluid in flow”: With the Veress needle placed in the abdominal cavity, lifting the abdominal wall creates a negative intra-abdominal pressure. A drop of water is then positioned on the open end of the Veress needle. If the needle is correctly positioned, the water should disappear down the shaft. The drop is only sucked in if the intra-abdominal pressure is negative. For “fluid in flow,” a 5 mm syringe is filled with a saline solution. The piston is removed; the syringe is connected to the Veress cannula and by lifting the abdominal wall, the saline solution level drops rapidly as it enters into the free abdominal cavity.
-
Before insufflation with CO2 gas begins, the initial pressure must be below 9 mmHg to confirm the correctly placed needle. The initial gas pressure (<9 mmHg) reflects the correct intraperitoneal Veress needle placement, although this pressure is not a precise reflection of the intraperitoneal pressure. The Veress needle is connected to the insufflator and the pressure is measured continuously as the needle traverses the various layers of the abdominal wall. A pressure below 9 mmHg confirms the correct needle placement.
Any movement of the needle after placement must be avoided as this may convert a small needlepoint injury into a complex and threatening tear. After ensuring that the Veress needle has been positioned correctly, the insufflation of CO2 gas is started. CO2 gas is used because room air is not soluble in blood and may cause an air embolism if it is pumped into a blood vessel accidentally. Before starting the intra-abdominal insufflation, the gas hose is flushed with approximately 1 L of CO2 gas to purify any room air. The initial intra-abdominal insufflation pressure should not exceed 10 mmHg and is started with only 1 liter of CO2 gas flow per minute. Once a good gas flow and an appropriate pressure have been achieved, the influx can be raised so that 2–3 liters of CO2 gas can be insufflated per minute until 3–6 liters are insufflated, depending on the patient’s size and obesity.
-
After an insufflation volume of approximately 300 mL, the percussion of the liver region confirms the loss of liver dullness. This sign indicates the intra-abdominal insufflation and the distribution of the gas in the whole abdominal cavity.
After having created the pneumoperitoneum in the usual manner, the abdominal pressure should be built up to 18–25 mmHg before inserting the primary trocar as this maximizes the distension of the abdominal wall from all underlying structures. Once the layers of the abdominal wall are compressed, trocar incision becomes easy and the risk of injury minimal as the inflated distance between the abdominal wall and intra-abdominal structures further reduces the risk of damage. The distension pressure should be reduced to 12–15 mmHg for ventilation reasons once the trocar placement has been verified. During gas insufflation, symmetric distension of the lower abdomen and the disappearance of liver dullness can be observed. Once the insufflation pressure reaches 20–25 mmHg, the distension of the abdominal wall should be sufficient for safe insertion of the trocar. This can be tested by the:
-
Aspiration and Sounding test (after CO2 insufflation): CO2 is aspirated in a syringe containing 20 mL of normal saline solution and the result examined. When the tip lies free in the abdominal gas, CO2 bubbles are visible in the normal saline solution during respiration, indicating the position in the free abdominal cavity. When planning a Z insertion, the aspiration must be performed horizontally toward the right or left and caudally depending on the preparation.
The 5 mm trocar is then placed in a Z technique superficially and brought through the abdominal wall orthogonally.
-
Hiss phenomenon: After successful perforation of the anterior abdominal wall with the primary trocar, a soft hissing sound is produced as a result of negative pressure in the abdominal cavity.
The correct position of the trocar can be checked with a 5 mm optic in cases of small operations or the entry site can be dilated to 10 mm after validation that there are no remarkable adhesions. Panoramic viewing reveals any pathological changes in the vicinity of the abdomen, e. g., in the intestines, liver, gallbladder, or spleen (7, 11, 21–23).
It is recommended to use heated and humidified CO2 gas for insufflation. Various types of small machines can be attached to the electronic pneuautomatic to fulfill this purpose. The advantage of heated, moist CO2 gas can best be illustrated with an egg. If you spray the egg white and yellow yolk with a continuous flow of heated CO2 gas (37°C), they dry out. If you spray them with cold CO2 gas, they dry out. If you spray them with cold, moist CO2 gas, they dry out. However, if you spray them with heated, moist CO2 gas, they retain their original composition ( 24–26 ).
Entry under vision
Entering the abdominal cavity under vision is more popular among general surgeons than among gynecologists, although its use is increasing among gynecologists. Trocar insertion is performed with direct vision trocars that are available as single use or reusable instruments (Figure 6). Entry under vision can either be reached directly or after creation of pneumoperitoneum with the Veress needle.
The 5 or 10 mm laparoscope is placed directly into the trocar sheath so that the trocar end can be seen and followed. The trocar is then pushed with a twisting motion stepwise into the peritoneal cavity. Each layer of the abdominal wall is visualized and registered as the trocar is moved in.
Beside disposable trocars, there is one non-disposable port system for this technique. It features a reusable, stainless steel-threaded cannula with no sharp components and requires no trocar. This port system can be screwed in without any physical effort. Using the EndotipTM (Karl Storz; Tuttlingen, Germany), a 0° telescope is put into the trocar behind the aperture so that the whole circumference can be seen. The cannula is then rotated clockwise with low force with finger/wrist action. The trocar is inserted into the skin and fascia incision and held perpendicularly to the supine patient with the non-dominant hand. The cannula is then rotated clockwise with the dominant hand applying minimal downward force ( 27 ). Only a little force is needed to engage and transpose upwards the various layers as it burrows through the either hyperdistended or soft and flat abdominal wall. Under continuous gentle rotation of the optic trocar, it passes through the sequential layers subcutaneous fat, anterior rectus sheath, preperitoneal fat, and peritoneum. The different layers are easy to differentiate, and the peritoneum is pierced only after it has been ascertained that the abdominal wall is free of adherent bowel. (18, 23, 28, 29).
EndopathTM (Ethicon, Johnson & Johnson; New Brunswick, NJ, USA) has a cannula-integrated thread design that provides greater abdominal wall retention and minimal trocar slip-outs. It is compatible with a wide range of instruments (4.7–12.9 mm). The bladeless tip separates rather than cuts along tissue fibers, pushing tissues and vessels away. Visualization through a plexiglas cannula eliminates blind entry by enabling visualization of the tissue layers during insertion. The design requires a lower peak instrument insertion and extraction force.
Both methods have in common a laparoscope that is inserted into the trocar, and once the trocar has penetrated the subcutis, it advances through the abdominal wall layers stepwise under permanent monitoring. By this method, bowel damage or blood vessel injury may be avoided.
Vaginal instruments
Uterus manipulator
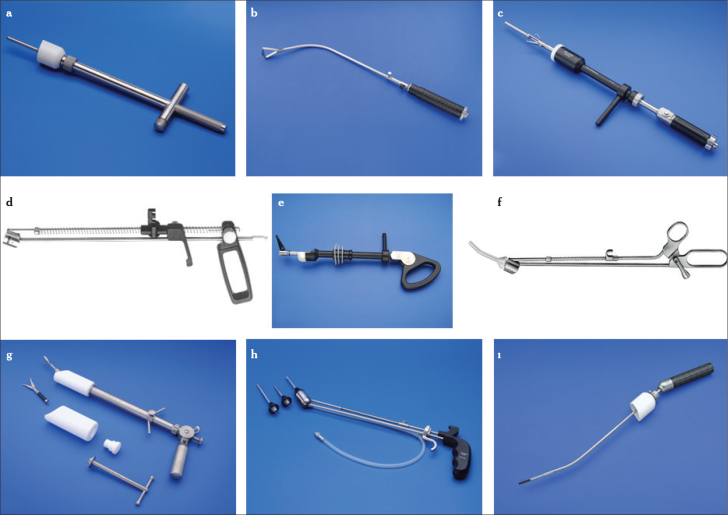
There are a number of different uterine manipulators (Figure 9). The use of a uterine manipulator is controversial. The auxiliary function of manipulating the uterus during the procedure is not required for small operations with a good operative access, e.g., adnexal surgery. The indication for the use of a uterine manipulator has to be taken carefully as its use is associated with a certain intraoperative risk for injury of the cervix, uterine cavity, and other neighboring structures. On the other hand, the proper application of a uterine manipulator helps to improve vision and therefore provides better surgical preconditions ( 6 ).
Figure 9.
a-ı. Hohl manipulator (Storz) (a), Dionisi uterine manipulator (Storz) (b), Mangeshikar uterine manipulator (Storz) (c), RfQ uterine manipulator (d), Clermont-Ferrand uterine manipulator (Storz) (e), Braun uterine manipulator (f), Koninckx uterine manipulator (Storz) (g), Tintara uterine manipulator (Storz) (h), Donnez uterine manipulator (Storz) (ı)
Advancements in laparoscopic entries
Termination of the laparoscopic procedure
After completion of the operation, the laparoscope should be used to check on the way out that there has not been a through-and-through injury of bowel adherent under the umbilicus by visual control during port and laparoscope removal. All ancillary ports are removed under direct vision to ensure that there is no unrecognized hemorrhage and if there is one, it can be treated immediately. Prior to the removal of the instruments, a last inspection of the abdominal cavity is essential to ensure the absence of bleeding and retroperitoneal hematoma. Also, the area under the optic trocar has to be inspected for any unrecognized bleeding from this place of insertion. Once the working trocar on the left and possibly in the midline are taken out, the peritoneal gap is coagulated from the trocar in the right lower abdomen. The peritoneal gap of this trocar is coagulated bipolarly after the trocar has already been taken out and the gap is closed on the way out. Fascial incisions of the ancillary trocars larger than 5 mm should be sutured to prevent hernia formation. A single stitch with an absorbable polyfilar suture 3-0 is applied under direct view using the pneumoperitoneum and the laparoscope to prevent peritoneal involvement or even injury of the omentum or bowel. At the end of the operation, the patient is returned to the horizontal position to avoid brisk vascular changes. The pneumoperitoneum is then released slowly by opening the inserting valve. The laparoscope is taken out in the horizontal position to avoid a possible aspiration of air, which is responsible for shoulder pain in the postoperative period. Before removing the optic trocar, reinsertion of the laparoscope and removal of the trocar under sight are performed so that the stepwise closure of the abdominal wall in a reverse Z technique is guaranteed. Thus, the fascial incision does not have to be sutured as it is functionally closed (30, 31).
A certain amount of gas or irrigation fluid remaining in the abdominal cavity can be tolerated. This gas may irritate the peritoneum and the patients may experience discomfort and minor pain in the shoulder area for up to 2 weeks after the operation (6, 7, 32).
Acknowledgements
We thank Mathias Podlovics for all the graphic designs. We also thank Dawn Rüther for editing the manuscript and Thoralf Schollmeyer for his valuable contributions to the manuscript.
Footnotes
Peer-review: Externally peer-reviewed.
Author Contributions: Concept - I.A., L.M.; Design - I.A., M.E., L.M.; Supervision - N.M., G.N.; Resource - I.A., N.M.; Materials - M.E., L.M.; Data Collection and/or Processing - M.E., N.M., G.N.; Analysis and/or Interpretation - I.A., G.N., N.M.; Literature Search - I.A., L.M., M.E.; Writing - I.A., M.E.; Critical Reviews - G.N., N.M., M.E.
Conflict of Interest: No conflict of interest was declared by the authors.
Financial Disclosure: The authors declared that this study has received no financial support.
References
- 1.Alkatout I, Bojahr B, Dittmann L, Warneke V, Mettler L, Jonat W, Schollmeyer T. Precarious preoperative diagnostics and hints for the laparoscopic excision of uterine adenomatoid tumors: two exemplary cases and literature review. Fertil Steril. 2011;95:1119 e5–8. doi: 10.1016/j.fertnstert.2010.10.017. [DOI] [PubMed] [Google Scholar]
- 2.Alkatout I, Honemeyer U, Strauss A, Tinelli A, Malvasi A, Jonat W, et al. Clinical diagnosis and treatment of ectopic pregnancy. Obstet Gynecol Surv. 2013;68:571–81. doi: 10.1097/OGX.0b013e31829cdbeb. http://dx.doi.org/10.1097/OGX.0b013e31829cdbeb. [DOI] [PubMed] [Google Scholar]
- 3.Alkatout I, Stuhlmann-Laeisz C, Mettler L, Jonat W, Schollmeyer T. Organ-preserving management of ovarian pregnancies by laparoscopic approach. Fertil Steril. 2011;95:2467–70. e1–2. doi: 10.1016/j.fertnstert.2010.12.060. [DOI] [PubMed] [Google Scholar]
- 4.Levine R. Instrumentation and equipment. In: Pasic R, Levine R, editors. A practical Manual of Laparoscopy: A Clinical Cookbook. Abingdon, UK: Informa Healthcare; 2007. pp. 19–38. http://dx.doi.org/10.3109/9781439804315. [Google Scholar]
- 5.Alkatout I, Mettler L, Beteta C, Hedderich J, Jonat W, Schollmeyer T, Salmassi A. Combined surgical and hormone therapy for endometriosis is the most effective treatment: prospective, randomized, controlled trial. J Minim Invasive Gynecol. 2013;20:473–81. doi: 10.1016/j.jmig.2013.01.019. http://dx.doi.org/10.1016/j.jmig.2013.01.019. [DOI] [PubMed] [Google Scholar]
- 6.Pasic R. Creation of pneumoperitoneum and trocar insertion techniques. In: Pasic R, Levine R, editors. A Practical Manual of Laparoscopy: A Clinical Cookbook. Abingdon, UK: Informa Healthcare; 2007. pp. 57–74. http://dx.doi.org/10.3109/9781439804315-6. [Google Scholar]
- 7.RCOG Green-top Guideline. Preventing entry-related gynaecological laparoscopic injuries. 2008;49:1–10. [Google Scholar]
- 8.Cogliandolo A, Manganaro T, Saitta FP, Micali B. Blind versus open approach to laparoscopic cholecystectomy: a randomized study. Surg Laparosc Endosc. 1998;8:353–5. http://dx.doi.org/10.1097/00019509-199810000-00006. [PubMed] [Google Scholar]
- 9.Hasson HM. Open laparoscopy: a report of 150 cases. J Reprod Med. 1974;12:234–8. [PubMed] [Google Scholar]
- 10.Hasson HM, Rotman C, Rana N, Kumari NA. Open laparoscopy: 29-year experience. Obstet Gynecol. 2000;96:763–6. doi: 10.1016/s0029-7844(00)01026-7. http://dx.doi.org/10.1016/S0029-7844(00)01026-7. [DOI] [PubMed] [Google Scholar]
- 11.Ballem RV, Rudomanski J. Techniques of pneumoperitoneum. Surg Laparosc Endosc. 1993;3:42–3. [PubMed] [Google Scholar]
- 12.Gunenc MZ, Yesildaglar N, Bingol B, Onalan G, Tabak S, Gokmen B. The safety and efficacy of direct trocar insertion with elevation of the rectus sheath instead of the skin for pneumoperitoneum. Surg Laparosc Endosc Percutan Tech. 2005;15:80–1. doi: 10.1097/01.sle.0000162106.95875.b9. http://dx.doi.org/10.1097/01.sle.0000162106.95875.b9. [DOI] [PubMed] [Google Scholar]
- 13.Jansen FW, Kolkman W, Bakkum EA, de Kroon CD, Trimbos-Kemper TC, Trimbos JB. Complications of laparoscopy: an inquiry about closed- versus open-entry technique. Am J Obstet Gynecol. 2004;190:634–8. doi: 10.1016/j.ajog.2003.09.035. http://dx.doi.org/10.1016/j.ajog.2003.09.035. [DOI] [PubMed] [Google Scholar]
- 14.Magrina JF. Complications of laparoscopic surgery. Clin Obstet Gynecol. 2002;45:469–80. doi: 10.1097/00003081-200206000-00018. http://dx.doi.org/10.1097/00003081-200206000-00018. [DOI] [PubMed] [Google Scholar]
- 15.Semm K. Cutting versus conical tip designs. Endosc Surg Allied Technol. 1995;3:39–47. [PubMed] [Google Scholar]
- 16.Vilos GA, Ternamian A, Dempster J, Laberge PY The Society of Obstetricians and Gynaecologists of Canada. Laparoscopic entry: a review of techniques, technologies, and complications. J Obstet Gynaecol Can. 2007;29:433–65. doi: 10.1016/S1701-2163(16)35496-2. [DOI] [PubMed] [Google Scholar]
- 17.Bemelman WA, Dunker MS, Busch OR, Den Boer KT, de Wit LT, Gouma DJ. Efficacy of establishment of pneumoperitoneum with the Veress needle, Hasson trocar, and modified blunt trocar (TrocDoc): a randomized study. J Laparoendosc Adv Surg Tech A. 2000;10:325–30. doi: 10.1089/lap.2000.10.325. http://dx.doi.org/10.1089/lap.2000.10.325. [DOI] [PubMed] [Google Scholar]
- 18.Berch BR, Torquati A, Lutfi RE, Richards WO. Experience with the optical access trocar for safe and rapid entry in the performance of laparoscopic gastric bypass. Surg Endosc. 2006;20:1238–41. doi: 10.1007/s00464-005-0188-4. http://dx.doi.org/10.1007/s00464-005-0188-4. [DOI] [PubMed] [Google Scholar]
- 19.Garry R. Laparoscopic surgery. Best Pract Res Clin Obstet Gynaecol. 2006;20:89–104. doi: 10.1016/j.bpobgyn.2005.10.003. http://dx.doi.org/10.1016/j.bpobgyn.2005.10.003. [DOI] [PubMed] [Google Scholar]
- 20.Veress J. Neues Instrument zur Ausführung von Brust- und Bauchpunktionen und Pneumothoraxbehandlung. Deutsche medizinische Wochenschrift. 1938;64:1480–1. http://dx.doi.org/10.1055/s-0028-1123401. [Google Scholar]
- 21.Vilos GA, Vilos AG. Safe laparoscopic entry guided by Veress needle CO2 insufflation pressure. J Am Assoc Gynecol Laparosc. 2003;10:415–20. http://dx.doi.org/10.1016/S1074-3804(05)60277-0. [PubMed] [Google Scholar]
- 22.Teoh B, Sen R, Abbott J. An evaluation of four tests used to ascertain Veres needle placement at closed laparoscopy. J Minim Invasive Gynecol. 2005;12:153–8. doi: 10.1016/j.jmig.2005.01.011. http://dx.doi.org/10.1016/j.jmig.2005.01.011. [DOI] [PubMed] [Google Scholar]
- 23.Vilos GA, Vilos AG, Abu-Rafea B, Hollett-Caines J, Nikkhah-Abyaneh Z, Edris F. Three simple steps during closed laparoscopic entry may minimize major injuries. Surg Endosc. 2009;23:758–64. doi: 10.1007/s00464-008-0060-4. http://dx.doi.org/10.1007/s00464-008-0060-4. [DOI] [PubMed] [Google Scholar]
- 24.Sammour T, Kahokehr A, Hill AG. Meta-analysis of the effect of warm humidified insufflation on pain after laparoscopy. Br J Surg. 2008;95:950–6. doi: 10.1002/bjs.6304. http://dx.doi.org/10.1002/bjs.6304. [DOI] [PubMed] [Google Scholar]
- 25.Peng Y, Zheng M, Ye Q, Chen X, Yu B, Liu B. Heated and humidified CO2 prevents hypothermia, peritoneal injury, and intra-abdominal adhesions during prolonged laparoscopic insufflations. J Surg Res. 2009;151:40–7. doi: 10.1016/j.jss.2008.03.039. http://dx.doi.org/10.1016/j.jss.2008.03.039. [DOI] [PubMed] [Google Scholar]
- 26.Ott DE. Laparoscopy and tribology: the effect of laparoscopic gas on peritoneal fluid. J Am Assoc Gynecol Laparosc. 2001;8:117–23. doi: 10.1016/s1074-3804(05)60560-9. http://dx.doi.org/10.1016/S1074-3804(05)60560-9. [DOI] [PubMed] [Google Scholar]
- 27.Ternamian AM. Laparoscopy without trocars. Surg Endosc. 1997;11:815–8. doi: 10.1007/s004649900461. http://dx.doi.org/10.1007/s004649900461. [DOI] [PubMed] [Google Scholar]
- 28.Ternamian AM, Vilos GA, Vilos AG, Abu-Rafea B, Tyrwhitt J, MacLeod NT. Laparoscopic peritoneal entry with the reusable threaded visual cannula. J Minim Invasive Gynecol. 2010;17:461–7. doi: 10.1016/j.jmig.2010.03.001. http://dx.doi.org/10.1016/j.jmig.2010.03.001. [DOI] [PubMed] [Google Scholar]
- 29.Ternamian AM, Deitel M. Endoscopic threaded imaging port (EndoTIP) for laparoscopy: experience with different body weights. Obes Surg. 1999;9:44–7. doi: 10.1381/096089299765553746. http://dx.doi.org/10.1381/096089299765553746. [DOI] [PubMed] [Google Scholar]
- 30.Alkatout I, Schollmeyer T, Hawaldar NA, Sharma N, Mettler L. Principles and safety measures of electrosurgery in laparoscopy. JSLS. 2012;16:130–9. doi: 10.4293/108680812X13291597716348. http://dx.doi.org/10.4293/108680812X13291597716348. [DOI] [PMC free article] [PubMed] [Google Scholar]
- 31.Mettler L, Clevin L, Ternamian A, Puntambekar S, Schollmeyer T, Alkatout I. The past, present and future of minimally invasive endoscopy in gynecology: a review and speculative outlook. Minim Invasive Ther Allied Technol. 2013;22:210–26. doi: 10.3109/13645706.2013.823451. http://dx.doi.org/10.3109/13645706.2013.823451. [DOI] [PubMed] [Google Scholar]
- 32.Palmer R. Safety in laparoscopy. J Reprod Med. 1974;13:1–5. [PubMed] [Google Scholar]


