Summary
Electroporation has been a widely used tool to introduce DNA plasmids or RNA oligos into cultured cells, and recently in vivo into chick or mouse embryos. Here we report a rapid and efficient approach to transfect adult mouse dorsal root ganglion (DRG) neurons in vivo with precise spatiotemporal control via electroporation. This approach will allow both gain- and loss-of-function experiments in vivo to study the function of adult sensory neurons, such as sensory axon regeneration.
Keywords: In vivo electroporation, Peripheral nervous system, Axon regeneration, Dorsal root ganglion, Adult mouse sensory neurons
1. Introduction
Genetic manipulation of adult neurons is particularly useful for studying genes that also play important roles during development because traditional knockout approach usually leads to early embryonic lethality or compensatory effects. The inducible transgenic approach, in which the gene of interest is acutely deleted in the adult stage, can significantly reduce the likelihood of compensatory gene expression changes or developmental defects. Another approach to specifically manipulate gene expression in adult neurons is viral vector-mediated gene targeting. However, both approaches involve time-consuming and expensive procedures, such as many rounds of animal crossing and tedious virus purification. Electroporation has become a routine and powerful technique to acutely manipulate gene expression in neurons both in vitro and in vivo. Gene delivery into embryonic neurons in vivo using electroporation (1) has greatly benefitted the study of gene functions during neural development. Similar approaches to deliver genes into certain postnatal or adult neurons have also been developed (2–4). In axon regeneration studies, mouse DRG neurons have becoming a valuable model (5). Each DRG neuron extends a single unipolar axon that split into two branches: one branch extends to innervate the periphery targets (peripheral branch) and the other one goes up to enter the spinal cord (central branch). As a result, DRG neurons can be used for studying axon regeneration after either peripheral nerve or spinal cord injuries. To date, however, we know very little about the signaling pathways by which axon regeneration of DRG neurons is regulated in vivo because it requires genetic modulation of multiple genes simultaneously in adult DRG neurons. We recently have developed a novel in vivo electroporation technique that allows specific manipulation of multiple gene expression in adult DRG neurons simultaneously (6), thus providing a potential useful tool for in vivo dissection of pathways regulating mammalian axon regeneration. Using such approach, we have elucidated the important roles of several genes, including cytoskeletal proteins (7) and epigenetic modulators (8) in regulation of mouse sensory axon regeneration. Here, we provide a detailed description of such in vivo electroporation approach.
2. Materials
2.1 Animals and Surgery materials
Animals: adult female CF-1 mice (8–10-week-old, weighing 30 to 35 g) from Charles River Breeding laboratories are used for the experiments. The animals are housed in small cages with sawdust flooring and maintained in a controlled 12-hour light-dark cycle. The animals have access to food and water ad libitum. All animal experiments should be performed in accordance with the animal protocol approved by the Institutional Animal Care and Use Committee.
Stereotaxic apparatus: stereotaxic frame for rats (Model 900, David Kopf Instruments, and UK) equipped with a mouse adaptor (Kopf Mouse Adaptor from 2Biol, Varese, Italy). We recommend placing the stereotaxic frame on a stable table to increase precision during surgery.
Surgery materials: 70% alcohol, sterilized cotton swab sticks, sterilized Gauze, surgery forceps, surgery scissors, bone rongeurs, small surgical retractors, small scalpel and scalpel blades, 30-G needles, 1.0-mL disposable syringes for intraperitoneal injection (i.p.), fur remove clipper (miniARCO, Kent Scientific Coporation), and a surgery microscope (or a stereo dissection microscope).
2.2 Anesthetic solution
Mix 1ml Ketamine (conc. 100mg/ml) and 0.1ml Xylazine (conc. 100mg/ml) with 8.9ml normal saline (0.9%) or phosphate buffered saline (PBS). Store the mixed solution at 4°C. Before each use, filter the solution with 0.22-μm syringe filters (Millex-HP, Millipore).
2.3 Plasmid Preparation
Plasmids are prepared using the commercial available Maxiprep Kit (e.g. Invitrogen Purelink) according to the manufacturer’s protocol. Plasmid DNAs (e.g. pCMV-EGFP-N1) are diluted in the sterile, distilled, and deionized water with a final concentration of 2.0–4.0 μg/μl. To help visualize the DNA/RNA solution, add 10% fast green dye (from 1% stock).
2.4 Microinjection and electroporation equipment
The glass micropipette used for the microinjection is made by pulling the capillary glass (10 cm, standard wall, Sutter Instrument) with a micropipette puller (e.g. Sutter Instrument). A microelectrode holder (with port for air) is used to fix the micropipette. The Picospritzer II (Parker Inc.) is used for the injection. The BTX ECM830 Square Wave Electroporation System is used for the electroporation. The electrode is a tweezer-like electrode (Ø1.2 mm) custom made by Harvard Apparatus (see ref. 6).
2.5 Preparation of microinjection glass pipette
Pull the capillary glass tube using the micropipette puller.
Pinch off the tip of the pulled capillary glass pipette with jeweler’s #5 forceps to generate an opening of about 80 μm in external diameter.
Sterilize the glass pipette under UV light on a clean bench for about 20–30 min.
2.6 Perfusion solution
Add 40g of paraformaldehyde to 800ml of water and heat to 60°C while stirring to dissolve the paraformaldehyde. Cool off the solution and store at 4°C before use.
3. Method
3.1 Neurosurgery to expose the dorsal root ganglion
Anesthetize the mouse by intra-peritoneal injection of the previously prepared anesthetic solution of katamine (100 mg/kg) and xylazine (10 mg/kg).
Shave the animal’s back fur using the fur clipper and disinfect the back skin with 70% alcohol (Fig. 1).
Put the mouse on heated blanket (35.0 °C) and monitor the rectal temperature with a temperature probe.
To test the depth of animal’s consciousness, pinch the toes and tail and observe the animal for a response.
Fix the animal on the stereotaxic frame and in the mouse adapter.
Make a 3-cm-long skin incision in the midline of the back using a sharp scalpel blade, following the rostrocaudal direction.
Dissect free the paraspinous muscles, such as the musculus multifidus and the musculus longissimus lumborum, from the L4–L5 spinous processes, and expose the transverse processes by scraping off attached connective tissue (Fig. 2).
Remove the processus accessorius and parts of the processus transversus under a surgery microscope with micro-rongeurs to visualize the dorsal side of the left L4 and L5 DRGs.
Stop any bleeding with sterilized cotton Swab sticks and gauze.
Figure 1. Preparation of the skin.
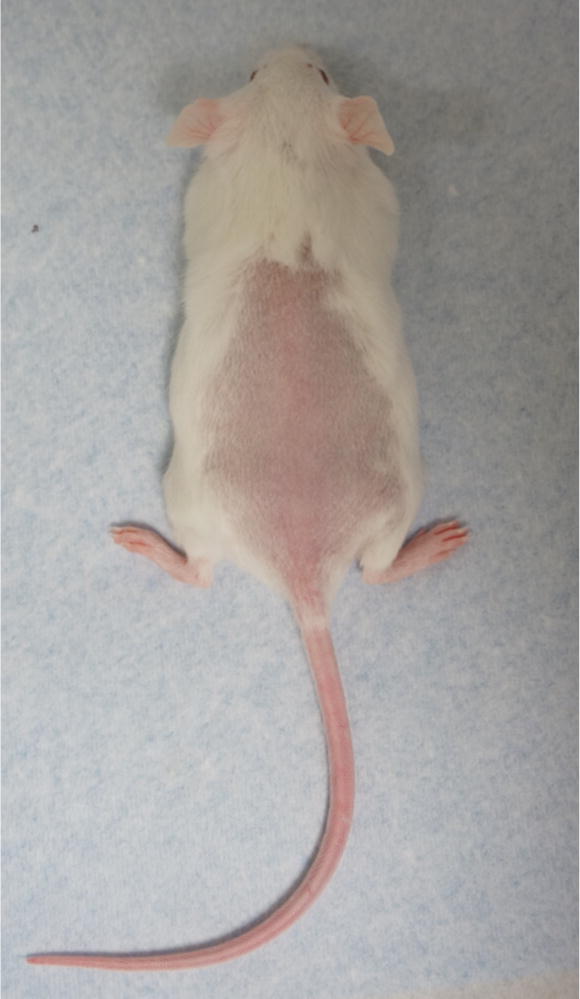
Shave the back skin to remove the fur.
Figure 2. Exposure of the vertebrate.
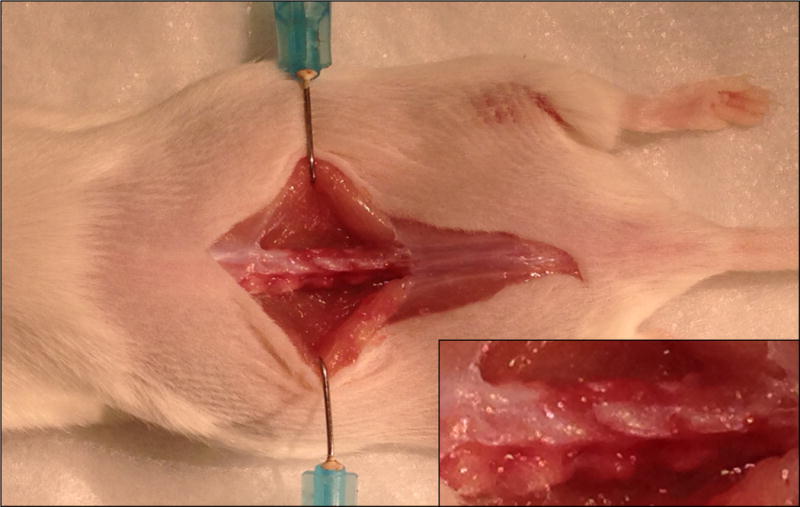
Dissect muscles to expose the L4–L5 vertebrates.
3.2 Microinjection
Load the DNA plasmid or RNA oligo solution (2–4 μl) into the pulled capillary micropipette with a micropipette loading tip.
Fix the micropipette onto a microelectrode holder (with port for air) and connect it to the Picospritzer.
Under the surgery microscope, carefully insert the tip of the micropipette into the DRG with a 45-degree angle.
Gradually inject 1.0 μl solution of DNA plasmids or RNA oligos into the DRG using the Picospritzer (Pressure: 30 psi, duration: 8 msec) (Fig. 3).
Figure 3. microinjection of plasmid.
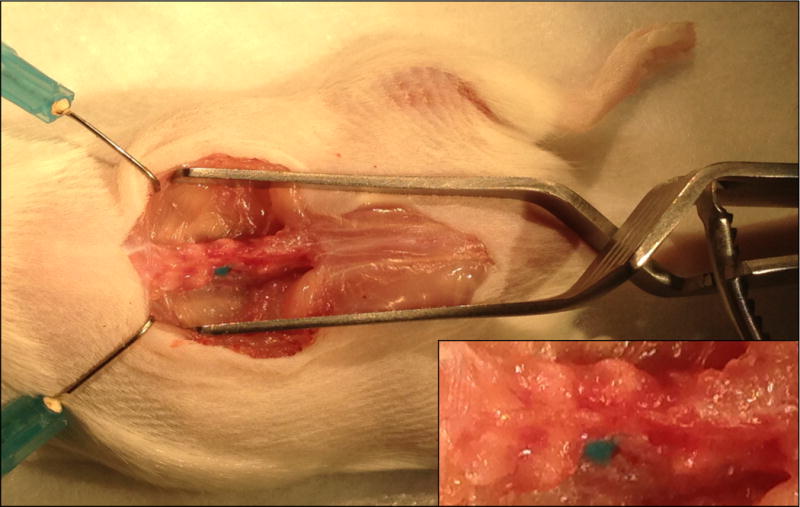
1.0 μl solution of DNA plasmids or RNA oligos is gradually injected into the DRG using the air pressure generated by the Picospritzer. Note the round DRG filled with the fast green dye.
3.3 In vivo electroporation
Add a few drops of PBS solution on the surface of the electrode.
Clean up any bleeding with sterilized cotton swab sticks and fill the surgery site with sterile saline to prevent desiccation.
Gently pinch the target DRG with the electrode and apply five square electric pulses with the BTX ECM830 system (15 ms pulses at 35 V with 950 ms interval) (Fig. 4).
Carefully close the muscle and skin separately with 5–0 nylon sutures. Place the mouse on a heated blanket (35.0 °C) until the animal completely recovers from anesthesia.
Figure. 4. in vivo electroporation.
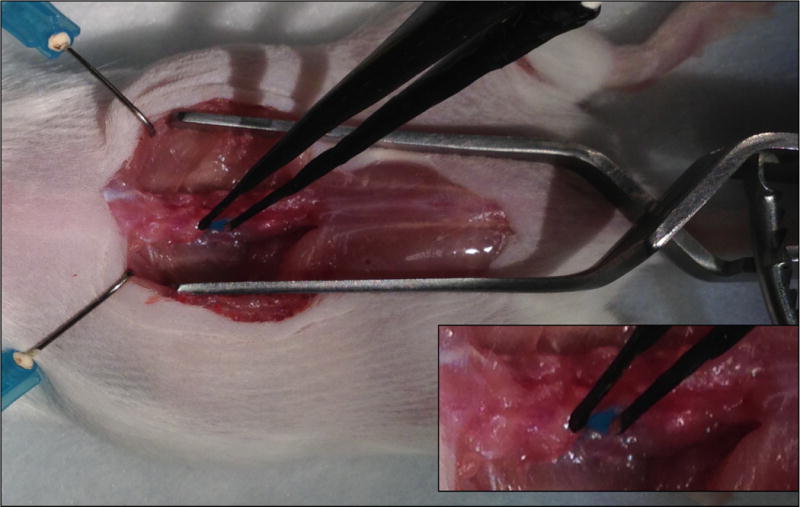
Clasp the DRG with the electrodes and deliver the electric pulses.
3.4 Sciatic nerve crush
A few days (depending on the experimental design) after the electroporation, anesthetize the mouse again with intra-peritoneal injection of the anesthetic solution of katamine (100 mg/kg) and xylazine (10 mg/kg).
Expose the sciatic nerve at the sciatic notch by a small incision.
Crush the nerve with jeweler’s #5 forceps for 15 seconds twice and mark the crush site with a 10–0 nylon epineural suture.
Close the skin with 5–0 nylon sutures.
Place the mouse on a heated blanket (35.0 °C) until the animal completely recovers from anesthesia.
3.5 DRG and sciatic nerve harvest
A few days after the sciatic nerve crush (depending on the experimental design) terminally anesthetize the mouse with anesthetic solution of katamine (100 mg/kg) and xylazine (10 mg/kg).
Transcardially perfuse the mouse with PBS (pH 7.4) followed by ice-cold 4% paraformaldehyde (PFA) in PBS.
Under the dissecting microscope, carefully dissect out the DRG together with the whole sciatic nerve were and post fix the tissues overnight in 4% PFA at 4°C.
3.6 Imaging and measuring the fluorescence labeled sensory axons
Place the DRG or the sciatic nerve between 2 glass slides and flatten the whole mounted tissue with pressure.
Place the flattened tissues under an automated epifluorescent microscope equipped with the mosaic acquisition and processing capacity. An alternative approach is to take multiple overlapping images manually and stitch the images together using the Mosaic plug-in of the ImageJ program.
Take the images of the DRG (Fig. 5A) or the sciatic nerve (Fig. 5B) with a CCD camera and assemble the images.
Manually trace all identifiable fluoresecent-labeled axons in the sciatic nerve from the crush site (marked with the 10–0 epineural suture) to the distal growth cone to measure the length of regenerating axons (Fig. 6).
Figure 5. In vivo electroporation.
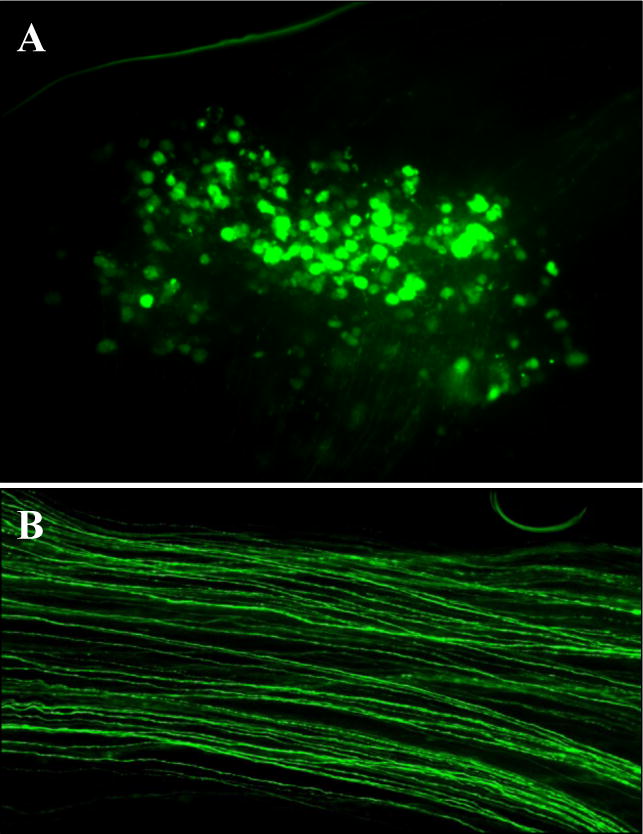
Efficient EGFP transfection of adult DRG neurons (A) and sciatic nerve axons (B).
Figure 6. Peripheral axon regeneration.
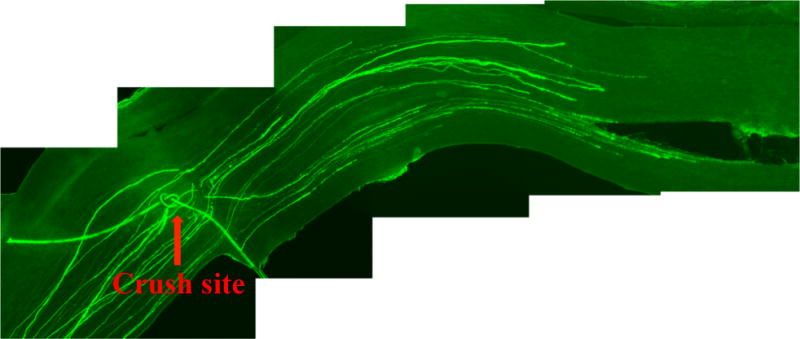
A representative image of regenerating axons growing from crush site (marked with the epineural suture).
Acknowledgments
This work was supported by grants to F.Q.Z. from NIH (R01NS064288) and the Craig H. Neilsen Foundation.
Footnotes
When making the micropipette for injection, pinch the tip of pulled capillary glass pipette with a 30–45 degree angle to get a sharp end, which makes it easier for the micropipette to penetrate into the DRG.
For accurate identification of the L4/L5 DRG, the superior edge of the iliac crest is a very useful anatomic landmark. Usually, the transverse process of L5 vertebrate is located around the superior edge of the iliac crest.
When surgically exposing the DRG, the processus accessorius and parts of the processus transversus need to carefully removed with the micro-rongeurs to avoid any damage to the spinal cord, DRG and the nerve tissue.
Before microinjection, it is very important to stop any bleeding with cotton swab sticks, as the bleeding can affect precision of the microinjection.
During microinjection, insert the tip of the glass micropipette into the DRG with a 45-degree angle, which will help the diffusion of the injected solution inside the DRG.
The successful microinjection is the key point of the entire procedure. To increase the precision of the microinjection, add fast green dye into the DNA/RNA solution to visualize the injection result. A successful injection often shows a clearly defined round-shaped DRG.
During microinjection, if the injected solution (colored with fast green) is seen in other regions, adjust the position of the pipette tip by pulling back or penetrating a little further until the solution can be injected into the DRG. Usually it takes multiple injections at different sites to fill the DRG.
Make sure the contact surfaces of the electrode and DRG are filled with PBS, which will increase transduction of the electric current. A successful electroporation usually result in generation of gas bubbles around the DRG tissue.
For analyzing sciatic nerve regeneration, accurate identification of the crush site is crucial. Sometime the epineural suture marking the crush site may fall off during the dissection process to remove the sciatic nerve. It is important to re-mark the crush site with suture as soon as possible while the crush site can still be identified by other visible markers.
Although the flattened nerve can be imaged by the epifluorescent microscope, some axons deep in the tissue may not be identified. Flip the slide to image both sides of the nerve may help identify more labeled axons. Alternatively, confocal microscopy may be used to generate a 3D reconstruction of the nerve.
Disclosures: We have nothing to disclose.
References
- 1.Saito T, Nakatsuji N. Efficient gene transfer into the embryonic mouse brain using in vivo electroporation. Dev Biol. 2001;240(1):237–246. doi: 10.1006/dbio.2001.0439. [DOI] [PubMed] [Google Scholar]
- 2.Matsuda T, Cepko CL. Controlled expression of transgenes introduced by in vivo electroporation. Proc Natl Acad Sci U S A. 2007;104(3):1027–1032. doi: 10.1073/pnas.0610155104. [DOI] [PMC free article] [PubMed] [Google Scholar]
- 3.Barnabe-Heider F, et al. Genetic manipulation of adult mouse neurogenic niches by in vivo electroporation. Nat Methods. 2008;5(2):189–196. doi: 10.1038/nmeth.1174. [DOI] [PubMed] [Google Scholar]
- 4.Konishi Y, Stegmuller J, Matsuda T, Bonni S, Bonni A. Cdh1-APC controls axonal growth and patterning in the mammalian brain. Science. 2004;303(5660):1026–1030. doi: 10.1126/science.1093712. [DOI] [PubMed] [Google Scholar]
- 5.Saijilafu Zhang BY, Zhou FQ. Signaling pathways that regulate axon regeneration. Neurosci Bull. 2013 doi: 10.1007/s12264-013-1357-4. [DOI] [PMC free article] [PubMed] [Google Scholar]
- 6.Saijilafu, Hur EM, Zhou FQ. Genetic dissection of axon regeneration via in vivo electroporation of adult mouse sensory neurons. Nat Commun. 2011;2:543. doi: 10.1038/ncomms1568. [DOI] [PMC free article] [PubMed] [Google Scholar]
- 7.Hur EM, et al. GSK3 controls axon growth via CLASP-mediated regulation of growth cone microtubules. Genes Dev. 2011;25(18):1968–1981. doi: 10.1101/gad.17015911. [DOI] [PMC free article] [PubMed] [Google Scholar]
- 8.Liu CM, et al. MicroRNA-138 and SIRT1 form a mutual negative feedback loop to regulate mammalian axon regeneration. Genes Dev. 2013;27(13):1473–1483. doi: 10.1101/gad.209619.112. [DOI] [PMC free article] [PubMed] [Google Scholar]


