Abstract
Preparing whole mounts of the mouse small intestine and colon for subsequent analysis or quantification can be time consuming and difficult. We describe the use of a simple device to cut and ‘roll’ mouse intestines to rapidly prepare whole mount preparations of superior and uniform quality to that which can be achieved by hand. The device comprises a base that holds 4 stainless steel rods and a top, which acts a cutting guide. The rods are inserted into the lumen of the small intestine [divided into thirds] and the colon. The rods and samples are then placed over a piece of filter paper or card into the holding slots in the base of the device. The top of the device is then positioned and serves as a cutting guide. The two angled sections in the center of the top piece are used to guide a knife or scalpel and cut the intestines longitudinally on the top of the rods. Once the intestinal sections have been cut, the top is removed and the card, tissue and rods gently removed from the device and placed on the bench. The rods are then gently rolled sideways to flatten and stick the intestinal segments onto the underlying piece of filter paper or card. The final preparation can then be examined or fixed and stored for later analysis. The preparations are invaluable for the study of intestinal changes in normal or genetically modified mouse models. The preparations have been used for the study and quantification of the effects of inflammation (colitis), damage, pre-cancerous lesions (aberrant crypt foci (ACFs) and mucin depleted foci (MDFs)) and polyps or tumors.
Keywords: Medicine, Issue 104, Mouse, murine, intestine, gastrointestinal, colon, whole mount, en face, aberrant, crypts, neoplasia, cancer, colitis, polyp
Introduction
The mouse and the genetically modified mouse1-3 are an invaluable model for the study of various pathologies especially cancer and its relationship to inflammation in the gastrointestinal tract. This often requires the preparation of whole mounts of the small intestine and/or colon.
The preparation of whole mounts can be done with a precision pair of offset scissors but it can take about 20 min per mouse4. This is not very practical for comparative studies, which require a significant amount of mice (say 10 per group subject to statistical analysis). In addition, the length of time taken increases the risk of tissue degradation. An attempt to alleviate this problem led to the trial of various cutting preparation aids. The first was based on a series of metal plates, with cutting groves, but the plates obscured the tissue and the cutting was thus difficult to control.
A conventional six-sided pencil finally provided inspiration for the cutting device, as we could then see how a half pencil shape would make a good guide for a scalpel (Figure 1). This resulted in a design for a frame with four cutting guides5. The effectiveness of this device was dramatic as the preparations in Figure 4 demonstrate the difference between the scissor preparation and the device preparation.
The tops of the original devices was constructed from several pieces of metal, but later ones, and the current model was machined out of a solid piece of Duralumin. The base was machined out of highest quality high-density resin.
The device has proved to be of great use for the preparation of whole mounts of mouse intestine as it greatly speeds up and improves the quality and consistency of the preparations, which have a wide range of applications.
Protocol
The various experimental procedures and the humane euthanasia are approved by the host institutions ethical committee and by the appropriate regulatory bodies. Euthanasia is normally achieved using CO2 asphyxiation followed by cervical dislocation.
1. Device
Machine the main portion of the base of the device from out of a solid block of high-density acetyl resin, as described in this manuscript. At each end create 3 mm high-elevated strips, and part machine out of these 2.5 mm groves to take the rods (see Figure 2 and Figure 3).
Make rods from a 2.4 mm diameter stainless steel with rounded-off ends. NOTE: The main frame of the lid was machined out of Duralumin plate. A limited number of finished devices are available from Dr. Goodlad.
2. Use of the Device
Dissect out the small intestine and colon from the abdominal cavity using scissors and gloved fingers. Remove the mesentery by holding it with curved forceps and gently pulling it away from the intestine.
Rinse the intestines with cold phosphate buffered saline (PBS, pH 7.4) using a Gilson type pipette tip, which had been cut down at its wider end so that it can fit onto a 10 or 20 ml luer fitting plastic syringe.
Lay out the small bowel (SB) on to a sheet of paper towel and divide into three equal sections in length (proximal, mid, and distal – SB1, SB2 and SB3) using scissors. Remove the cecum and lay out the colon.
Make several very small cuts into the intestinal segments with scissors to allow the fluid to escape and place a sheet of paper towel over the intestines and gently run a finger over the preparations to squeeze out the fluid and blot dry.
Lift the sections and insert the stainless steel rods that were previously wetted by soaking in a beaker of phosphate buffered saline. NOTE: The intestine can be inverted if so desired (turned inside out).
Label a piece of card or filter paper cut to size to fit into the base of the device. Pencil is best, as it is unaffected by virtually all solutions. Autopsy date, experimental code and animal identification number are suggested.
Place the card or filter paper into the base of the device. Insert the rods and intestines into the slots in the base of the device. Make sure the proximal end of the segments is positioned in a standardized manner. The proximal ends should be near the card labels.
Place the top piece of the device over the base. Use the angled bars to guide a scalpel blade to longitudinally cut the sections. NOTE: It helps if the tissue is gently and carefully held with a finger to ensure that it does not move with the knife.
Remove the top piece of the device. Carefully remove the filter paper and tissues (still on their rods). NOTE: A piece of stiff card placed underneath the filter paper will aid lifting.
Slightly wet (with a gloved fingertip dipped in PBS) the segments. Roll the rod, side to side to open up the gut and spread it flat. The tissue will then adhere to the filter paper.
Visually examine the preparations for any gross lesions.
Transfer the tissue adhered to the filter paper to a shallow bath (or sandwich box) containing fixative. NOTE: After the tissue adheres to the filter paper or to card it will remain firmly attached. A wide range of fixatives can be used to preserve the preparation. It is recommended that Carnoy’s fluid should be used for the study of intestinal cell proliferations6, which is the ideal fixation for the best cell proliferation methods; however formalin or many other fixatives can also be used if other endpoints are required.
After fixation (usually 3 hr), transfer the preparations into 70% ethanol. The samples can then be stored until required. The preparations can be studied en face and/or used for the preparation of histological samples for H&E or other histological staining techniques, immunohistochemistry and/or in situ hybridization. NOTE: Prolonged fixation can reduce immunohistochemical reactivity and/or in situ hybridization reactivity. Polypropylene sandwich boxes are ideal for storing a large number of the preparations.
If required the fixed tissues from the various intestinal segments can be made into ‘Swiss rolls’ and stained with the entire range of histological methods6 including those described above. To make a ‘Swiss roll’ the intestinal segments are removed from the filter paper, rolled around a cocktail stick or a toothpick, secured with an entomological pin and processed for wax embedding6.
If required, stain the bulk tissue with methylene blue to visualize aberrant crypt foci7.
Score the fixed preparations at leisure.
Representative Results
Polyps are easy to identify under a stereomicroscope with a cold light source to side illuminate the tissue (Figure 4). It is helpful to mark the card with pencil marks when a polyp is observed in order that scoring can be discussed later and different operators can reach agreement. The tissue can also be bulk stained [with methylene blue] to identify aberrant crypt foci8 or mucin depleted foci (MDFs)9 by illumination from above or by trans illumination (Figure 5).
The location of lesions can also be scored on a positional basis8. To do this one first needs to prepare a grid of 10 square in a computer drawing package, copy this several times and then stretch the several grids to various known sizes and print onto an acetate sheet (see Figure 6) [Intaglio is a useful and relatively simple program for doing this]. One can then find a grid that fits the length of the section and use it to score the events of interest.
Once scored, part or all of the tissue can be removed for further analysis or the whole sections can be rolled up into a ‘Swiss roll’ for histological sectioning. While this procedure has been described as technically challenging10 the flat and even nature of the preparations makes this procedure much more straightforward. The macro preparation can be used to score ‘macro polyps’ and the Swiss rolls used to score ‘micro polyps’11,12 (Figure 7).
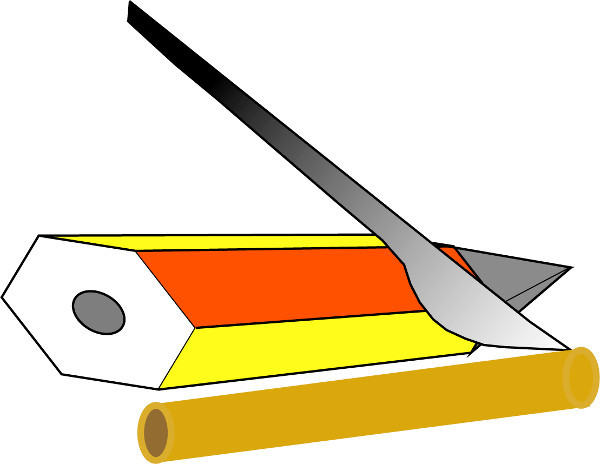 Figure 1. How the inspiration of the device came from a pencil. Discussions in the Biological Service unit lead to the idea of using a half pencil shape to act as a cutting guide. Please click here to view a larger version of this figure.
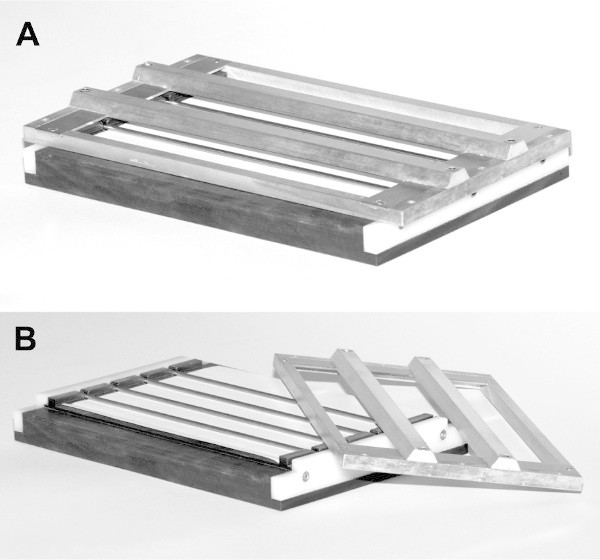 Figure 2. Photos of the original device. The original device was constructed from several pieces of metal, prepared by hand. (A) The device assembled. (B) The top of the device has been removed to show the rods in position. Please click here to view a larger version of this figure.
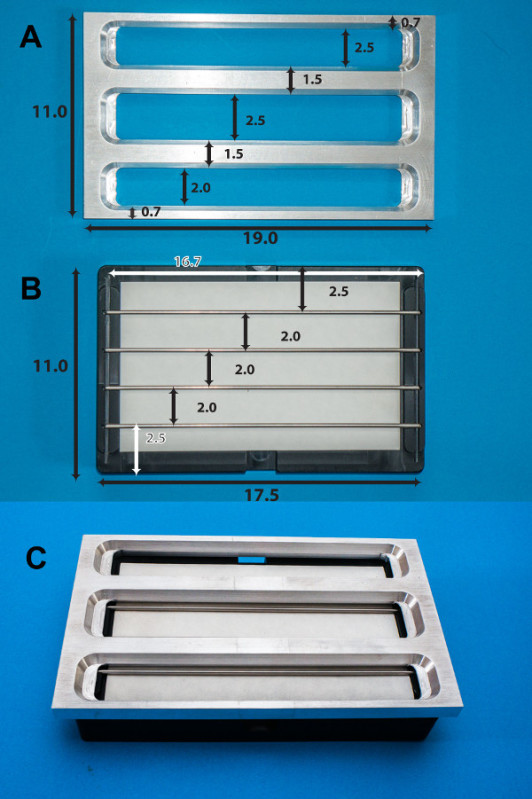 Figure 3. Photos of redesigned device.(A) The main frame of the lid is machined out of Duralumin plate. (B) The base (seen in black) is made of a solid block of high-density acetyl resin, having 4 removable rods sitting in a channel. Shown is a filter paper (white) placed on the top of the base (black). (C) The final view of the device: the lid (A) is placed on the top of the basin (B). Dimensions in centimeters are shown. The rods were 2.4 mm in diameter with rounded-off ends. See reference 5 for more details. Please click here to view a larger version of this figure.
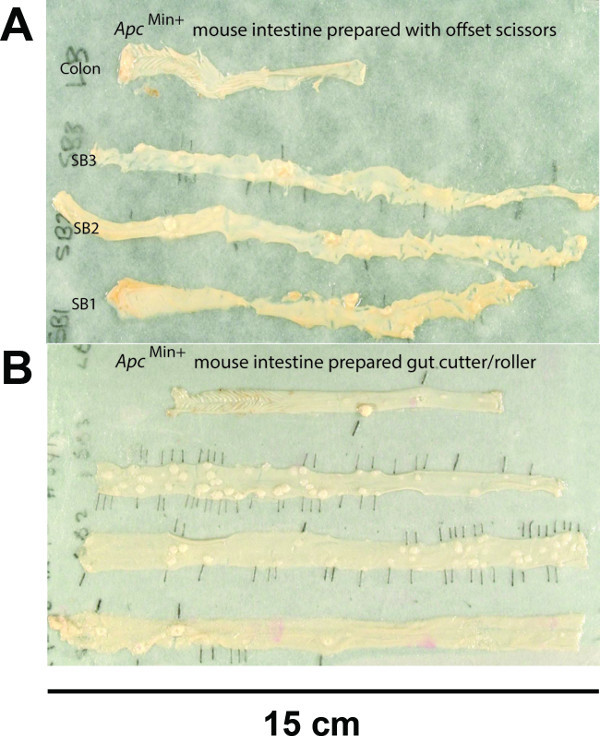 Figure 4. Gut preparation made with offset scissor and using the device.(A) The intestines prepared using offset scissors. (B) the intestines prepared with the gut cutter showing the even width throughout the gut and the better presentation of the tissue, which makes counting, and observation of polyps much easier. Modified from Figure 3 in Cell Proliferation6. Scale bar with the unit is indicated. Please click here to view a larger version of this figure.
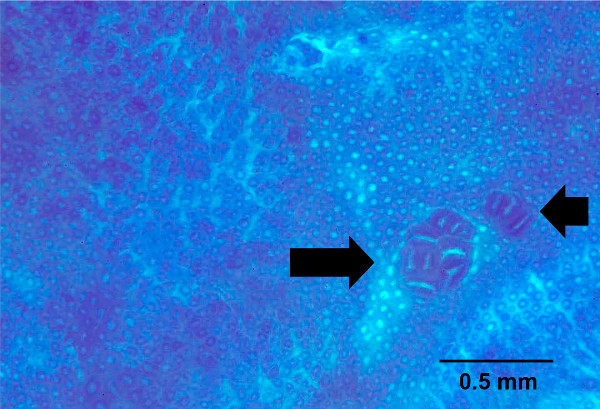 Figure 5. Aberrant crypt foci seen in whole mount of colon stained with methylene blue. The whole mount colon was bulk stained with methylene blue to identify aberrant crypt foci, shown by arrows. Scale bar with the unit is indicated. Please click here to view a larger version of this figure.
 Figure 6. Template for acetate sheets for positional scoring. Various sizes of grid of 10 squares are printed out on acetate sheets. The cut intestine is laid on the grid that fits the length of the section, and the events of interest are scored such as counting number of lesions in each square. Please click here to view a larger version of this figure.
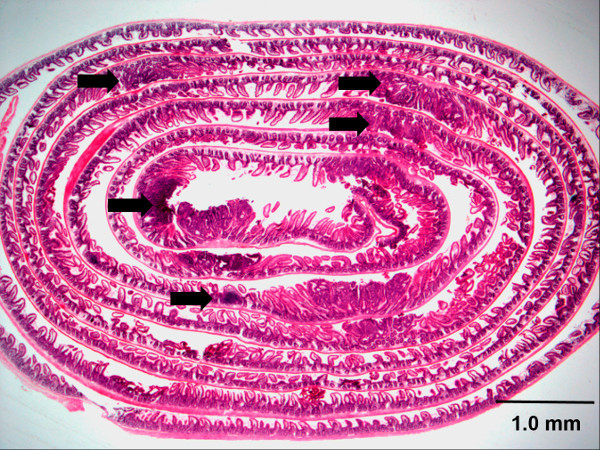 Figure 7. Swiss roll of an H&E stained mouse small intestine. The small intestine Swiss roll shown is from an Apc (Min/+) mouse, a well characterized in vivo model of intestinal tumor-genesis. Arrows indicate representative adenomas. Scale bar with the unit is shown. Please click here to view a larger version of this figure.
Discussion
The device greatly speeds up the process so that two operators can fully autopsy a mouse within 6 min. This will include a visual check for obvious gross lesions and weighing and fixing the major organs. It will also allow the operators to rinse, blot and weigh the stomach, caecum, small intestine and colon and prepare the whole mounts. The flattened tissue can be fixed very quickly and thus avoid degradation artifacts.
One of the major advantages of the device (apart from speed) is that the device can generate the production of far better quality preparations, which then makes subsequent analysis and quantification much easier. En face scoring is ideal for quantifying macroscopic carcinogenic and pre-carcinogenic lesions (such as polyp number, diameter and burden volume). The even nature of the preparations makes them ideal for later rolling into ‘Swiss rolls’ and sectioning so that histological analysis of ‘micro polyp’ number can also be quantified. Aberrant crypt foci and other pre-neoplastic lesions can also be visualized using the whole mounts.
Inflammatory changes in various colitis models can also be observed using the whole mounts.
Furthermore the quantitative and spatial location of these events in different regions of the gut can be determined. Limitation of the technique is that the use of the device requires some dexterity, especially in the scoring of the tissue with the scalpel. Most operators can master the technique in a short time after a few minutes practice. The preparations only take a few minutes but if instant preservation is required small samples can be taken for fixation or frozen and then the rest of the tissue prepared as usual.
Disclosures
The authors have nothing to disclose.
Acknowledgments
The evolution of the device started with somewhat different cutting prototype demonstrated at the Imperial Cancer Research Fund (ICRF) mouse club by Bass Hassan, following this there were several discussions with Rob Rudling and Nikki Mandir in the containment facility at ICRF Clare Hall. Jo Kitau of the mechanical workshop at ICRF constructed the initial versions and Andy Lucas designed and perfected the final model in the CRUK workshop in Oxford.
References
- Goodlad RA. Cancer Handbook. In: Alison MR, editor. John Wiley and Sons, Ltd; 2007. pp. 243–262. [Google Scholar]
- Ward JM, Treuting PM. Rodent intestinal epithelial carcinogenesis: pathology and preclinical models. Toxicol Pathol. 2014;42:148–161. doi: 10.1177/0192623313505156. [DOI] [PubMed] [Google Scholar]
- Sundberg JP, Hogenesch H, Nikitin AY, Treuting PM, Ward JM. Training mouse pathologists: ten years of workshops on the Pathology of Mouse Models of Human Disease. Toxicol Pathol. 2012;40:823–825. doi: 10.1177/0192623312439123. [DOI] [PubMed] [Google Scholar]
- Wasan HS, Novelli M, Bee J, Bodmer WF. Dietary fat influences on polyp phenotype in multiple intestinal neoplasia mice. Proc Natl Acade Sci USA. 1997;94:3308–3313. doi: 10.1073/pnas.94.7.3308. [DOI] [PMC free article] [PubMed] [Google Scholar]
- Rudling R, Hassan AB, Kitau J, Mandir N, Goodlad RA. A simple device to rapidly prepare whole mounts of murine intestine. Cell Prolif. 2006;39:415–420. doi: 10.1111/j.1365-2184.2006.00391.x. [DOI] [PMC free article] [PubMed] [Google Scholar]
- Alferez D, Goodlad RA. To best measure cell proliferation in samples from the intestine. Cell Prolif. 2007;40:231–240. doi: 10.1111/j.1365-2184.2007.00427.x. [DOI] [PMC free article] [PubMed] [Google Scholar]
- Park HS, Goodlad RA, Wright NA. The incidence of aberrant crypt foci and colonic carcinoma in dimethylhydrazine-treated rats varies in a site-specific manner and depends on tumor histology. Cancer Res. 1997;57:4507–4510. [PubMed] [Google Scholar]
- Park HS, et al. Effects of epidermal growth factor and dimethylhydrazine on crypt size, cell proliferation, and crypt fission in the rat colon. Cell proliferation and crypt fission are controlled independently. Am J Pathol. 1997;151:843–852. [PMC free article] [PubMed] [Google Scholar]
- Femia AP, Dolara P, Caderni G. Mucin-depleted foci (MDF) in the colon of rats treated with azoxymethane (AOM) are useful biomarkers for colon carcinogenesis. Carcinogenesis. 2004;25:277–281. doi: 10.1093/carcin/bgh005. [DOI] [PubMed] [Google Scholar]
- Ruehl-Fehlert C, et al. Revised guides for organ sampling and trimming in rats and mice--part 1. Exp Toxicol Pathol. 2003;55:91–106. [PubMed] [Google Scholar]
- Goodlad RA, et al. Inhibiting vascular endothelial growth factor receptor-2 signaling reduces tumor burden in the ApcMin/+ mouse model of early intestinal cancer. Carcinogenesis. 2006;27:2133–2139. doi: 10.1093/carcin/bgl113. [DOI] [PubMed] [Google Scholar]
- Mandir N, Englyst H, Goodlad RA. Resistant carbohydrates stimulate cell proliferation and crypt fission in wild-type mice and in the Apc(Min/+) mouse model of intestinal cancer, association with enhanced polyp development. Br J Nutr. 2008;100:711–721. doi: 10.1017/S0007114508901276. [DOI] [PubMed] [Google Scholar]


