

Abstract
Viruses have been used as transsynaptic tracers, allowing one to map the inputs and outputs of neuronal populations, due to their ability to replicate in neurons and transmit in vivo only across synaptically connected cells. To date, their use has been largely restricted to mammals. In order to explore the use of such viruses in an expanded host range, we tested the transsynaptic tracing ability of recombinant vesicular stomatitis virus (rVSV) vectors in a variety of organisms. Successful infection and gene expression were achieved in a wide range of organisms, including vertebrate and invertebrate model organisms. Moreover, rVSV enabled transsynaptic tracing of neural circuitry in predictable directions dictated by the viral envelope glycoprotein (G), derived from either VSV or rabies virus (RABV). Anterograde and retrograde labeling, from initial infection and/or viral replication and transmission, was observed in Old and New World monkeys, seahorses, jellyfish, zebrafish, chickens, and mice. These vectors are widely applicable for gene delivery, afferent tract tracing, and/or directional connectivity mapping. Here, we detail the use of these vectors and provide protocols for propagating virus, changing the surface glycoprotein, and infecting multiple organisms using several injection strategies.
Keywords: VSV, transsynaptic tracing, neural circuitry, axon tracing, gene delivery
INTRODUCTION
Understanding the connectivity of neurons in the brain is essential to understanding the complex computations of the central nervous system. However, detailing the anatomical connections among neurons can be a difficult and laborious task. This has classically been done using small-molecule and protein tracers to identify neurons that project either to or from targeted regions in the brain. However, these methods suffer from various shortcomings, including dilution of tracer and lack of synaptic specificity (Nassi et al., 2015). Viruses that are restricted to transmission only among synaptically connected neurons have properties that overcome these limitations.
While observations of transneuronal spread of neurotropic viruses, such as the herpes simplex virus (HSV; Goodpasture and Teague, 1923) and the vesicular stomatitis virus (VSV; Sabin and Olitsky, 1937) were made almost a century ago, detailed analyses of synaptic connectivity in a laboratory setting were not made until the late 1980s (Ugolini et al., 1989). When injected into targeted locations in either the central or peripheral nervous systems, HSV (Ugolini et al., 1989; Viney et al., 2007), VSV (Lundh, 1990; Beier et al., 2011), and rabies virus (RABV; Kelly and Strick, 2000) were observed to transmit in a pattern consistent with infection and spread among connected neurons. By observing the progressive infection of a chain of neurons in a circuit, putative circuit maps have been constructed.
To date, most studies using transsynaptic viruses have been limited to mammals. However, a comparative analysis of circuits across evolution can give important insight into circuit evolution and function. A common technique that can be used to trace connections in many different organisms would be quite valuable for such phylogenic comparisons.
We recently demonstrated anterograde and retrograde transsynaptic transmission of rVSV in the mouse, chick, and zebrafish (Mundell et al., 2015). In addition, even when the virus was not clearly able to transsynaptically transmit among neurons, we demonstrated its utility for labeling neurons and tracing projection patterns. Here, we detail the production and use of rVSV vectors in a variety of systems, providing protocols for delivery of rVSV vectors via stereotaxic injection into mice, chicks, and zebrafish.
STRATEGIC PLANNING
VSV is a negative-stranded RNA virus of the family rhabdoviridae. Viruses in this family do not have a DNA phase in their lifecycle, and the functional infectious unit is the RNA genome in association with the viral capsid and accessory proteins, called the ribonucleotide particle (RNP). Therefore, procedures for making genomic modifications and subsequent recovery of infectious viral particles from rVSV genome cDNA clones are not as straightforward as for other commonly used viral vectors, such as retroviruses and adeno-associated viruses. Several published protocols exist for the “rescue” of infectious viral particles from viral cDNAs, including use of vaccinia virus to supply bacteriophage T7 RNA polymerase, as well as a more recent helper-virus-free method (Lawson et al., 1995; Whelan et al., 1995; Witko et al., 2006), which offers advantages regarding efficiency as well as convenience. However, the generation of VSV vectors from recombinant DNA can be time consuming and difficult for laboratories that do not specialize in virus production. Therefore, we will focus on the amplification of existing stocks of rVSV, which can be purchased from a core facility, such as the Salk Institute Gene Transfer, Targeting and Therapeutics Core (http://vectorcore.salk.edu/), or obtained from other laboratories that have these stocks.
Several factors should be considered when selecting an rVSV stock for transsynaptic tracing, including choice of fluorophore or functional gene and glycoprotein (G), and if a replication-competent or replication-conditional rVSV version is desired. rVSV vectors have been engineered to encode numerous fluorescent proteins, including GFP, YFP/Venus, CFP, mCherry, tdTomato, and Kusabira-Orange. While this allows for flexibility with regard to co-labeling with multiple viral stocks or fluorescent immunolabeling, these fluorescent proteins may not be equal in sensitivity and kinetics. The choice of G protein will often be dictated by the desired direction of transsynaptic transmission, and/or, if desired, infection of specific cell types. Some G proteins, such as RABV-G, direct the virus to spread transsynaptically in the retrograde direction, while others, such as the native VSV-G, direct anterograde transsynaptic transmission (Beier et al., 2011; Beier et al., 2013b). VSV can also be pseudotyped with exogenous G proteins that permit infection of cell types expressing a specific cognate receptor, e.g., the avian EnvA protein and TVA receptor (Wickersham et al., 2007; Beier et al., 2011). In addition, replication-conditional rVSV vectors can be used as monosynaptic tracers, and may be modified for cell type-specific infection and tracing, as is the case with EnvA-pseudotyped rVSVΔG (rVSVΔG(EnvA)), as described in Basic Protocol 2.
Schematic progression of these protocols is diagrammed in Figure 1.26.1.
Figure 1.26.1. Schematic overview of rVSV propagation procedures.

Illustrations of (A) expansion of replication-competent rVSV stocks, (B) passage of replication-conditional vectors, and (C) generation of rVSVΔG(EnvA) with minimal contamination of the previous G protein.
NOTE: Although VSV in its native form is primarily an animal pathogen and does not cause severe disease in humans, it is endemic to isolated human populations. Thus, VSV is considered to be a Biosafety Level 2 (BSL-2) agent. Typically, BSL-2 laboratories must be dedicated for viral experiments and contain a biosafety hood for the handling of viruses. In many cases, restricted access, dedicated housing for infected animals, and separate disposal of infectious waste is required. Please consult with your home institution to determine appropriate safety procedures and containment facilities.
NOTE: All protocols using live animals must first be reviewed and approved by the appropriate Institutional Animal Care and Use Committee (IACUC) and conform to governmental regulations regarding the care and use of laboratory animals.
BASIC PROTOCOL 1
Passage and concentration of replication-competent rVSV
A primary rVSV stock needs to be propagated and concentrated to yield a high-titer stock that can be injected into an animal. This requires passaging of virus through cells, collection of virus from these cells, and ultracentrifugation to increase the concentration of virus. rVSV can be generated as either replication competent (i.e., viruses that express all of the viral proteins necessary for replication from the viral genome) or as replication conditional (i.e., lack a required gene, such as the G gene, “ΔG viruses”). There are a number of subtle but important differences between methods for amplifying replication-competent versus replication-conditional viruses; thus, two separate protocols are provided in this unit—for replication-competent (Basic Protocol 1) and replication-conditional viruses (Alternate Protocol). One difference to note is the multiplicity of infection, or MOI. This refers to the number of infectious particles per cell used to make a stock, i.e., in the initial step of stock preparation described below. The MOI is very low for preparing a stock of a replication-competent virus, only 0.01 to 0.1. This is to avoid the propagation of partial viral genomes, called defective interfering (DI) particles, which can compete for viral components and reduce the titer of the wild-type virus (Huang and Baltimore, 1970). DI particles only replicate in cells co-infected with a wild-type genome. By using a low MOI, one reduces the chance that a cell is co-infected with a DI and a wild-type particle, and thus reduces the load of DI particles in a stock. Preparation of a replication-conditional stock (e.g., virus with the G gene deleted) uses an MOI of 3. In this case, in the first step of stock preparation, the goal is to have each cell infected, so that the population of cells on the plate produces a burst of replication-conditional virus in a fairly synchronous manner. Due to the fact that some of the G proteins are toxic, and the promoters that express the G proteins will be shut off by rVSV as it replicates, one does not rely on the spread of virus through the plate over time to create a high-titer stock, as occurs with replication-competent viruses.
Materials
10% (w/v) poly-d-lysine hydrobromide (Sigma-Aldrich, cat. no. P7405)
Tissue culture–grade H2O
Cells: 293 (ATCC #CRL-1573; Graham et al., 1977), 293T cells (ATCC #CRL-3216; DuBridge et al., 1987), or BHK-21 cells (ATCC #CCL-10; Whitt, 2010); all can be purchased from http://www.atcc.org/
Dulbecco’s Modified Eagle Medium (DMEM; Invitrogen, cat. no. 12491-015)
Fetal bovine serum (FBS; Thermo Fisher Scientific, cat. no. 10082139)
Penicillin/streptomycin, 5000 U/ml (Thermo Fisher Scientific, cat. no. 15070-063)
Recombinant vesicular stomatitis virus (rVSV; see Strategic Planning)
70% ethanol (optional)
10% (v/v) bleach
Mineral oil (Sigma-Aldrich, cat. no. M5904-500 ml)
Cell culture plates: 10-cm tissue culture–treated dishes (Corning, cat. no. 430167)
Fluorescence inverted microscope
Cell scrapers (Fisher Scientific, cat. no. 08-100-242)
Beckman ultracentrifuge tubes, Thinwall, Ultra-Clear, 38.5 ml, 25 × 89 mm (Beckman-Coulter, cat. no. 344058)
Corning bottle-top vacuum filter system, 0.45 μm (Sigma-Aldrich, cat. no. CLS430768)
Ultracentrifuge with Beckman SW28 or SW32 rotor, or equivalent
Shaker
Conical-bottomed cryogenic vials, 0.5 ml (Sigma-Aldrich, cat. no. Z353361)
12- or 24-well culture plates
NOTE: All steps need to be conducted in a BSL-2 approved space, with proper use of personal protective equipment (PPE).
Day 0
-
1
If using 293 cells, pretreat tissue culture plates with poly-D-lysine (PDL) to increase their adherence. To PDL-treat plates, add 10% PDL to tissue culture–grade water, and add to dish to coat the surface of the plate. Rock gently to ensure even coating. After 5 min, aspirate solution and rinse with sterile tissue culture-grade water. Allow 2 hr for the plates to dry.
-
2
At a time point 24 hr before transfection, in a BSL-2 approved tissue culture hood, split 293 cells into DMEM containing 10% FBS and 1× penicillin/streptomycin (added from 100×, 5000 U/ml stock) such that you will have four 10-cm plates at 100% confluency the next day.
BHK-21 cells adhere better to the plates and grow faster than 293 cells. Either cell type is fine for replication-competent virus.
Day 1
-
3
When plates are at 100% confluency, change the medium to 5 ml/plate, then infect with rVSV at a multiplicity of infection (MOI; the ratio of infectious viral particles to cells) that is greater than 0.01 and less than 0.1.
Day 2
-
4
Check the infection 24 hours later using a fluorescence microscope.
You should see infected cells, as determined by fluorescent protein expression, some of which may have evidence of the cytopathic effect (CPE), some with surrounding patches of infected cells. Example images of CPE in 293T cells are shown in Figure 1.26.2. Typically, it is only worth collecting the medium for the later concentration if >50% of cells are infected.
-
5
When the criteria from step 4 are met, collect the 5 ml of medium from each plate and replace with 5 ml of fresh DMEM containing 2% FBS (a reduced concentration of FBS will reduce the viscosity of the concentrated prep). If too few cells are infected (e.g., <50%), wait another 12 to 24 hr and check again. Freeze the collected supernatants at −80°C.
Figure 1.26.2. Cytopathic effect (CPE) in 293T cells infected with replication-conditional and replication-competent rVSV stocks.

Example images of (A–C) uninfected control cells, (D–F) rVSVΔG(VSV-G) expressing tdTomato, and fluorescence from (G–I) rVSV(VSV-G) expressing Venus, (J–L) rVSVΔG(RABV-G) expressing GFP, and (M–O) rVSV(RABV-G) expressing GFP infected 293T cells at 20 hr post infection (hpi). Morphological rounding of cells is observed in infected 293T cells (white arrows).
Days 3 to 5
-
6
Collect medium from cells every 24 hr thereafter for 3 days, for a total of 4 days. Collect medium into a new tube each day. On the final day, scrape the cells off of the plate, and collect the cells with the 5 ml of supernatant.
Scraping the cells and freeze-thawing them along with the supernatant can increase viral titer, likely due to release of intracellular virions. One additional step that can increase titer is to add NaCl to 0.1 M from a concentrated stock (e.g., 3 M) when scraping the cells (note that this addition of 0.1 M NaCl is over and above the amount of NaCl in the DMEM).
Day 6
Altogether, if you started with four plates, you should have 20 ml of medium from each day (80 ml of total medium), which will roughly fill two ultracentrifuge tubes.
When ready to concentrate virus:
-
7
UV-treat Beckman ultracentrifuge tubes in a tissue culture hood for at least 10 minutes.
You can also rinse them first with 70% ethanol (v/v) and invert them to dry prior to UV treatment.
-
8
Thaw the supernatants at 37°C such that the ice has just thawed, then place the tubes on ice, and filter virus through 0.45-μm filters (still on ice). Aliquot 36 ml of filtered virus into sterilized Beckman ultracentrifuge tubes.
-
9
Concentrate the virus by ultracentrifugation for 3 hr at 60,000 × g, 4°C. Decant the supernatant into a container containing bleach (10% v/v), and, while holding the tube upside-down over the container with bleach, use a vacuum aspirator to remove liquid droplets from the side of the tube.
This will leave a small residual volume of medium, ~30 μl.
-
10
Cover the tubes with parafilm and return to the ultracentrifuge buckets. Shake the tubes at 4°C for 1 hr in a standard shaker at ~200 rpm with the ultracentrifuge buckets on ice (putting the tubes in the buckets keeps them upright). Collect all of the stock from each ultracentrifuge tube into a conical-bottomed cryogenic vial, and use a small volume of concentrated medium from the tube (e.g., 10 to 15 μl) to rinse the bottom of each ultracentrifuge tube. If there are clumps, gently pipet up and down about 10 times, being careful not to create foam in the stock.
You can also continue to shake for several more hours without losing titer (Zimmer et al., 2013).
-
11
Prepare 5- to 10-μl aliquots of virus in conical cryogenic vials and store in a −80°C freezer. For long-term storage, pipet 10 μl of mineral oil on the top of the aliquots to prevent freeze-drying.
-
12
Titer the virus by serial dilution.
293 cells are sufficient for most applications, unless the glycoprotein is EnvA, in which case TVA-expressing cells, such as the 293 derivative line TVA800 (Narayan et al., 2003), are needed. Cells should be near confluency, or have just reached confluency, at this stage.- Remove medium from the cells and replace with a minimal volume of DMEM containing 2% FBS sufficient to cover the cell monolayer (for a 24-well plate, 200 μl per well is sufficient).
- Prepare a series of tubes with 18 μl of serum- and antibiotic-free DMEM each. Prepare at least 10 separate wells of cells for titration in either a 12- or 24-well plate.
- On ice, pipet 2 μl of the concentrated stock into the first tube (to make 20 μl) and discard pipet tip into 10% bleach solution. Vortex the tube with virus well for ~10 sec.
-
Using a new tip, pipet 2 μl from this 20-μl stock into the next 18-μl aliquot, vortex to mix, and repeat until you have a dilution series at 10-fold increments, including three to ten tubes; the number of dilutions tested depends upon your estimate of titer. Then, using a new tip, pipet 2 μl from the first diluted viral stock into the first well. Discard pipet tip, then, pipet 2 μl from the second diluted viral stock into the second well, and repeat until 2 μl from each diluted stock has been pipetted into unique wells, as illustrated in Figure 1.26.3.As the replication-competent viruses can spread among cells very quickly, incubating overnight and checking the next morning is sufficient. Initial infection can be observed in a matter of hours, but you would likely get an underrepresentation of titer by waiting less than ~8 to 10 hr, due to inadequate expression/detection of fluorescence. If you wait longer than 12 hr, the individual foci will merge and/or cells will lyse and be uncountable. Using a fluorescence inverted microscope, count fluorescent foci, rather than looking for individual cells. Alternatively, a plaque assay using agarose medium helps to prevent viral spread across the dish, and can give more accurate estimates of viral titer (Dulbecco and Vogt, 1953; Baer and Kehn-Hall, 2014). Standard concentrated titers for most replication-competent forms of rVSV have a range of 1010 to 1012 plaque forming units (pfu)/ml, but can be lower depending on the identity of the G protein encoded in the viral genome.
Figure 1.26.3. Serial dilution of rVSV for viral titration.

Step 1: Pipet 2 μl of concentrated stock into the first well. Step 2: Pipet 2 μl of concentrated stock into tube containing 18 μl of DMEM (to make 1/10 dilution) and vortex to mix well. Step 3 and subsequent steps: To prepare serial 10-fold dilutions, pipet 2 μl of previous 20-μl dilution into the next 18-μl aliquot, and repeat until you have a dilution series at 10-fold increments (dilution range = 10−1 to 10−11). Step 4: Add 2 μl of an aliquot to a designated well, such that each well represents a different viral dilution. The number of infected cells per well can be counted at a later time point to determine viral titer.
ALTERNATE PROTOCOL 1
Passage and concentration of rVSVΔG
The following contains a protocol for growing replication-conditional virus.
Materials
10% (w/v) poly-d-lysine hydrobromide (Sigma-Aldrich, cat. no. P7405)
Tissue culture–grade H2O
Cells: 293 (ATCC #CRL-1573); Graham et al., 1977), 293T cells (ATCC #CRL-3216; DuBridge et al., 1987), TVA800 (obtained from the John Young lab or the Ed Callaway lab at the Salk Institute)
Dulbecco’s Modified Eagle Medium (DMEM; Invitrogen, cat. no. 12491-015)
Fetal bovine serum (FBS)
Plasmid encoding the G protein (pCMV-VSV-G; Stewart et al., 2003; Addgene, Plasmid #845)
rVSVΔG (see Strategic Planning)
70% ethanol (optional)
10% (v/v) bleach
Mineral oil (Sigma-Aldrich, cat. no. M5904-500 ml)
Cell culture plates: 10-cm tissue culture–treated dishes (Corning, cat. no. 430167)
Fluorescence inverted microscope
Beckman ultracentrifuge tubes, Thinwall, Ultra-Clear, 38.5 ml, 25 × 89 mm (Beckman-Coulter, cat. no. 344058)
Corning bottle-top vacuum filter system, 0.45 μm (Sigma-Aldrich, cat. no. CLS430768)
Ultracentrifuge with Beckman SW28 or SW32 rotor, or equivalent
Shaker
Conical-bottomed cryogenic vials, 0.5 ml (Sigma-Aldrich, cat. no. Z353361)
12- or 24-well culture plates
Additional reagents and equipment for transfection (Ausubel et al., 2015, Chapter 9)
NOTE: all steps need to be conducted in a BSL-2 approved space, with proper use of personal protective equipment (PPE).
Day 0
-
1
If using 293 cells, pretreat tissue culture plates with poly-D-lysine (PDL) to increase their adherence. To PDL-treat plates, add 10% PDL to tissue culture–grade water, and add to dish to coat the surface of the plate. Rock gently to ensure even coating. After 5 min, aspirate solution and rinse with sterile tissue culture-grade water. Allow 2 hr for the plates to dry.
-
2
Split 293T cells into DMEM containing 10% FBS several times, so that they are never over-confluent and are growing exponentially.
Splits of 1 to 10 or 1 to 20 work well, typically requiring a split every 2 to 3 days.
-
3
Prepare cells for transfection such that you will have four 10-cm plates at ~80% confluency the next day.
293/293T cells work well due to their high transfectability; BHK-21 cells are not optimal for this protocol. Other highly transfectable cell lines may serve the purpose as well.
Day 1
-
4
At 80% confluency, change medium to serum-free DMEM, then transfect the cells with 5 μg of plasmid encoding the G protein [i.e., pCMV-VSV-G (Stewart et al., 2003)] per plate.
We use PEI (Boussif et al., 1995), but other transfection methods such as FUGENE or Lipofectamine may be used. The optimum PEI:DNA ratio needs to be determined empirically, but is typically 4:1 or 5:1. Do this in a separate experiment with a fluorescent reporter, i.e., pCAG-GFP (Matsuda and Cepko, 2004). Also see Ausubel et al. (2015), Chapter 9.
-
5
Wait 6 hr after the transfection, then change the medium to 5 ml/plate of DMEM containing 2% FBS, then infect with rVSVΔG at an MOI ~3.
This MOI will lead to an initial infection of >95% of the cells; lower MOI will produce lower titers. If only a small amount of virus is available, i.e., not enough for this MOI on 4 plates, it is worth going through this procedure several times, using a small number of cells to start, and building up to larger numbers of cells until enough stock is generated for infection of at least four 10-cm plates. This usually means >10 ml of a stock with a titer of >107 pfu/ml.
Day 2
-
6
Check the infection 24 hr later using a fluorescence microscope. You should see infected cells, some with surrounding patches of infected cells.
Typically, it is only worth collecting if you see >50% of cells infected.
-
7
If the criterion from step 6 is met, collect the 5 ml of medium/plate and replace with 5 ml of fresh DMEM containing 2% FBS. If too few cells are infected, wait for another 12 to 24 hr and check again. Freeze the collected supernatants at −80°C.
One additional step that can increase titer is to add NaCl to 0.1 M from a concentrated stock (e.g., 3 M) when scraping the cells on the final day of collection (i.e., day 3; note that this 0.1 M NaCl is in addition to the NaCl in the medium).
Days 3 to 5
-
8
Follow steps 6 to 12 of Basic Protocol 1.
-
9
The next day, add more medium to each well (for a 24-well plate, an addition of 800 μl is sufficient). Incubate the infected cells for a total of 2 to 3 days before counting infected cells.
Initial infection can be observed in a matter of hours, but you will get an under-representation of titer if you wait less than ~8 to 10 hr. Expect to see single fluorescent cells or sometimes two cells from cells that have divided after the initial infection. Good viral preparations are usually in the range of 108 to 1010 pfu/ml.
BASIC PROTOCOL 2
Generation of rVSVΔG pseudotyped with minimal contamination of previous envelope G protein
Here, we detail the production of rVSVΔG with the EnvA pseudotype. However, in practice this can be done with any G protein that can be used by VSV, so long as it is encoded in the plasmid transfected in step 3.
Materials
10% (w/v) poly-d-lysine hydrobromide (Sigma-Aldrich, cat. no. P7405)
Tissue culture–grade H2O
Cells: 293 (ATCC #CRL-1573); Graham et al., 1977), 293T cells (ATCC #CRL-3216; DuBridge et al., 1987), or TVA800 (obtained from the John Young lab or the Ed Callaway lab at the Salk Institute)
Dulbecco’s Modified Eagle Medium (DMEM; Invitrogen, cat. no. 12491-015)
Fetal bovine serum (FBS; Thermo Fisher Scientific, cat. no. 10082139)
Penicillin/streptomycin, 5000 U/ml (Thermo Fisher Scientific, cat. no. 15070-063)
Plasmid encoding the EnvA protein
rVSVΔG (see Strategic Planning)
Phosphate-buffered saline (PBS; appendix 2A)
70% ethanol (optional)
10% (v/v) bleach
Mineral oil (Sigma-Aldrich, cat. no. M5904-500 ml)
Cell culture plates: 10-cm tissue culture–treated dishes (Corning, cat. no. 430167)
Fluorescence inverted microscope
Rocking platform
Tabletop centrifuge
Cell scrapers (Fisher Scientific, cat. no. 08-100-242)
Beckman ultracentrifuge tubes, Thinwall, Ultra-Clear, 38.5 ml, 25 × 89 mm (Beckman-Coulter, cat. no. 344058)
Corning bottle-top vacuum filter system, 0.45 μm (Sigma-Aldrich, cat. no. CLS430768)
Ultracentrifuge with Beckman SW28 or SW32 rotor, or equivalent
Shaker
Conical-bottomed cryogenic vials, 0.5 ml (Sigma-Aldrich, cat. no. Z353361)
24-well plates
Additional reagents and equipment for transfection (Ausubel et al., 2015, Chapter 9), basic cell culture techniques including trypsinization (appendix 3B; Phelan, 2007), and titration of virus (Basic Protocol 1, step 12)
NOTE: all steps need to be conducted in a BSL-2 approved space, with proper use of personal protective equipment (PPE).
Day 0
-
1
If using 293 cells, pretreat tissue culture plates with poly-d-lysine (PDL) to increase their adherence. To PDL-treat plates, add 10% (w/v) PDL to tissue culture-grade water, filter sterilize through a 0.45- or 0.2-μm filter, and add to dish to coat the surface of the plate. Rock gently to ensure even coating. After 5 min, aspirate solution, and rinse with sterile tissue culture-grade water. Allow 2 hr for the plates to dry.
-
2
Split 293 cells into DMEM containing 10% FBS several times as you build up enough 10-cm plates, so that they are never 1 day past confluency.
The idea is to keep them growing exponentially. Splits of 1 to 10 or 1 to 20 work well, typically requiring a split every 2 to 3 days.
Day 1
-
3
At 50% confluency, change medium to DMEM only (FBS can reduce transfection efficiency), then transfect the cells with a plasmid encoding the EnvA protein at a concentration of 5 μg of plasmid per 10-cm plate.
We use the original vector, which expresses EnvA-IRES-GFP in a retroviral (CMMP) backbone (Wickersham et al., 2007). This EnvA protein contains the C-terminal domain of RABV-G, and the N-terminal domain of EnvA. Standard transfection reagents, such as PEI, Lipofectamine, etc. can be used. Also see Ausubel et al. (2015), Chapter 9.
Day 2
-
4
After 1 to 2 days, check the expression of the plasmid by analyzing the level of GFP fluorescence, as this vector also encodes GFP. Remove medium, and store at 4°C. This can be saved for later use in step 9.
-
5
Infect with rVSVΔG at a multiplicity of infection (MOI) of about 3 (or if you do not have enough starter virus, as much as you can) and place in a 37°C incubator.
If this starter stock is unconcentrated, the virus can be added to the plate as-is, as long as the volume is greater than 1 ml. If the starter stock is already concentrated, it can first be diluted to 1 ml and then put on the plate.
-
6
Gently rock the plates every 10 min or so for 30 to 60 min if the volume of virus-containing medium is only 1 ml.
If the volume is greater than 2 ml, rocking is not necessary. Make sure that your incubator is well humidified or the cells will dry out.
-
7
After this time, if you used an inoculation volume >2 ml, remove it and the medium containing with virus from the cells, set aside a small aliquot (about 100 μl at −80°C), and store the rest at −80°C (not all of the virus from the medium infects the cells, and therefore this stock may be re-used at a later time, after titering the small aliquot to determine if there is residual virus in the medium).
If you used only 1 ml for the inoculum, you have the option of performing this step or moving on to the next without saving the residual inoculum.
-
8
Wash the cells with sterile PBS prewarmed to 37°C. Use 5 ml/wash. Repeat. Make sure to remove all PBS after each wash.
This step, and the next, is to remove all non-internalized virus.
-
9
Trypsinize with 1 ml trypsin/plate (APPENDIX 3B, Phelan, 2007). Do not trypsinize for too long (1 to 2 min in a 37°C incubator should be sufficient). Resuspend cells in the medium you saved from step 4.
-
10
Spin cells at a low speed (5 min at ~250 × g, room temperature) in a tabletop centrifuge to pellet the cells.
-
11
Gently resuspend the cells in 5 ml medium DMEM containing 10% FBS and 1× penicillin/streptomycin per plate and replate on plates prepared with PDL (see step 1). Put in a humidified incubator set to 35°C, 3% CO2.
Day 3
-
12
At about 20 hr post-infection, harvest the supernatant from each plate. Save a small aliquot (~100 μl) in a small tube for titration, while freezing the rest at −80°C. Replace with 5 ml of DMEM containing 2% FBS. Monitor for evidence of CPE, such as rounded cells, to see how infection is proceeding (Fig. 1.26.2).
Days 4 to 6
-
13
Repeat the collection of supernatant once per day for 4 days, or until the majority of cells show CPE and are about to come off of the dish.
Typically, the viral titers are best at the early time points, but this is variable depending on the initial MOI and health of the cells.
-
14
On the final day, scrape the cells off of the plate using a cell scraper, and collect the cells along with the 5 ml of supernatant.
One additional step that can increase titer is to add NaCl to 0.1 M from a concentrated stock (e.g., 3 M) when scraping the cells (i.e., this is in addition to the NaCl in the DMEM). Freeze at −80°C.
-
15
Follow steps 7 to 11 of Basic Protocol 1.
After concentration
-
16
Follow step 12 of Basic Protocol 1, with one difference. Titration should be done on both a TVA-expressing cell line, such as the TVA800 line (Narayan et al., 2003), and a non-TVA-expressing line, such as 293 cells.
-
17
The next day, add more medium to each well (for a 24-well plate, an addition of 800 μl is sufficient). Incubate the infected cells for a total of 2 to 3 days before counting fluorescent cells.
Initial infection can be observed in a matter of hours, but you will get an under-representation of titer if you wait less than ~8 to 10 hr. Expect to see single fluorescent cells, or sometimes two cells from cells that have divided after the initial infection. Good viral preparations are usually in the range of 108 to 1010 pfu/ml. The titer on 293 cells should be at least 4 log units lower than on TVA-expressing cells.
BASIC PROTOCOL 3
Stereotaxic injection of rVSV into mice
Pioneering experiments as far back as the 1930s suggested that VSV can spread among neurons in the CNS (Sabin and Olitsky, 1937). We expanded upon this initial characterization by injecting the virus into specific locations within the mouse brain, following the time course of viral infection, and observing the anatomical location of infected neurons at different time points. We demonstrated that rVSV with its native glycoprotein [rVSV(VSV-G)] transmits among neurons in the direction of information flow—i.e., by anterograde transsynaptic transmission (Beier et al., 2011). In addition, we modified the virus by replacing the native VSV-G with RABV-G [rVSV(RABV-G)], and showed that this modification directed exclusive retrograde transsynaptic transmission (Beier et al., 2011 2013b). Therefore, the replication-competent form of rVSV can be used to label multiple neurons in a circuit, depending on the site of viral injection, in a direction determined by the identity of the viral glycoprotein. Furthermore, the virus can be modified to be replication conditional, such that its genome does not encode a G protein, and thus rVSVΔG will only spread from cell types that are made to express an exogenous G protein. This modification permits the potential for labeling only the inputs that send direct projections to the defined cells (known as monosynaptic tracing). Below is a protocol for stereotaxic intracranial injection of replication-competent rVSV into a mouse under BSL-2 conditions.
Materials
Mineral oil (Sigma-Aldrich, cat. no. M5904-500 ml)
Purified rVSV (titer should be >109 pfu/ml; stored in aliquots at −80°C; see Basic Protocol 1, Alternate Protocol, or Basic Protocol 2)
Mice of any strain (optimal age should be determined empirically; stereotactic coordinates change over time, with 6 weeks of age sufficient for adult coordinates)
0.01 mg/ml buprenorphine in 0.9% (w/v) NaCl
Anesthetic: inhalable isoflurane, or 10 mg/ml ketamine and 1 mg/ml xylazine in 0.9% (w/v) NaCl (appendix 4B; Davis, 2008)
70% (v/v) ethanol in spray bottle
Refresh Lacri-Lube Lubricant Eye Ointment
Betadine surgical scrubs, 7.5% povidone-iodine
Mouse brain atlas (e.g., Franklin and Paxinos, 2007; or Allen Institute Brain Atlas; http://www.brain-map.org/)
Stereotaxic apparatus (e.g., David Kopf Instruments)
Injection pump (UMP-3, World Precision Instruments)
Dual small hub RN coupler (Hamilton, cat. no. 55752-01) to hold glass capillary in place during injection
Glass capillaries (Drummond Scientific, cat. no. 5-000-2005) pulled into fine-tipped injection needles; both the plunger and glass capillaries made to fit the plunger are provided
Dumont #5 forceps (Fine Science Tools, cat. no. 11251-20)
Dumont #55 forceps (Fine Science Tools, cat. no. 11255-20)
Fine scissors (Fine Science Tools, cat. no. 14060-09)
Heating pad
Animal clippers
Scalpel handle (Fine Science Tools, cat. no. 10003-12)
Scalpel blades (Fine Science Tools, cat. no. 10010-00)
Dental drill (Stoelting, cat. no. 51449)
Drill bits (Stoelting, cat. no. 514551)
Coated Vicryl (polyglactin 910) sutures, size 4–0 (Ethicon, product code J214H)
Additional reagents and equipment for injection (appendix 4F; Donovan and Brown, 2005) and anesthesia (appendix 4B; Davis, 2007) of rodents
NOTE: Personal protective equipment (PPE) should be used for this protocol.
Prepare apparatus and animal
-
1
Before beginning the experiment, identify the location of the injection.
This can typically be done by using one of the many published brain atlases, such as the Franklin and Paxinos brain atlas, or the Allen Institute Brain atlases (Franklin and Paxinos, 2007; Lein et al., 2007).
-
2
Sterilize all surgical tools used in the procedures by autoclave or bead sterilizer.
It is important to use aseptic technique throughout the surgery.
-
3
Prepare the stereotaxic apparatus and injection equipment.
We use an UMP-3 injection system, but other systems, such as iontophoresis, also are fine. For the UMP-3 system, first turn on the microinjector controller, and be sure that the plunger and electrode holder are in their proper position. Take one of the glass capillaries that were pulled into injection needles, and break off the flimsy tip of the needle with a forceps or a pair of scissors. We use a vertical puller to pull the injection capillaries, and use both ends. The size of the bore of the needle will depend on the equipment, etc., but as long as the diameter is not too wide, the exact size of the bore is not critical. Then, backfill this injection needle with mineral oil to provide an interface with the virus. It is important that no air bubbles be in the needle; otherwise, the pump will not dispense the proper volume of virus. Put the rounded (not sharp) end of needle over the plunger end, making sure that no air bubbles remain in the needle, and insert it past the gasket of the RN coupler, until the capillary can no longer be pushed up.
Perform stereotaxic injection
-
4
Thaw an aliquot of virus and place it on ice. If clumps of virus are apparent, pipet up and down gently multiple times. If clumps remain, spin briefly in a microcentrifuge. Next, draw the necessary amount of virus into the injection capillary.
This can be accomplished in many ways; we simply move the tube of virus under the capillary so that the virus can be directly withdrawn from the tube. The virus can also be aliquotted onto a small piece of parafilm or other hydrophobic substance and subsequently drawn into the capillary. It is important that the tube containing the virus be opened gently to prevent aerosolization of virus. Ideally, as much of this step as possible should be conducted in a BSL-2 hood.
-
5
Give animal a preoperative dose of the analgesic buprenorphine (0.05 to 0.1 mg/kg) by intraperitoneal injection (appendix 4F; Donovan and Brown, 2005) in order to reduce postoperative pain. Anesthetize the animals (appendix 4B; Davis, 2008) via isoflurane inhalation, or an intraperitoneal injection (appendix 4F; Donovan and Brown, 2005) of a ketamine (100 mg/kg) and xylazine (10 mg/kg) mixture (isoflurane results in a much quicker recovery from surgery, but requires additional equipment for proper ventilation and disposal). To ensure that the animal is properly anesthetized, check for a response to a light pain stimulus, such as a toe pinch. If the animal does not respond, proceed with procedure. If isoflurane is used, be sure to maintain a continuous flow of isoflurane (~1.5% to 2% isoflurane in O2) to maintain anesthesia. Continually monitor pulse, breathing rate, color of mucus membranes, and temperature of the animal throughout the experiment, particularly with ketamine/xylazine-based anesthesia, as hypothermia is common. Be sure to obtain proper licenses before using anesthetic drugs.
-
6
To prevent hypothermia, place animal on a heating pad and keep it there throughout the duration of the surgical procedure.
-
7
Once it has been anesthetized, first place the mouse’s teeth inside the bite bar, and secure the head using the ear bars. Be sure that the head is completely immobilized (Fig. 1.26.4A).
-
8
Prior to making an incision, first shave the fur on top of the head using animal clippers and clean first with 70% ethanol, followed by three times with betadine. Make an incision with a scalpel to access the skull (Fig. 1.26.4C).
-
9
Apply ophthalmic ointment to eyes in order to prevent drying of the corneas, as the animal does not blink while anesthetized (Fig.1.26.4D).
-
10
Working from this point on under a stereomicroscope, locate bregma by finding the location in the center of the skull where the sagittal and two coronal sutures meet.
-
11
After moving the stereotaxic arm holding the injection pump to the proper coordinates, turn on the hand-held drill and make a hole in the skull.
This is acceptable for most procedures that do not require the surface of the cortex to be pristine. If it is necessary to have completely undamaged cortical tissue, instead of drilling a hole directly through the skull, which may damage the cortex if the drill bit goes too deep, the bone can be gently shaved away.
-
12
Move the capillary just dorsal to the brain surface, over the location of the previously drilled hole—the needle should be sharp enough to penetrate the dura with ease. Then, lower capillary to the desired depth, and begin the injection. Inject at a slow rate, such as 100 nl/min (Fig. 1.26.4E).
-
13
After the virus has been injected (the volume of virus depends on the experiment, typically between 10 and 500 nl), leave the capillary in place for at least 5 to 7 min, as this permits diffusion of the virus (thus increasing infection) and allows the pressure at the injection site to normalize, preventing a significant amount of virus from leaking out the needle tract as the capillary is withdrawn.
-
14
Slowly raise the capillary from the injection site over the course of a few minutes.
A gradual removal of the capillary will help to prevent the development of negative pressure along the needle tract, and will help to reduce virus leaking out along the needle tract.
-
15
Once the virus has been injected and the capillary removed, suture the skin using standard methods, e.g., Vicryl sutures, and place the animal on a heating pad (Fig. 1.26.4F). Monitor animals continuously until they recover from anesthesia. Continue to administer buprenorphine every 12 hr for 2 days.
-
16
Dispose of glass pipets and other solid waste into a biohazard waste container. Spray work surface and surgical tools with 70% ethanol and clean thoroughly.
Example results from rVSV(VSV-G) injected into either the hippocampus or dorsal striatum are shown in Fig. 1.26.4G–I.
Figure 1.26.4. Injection of rVSV into adult mice.

After the mouse is anesthetized, place mouse in stereotaxic apparatus, (A) inserting the teeth into the bite bar, and securing the ear bars. (B) To ensure that the mouse is properly anesthetized, gently but firmly pinch the toes of the mouse. If it does not respond, proceed to the next steps. (C) Use a scalpel to make an incision along the top of the scalp. (D) Apply ophthalmic ointment to the eyes to prevent drying of the corneas. Move the injection pump to the desired coordinates, and drill a hole in the skull at the desired anterior/posterior and lateral/medial coordinates along the skull. After the hole has been drilled, (E) insert injection capillary through the hole, and stop at the proper dorsal/ventral coordinates. Inject the rVSV at a rate of 100 nl/min. After waiting at least 5 minutes, slowly withdraw the injection capillary. (F) When complete, remove the mouse from the stereotaxic apparatus, and suture the skin. Place the mouse on a heating pad to assist in recovery from anesthesia, providing analgesic administration as necessary. (G) An example brain, fixed 2 days post-injection, after a bilateral injection of rVSV(VSV-G) expressing YFP. (H) A coronal section of the brain shown in (G), showing infection of primary hippocampal neurons. (I) A parasagittal brain section indicating anterograde transsynaptic transmission of rVSV(VSV-G) after injection into the dorsal striatum. Shown is a section taken 3 days post-infection.
BASIC PROTOCOL 4
Injection of rVSV into embryonic chicken visual system
Our recent work in chickens demonstrated the ability of rVSV to function as a transsynaptic tracer in the developing visual system. By 2 or 3 days post infection (dpi), both rVSV(VSV-G) and rVSV(RABV-G) vectors demonstrated transmission patterns consistent with spread between primary, secondary, and higher-order sites of multiple visual pathways. The methods below provide a protocol for rVSV infection of the embryonic chicken retina and midbrain (optic tectum). Manipulation of late-stage chick embryos is often lethal, so care must be taken at each step, as detailed below.
Materials
Fertilized White Leghorn chicken eggs (Charles River, specific antigen free); store at 16°C (range = 13° to 21°C) at 70% to 80% relative humidity for up to 1 week to prevent development
70% (v/v) ethanol in spray bottle
Purified rVSV (titer should be >109 pfu/ml, stored in aliquots at −80°C; see Basic Protocol 1, Alternate Protocol, and Basic Protocol 2)
DMEM (see Basic Protocol 1)
PBS (appendix 2A)
10× (1% w/v) Fast Green (Fisher Scientific, cat. no. BP123; optional)
4% (v/v) formaldehyde (w/v) in PBS
Dispase I (Sigma-Aldrich, cat. no. D4818)
Egg rack (we use egg packaging from Charles River)
Egg incubator
18-G needles
10-ml syringes
1.9 mil (thickness = 0.0019 in.) clear acrylic packaging tape (Duck Brand, cat. no. DUC0007567)
Curved scissors (Fine Science Tools, cat. no. 14091-09)
5-μl Hamilton syringe (Hamilton, cat. no. 87931)
30-G, 15 mm beveled needle tip for Hamilton syringe (Hamilton, cat. no. 7803-07)
Stereomicroscope with zoom optics and illuminated stage
Dumont #5 forceps (Fine Science Tools, cat. no. 11251-20)
Dumont #55 forceps (Fine Science Tools, cat. no. 11255-20)
Spring scissors (Roboz, cat. no. RS-5606)
NOTE: Personal protective equipment (PPE) should be used for this protocol.
NOTE: Aseptic technique should be used throughout. All surgical tools should be sterilized by an autoclave or bead sterilizer.
Prepare eggs and virus suspension
-
1
To initiate the experiment, place fertilized eggs in a cardboard egg rack such that they lie on the side of their long axis, and incubate eggs at 38°C with 50% humidity for 48 hr.
Eggs should be carefully maintained in this orientation throughout incubation.
-
2
After 48 hr have passed (day 2), remove egg rack from incubator and spray the top of the eggs with 70% ethanol. To facilitate removal of albumin, make a hole at the top, blunt end of the egg by piercing through the shell with the beveled tip of an 18-G needle (Fig. 1.26.5A).
Making a pilot hole helps to prevent clogging of syringe and needle used in the next step.
-
3
Insert an 18-G needle fitted on a 10-ml syringe angled away from the center of the egg such that the yolk is not punctured. Remove 3 to 4 ml albumin to lower the developing embryo away from the egg shell (Fig. 1.26.5B) to prevent lethality during late-stage manipulation associated with attachment of the embryo and vascularized extraembryonic membranes to the eggshell. Place a 2″ × 2″ piece of tape over the top of the egg including the needle hole, taking care to maintain orientation of the egg (Fig. 1.26.5C). Return eggs to the incubator.
IMPORTANT NOTE: The following steps are performed in a room with BSL-2 certification.
-
4
At day 14 of incubation, prior to injection, thaw viral aliquots on ice. If clumps of virus are apparent, pipet up and down gently multiple times. If clumps remain, spin briefly in a microcentrifuge and store on ice to prevent a drop in viral titer.
-
5
Swab the taped surface of the egg with 70% ethanol.
-
6
Using curved scissors, make a window by cutting a round opening through the tape and underlying shell (Fig. 1.26.5D). Confirm movement of live embryo prior to preparing the viral injection.
Figure 1.26.5. Injection of rVSV in chicken embryos.
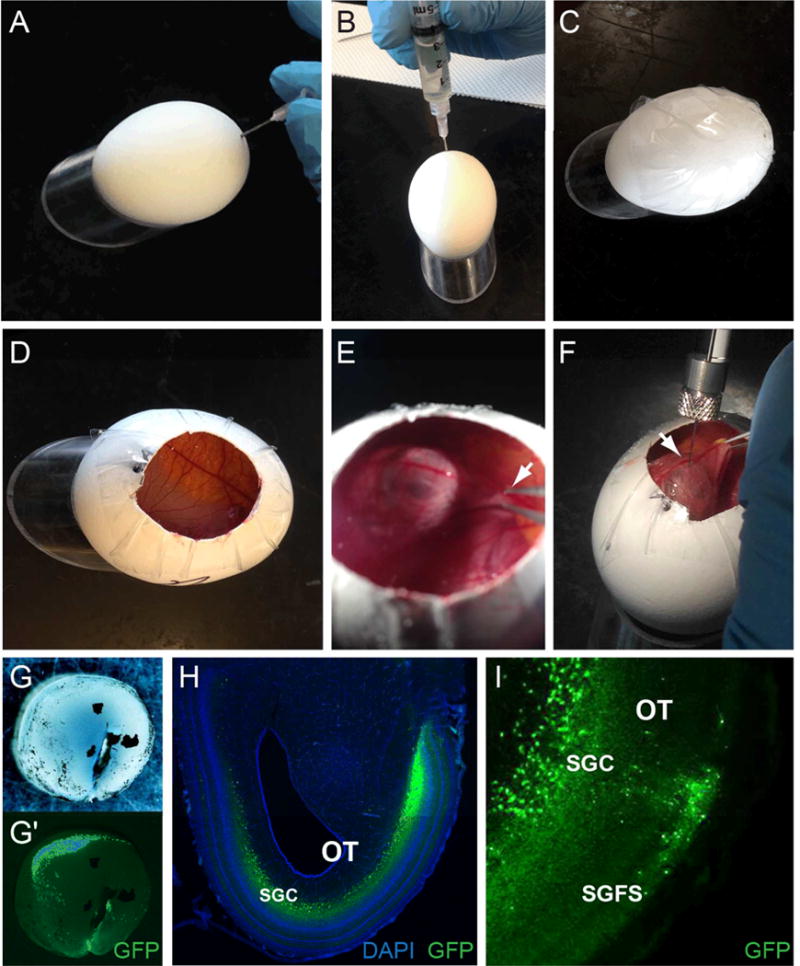
(A–C) To prevent lethality associated with injection at late stages, embryos and extraembryonic membranes must be lowered away from the shell at E2, prior to extensive vascularization. Use a syringe needle to make a pilot hole (A), prior to removal of 3–4 ml of albumin (B). Seal the hole by placing tape over the top surface of the egg (C). This will also prevent cracking of the egg during egg windowing 12 days later. (D–F) Injection of rVSV at E14. To window the egg, cut a circular opening through the tape and the top of the shell (D). Avoiding vasculature, make a small opening in the chorioallantoic membrane and grasp the beak of the embryo with forceps (E). Raise head and position the site to be injected against the overlaying membrane, away from major blood vessels. While maintaining position of the head, inject rVSV with a beveled tip Hamilton syringe into the desired location. Shown is an injection into the vitreous cavity of the right eye (F). (G–I) Anticipated results. Representative images of brightfield (G) and GFP expression (green) (G′) in a dissected retina, two days after rVSV(VSV-G) injection into the vitreous cavity of the eye. A representative section through the midbrain shows distinct GFP expression within the optic tectum (H–I). As expected, GFP-positive neurons are observed in the outer stratum griseum et fibrosum superficiale (SGFS) and the inner stratum griseum central (SGC) layers of the optic tectum (H–I), suggesting efficient rVSV transmission and labeling of visual circuits from the eye to the brain. Sections are counterstained with DAPI in H (blue).
Inject rVSV into embryos
-
7
Open rVSV tube gently to prevent aerosolization of virus. Using a clean Hamilton syringe with a 30-G beveled tip, draw up 0.5 to 2 μl of the rVSV suspension. If injection of low-titer virus is desired, dilute virus stock in DMEM or PBS as needed.
Depending on the desired location of injection, a micromanipulator may be used to position the syringe for injection. This is typically not required for injection into large structures such as the eye or the optic tectum, which do not require such precision. For brain injections through hardened or thick skull, a 25-G needle can be used to make a pilot hole prior to Hamilton syringe insertion. For visualization of the injection site, 0.5 μl of 10× Fast Green may be added to the 10-μl aliquot of rVSV prior to injection.
-
8
Working from this point on under a stereomicroscope, locate the head of the chicken embryo. Using forceps, make a small incision in the chorioallantoic membrane adjacent to the beak. Use care to avoid disruption of vasculature.
-
9
Carefully grasp the beak of the embryo with forceps and lift head against the membrane to position the embryo for injection of rVSV into the eye or midbrain (optic tectum) (Fig. 1.26.5E).
-
10
For rVSV infection of the retina, insert beveled tip of Hamilton syringe through the membrane into the vitreal cavity of the eye and slowly inject virus. Maintain the position of the head and the needle within the vitreous for 1 to 3 min.
In some cases, embryonic movement can necessitate earlier needle retraction.
-
11
Seal the windowed opening with tape (see step 3) and immediately return egg to the 38°C incubator for recovery.
-
12
Dispose of solid waste into the biohazard waste container. Spray work surface and surgical tools with 70% ethanol and clean thoroughly.
-
13
Incubate embryos for an additional 24 to 72 hr post infection (hpi) prior to sacrifice and harvesting of desired tissues (in this case, the retina and the brain).
-
14
Using forceps and fine spring scissors, dissect brain and eyes away from surrounding tissue.
For whole-mount preparations, retinae can be further isolated from the sclera and retinal pigmented epithelium (RPE) in ice-cold PBS prior to fixation in 4% formaldehyde overnight at 4°C. In embryos E16 and younger, the RPE can usually be removed manually with forceps. For removal of RPE in embryos E17 or older, place retina in 0.1 mg/ml Dispase I in PBS for 20 to 30 min. Carefully remove RPE with forceps or hair loop and fix retina in 4% formaldehyde overnight at 4°C. Wash tissues three times in PBS. GFP from rVSV can be directly imaged in whole-mount preparations of the retina or brain prior to tissue processing for frozen section immunohistochemistry. An example whole-mount image of a retina expressing GFP from rVSV is shown in Figure 1.26.5G–G′.
For information about tissue processing and immunohistochemistry, see Mundell et al. (2015). Example images of midbrain sections in Figure 1.26.5H–I show the expected pattern of rVSV(VSV-G) transmission in the brain after retinal infection, as indicated by GFP expression in distinct layers of the optic tectum.
BASIC PROTOCOL 5
Viral tracing of visual circuitry in zebrafish
The zebrafish represents a powerful model organism for the study of the development and function of neuronal systems. As zebrafish develop in transparent eggs, embryonic fish can easily be manipulated as early as the single-cell stage. With the development of modern neurobiological and genetic techniques, early access to the CNS represents a powerful tool for the study of circuits. We recently showed that rVSV vectors can transmit transsynaptically either in the anterograde or retrograde directions in developing zebrafish. Here, we detail how to make unilateral eye injections into embryonic zebrafish.
Materials
Larval zebrafish, 2 to 5 days-post fertilization
Embryo water: mix 20 ml methylene blue (1 g/liter stock; Fisher Scientific, cat. no. BP117), 6 g Instant Ocean Aquarium Sea Salt Mixture, and 20 liters H2O
100× (20 mM) 1-phenyl-2-thiourea (PTU) stock (Fisher Scientific, cat. no. AC207250250; dilute in water, heat to dissolve)
70% (v/v) ethanol in spray bottle
30× (0.4% w/v) Tricaine (Acros Organics, cat. no. A00004; adjusted to pH 7 to 7.5 with 1 M Tris base, pH 9)
1.5% low-melting point agarose (Fisher Scientific, cat. no. BP1360; dilute in water and keep at 42°C)
Purified recombinant VSV (rVSV; titer should be >109 pfu/ml, stored in 10-μl aliquots at −80°C; see Basic Protocol 1, Alternate Protocol, and Basic Protocol 2)
10× (1% w/v) Fast Green (Fisher Scientific, cat. no. BP123)
Halocarbon Oil Series 27 (Sigma-Aldrich, cat. no. H8773)
Bleach
4% formaldehyde in PBS (appendix 2A) with 0.25% (v/v) Triton X-100
PBT: 0.25% (v/v) Triton X-100 in phosphate-buffered saline (PBS; appendix 2A)
Glass pipets (100 mm length, 1 mm outer diameter, 0.75 mm inner diameter, with filament; e.g., World Precision Instruments, cat. no. TW100F-4)
Micropipet puller (Sutter Instruments, cat. no. P-97)
Fine forceps, no. 5 (Fine Science Tools, cat. no. 11251-20)
Stereomicroscope with zoom optics and illuminated stage
100-mm petri dishes
Glass Pasteur pipets (Fisher Scientific, cat. no. 13-678-30)
Pipet pump (Bel-Art Products, cat. no. F37898-0000)
Pneumatic pump with foot switch (World Precision Instruments, cat. no. PV820 and 3260)
Source of pressurized gas, e.g., nitrogen tank
Glass-bottom dishes (MatTek Corporation, cat. no. P50G-1.5-14-F)
Microloader tips (Eppendorf, cat. no. 5242956003)
Microelectrode holder (World Precision Instruments, cat. no. 5430-ALL)
Micromanipulator (Narishige, cat. no. MN-151)
Stage micrometer (Fisher Scientific, cat. no. 50-753-2911)
Incubator with lighting timer
Fluorescent stereomicroscope
Rocking platform
NOTE: PPE should be used for this protocol.
Before day of injection
-
1
Prepare glass pipets with micropipet puller. Make needles with gradual 6- to 8-mm taper. Remove the last 1 to 2 mm of the taper with a pair of fine forceps under a stereomicroscope to create a ~10-μm tip opening.
-
2
Collect zebrafish embryos.
-
3
Incubate at 28°C in embryo water in 100-mm petri dishes. Keep no more than 50 embryos in a single petri dish. To prevent pigment formation, transfer embryos to embryo water with 1× (0.2 mM) PTU.
Zebrafish embryos and larvae can be transferred using a glass Pasteur pipet and a pipet pump.
Day of injection: preparation
-
4
Spray work surface, forceps, and pipet pump with 70% ethanol. Wipe dry after 5 min.
-
5
Turn on pneumatic pump and pressurized air, e.g., nitrogen tank. Adjust injection pressure to 10 psi (see Fig. 1.26.6 for setup).
-
6
Anesthetize zebrafish by immersing them in 1× Tricaine (0.013% w/v) diluted in embryo water.
-
7
For embryos still inside their chorion, remove chorion with two pairs of forceps.
Fish do not need to be transferred for chorion removal.
After 2 to 3 min of incubation in Tricaine, animals should cease spontaneous movements and be unresponsive to touch by forceps.
-
8
Place animals into the center chamber of a glass-bottom dish. Remove excess water so that only a small drop of liquid remains.
-
9
Add 200 to 250 μl of 1.5% low-melting point agarose around the fish.
The agarose should fill the bottom surface of the center chamber (Fig. 1.26.7A).
-
10
Use forceps to arrange fish so that the area to be injected is facing up.
For unilateral retinal injection, zebrafish larvae are mounted laterally. Reorientation of the fish needs to be completed before the agarose solidifies.
-
11
After the agarose has solidified, fill the dish with 1× Tricaine.
The following steps are performed in a room with BSL-2 certification
-
12
Thaw viral aliquots on ice. If clumps of virus are apparent, pipet up and down gently multiple times. If clumps remain, spin briefly in a microcentrifuge and store on ice to prevent a drop in viral titer. If lower titer is desired, dilute rVSV with tissue culture medium (e.g., DMEM) or PBS. Add 0.5 μl of 10× Fast Green dye, flick, and spin down briefly in microcentrifuge.
Pipetting of rVSV should ideally be done in a biosafety hood to prevent dispersion of aerosol. Viral titer used for injection ranges from 106 to 109 pfu/ml; younger animals are generally easier to infect and require a lower viral titer.
-
13
Withdraw 2 μl of rVSV using a microloader tip attached to a 20-μl (P-20) pipet tip. Insert tip into glass pipet and dispense virus into the glass pipet. Insert glass pipet into the microelectrode holder, which is mounted on the micromanipulator.
-
14
In order to calibrate injection volume, add one drop of halocarbon oil on to the micrometer and adjust micromanipulator so that the tip of the glass pipet is inserted into the center of the drop of halocarbon oil. Adjust injection duration (usually around 0.1 sec) so that each foot-pedal press dispenses a drop of rVSV solution with a diameter of ~100 μm (which corresponds to an injection volume of 0.5 nl). See Figure 1.26.7B.
-
15
Retract needle along its longitudinal axis with the micromanipulator. Remove micrometer.
Figure 1.26.6. Zebrafish injection setup.

(A) Pneumatic pump, (B) stereomicroscope, (C) micromanipulator, and (D) forceps and pipette pump.
Figure 1.26.7. Zebrafish mounting and injection.
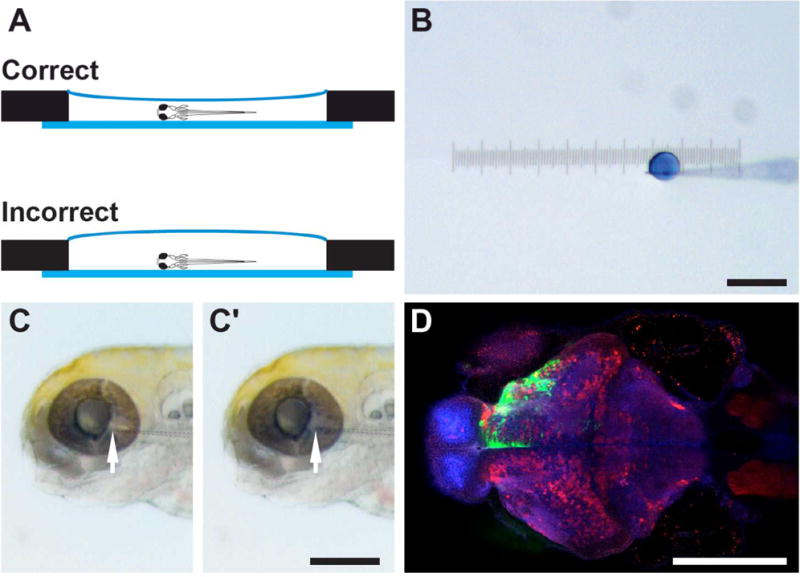
(A) Zebrafish larvae are mounted in the center chamber of a glass-bottom dish (side view). Low-melting point agarose should cover the entire center chamber. However, an excessive amount of agarose will make needle positioning more difficult. (B) A droplet of virus mixed with Fast Green dye after a single pressure injection, with a diameter of ~100 μm. (C) For retinal injection, the glass pipette tip (arrow) is inserted into the vitreous cavity of the eye. After injection, the blue/green virus solution is visible in the retina and the eye becomes slightly swollen (C′). (D) Representative image of zebrafish injected with rVSV(VSV-G) expressing Venus, fixed 1 dpi. Shown here is a horizontal optical section, with the rostral direction facing left and caudal direction facing right. Injection of the left eye results in Venus labeling (green) in the contralateral (top) half of the brain. This sample is counterstained with anti-GABA (red) and anti-ERK (blue) antibodies. Scale bars = 200 μm.
Zebrafish injection
-
16
Place mounted fish under the stereomicroscope. Extend needle along its longitudinal axis until the tip is in the same field of view as the fish.
-
17
Adjust micromanipulator to insert the needle tip into the area of interest (Fig. 1.26.7C).
To infect the retina for anterograde or retrograde transsynaptic tracing, the needle tip enters from the temporal edge and 0.5 nl of virus (~one foot-pedal press) is injected into the retina or the vitreous cavity.
-
18
Aspirate or pour out the 1× Tricaine solution, and replace with embryo water without anesthetic. Allow the fish to recover for 10 to 30 min at room temperature or 28°C.
-
19
Carefully remove agarose surrounding the injected fish. Transfer fish to a new petri dish. Incubate at 28°C in a low-temperature incubator with a lighting timer (14 hr light, 10 hr dark).
-
20
Dispose of glass pipets and other solid waste into a biohazard waste container. Add bleach (at least 10% v/v) to liquid waste container to denature viral particles. Spray work surface and surgical tools with 70% ethanol and clean thoroughly.
-
21
Optional: Check for evidence of viral infection in the fish with a fluorescent stereomicroscope.
For retinal injection, the temporal retina and the retinal ganglion cell axons in the contralateral brain will be visible by 24 hr post infection. Transsynaptic labeling of neurons in the brain may not yet be apparent under the stereomicroscope.
-
22
After the desired incubation duration, anesthetize fish with Tricaine and transfer to fixative (4% formaldehyde in PBS with 0.25% Triton X-100). Fix with gentle rocking overnight at 4°C.
A maximum of 25 fish can be fixed in 1 ml of fixative.
-
23
Remove fixative. Wash in PBT three times, each time for 5 min.
-
24
Perform whole-mount immunohistochemistry as described in Inoue and Wittbrodt (2011) and Mundell et al. (2015). For imaging, transfer to a glass-bottom dish and mount in low-melting point agarose, as described in steps 4 to 6, above.
A representative image of whole-mount immunohistochemistry for GFP following infection of the retina with rVSV(VSV-G) expressing GFP is shown in Figure 1.26.7D.
COMMENTARY
Background Information
Traditionally, anatomical circuit tracing has been conducted using dyes and small molecules. While providing invaluable insight into circuit structure, these methods suffer from certain limitations that are solved by transsynaptic viruses. Transsynaptic viruses replicate in each neuron, therefore amplifying the signal at each link in a chain of neurons, and spread specifically to connected neurons. This amplification both permits the labeling of multiple neurons and provides a Golgi-like fill of each infected neuron. Transsynaptic viruses thus represent an attractive technique for analyzing circuit connectivity (for a more comprehensive review of the benefits and drawbacks of transsynaptic viruses, see a recent review by Nassi et al., 2015).
A number of neurotropic viruses are currently being used as transsynaptic tracers, including HSV and RABV. VSV represents an alternative to these vectors, and presents several advantages over these other viruses (as well as disadvantages). For example, VSV can be readily pseudotyped with the G proteins of other viruses, whereas RABV is more selective with the G proteins that can be incorporated into the envelope. This is advantageous, as we recently showed that the identity of the viral G protein determines the direction of transsynaptic spread (Beier et al., 2011), with the synapse specificity being validated by electrophysiology (Beier et al., 2011 2013a). HSV has a much larger and more complicated genome than VSV and RABV, and encodes multiple G proteins. In addition, gene expression from VSV vectors is extremely rapid, permitting visualization within hours post-infection (Pol et al., 2002; Beier et al., 2013b). One drawback with all of these viruses, however, is that all are toxic to cells, and thus do not readily enable physiological analyses (see below).
Critical Parameters
rVSV vectors are able to infect neurons in many species and may therefore be a useful tool for comparative circuitry tracing among vertebrates. Although rVSV vectors have a wide host range, the degree to which these vectors are effective as circuitry tracers and the amount of cell toxicity induced by rVSV can vary among species and/or different circuits. Species differences in rVSV-mediated fluorescent labeling/tract mapping, the transsynaptic tracing ability of rVSV, and/or the timing of transmission among neurons in a circuit have been reported (Beier et al., 2011 2013a, b; Mundell et al., 2015) and should be considered for comparative tracing studies. The intensity of fluorescent labeling and the extent of toxicity can vary significantly depending on the duration of the infection. In addition, our preliminary studies suggest that transmission of rVSV may also be affected by the developmental stage of the host (see below). Thus, these properties should be tested empirically in each species, in each circuit, and at each developmental stage. In addition, each stock can vary in its characteristics, and thus a stock that will be used in multiple experiments should be tested prior to investing a great deal of time and animals in experiments with a given stock.
Troubleshooting
Among the most common problems when using rVSV as a transsynaptic tracer is low infectivity or variability of infection between experiments. Low rates of infection are usually due to insufficient titer of virus. This may be caused by a reduction in viral titer during storage or handling, or excessive dilution of virus at the injection site. Variations in numbers of cells initially infected at an injection site may also result from issues specific to the injection site; such issues can be difficult to diagnose and correct without the use of control injections (with the same virus stock) at a different site with known characteristics regarding levels of infection. Some possible solutions to injection site issues are to use multiple injections within large injection sites or to limit diffusion by injection of virus at a slower rate. The most crucial aspects of rVSV injection into chicken embryos are (1) minimizing vascular disruption/bleeding during manipulations, and (2) maintaining proper humidity of eggs during incubation. These and other common issues encountered, causes, and possible corrective actions are shown in Table 1.26.1.
Table 1.26.1.
Troubleshooting Common Issues in Production and Infection with rVSV
| Issue | Possible cause | Corrective Action |
|---|---|---|
| Low titer (< 105 pfu/mL with un-concentrated rVSV stock) | Initial infection with rVSVΔG did not infect the majority of the cells on the dish and/or intracellular virus was not captured during final collection of supernatant | Cover cells with DMEM containing additional 0.1 M NaCl when scraping and freeze-thawing cells during final supernatant collection. If rVSVΔG titer is low, infect with a higher MOI of starter virus. |
| Low titer (< 108 pfu/mL with concentrated rVSV stock) | Loss of infectious rVSV particles during concentration | May not have resuspended all of the particles or were too rough in resuspension of particles following the centrifugation. Also may have left too much residual volume when removing the supernatant following centrifugation. |
| No infection or low infectivity | Insufficient concentration of virus | Inject with higher titer concentrated virus stock. |
| Viral titer was reduced during storage or use | Re-titer virus against un-thawed aliquots to determine if loss was due to handling. Store virus at −80°C and cover small aliquots with mineral oil to prevent freeze-drying. If the virus stock lyophilized with time in the freezer, may need to add medium to resuspend virus. | |
| Duration of infection is too short | Increase survival time post-infection in 0.5 to 1 day increments to determine optimal duration of infection. | |
| Variability of infection between experiments | Variations in diffusion/dilution of virus at injection site and/or infection along needle tract | Reduce the rate of virus delivery and/or extend time interval between injection and removal of needle. |
| Infection outside of expected location | Incorrect coordinates or error during setup of stereotaxic injection | Repeat injections. |
| Infection of cells along the needle tract | Extend time interval between injection and removal of needle and/or use smaller tip diameter for needles used for injection. | |
| High mortality rate after chick injection | Vascular disruption/bleeding | Reduce size of opening in egg shell; avoid cutting membranes during injection. |
| Low humidity of eggs during incubation. | Check temperature and humidity of egg incubator. Monitor injected chicks every 12 hours post-infection for viability and condensation inside the taped area of egg. If condensation is not present, re-seal shell with tape to maintain humidity. | |
| High background fluorescence in tissue sections | Autofluorescence due to red blood cells. | Prior to dissection, perfuse tissue with PBS, followed by 4% formaldehyde in PBS. |
Anticipated Results
While the time necessary for expression of rVSV genes can vary from species to species, and depends on the temperature of incubation (Beier et al., 2013b), expression is typically very rapid, permitting visualization of fluorescent proteins expressed by the virus in initially infected neurons within a few hours. In addition, in hippocampal slice culture, transsynaptic spread was observed to occur within less than 18 hr post infection (Beier et al., 2011). However, in this case, recordings were initiated from regions of the slice with initially infected neurons (“starter cells”) surrounded by GFP+ cells, which represented putative local labeling of transsynaptic outputs. In in vivo transsynaptic tracing experiments using replication-competent viruses, cells infected by local viral transsynaptic transmission (i.e., spread) near the injection site are indistinguishable from cells infected by the initial virus inoculum. To enable one to distinguish cells infected by spread of replication-competent vectors, infection of brain regions located at a distance from the injection site is necessary. Infection of cells at a distance takes longer, with variables such as axonal length likely contributing to the lag time for visualization of infected cells. It is thus necessary to examine the tissue at several time points, usually over 2 to 3 days, e.g., at 12-hr intervals. Timing can vary with the age of the animal, the circuit, and the type of viral G protein, with VSV-G giving the most rapid spread.
As the fluorescent proteins are located in the first position of the viral genome, which is the position of highest expression for VSV, expression is rapid and robust. However, one drawback of using these rVSV vectors is that they are rapidly toxic to the infected neurons. Therefore, rVSV vectors, in their current configurations, are best utilized as anatomical tracing vectors, where the fluorescent labeling of neurons is the desired result. Modifications to reduce the toxicity of the vectors may be achieved, and could allow for the analysis of circuit function by encoding functional genes such as light-activated ion channels (Boyden et al., 2005) and genetically encoded calcium sensors (Tian et al., 2009).
The mechanisms that restrict transmission of any of the transsynaptic tracing viruses to synaptically connected cells in vivo are not understood. This restriction is particularly intriguing, and fortuitous, as such vectors readily spread among many non-neuronal cell types in vitro. In addition, the parameters that regulate the rate of spread and rate of cellular and organismal toxicity in vivo are not known. For example, an intracranial injection of rVSV(VSV-G) is lethal to mice, yet an intracranial injection of rVSV vectors encoding any other G protein [such as rVSV(RABV-G)] is not lethal. The transsynaptic spread of most of these vectors encoding G proteins from other viruses appears to be less efficient in vivo than vectors encoding the native VSV-G (unpub. observ.). The reasons for this are unclear, but may relate to a lack of efficient incorporation of the viral G protein into the budding viral particles, which might reduce the rate of spread. Furthermore, injections into young mice, young zebrafish (less than 5 dpf), and Xenopus embryos (less than 3 days post fertilization) lead to more efficient transsynaptic tracing. The development of the host immune response as animals become mature may explain the change in efficiency of virus spread, as it is known that the innate immune response is very effective at controlling VSV spread (Junt et al., 2007; Iannacone et al., 2010).
Time Considerations
Passage and concentration of rVSV
Growth rates of cultured cells can vary by cell line, passage number, and handling. Depending on growth and timing of starter virus infection, passage of rVSV or rVSVΔG takes 6 to 7 days from the time of seeding cells to collection of all supernatant. Depending on the number of viruses being grown, allow for 30 min to 3 hr of tissue culture work each day.
Stereotaxic injection of rVSV into mice
Prior to injections, allow 30 min for preparation and setup of the stereotaxic apparatus, while the injections themselves may take 1 to 3 hr, depending on the number of mice to be injected and site of injections. For coordinates that are not routine, perform a pilot experiment on a small number of animals. Usually 2 to 3 days of survival time post infection is sufficient for rVSV infection and transsynaptic transmission.
Injection of rVSV into embryonic chick or zebrafish
Not including incubation times, the entire injection protocol for embryonic chicks can be completed in less than 10 to 15 min for each embryo. Similarly, for injection into zebrafish, allow ~1 hr for preparation and 1 to 2 hr for injection of a cohort of fish, depending on number of embryos to be injected. Dissection of chicken brains and retinas can be completed in 1 to 6 hr, depending on use of Dispase to remove the retinal pigmented epithelium (this adds 15 to 30 min of dissection time for each sample). Standard incubation and wash times are used for immunohistochemistry procedures that span 4 to 5 days for frozen tissue sections (chicken) and 4 to 6 days for whole-mount labeling (zebrafish).
Acknowledgments
This work was supported by grants from the Howard Hughes Medical Institute (HHMI) U01 NS090449 (C.L.C.), and the National Institutes of Health (NIH) NS083848 (C.L.C.), EY023911 (N.A.M.), NS068012 (K.T.B.), and EY024844 (Y.A.P.). We thank Kathy DeLoach for assistance with mouse surgery images and Sylvain Lapan for assistance with chicken injection images.
Footnotes
INTERNET RESOURCES
Many cell lines, including 293 and BHK-21 cells, can be purchased from the ATCC website.
The Salk vector core sells aliquots of multiple viral vectors, including rVSV vectors.
LITERATURE CITED
- Baer A, Kehn-Hall K. Viral Concentration Determination Through Plaque Assays: Using Traditional and Novel Overlay Systems. Journal of Visualized Experiments. 2014;(93):1–10. doi: 10.3791/52065. [DOI] [PMC free article] [PubMed] [Google Scholar]
- Beier KT, Borghuis BG, El-Danaf RN, Huberman AD, Demb JB, Cepko CL. Transsynaptic tracing with vesicular stomatitis virus reveals novel retinal circuitry. The Journal of Neuroscience. 2013;33(1):35–51. doi: 10.1523/JNEUROSCI.0245-12.2013. [DOI] [PMC free article] [PubMed] [Google Scholar]
- Beier KT, Saunders AB, Oldenburg IA, Sabatini BL, Cepko CL. Vesicular stomatitis virus with the rabies virus glycoprotein directs retrograde transsynaptic transport among neurons in vivo. Frontiers in Neural Circuits. 2013;7:11. doi: 10.3389/fncir.2013.00011. [DOI] [PMC free article] [PubMed] [Google Scholar]
- Beier KT, Saunders A, Oldenburg Ia, Miyamichi K, Akhtar N, Luo L, Cepko CL. Anterograde or retrograde transsynaptic labeling of CNS neurons with vesicular stomatitis virus vectors. PNAS. 2011;108(37):15414–15419. doi: 10.1073/pnas.1110854108. [DOI] [PMC free article] [PubMed] [Google Scholar]
- Boussif O, Lezoualc’h F, Zanta Ma, Mergny MD, Scherman D, Demeneix B, Behr JP. A versatile vector for gene and oligonucleotide transfer into cells in culture and in vivo: polyethylenimine. PNAS. 1995;92(16):7297–7301. doi: 10.1073/pnas.92.16.7297. [DOI] [PMC free article] [PubMed] [Google Scholar]
- Boyden ES, Zhang F, Bamberg E, Nagel G, Deisseroth K. Millisecond-timescale, genetically targeted optical control of neural activity. Nature Neuroscience. 2005;8(9):1263–1268. doi: 10.1038/nn1525. [DOI] [PubMed] [Google Scholar]
- DuBridge RB, Tang P, Hsia HC, Leong PM, Miller JH, Calos MP. Analysis of mutation in human cells by using an Epstein-Barr virus shuttle system. Molecular and Cellular Biology. 1987;7(1):379–387. doi: 10.1128/MCB.7.1.379. [DOI] [PMC free article] [PubMed] [Google Scholar]
- Dulbecco R, Vogt M. Downloaded from symposium.cshlp.org on August 13, 2015. Cold Spring Harbor Laboratory Press; 1950. Published by. [Google Scholar]
- Franklin K, Paxinos G. Elsevier. 3rd. Academic Press; 2007. The Mouse Brain in Stereotaxic Coordinates. [Google Scholar]
- Goodpasture EW, Teague O. Transmission of the {Virus} of {Herpes} {Febrilis} along {Nerves} in experimentally infected {Rabbits} The Journal of Medical Research. 1923;44(2):139–184.7. Retrieved from http://www.ncbi.nlm.nih.gov.ezp-prod1.hul.harvard.edu/pubmed/19972593. [PMC free article] [PubMed] [Google Scholar]
- Graham FL, Smiley J, Russell WC, Nairn R. Characteristics of a human cell line transformed by {DNA} from human adenovirus type 5. The Journal of General Virology. 1977;36(1):59–74. doi: 10.1099/0022-1317-36-1-59. Retrieved from http://www.ncbi.nlm.nih.gov/pubmed/886304. [DOI] [PubMed] [Google Scholar]
- Huang A, Baltimore D. Defective viral particles and viral disease processes. Nature. 1970;226(5243):325–327. doi: 10.1038/226325a0. [DOI] [PubMed] [Google Scholar]
- Iannacone M, Moseman EA, Tonti E, Bosurgi L, Junt T, Henrickson SE, von Andrian UH. Subcapsular sinus macrophages prevent CNS invasion on peripheral infection with a neurotropic virus. Nature. 2010;465(7301):1079–1083. doi: 10.1038/nature09118. [DOI] [PMC free article] [PubMed] [Google Scholar]
- Inoue D, Wittbrodt J. One for all-a highly efficient and versatile method for fluorescent immunostaining in fish embryos. PLoS ONE. 2011;6(5):1–7. doi: 10.1371/journal.pone.0019713. [DOI] [PMC free article] [PubMed] [Google Scholar]
- Junt T, Moseman EA, Iannacone M, Massberg S, Lang Pa, Boes M, von Andrian UH. Subcapsular sinus macrophages in lymph nodes clear lymph-borne viruses and present them to antiviral B cells. Nature. 2007;450(7166):110–114. doi: 10.1038/nature06287. [DOI] [PubMed] [Google Scholar]
- Kelly RM, Strick PL. Rabies as a transneuronal tracer of circuits in the central nervous system. Journal of Neuroscience Methods. 2000;103(1):63–71. doi: 10.1016/s0165-0270(00)00296-x. Retrieved from http://www.ncbi.nlm.nih.gov/pubmed/11074096. [DOI] [PubMed] [Google Scholar]
- Lawson ND, Stillman Ea, Whitt Ma, Rose JK. Recombinant vesicular stomatitis viruses from DNA. Proceedings of the National Academy of Sciences of the United States of America. 1995;92(10):4477–4481. doi: 10.1073/pnas.92.19.9009c. [DOI] [PMC free article] [PubMed] [Google Scholar]
- Lein ES, Hawrylycz MJ, Ao N, Ayres M, Bensinger A, Bernard A, Jones AR. Genome-wide atlas of gene expression in the adult mouse brain. Nature. 2007;445(7124):168–176. doi: 10.1038/nature05453. [DOI] [PubMed] [Google Scholar]
- Lundh B. Spread of vesicular stomatitis virus along the visual pathways after retinal infection in the mouse. Acta Neuropathol. 1990;79(4):395–401. doi: 10.1007/BF00308715. [DOI] [PubMed] [Google Scholar]
- Matsuda T, Cepko CL. Electroporation and RNA interference in the rodent retina in vivo and in vitro. Proceedings of the National Academy of Sciences of the United States of America. 2004;101(1):16–22. doi: 10.1073/pnas.2235688100. [DOI] [PMC free article] [PubMed] [Google Scholar]
- Mundell N, Beier KT, Pan Y, Lapan S, Göz Aytürk D, Berezovskii VK, Cepko CL. Vesicular stomatitis virus enables gene transfer and transsynaptic tracing in a wide range of organisms. J Comp Neurol. 2015;523:1639–1663. doi: 10.1002/cne.23761. [DOI] [PMC free article] [PubMed] [Google Scholar]
- Narayan S, Barnard RJO, Young JAT. Two retroviral entry pathways distinguished by lipid raft association of the viral receptor and differences in viral infectivity. Journal of Virology. 2003;77(3):1977–1983. doi: 10.1128/JVI.77.3.1977-1983.2003. Retrieved from http://www.ncbi.nlm.nih.gov.ezp-prod1.hul.harvard.edu/pubmed/12525631. [DOI] [PMC free article] [PubMed] [Google Scholar]
- Nassi J, Cepko CL, Born RT, Beier KT. Neuroanatomy goes viral! Front Neuroanat. 2015;9(80) doi: 10.3389/fnana.2015.00080. [DOI] [PMC free article] [PubMed] [Google Scholar]
- Van Den Pol AN, Dalton KP, Rose JK. Relative neurotropism of a recombinant rhabdovirus expressing a green fluorescent envelope glycoprotein. J Virol. 2002;76(3):1309–27. doi: 10.1128/JVI.76.3.1309-1327.2002. [DOI] [PMC free article] [PubMed] [Google Scholar]
- Sabin AB, Olitsky PK. Influence of Host Factors on Neuroinvasiveness of Vesicular Stomatitis Virus: I. Effect of Age on the Invasion of the Brain by Virus Instilled in the Nose. The Journal of Experimental Medicine. 1937;66(1):15–34. doi: 10.1084/jem.66.1.15. [DOI] [PMC free article] [PubMed] [Google Scholar]
- Stewart SA, Dykxhoorn DM, Palliser D, Mizuno H, Yu EY, An DS, Novina CD. Lentivirus-delivered stable gene silencing by RNAi in primary cells. RNA (New York, NY) 2003;9(4):493–501. doi: 10.1261/rna.2192803. Retrieved from http://www.ncbi.nlm.nih.gov.ezp-prod1.hul.harvard.edu/pubmed/12649500. [DOI] [PMC free article] [PubMed] [Google Scholar]
- Tian L, Hires SA, Mao T, Huber D, Chiappe ME, Chalasani SH, Looger LL. Imaging neural activity in worms, flies and mice with improved {GCaMP} calcium indicators. Nature Methods. 2009;6(12):875–881. doi: 10.1038/nmeth.1398. [DOI] [PMC free article] [PubMed] [Google Scholar]
- Ugolini G, Kuypers HG, Strick PL. Transneuronal transfer of herpes virus from peripheral nerves to cortex and brainstem. Science (New York, NY) 1989;243(4887):89–91. doi: 10.1126/science.2536188. Retrieved from http://www.ncbi.nlm.nih.gov/pubmed/2536188. [DOI] [PubMed] [Google Scholar]
- Viney TJ, Balint K, Hillier D, Siegert S, Boldogkoi Z, Enquist LW, Roska B. Local retinal circuits of melanopsin-containing ganglion cells identified by transsynaptic viral tracing. Current Biology: CB. 2007;17(11):981–8. doi: 10.1016/j.cub.2007.04.058. [DOI] [PubMed] [Google Scholar]
- Whelan SP, Ball LA, Barr JN, Wertz GT. Efficient recovery of infectious vesicular stomatitis virus entirely from cDNA clones. Proceedings of the National Academy of Sciences of the United States of America. 1995;92(18):8388–8392. doi: 10.1073/pnas.92.18.8388. Retrieved from http://www.ncbi.nlm.nih.gov/pubmed/7667300. [DOI] [PMC free article] [PubMed] [Google Scholar]
- Whitt MA. Generation of VSV pseudotypes using recombinant dG-VSV for studies on virus entry, identification of entry inhibitors, and immune responses to vaccines. Journal of Virological Methods. 2010;169(2):365–374. doi: 10.1016/j.jviromet.2010.08.006. [DOI] [PMC free article] [PubMed] [Google Scholar]
- Wickersham IR, Lyon DC, Barnard RJO, Mori T, Finke S, Conzelmann KK, Callaway EM. Monosynaptic Restriction of Transsynaptic Tracing from Single, Genetically Targeted Neurons. Neuron. 2007;53(3):639–647. doi: 10.1016/j.neuron.2007.01.033. [DOI] [PMC free article] [PubMed] [Google Scholar]
- Witko S, Kotash C, Nowak R, Johnson J, Boutilier L, Melville K, Parks C. An efficient helper-virus-free method for rescue of recombinant paramyxoviruses and rhadoviruses from a cell line suitable for vaccine development. J Virol Methods. 2006;1(135):91–101. doi: 10.1016/j.jviromet.2006.02.006. [DOI] [PubMed] [Google Scholar]
- Zimmer B, Summermatter K, Zimmer G. Stability and inactivation of vesicular stomatitis virus, a prototype rhabdovirus. Veterinary Microbiology. 2013;162(1):78–84. doi: 10.1016/j.vetmic.2012.08.023. [DOI] [PubMed] [Google Scholar]