Abstract
Immunophenotyping of peripheral blood by flow cytometry determines changes in the frequency and activation status of peripheral leukocytes during disease and treatment. It has the potential to predict therapeutic efficacy and identify novel therapeutic targets. Whole blood staining utilizes unmanipulated blood, which minimizes artifacts that can occur during sample preparation. However, whole blood staining must also be done on freshly collected blood to ensure the integrity of the sample. Additionally, it is best to prepare antibody cocktails on the same day to avoid potential instability of tandem-dyes and prevent reagent interaction between brilliant violet dyes. Therefore, whole blood staining requires careful standardization to control for intra and inter-experimental variability.
Here, we report deployment of an automated liquid handler equipped with a two-dimensional (2D) barcode reader into a standard process of making antibody cocktails for flow cytometry. Antibodies were transferred into 2D barcoded tubes arranged in a 96 well format and their contents compiled in a database. The liquid handler could then locate the source antibody vials by referencing antibody names within the database. Our method eliminated tedious coordination for positioning of source antibody tubes. It provided versatility allowing the user to easily change any number of details in the antibody dispensing process such as specific antibody to use, volume, and destination by modifying the database without rewriting the scripting in the software method for each assay.
A proof of concept experiment achieved outstanding inter and intra- assay precision, demonstrated by replicate preparation of an 11-color, 17-antibody flow cytometry assay. These methodologies increased overall throughput for flow cytometry assays and facilitated daily preparation of the complex antibody cocktails required for the detailed phenotypic characterization of freshly collected anticoagulated peripheral blood.
Keywords: Immunology, Issue 108, Whole blood, human, automation, flow cytometry, immunophenotyping, immune monitoring, T cells, activation, immunology, 2D barcode, automated liquid handler, immunotherapy
Introduction
Immunophenotyping of human peripheral blood determines quantitative and qualitative changes in immune cell subsets1. It provides insight into mechanisms of action and resistance, aids discovery of predictive biomarkers, and facilitates the development of combination immunotherapies. Therefore, the validation and standardization of immunophenotyping is an area of considerable interest to academic researchers, clinical laboratories, and industries.
Although immunophenotyping of peripheral blood by flow cytometric methods is currently used for clinical management of hematological malignancies2,3 and human immunodeficiency virus (HIV) infection4,5, reliable immunophenotyping of peripheral blood for immunotherapy demands specific considerations in the validation and standardization because it requires more extensive coverage over immune cell subsets and activation/inhibitory receptors1,6-8. Successful immunophenotyping requires careful standardization to minimize experiment-to-experiment variability related to instrument setup and the cell staining procedure9,10. While standardization of instrument settings for flow cytometry is well established to address the former concern9,11,12, it remains unclear how to minimize variability related to cell staining without restricting coverage of immune cell subsets and their activation status.
As the number of antigens to be detected increases, so too does the opportunity for error and variability owing to suboptimal reagent dispensing and cross-contamination. Methods for the phenoptypic analysis of anticoagulated whole blood were established in the late 1980's for use in clinical laboratory assays. These same methods serve the needs of the research laboratory for sample preparation. Importantly, the antibody cocktails used in the clinical laboratory are typically less complex and available pre-titered and pre-mixed from the manufacturer. Only a single transfer of the pre-mixed antibody cocktail is required. In the research setting, antibody cocktails of 10-16 antibodies are typical. Each cocktail must be validated for stability by the laboratory or prepared fresh before each assay. Preparing multiple antibody cocktails for a sample might entail the pipetting of 50-80 individual antibodies, a task that is both tedious and error prone.
Automation of cocktail preparation has several advantages over manual cocktail preparation such as fewer errors, increased accuracy of pipetting, and possibly even decreased reagent wastage. Here, we report the successful introduction of an automated liquid handler equipped with a two-dimensional (2D) barcode reader into the cell-staining process of immunophenotyping to minimize variability related to sample preparation.
Protocol
Collection and use of the peripheral blood in this protocol was approved by the Providence Health & Services Institutional Review Board. All human subjects provided their written informed consent.
Note: Follow Universal Precautions. All human blood should be treated as if infectious and handled in accordance with Biosafety Level 2 practices.
Note: Immunophenotyping with peripheral whole blood is performed by incubating anticoagulated whole blood with fluorescent-tagged monoclonal antibodies to detect cell surface antigens, followed by hypotonic lysis to remove red blood cells. Cells are washed and the sample is analyzed by a flow cytometer. The method described herein focuses on preparation of antibody cocktails using the automated liquid handler equipped with a 2D barcode reader. First, the "Base Cocktail" that identifies immune cell subsets and the "Activation Cocktail" that monitors inducible antigens are prepared separately (Table 1). Then both cocktails are mixed to create a "Master Antibody Cocktail". See Figure 1 for the workflow.
1. Specimen
Collect peripheral blood via venipuncture in a sodium heparin anticoagulated blood collection tube, invert gently several times to ensure proper mixing, and then hold at RT. Reject specimen if clotted or hemolyzed13.
2. Labware Preparation
Label 2D barcode tubes with human-readable labels (antibody name, vender, catalogue number, and lot number).
Transfer entire content of antibody vials from the vender (listed in Table 1) to corresponding 2D barcode tubes. Note: Take extreme caution to not introduce bubbles as bubbles falsely trigger liquid level sensing (LLS) that results in suboptimal transfer of reagent. Note: Make sure that each antibody vial has sufficient antibody for the run.
Read the 2D barcode for each tube by the 2D barcode reader.
Make a spreadsheet that contains the antibody names (AB) and barcode reads (BC) using a spreadsheet software and save it in a comma separated values (csv) file as "AB_BC.csv" (Table 2). Note: Make sure to format cells as "Text" not "Number" in order to keep the first "0" for barcode numbers if any (e.g.,0163562544). Add "x, 0000000000" at the end to specify end of data.
Screw LLS metal plates to the frame of the deck in the automated liquid hander to enable LLS.
3. Programing for the Automated Liquid Handler
Note: Two methods will be programmed in the software for the automated liquid handler: a) a method for making "Base Cocktail" and "Activation Cocktail" in 3.1), and b) a method for making "Master Antibody Cocktail" by combining the "Base Cocktail" and "Activation Cocktail" in 3.2) (Figure 1).
- Create a method for making the "Base Cocktail" and "Activation Cocktail" (Figure 2).
- Using the spreadsheet software, make a spreadsheet that has information for antibody names (AB_NAME), destination tube location (WELL-BASE or WELL-ACT), and volume (VOL) in μl for "Base Cocktail" with P50 tips (BASE_CT_P50: Table 3) or P200 tips (BASE_CT_P200: Table 4) and "Activation Cocktail" with P50 tips (ACT_CT_P50: Table 5) or P200 tips (ACT_CT_P200: Table 6). Save them as csv files. For "WELL-BASE" and "WELL-ACT" location, refer to numbers in Figure 3. Note: VOL = titer x (# of staining + 2) μl. Titers in Table 1 are lot specific. Operator should determine a titer for each antibody as described by others 14.
- Click an icon to launch the software for the automated liquid handler on the computer to create a method for making "Base Cocktail" and "Activation Cocktail". Note: The following steps 3.1.3-3.1.7 will define the labware: the tube rack with 2D barcode tubes (Figure 4). Measurements are provided as a reference. Investigators should determine and adjust for each instrument.
- In the toolbar under "Project", select "Labware Type Editor". Right-click on an object for a 96 well flat plate, select "Copy" and type "Matrix_OneML_TubeRack" in a pop-up window.
- Double-click on the object "Matrix_OneML_TubeRack" to open the dialogue box. Highlight "Basic information", set 12.775 cm (X) and 8.546 cm (Y) for "Span" and 4.625 cm for "Height". (Figure 4A).
- Next, highlight "Movement Information". Set Gripper offset 0 (X), 0 (Y), and 0.3 (Z), Gripper Squeeze -0.1cm, Gripper Unsqueeze 2.6 cm, Speed Limit 75%, and then check "Use the gripper sensor" (Figure 4B).
- Then, highlight "Well_1". Set as follows: "Well Offset"; 1.5 cm (X) and 1.13 cm (Y), "Well Count"; 12 (X) and 8 (Y), "Well Spacing"; 0.9 (X) and 0.9 (Y), "Maximum volume"; 1,500 μl, Format"; Regular, "Colum 2 Offset"; 0, and "Default Volume"; 0 (Figure 4C).
- Finally, press an "Edit…" button to the right of "Well Configuration" (Figure 4C). In a pop-up window, set as follows: "Shape"; Round, "Upper Radius"; 0.37 cm, "Lower Radius"; 0.37 cm, and "Height"; 3.9 cm. Check "Bottom Section" and set "Shape"; Cone, "Radius"; 0.37 cm, and "Height"; 0.4 cm (Figure 4D). Note: The following steps 3.1.8-3.1.11 will define the labware: the tube rack with microfuge tubes. Measurements are provided as a reference. Investigators should determine and adjust for each instrument.
- In the toolbar under "Project", select "Labware Type Editor". Right-click on an object for a 24-position rack, select "Copy" and type "SmallTuberack_microfugetubes".
- Double-click on the object "SmallTuberack_microfugetubes" to open the dialogue box. Highlight "Basic information", set 12.75 cm (X) and 8.5 cm (Y) for "Span" and 3.95 cm for "Height".
- Next, highlight "Well_1". Set as follows: "Well Offset"; 1.621 cm (X) and 1.181 cm (Y), "Well Count"; 6 (X) and 4 (Y), "Well Spacing"; 1.9 (X) and 1.9 (Y), "Maximum volume"; 1,000 μl, Format"; Regular, "Colum 2 Offset"; 0, and "Default Volume"; 0.
- Finally, press an "Edit…" button to the right of "Well Configuration". In a pop-up window, set as follows: "Shape"; Round, "Upper Radius"; 0.3345 cm, "Lower Radius"; 0.274 cm, and "Height"; 3.6728 cm. Check "Bottom Section" and set "Shape"; Hemisphere, and "Radius"; 0.1575 cm. Note: The following steps 3.1.12-3.1.35 will explain how to program the "New Method" for making the "Base Cocktail" and "Activation Cocktail" (Figure 2).
- Click the "New Method" icon and open.
- Drag an "IF" icon between a "Start" and "Finish" icon in the new method (Figure 2). Click and highlight the "IF" icon. Type the following for Condition: CreateObject("World.EngineObject").simulating Note: This will prevent the software from performing error checking and enable this method to work. Without this step, the software will alert missing information for dataset as barcode reads are only available after the step "VisionMate: Read barcodes" described in 3.1.20). Since this step disables the verification step in the software, operator must confirm there are enough tips and reagent on the deck to perform this method.
- Insert an "Instrument Setup" icon between the "Then" icon and the first "End" icon under the "IF" icon (Figure 2). Note: For all the following steps, drag icons between the "Else" icon and the second "End" icon under the "IF" icon so that steps are encapsulated in the "Else".
- Drag the "Instrument Setup" icon underneath the "Else" icon in the method (Figure 2).
- Click the "Instrument Setup" icon in the method to open the window. Configure labwares by dragging icons for P50 LLS filtered tips, P200 LLS filtered tips, P1000 tips, "Matrix_OneML_TubeRack", two "SmallTuberack_microfugetubes", and reservoir to corresponding deck location from the icon list.
- Open the dialogue box for the "Matrix_OneML_TubeRack" and name as "AB_BOX". Open the dialogue box for the "SmallTuberack_microfugetubes" and name one as "BASE_CT" for Base Cocktails and the other as "ACT_CT" for Activation Cocktails (Figure 5).
- Drag a "Transfer" icon to the method (Figure 2) to add a step for transferring buffer from the reservoir into microfuge tubes for "Base Cocktail" and "Activation Cocktail". Transfer volume = 25 μl x (# of staining +2) for "Base Cocktail" and = 25 μl x (# of staining +2) for "Activation Cocktail".
- Add steps for moving the "Matrix_OneML_TubeRack" onto the 2D barcode reader. Drag a "VisionMate Move" icon to the method (Figure 2) and specify the move from the initial deck position to the barcode reader position on the deck.
- Drag a "VisionMate: Read barcodes" icon to the method (Figure 2). Open the dialogue box, and choose "VisionMate" as the device and name the data set as "BC_Read".
- Drag a "User Pause" (Figure 2), select "Pause the whole system and display this message" and type a comment into the field to remind users of confirming that all barcodes are read before proceeding to the next step. Note: The following steps 3.1.22-3.1.26 will link between well locations and antibody names using barcode information. This will enable the automated liquid handler to find a location of the particular antibody based on the antibody name "AB".
- Drag a "Reporting Step" icon to the method (Figure 2).
- Make a text file using a text program and save it as "BC_Readout" in the document folder on the computer.
- Open the dialogue box for "Reporting Step", choose "Text File" for Report Style, and select the "BC_Readout" file through browsing. Note: The resulting "BC_Readout" file will contain information for all labwares on the deck except tips as configured in 3.1.16 including information for barcode reads for 2D barcode tubes and well locations in the "Matrix_OneML_TubeRack".
- Add a "Create Data Set" step to link barcode and well information. Drag the "Create Data Set" icon to the method (Figure 2), click it to open the dialogue box, choose "Read from a file" and select "AB_BC.csv" (Table 2 created in 2.4), check "Comma-Delimited" and "The file has a header row". Note: In the File Preview window, antibody names (AB) and barcode reads (BC) should be seen.
- In the same dialogue box for "Create Data Set" in 3.1.25, select "VM1" for the labware location and "0" for stack depth, select "Match the Sample ID", and use the field "BC" to match with the Data Set "BC_Read". Select "AB" and "BC" for "Data Sets To Be Created" (Figure 6).
- Drag a "VisionMate Move" icon to the method (Figure 2) and specify the move from the barcode reader position "VM1" back to the initial deck position on the deck. Note: The following steps 3.1.28-3.1.33 will define transfer step for "Base Cocktail".
- Drag a "Worklist" icon (Figure 2) and browse to select the worklist file "Base_CT_P50" (Table 3) created in 3.1.1. Check "Loop entire worklist".
- Drag the "Transfer" icon directly underneath the "Worklist" icon (Figure 2).
- Click the "Transfer" icon to open the specification field. Select just one of the probes, P50 LLS filtered tips, select "unload them" when the transfer is done, and check "Change tips between transfers". Add source by clicking "Click here to add a source", select "Matrix_OneML_TubeRack" as a labware, and select location on the deck by name "AB_BOX".
- In the specification field for "Transfer", "Zoom in" on the diagram of 96 wells by right-clicking and choose "AB" immediately after "Use Data Set" and select where its values "are equal to" and "= AB_NAME". Select transfer technique of choice. Note: Use of LLS is highly recommended to avoid getting precipitated debris near bottom.
- In the specification field for "Transfer", select destination by clicking "Click here to add a destination", right click to zoom in and select "SmallTuberack_microfugetubes" as a labware, volume as "=VOL", and location on the deck by name "BASE_CT". After zooming out, right-click again, check "Specify Selection as Text", and check "Specify the targets with the expression below:" and type "=WELL_BASE" as a variable for a destination deck position.
- Repeat 3.1.29-3.1.32 similarly for "Base Cocktail" with P200 tips, by selecting the csv file "Base_CT_P200" (Table 4) then choose P200 LLS filtered tips as well as appropriate pipette technique for P200 LLS filtered tips. Note: The following steps 3.1.34 and 3.1.35 will define transfer step for "Activation Cocktail".
- Repeat 3.1.29-3.1.32 similarly for "Activation Cocktail" with P50 tips, by selecting the csv file "ACT_CT_P50" (Table 5) and choosing "ACT_CT" as a destination. Right click on destination and check "Specify Selection as Text". Check "Specify the targets with the expression below:" and type "=WELL_ACT" as a variable for a destination position.
- Repeat 3.1.34 similarly for "Activation Cocktail" with P200 tips, by selecting the csv file "ACT_CT_P200" (Table 6) and P200 LLS filtered tips. Note: The method for making "Base Cocktail" and "Activation Cocktail" can be closed after saving.
- Create a new method for making "Master Antibody Cocktail" by combining "Base Cocktail" and "Activation Cocktail" into 5 ml round-bottom polystyrene tubes (Figure 7). Note: The following steps 3.2.1-3.2.6 will define the labware: the tube rack with 5 ml round-bottom polystyrene tubes. Numbers are provided for reference. Investigators should determine and adjust for the instrument.
- In the toolbar under "Project", select "Labware Type Editor". Right-click on an object for the 24-position rack, select "Copy" and type "BiocisionCoolRack_XT" in a pop-up window.
- Double-click on the object "BiocisionCoolRack_XT" to open the dialogue box.
- Highlight "Basic information", set 12.78 cm (X) and 8.57 cm (Y) for "Span" and 7.93 cm for "Height".
- Highlight "Well_1". Set as follows: "Well Offset"; 1.55 cm (X) and 1.33 cm (Y), "Well Count"; 6 (X) and 4 (Y), "Well Spacing"; 1.95 (X) and 1.97 (Y), "Maximum volume"; 2,000 μl, Format"; Regular, "Colum 2 Offset"; 0, and "Default Volume"; 0.
- Open "Well Configuration" to edit. Set as follows: "Shape"; Round, "Upper Radius"; 0.5375 cm, "Lower Radius"; 0.48 cm, and "Height"; 7.07 cm. Check "Bottom Section" and set "Shape"; Hemisphere, and "Radius"; 0.45 cm. Note: The following steps 3.2.6-3.2.7 will define transfer steps and be used in step 3.2.14.
- Create a csv file "AB_MACT" (Table 7) for making antibody cocktail with the following headers: a) "SRC_BASE"; a labware name for "Base Cocktail", b) "WELL_BASE"; well locations in the labware for "Base Cocktail", c) "VOL_BASE"; transfer volume for "Base Cocktail" in μl, d) "SRC_ACT"; a labware name for "Activation Cocktail", e) "WELL_ACT"; well locations in the labware for "Activation Cocktail", f) "VOL_ACT"; transfer volume for "Activation Cocktail" in μl, g) "DEST_MACT"; deck position information for "Master Antibody Cocktail", and h) "WELL_MACT"; well position information in the tube rack for "Master Antibody Cocktail".
- Fill out information under headers created in 3.2.6) (Table 7) as follows: a) use "BASE_CT" under SRC_BASE, b) list well location information for "WELL_BASE" as shown in Figure 3A, c) list total volume of antibodies (25 μl of buffer + sum of all base antibody titers for single staining) under "VOL_BASE", d) use "ACT_CT" under SRC_ACT, e) list well location information for "WELL_BASE" as shown in Figure 3B, f) list total volume of antibodies (25 μl of buffer + sum of all activation antibody titers for single staining) under "VOL_ACT". Transfer 25 μl of buffer for T-Cell FM3. Refer to Table 1 for Tests 1-3, g) use "SPL_TUBES_1" (see 3.2.10) for "DEST_MACT", and h) list well location information for "WELL_MACT" as shown in Figure 8. Note: The following steps 3.2.8-3.2.15 will program the method for making "Master Antibody Cocktail"
- Open a new method (Figure 7).
- Drag the "Instrument Setup" icon to the new method (Figure 7).
- In the specification field of "Instrument Setup", drag icons for P1000 tips, two "SmallTuberack_microfugetubes", and "BiocisionCoolRack_XT" onto the deck diagram. Open the dialogue box for the two "SmallTuberack_microfugetubes" and name as "BASE_CT" and "ACT_CT", respectively, as specified in 3.1.17. Open the dialogue box for "BiocisionCoolRack_XT" and name as "SPL_TUBES_1" as specified in 3.2.7 (Figure 9).
- Add a new "Group" by dragging a "Group" icon to the method (Figure 7).
- Drag the "Transfer From File" icon directly underneath the "Group" icon to transfer "Base Cocktail" for making "Master Antibody Cocktail" (Figure 7).
- In the specification field for "Transfer From File", select the P1000 tips in use, select "unload them" when the transfer is done, and check "Change tips between transfers".
- In the specification field for "Transfer From File", select the file "AB_MACT" (Table 7) by browsing, check "File has a header row". Select "SRC_BASE" for source labware position and "WELL_BASE" for well information in the source labware, select "DEST_MACT" for the destination labware and "WELL_MACT" for well information in the destination labware, and select "VOL_BASE" for volume information (Figure 10). Chose appropriate transfer technique for P1000 tips. Note: LLS may not be necessary for this process.
- Add another "Transfer From File" by dragging it directly underneath "Group" to transfer the "Activation Cocktail" that is to be mixed with the "Base Cocktail" for making "Master Antibody Cocktail" (Figure 7). Similarly set up the transfer step as in 3.2.13 and 3.2.14. Exceptions are as follows: a) Select "SRC_ACT" for source labware position, b) "WELL_ACT" for well information in the source labware, and c) "VOL_ACT" for volume information.
4. Operating Procedure
First, double-click the software icon to launch the 2D barcode reader on the computer.
Then, double-click the software icon to launch the automated liquid handler on the computer.
Under "Instrument", select "Home All Axes" to prime syringes of the automated liquid handler. Make sure all syringes contain no visible air bubbles. Note: "Home All Axes" will also give the instrument a point of reference from which to make subsequent moves.
Open the method for making the "Base Cocktail" and the "Activation Cocktail" (Figure 2) in the software for the automated liquid handler.
Place the microfuge tubes into "SmallTuberack_microfugetubes" for "BASE_CT" and "ACT_CT" according to the number of "Base Cocktail" and "Activation Cocktail" to be made (Figure 3). Then place them on the deck according to the "Instrument Setup" (Figure 5).
Place the reservoir with buffer on the deck according to the "Instrument Setup".
De-cap 2D barcode tubes containing the antibodies using an 8-channel screw cap decapper. Keep caps in exact order on a cap holding tray in order to avoid cross-contamination. Place the "Matrix_OneML_TubeRack" on the deck according to the "Instrument Setup" (Figure 5).
Place P50 LLS filtered tips, P200 LLS filtered tips, and P1000 tips on the deck according to the "Instrument Setup" (Figure 5).
Start the method by clicking the green triangle-shaped start icon. As prompted by the popup window, make sure that all items on the deck match the "Instrument Setup" as defined in the method. Do not place any objects that are not listed in the "Instrument Setup" on the deck, as this could crush the pod and/or the gripper. Press "OK" to proceed.
After the "Matrix_OneML_TubeRack" is moved onto the 2D barcode reader and barcodes are read, another popup window will ask whether all barcodes are read. Proceed by pressing "OK" once confirmed.
Upon completion of the transfer by the automated liquid handler, recap the 2D barcoded tubes using an 8-channel screw cap decapper, and put them back to 4 °C.
Vortex all the microfuge tubes vigorously for 20 sec, and return them into the tube racks. Note: Insufficient vortexing may result in suboptimal staining of cells.
Close the method for making "Base Cocktail" and "Activation Cocktail". Then open the method for making "Master Antibody Cocktail".
Set up pre-labeled 5 ml round-bottom polystyrene tubes on the "BiocisionCoolRack_XT" (Figure 8) and place it on the deck. Labels should indicate what "Base Cocktail" and "Activation Cocktail" are mixed, as well as the appropriate patient ID.
Place tube racks for "Base Cocktail", "Activation Cocktail", and P1000 tips on the deck (Figure 9). Start the method (Figure 7). As prompted by the popup window, make sure that items on the deck match Instrumental Setup in the method (Figure 9). Press "OK" to proceed.
When the above process is done, manually add 50 μl of blood specimens into each 5 ml round-bottom polystyrene tube that contains the antibody cocktail.
Vortex sample tubes inside a Class II biological safety cabinet and incubate 15 min at RT in the dark. Take care to avoid streaking blood on the sides of the tubes, as this will result in inconsistent staining. Carefully remove any streaks of blood by cotton swabs moistened with flow wash buffer.
Add 1 ml of RBC lysis buffer manually and incubate 15 min at RT in the dark.
Add 2 ml of flow wash buffer (0.1% sodium azide, 1% BSA, 10 U/ml Heparin in 1x HBSS) and centrifuge for 5 min at 400 x g. Discard supernatant inside a Class II biological safety cabinet. Repeat this washing process. Re-suspend stained cells in 0.5 ml of flow wash buffer.
Set up a flow cytometer that is equipped with flour lasers and appropriate filters, and run specimens using 5 ml round-bottom polystyrene tubes. Use standard cytometer calibration and fluorescence compensation methods for data collection12,15. Collect all parameters listed in "FLUOROPHORE" in Table 1. Note: appropriate control materials should be used in each run to ensure proper assay performance.
After running samples, export acquired data as fcs files.
Analyze data using appropriate software. Identify T cell subsets using a gating strategy outlined by the Human Immunology Project1.
Representative Results
The goal of whole blood immunophenotyping is to obtain quantitative (the delineation of immune cell subsets) and qualitative (activation status detection) information on immune cells. We have slightly modified the T cell immunophenotyping panel proposed by the Human Immunology Project1 to improve overall performance of our method (Table 1). Our T cell panel aims to identify naïve, central memory (CM), effector memory (EM), and effector T cells. Briefly, we discriminate doublets based on FCS-A and FCS-H. Then we gate on lymphocytes based on side scatter and CD45 levels. T cells are then identified by expression of CD3. CD3+ T cells are differentiated into γδ T cells and αβ T cells. αβ T cells are further divided into CD4+ and CD8+ T cells. CD4+ and CD8+ T cells are then analyzed for their subsets based on expression of CD45RA and CCR7: CD45RA-CCR7+ CM, CD45RA+CCR7+ Naïve, CD45RA+CCR7- effector, and CD45RA-CCR7- EM T cells1. Additionally, we also monitor their expression of activation markers such as CD38, HLA-DR, ICOS, PD-1, GITR, 4-1BB, CD69, NKG2D, and OX40 to obtain qualitative information.
To demonstrate the precision of this method, we stained peripheral whole blood samples from 4 healthy donors 5 times in one day. Figure 11 shows the relationship between percent T cell subpopulation on gated lymphocytes and percent coefficient of variance (%CV). A detailed breakdown of percent T cell subpopulations on gated lymphocytes and %CV for each subset is shown in Table 8. Data from Tests 2 and 3 are not included in Figure 11 and Table 8 for simplicity. Less than 25% CV between run (inter-assay precision) has been suggested for acceptance criteria for phenotypic biomarker assays for research use10. All measurements met this criteria except ICOS+ γδ T cells (26.64-46.39%. Table 8) and ICOS+ CD8 T cells (14.64-58.39%. Table 8). These values are shown for demonstration purposes. We do not utilize these measurements because ICOS mainly plays an important role in activation of CD4 T cells16. The trend of higher %CV in populations that comprise a low percentage for the total population was observed by others7. In case investigators are interested in monitoring rare-events, the number of cells examined needs to be increased in order to overcome greater imprecision17. Together, our data show the successful deployment of automation in the sample preparation of whole blood immunophenotyping.
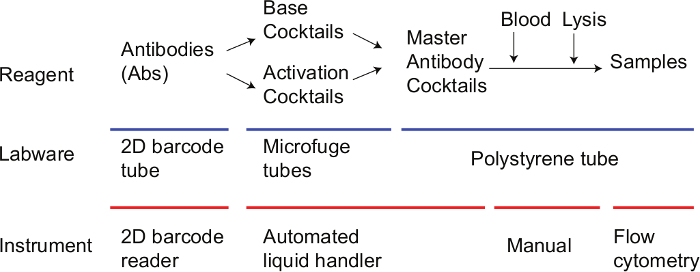 Figure 1. Workflow for immunophenotyping with peripheral whole blood. Step by step workflow of immunophenotypic assay is shown. Please click here to view a larger version of this figure.
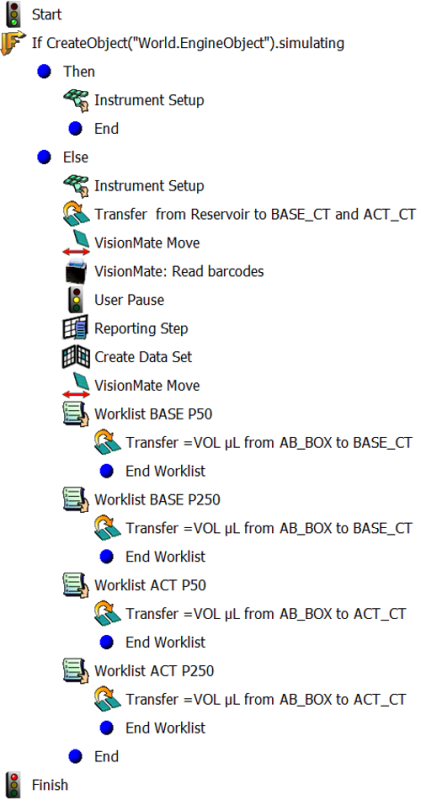 Figure 2. Overview of the method for making "Base Cocktail" and "Activation Cocktail". Steps in the method for making "Base Cocktail" and "Activation Cocktail" in the software for the automated liquid handler are shown. Please click here to view a larger version of this figure.
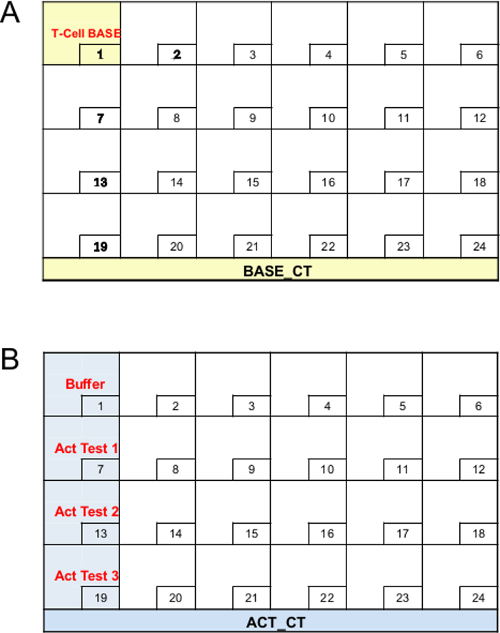 Figure 3. Layout for the tube rack with BACE_CT and ACT_CT. (A) shows layout for the tube rack "BACE_CT". (B) shows layout for the tube rack "ACT_CT". Please click here to view a larger version of this figure.
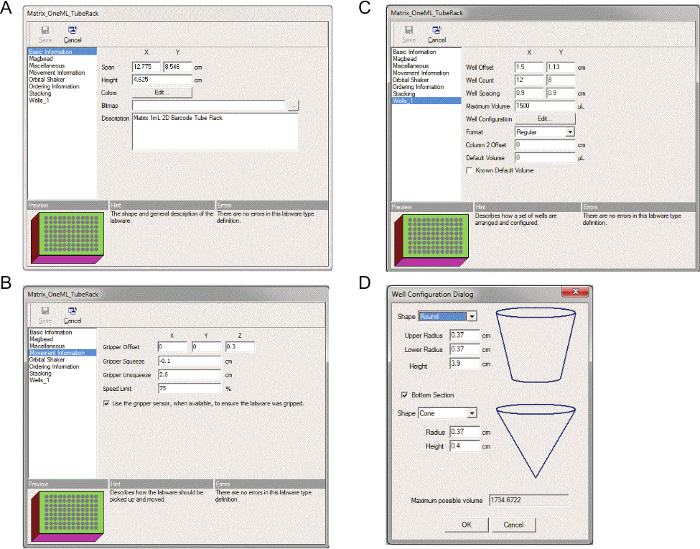 Figure 4. Labware definition for the tube rack with 2D barcode tubes. Step by step process of defining the tube rack with 2D barcode tubes. Please click here to view a larger version of this figure.
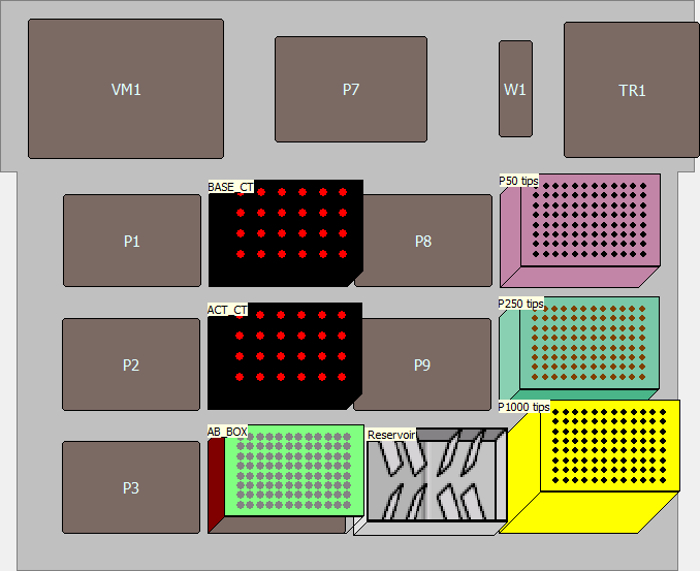 Figure 5. Instrument setup for the method for making "Base Cocktail" and "Activation Cocktail". It shows the deck layout for the method for making "Base Cocktail" and "Activation Cocktail". Please click here to view a larger version of this figure.
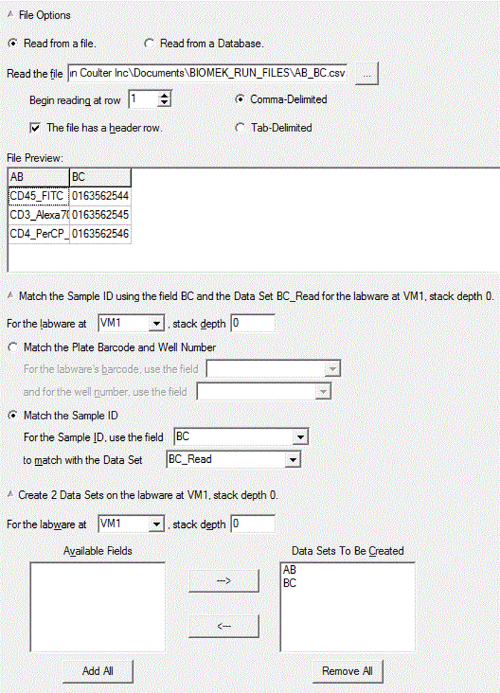 Figure 6. Setup for "Create Data Set". It shows detailed setting for "Create Data Set". Please click here to view a larger version of this figure.
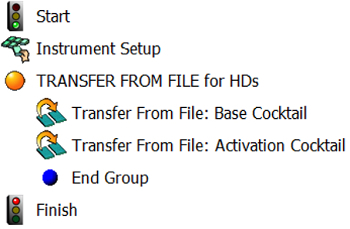 Figure 7. Overview of the method for making "Master Antibody Cocktail". Steps in the method for making "Master Antibody Cocktail" in the software for the automated liquid handler is shown. Please click here to view a larger version of this figure.
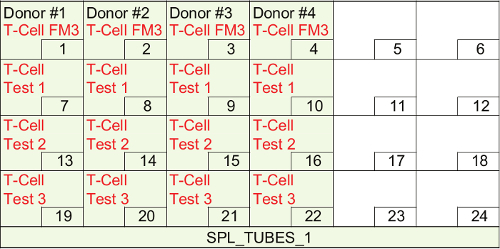 Figure 8. Layout for the tube rack with 5 ml round-bottom polystyrene tubes. It shows layout for the tube rack "SPL_TUBES_1". FM3 means fluorescence minus 3 (brilliant violet 421, phycoerythrin, and allophycocyanin). Please click here to view a larger version of this figure.
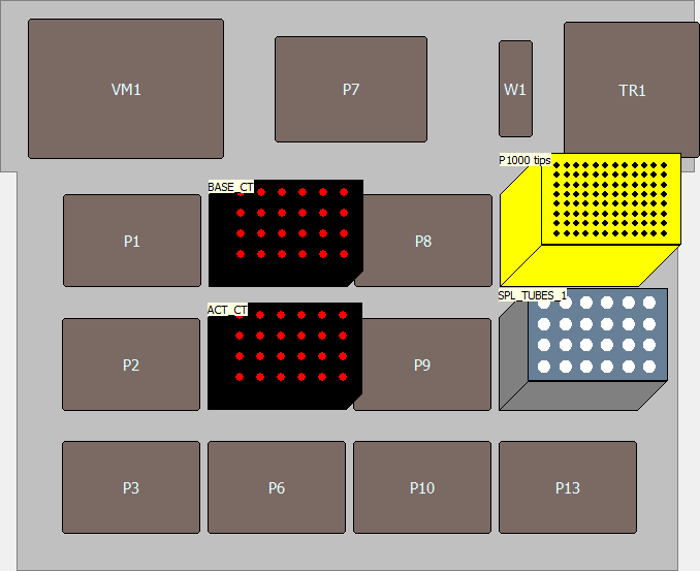 Figure 9. Instrument setup for the method for making "Master Antibody Cocktail". It shows the deck layout for the method for making "Master Antibody Cocktail". Please click here to view a larger version of this figure.
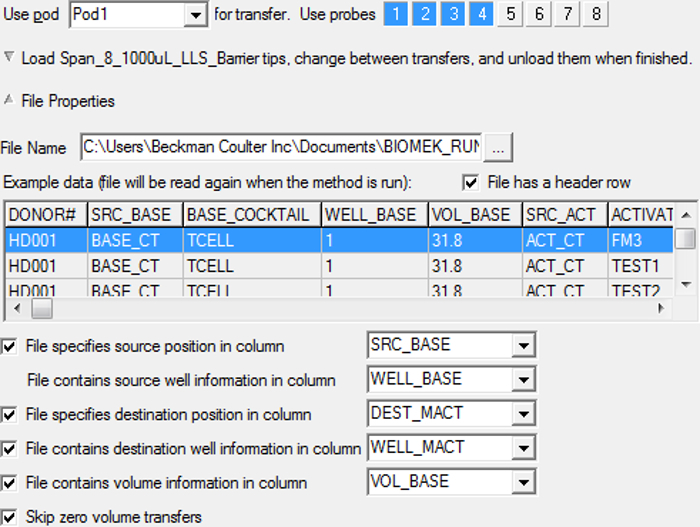 Figure 10. Setup for "Transfer From File". It shows detailed setting for "Transfer From File". Please click here to view a larger version of this figure.
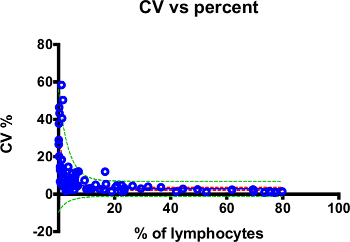 Figure 11. Low variability in semi-automated whole blood immunophenotyping. Single CV values of all cell populations analyzed from four healthy donors are shown as blue open circle. Regression curve is shown in the blue line. Red dotted lines indicate 95% confident bands and greed dotted lines show 95% prediction bands. Please click here to view a larger version of this figure.
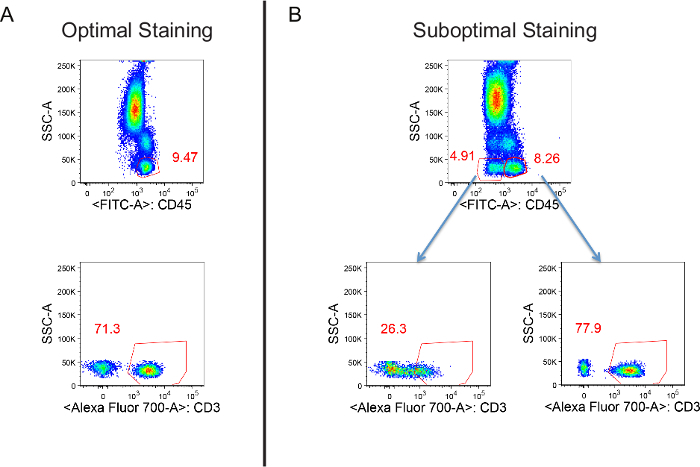 Figure 12. An example of suboptimal staining. Staining was conducted with adequate or inadequate vortexing of microfuge tubes from "BACE_CT" and "ACT_CT". There are two gated populations in B. The minor population with weak CD45 staining represents cells that do not get optimal staining. Please click here to view a larger version of this figure.
| GROUP | MARKER | FLUOROPHORE | Clone | TITER (µl/staining) | |
| BASE COCKTAIL | TCELL | CD45 | FITC | 2D1 | 0.4 |
| CD3 | Alexa700 | UCHT1 | 1 | ||
| CD8 | APC-H7 | SK1 | 0.4 | ||
| CD4 | PerCP-CY5.5 | SK3 | 2 | ||
| CCR7 | PE-CF594 | 150503 | 1 | ||
| CD45RA | PE-Cy7 | L48 | 1 | ||
| TCRab | BV786 | T10B9.1A-31 | 1 | ||
| TCRgd | BV650 | B1 | 5 | ||
| ACTIVATION COCKTAIL-1 | TEST1 | HLA-DR | BV421 | G46-6 | 5 |
| CD278(ICOS) | PE | DX29 | 5 | ||
| CD38 | APC | HB7 | 1 | ||
| ACTIVATION COCKTAIL-2 | TEST2 | CD279(PD1) | BV421 | EH12.1 | 2.5 |
| CD357(GITR) | PE | eBioAITR | 5 | ||
| CD137(41BB) | APC | 4B4-1 | 10 | ||
| ACTIVATION COCKTAIL-3 | TEST3 | CD69 | BV421 | FN50 | 1 |
| CD314(NKG2D) | PE | 1D11 | 2 | ||
| CD134(OX40) | APC | ACT35 | 5 |
Table 1. An antibody list for the modified T cell panel.
| AB | BC |
| CD45_FITC | 0163562388 |
| CD3_Alexa700 | 0163562110 |
| CD4_PerCP_CY5.5 | 0163562364 |
| CD8_APC-H7 | 0163562363 |
| CCR7_PE-CF594 | 0163562387 |
| CD45RA_PE-Cy7 | 0163562091 |
| TCRab_BV786 | 0163562069 |
| TCRgd_BV650 | 0163562108 |
| A_HLA-DR_BV421 | 0163562339 |
| A_CD278(ICOS)_PE | 0163562082 |
| A_CD38_APC | 0163562317 |
| A_CD279(PD1)_BV421 | 0163562340 |
| A_CD357(GITR)_PE | 0163562093 |
| A_CD137(41BB)_APC | 0163562315 |
| A_CD69_BV421 | 0163562341 |
| A_CD314(NKG2D)_PE | 0163562314 |
| A_CD134(OX40)_APC | 0163562316 |
Table 2. Antibody names with 2D barcode numbers.
| GROUP | WELL_BASE | AB_NAME | VOL |
| TCELL | 1 | CD8_APC-H7 | 7.2 |
| TCELL | 1 | CD45_FITC | 7.2 |
| TCELL | 1 | CD3_Alexa700 | 18 |
| TCELL | 1 | CCR7_PE-CF594 | 18 |
| TCELL | 1 | CD45RA_PE-Cy7 | 18 |
| TCELL | 1 | TCRab_BV786 | 18 |
Table 3. A file "BASE_CT_P50": antibody names and volume information.
| GROUP | WELL_BASE | AB_NAME | VOL |
| TCELL | 1 | CD4_PerCP_CY5.5 | 36 |
| TCELL | 1 | TCRgd_BV650 | 90 |
Table 4. A file "BASE_CT_P200": antibody names and volume information.
| GROUP | WELL_ACT | AB_NAME | VOL |
| TEST1 | 7 | A_HLA-DR_BV421 | 30 |
| TEST1 | 7 | A_CD278(ICOS)_PE | 30 |
| TEST1 | 7 | A_CD38_APC | 6 |
| TEST2 | 13 | A_CD279(PD1)_BV421 | 15 |
| TEST2 | 13 | A_CD357(GITR)_PE | 30 |
| TEST3 | 19 | A_CD314(NKG2D)_PE | 12 |
| TEST3 | 19 | A_CD69_BV421 | 6 |
| TEST3 | 19 | A_CD134(OX40)_APC | 30 |
Table 5. A file "ACT_ CT_P50": antibody names and volume information.
| GROUP | WELL_ACT | AB_NAME | VOL |
| TEST2 | 13 | A_CD137(41BB)_APC | 60 |
Table 6. A file "ACT_CT _P200": antibody names and volume information.
| DONOR# | SRC_ BASE | BASE COCKTAIL | WELL_ BASE | VOL_ BASE | SRC_ACT | ACTI- VATION COCKTAIL | WELL_ ACT | VOL_ACT | DEST_MACT | WELL_ MACT |
| HD001 | BASE_CT | TCELL | 1 | 36.8 | ACT_CT | FM3 | 1 | 25 | SPL_TUBES_1 | 1 |
| HD001 | BASE_CT | TCELL | 1 | 36.8 | ACT_CT | TEST1 | 7 | 36 | SPL_TUBES_1 | 7 |
| HD001 | BASE_CT | TCELL | 1 | 36.8 | ACT_CT | TEST2 | 13 | 42.5 | SPL_TUBES_1 | 13 |
| HD001 | BASE_CT | TCELL | 1 | 36.8 | ACT_CT | TEST3 | 19 | 33 | SPL_TUBES_1 | 19 |
| HD002 | BASE_CT | TCELL | 1 | 36.8 | ACT_CT | FM3 | 1 | 25 | SPL_TUBES_1 | 2 |
| HD002 | BASE_CT | TCELL | 1 | 36.8 | ACT_CT | TEST1 | 7 | 36 | SPL_TUBES_1 | 8 |
| HD002 | BASE_CT | TCELL | 1 | 36.8 | ACT_CT | TEST2 | 13 | 42.5 | SPL_TUBES_1 | 14 |
| HD002 | BASE_CT | TCELL | 1 | 36.8 | ACT_CT | TEST3 | 19 | 33 | SPL_TUBES_1 | 20 |
| HD003 | BASE_CT | TCELL | 1 | 36.8 | ACT_CT | FM3 | 1 | 25 | SPL_TUBES_1 | 3 |
| HD003 | BASE_CT | TCELL | 1 | 36.8 | ACT_CT | TEST1 | 7 | 36 | SPL_TUBES_1 | 9 |
| HD003 | BASE_CT | TCELL | 1 | 36.8 | ACT_CT | TEST2 | 13 | 42.5 | SPL_TUBES_1 | 15 |
| HD003 | BASE_CT | TCELL | 1 | 36.8 | ACT_CT | TEST3 | 19 | 33 | SPL_TUBES_1 | 21 |
| HD004 | BASE_CT | TCELL | 1 | 36.8 | ACT_CT | FM3 | 1 | 25 | SPL_TUBES_1 | 4 |
| HD004 | BASE_CT | TCELL | 1 | 36.8 | ACT_CT | TEST1 | 7 | 36 | SPL_TUBES_1 | 10 |
| HD004 | BASE_CT | TCELL | 1 | 36.8 | ACT_CT | TEST2 | 13 | 42.5 | SPL_TUBES_1 | 16 |
| HD004 | BASE_CT | TCELL | 1 | 36.8 | ACT_CT | TEST3 | 19 | 33 | SPL_TUBES_1 | 22 |
Table 7. A file "AB_MACT": Source and destination information for "Master Antibody Cocktail".
| Population # in Fig. 1 | i | ii | iii | iv | v | |
| Population name | CD3+ | ab T cells | gd T cells | CD3+CD4+ | CD3+CD8+ | |
| % of lymphocytes | Heathly donor #1 | 79.80 | 75.20 | 2.70 | 49.60 | 22.30 |
| Heathly donor #2 | 69.40 | 61.90 | 5.85 | 44.40 | 16.20 | |
| Heathly donor #3 | 75.80 | 69.60 | 4.75 | 42.00 | 23.50 | |
| Heathly donor #4 | 77.20 | 73.50 | 1.98 | 52.70 | 18.90 | |
| %CV | Heathly donor #1 | 1.42 | 1.58 | 3.70 | 2.50 | 1.56 |
| Heathly donor #2 | 2.48 | 2.39 | 5.74 | 2.82 | 2.41 | |
| Heathly donor #3 | 1.15 | 1.40 | 6.32 | 1.42 | 2.72 | |
| Heathly donor #4 | 0.81 | 0.94 | 5.45 | 1.20 | 1.44 | |
| Average | 1.47 | 1.58 | 5.30 | 1.99 | 2.03 | |
| Standard deviation | 0.72 | 0.61 | 1.13 | 0.79 | 0.63 |
Table 8. Raw data for % of lymphocytes and % CV for each subset plotted in Figure 4. Note that data for Tests 2 and 3 are not shown in Figure 5 and Table 8 to simplify data presentation.
Discussion
Immunophenotyping of peripheral blood is critically important for gaining insights into individual responses to immunotherapy. The challenge lies in assay standardization to control experiment-to-experiment variability1,14. One main source of variability lies in the human manipulation of samples. Therefore, it is conceivable that partial or full automation of sample processing will facilitate a dramatic reduction in experiment-to-experiment variability1,14. In this protocol, we report our successful effort to minimize assay variability by introducing an automated liquid handler equipped with 2D barcode reader for sample staining in whole blood immunophenotyping.
In design, our method is versatile and can monitor other immune subsets by adding additional "Base Cocktails" to define them. Such subsets include T helper cells, T regulatory cells, B cells, NK cells, dendritic cells, and monocytes (manuscript in preparation)18. We adapted the consortium's recommended antibody panels by introducing additional markers1. Cell populations were identified using "Base Cocktail" conjugated to fluorochromes with minimal emission into the brilliant violet 421 (BV421), phycoerythrin (PE), and allophycocyanin (APC) detectors, as we wanted to reserve these channels for the detection of inducible antigens. This feature not only ensures the highest sensitivity to monitor activation status of immune cells but also enables flexible accommodation of new activation markers as these three fluorochromes are most frequently conjugated with antibodies against inducible markers. Therefore, our method is not only suitable for cocktail preparation for whole blood immunophenotyping but is also useful for staining other samples including peripheral blood mononuclear cells and cells recovered from disaggregated tissues (e.g., tumor).
Successful introduction of our method requires special attention to steps in labware preparation, and programing and execution of the method. Preparation of the 2D barcode tubes includes labeling with human-readable labels and transferring of the antibodies to the designated tubes. To prevent the introduction of errors, we recommend doing this with two people. Whenever changing spreadsheets, investigators should verify whether the method works properly. Choosing appropriate pipetting methods during programing ensures successful liquid transfer. LLS enables pipetting without getting precipitated debris from the bottom of antibody tubes, for which we use either P50 or P200 conductive tips. LLS may not be a good option for P1000 tips as LLS is more sensitive with P1000 tips and sometimes falsely triggered by presence of bubbles. Heights in labware definition should be adjusted for each instrument as suboptimal liquid transfer could occur, for example, if there is not enough space between the edge of tips and the bottom of tubes. As shown in Figure 12, if the "Base Cocktail" and/or "Activation Cocktail" are not vortexed well, it may result in suboptimal staining.
We thought about using lyophilized reagents for cell staining as an alternative approach to reduce variability related with reagent dispensing19. However, polymer conjugates of brilliant violet dyes are known to interact with each other causing non-specific signals. As such, adding more than two polymer conjugates (e.g., BV421 and BV650 etc.) in lyophilized reagents may cause non-specific signaling (e.g., increase of BV650 background signal in BV421+ population)20. Moreover, lyophilized reagents lack flexibility for including new staining. They are usually more expensive and require a bulk order. For those reasons, we chose to use the automated liquid handler equipped with the 2D barcode tubes. Although it takes time to set up and entails an upfront investment to purchase the instrument, in the long run such factors will be compensated for by the increased productivity and reproducibility of assays. In fact, a few groups previously reported the successful integration of the automated liquid handler into their workflow of immunophenotyping or similar applications21,22. Automated solutions for flow cytometry analysis are also available from commercial sources (FACS SPA III, Automated Cocktail Preparation Workstation, and FlowStainer). This further indicates there is a great need for automated cocktail preparation for immunophenotyping.
After mastering this technique, we envision that the development of fully automated whole blood immunophenotyping will further reduce experiment-to-experiment variability and might make whole blood immunophenotyping feasible even in a multicenter clinical trial setting23. We have already begun using a lyse wash assistant to automate the lysis and washing steps. We also envision that automated determination of the volume of antibody in the 2D barcode tubes and the tracking of reagent dispensing will greatly improve inventory of antibodies and the quality control over our method, respectively.
Disclosures
YK, ILG, TLM, WLM, DPH, and KSB: No competing financial interests. ANT is an employee of Beckman Coulter, Inc. Publication of this video article is sponsored by Beckman Coulter, Inc.
Acknowledgments
We thank Hannah Puzas for assistance with system design and configuration, and Kevin Khovananth for technical advice. Funding for this work was provided by The Hearst Foundations and the Providence Portland Medical Foundation.
References
- Maecker HT, McCoy JP, Nussenblatt R. Standardizing immunophenotyping for the Human Immunology Project. Nat. Rev. Immunol. 2012;12(3):191–200. doi: 10.1038/nri3158. [DOI] [PMC free article] [PubMed] [Google Scholar]
- Craig FE, Foon KA. Flow cytometric immunophenotyping for hematologic neoplasms. Blood. 2008;111(8):3941–3967. doi: 10.1182/blood-2007-11-120535. [DOI] [PubMed] [Google Scholar]
- Johansson U, Bloxham D, et al. Guidelines on the use of multicolour flow cytometry in the diagnosis of haematological neoplasms. Br. J. Haematol. 2014;165(4):455–488. doi: 10.1111/bjh.12789. [DOI] [PubMed] [Google Scholar]
- Schnizlein-Bick CT, Spritzler J, et al. Evaluation of TruCount Absolute-Count Tubes for Determining CD4 and CD8 Cell Numbers in Human Immunodeficiency Virus-Positive Adults. Clin. Vaccine Immunol. 2000;7(3):336–343. doi: 10.1128/cdli.7.3.336-343.2000. [DOI] [PMC free article] [PubMed] [Google Scholar]
- Cossarizza A, De Biasi S, et al. Cytometry, immunology, and HIV infection: Three decades of strong interactions. Cytometry A. 2013;83(8):680–691. doi: 10.1002/cyto.a.22318. [DOI] [PubMed] [Google Scholar]
- Hensley TR, Easter AB, et al. Enumeration of Major Peripheral Blood Leukocyte Populations for Multicenter Clinical Trials Using a Whole Blood Phenotyping Assay. J. Vis. Exp. 2012. p. e4302. [DOI] [PMC free article] [PubMed]
- Streitz M, Miloud T, et al. Standardization of whole blood immune phenotype monitoring for clinical trials: panels and methods from the ONE study. Transplant. Res. 2013;2(1):17. doi: 10.1186/2047-1440-2-17. [DOI] [PMC free article] [PubMed] [Google Scholar]
- Hensley-McBain T, Heit A, De Rosa SC, McElrath MJ, Andersen-Nissen E. Optimization of a whole blood phenotyping assay for enumeration of peripheral blood leukocyte populations in multicenter clinical trials. J. Immunol. Methods. 2014;411:23–36. doi: 10.1016/j.jim.2014.06.002. [DOI] [PMC free article] [PubMed] [Google Scholar]
- Green CL, Brown L, Stewart JJ, Xu Y, Litwin V, Closkey TWM. Recommendations for the validation of flow cytometric testing during drug development: I instrumentation. J. Immunol. Methods. 2011;363(2):104–119. doi: 10.1016/j.jim.2010.07.004. [DOI] [PubMed] [Google Scholar]
- O'Hara DM, Xu Y, Liang Z, Reddy MP, Wu DY, Litwin V. Recommendations for the validation of flow cytometric testing during drug development: II assays. J. Immunol. Methods. 2011;363(2):120–134. doi: 10.1016/j.jim.2010.09.036. [DOI] [PubMed] [Google Scholar]
- Owens MA, Vall HG, Hurley AA, Wormsley SB. Validation and quality control of immunophenotyping in clinical flow cytometry. J. Immunol. Methods. 2000;243(1-2):33–50. doi: 10.1016/s0022-1759(00)00226-x. [DOI] [PubMed] [Google Scholar]
- Kalina T, Flores-Montero J, et al. EuroFlow standardization of flow cytometer instrument settings and immunophenotyping protocols. Leukemia. 2012;26(9):1986–2010. doi: 10.1038/leu.2012.122. [DOI] [PMC free article] [PubMed] [Google Scholar]
- Calvelli T, Denny TN, Paxton H, Gelman R, Kagan J. Guideline for flow cytometric immunophenotyping: a report from the National Institute of Allergy and Infectious Diseases, Division of AIDS. Cytometry A. 1993;14(7):702–715. doi: 10.1002/cyto.990140703. [DOI] [PubMed] [Google Scholar]
- Biancotto A, McCoy JP. Studying the human immunome: the complexity of comprehensive leukocyte immunophenotyping. Curr. Top. Microbiol. Immunol. 2014;377:23–60. doi: 10.1007/82_2013_336. [DOI] [PMC free article] [PubMed] [Google Scholar]
- Perfetto SP, Ambrozak D, Nguyen R, Chattopadhyay P, Roederer M. Quality assurance for polychromatic flow cytometry. Nat. Protoc. 2006;1(3):1522–1530. doi: 10.1038/nprot.2006.250. [DOI] [PubMed] [Google Scholar]
- Yong PFK, Salzer U, Grimbacher B. The role of costimulation in antibody deficiencies: ICOS and common variable immunodeficiency. Immunol. Rev. 2009;229(1):101–113. doi: 10.1111/j.1600-065X.2009.00764.x. [DOI] [PubMed] [Google Scholar]
- Donnenberg AD, Donnenberg VS. Rare-Event Analysis in Flow Cytometry. Clin. Lab. Med. 2007;27(3):627–652. doi: 10.1016/j.cll.2007.05.013. [DOI] [PubMed] [Google Scholar]
- Biancotto A, Fuchs JC, Williams A, Dagur PK, McCoy JP. High dimensional flow cytometry for comprehensive leukocyte immunophenotyping (CLIP) in translational research. J. Immunol. Methods. 2011;363(2):245–261. doi: 10.1016/j.jim.2010.06.010. [DOI] [PMC free article] [PubMed] [Google Scholar]
- Villanova F, Di Meglio P, et al. Integration of Lyoplate Based Flow Cytometry and Computational Analysis for Standardized Immunological Biomarker Discovery. PloS One. 2013;8(7):e65485. doi: 10.1371/journal.pone.0065485. [DOI] [PMC free article] [PubMed] [Google Scholar]
- BD biosciences. Optimizing Experiments Using BD Horizon Brilliant Polymer Conjugates. 2014.
- Malergue F, van Agthoven A, Scifo C, Egan D, Strous GJ. Automation of a Phospho-STAT5 Staining Procedure for Flow Cytometry for Application in Drug Discovery. J. Biomol. Screen. 2015;20(3):416–421. doi: 10.1177/1087057114555477. [DOI] [PubMed] [Google Scholar]
- Hasan M, Beitz B, et al. Semi-automated and standardized cytometric procedures for multi-panel and multi-parametric wholeblood immunophenotyping. Clin. Immunol. 2015;157(2):261–276. doi: 10.1016/j.clim.2014.12.008. [DOI] [PubMed] [Google Scholar]
- Maecker HT, McCoy JP, et al. A model for harmonizing flow cytometry in clinical trials. Nat. immunol. 2010;11(11):975–978. doi: 10.1038/ni1110-975. [DOI] [PMC free article] [PubMed] [Google Scholar]


