Abstract
A multi-sensor flexible strip is developed for a urethral catheter to measure distributed pressure in a human urethra. The developed sensor strip has important clinical applications in urodynamic testing for analyzing the causes of urinary incontinence in patients. There are two major challenges in the development of the sensor. First, a highly sensitive sensor strip that is flexible enough for urethral insertion into a human body is required and second, the sensor has to work reliably in a liquid in-vivo environment in the human body. Capacitive force sensors are designed and micro-fabricated using polyimide/PDMS substrates and copper electrodes. To remove the parasitic influence of urethral tissues which create fringe capacitance that can lead to significant errors, a reference fringe capacitance measurement sensor is incorporated on the strip. The sensing strip is embedded on a catheter and experimental in-vitro evaluation is presented using a bench-top pressure chamber. The sensors on the strip are able to provide the required sensitivity and range. Preliminary experimental results also show promise that by using measurements from the reference parasitic sensor on the strip, the influence of parasitics from human tissue on the pressure measurements can be removed.
Keywords: instrumented catheter, urethral sensors, in vivo sensors, catheter pressure sensors, in vivo force sensors, parasitic capacitance, capacitive sensors
I. Introduction
Urinary incontinence (UI), as defined by the International Continence Society, is “the complaint of any involuntary leakage of urine” [1]. The most common type of urinary incontinence in women is stress urinary incontinence (SUI), followed by urge and mixed incontinence [2]. Urinary incontinence is not a life-threatening or dangerous condition, but it is socially embarrassing and may cause withdrawal from social situations and reduce quality of life [3]. An estimated 80% of people affected are women [4-11]. Urinary incontinence is believed to affect at least 13 million people in the United States, and this number is expected to increase sharply with the aging of the baby boomers.
A variety of approaches have been designed to diagnose the cause of SUI. The most widely used method is urodynamics [12] to measure storage and voiding functions of the urinary bladder and the urethra. Urodynamic testing normally consists of two main phases [13]: filling cystometry to investigate storage of urine in the bladder, including ability to store without leakage during provocative maneuvers such as coughing and in-spot jogging, and pressure-flow measurement to examine urine voiding performance.
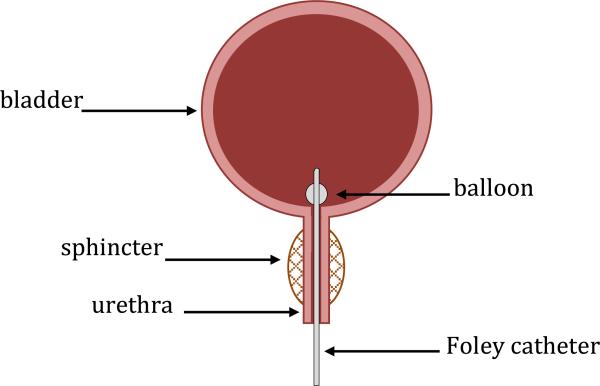
During these tests a thin, flexible catheter, called a Foley catheter, is inserted into the bladder through the urethra (Figure 1). The most advanced catheter on the market is a micro-tip catheter with a single pressure sensor at the tip which can measure the pressure in the bladder [14]. Current methods for recording distributed urethral closure pressures require pulling the same single microtip pressure sensing catheter through the urethra in order to measure pressure at different locations in the urethra [13].
Fig. 1.
Foley catheter inserted into urethra.
More sophisticated testing uses an intravaginal or peri-anal electrode to additionally measure the electrical activity of the pelvic floor muscles [15]. Further ambulatory urodynamic studies with natural filling are also applied for patients to avoid the unnatural environment of the urodynamic clinic [16]. Ambulatory studies have been found useful for confirming overactive detrusor muscle activity in patients for whom conventional urodynamic tests failed to reproduce symptoms [17].
The urodynamic methods described above cannot provide pressure distributions in the urethra in real-time. They can only measure pressure at a single point in the urethra. They also preclude the conduct of recording urethral pressure profiles during provocative manoeuvres, such as coughing and val salva. Furthermore, the cost of a current single microtip pressure sensing catheter is extremely high (>$2000) and so even the use of these inadequate catheters poses a significant health cost.
Unique Catheter Features
An instrumented catheter with a capability to measure pressure and forces at multiple locations in the urethra is developed with the following unique features:
The developed catheter will provide simultaneous measurement of pressure at multiple locations in the urethra with one static device, instead of the current technique of moving the device to measure pressure at one location at a time. The proposed technique provides real-time measurement of the distribution of pressure and can be used for urethral measurement during provocative maneuvers, such as coughing, pressing the stomach, etc.
The developed sensing device will be highly flexible for insertion into the urethra and highly compact for inclusion on a 2.6 (mm) diameter catheter.
The proposed sensor system relies on an inexpensive disposable sensor strip. The sensor strip can be utilized with catheters of various sizes, as long as the slot size is standardized for the strip in all catheters.
In order to obtain adequate sensitivity for measurement of low urethral pressures, capacitive sensors with small micron-sized air-gaps on a flexible substrate are utilized. With capacitive sensors, parasitic fringe capacitance from human tissues is a significant source of error. This error is removed by using a reference sensor that is insensitive to pressure but measures parasitic capacitance only.
The sensors will utilize signal lines embedded on the sensor strip. A single electronic interface at the distal end of the catheter will enable all sensor signals to be read simultaneously.
The sensor is fabricated using pre-fabricated flexible copper-on-PI substrate. The top and bottom electrodes are fabricated separately and then assembled together using a channeled-PDMS dielectric. A custom-designed aligner to render the sensor layers to be optically transparent and enable alignment of the layers for assembly is used.
Biomedical pressure sensors have previously been developed in literature for cardiac, eye and brain applications ([24], [25], [26]). However, all of these applications involve only a single sensor, and not a series of pressure sensors on a flxible substrate for distributed force measurement. The urological domain has never previously been addressed.
II. Technical Sensor Design
Various force/contact-pressure sensing mechanisms could be explored for urethral pressure measurement. Piezoelectric sensors [18] could not be used for this application, since typical piezoelectric materials do not measure static forces and the pressure distribution to be measured in this application is either static or varying very slowly in time. Piezoresistive sensors [19] could not be used either, since they are susceptible to drift and require either calibration just before the measurement or compensation in order to be able to measure absolute pressures with accuracy. Given the small size of the catheter, it was therefore decided to use the flexible capacitive sensing mechanism [20, 21], due to its high sensitivity for measuring low and static force/pressure with adequate resolution, even though it has the inherent problem of parasitic capacitance errors in the case of proximity to human tissues.
The overall strategy is to fabricate an 8 Fr. Foley catheter with distributed pressure sensors along the length of the catheter. Figure 2 shows the schematic of a proposed architecture for the instrumented catheter. The Foley retention balloon helps the catheter stay inside the urethra. Pressure sensors 1 to 9 measure the contact pressure distribution in the urethra. Since the urethra length is about 4 cm in humans, the 9 pressure sensors have to be located within 4 cm. To use the maximum available space on the catheter, the width of each capacitive sensor on the strip is chosen to be 400 μm and the length to be 3.64 mm in order to accommodate 9 sensors in the urethra. The typical maximum pressure inside the bladder that needs to be measured is about 100 cm H2O which is 1.42 psi. The specifications were therefore chosen as a sensing resolution of 0.1 psi with a maximum pressure reading capability of 5 psi.
Fig. 2.
Instrumented catheter with sensors.
Figure 3 shows a schematic of the sensor strip, the signal lines from the sensors and the reference electrode that is used for parasitic removal which will be discussed later.
Fig. 3.
Instrumented catheter with sensors (top view).
A capacitive sensor is the basic pressure measurement sensing unit utilized as part of an array in this project. There are two electrodes in the capacitive sensor, one on top and the other on the bottom as shown in Figure 4.
Fig. 4.
Mechanical model of a capacitor.
In the schematic in Figure 4, a sensing electrode is at the bottom of the sensor under a dielectric. The top electrode is the common ground plate for all the sensors. The deflection of the top electrode causes the distance between the electrodes and hence the capacitance of the sensor to change, after which the capacitance change can be measured and can be converted back into pressure readout.
If the distance between the electrodes is changed by applying a normal force on them, then the capacitance changes. The sensitivity of capacitance change to the applied pressure can be calculated as follows [22]:
| (eq. 1) |
| (eq. 2) |
where ε0 is the permittivity of air which is 8.85 × 10⁻¹² F/m, A is the common area of the plates and D is the distance between them.
From static equilibrium of the top electrode under a deflection ΔD due to a pressure ΔP, the sensitivity of the sensor can be found as follows
| (eq. 3) |
where k is the stiffness of the top electrode and S is the sensitivity of the sensor and shows the change in capacitance due to change in applied pressure.
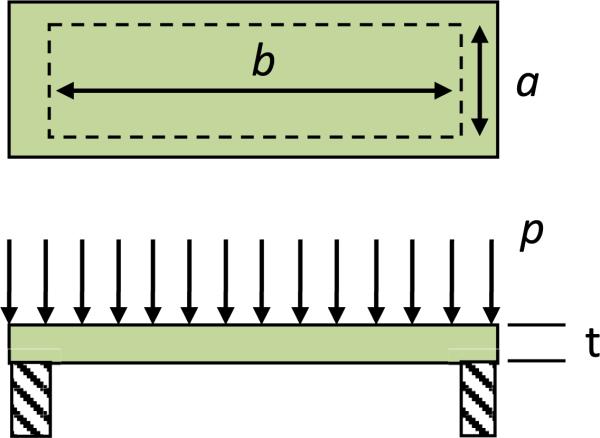
The sensitivity depends on the stiffness of the deformable electrode. To estimate the stiffness, k, of an individual sensor, the electrode is modeled as a clamped copper rectangular membrane under uniform pressure p, as shown in Figure 5.
Fig. 5.
Mechanical model of a capacitor's electrode.
The maximum deflection of rectangular diaphragms is at the center and is [23]
| (eq. 4) |
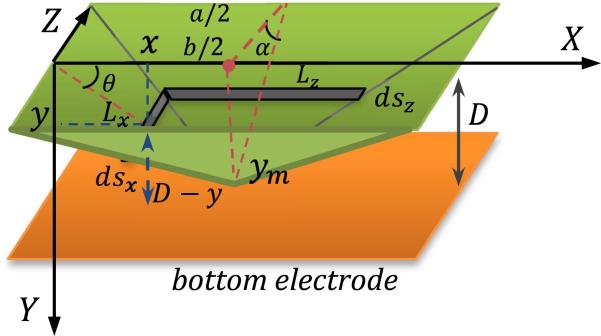
where p is the applied pressure, a is the dimension of shorter edge, b is the dimension of the longer edge, t is the diaphragm thickness and E is the modulus of elasticity of the structural material. Since the total distance between top and bottom electrode is just 10 μm, while the lateral dimensions of each top electrode is 400 μm × 3644 μm, it is assumed that the deformation of the membrane is linear (Figure 6). Indeed the central deflection from eq. (4) is found to be less than 1 micron even for maximum pressure. The approximate capacitance change due to applied pressure can then be calculated.as follows.
Fig. 6.
Top electrode is assumed to deflect linearly due to applied pressure.
The total capacitance after pressure is applied is the integral of the infinitesimal capacitors shown in Figure 6, integrated over the area of the plate. The calculation of the total capacitance is shown in eq. 5.
| (eq. 5) |
where and . To find the order of capacitance change, the sensor design parameters D = 10 μm, εr = 1, ΔP = 0.1 psi and Ecopper = 17.0 × 10⁶ psi for copper electrode should be plugged into for equation 4 and 5, and that gives ym = 30 nm and ΔC ≅ 3.6 fF. Thus, the theoretical sensor sensitivity is expected to be 36 fF/psi. This level of capacitance change can be easily measured using commercial capacitance measurement chips.
This analysis has shown that a sensitivity capable of measuring 0.1 psi can be achieved by each of the sensors in the strip. Equation 3 can be rewritten as
| (eq. 6) |
where λ is a material parameter that is the ratio of electrical permittivity to mechanical stiffness and β is a geometric parameter and is the ratio of the common area of the electrodes to their relative distance. To improve sensitivity, λ and β need to be made as high as possible.
III. Sensor Fabrication
The sensor strip contains three sub layers, as shown in Figure 7:
Bottom electrode that is used to sense the individual capacitance change on each sensor which is related to applied pressure,
Dielectric layer which is an air cavity in a PDMS frame so as to minimize resistance to deformation of the top electrode, and
Top deformable common electrode that is also a ground plate.
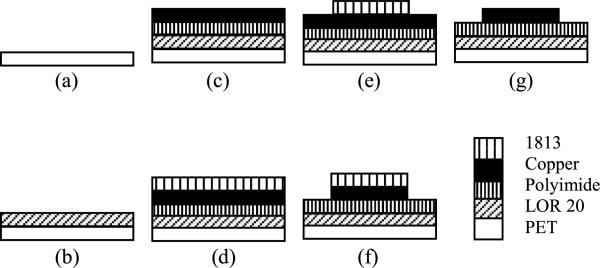
The fabrication of the sensor strip starts with a PET (Grafix Clear .005 Dura-Lar Film) substrate (Figure 8). This substrate choice helps in cutting out the sensor and at the same time provides optical transparency which is important later in the alignment of the top and bottom electrodes during assembly. The sensors and signal lines are made on a polyimide sheet with 9 μm electro deposited copper (AC091200EV from DuPont Flexible Circuit Materials Group). To add AC091200EV to PET as the substrate, lift-off-resist 10 μm LOR 20 B (MicroChem Corporation) was coated on PET. This layer is the sacrificial layer that will be dissolved in the developer to release the sensor at the end of the fabrication process. Then AC091200EV was added on the top of LOR 20B. The setup was then placed on a hotplate at 65 °C for 10 min to cure LOR 20B. Patterning of the copper layer to create the electrodes was initiated by coating copper by 2 μm photoresist 1813 (MicroChem Corporation). Due to the thermal expansion coefficient being higher for copper than the polyimide and PET layers, the setup cannot withstand temperature higher than 70 °C. Otherwise the copper layer will expand more than the polymer layers and everything will irreversibly deform. Hence, the standard operating procedure for curing photoresist 1813 was changed to soft baking at 65 °C for 3 min and hard baking at 65 °C for 15 min after photolithography. The electrodes and traces were then made by submerging it into copper etchant FeCl3:H2O 1:8 (v/v) (MG Chemicals 415 Ferric Chloride Liquid), at 50°C in the solution for 40 min. The Copper etch rate is about 225 nm/min in this solution. Subsequently, the photoresist 1813 was washed out in acetone and the electrodes were checked under microscope and tested with a multi-meter to ensure the integrity of all signal lines and electrodes.
Fig. 7.
Flexible capacitive sensor layers.
Fig. 8.
Electrode fabrication steps.
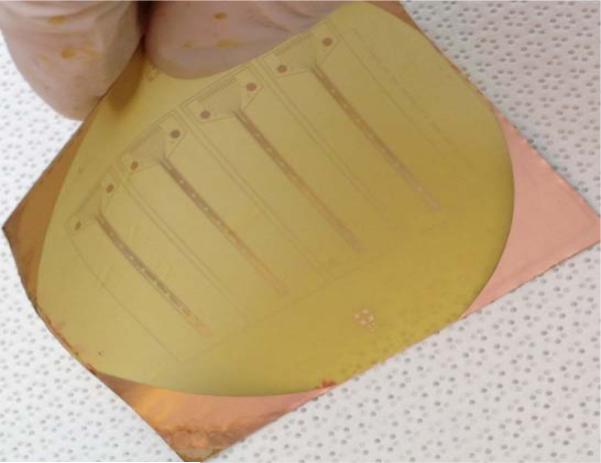
Figure 9 shows a photograph of the fabricated copper electrodes on polyimide substrate while it is bent.
Fig. 9.
Fabricated electrodes on translucent flexible substrate.
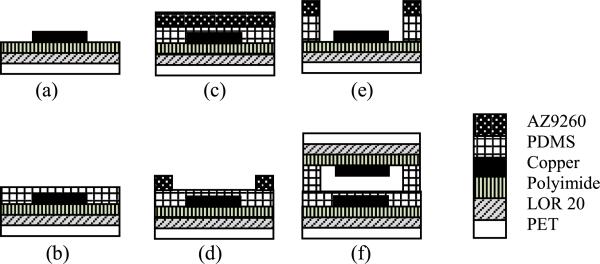
After fabrication of the top and bottom copper electrodes, a spacer layer from PDMS (Sylgard 184, Dow Corning) was made to hold the structure of the sensor together. PDMS is utilized for this purpose because it is transparent and flexible. For the spacer layer, PDMS was spun on both top and bottom electrodes separately. The thickness on the bottom electrode was 5 μm. This layer will prevent any short circuits between top and bottom electrodes in the case of exceeding the designed pressure range. The thickness on the top electrode was 5 μm for making the air cavity layer to allow deformation between top and bottom electrodes. After coating the electrodes with PDMS, they were placed on a hotplate at 65° C for 3 hours for to cure on polyimide layer (Figure 10). After this step, photoresist AZ9260 was spun, baked and patterned on PDMS to make a masking layer. The thickness of AZ9260 was 20 μm. Soft bake was at 70° C for 3 min with no hard bake. To make the 5 μm cavity, PDMS layer on top electrode is fully etched by plasma in the STS etch machine (SF6, 45 sccm, O2, 15 sccm, 100 mTorr, 100 W) (Figure 10c). The etching rate was 150 nm/min. After checking the etched profile with the surface profiler (Figure 11), the top and bottom electrodes on PET for each sensor were cut out by scissors. They were put in oxygen plasma (O2:75 sccm, 100 W) to clean the PDMS surface and prepare them for bonding. Alignment between top and bottom electrode-PDMS assemblies was done within 10 min, otherwise the surface had be treated by oxygen plasma again.
Fig. 10.
Fabrication process of flexible pressure sensor.
Fig. 11.
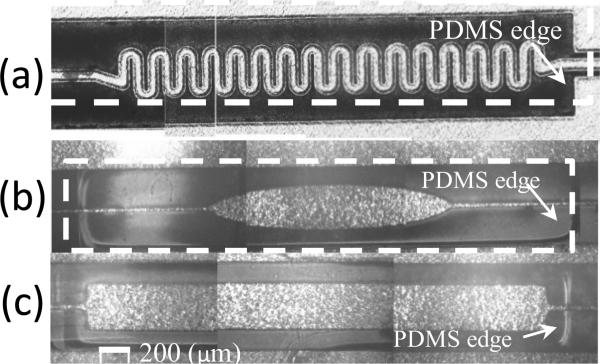
Three fabricated designs for top electrode: (a) spring shaped, (b) elliptical: a dashed rectangle is drawn to show the etched window in PDMS, (c) rectangular. PDMS cavity can be seen in (b) and (c).
Three different shapes for the top electrode were designed and fabricated to find the best one that meets the sensitivity requirements. The three shapes are the spring shaped electrode, the elliptical electrode and the rectangular electrode, as shown in the photographs in Figure 11. The spring shaped and elliptical electrodes have less metal and were therefore expected to be less stiff compared to the rectangular electrodes. However, the rectangular electrode has more metallic surface area and therefore more electrical sensivity. In addition to the metal, the top electrode has a polyimide substrate and hence the stiffness reduction achieved by reducing metal is limited.
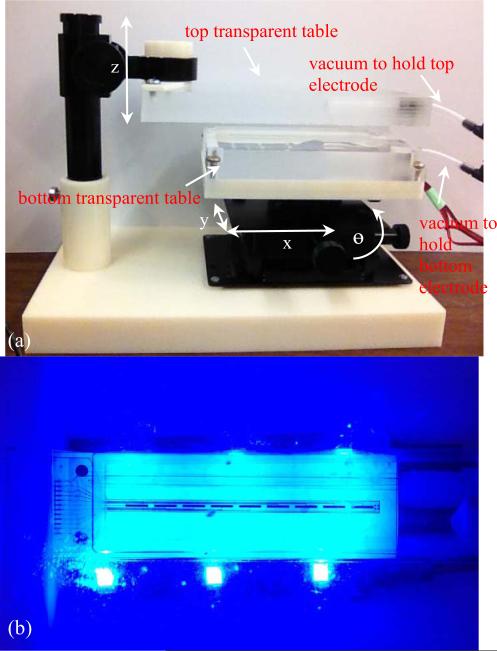
The top common ground electrode makes contact with a ground trace line on the bottom substrate through conductive epoxy after the PDMS-top-electrode structure is flip-chip assembled on the sensor strip. A four degree of freedom aligner was constructed for the aligning steps (Figure 12).
Fig. 12.
(a) top: 4 degree of freedom aligner to move and align top and bottom electrodes, (b) bottom: backlight that is used for aligning top and bottom layers.
Since the electrodes are flexible, they may easily wrinkle and create small waves on top of the substrate. Wrinkles can produce variability in the sensor resolution and range. Hence an aligner was made to hold the top and bottom electrodes using vacuum. The bottom stage can move in x and y directions and rotate around the z axis while the top electrode just moves in the z direction. Backlight through the bottom is provided by LEDs to see through the sensor. This is possible because of the polyimide and PDMS layers being translucent. So the alignment marks are visible if there is enough light from the bottom of the aligner. After careful lining up of the alignment marks and pressing the top and bottom layers slightly together, the vacuum was released. Then the whole setup was placed between two glassware slides and set on a hotplate at 70 °C for 10 hours overnight. Two 100 g calibrating weights were put on the glassware slide to provide uniform pressure for PDMS to PDMS bonding. Finally, to release the sensor it was put in AZ400K:H2O 1:5 (v/v) for 3 hours with 40% ultrasound. AZ400K dissolves LOR 20B and releases the sensor from PET.
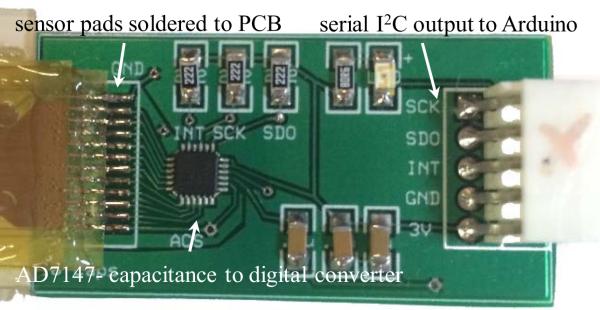
After alignment and bonding are completed, the sensor is cut out of the polyimide to be sandwiched between external PDMS layers for protection from liquid. Then the sensor is connected to a printed circuit board for data acquisition. The connections between the sensor and the PCB are made through a zero-insertion-force connector for flexible circuits (Figure 13). The PCB has a 16 bit capacitance to digital converter AD7147 (AnalogDevice) that reads the capacitance in the range of ±8 pF.
Fig. 13.
PCB interfaced to sensor showing major electronic components.
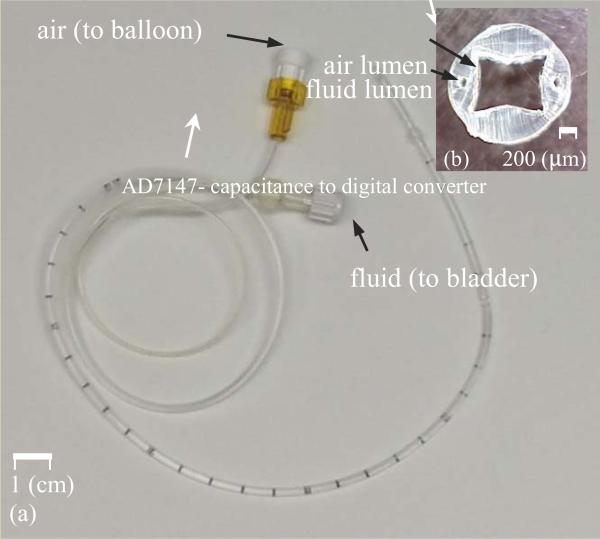
An 8 Fr. (2.6 mm diameter) Foley catheter is used as the device to be instrumented. The catheter has three separate lumens from the beginning all the way down the length of the catheter to the ending point inside bladder (Figure 14):
one square shape lumen (1100×1100 μm2) that is open at both ends, and allows urine to drain out into a collection bag and
two small and circular lumens (diameter 100μm) that connect to a balloon at the tip. The balloon is inflated with air when it is inside the bladder to prevent the catheter from coming out of the bladder.
Fig. 14.
(a) Foley catheter, (b) cross sectional view of the catheter.
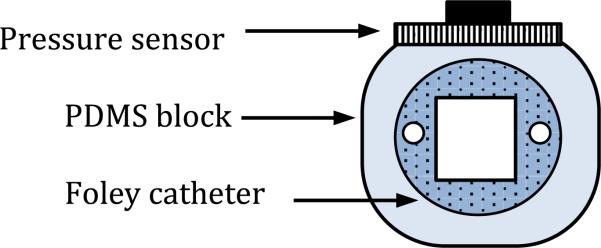
To install the sensor array on the catheter, a rectangular block from PDMS (transparent and flexible) is fabricated around the catheter by molding. PDMS is used to stick the micro-fabricated sensor to the flat surface (Figure 15).
Fig. 15.
Schematics of the sensor on the catheter.
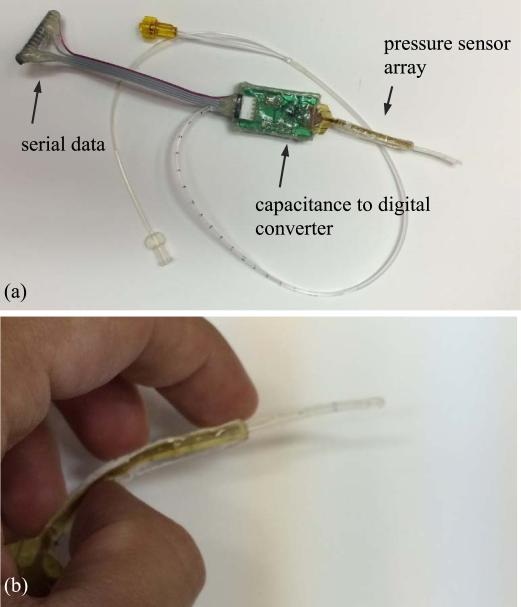
The sensor makes contact with the sphincter muscles inside the urethra to measure the urethral pressure profile. The signals are sent out on the catheter through traces to a Capacitance to Digital Converter (CDC) chip (Figure 16) on a printed circuit board (PCB). The board sends the data to a computer for analysis. As shown in Figure 16(a), the PCB is fully covered by a layer of hot melt adhesive (HMA) so as to protect all the electronics on it from liquid/urine. Figure 16(b) shows a zoomed photograph of the sensing portion of the catheter. It can be seen that the sensing strip can be significantly bent with no damage occurring to any of the sensors. Note that the sensor has to be significantly bent during insertion, but once located in the urethra for data acquisition is relatively straight.
Fig. 16.
(a) top: assembled sensor on catheter, (b) bottom: the flexible sensor is bent.
IV. In-Vitro Experimental Evaluation of Sensors
The interface between the PI and PDMS layers does not get damaged by bending or by contact with liquid. The sensing strip has been immersed in saline for several hours to test the strength of the PI-PDMS adhesion. It was found that the layers do not delaminate even after several hours of immersion in saline. It should be noted that the sensors are meant to be disposable and one-time use only.
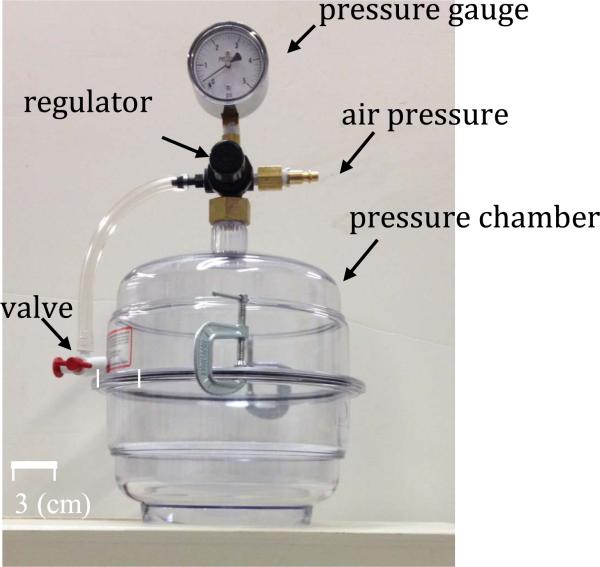
The developed sensor is tested in an air pressure chamber (Figure 17) in which the internal pressure can be controlled to different static values in the range of [0-5] psi with 0.1 psi resolution. In order to conduct the tests, the pressure was increased from 0 to 1.0 psi, in steps of 0.1 psi. Also, a reference pressure sensor MS5534C manufactured by Intersema is placed inside the chamber for calibration purposes (resolution 0.15 psi).
Fig. 17.
Pressure chamber, it can apply pressure in [0,5] psi range.
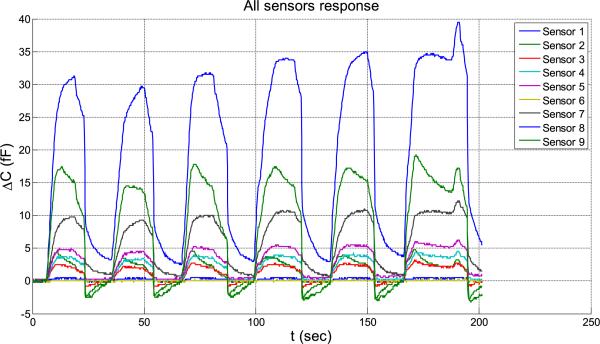
In Figure 18, the pressure is changed from 0 to 0.1 psi and it is observed that all 9 sensors respond to this small pressure change. In this figure, the capacitance change is shown on the vertical axis. The responses of the 9 sensors are not equal, varying from 1 fF for sensor 1 to 35 fF for sensor 8. This variability in sensitivity is expected to be due to unequal gaps obtained from the sensor assembly. Nonetheless, even the least sensitive sensor resolution is better than 0.1 psi. The difference in sensitivities can be eliminated by calibrating, so that all sensors provide readings in psi after calibration. The sampling time used is 170 milli-seconds.
Fig. 18.
5 times, P = 0.1 (psi) sensors’ response from C1 to C9.
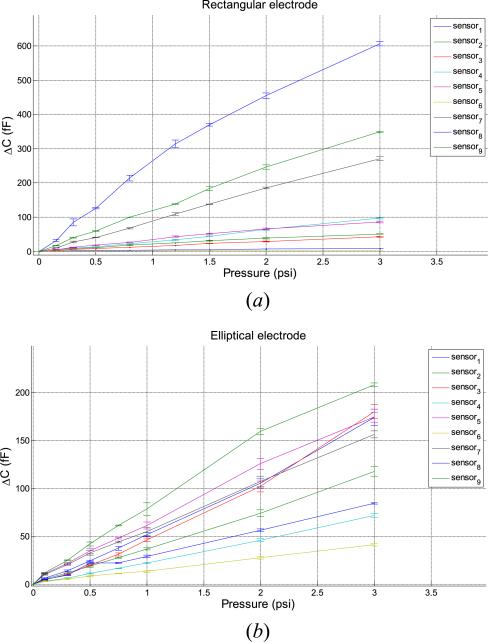
The variation of capacitance with applied pressure is shown in Figure 20 for two types of electrodes – the rectangular and elliptical electrodes. The rectangular electrodes have more sensitivity but the elliptical electrodes in Figure 20(b) have more uniformity in the response of the 9 sensors, the calibration factor varying from 20fF/psi to 80 fF/psi. It should be noted that the analytical estimate of the calibration factor was 36 fF/psi.
Fig. 20.
Sensors’ response and the response of the reference electrode.
V. Removal of Parasitic Capacitance
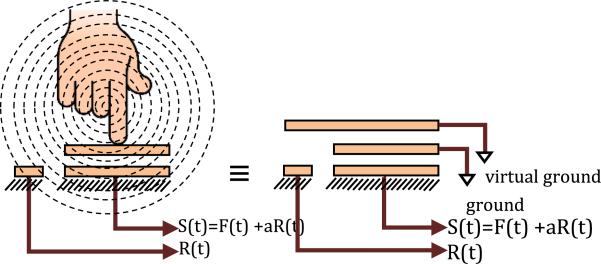
Proximity to human body can introduce significant parasitic capacitance into the sensor. The human body surface acts like the top electrode of a capacitor that is connected to a virtual ground. This parasitic capacitance is very low and in order of pF, but it is of the same order as the strength of the capacitance signal due to applied pressure in this highly sensitive application. Therefore, signal processing techniques have to be utilized to remove parasitic effects. For this purpose, a single free bottom electrode (without the corresponding top electrode) has been fabricated on the sensing strip to only measure the parasitic capacitance without being sensitive to pressure.
Figure 20 shows a schematic of the parasitic capacitance R(t) created by the proximity of a human body on the reference parasitic sensor and its influence on the sensor signal S(t) in the presence of the contact force F(t).
The relation between S(t), F(t) and R(t) can be written in matrix form as follows:
| (eq. 7) |
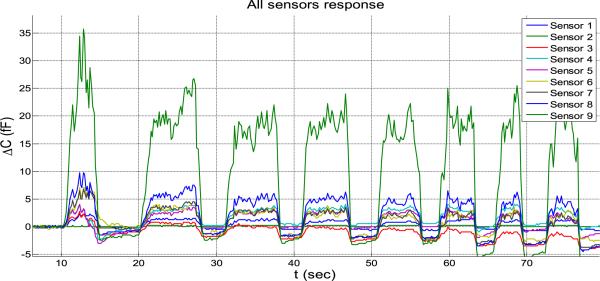
In Figure 21, the response purely due to proximity to the human body is plotted.
Fig. 21.
Human body's effect on capacitance (5 tests).
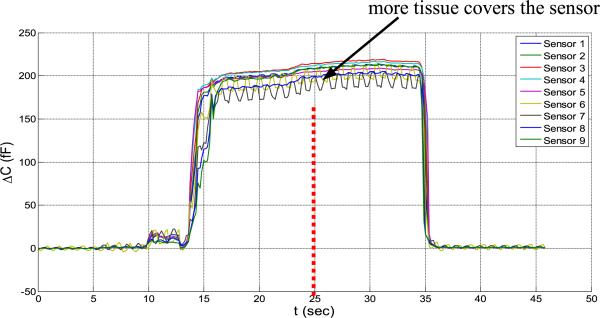
Next, it is assumed that when the sensor array is inserted into the human body, because all the sensors are covered uniformly with the tissue, the coefficient matrix [aij] is constant. With this assumption, the coefficient matrix [aij] can be found by setting pressure to be zero (F=0) and only measuring the influence of the human tissue. In Figure 22, the effect of adding more tissue on the parasitic capacitance when the sensor is already covered by tissue is evaluated. When all the sensors are covered uniformly with tissue, bringing more tissue close to the sensor does not change the capacitance significantly.
Fig. 22.
Covering the sensor with more tissue does not change the capacitance.
In this test, at first the sensors are covered by one hand when another hand comes close and covers over the first hand. Not a significant change is seen in the signals from the sensors. Note that the hand over the sensors was done as a test of the ability to compensate parasitics as a proxy to the more complex in vivo situation where it will be in contact with the urethral tissue.
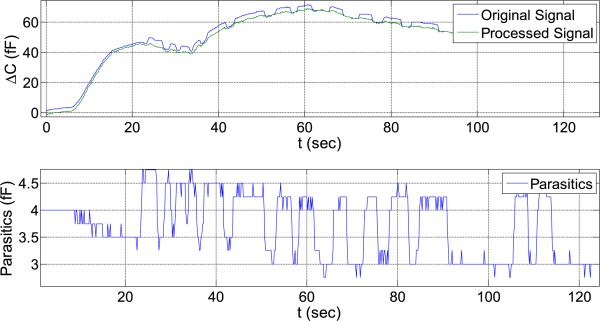
Based on the parasitic data of Figure 21, the coefficient matrix [aij] is calculated. In the next experiment, pressure and parasitic capacitance are applied at the same time (Figure 23). Pressure inside the chamber is increased while a human hand is simultaneously moving closer and further from the setup.
Fig. 23.
Uncompensated signal (blue), reference signal (red) and cleaned signal (black).
The previously calculated calibration coefficients [aij] are used to remove the influence of the parasitic capacitance R(t) so that only the response due to pressure is obtained. This can be seen in Figure 23 (black curve), where the signal has much less noise and shows no parasitic influence, only the influence of mechanical pressure.
VI. Conclusions
A multi-sensor flexible catheter strip for measurement of distributed pressure inside the urethra was developed. The sensor strip can be significantly bent during urethral insertion into the body. The developed sensor has important clinical applications in urodynamic testing and potentially in other invivo biomedical catheter applications. Capacitive force sensors were designed and micro-fabricated using surface micromachining, polyimide/ PDMS substrates and copper electrodes. To remove the parasitic influence of urethral tissues which create fringe capacitance that can lead to significant errors, a reference fringe capacitance measurement sensor was incorporated on the strip. The sensing strip was embedded on a catheter and experimental in-vitro evaluation was conducted using a bench-top pressure chamber. The sensors on the strip were able to provide the required sensitivity and range. The experimental results also showed preliminary data to indicate that by using measurements from the reference parasitic sensor on the strip, the influence of human tissue parasitics on the urethral pressure measurements could be possibly removed.
Future work will involve evaluation of the catheter in an IACUC approved canine study and later in an IRB approved clinical human study.
Fig. 19.
Sensor strip response (a) response of the 9 rectangular sensors to P = [0.15 0.3 0.5 0.8 1.2 1.5 2 3] (psi), five tests. (b) response of the 9 elliptical sensors to P = [0.15 0.3 0.5 0.8 1.2 1.5 2 3] (psi), five tests.
Footnotes
This project was supported in part by a R21 research grant 1R21DK091555-01A1 from the National Institutes of Health (NIH)
References
- 1.Abrams P, et al. The standardization of terminology of lower urinary tract function recommended by the international continence society. International Urogynecology Journal. 1990;1(1):45–58. [Google Scholar]
- 2.Bo K. Urinary incontinence, pelvic floor dysfunction, exercise and sport. Sports Med. 2004;34(7):451–64. doi: 10.2165/00007256-200434070-00004. [DOI] [PubMed] [Google Scholar]
- 3.Nygaard I, et al. Is urinary incontinence a barrier to exercise in women? Obstet Gynecol. 2005;106(2):307–14. doi: 10.1097/01.AOG.0000168455.39156.0f. [DOI] [PubMed] [Google Scholar]
- 4.Schulman C, Claesm H, Mattijs J. Urinary incontinence in Belgium: a population based epidemiological survey. Euro Urol. 1997;32:315. [PubMed] [Google Scholar]
- 5.Herzog AR, Fultz NH. Prevalence and incidence of urinary incontinence in community-dwelling populations. J. Am. Geriat. Soc. 1990;38:273. doi: 10.1111/j.1532-5415.1990.tb03504.x. [DOI] [PubMed] [Google Scholar]
- 6.Damian J, Martin-Moreno JM, Lobo F, Bonache J, Cervino J, Redondo-Marquez L, et al. Prevalence of urinary incontinence among Spanish older people living at home. Eur. Urol. 1998;34:333. doi: 10.1159/000019750. [DOI] [PubMed] [Google Scholar]
- 7.Diokno AC, Brock BM, Brown MB, Herzog R. Prevalence of urinary incontinence and other urological symptoms in the noninstitutionalized elderly. J. Urol. 1986;136:1022. [PubMed] [Google Scholar]
- 8.Ueda T, Tamaki M, Kageyama S, Yoshimura N, Yoshida O. Urinary incontinence among community-dwelling people aged 40 years or older in Japan: prevalence, risk factors, knowledge and self perception. Int. J. Urol. 2000;7:95. doi: 10.1046/j.1442-2042.2000.00147.x. [DOI] [PubMed] [Google Scholar]
- 9.Wagner TH, Hu TW. Economic costs of urinary incontinence in 1995. Urology. 1998;51(3):355–361. doi: 10.1016/s0090-4295(97)00623-7. [DOI] [PubMed] [Google Scholar]
- 10.Fenely RC, Sheperd AM, Powell PH, Blannin J. Urinary incontinence: prevalence and needs. Br. J. Urol. 1979;51:493. doi: 10.1111/j.1464-410x.1979.tb03585.x. [DOI] [PubMed] [Google Scholar]
- 11.Yarnell JWG, St Leger AS. The prevalence, severity and factors associated with urinary incontinence in a random sample of the elderly. Age, Ageing. 1979;8:81. doi: 10.1093/ageing/8.2.81. [DOI] [PubMed] [Google Scholar]
- 12.Abrams P. Urodynamics. Springer-Verlag; London: 1997. [Google Scholar]
- 13.Schafer W, et al. Good urodynamic practices: uroflowmetry, filling cystometry, and pressure-flow studies. Neurourol Urodyn. 2002;21(3):261–74. doi: 10.1002/nau.10066. [DOI] [PubMed] [Google Scholar]
- 14. [March 7th, 2015];Luna Micro-tip Catheters for Urology Measurement. Web-site: http://www.mmsinternational.com/int/761/urology-ambulatory-urodynamics-product-luna-catheters.
- 15.Resplande J, et al. Urodynamic changes induced by the intravaginal electrode during pelvic floor electrical stimulation. Neurourol Urodyn. 2003;22(1):24–8. doi: 10.1002/nau.10062. [DOI] [PubMed] [Google Scholar]
- 16.Griffiths CJ, et al. Ambulatory monitoring of bladder and detrusor pressure during natural filling. J Urol. 1989;142(3):780–4. doi: 10.1016/s0022-5347(17)38887-0. [DOI] [PubMed] [Google Scholar]
- 17.Webb RJ, Ramsden PD, Neal DE. Ambulatory monitoring and electronic measurement of urinary leakage in the diagnosis of detrusor instability and incontinence. Br J Urol. 1991;68(2):148–52. doi: 10.1111/j.1464-410x.1991.tb15283.x. [DOI] [PubMed] [Google Scholar]
- 18.Tadigadapa S, Mateti K. Piezoelectric MEMS Sensors: State-of-the-art and perspectives. Measurement Science and Technology. 2009;20(9) [Google Scholar]
- 19.Kim SC, Wise KD. Temperature Sensitivity in Silicon Piezoresistive Transdcuers. IEEE Transactions on Electron Devices. 1983 Jul;30(7):802–810. [Google Scholar]
- 20.Sezen AS, Rajamani R, Morrow D, Gilbert B, Kaufman KR. An Ultra-Miniature MEMS Pressure Sensor with High Sensitivity for Measurement of Intra-Muscular Pressure in Patients with Neuro-Muscular Diseases. ASME Journal of Medical Devices. 2009 Sep;3(3):031006. 9 pages. [Google Scholar]
- 21.Peng P, Rajamani R, Erdman AG. Flexible Tactile Sensor for Tissue Elasticity Measurements. IEEE/ASME Journal of Microelectromechanical Systems. 2009 Dec;18(6):1226–1233. [Google Scholar]
- 22.Senturia SD. Microsystem Design. Springer; New York: Dec, 2004. p. 698. ISBN-13: 978-0792372462. [Google Scholar]
- 23.Giovanni MD. Flat and Corrugated Diaphragm Design Handbook. Marcel Dekker; New York: 1982. [Google Scholar]
- 24.Najafi N, Ludomirsky A. Initial Animal Studies of a Wireless Battery-Less MEMS Implant for Cardiovascular Applications. Biomedical Microdevices. 2004;6(1):61–65. doi: 10.1023/b:bmmd.0000013367.30870.4e. [DOI] [PubMed] [Google Scholar]
- 25.Chen PJ, Rodger DC, Agrawal R, Saati S, Meng E, Varma R, Humayun MS, Tai YC. Implantable Micromechanical Parylene-Based Pressure Sensors for Unpowered Intraocular Pressure Sensing. Journal of Micromechanics and Microengineering. 2007;17(10):1931–1938. [Google Scholar]
- 26.Yoon HJ, Jung JM, Jeong JS, Yang SS. Micro Devices for a Cerebrospinal Fluid Shunt System. Sensors and Actuators A:Physical. 2004;110(1):68–76. [Google Scholar]


