

Abstract
A bioengineered model of three-dimensional (3D) brain-like tissue was developed using silk-collagen protein scaffolds seeded with primary cortical neurons. The scaffold design provides compartmentalized control for spatial separation of neuronal cell bodies and neural projections, resembling the layered structure of the brain (cerebral cortex). Neurons seeded in a donut-shaped porous silk sponge grow robust neuronal projections within a collagen-filled central region, generating 3D neural networks with structural and functional connectivity. The silk scaffold preserves the mechanical stability of the engineered tissues, allowing for ease of handling, long-term culture in vitro, anchoring of the central collagen gel to avoid shrinkage, and neural network maturation. This protocol describes the preparation and manipulation of silk-collagen constructs, including the isolation and seeding of primary rat cortical neurons. This 3D technique is useful for mechanical injury studies, as a drug screening tool and could serve as a foundation for brain-related disease models. The protocol of construct assembly takes 2 days and the resulting tissues can be maintained in culture for several weeks.
INTRODUCTION
Deciphering the structure and function of the brain is of great interest, however despite enormous efforts towards this goal the brain remains the least understood organ of our body. Brain research is simultaneously performed at various levels, from studies of development to behavior. Due to the architectural and functional complexity the brain requires sophisticated interdisciplinary methods and equipment for study. In order to gain insight into the formation and activity of basic units of the brain, such as the neuronal networks, in vitro research models are used to recapitulate the complexity of structure and function of native brain tissue. These tissue models aim to reconstruct elementary architectural components of the brain and to study brain cell biology under controlled experimental conditions.
Much knowledge about the biology and signal processing in neuronal networks has been derived from primary brain-derived cells cultured in 2D on tissue culture plastic. Although these cultures are relatively simple and convenient to analyze with a variety of established methods, it is now widely recognized that 3D culture conditions are more physiologically relevant than conventional 2D cultures. Accordingly, 3D tissue models were shown to more faithfully recapitulate disease phenotype for brain disorders such as Alzheimer1 or microcephaly2, suggesting that the utilization of 3D tissue models is highly significant for basic research as well as for applications such as drug discovery in the pharmaceutical industry.
3D research tissue models aimed at recapitulating the detailed structural features and functions of native tissues face a major challenge in overcoming the developmental steps of cells and tissues during the maturation of organisms, and a variety of approaches are being pursued including tissue engineering3. There has been significant progress in reconstructing native environments or niches for the cells by generating new materials to support the cells ex vivo, however, the complexity of tissues is far beyond even the most advanced scaffolds and bioreactors available today. Nevertheless, the ability to recreate biomimetic structures by designing microarchitectural features of tissues is available, and such systems can provide structural and functional relevance for complex tissues such as the brain.
Several 3D in vitro research models in form of cerebral organoids, neurospheroids, and hydrogel cultures have been developed to study specific processes of the brain which are difficult to investigate and manipulate in vivo in animal models or ex vivo in brain slices3. In contrast to these models, our short protocol generates bioengineered brain-like tissues by recapitulating the compartmentalized architecture and robust functional neural networks by means of silk-collagen protein composite scaffold. We have demonstrated the utility of our model in ref 4.
Development of the protocol
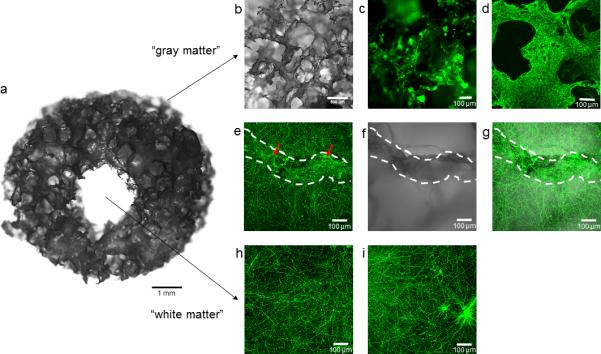
A novel model of 3D brain-like tissue was developed by applying an interdisciplinary approach of “top-down bioengineering”4 which involves seeding cells within a biomaterial scaffold to assemble microstructural features representative of native tissues. Specifically, we aimed to recapitulate the basic structural features formed during the development of the forebrain cerebral cortex, consisting of gray matter (containing cell bodies) and white matter (containing neuronal axons). We utilized our expertise in silk protein processing5,6 to design scaffold architectures which provide spatial separation of cell bodies and neural processes. Correspondingly, a silk protein-based porous scaffold in the form of concentrically-shaped donuts mimicking the neuron-rich gray matter was developed and infused with a type I collagen gel mimicking the axon-rich white matter (Figure 1). The shape and size of the silk scaffolds was chosen to fit the dimensions of the 96-well tissue culture plate. The diameter of 6 mm fits ideally in the wells of the plate and allows for easy cell seeding and collagen embedding. Nevertheless, depending on the application, the dimensions of the constructs can be adjusted. In order to recapitulate the properties of the native cortex and establish the suitable conditions for neural growth, the parameters of the construct such as structure, matrix components and mechanical stiffness were systematically studied4. Here we describe the most optimal conditions established during the course of the protocol development, which support the development of 3D compartmentalized neuronal networks.
Figure 1.

The preparation process of 3D bioengineered brain tissue. a) Aqueous-based silk sponge hydrated in water, scale bar 1 cm; b) Cutting out 6 mm diameter discs, scale bar 1 cm; c) Magnification of the disc, scale bar 5 mm; d) Cutting out 2 mm diameter central space, scale bar 5 mm; e) Silk donut-shaped scaffold, scale bar 5 mm; f) Silk scaffold filled with collagen gel, scale bar 5 mm; g) 3D bioengineered brain tissue constructs in 24-well tissue culture plate, scale bar 5 mm.
Applications
We have used this protocol previously to show that the 3D brain tissue model can be applied to the study traumatic brain injury (TBI)4. The tissue model responds in vitro with biochemical and electrophysiological outcomes that mimic observations reported in vivo. Moreover, the tissue model allowed for real-time nondestructive assessments such as local field potential measurement and liquid chromatography on culture medium supernatants, thus offering new directions for studies on brain homeostasis and injury. Importantly, the tissue model was shown to be functional for at least two months, providing a system for both acute and chronic studies relevant to brain structure-function.
This model should be useful as a foundation for other brain-related studies. This protocol can be utilized by researchers interested in the study of synaptic formation between neurons and neural network development, and signaling. Moreover, the cellular complexity of the model can be further increased by the inclusion of other brain-derived cell types such as astrocytes, microglia and oligodendrocytes in order to study cell-cell interactions and their respective impact on brain structure-function during homeostasis and regeneration/repair scenarios.
The protocol can be also adapted to develop new disease tissue models for disorders such as Alzheimer, Parkinson or epilepsy, by utilizing human patient-derived induced pluripotent stem cells (iPSCs). The differentiation of iPSCs to neurons has been described7,8. Thus, the combination of disease-specific neurons in combination with our protocol could result in new tissue platforms of human neural tissue models for the study of disease and therapeutic options. Alternatively, the protocol can be also utilized to study various types of brain cancers such as astrocytoma, oligodendrogliomas or ependymomas, along with the formation of secondary brain tumors.
The protocol is based on a tissue engineering approach utilizing composite biomaterials consisting of silk-fibroin protein porous scaffolds and collagen type I gel fillers. Thus, the protocol can also be applied with adaptations to study the influence of variants of the microenvironment on neural network formation and function. While developing the tissue model, we evaluated three types of natural ECM-derived hydrogels: fibrin, matrigel and rat collagen type I. However, fibrin and matrigel underwent rapid degradation or contraction and could not sustain the cultures for more than a week4. In the current protocol collagen type I was utilized as the silk scaffold filler, due to the fact that this soft biomaterial enables excellent neurite outgrowth in 3D, is easily available, and results in reproducible outcomes. However, new variants of these gels including synthetic hydrogels compatible with neural applications can also be considered9-11. The utilization of hydrogels tailored to the tissue model based on mechanical stiffness and ligand presentation may further expand the range of applications for this protocol.
Comparison with other methods
Recently there has been increased interest focused on 3D neural models, resulting in the development of several methods aimed at the reconstruction of brain tissue in vitro. These published methods can be divided into three categories: organoids2,12-14, neurospheroids15-17 and hydrogel cultures1,18,19.
Organoids and hydrogel cultures, as with our protocol, are top-down approaches where scaffolds provide support for the cells towards their appropriate positions and differentiation states within the engineered tissue. However, cerebral organoids, miniaturized rudimentary 3D organs, are developed from stem cells over months of culture under tight control of growth factors and suffer from hypoxia, areas of necrosis, and variability between samples2,12-14. Further, these systems limit compartmental control to study cell-specific features. In addition, hydrogel cultures suffer from contraction of loss of integrity over time, limiting culture times and function. In contrast, our protocol is highly reproducible, rapid to form, and consistent in outcome. The neuronal networks can be observed after 3 days of culture and are maintained for weeks or months4. As shown previously, rat cortical primary neurons can be functionally maintained for more than two months with the silk scaffold 3D culture system, while in 2D, the same cells mostly die within 3 weeks4. Human iPSC-derived neurons can be maintained for several months both in 2D and 3D culture conditions2,12, possibly due to their slow differentiation. In contrast, the longevity of our constructs may be due to the high network connectivity or unique silk protein properties (i.e. negative charge of the silk scaffolds may protect the neurons from excitotoxicity, absence of specific cell signaling domains, maintenance of mass transfer over time due to scaffold stability and porous structure). Moreover, optimal designs with the highly porous structure of the silk scaffold allows for free diffusion of nutrients and oxygen, thus preventing metabolic deficits in the tissue constructs to provide more relevant physiological conditions.
The hydrogel cultures are based on uniformly dispersed cells inside in situ gelling biomaterials1,18,19, and rely on self-directed assembly of cells over time. Similarly, our protocol utilizes hydrogels as an environment for axonal outgrowth, but at the same time provides compartmentalized neuronal growth to mimic the architecture of the cerebral cortex. Additionally, the use of silk in our protocol results in mechanical stability and ease of handling of the 3D brain tissues, which cannot be met by methods based solely on soft hydrogels. The stable silk sponges also serve as anchoring support for the central collagen gel to avoid loss of volume or shape over time while in tissue culture.
In contrast to our protocol, neurospheroids as modular units of neural tissues15 are based on a bottom-up approach of tissue engineering. The microfabricated neurospheroids are formed solely out of neurons, and are thus limited in size to 150 μm due to the limits of oxygen diffusion. On the other hand, our protocol generates 3D tissue constructs in the millimeter range, and the porous silk scaffold structure allows the seeding of high cell numbers (in the range of millions) within a confined volume, resulting in the generation of dense neural networks. Moreover, the architecture of the scaffolds was optimized to meet the metabolic demand of high density cell cultures in terms of free diffusion of nutrients and oxygen.
Summarizing, the protocol has several characteristics that make it an attractive alternative for 3D neural tissue models. Thus, we propose this protocol as a foundation for the establishment and study of new brain-related disease models.
Experimental design
The generation of bioengineered brain-like 3D tissue models consist of 3 main steps: silk porous scaffold preparation, cortical tissue and cell isolation, and tissue construct assembly. The silk extraction protocol from Bombyx mori cocoons, as well as the preparation of aqueous-based silk porous sponges was described in detail previously5. Similarly, the dissection technique of rodent brain and cortex was described elsewhere20, and thus is not included here. This protocol is focused on the preparation steps to form the 3D neuronal tissues, including scaffold shaping (steps 1-9), isolation of primary neurons (steps 10-18), and tissue construct assembly (steps 19-27).
The rat cortical neurons show excellent growth and survival in the collagen gels, however this outcome would have to be optimized for neurons derived from other sources or regions of the brain. Users who obtain cells from different species than the rat, such as mouse or human, may need to modify the coating procedure of the silk scaffolds and the composition of the filling gel in order to achieve comparable neural outgrowth and the seeding density of cells.
Successful reconstitution of brain-like tissues can be assessed visually using bright field microscopy by identifying the outgrowth of neurites within the central collagen gel. However, as collagen is not fully transparent, the identification of thin neurites may be difficult for the untrained eye. Thus, in order to evaluate the quality of constructs, we suggest that fluorescent immunostaining (option A) is performed using anti-TUJ1 antibody (Table 1) by following the protocol described in Box 1. The outcome of immunostaining can be compared with Figure 2, where cell bodies should be localized directly on the silk sponge and outgrowing neurites should form a dense network within the central collagen gel. Moreover, residual astrocytes can be identified among neurons on the silk scaffold (Figure 4a). The constructs should maintain the longevity and functionality for several weeks as demonstrated with gene expression analysis (Figure 4b) (option B), local field potential measurement (Figure 4c) (option C) and Tandem Liquid Chromatography/MS (Figure 4d) (option D). Overall, 3D brain-like tissue allows for multimodal assessment including genetic, biochemical, structural and electrophysiological measurements which makes it an attractive model to study brain-related diseases.
Table 1.
Antibodies used during immunostaining
| antibody | host | dilution | provider | ordering number |
|---|---|---|---|---|
| β-Tubulin III (TUJ-1) (neuronal marker) | mouse | 1:1000 | Sigma-Aldrich | T8578 |
| GFAP (astrocytic marker) | rabbit | 1:1000 | Sigma-Aldrich | G9269 |
| Alexa Fluor 488 Donkey Anti-Mouse | donkey | 1:250 | Life Technologies | A-21202 |
| Alexa Fluor 647 Donkey Anti-Rabbit | donkey | 1:250 | Life Technologies | A-31573 |
Figure 2.
Neuronal compartmentalized outgrowth in the 3D brain-like tissue model. A) Macroscopic view of 3D bioengineered brain tissue, scale bar 1 mm; b) Macroscopic view of silk sponge showing the high porosity of the scaffold; c) Cell distribution upon attachment to the scaffold at day 1 of culture; d) Lack of collagen in the scaffold will result in no network formation due to the outgrowth of neurites on the surface of the silk (day 7); e) Neurons rapidly grow neurites into the surrounding collagen gel (day 7); f) Silk scaffold; g) Overlay image of neuronal projections and silk (e) and f), the white dotted lines indicate the silk scaffold on which cell bodies are present (red arrows). The cell bodies are distinctly visible as bright green foci; h) Representative image of neuronal network formed at day 7 in the central collagen window; i) Neuronal network with cell foci in sample with insufficient washing steps before collagen embedding. Cells visualized with anti-TUJ1 antibody fluorescently labeled with Alexa-488 followed by confocal microscopy. b-i scale bar 100 μm.
Figure 4.

Functional evaluation of the constructs. a) Immunostaining of 1 week old culture shows intimate localization of astrocytes (GFAP-magenta) in the direct proximity of neuronal cell bodies (TUJ-1-green). Scale bar 100 μm; b) Gene expression of neural cell adhesion molecule L1 (NCAM-L1) and synaptosomal-associated protein 25 (SNP-25) over 3 weeks of culture (red line) corresponding to neural network development over time. As a control the 3D brain like constructs are compared against regular 2D cultures (black line) and 3D dispersion cultures in collagen (blue line). Data are means ± SD. For the 2D and collagen groups, n = 3 replicates per time point per GOI. For the 3D scaffold group, n = 3, except for the 24-h and 1-wk time points, where n = 2, the 2-wk time point, where n = 2 for SNP- 25, and the 3-wk time point, where n = 2 for NCAM- L1 and growth-associated protein 43 and n = 1 for SNP- 25. Asymmetric error bars show maximum and minimum fold change. Two-way ANOVA with Bonferroni posttests: 2D vs. Col: *P <0.05; **P < 0.001; 2D vs. 3D: †P < 0.05; ‡P < 0.001; Col vs. 3D: §P < 0.05; c) Local field potential measurement. Spontaneous spiking activity is observed in our cultures, which can be diminished with 20 μM TTX; d) Injury-triggered glutamate (Glu) release. Glu peaks (arrow) at a retention time of ~21 min. Representative LC/MS detection traces of the internal control Glu-N15 and the Glu level at the baseline and after impact. The panels 4b-4d were previously published in Tang-Schomer, M. D. et al. Bioengineered functional brain-like cortical tissue. Proc. Natl. Acad. Sci. U.S.A. 111, 13811-13816 (2014).
Limitations
One of the most important issues for neuronal cultures using biomaterials is the poor adhesion of neurons to the substrate as neuronal survival and growth is dependent on attachment. The silk protein alone, while biocompatible, does not support neuronal adhesion due to the lack of specific protein sequences or epitopes recognized by cell membrane adhesive receptors. Moreover, at neutral pH silk fibroin has a net negative charge which affects the electrostatic interaction with the negatively charged cell membrane21. Therefore, silk scaffolds often require pre-coating to enhance adhesion of cells after seeding. Several treatment options can be used, including poly-D-lysine (PDL), laminin or fibronectin. In this protocol we treat the silk scaffolds with PDL prior to cell seeding, which supports robust cell attachment and survival. Additionally, we recently identified a putative neuron-specific surface binding sequence in the dragline silk protein species that could be engineered into Bombyx mori silk fibers for engineering alternative non-treated biomaterials22.
Both silk and collagen I are exogenous compounds, which do not occur in native brain tissue. Thus, our model has limited microenvironmental fidelity to the in vivo situation. However, the model successfully recapitulates the basic mechanobiological and functional responses of the brain, including TBI4.
The generation of extensive neuronal networks in our tissue model inevitably requires a high seeding density of cells. However, cell number can be varied depending on the nature of scientific question being addressed and the aim of the experiments. In our experience, increasing numbers of cells between 0.1 to 4×10⁶ results in a corresponding increase in the density of networks that form. Apart from primary rat neurons, cells of other origin can be studied in this model. However, the large amount of cells needed may be a barrier to the use of certain cell types. In this case we suggest optimizing the cell number per scaffold to form a robust neural network.
Due to the 3D character of the tissue model, analysis may require adaptations of methods commonly used in 2D cultures. However, we have previously shown that the variety of assays can be performed including immunocytochemistry and microscopy, local field potential measurements, cell viability assays, LC/MS mass spectrometry and quantitative gene expression4.
MATERIALS
REAGENTS
Cells
- We use primary cortical neurons isolated from embryonic day 18 (E18) Sprague-Dawley rats. The brain tissue dissection protocol was approved by the Tufts University Institutional Animal Care and Use Committee and complies with the National Institutes of Health Guide for the Care and Use of Laboratory Animals (Institutional Animal Care and Use Committee B2011-45). The cortical dissection can be performed as previously described20 and thus is not included in this protocol. Dissection of cortices from one rat litter takes about 2 hours. The cortices should be placed on ice during the dissection process and cell isolation should immediately follow the dissection to preserve the viability of cells.Caution: Research involving animals must be conducted in accordance with relevant ethical guidelines and applicable institutional and funding agency regulations.
Culture media and supplements
Dulbecco's Modified Eagle's Medium (DMEM) (10X) (Sigma-Aldrich, cat. no. D 2429)
Neurobasal Medium (Gibco; cat. no. 21103049)
B-27 Supplement (50X), serum free (Life Technologies, cat. no. 17504-044)
GlutaMAX Supplement (Life Technologies, cat. no. 35050-061)
Penicillin-streptomycin (Cellgro (Corning), cat. no. 30-002-CI)
Enzymes and other reagents
Collagen I, Rat Tail (Corning, cat. no. 354236)
DNase I, grade II, from bovine pancreas (Roche, cat. no. 10104159001)
Dulbecco's phosphate-buffered saline (DPBS), no calcium, no magnesium (Life Technologies, cat. no. 14190144)
Poly-D-lysine hydrobromide (PDL) (Sigma-Aldrich, cat. no. P6407)
- Sodium hydroxide solution (Sigma-Aldrich, cat. no. S2770)Caution: Sodium hydroxide is toxic and corrosive. Use personal protective equipment to avoid contact with skin and eyes. Collect and discard waste appropriately.
Trypsin-Ethylenediaminetetraacetic acid (EDTA) 0.25% solution, sterile-filtered (Sigma-Aldrich, cat. no. T4049)
Trypsin inhibitor from Glycine max (soybean) (Sigma-Aldrich, cat. no. T6522)
UltraPure DNase/RNase-Free Distilled Water (Life Technologies, cat. no. 10977-015)
- 4% paraformaldehyde (PFA) (Santa Cruz Biotechnology, cat. no. sc-281692)Caution: PFA is toxic. Use personal protective equipment to avoid contact with skin and eyes. Open only inside the chemical hood. Collect and discard waste appropriately.
Bovine serum albumin (BSA) (Sigma-Aldrich, cat. no. A7906)
Triton X-100 (Sigma-Aldrich, cat. no. X100)
Donkey serum (Sigma-Aldrich, cat. no. D9663)
QIAshredder (Qiagen, cat. no. 79654)
AllPrep DNA/RNA/Protein Mini Kit (Qiagen, cat. no. 80004)
BCA Protein Assay (Thermo Scientific, cat. no. 23225)
Sodium chloride, NaCl (Sigma-Aldrich, cat. no. S7653)
Potassium chloride, KCl (Sigma-Aldrich, cat. no. P9333)
Glutamine (Sigma-Aldrich, cat. no. 1294808)
4-(2-Hydroxyethyl)piperazine-1-ethanesulfonic acid (HEPES) (Sigma-Aldrich, cat. no. H4034)
Calcium chloride, CaCl2 (Sigma-Aldrich, cat. no. C5670)
Magnesium chloride, MgCl2 (Sigma-Aldrich, cat. no. M4880)
Glucose (Sigma-Aldrich, cat. no. G7528)
Tetrodotoxin (TTX) (Millipore, cat . no. 554412)
Antibodies, as listed in Table 1.
EQUIPMENT
pH test strips (Sigma-Aldrich, cat. no. P3536)
Tabletop centrifuge (Eppendorf, 5804 R)
CO2 incubator (VWR, model: Symphony 5.3A)
Class II, A2 biological safety cabinet (NuAire, model: LabGard ES, NU-425)
Unstirred water bath (VWR, model: 89032-204)
Tissue culture–treated plate, 96 well (Falcon, cat. no. 353072)
Tissue culture–treated plate, 24 well (Falcon, cat. no. 353047)
Polypropylene conical centrifuge tube, 15 mL (Falcon, cat. no. 352196)
Sterile disposable biopsy punch 6 mm diameter (VWR, cat. no. 96-1125)
Sterile disposable biopsy punch 2 mm diameter (VWR, cat. no. 21909-132)
Stainless steel forceps (Sigma-Aldrich, cat. no. Z168777)
Dissecting scissors (Sigma-Aldrich, cat. no. Z265969)
Autoclave (Consolidated Sterilizer Systems, model: SR-28B)
P1000 Barrier pipette tips (VWR, cat. no. 89079-470)
P200 Barrier pipette tips (VWR, cat. no. 89079-458)
P10 Barrier pipette tips (VWR, cat. no. 89079-464)
Serological pipette, 10 mL, individually wrapped (Falcon, cat. no. 357551)
Serological pipette, 25 mL, individually wrapped (Falcon, cat. no. 357535)
Petri dish 35 mm diameter (Falcon, cat. no. 353001)
Sterile filter systems, disposable (0.22 μM, PES; Millipore, cat. no.)
Pipette aid (Drummond, cat. no. 4-000-100)
Haemocytometer (Sigma-Aldrich, cat. no. Z359629)
Ice maker (Hoshizaki, model: F-450MAH)
NanoDrop (Thermo Scientific, model: 2000c/2000 UV-Vis Spectrophotometer)
triple quadruple mass spectrometer (MDS Inc., model: 3200Q TRAP LC/MS/MS system)
Orbital shaker (KJ-201 BD)
pH meter (Fisher Scientific, model: Accumet basic AB 15)
Clampfit software (Molecular Devices) for data analysis
ImageJ (NIH) for data analysis
REAGENT SETUP
Silk sponges of pore size 500-600 μm prepared from 6% silk solution according to the previously published protocol5. The sponges can be stored for weeks at 4°C immersed in water in a closed container to prevent dehydration.
Neuronal culture medium: Neurobasal medium requires supplementation with GlutaMAX (200 mM) and B-27 supplement (50X) prior to use. Thaw B-27 supplement overnight at 4°C. Aseptically add GlutaMAX to 0.2 mM final concentration and 1% penicillin-streptomycin, and 2% B-27 supplement to the medium before use. Remaining B-27 supplement should be aliquoted into working volumes and stored at −20°C. The aliquots should not be used beyond the expiration date stated by the manufacturer. Once supplemented, the complete culture medium is stable for up to one week when stored in the dark at 4°C.
Trypsin-EDTA/DNase I solution for cortical dissociation: under aseptic conditions and on ice dissolve 100 mg vial content of DNase I in 33 ml trypsin-EDTA to achieve 0.3% DNase in trypsin-EDTA. Mix the solution carefully. Freeze at −80°C in 5 mL aliquots for further use. The aliquots should not be used beyond the expiration date stated by the manufacturer. Pre-warm to 37°C in water bath right before use.
Trypsin inhibitor: dissolve in DPBS to achieve concentration of 0.25%. Filter-sterilize and freeze at −20°C in 5 mL aliquots for further use. The aliquots should not be used beyond the expiration date stated by the manufacturer. Pre-warm to 37°C in water bath right before use.
Poly-D-lysine hydrobromide (PDL): under aseptic conditions add 50 mL of sterile tissue culture grade water to 5 mg of PDL resulting in 0.1 mg/mL solution. Freeze at −20°C in 1 mL aliquots for further use. The aliquots should not be used beyond the expiration date stated by the manufacturer. Sterile solutions are stable for up to 2 years when stored at 2-8°C.
- Blocking solution: 1% bovine serum albumin (BSA), 2% serum, 0.2% Triton X-100 in PBS. To prepare 100 mL add 1 g of BSA powder, 2 mL of serum, 200 μL Triton X-100 to 98 mL of PBS. Mix until all the components are dissolved and the solution is clear. Store at 2-8°C.CRITICAL: To minimize the unspecific fluorescent background use serum from the same species as your secondary antibody.
HEPES-buffered artificial cerebrospinal fluid (CSF): 125 mM NaCl, 5 mM KCl, 5 mM Glutamine, 10 mM HEPES, 3.1 mM CaCl2, and 1.3 mM MgCl2 titrated to pH 7.4 using 1 M NaOH. The solution can be made in advance and stored at room temperature. It needs to be supplemented with 10 mM glucose just before use.
EQUIPMENT SETUP
Water bath set at 37°C
CO2 incubator at 37°C with 95% humidity, 95% air and 5% CO2
Tabletop centrifuge: 150 × g, room temperature (~24°C)
Autoclave: wet cycle 121°C, 20 minutes
Stainless steel forceps and micro scissors sterilized to prevent contamination of cultures
Microscopy: Confocal microscope, 20x objective, 1024×1024 px image resolution, 1 μm z-step over 100 μm distance.
Local field potential setup: recording probe (custom-built) consists of two parallel tungsten electrodes (50 μm diameter tip and 250 μm separation between the electrodes) with the signal electrode positioned to record. The signal amplification is done using an amplifier (AM-Systems), filtered at 0.1 Hz to 10 kHz, and digitized at 50 kHz. The recording of the signal: Clampex software, version 9.2 (Molecular Devices). Tandem Liquid Chromatography/MS Analysis: triple quadruple mass spectrometer (3200Q TRAP LC/MS/MS system) using an aminopropyl column (Luna NH2; Phenomenex). Use the gradient method using Solvent A, a 95:5 water/acetonitrile solution containing 20 mM ammonium acetate and 20 mM ammonium hydroxide (pH 9.5), and Solvent B (acetonitrile).
PROCEDURE
Steps 1-9: Scaffold preparation
Before use, cut aqueous-based silk sponges hydrated in water to fit the desired dimensions. To obtain uniform disks fitting in a 96-well plate we suggest using either disposable biopsy punches or cork-borer set of outer diameter 6 mm and inner diameter 2 mm (Figure 1).
Adjust the height of the scaffold to about 2-3 mm using scissors.
Place the pre-cut scaffolds in an autoclavable container containing sterile tissue culture grade water.
- Autoclave the scaffolds to sterilize them (wet cycle 121°C, 20 minutes). Cool down to room temperature before using in further steps.Pause point: The sterile scaffolds can be stored in water at 4°C in a closed container to prevent sample dehydration. Avoid drying of the scaffolds by immersing them in water in all times during storage.Critical step: From this step forward all the steps should be performed inside the biological safety cabinet using aseptic technique to maintain the sterility of the scaffolds.
Transfer the scaffolds into a 96-well plate using sterile forceps, placing one scaffold per well on the bottom of the well.
Aspirate any remaining liquid from the scaffolds.
Apply 100 μL of 0.1 mg/ml PDL solution per scaffold to prepare them for cell attachment. Incubate at 37°C in the CO2 incubator for 1 hour. PDL is a positively charged nonspecific attachment factor for cells useful in promoting cell adhesion to solid substrates. PDL enhances electrostatic interaction between the negatively charged cell membrane and the culture surface.
Aspirate the PDL solution and thoroughly rinse at least 2 times with sterile DPBS to remove any traces of PDL. Unbound PDL is neurotoxic and can lead to a lack of cell attachment to the scaffolds.
Aspirate the DPBS from the wells and apply 200 μL of culture medium per well. Place in the incubator to equilibrate the scaffolds before the cell seeding for at least one hour before the cell seeding.
Steps 10-14: Cell isolation
-
10.Using a 25 mL serological pipette place the dissected rat cortices in a 35 mm petri dish. Be very gentle while during the transfer to avoid mechanical damage to the soft tissues. Apply 5 mL of pre-warmed trypsin-EDTA/DNase solution to the tissues and incubate for 20 minutes at 37°C in the CO2 incubator to digest the tissue.Critical step: Keep the incubation time accurate to avoid over-digestion of the tissue.
-
11.Using a 10 mL serological pipette collect all the contents of the petri dish and transfer this to the conical tube containing trypsin inhibitor to stop the digestion. Pipette 20 times up and down to mechanically dissociate the tissue to the single cell suspension.Critical step: Avoid strong pipetting to prevent cell damage due to the excessive shear stress.
-
12.
Spin down the cells for 5 minutes at 150 × g at room temperature.
-
13.
Discard the supernatant. Resuspend the cell pellet in culture medium at a ratio of 1 mL of culture medium per one cortex.
-
14.Count the cells using a haemocytometer or by other means. The resulting cell number is usually around 15-20×106 cells/mL per cortex. Keep the cells on ice and utilize immediately upon isolation.Critical step: Avoid keeping the cells on ice for a long time to preserve cell fitness. Maintain the right timing during the scaffold preparation and cell isolation.
Steps 15-18: Cell seeding
-
15.
Remove the 96-well plate containing silk scaffolds from the incubator (from step 9). Aspirate the culture medium to obtain slightly dehydrated scaffolds. Using sterile forceps place the scaffolds in new un-coated wells on the plate to avoid cell attachment to surfaces other than scaffolds.
-
16.Taking the cells from step 14, adjust the cell concentration to 1×10⁷ cells/mL. Add 200 μL of the cell suspension to each scaffold-containing well of the 96-well plate.Critical Step: If other cell seeding density/scaffold is desired, adjust the concentration of the cells in the medium while keeping the volume of 200 μL/scaffold constant.
-
17.
Move the 96-well tissue culture plate to the incubator overnight to allow for cell attachment to the scaffolds.
-
18.
The following day aspirate the culture medium from the scaffolds to remove any unattached cells. Using sterile forceps move the scaffolds to new un-coated and un-seeded wells in the 96-well plate and apply 300 μL of culture medium per well.
Steps 19-25: Collagen embedding
-
19.Place a 15 mL conical tube on ice. Add 10x DMEM (10% of final volume), followed by sodium hydroxide (3% of final volume) and finally collagen type I. Mix several times up and down with a pipette avoiding air bubble formation. If the collagen needs to be diluted to reach the desired concentration of 3 mg/ml use tissue culture grade water to fill up the volume.Critical step: The collagen solution is viscous and requires good pipetting technique to avoid pipetting error. We suggest the use of reverse pipetting technique as follows: Press the operating button to the second stop. Dip the tip into the solution to a depth of 1 cm and slowly release the operating button. This action will fill the tip. Withdraw the tip from the liquid, touching it against the edge of the collagen bottle to remove excess liquid. Dispense the liquid into the receiving conical tube by depressing the operating button gently and steadily to the first stop. Hold the button in this position. Some liquid will remain in the tip, and this should not be dispensed. The liquid remaining in the tip can be thrown away with the tip. Release the operating button to the ready position.
-
20.Apply 2 μL of collagen solution onto a pH strip to ensure the pH of collagen solution is neutral (pH=7.4). If necessary, adjust the pH by adding 1 μL more of sodium hydroxide and mix the collagen solution thoroughly. Repeat till pH 7.4 is reached. Keep the solution on ice at all time to prevent the gelation.Critical step: Adjusting the pH to neutral value is crucial to achieve collagen gelation and cell growth. Too high/low pH may affect cell viability and overall success of the assay.
-
21.Aspirate the culture medium from the scaffold-containing wells (from step 18). Using the sterile forceps, move the scaffolds to fresh dry wells, dabbing the scaffold on a dry sterile surface a few times first to ensure most of the excess liquid is removed.Critical step: The scaffolds need to remain hydrated yet free of excess liquid in order to not dilute the collagen during the next step. Quickly proceed to Step 22.Critical step: Process one sample at a time for this and the following step, to prevent the cells from drying.
-
22.
Apply 100 μL of collagen solution from step 20 per scaffold by pipetting it in the center of the scaffold. This volume should be enough to fill in the sample. Avoid air bubble formation. Set the scaffold on a fresh, clean and dry surface before adding liquid gel. The hydrophobic surface helps to contain the liquid gel within the scaffold, Otherwise, a wet (or wetted) surface would lead the liquid gel to spread and unable to solidify in place.
-
23.
Move the 96-well plate with the scaffolds to the incubator for 30 minutes at 37°C to allow for collagen gelation. If gelled successfully, the collagen will turn milky (Figure 1f).
-
24.
Apply 200 μL of culture medium per scaffold. Pipet the medium carefully by resting the pipette tip on the wall of the well to prevent mechanical damage to the collagen gel.
-
25.
Move to the incubator at 37°C overnight to equilibrate the constructs.
Steps 26-27: Long term culture
-
26.The next day, using sterile forceps move the constructs from the 96-well plate to 24-well plate containing 1 mL of culture medium/well. Make sure the constructs are completely immersed in the medium to achieve nutrient transfer to the cells (Figure 1g).Critical step: Be gentle and handle the constructs with care while removing them out of 96-well plate. Abrupt pulling on the scaffolds with the forceps may result in mechanical destruction of the collagen gel.
-
27.
Four days later feed the cultures by carefully removing half of the culture medium from each well and replacing with same volume of fresh medium to maintain the minimal change to environmental and culture media condition. Do not use a vacuum pump to aspirate the culture medium but remove the medium manually with the pipette. Avoid touching the constructs with pipette tip or exposing them to air, to prevent from drying out or mechanical damage. Repeat the culture medium change every three days thereafter. At desired time points, move to next step to analyze the model.
Step 28: Downstream Analysis assays
-
28.
Constructs can be analyzed via immunostaining (option A), DNA, RNA and protein can be extracted (option B) for use in further assays of interest such as qRT-PCR or immunoassays to evaluate the expression levels of genes and proteins, the local field can be monitored (option C) or Tandem Liquid Chromatography/MS can be performed (option D). As many non-terminal assays can be utilized, users should consider performing more than one assay on one sample set, such as collecting medium supernatant for Tandem Liquid Chromatography/MS, followed with local field potential measurement and immunostaining or qPCR.
A ǀ Immunostaining ǀ Timing: 2 days
- At the desired time point take the constructs out of the culture plates and transfer them to 2 mL tubes containing 1 mL PBS to wash out medium remnants. Using the 1,000 μL pipette remove and discard the PBS from the tube.CRITICAL STEP: While pipetting, avoid touching the construct with the pipette tip in order to preserve the construct integrity.
- Fix the constructs using 4% paraformaldehyde (PFA) (about 250 μl/construct). Incubate 1 hour at room temperature to allow for adequate fixation.Caution: PFA is toxic, therefore the fixation step should be performed entirely inside the chemical hood and the waste should be disposed appropriately.Pause point: Fixed scaffolds can be stored in PBS at 4°C for a few days before further immunostaining.
- Wash the construct 3 times for 15 minutes with 1 mL PBS while shaking on orbital shaker (around 50 rpm) to remove any unreacted PFA. Use shaking for all the subsequent steps.Critical step: Do not use high speed shaking during the immunostaining as this can contribute to disintegration of collagenous gel.
Immerse the constructs in 250 μl blocking solution (1% bovine serum albumin (BSA), 2% serum, 0.2% Triton X-100 in PBS; check Reagent Setup) for 1 hour at room temperature to reduce unspecific staining.
Dilute the primary antibody (Table 1) in blocking solution, apply on the constructs and incubate at 4°C overnight.
Wash the constructs 3 times for 30 minutes with 1 mL PBS at room temperature to remove any unreacted primary antibody. Critical step: Starting from this step, protect the samples from exposure to light to prevent photobleaching.
Dilute the secondary antibody (Table 1) in the blocking solution, apply 250 μl on the constructs and incubate at room temperature for 3 hours in the dark.
- Wash the constructs 3 times for 30 minutes with 1 mL PBS at room temperature to remove any unreacted secondary antibody.Pause point: The stained samples can be stored at 4°C in dark immersed in PBS to protect from dehydration.
- Perform microscopy using confocal microscope. To evaluate the density of the neural network scan the samples focusing on the central collagen-filled window.Pause point: Upon microscopy the samples can be returned to PBS and kept at 4°C in dark. Samples may be re-used for microscopy if needed.
Overlay the images using maximum intensity projection. To do this, open the image in ImageJ software (NIH). Set calibration of the image appropriately. Select at least 3 random 100×100 μm areas within the final image by applying grid on top of the image. Using the segmented line tool measure the length of all the neurites present in the selected areas. Sum up the total length of all the neurites within the selected area. Recalculate the total length of the neurite network as per 1 mm2
B ǀ Isolation of DNA, mRNA and protein ǀ Timing: 2 hours
CRITICAL: RNA, DNA and protein isolation is performed with commercial kit (AllPrep DNA/RNA/Protein Mini Kit) according to the manufacturer instructions.
1. If you wish to process the construct at a later date, wash twice with PBS and immediately place in a −80°C freezer. Otherwise proceed to next step. Pause point: The construct can be frozen for storage before the lysis step. Wash the construct twice with PBS, remove the construct from the liquid, and immediately place in a −80°C freezer for storage
Place construct in a 2 mL tubes containing 250 μl RLT lysis buffer. Place one scaffold per tube. Proceed to the next step immediately.
Disrupt the construct by fragmenting it with sterile microscissors. Pipette vigorously 5-10 times.
To homogenize the disrupted tissue, transfer the content of the tube to the spin column using 1000 μL pipette. Spin the column for 2 minutes at full speed in a microcentrifuge. The lysate is homogenized as it passes through the spin column.
Collect the flow through and use it immediately to isolate RNA, DNA and protein following the manufacturer instructions. Discard the column.
- Upon the isolation quantify the yield of the nucleic acids with any compatible method (e.g., using NanoDrop). Quantify the protein yield using BCA Protein Assay according to the manufacturer instructions.Pause point: The isolates can be frozen before continuing with further analytical methods: RNA and protein at −80°C, DNA at −20°C.
C ǀ Local field potential measurement ǀ Timing: 30 min
- Transfer the constructs from culture medium to HEPES-buffered artificial cerebrospinal fluid (CSF) in a 35 mm dish.Caution: It is important to keep the construct stationary in the liquid. The liquid level should submerge the construct but do not let it float.
Place the reference electrode in the liquid at a safe distance away from the construct.
Place the recording electrode by lowering the tip of the electrode into the construct with the micromanipulator. The electrode can be retrieved and re-entered into a different spot. Visual inspection is sufficient to determine the entry of the electrode into the construct. A slight movement of the electrode would move the construct if it is appropriately positioned.
- Monitor the spontaneous activity of the construct using Clampex software). Start recording once the trace is stabilized.Caution: Environmental noises need to be prevented by shielding the recording area with a Faraday cage, turning off all electronic devices within the cage, and avoiding cell phone usage near the cage.
Apply a drug of interest by pipetting concentrated drug solution (such as TTX at 1 mM) directly in the HEPES-buffered artificial CSF (TTX, 20 μM final concentration) at the vicinity of the recording electrode. Allow < 3 min for diffusion of the drug before recording.
Record the signal continuously for 10 minutes.
Change the solution by pipetting out the existing liquid while keeping the electrode in place.
Remove the recording electrode with the micro-manipulator while holding down the construct with a tweezer.
Rinse the electrodes with PBS between samples.
For analysis, import the data into the Clampfit software.
Obtain the power spectra by fast Fourier transformation (FFT). Perform analysis for the spectrum from 0 to 50 Hz. For total power analysis, obtain the spectrum for a 10-min recording trace, and calculate the sum of 0-50 Hz power (mV2/Hz). For analyzing time-evolved changes, divide a 10-minute trace into 22 segments (t0–t21) with a window size of 27 s. The Power spectra of each time window is obtained by FFT of each segment.
D ǀ Tandem Liquid Chromatography/MS ǀ Timing: 4 hours (depending on the number of samples)
- To analyze the quantity of neurotransmitters, such as glutamate (Glu), collect 100 uL culture media samples from the cultures.Pause point: The media sample can be frozen-stored at −80°C before MS analysis.
Mix the solution samples with internal standard 15N-labeled Glu (1 uL, final concentration 1,000 ng).
Transfer the solution to MS loading tubes. To prevent contamination of insoluble particulate, solutions can be centrifuged at maximum speed for 1 min and the supernatants collected for MS analysis.
Perform the MS analysis of the samples on a triple quadruple mass spectrometer (3200Q TRAP LC/MS/MS system) using an aminopropyl column. Use a gradient method, using Solvent A, a 95:5 water/acetonitrile solution containing 20 mM ammonium acetate and 20 mM ammonium hydroxide (pH 9.5), and Solvent B (acetonitrile). Run the flow at a rate of 150 μL/min with gradient t = 0 min, 85% (vol/vol) B; t = 15 min, 0% B; t = 28 min, 0% B; t = 30 min, 85% (vol/vol) B; and t = 40 min, 85% (vol/vol) B.
Use positive ionization mode to detect Glu (C5H10NO4 +; Q1 mass = 148.14; Q3 mass = 84).
Apply Glu standards to obtain the characteristic retention time.
For quantification, integrate the signals from peaks centered at the retention time. Calculate the ratio of the peak of the signal of interest over that of the internal control and convert it to concentration.
TIMING
Day 1
Steps 1-3: 1 hour
Step 4: 1 hour
Steps 5-9: 3 hours
Steps 10-14: 1 hour
Steps 15-17: 30 minutes
Day 2
Steps 18-25: 2 hours
Day 3
Step 26: 30 minutes
Step 27: 30 minutes
Optional downstream analysis assays:
Option A, Immunostaining: 2 days
Option B, Isolation of DNA, mRNA and protein: 2 hours
Option C, Local field potential measurement: 30 minutes
Option D, Tandem Liquid Chromatography/MS: 4 hours
TROUBLESHOOTING
Troubleshooting advice can be found in Table 2.
Table 2.
| Step | Problem | Possible reason | Solution |
|---|---|---|---|
| 11 | Large tissue pieces in the medium | too delicate pipetting | pipette more vigorously |
| too few pipetting steps | use 20 pipetting cycles | ||
| 11, 13 | Cell clumping | DNase is inactive or missing in the trypsin-EDTA solution | make sure the DNase was added to the trypsin-EDTA solution, make sure the trypsin-EDTA/DNase solution is stored in proper conditions, avoid prolonged incubation at 37°C during thawing the aliquots |
| the incubation time with trypsin-EDTA/DNase was too long leading to over-digestion of the tissue | keep accurate timing of 20 minutes | ||
| 18 | Lack of cell adhesion | insufficient PDL coating | make sure the concentration of PDL is at 0.1 mg/ml, increase the incubation time during coating with PDL |
| insufficient washing after PDL incubation | wash the scaffold at least 2 times with sufficient amount of DPBS, aspirate all the liquid from the scaffolds after each washing step | ||
| 23 | The collagen does not gel | the pH of the collagen solution is not neutral | make sure the pH of the collagen solution is at pH 7.4 before the scaffold embedding |
| incorrect ratio of the reagents used for collagen neutralization | make sure your calculations are correct | ||
| too short incubation time at 37°C | prolong the incubation time at 37°C | ||
| dilution of liquid collagen with remaining culture media in the scaffold during gel infusion | See Tip for Step 22 | ||
| 26 | Cell clusters visible in the collagen window (Figure 2i) | insufficient washing of the scaffolds before collagen embedding | perform an additional washing step with medium, aspirate any remaining medium to remove the unattached cells |
| missed transfer of scaffolds to the fresh wells | make sure you transfer the scaffolds to the new wells after each step | ||
| no collagen visible in the central window | collagen did not gel | check above troubleshooting of point 23 | |
| too little collagen applied due to the pipetting error | collagen solution is viscous, apply good pipetting technique | ||
| air bubble in the central window due to the pipetting | collagen solution is viscous, apply good pipetting technique | ||
| too rough handling of the constructs | handle the constructs with care during the transfer from 96- to 24-well plate |
ANTICIPATED RESULTS
In this protocol we describe a step-by-step preparation procedure of modular silk-protein based neural tissue constructs as well as several suggested analysis methods (options A-D, final step). The donut-shaped silk sponges convey the idea of layered brain architecture, consisting of neuron-rich gray matter and axon-rich white matter. The mechanical stability of free-standing silk scaffolds allows for straightforward pre-cutting of material to the desired concentric shape while preserving the highly porous structure of the scaffold with interconnected pore sizes of about 500 μm (Figure 1a-e, Figure 2a-b). The porosity of the material and exceptionally high surface area allows a high seeding density of the cells within a confined volume (Figure 2c). Moreover, the porosity of the scaffold does not restrict the diffusion of nutrients and wastes, thus resulting in high viability of dense cell cultures over extended time frames of weeks or months4. Upon seeding, the neurons rapidly and uniformly attach to the scaffold (Figure 2c) and grow neurites into the surrounding collagen gel (Figure 2e-g). The cell seeding density is proportional to the density of neuronal outgrowths observed in the central area of the constructs reaching saturation at 2×10⁶ cells/scaffold (Figure 3). The collagen gel is essential to achieve compartmentalization of the construct and collagen should be applied on the silk scaffold shortly after the cell attachment. A delay in the collagen overlay may result in lack of network formation due to the outgrowth of neurites on the surface of the silk (Figure 2d). The collagen overlay requires proper handling of the scaffolds and removal of unattached cells (Figure 2h), otherwise cell foci can form in the collagen compartment, thus disturbing the analysis of the results in the case of the evaluation of network density using microscopy (Figure 2i).
Figure 3.
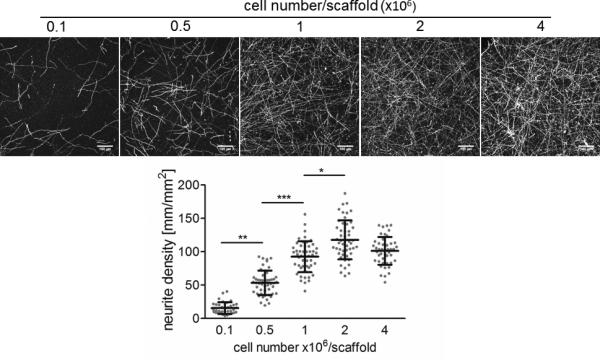
Neurite density in relation to the number of seeded cells. Constructs were immunostained after 1 week of culture with anti-TUJ1 antibody fluorescently labeled with Alexa-488. Images were acquired with confocal microscope (Leica SP2) over the depth of 200 μm, overlayed using maximum intensity and quantified using ImageJ software (NIH). Sale bar 100 μm. Statistical analysis was performed with ANOVA test with Dunn's multiple comparison post-test using GraphPad InStat 3 software (GraphPad): *** P<0.001, ** P<0.01, * P<0.05. 0.1 vs. 0.5: **P<0.01; 0.1 vs. 1:***P<0.001; 0.1 vs. 2:***P<0.001; 0.1 vs. 4:***P<0.001; 0.5 vs. 1:***P<0.001; 0.5 vs. 2:***P<0.001; 0.5 vs. 4:***P<0.001; 1 vs. 2:*P<0.05; 1 vs. 4:ns P>0.05; 2 vs. 4:ns P>0.05. Data shown as individual data points with means ±SD, n=43-50.
EDITORIAL SUMMARY.
Silk-collagen protein scaffolds are seeded with rat primary cortical neurons, which grow neuronal projections that form neuronal networks and functional connectivity.
Acknowledgments
We thank Dr. Stephen Moss from Tufts University for providing embryonic rat brain tissues. This work was funded by National Institutes of Health P41 Tissue Engineering Resource Center Grant EB002520 and German Research Foundation (DFG) (CH 1400/2-1, Postdoctoral Fellowship for K.C.).
Footnotes
Contributions
K.C. performed experimental work, data analysis and wrote the paper. M.D.T.-S., D.L.K. and F.G.O. conceived the idea, M.D.T-s developed the design and protocol, and D.L.K and F.G.O. supervised the project. All authors commented on the results and the manuscript.
Competing financial interests
The authors declare that they have no competing financial interests.
Contributor Information
Karolina Chwalek, Department of Biomedical Engineering, Tufts University, 4 Colby Street, Medford, Massachusetts 02155, USA, Karolina.Chwalek@tufts.edu.
Min D. Tang-Schomer, Connecticut Children's Medical Center, Departments of Pediatrics, 263 Farmington Avenue, Farmington, Connecticut 06030, USA, MTang@connecticutchildrens.org
Fiorenzo G. Omenetto, Department of Biomedical Engineering, Tufts University, 4 Colby Street, Medford, Massachusetts 02155, USA Department of Physics, Tufts University, 4 Colby Street, Medford, Massachusetts 02155, USA, Fiorenzo.Omenetto@tufts.edu.
David L. Kaplan, Department of Biomedical Engineering, Tufts University, 4 Colby Street, Medford, Massachusetts 02155, USA.
REFERENCES
- 1.Choi SH, et al. A three-dimensional human neural cell culture model of Alzheimer's disease. Nature. 2014;515:274–278. doi: 10.1038/nature13800. [DOI] [PMC free article] [PubMed] [Google Scholar]
- 2.Lancaster MA, et al. Cerebral organoids model human brain development and microcephaly. Nature. 2013;501:373–379. doi: 10.1038/nature12517. [DOI] [PMC free article] [PubMed] [Google Scholar]
- 3.Hopkins AM, DeSimone E, Chwalek K, Kaplan DL. 3D in vitro modeling of the central nervous system. Prog. Neurobiol. 2015;125C:1–25. doi: 10.1016/j.pneurobio.2014.11.003. [DOI] [PMC free article] [PubMed] [Google Scholar]
- 4.Tang-Schomer MD, et al. Bioengineered functional brain-like cortical tissue. Proc. Natl. Acad. Sci. U.S.A. 2014;111:13811–13816. doi: 10.1073/pnas.1324214111. [DOI] [PMC free article] [PubMed] [Google Scholar]
- 5.Rockwood DN, et al. Materials fabrication from Bombyx mori silk fibroin. Nat. Protoc. 2011;6:1612–1631. doi: 10.1038/nprot.2011.379. [DOI] [PMC free article] [PubMed] [Google Scholar]
- 6.Vepari C, Kaplan DL. Silk as a biomaterial. Prog. Polym. Sci. 2007;32:991–1007. doi: 10.1016/j.progpolymsci.2007.05.013. [DOI] [PMC free article] [PubMed] [Google Scholar]
- 7.Devine MJ, et al. Parkinson's disease induced pluripotent stem cells with triplication of the alpha-synuclein locus. Nat. Commun. 2011;2:440. doi: 10.1038/ncomms1453. [DOI] [PMC free article] [PubMed] [Google Scholar]
- 8.Shi Y, Kirwan P, Livesey FJ. Directed differentiation of human pluripotent stem cells to cerebral cortex neurons and neural networks. Nat. Protoc. 2012;7:1836–1846. doi: 10.1038/nprot.2012.116. [DOI] [PubMed] [Google Scholar]
- 9.Li X, Liu X, Zhang N, Wen X. Engineering in situ cross-linkable and neurocompatible hydrogels. J. Neurotrauma. 2014;31:1431–1438. doi: 10.1089/neu.2013.3215. [DOI] [PubMed] [Google Scholar]
- 10.Lutolf MP, et al. Synthetic matrix metalloproteinase-sensitive hydrogels for the conduction of tissue regeneration: engineering cell-invasion characteristics. Proc. Natl. Acad. Sci. U.S.A. 2003;100:5413–5418. doi: 10.1073/pnas.0737381100. [DOI] [PMC free article] [PubMed] [Google Scholar]
- 11.Tsurkan MV, et al. Defined polymer-peptide conjugates to form cell-instructive starPEG-heparin matrices in situ. Adv. Mater. 2013;25:2606–2610. doi: 10.1002/adma.201300691. [DOI] [PubMed] [Google Scholar]
- 12.Dubois-Dauphin ML, et al. The long-term survival of in vitro engineered nervous tissue derived from the specific neural differentiation of mouse embryonic stem cells. Biomaterials. 2010;31:7032–7042. doi: 10.1016/j.biomaterials.2010.06.017. [DOI] [PubMed] [Google Scholar]
- 13.Hogberg HT, et al. Toward a 3D model of human brain development for studying gene/environment interactions. Stem Cell Res.Ther. 2013;4(Suppl 1):S4. doi: 10.1186/scrt365. [DOI] [PMC free article] [PubMed] [Google Scholar]
- 14.Muguruma K, Nishiyama A, Kawakami H, Hashimoto K, Sasai Y. Self- organization of polarized cerebellar tissue in 3D culture of human pluripotent stem cells. Cell. Rep. 2015:S2211–1247(14)01104-8. doi: 10.1016/j.celrep.2014.12.051. [DOI] [PubMed] [Google Scholar]
- 15.Kato-Negishi M, Morimoto Y, Onoe H, Takeuchi S. Millimeter-sized neural building blocks for 3D heterogeneous neural network assembly. Adv. Healthc. Mater. 2013;2:1564–1570. doi: 10.1002/adhm.201300052. [DOI] [PubMed] [Google Scholar]
- 16.van Vliet E, et al. Electrophysiological recording of re-aggregating brain cell cultures on multi-electrode arrays to detect acute neurotoxic effects. Neurotoxicology. 2007;28:1136–1146. doi: 10.1016/j.neuro.2007.06.004. [DOI] [PubMed] [Google Scholar]
- 17.Zurich MG, Honegger P, Schilter B, Costa LG, Monnet-Tschudi F. Involvement of glial cells in the neurotoxicity of parathion and chlorpyrifos. Toxicol Appl Pharmacol. 2004;201:97–104. doi: 10.1016/j.taap.2004.05.003. [DOI] [PubMed] [Google Scholar]
- 18.Aurand ER, Wagner JL, Shandas R, Bjugstad KB. Hydrogel formulation determines cell fate of fetal and adult neural progenitor cells. Stem Cell Res. 2014;12:11–23. doi: 10.1016/j.scr.2013.09.013. [DOI] [PMC free article] [PubMed] [Google Scholar]
- 19.Watanabe K, Nakamura M, Okano H, Toyama Y. Establishment of three- dimensional culture of neural stem/progenitor cells in collagen type-1 gel. Restor. Neurol. Neurosci. 2007;25:109–117. [PubMed] [Google Scholar]
- 20.Pacifici M, Peruzzi F. Isolation and culture of rat embryonic neural cells: a quick protocol. J. Vis. Exp. 2012;63:e3965. doi: 10.3791/3965. [DOI] [PMC free article] [PubMed] [Google Scholar]
- 21.Leal-Egana A, Scheibel T. Interactions of cells with silk surfaces. J. Mater. Chem. 2012;22:14330–14336. [Google Scholar]
- 22.An B, et al. Physical and biological regulation of neuron regenerative growth and network formation on recombinant dragline silks. Biomaterials. 2015;48:137–146. doi: 10.1016/j.biomaterials.2015.01.044. [DOI] [PMC free article] [PubMed] [Google Scholar]