Abstract
Purpose
To evaluate 2 polishing systems and 3 polishing speeds on the gloss, roughness, and heat production of yttria stabilized tetragonal zirconia polycrystal (Y-TZP).
Materials and Methods
A Y-TZP block (Zenostar Zr Translucent) was sectioned into 4 mm thick sections. Specimens (n = 30 per polishing system) were first wet ground with a fine diamond bur at 200,000 RPM for 15 seconds. The baseline gloss of all specimens was measured in a glossmeter (60° angle) in a direction perpendicular to grinding. Initial surface roughness (Ra) was determined on an optical profilometer in a direction perpendicular to grinding. The specimens were then polished with either a Dialite ZR Polishing kit or a CeraMaster Polishing kit. All grinding and polishing was performed by the same operator calibrated to apply approximately 2 N pressure. The medium grit polisher was used for 30 seconds, repeated for 30 seconds, and then the fine grit polisher was used. After each step, the gloss and roughness of each specimen was re-measured as described previously. Each polishing system was used at 5000, 15,000, and 40,000 RPM (n = 10 for each polish system/speed combination). A group of glazed specimens (n = 10) was evaluated for gloss and roughness as a control. The heat generated for each polishing step was measured with a thermocouple. The gloss and roughness of the specimens were analyzed using a linear mixed model and Tukey-Kramer post-hoc tests. Each step of polishing was compared to the glazed control group with an ANOVA and Dunnett’s test.
Results
Polishing step, system, and speed were significant (p < 0.05) for gloss and roughness. Examination of system and step interaction was significant for gloss only. Post-hoc analysis revealed that 15,000 RPM produced higher gloss and lower roughness than other speeds. Each progressive step produced an improvement in gloss except for initial 30 seconds with the CeraMaster Coarse (medium polisher) (p = 0.34). Roughness was also reduced at each progressive step. No polishing speed/system produced an increase in temperature above 41°C. Both polishing systems were capable of achieving a similar or superior roughness and gloss as the glazed control specimens after the final polishing step at 15,000 RPM.
Conclusions
15,000 RPM is an optimal polishing speed. Progressing through the polishing sequence significantly improves gloss and roughness and can create similar values as glazed zirconia.
Keywords: Gloss, roughness, temperature, Dialite ZR, CeraMaster
Full-contour yttria stabilized tetragonal zirconia polycrystal (Y-TZP) restorations have gained popularity due to the decreased potential for chipping when the veneering porcelain is omitted.1 In these full-contour restorations, zirconia is present on the occlusal surface and must be polished following occlusal adjustment. Polishing ceramic restorations reduces plaque accumulation,2 improves patient comfort,3 removes defects that can lead to fracture,4 and smooths surfaces in contact with opposing enamel.5,6 Clinically, an effective polishing method would compare to the surface obtained by applying a glaze. The effectiveness of polishing a ceramic may be evaluated by measuring roughness and gloss.
Roughness represents the vertical deviations of a surface from its ideal form. Roughness of a dental restorative material can contribute to plaque accumulation at values greater than 0.2 μm.2 Finishing a restoration to an Ra below 0.5 μm is preferred, as this roughness can be sensed by the tongue.3 Adjusting zirconia with a diamond bur will decrease its flexural strength.4,7–11 However, re-polishing the zirconia has been shown to regain 72% of the strength.4 Polishing adjusted zirconia also shows a trend towards decreasing opposing enamel wear.5,6 Gloss is the amount of specular (mirror-like) reflection from a surface as compared with a standard (normally black glass). Achieving a high gloss is important for creating an esthetic restoration.
Heat production during polishing is also a concern of dental clinicians. Early work by Zach and Cohen12 showed that a pulpal temperature increase of 5.5°C caused irreversible pulpitis in 15% of tested Rhesus monkeys. Later work by Baldissara et al13 concluded that pulpal temperature increases ranging from 8.9 to 14.7°C showed no clinical or histological signs of necrosis for vital human teeth. Heat production during adjustment of Y-TZP is also theorized to produce reverse transformation. Temperature changes above 350°C may induce reverse transformation,14 which has been shown to weaken Y-TZP.8 The temperature increase from polishing Y-TZP at different speeds has not been previously examined.
Several different polishing systems are available for polishing ceramic restorations. These systems vary based on the type of abrasive (diamond, silica, alumina), size of abrasive particles, concentration of abrasive particles, and binder used to form the polisher shape (epoxy, polyurethane).15 Previous studies have examined the effectiveness of polishing systems for polishing dental porcelain. These studies found different commercial polishing systems to be more effective than others based on surface profilometry and SEM observation.16–18 Zirconia is much harder than other dental ceramics,19 and therefore requires specialized equipment for polishing. A recent study compared ten zirconia intraoral polishing systems and reported significant differences between systems but few differences between the steps in each system.20
The aim of this study was to evaluate two polishing systems (each with 2 steps) at three speeds of progressive steps for their ability to produce high gloss and low roughness on zirconia. Additionally, the temperature change of the zirconia blocks was measured for each polish condition. The null hypotheses of this study are: 1. there is no difference in the roughness or gloss of zirconia with each polishing speed, 2. there is no difference in the roughness or gloss of zirconia following each polishing step, 3. there is no difference in the roughness or gloss between the polishing systems at each step, 4. there is no difference in the roughness or gloss of the control glazed specimens and each step of polishing.
MATERIALS AND METHODS
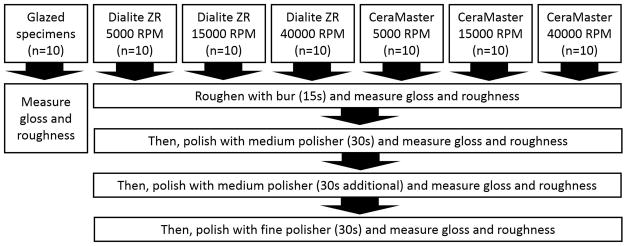
Two polishing systems were employed in this study with two steps (polishers) each: CeraMaster and CeraMaster Coarse (Shofu Inc, Kyoto, Japan) and Dialite ZR medium and fine (Brasseler, Savannah, GA). Each polisher was used for 30 seconds to represent an average amount of time a clinician would spend polishing a restoration. The medium polisher (CeraMaster Coarse in the Shofu system) was evaluated for an additional 30 seconds of use to determine if additional polishing would improve gloss and roughness. The CeraMaster system is recommended for use at 10,000 to 15,000 RPM at 1.5 N force. The Dialite ZR system is recommended for use at 5000–7000 RPM. Different polishing speeds were selected to represent recommended speeds of each manufacturer (5000 and 15,000 RPM) and the maximum speed of the electric handpiece used in this study (40,000 RPM). Glazed zirconia was evaluated as a control. An outline of the experimental design is presented in Figure 1.
Figure 1.
Outline of experimental design.
Specimen preparation
A pre-sintered Y-TZP block (Zenostar Zr Translucent; Wieland, Troy, MI) was sectioned into 4 mm thick sections with a lapidary saw. The zirconia was then sintered following the manufacturer’s instructions. Specimens (n = 10 per group) were first roughened with a fine diamond bur (8879.31.014; Brasseler) under water with a high-speed electric handpiece (Forza F5; Brasseler). The handpiece was used at 200,000 RPM for 15 seconds with back and forth movements in one direction. All grinding and polishing was performed by the same operator who was calibrated to apply approximately 2 N pressure. A new bur was used for each specimen. Following initial grinding, specimens were cleaned in an ultrasonic device with water for 10 minutes, and the initial gloss and roughness were measured.
Initial gloss measurements were recorded using a glossmeter (Novo-Curve; Rhopoint Instruments, East Sussex, UK) using 60° geometry. A positioning fixture made from impression material was used on the gloss meter to position each specimen and ensure measurements were perpendicular to the direction of grinding. Several measurements were made in the direction parallel to grinding to confirm that the values were higher. Two gloss unit (GU) values were recorded from each specimen and averaged.
The initial surface roughness (Ra) was determined by ISO guidelines21 using a S16/3.5 sensor on a 3D optical profilometer (Proscan 2000; Scantron Industrial Products, Tauton UK). Four lines in the center of each specimen were scanned perpendicular to the direction of grinding at a resolution of 3 μm to maximize roughness values and provide consistency with previous studies. Ra was calculated with Proform software (Scantron Inudstrial Products). Based on previous roughness measurements,5 a 2.5 mm cutoff length was selected to remove macro surface form which was accomplished with a surface filter (number 125).
Polishing
The specimens were then polished with the zirconia polishing systems. The zirconia specimens were polished first with the medium grit polishing point from the respective systems (CeraMaster Coarse from the Shofu kit). All specimens were polished for 30 seconds in the same direction as the grinding was performed. The same calibrated operator performed all polishing. Specimens were polished at either 5000, 15,000, or 40,000 RPM with a slow-speed handpiece (Forza F1; Brasseler) without lubrication. Specimens were cleaned in an ultrasonic device with water for 10 minutes, and then roughness and gloss were re-measured. The same procedure was repeated on the same specimens for an additional 30 seconds with the medium polishers and then for 30 seconds with the fine-grit polishers. A new polisher was used for every specimen (polishers were reused for the medium polish 60-second group).
Control
Ten additional blocks were sectioned from the pre-sintered Y-TZP block (Zenostar Zr Translucent) and fired. The specimens were covered with one layer of a glaze (Vita LT Glaze; VITA) and vibrated until the surface was uniformly covered, allowed to air dry, and fired (without vacuum, 960°C holding temperature; 50°C/min temperature increase; closing time 2 minutes; 500°C standby temperature; long-term cooling at 0°C). Gloss and roughness were measured as described previously.
Specimen analysis
One representative specimen from each polishing system/step at 15,000 RPM was analyzed by scanning electron microscopy (SEM). Additionally, the corresponding bur or polisher was observed with SEM. The specimens were cleaned in ethanol, secured to SEM tabs with gold conducting tape, and gold-coated in a vacuum sputter coater (Desk-I; Denton Vacuum Inc., Moorestown, NJ). The specimens were examined in a SEM (Quanta FEG 650; FEI, Hillsboro, OR) using the secondary electron imaging mode.
Temperature measurement
Six 4-mm-thick zirconia specimens were prepared as described above. The block was first adjusted with the fine diamond bur as described above. A cut-out was prepared into the side of the zirconia block with an approximately 0.5 mm distance between the ceiling of the cut-out and the top surface of the zirconia. A thermocouple attached to a digital thermometer (51 II; Fluke, Everett, WA) was placed inside the cut-out and secured to the ceiling of the cut-out. The zirconia specimen was then placed into a vice with insulating ceramic tiles between the walls of the vice and the specimen (Fig 2). For each zirconia specimen, a medium polisher (one for each speed and each system) was used on the area directly above the thermocouple. The test was started when the thermometer equilibrated to room temperature (24.0 ± 0.3°C). The maximum temperature over a 1-minute time interval was recorded. The same specimens were then used with the fine polishers.
Figure 2.
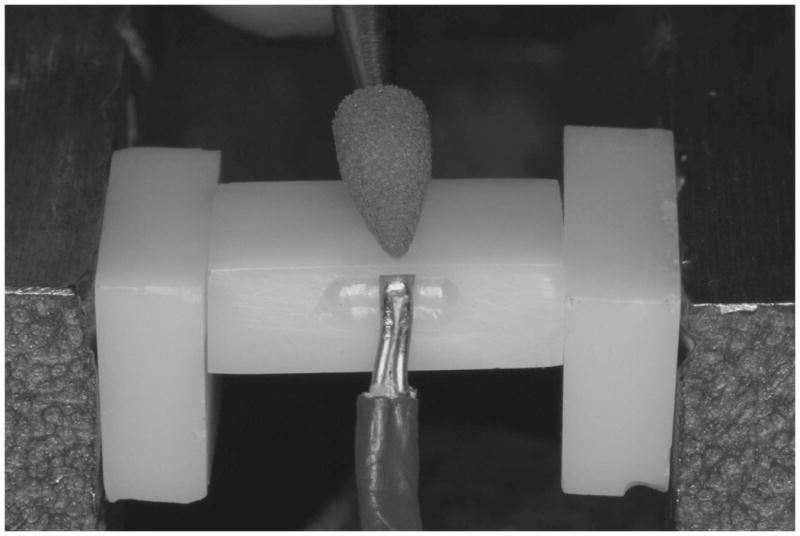
Thermocouple inserted into cut-out of zirconia specimen.
Statistical methods
Repeated measures analysis using a liner mixed model was performed to assess the effects of system, speed, and step on roughness and gloss. The interaction between system and step was also inspected via the above procedure. Selection of covariance structure was accomplished by comparing the covariance estimates and the goodness-of-fit indices. It was appropriate to model the within-subject error structure as first-order autoregressive. Post-hoc comparisons accounting for multiple testing were conducted using Tukey-Kramer method. Gloss and roughness of the polished groups were compared with a control glazed surface for each step of polishing using ANOVA. Dunnett’s test was then used to identify which of the polishing systems at various speeds was significantly different from the control group. For any variable that did not meet the assumptions of ANOVA, an appropriate transformation was applied. A p-value of < 0.05 was considered statistically significant in two-tailed statistical tests. All analyses were conducted using SAS 9.4 (SAS Institute, Cary NC) software.
RESULTS
The gloss and roughness of each polishing combination are presented in Table 1 and 2, and the results of the repeated measures analysis using linear mixed model and post-hoc comparisons are presented in Table 3. Analyses of gloss and roughness indicated that speed, system, and step were significant (p < 0.05). The interaction between polishing system and step was significant for gloss (p < 0.0001) but not roughness (p = 0.06). Post-hoc comparisons suggested that polishing at the speed of 15,000 RPM yielded higher gloss values than 5000 or 40,000 RPM (p < 0.001). Polishing at 15,000 and 40,000 RPM produced lower roughness than 5000 RPM. Each progressive step produced an improvement in gloss under each polishing system (p < 0.0001) except for initial 30 seconds with the CeraMaster Coarse (p = 0.34). Reduction in roughness was also observed at each continuing step (p < 0.0001). The Dialite ZR medium polisher produced significantly higher gloss values than the CeraMaster Coarse after 30 seconds and 60 seconds (p < 0.0001); however, there was no difference in gloss between the Dialite ZR fine and CeraMaster polishers (p = 0.78). The Dialite ZR polishers were also less effective in reducing roughness than CeraMaster polishers (p < 0.0001).
Table 1.
Gloss (Gloss Unit) [mean ± SD] for each polishing system, step, and speed
| Bur roughen (15 s) | Medium polish (30 s) | Medium polish (60 s) | Fine polish (30 s) | |
|---|---|---|---|---|
| Dialite ZR 5000 RPM | 9.4 ± 1.3 | 26.7 ± 10.0 | 32.6 ± 11.8 | 71.1 ± 25.9 |
| Dialite ZR 15,000 RPM | 9.0 ± 0.6 | 61.3 ± 19.3 | 96.3 ± 15.6 | 134.3 ± 20.6 |
| Dialite ZR 40,000 RPM | 8.3 ± 0.8 | 64.8 ± 11.0 | 87.9 ± 10.1 | 136.9 ± 17.5 |
| CeraMaster 5000 RPM | 9.0 ± 0.5 | 20.3 ± 3.6 | 25.9 ± 6.5 | 73.1 ± 20.4 |
| CeraMaster 15,000 RPM | 8.8 ± 0.8 | 24.2 ± 3.0 | 30.0 ± 6.2 | 140.3 ± 21.3 |
| CeraMaster 40, 000 RPM | 8.9 ± 0.5 | 23.7 ± 1.6 | 31.5 ± 4.1 | 98.9 ± 11.1 |
Table 2.
Roughness (Ra in μm) [mean ± SD] for each polishing system, step, and speed
| Bur roughen (15 s) | Medium polish (30 s) | Medium polish (60 s) | Fine polish (30 s) | |
|---|---|---|---|---|
| Dialite ZR 5000 RPM | 4.0 ± 0.4 | 2.4 ± 0.3 | 2.3 ± 0.3 | 2.0 ± 0.2 |
| Dialite ZR 15,000 RPM | 4.1 ± 0.3 | 2.3 ± 0.4 | 1.5 ± 0.4 | 0.6 ± 0.2 |
| Dialite ZR 40,000 RPM | 3.8 ± 0.2 | 1.8 ± 0.5 | 1.4 ± 0.2 | 1.3 ± 0.3 |
| CeraMaster 5000 RPM | 4.0 ± 0.4 | 2.7 ± 0.1 | 2.8 ± 0.2 | 2.3 ± 0.2 |
| CeraMaster 15,000 RPM | 3.8 ± 0.2 | 3.0 ± 0.8 | 2.4 ± 0.2 | 1.0 ± 0.3 |
| CeraMaster 40, 000 RPM | 4.0 ± 0.4 | 2.5 ± 0.1 | 2.1 ± 0.1 | 1.6 ± 0.1 |
Table 3.
Results of repeated measures analysis using linear mixed model and post-hoc comparisons
| Gloss | Roughness | ||
|---|---|---|---|
| Effect | p | Effect | p |
| System | 0.0002* | System | 0.006* |
| Speed | <0.0001* | Speed | <0.0001* |
| Step | <0.0001* | Step | <0.0001* |
| System x Step | <0.0001* | System x Step | 0.06 |
| Post-hoc analysis | Post-hoc analysis | ||
| Speed | p | System | p |
| 5000 RPM – 15,000 RPM | <0.0001* | Dialite ZR - CeraMaster | 0.006 |
| 5000 RPM – 40,000 RPM | 0.0002* | Speed | p |
| 15,000 RPM – 40,000 RPM | 0.0005* | 5000 RPM – 15,000 RPM | <0.0001* |
| System x Step | p | 5000 RPM – 40,000 RPM | <0.0001* |
| Dialite ZR: Step 1 - Step 2 | <0.0001* | 15,000 RPM – 40,000 RPM | 0.36 |
| Dialite ZR: Step 2 - Step 3 | <0.0001* | Step | p |
| Dialite ZR: Step 3 - Step 4 | <0.0001* | Step 1 - Step 2 | <0.0001* |
| CeraMaster: Step 1 - Step 2 | 0.002* | Step 2 - Step 3 | 0.002* |
| CeraMaster: Step 2 - Step 3 | 0.34 | Step 3 - Step 4 | <0.0001* |
| CeraMaster: Step 3 - Step 4 | <0.0001* | ||
| Step x System | p | ||
| Step 1: Dialite ZR – CeraMaster | 0.9 | ||
| Step 2: Dialite ZR – CeraMaster | <0.0001* | ||
| Step 3: Dialite ZR – CeraMaster | <0.0001* | ||
| Step 4: Dialite ZR – CeraMaster | 0.78 | ||
Step 1: Bur roughen (15 s), Step 2: Medium polish (30 s), Step 3: Medium polish (60 s), Step 4: Fine polish (30 s).
Denotes statistical significance at p < 0.05
The results of the Dunnett’s tests are shown in Table 4. Both systems at all speeds were able to achieve or surpass control gloss values by the final polishing step. The Dialite ZR system achieved control gloss values with 1 minute using a medium polisher at 15,000 and 40,000 RPM. The Dialite system at 40,000 RPM and the CeraMaster system at 15,000 RPM achieved significantly similar roughness values as the control after the final step; and the Dialite ZR system at 15,000 achieved a significantly less rough surface than the control after the final step.
Table 4.
Comparison of polishing steps to glazed zirconia
| Dialite ZR (5000 RPM) | Dialite ZR (15,000 RPM) | Dialite ZR (40,000 RPM) | Cera-Master (5000 RPM) | Cera-Master (15,000 RPM) | Cera-Master (40,000 RPM) | |
|---|---|---|---|---|---|---|
| Gloss | ||||||
| Bur roughen (15 s) | − | − | − | − | − | − |
| Medium polish (30 s) | − | − | − | − | − | − |
| Medium polish (60 s) | − | − | − | − | ||
| Fine polish (30 s) | + | + | + | |||
| Roughness | ||||||
| Bur roughen (15 s) | + | + | + | + | + | + |
| Medium polish (30 s) | + | + | + | + | + | + |
| Medium polish (60 s) | + | + | + | + | + | |
| Fine polish (30 s) | + | − | + | + | ||
− indicates significantly less than control, + indicates significantly greater than control
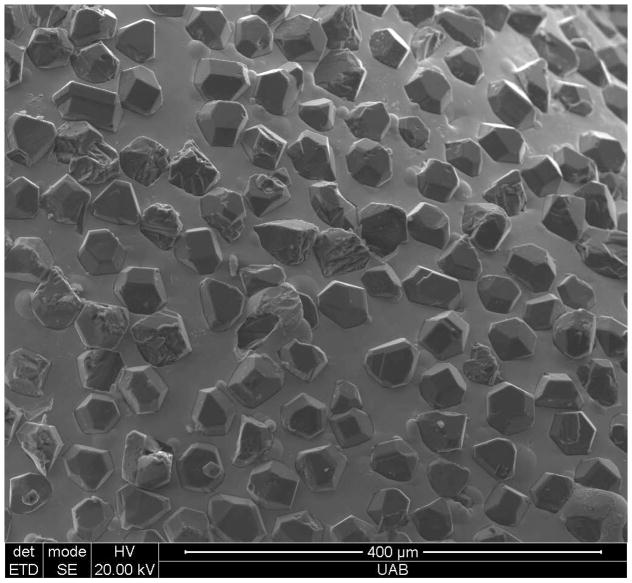
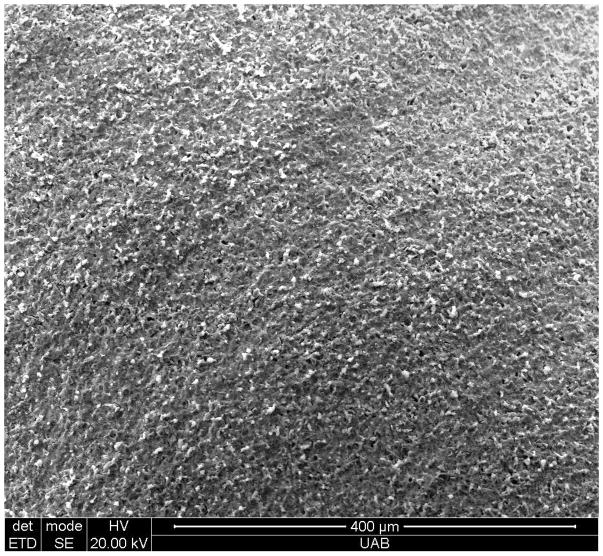
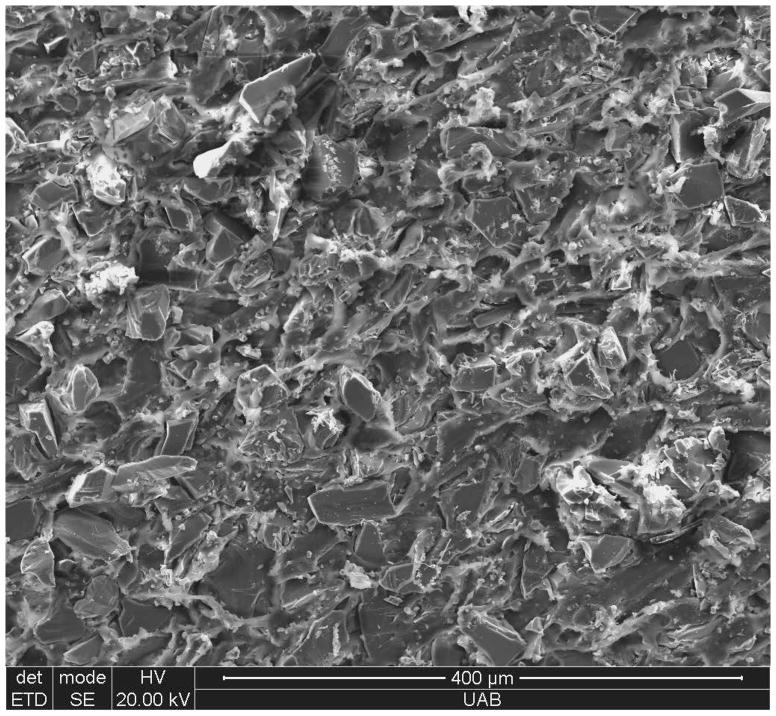
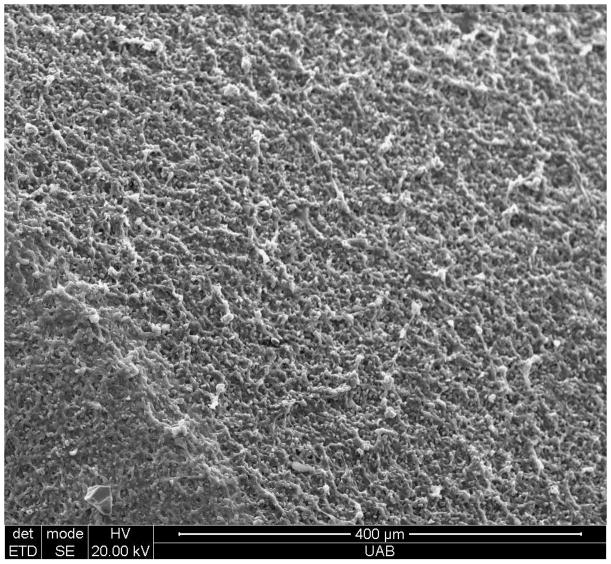
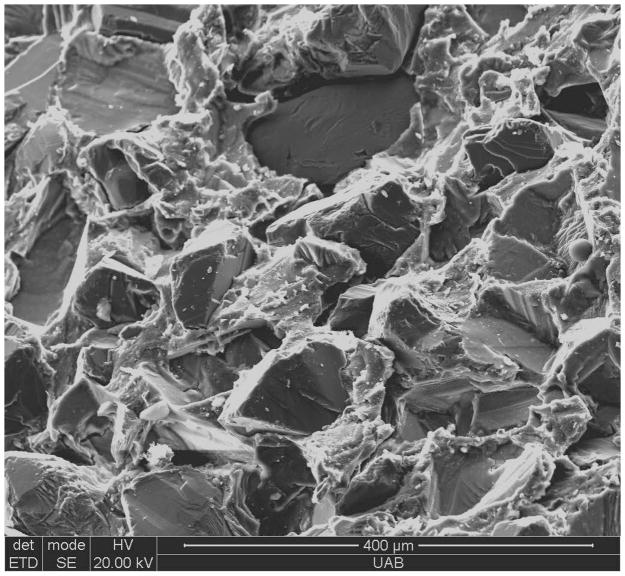
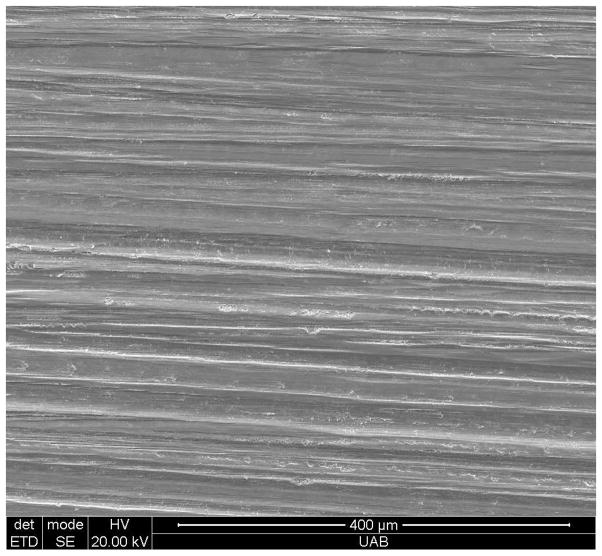
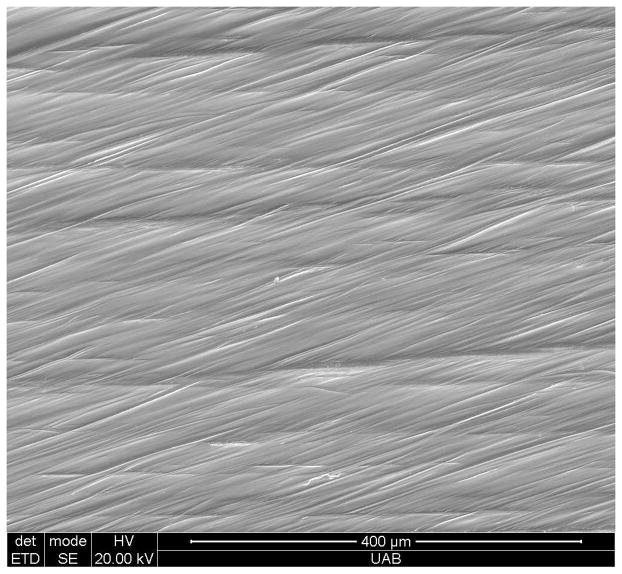
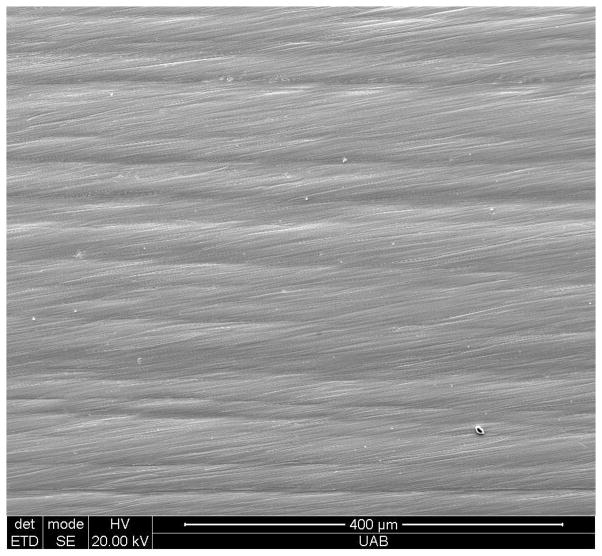
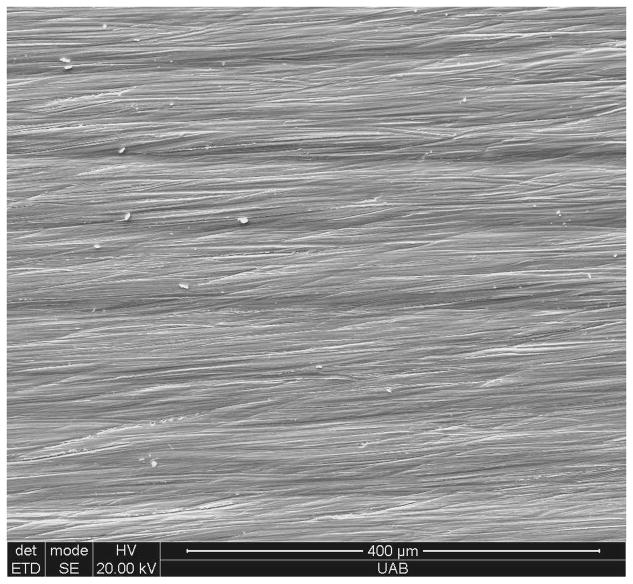
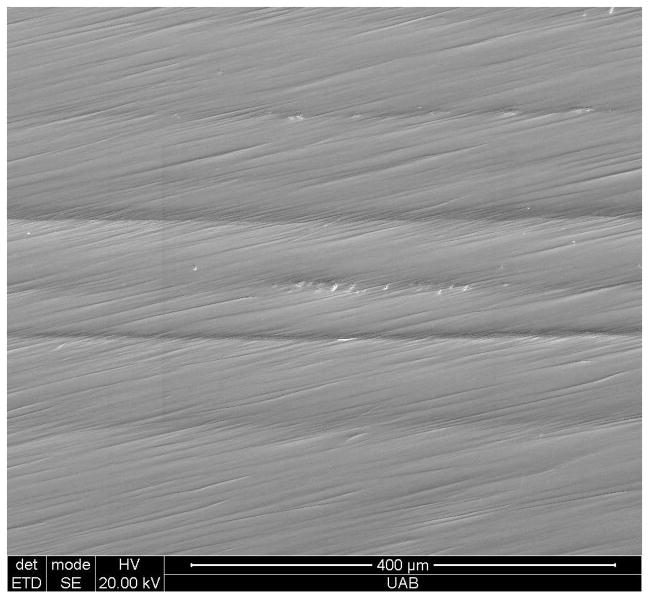
The heat produced from each polishing system/speed is presented in Table 5. Figures 3 to 7 show the fine diamond bur and each of the polishers. The abrasive particles are roughly 10 to 20 μm in the diamond bur (Fig 3), 10 to 20 μm in the Dialite ZR medium polisher (Fig 4), 1 to 5 μm in the Dialite ZR fine polisher (Fig 5), 50 to 80 μm in the CeraMaster Coarse polisher (Fig 6), and 1 to 5 μm in the CeraMaster polisher (Fig 7). Figure 3 demonstrates the wear facets on the abrasive diamond particles, and Figures 4 and 6 show areas of particle pull-out. Figures 8 to 12 show the surface of zirconia roughened with a diamond bur and progressively polished with each polisher. Figure 8 shows sharp deep grooves about 10 to 20 μm wide left by the fine diamond bur. Figures 9 and 11 demonstrate that after the first polishing step, the 10 to 20 μm grooves appear shallow and blunted with fine surface scratches. In Figures 10 and 12, the wide grooves can still be observed, but the fine surface scratches appear to have dulled.
Table 5.
Maximum temperature of zirconia polished for 1 minute with various polishers/polishing speeds
| Group | Maximum temperature (°C) |
|---|---|
| CeraMaster Coarse 5000 RPM | 27.1 |
| CeraMaster Coarse 15,000 RPM | 32.4 |
| CeraMaster Coarse 40,000 RPM | 40.9 |
| CeraMaster 5000 RPM | 29.1 |
| CeraMaster 15,000 RPM | 30.3 |
| CeraMaster 40,000 RPM | 38.3 |
| Dialite ZR Medium 5000 RPM | 29 |
| Dialite ZR Medium 15,000 RPM | 34.1 |
| Dialite ZR Medium 40,000 RPM | 34 |
| Dialite ZR Fine 5000 RPM | 28.2 |
| Dialite ZR Fine 15,000 RPM | 29.1 |
| Dialite ZR Fine 40,000 RPM | 35.9 |
Figure 3.
SEM image of the fine diamond bur.
Figure 7.
SEM images of the CeraMaster polisher.
Figure 4.
SEM image of the Dialite ZR medium polisher.
Figure 5.
SEM images of the Dialte ZR fine polisher.
Figure 6.
SEM images of the CeraMaster coarse polisher.
Figure 8.
Zirconia specimens after being polished by the fine diamond bur.
Figure 12.
Zirconia specimens after being polished by the CeraMaster polisher.
Figure 9.
Zirconia specimens after being polished by the Dialite ZR medium polisher.
Figure 11.
Zirconia specimens after being polished by the CeraMaster coarse polisher.
Figure 10.
Zirconia specimens after being polished by the Dialte ZR fine polisher.
DISCUSSION
Based on these results, none of the null hypotheses can be accepted. Polishing at 15,000 RPM provided higher gloss and lower or similar roughness as polishing at 5000 or 40,000 RPM. All polishing steps improved gloss and roughness other than the initial 30 seconds with the CeraMaster Coarse polisher. The Dialite ZR medium polisher produced lower gloss than the CeraMaster Coarse polisher at 30 and 60 seconds of polishing. Dialite ZR polishers produced lower roughness at each step. Polishing with the Dialite ZR system at 15,000 or 40,000 RPM or the CeraMaster system at 15,000 RPM produced equivalent or better gloss and roughness than the control gloss specimens.
Observation of the zirconia specimens by SEM revealed that the diamond abrasive particles embedded in the fine diamond bur were sufficient to cut the zirconia surface (Fig 8). The wear facets on the diamond particles and the lack of particle pull-out (Fig 3) suggest a two-body abrasive wear mechanism. Although the abrasive particles in the Dialite ZR medium and CeraMaster coarse polishers were equivalent or larger in size than those on the fine diamond bur, these polishers smoothed the zirconia and produced fine surface scratches. The abrasive particles in these polishers did not show wear facets, and noticeable particle pull-out could be observed (Figs 4, 6), indicating a three-body abrasive wear mechanism. In other words, the particles in the polishers likely dislodged from the embedding medium (silicone for CeraMaster and polyurethane for Dialite ZR) and rolled or slid across the surface of the zirconia. The larger abrasive particles in the CeraMaster Coarse may not have as been capable of smoothing the bur-created grooves as the Dialite ZR medium polisher, which is reflected in the roughness data. The Dialite ZR fine and CeraMaster polishers contained abrasives only slightly larger in dimension than the scratch depths indicated by Ra values (Figs 5, 7, 10, 12). The asperities on these fine abrasive particles are likely the same dimensions as the surface scratches detected for Ra by the profilometer.
One benefit of polishing dental restorations is to prevent the adherence of plaque. An in vivo study by Quirynen et al22 demonstrated that rough strips (Ra = 4 μm) placed on teeth accumulated more plaque than smooth strips (Ra = 0.1 μm). Therefore, the roughness of the adjusted zirconia in this study (Ra = 4 ± 0.4 μm) would cause accumulation of plaque. A review by Teughels et al2 suggests polishing to a threshold of Ra < 0.2 μm to prevent the formation of a biofilm on dental materials. Although no polishing procedure achieved this threshold, the significant improvements in roughness made by progressing through the polishing procedure may help to reduce the degree of plaque accumulation after adjustment. Polishing can also be sensed by the patient’s tongue. A study by Jones et al3 concluded that 60% of participants could correctly differentiate between surfaces with Ra of 0.28 and 0.62 μm, and 76% could differentiate surfaces with Ra of 0.62 and 1.29 μm using the tips of their tongue. Based on those results, most patients would be able to perceive the difference between each step of polishing performed in the current study. Polishing zirconia to a similar roughness as enamel may prevent the patient from sensing the difference between the restoration and natural tooth structure. Willems et al23 reported the Ra of enamel (in contact areas) as 0.64 ± 0.25 μm, whereas this author has previously reported the Ra of enamel as 2.63 ± 1.14 μm.5 Polished zirconia (1.11 ± 0.26 μm) also causes less opposing enamel wear than adjusted zirconia (Ra = 2.73 ± 1.49 μm).5 In summary, at least some degree of polishing after adjustment with a fine diamond bur is necessary to reduce plaque accumulation, replicate the “feel” of natural enamel, and minimize wear of opposing enamel.
Clinically, obtaining a final roughness values similar to glazed zirconia would be a benchmark for assessing the effectiveness of a polishing system. Both polishing systems were able to produce similar roughness values as the glazed control specimens; however, the Ra obtained for glazed zirconia in the current study (1.2 ± 0.1 μm) is rougher than previously reported (0.2 ± 0.08 μm).24 Polishing zirconia at contact areas is preferable to applying glaze, as the glaze layer has been shown to easily wear off.25 Two previous studies assessed zirconia polishing systems and reported lower Ra values than obtained in the current study. In the first study, Ra values of 0.22 μm and 0.17 μm were obtained for a medium and fine polisher; however, the zirconia in their study was not pre-roughened with an adjustment bur.26 In another study, the zirconia was pre-roughened with a bur, creating shallower scratching as seen in SEM and a lower initial Ra (1.22 μm).20 One reason the Ra values obtained in this study are higher than previously reported is that non-contact profilometry was used in this study, whereas previous studies used contact profilometry. Another reason for differences between the current and previous studies is human variation in polishing force and motion. Although an attempt was made to control these factors, the use of a single human operator is a limitation of this study.
Several previous studies have shown that adjusting zirconia with a diamond bur reduces its flexural strength.4,7–11 Grinding produces surface defects that can be observed as abrasive scratches with SEM imaging (Fig 8). These defects act as areas of stress concentration and may initiate catastrophic cracks in zirconia during loading. Polishing zirconia reduced the amplitude of these scratches and has been shown to improve the flexural strength of adjusted zirconia.4 The process of adjusting zirconia may also create microcracks in its subsurface. Y-TZP undergoes transformation toughening in response to crack formation, which is achieved by compression of cracks when tetragonal phase zirconia transforms to the less compact monoclinic phase.27 Reheating zirconia following adjustment causes reverse transformation from the monoclinic phase back to the tetragonal phase, releasing the compression and decreasing the strength of the zirconia.8 A fear of some authors is that the heat produced from adjusting zirconia may trigger reverse transformation.10,28 Denry et al29 have shown that reverse transformation begins at 350°C. As all of the polishing speeds in the current study produced surface temperatures under 42°C, the heat generated from polishing zirconia is much less than that required to initiate reverse transformation. To validate the assumption that polishing would not initiate reverse transformation, future studies may examine the amount of phase transformation following polishing. Additionally, future studies should use thinner specimens, as a specimen closer in dimension to a clinical crown (0.7 – 1 mm) may show deeper penetration of microcracks due to easier crack propagation.
Polishing in the present study was performed without water lubrication. Dry polishing, particularly at high speeds, is cautioned due to a fear of thermal pulp damage. Baldissara et al13 reported that pulpal temperature increases of 14.7°C showed no clinical or histological signs of necrosis in vital human teeth. All polishing systems and speeds in this study produced temperature elevations below 17°C. The pulpal temperature change experienced during crown polishing would be significantly dampened due to the insulating ability of the bulk of the ceramic crown and the remaining tooth structure. Therefore, even at 40,000 RPM, thermal pulp damage from dry polishing seems unlikely. Iseri et al9 showed that dry adjusting zirconia with a diamond bur produced a temperature of 63.4°C (increase of 40°C from room temperature).
The clinical significance of the gloss achieved in this study is difficult to assess. The perception of gloss is more complex than merely the specular reflection measured in a gloss meter but may be more affected by specular highlights that result from the contours of an object.30 As a reference, two previous studies have measured the gloss of natural enamel as 53 and 110 GU.31,32 Generally, surfaces above 70 GU are considered high gloss, which could be obtained for the Dialite system with the medium polisher or progressing to the CeraMaster polisher (equivalent of fine polisher). Both polishing systems at 15,000 and 40,000 RPM were able to achieve gloss values greater than glazed zirconia. A limitation of this study is that a glossmeter with the ability to measure at a 20° angle could have better differentiated gloss values greater than 70 GU.
CONCLUSIONS
The preferred speed for polishing zirconia restorations is 15,000 RPM, to achieve high gloss and low roughness. Increasing the polishing speed to 40,000 RPM did not improve the final roughness or gloss, nor did it expedite the process. Decreasing the speed to 5000 RPM reduced the amount of gloss and improvements in roughness that could be achieved at higher speeds. There was a difference in the gloss and roughness produced between the two polishing systems tested. Progressing through the polishing procedure improved roughness and gloss at nearly every step and achieved similar surfaces as glazed zirconia; therefore, clinicians are advised to use both polishers provided in these systems. Temperature changes measured during dry polishing did not exceed 17°C. Therefore, polishing at speeds up to 40,000 RPM would be unlikely to cause thermal pulp damage and unable to induce reverse transformation.
Acknowledgments
Research reported in this publication was supported by National Center for Advancing Translational Sciences of the National Institutes of Health under award number UL1TR00165.
The authors would like to acknowledge Neel Patel and Steven Oliver for their assistance performing the experiments; Robert Oster of the UAB Center for Clinical and Translational Science for his assistance with the statistical analysis; William Stonewall Monroe and the UAB SEM Lab for their assistance with obtaining the SEM images; and Brasseler and Shofu for donating their materials.
Footnotes
The authors deny any conflicts of interest.
References
- 1.Guess PC, Schultheis S, Bonfante EA, et al. All-ceramic systems: laboratory and clinical performance. Dent Clin North Am. 2011;55:333–352. ix. doi: 10.1016/j.cden.2011.01.005. [DOI] [PubMed] [Google Scholar]
- 2.Teughels W, Van Assche N, Sliepen I, et al. Effect of material characteristics and/or surface topography on biofilm development. Clin Oral Implants Res. 2006;17(Suppl 2):68–81. doi: 10.1111/j.1600-0501.2006.01353.x. [DOI] [PubMed] [Google Scholar]
- 3.Jones CS, Billington RW, Pearson GJ. The in vivo perception of roughness of restorations. Br Dent J. 2004;196:42–45. doi: 10.1038/sj.bdj.4810881. discussion 31. [DOI] [PubMed] [Google Scholar]
- 4.Aboushelib MN, Wang H. Effect of surface treatment on flexural strength of zirconia bars. J Prosthet Dent. 2010;104:98–104. doi: 10.1016/S0022-3913(10)60100-X. [DOI] [PubMed] [Google Scholar]
- 5.Lawson NC, Janyavula S, Syklawer S, et al. Wear of enamel opposing zirconia and lithium disilicate after adjustment, polishing and glazing. J Dent. 2014;42:1586–1591. doi: 10.1016/j.jdent.2014.09.008. [DOI] [PubMed] [Google Scholar]
- 6.Preis V, Schmalzbauer M, Bougeard D, et al. Surface properties of monolithic zirconia after dental adjustment treatments and in vitro wear simulation. J Dent. 2015;43:133–139. doi: 10.1016/j.jdent.2014.08.011. [DOI] [PubMed] [Google Scholar]
- 7.Curtis AR, Wright AJ, Fleming GJ. The influence of surface modification techniques on the performance of a Y-TZP dental ceramic. J Dent. 2006;34:195–206. doi: 10.1016/j.jdent.2005.06.006. [DOI] [PubMed] [Google Scholar]
- 8.Guazzato M, Quach L, Albakry M, et al. Influence of surface and heat treatments on the flexural strength of Y-TZP dental ceramic. J Dent. 2005;33:9–18. doi: 10.1016/j.jdent.2004.07.001. [DOI] [PubMed] [Google Scholar]
- 9.Iseri U, Ozkurt Z, Yalniz A, et al. Comparison of different grinding procedures on the flexural strength of zirconia. J Prosthet Dent. 2012;107:309–315. doi: 10.1016/S0022-3913(12)60081-X. [DOI] [PubMed] [Google Scholar]
- 10.Kosmac T, Oblak C, Jevnikar P, et al. The effect of surface grinding and sandblasting on flexural strength and reliability of Y-TZP zirconia ceramic. Dent Mater. 1999;15:426–433. doi: 10.1016/s0109-5641(99)00070-6. [DOI] [PubMed] [Google Scholar]
- 11.Subasi MG, Demir N, Kara O, et al. Mechanical properties of zirconia after different surface treatments and repeated firings. J Adv Prosthodont. 2014;6:462–467. doi: 10.4047/jap.2014.6.6.462. [DOI] [PMC free article] [PubMed] [Google Scholar]
- 12.Zach L, Cohen G. Pulp response to externally applied heat. Oral Surg Oral Med Oral Pathol. 1965;19:515–530. doi: 10.1016/0030-4220(65)90015-0. [DOI] [PubMed] [Google Scholar]
- 13.Baldissara P, Catapano S, Scotti R. Clinical and histological evaluation of thermal injury thresholds in human teeth: a preliminary study. J Oral Rehabil. 1997;24:791–801. doi: 10.1046/j.1365-2842.1997.00566.x. [DOI] [PubMed] [Google Scholar]
- 14.Denry IL, Holloway JA. Microstructural and crystallographic surface changes after grinding zirconia-based dental ceramics. J Biomed Mater Res B Appl Biomater. 2006;76:440–448. doi: 10.1002/jbm.b.30382. [DOI] [PubMed] [Google Scholar]
- 15.Sorensen JA. Finishing and polishing with modern ceramic systems. Inside Dentistry. 2013;9:10–16. [Google Scholar]
- 16.Goldstein GR, Barnhard BR, Penugonda B. Profilometer, SEM, and visual assessment of porcelain polishing methods. J Prosthet Dent. 1991;65:627–634. doi: 10.1016/0022-3913(91)90196-4. [DOI] [PubMed] [Google Scholar]
- 17.Patterson CJ, McLundie AC, Stirrups DR, et al. Efficacy of a porcelain refinishing system in restoring surface finish after grinding with fine and extra-fine diamond burs. J Prosthet Dent. 1992;68:402–406. doi: 10.1016/0022-3913(92)90400-5. [DOI] [PubMed] [Google Scholar]
- 18.Wright MD, Masri R, Driscoll CF, et al. Comparison of three systems for the polishing of an ultra-low fusing dental porcelain. J Prosthet Dent. 2004;92:486–490. doi: 10.1016/j.prosdent.2004.07.021. [DOI] [PubMed] [Google Scholar]
- 19.Dupriez ND, von Koeckritz AK, Kunzelmann KH. A comparative study of sliding wear of nonmetallic dental restorative materials with emphasis on micromechanical wear mechanisms. J Biomed Mater Res B Appl Biomater. 2015;103:925–934. doi: 10.1002/jbm.b.33193. [DOI] [PubMed] [Google Scholar]
- 20.Preis V, Grumser K, Schneider-Feyrer S, et al. The effectiveness of polishing kits: influence on surface roughness of zirconia. Int J Prosthodont. 2015;28:149–151. doi: 10.11607/ijp.4153. [DOI] [PubMed] [Google Scholar]
- 21.ISO 4288: Geometrical product specifications (GPS)-Surface texture: Profile method- rules and procedures for the assessment of the surface texture. 1996
- 22.Quirynen M, Marechal M, Busscher HJ, et al. The influence of surface free energy and surface roughness on early plaque formation. An in vivo study in man. J Clin Periodontol. 1990;17:138–144. doi: 10.1111/j.1600-051x.1990.tb01077.x. [DOI] [PubMed] [Google Scholar]
- 23.Willems G, Lambrechts P, Braem M, et al. The surface roughness of enamel-to-enamel contact areas compared with the intrinsic roughness of dental resin composites. J Dent Res. 1991;70:1299–1305. doi: 10.1177/00220345910700091301. [DOI] [PubMed] [Google Scholar]
- 24.Wang F, Chen JH, Wang H. Surface roughness of a novel dental porcelain following different polishing procedures. Int J Prosthodont. 2009;22:178–180. [PubMed] [Google Scholar]
- 25.Janyavula S, Lawson N, Cakir D, et al. The wear of polished and glazed zirconia against enamel. J Prosthet Dent. 2013;109:22–29. doi: 10.1016/S0022-3913(13)60005-0. [DOI] [PubMed] [Google Scholar]
- 26.Happe A, Röling N, Schäfer A, et al. Effects of different polishing protocols on the surface roughness of Y-TZP surfaces used for custom-made implant abutments: a controlled morphologic SEM and profilometric pilot study. J Prosthet Dent. 2015;113:440–447. doi: 10.1016/j.prosdent.2014.12.005. [DOI] [PubMed] [Google Scholar]
- 27.Kelly JR, Denry I. Stabilized zirconia as a structural ceramic: an overview. Dent Mater. 2008;24:289–298. doi: 10.1016/j.dental.2007.05.005. [DOI] [PubMed] [Google Scholar]
- 28.Pereira GK, Amaral M, Simoneti R, et al. Effect of grinding with diamond-disc and -bur on the mechanical behavior of a Y-TZP ceramic. J Mech Behav Biomed Mater. 2014;37:133–140. doi: 10.1016/j.jmbbm.2014.05.010. [DOI] [PubMed] [Google Scholar]
- 29.Denry IL, Peacock JJ, Holloway JA. Effect of heat treatment after accelerated aging on phase transformation in 3Y-TZP. J Biomed Mater Res B Appl Biomater. 2010;93:236–243. doi: 10.1002/jbm.b.31580. [DOI] [PubMed] [Google Scholar]
- 30.Chadwick AC, Kentridge RW. The perception of gloss: A review. Vision Res. 2015;109:221–235. doi: 10.1016/j.visres.2014.10.026. [DOI] [PubMed] [Google Scholar]
- 31.Lefever D, Krejci I, Ardu S. Laboratory evaluation of the effect of toothbrushing on surface gloss of resin composites. Am J Dent. 2014;27:42–46. [PubMed] [Google Scholar]
- 32.Mormann WH, Stawarczyk B, Ender A, et al. Wear characteristics of current aesthetic dental restorative CAD/CAM materials: two-body wear, gloss retention, roughness and Martens hardness. J Mech Behav Biomed Mater. 2013;20:113–125. doi: 10.1016/j.jmbbm.2013.01.003. [DOI] [PubMed] [Google Scholar]


