Abstract
This article reviews the basic clinical techniques of performing a maxillary molar endodontic access opening, starting from the initial access opening into the pulp chamber, to the point where a size #10 file has been advanced to the apices of all three or four (or more) canals. The article explains how the use of the dental surgical operating microscope or microscope-level loupes magnification of ×6–8 or greater, combined with head-mounted or coaxial illumination, improve the ability of a dentist to identify microscopic root canal orifices, which facilitates the efficient creation of conservative access openings with adequate straight-line access in maxillary molars. Magnified photos illustrate various microscopic anatomical structures or landmarks of the initial access opening. Techniques are explored for implementing an access opening for teeth with vital versus necrotic pulpal tissues. The article also explores the use of piezoelectric or ultrasonic instruments for revealing root canal orifices and for removing pulp stones or calcified pulpal tissue inside the pulp chamber.
Keywords: Dentistry, endodontics, molar, pulpectomy, root canal preparation
INTRODUCTION
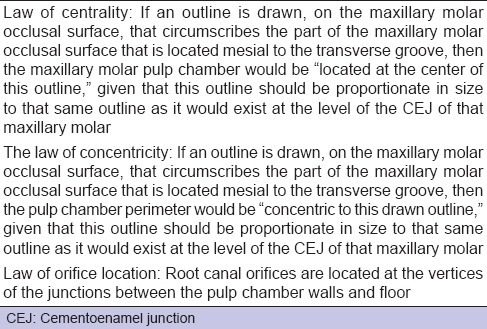
A clinician should form a conservative-sized maxillary molar access opening,[1,2] perhaps following various “laws” of maxillary molar root canal access openings[3] to help guide access [Table 1]. This article explores the basic clinical techniques of making a maxillary molar access opening and performing initial canal debridement up to a #10 file, emphasizing how microscope-level magnification of ×6–8 or greater, combined with shadow-free coaxial illumination,[4,5,6,7,8,9] facilitate these tasks.
Table 1.
“Laws” of maxillary molar access openings (adapted from Krasner and Rankow)
BURS TO USE FOR THE ACCESS OPENING
When making a maxillary molar access opening, the author suggests using a bur with a small cutting diameter and a short, tapering tip, such as a 330 bur, instead of using a fissure bur, which has a wider, flatter cutting tip, and a longer, nontapered cutting length.[10] Compared to a fissure bur, the 330 can more conservatively cut tiny pits or troughs, or cut a mesial-lateral slot into the maxillary molar to improve access to the mesial-buccal canals, and can be angled at a wider range of angles, which may minimize gouging the chamber floor and facilitate conservative expansion of the access opening. A high-speed round bur may gouge the chamber floor if the distance between the chamber floor and the pulp chamber roof is less than the radius of the round bur.[10] Slow-speed round burs, no larger than #2–4 size, are useful for safely debriding a pulp chamber tissue.
INITIAL PULP CHAMBER PENETRATION
A feeling of resistance, followed by a sudden feeling of a lack of resistance, often occurs when penetrating the pulp chamber roof. Penetrating the chamber floor gives a tactile feel of resistance throughout the entire floor. However, if a preoperative radiograph shows that the distance from the pulp chamber roof to the chamber floor is short, <1 mm, there may be a less obvious tactile sensation of the bur penetrating the pulp chamber roof, especially if the chamber is filled with calcified pulpal material [Figure 1].
Figure 1.
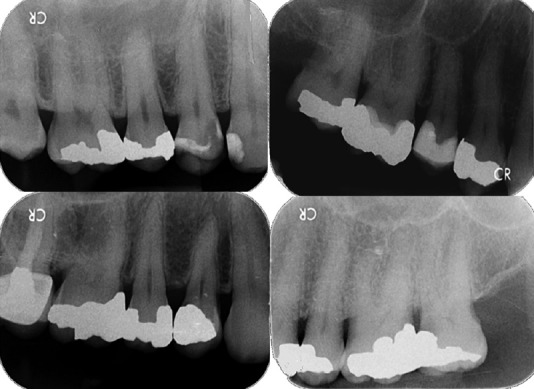
First molar showing a tall distance between the chamber floor and roof (top left), a shorter such distance (top right), and others showing calcified pulp chambers (bottom). The top left molar curves strongly at the coronal 1/10 of the mesial canal
Microscope-level magnification, combined with coaxial illumination, facilitate visually gauging bur penetration depth into a canal and distinguishing between the chamber roof and floor if the distance separating them is small, and there is no obvious tactile sensation of the bur penetrating the chamber roof [Figure 2]. Microscopes provide microscopically precise tactile sensation, where the dentist can associate differences in tactile sensation with microscopic differences in depths of bur penetration into the chamber. This allows the dentist to better distinguish between three basic levels of bur penetration into a calcified pulp chamber: Penetration at the level of the chamber roof, at the level of the pulp chamber itself, and at the level of the chamber floor.
Figure 2.
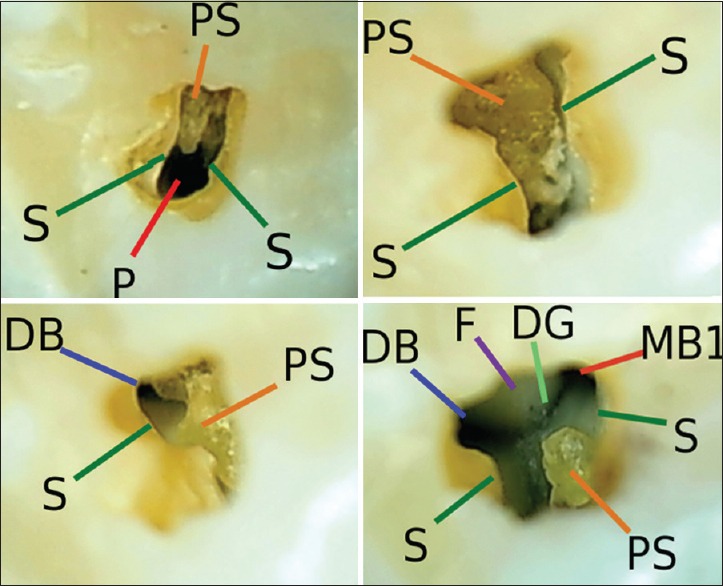
Micro-anatomy of an “incomplete” maxillary molar access opening includes: S: The “soffit”; P: The palatal canal; PS: A pulp stone; DB: The distobuccal canal orifice; MB1: The mesiobuccal 1 canal orifice; F: The chamber floor; DG: The developmental grooves
The dentist drills into the molar to approximately the depth of the chamber roof, a depth which often corresponds to the depth where the molar occlusal surface contacts the junction between the columnar and the tapering part of the 330 bur shank. The dentist angles the 330 bur toward the estimated location of the palatal canal (often the easiest canal to locate) while moving the 330 bur approximately along the axis connecting the palatal to the buccal canals.
Upon making the initial access penetration, the dentist may not know where the canal orifices are located, relative to this initial opening. To discover this, the dentist expands the initial opening buccally,[1] drilling approximately parallel to the molar mesial surface. The dentist uses microscopes and shadow-free, coaxial illumination,[8] to identify spatially orienting microanatomical pulp chamber landmarks such as the soffit (the overhanging border of the chamber roof); the occlusal aspect of the pulpal tissue mass within the chamber; the root canal orifices; calcified pulpal tissue; or the chamber floor [Figure 2]. A dark three-pronged line (the developmental grooves) may be visible in the chamber floor that helps in locating canal orifices at the extremities of the prongs.
Microscope-level magnification and coaxial illumination facilitate distinguishing between the interface of the overhanging soffit tooth structure and the pulpal tissue or between the soffit and the empty pulp chamber space apical to the soffit. Microscopes facilitate observing when, after lateral expansion of the access opening, this interface no longer exists, and the pulp chamber walls become a continuous surface, without overhanging soffit.[1]
GROSS REMOVAL OF PULP TISSUE INSIDE CHAMBER
A #2 or #4 slow-speed round bur, or a #2 peeso reamer, can debride gross amounts of pulp tissue in the chamber or under soffit overhangs, or remove calcified pulpal tissue or soffit tooth structure along the chamber perimeter. This reduces the amount of information-obstructing pulpal tissue and pulpal bleeding into the pulp chamber. A smaller #2 slow-speed round bur removes pulpal tissue overlying endodontic orifices that may cover single root canal orifices or cover two pinpoint canal orifices that are microscopically close to one another. A sharp 330 bur can be used with microscopes and coaxial illumination to rapidly debride pulpal tissue.
While forming the access opening, the dentist removes as much soffit tooth structure as the dentist can observe. Such removal reveals pulpal tissue, which the dentist then debrides, revealing more soffit tooth structure, which the dentist removes, repeating this cycle until the access opening equals the width of the pulp chamber.
DEBRIDEMENT OF CANAL TISSUE
A #1 peeso reamer can help debride the coronal 1/3 of a palatal canal, with minimal risk of ledging given the often wide diameter of the palatal canal. Peeso reamers can be used for enlarging buccal canal orifices although buccal canals often have narrow diameters or deep coronal curvatures that hinder penetration of peeso reamers beyond the orifice.
The author suggests using a #6 file, lubricated with a chelating agent, as the first file used in a canal,[11] and for initial canal debridement,[12] prior to perform general canal instrumentation. Such debridement minimizes the amount of pulpal tissue remaining in the narrow apical 1/3 of canals and apical canal anastomoses, which are perhaps most accessible to a thin #6 file for debridement, and reduces the risk of endodontic failure if a canal becomes ledged during later instrumentation. A lubricated #6 file can reach the apex of most molar canals without binding at the coronal or middle 2/3 of the canal or zipping or ledging a canal. However, in tight canals, such as a partially calcified MB2 canal, the dentist may crown down using a #6, 8 or #10 file in the coronal 1/3, then irrigate, before moving a #6 file to the apex.
Vital pulpal tissue may be denser and have higher tensile strength than necrotic pulpal tissue and may resist endodontic files. The author suggests not using a #10 or larger file as the initial file when penetrating a canal with vital tissue. A larger diameter file could be the same diameter as the apical one-third of the uninstrumented root, and may function-like a “piston” in the canal,[13] compressing coronal pulp tissue apically into a dense apical mass, that may be difficult to remove from the apical aspect of the canal and may extrude past the apex [Figure 3]. The #6 file is less likely than a #10–15 file to compress pulpal tissue since a space between the thinner file and the canal wall allows pulpal tissue to flow around the file during instrumentation [Figure 3]. Weaker necrotic tissue is more likely than vital tissue to flow around a file.
Figure 3.
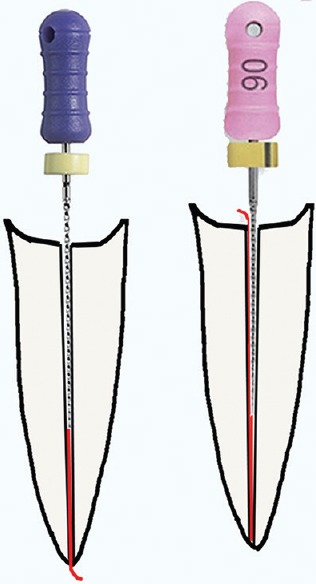
If a #10 file is placed in a very thin canal (left), the #10 file may compress canal tissue into the apex like a piston, but canal tissue is more likely to flow around the #6 file (right)
Using microscopically precise tactile sensation, the dentist moves a #6 file into a canal until the file provides a tactile sensation of being resisted by the pulpal tissue, irrigates the canal of eviscerated pulpal tissue, then advances the #6 file more apically until another piston effect sensation is felt, then irrigates again, repeating this cycle until the canal is debrided.
REMOVING PULP STONES OR CALCIFIED PULPAL TISSUE
Radiopacities, shown in the preoperative radiograph between the pulp chamber roof and floor, suggest that a pulp stone or a layer of calcified pulpal tissue may overlie the chamber floor [Figure 1].[8,14,15,16,17,18] Microscopes and coaxial illumination facilitate distinguishing between the color and texture differences of pulpal tissue, calcified pulpal tissue, and the chamber floor, which is often smoother and whiter than pulpal tissues [Figure 2].[6] Calcified pulpal tissue often has a light brown or dark yellow color and a corrugated texture, similar in appearance to ear wax. Calcified pulpal tissue may be difficult to distinguish from the chamber floor, if both have similar colors and textures, or if the calcified pulpal tissue exists as a thin layer that is fused to the chamber floor, with minimum space between the two [Figure 4]. The dentist can identify calcified pulpal tissue by observing microscopic amounts of soft organic debris below a layer of suspected calcified pulpal tissue after the tissue has been chipped ultrasonically. This debris may be necrotic with a yellow to brown color, or vital pulpal tissue with a pink color, and may result in reinfection if left in the chamber.
Figure 4.
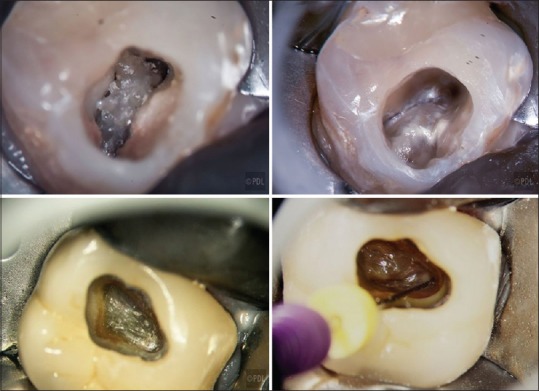
Calcified pulpal tissue (top left molar) is beige colored, with a corrugated texture, compared to the smoother chamber floor (top right). Calcified pulpal tissue can also show minimal textural contrast with the chamber floor (lower molar) (photo courtesy of Dr. Terry Pannkuk)
A file, placed in an opening in a layer of calcified pulpal tissue, may give a kink feeling, caused by the shaft of the file rubbing into the edge of the opening in the calcified pulpal tissue while the file is entering the canal orifice. If an opening in the calcified pulpal tissue layer is laterally positioned relative to the orifice, the coronal aspect of the file will be bent by the edge of the opening in the calcified pulpal tissue. Tooth structure overhanging a canal orifice may cause an additional bend in the file, resulting in several frictional contact points that generate several separate kink feelings in the same file. The tactile feeling of the file entering calcified tissue overlying a canal orifice could feel different each time the file enters the canal.
Using microscopically precise tactile sensation, a dentist can compare the tactile feeling, of an ultrasonic tip touching a microscopic point on a known part of the chamber floor, with the tactile feeling of the tip touching a microscopic point on a suspected part of the calcified pulpal tissue. The difference of tactile sensations facilitates distinguishing between the floor and the calcified pulpal tissue.
A dentist can enlarge an opening made in calcified pulpal tissue using a peeso reamer, or the opening may become enlarged via instrumentation with a file placed through the opening. With microscopes, the dentist may then observe a microscopically thin empty space between the opening in the calcified tissue, which seems to be the canal “orifice,” and the actual chamber floor.
While chipping away at calcified pulpal tissue with files, a 330 bur, tiny #1/2–2 slow-speed round burs, peeso reamers or a long, thin piezoelectric ultrasonic tip [Figure 5],[6,8] the dentist, using microscopes, may detect microscopic movement of the calcified pulpal tissue as it loosens. This movement shows that this calcified layer is not the chamber floor, which is immobile.
Figure 5.
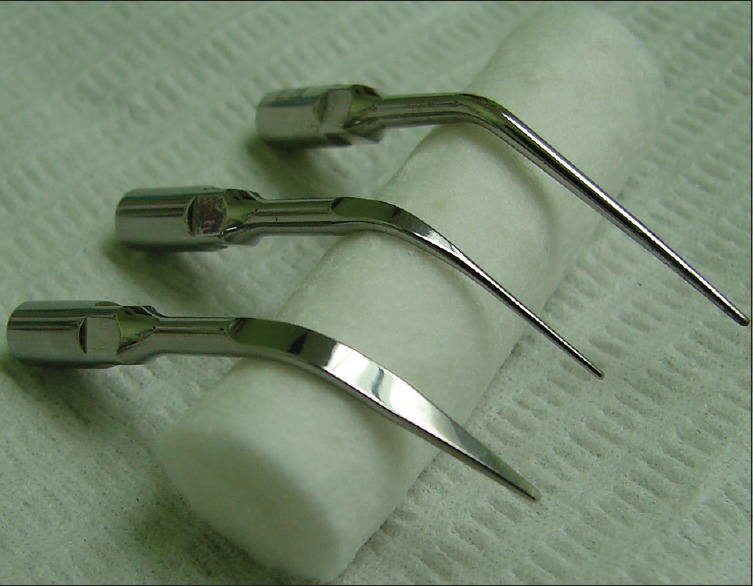
Three long-necked piezoelectric cavitron tips that remove calcified pulpal tissue include (left to right) a prophylaxis tip for removing supra-gingival calculus, a thinner prophylaxis tip for removing subgingival calculus, and a tip shaped for endodontic purposes
LOCATING THE PALATAL CANAL
Locating the palatal canal is a starting point for locating the other buccal canals,[10] unroofing the entire pulp chamber, and locating various microscopic anatomical landmarks within the pulp chamber [Figure 2]. Microscopes facilitate observing the molar perimeter at the cemantoenamel junction, which facilitates estimating the location of the palatal canal orifice, which is often located at or slightly mesial to the midpoint of the palatinal surface of the molar, and approximately 2–4 mm from the palatinal surface [Figure 6]. The palatal canal is often angled at approximately a 45–60° angle relative to the molar crown long axis. A dentist can point a 330 bur toward the medial, at approximately a 45–60° angle, and drill along an imaginary line that connects the occlusal surface drilling access point to the assumed location of the palatal canal orifice [Figure 6].
Figure 6.
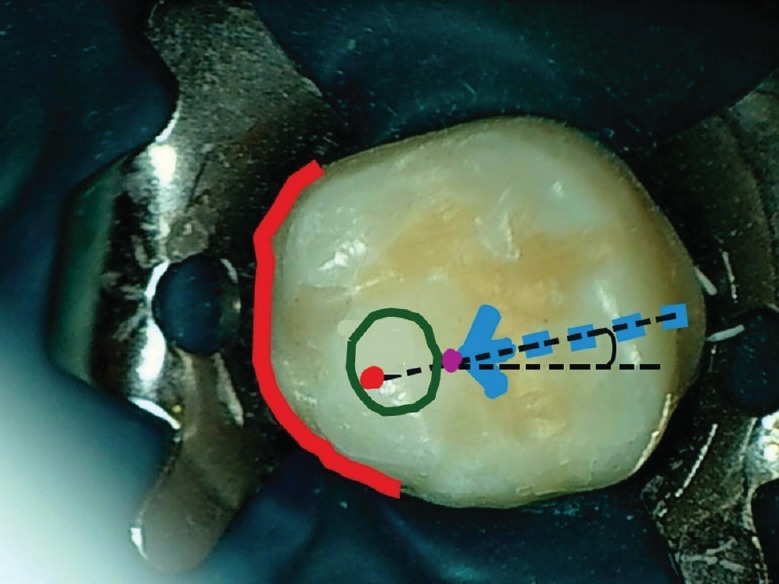
Preoperatively, a dentist assumes that the maxillary molar palatal canal is inside a green circle located mesial to the transverse groove, approximately 2–4 mm from the palatal root border (red curve), and drills along an imaginary line connecting the bur penetration point (purple dot) with the palatal canal (red dot)
After penetrating the pulp chamber roof, the dentist irrigates the initial access opening, and attempts to locate the palatal canal with a #10 file. If the palatal canal cannot be located, the dentist widens the access opening in the area where the dentist presumes that the palatal canal orifice is located, tries again to locate the orifice, and repeats these steps until the orifice is located. A dentist can distinguish the palatal canal visually from the other canals since the palatal canal deflects the file handle in a buccal direction [Figure 7]. Also, #6–#10 files can often be moved freely inside an uninstrumented palatal canal, which is often not true with the buccal canals.
Figure 7.
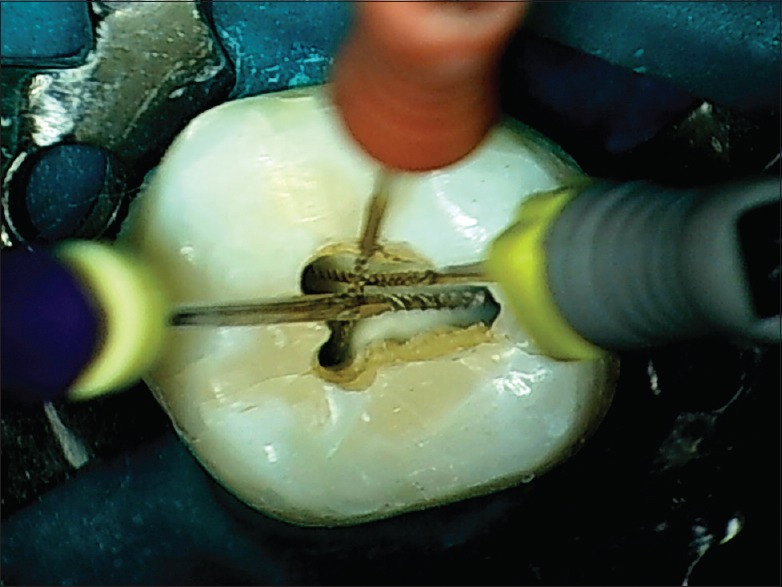
In a maxillary molar, the distobuccal canal deflects the file handle toward the mesial, and the mesiobuccal canal deflects the file handle towards the distal
A thin irrigating syringe (#20 guage) can often be used to debride the coronal 1/2 of a palatal canal, via simultaneously irrigating the canal while moving the syringe tip up and down in the canal, such that the tip simultaneously eviscerates and irrigates away palatal canal tissue.
LOCATING THE MESIOBUCAL AND DISTOBUCCAL CANALS
After locating either the mesiobuccal 1 (MB1) or the distobuccal (DB) canal, the dentist uses a #6 file to remove canal tissue that may be hemorrhaging blood, to make it easier to locate other canals. Even if there is a tiny distance between the DB, MB1 and MB2 canal orifies, the canals can be visually distinguished from one another using microscopes, even if blood, pus, or bleach floods the pulp chamber, by observing microscopic differences in the angles of files placed in the canals, and differences in the points that each file, respectively, contacts on the superior perimeter of the access opening [Figure 7]. A file that is not in the palatal canal, and that emerges from the canal with the file handle directed toward the mesial, is in the DB canal.
Microscopes facilitate observing if the file can only be maneuvered into a canal by angling the file with microscopic precision, due to microscopic obstructions along the mesial wall of the access opening. Using microscopes, a dentist can identify microscopic overhangs of the pulp chamber roof or walls, or tooth structure overhanging the orifices of the MB canals that may be obstructing files that the dentist is trying to maneuver into the MB canals, and use microscopically precise drilling to remove these overhangs. Microscopes facilitate angling of files with microscopic precision; this facilitates making a more conservative access opening since an access opening does not have to be excessively enlarged to permit a dentist using unaided vision to maneuver files into canals using file angulations that are macroscopic in precision.
THE MESIOBUCCAL 2 CANAL
Since the MB2 canal is present in most (70–90%) of maxillary first molars, and approximately, 45% of maxillary second molars,[19,20,21,22,23,24,25,26,27,28] its presence should be assumed until demonstrated otherwise. Dentists using a microscope are significantly more likely to locate an MB2 canal (which often has a microscopic orifice) or extra canals in addition to the 3–4 typically found in maxillary molars,[29,30,31,32,33,34,35] compared to dentists using unaided vision.[21,22,23,36,37,38] The MB2 canal may be located a fraction of a mm from the MB1 canal, and may eventually join with the MB1 canal,[37,38,39] The MB2 canal may also be located approximately midway between the MB1 canal and the palatal canals.[39] If an MB2 canal is extremely narrow in diameter or partly calcified, the canal may initially only be accessible using a #6 file lubricated with ethylenediaminetetraacetic acid chelating agent although sometimes MB2 canals may be inaccessible beyond 3–4 mm depth.[6,39]
The MB2 canal may be hidden under a layer of calcified pulpal tissue, or under an overhang located at the level of the chamber floor [Figure 8]. A dentist may notice a microscopic amount of NaOCl2 irrigant bubbling at this overhang or notice a microscopic amount of pulpal tissue hidden under this overhang. A file passing under an orifice overhang may be bent by a steep angle before it enters the canal orifice. Using microscopes, this overhang can be removed using a 330 bur or a piezoelectric cavitron tip.[19,21,36,37,40,41] However, if the file can reach the apex of a root that has an orifice overhang, removing the overhang may be unnecessary, and risks chamber floor perforation. Manually pushing files laterally against an orifice overhang during filing motions[13,40,41] may reduce the overhang.
Figure 8.
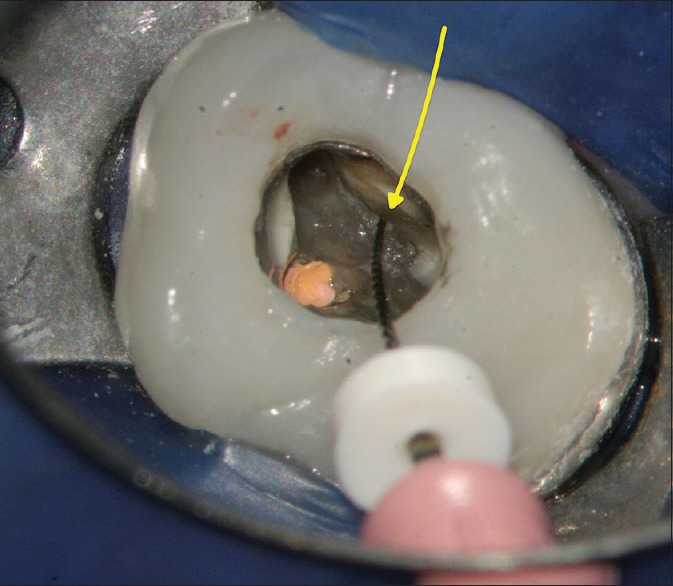
During retreatment of a molar root canal, an endodontist accessed the MB2 canal (yellow arrow) using a #6 file. The file handle protrudes at a deep angle towards the distal, due to tooth structure overhanging the MB2 orifice (photo courtesy of Dr. Peter Shelley). MB2: Mesiobuccal 2
LOCATING CANAL ORIFICES IN NECROTIC TEETH
Microscopes facilitate locating canals in necrotic teeth[6] where there may be minimal pulpal bleeding to indicate orifice locations [Figure 4]. Necrotic orifices are either darker or show a lighter demineralization color, compared to the surrounding chamber floor. Drying the chamber reveals these (often minimal) color contrasts.
A sharp endodontic explorer and microscopically precise tactile sensation, facilitate distinguishing the softer tactile feel of a microscopically tiny and calcified canal orifice from the harder feel of the chamber floor. Scraping the canal orifice with an endodontic explorer may result in microscopic crumbs of chalky white, semi-mineralized pulpal tissue flaking from the orifice. A dentist may attempt to penetrate the canal using a #6 file lubricated with a chelating agent, or use a stiffer #10 or #15 file to penetrate the coronal 2–3 mm of the canal to achieve coronal patency, irrigate the canal with NaOCl2, then move a #6 file to the apex. If a canal is too calcified to permit initial penetration, the dentist may use an ultrasonic piezo tip [Figure 5], Gates-Glidden bur, peeso reamer, or a 330 bur to excavate coronal canal calcifications in 0.5–1.0 mm increments to expose a patent canal segment.
DISTINGUISHING BETWEEN PERFORATIONS AND ACCESS IN ACTUAL CANALS
Microscopes and coaxial illumination facilitate distinguishing visually and tactilely, between a file penetrating a perforation or a canal. Microscopes facilitate assessing if an opening in the chamber floor is located approximately where it would be for an orifice versus a perforation.
A file in a perforation may provide a kink feeling, from the file rubbing against the coronal aspect of the perforation, and may provide irregular kink feelings as the file is advanced apically. A file in a canal generally does not give a kink feeling but provides a consistent, smoother tactile feeling. A file in a perforation may provide a tactile feeling of a “bottomless pit,” as if there is no boundary felt when the file is moved laterally. Sometimes, however, a file penetrating a perforation may show a tactile feeling similar to that of a file in a canal.
A file penetrating a perforation may cause bleeding. This bleeding may be unexpected if the tooth is necrotic. However, not all “unexpected bleeding” indicates a perforation. A file in a necrotic canal may induce orifice bleeding if the file is moved past the apex such as to sever blood vessels located just beyond the apex. In addition, a file placed in a necrotic canal of an abscessed tooth may cause a mixture of blood and pus to ooze from the canal orifice, which may seem like bleeding. In addition, a file penetrating an orifice that seems to be a perforation but is actually an orifice within a layer of calcified pulpal tissue, may cause bleeding if vascularized pulpal tissue is underneath the calcified layer. An apex locator[42,43] facilitates distinguishing between perforations and canals.
OBTAINING PATENCY TO THE APEX
Using microscopes, a dentist can visually estimate file penetration depth into a canal precisely, even if there is no silicone stopper on the file, by observing how many mm above the superior end of the spiral cutting length aspect of the file does the edge of the file contact the access opening perimeter [Figure 7]. With each file, the dentist redundantly verifies file penetration to the apex.[42,43]
Using a file no larger than a #6 file, lubricated with a chelating agent, as the first file to pass through a sharply angled canal inflection point, reduces the risk of ledging[43] that canal. Microscopes facilitate verifying that files of increasing diameter can pass the inflection point by visually gauging to a fraction of a mm at what depth of penetration does the file tip contact the inflection point, and associating a tactile kink feeling with this depth of penetration. If files pass with difficulty through the inflection point, then the dentist may need to remove tooth structure that deflects the coronal aspect of the file toward the medial aspect of the chamber floor. The dentist then observes if this improves straight-line access[44,45,46] causing a microscopic incremental increase in the amount of straightness of the file as it emerges from the canal or improves the depth of file penetration. Sometimes, difficulty passing the canal inflection point may be due to two canals joining at a common apex. Here, the dentist may choose one canal to be the patency-to-length canal, and choose the other canal to be patent up to the inflection point only.
CONCLUSION
While creating a maxillary molar endodontic access opening, microscope-level magnification of ×6–8 or greater, combined with coaxial illumination, facilitate creating a conservative access opening, identifying and debriding canals and calcified pulpal tissue, and identifying microscopic anatomical structures in the pulp chamber.
Financial support and sponsorship
Nil.
Conflicts of interest
There are no conflicts of interest.
REFERENCES
- 1.Clark D, Khademi JA. Case studies in modern molar endodontic access and directed dentin conservation. Dent Clin North Am. 2010;54:275–89. doi: 10.1016/j.cden.2010.01.003. [DOI] [PubMed] [Google Scholar]
- 2.Endodontics. Colleagues for Excellence Newsletter, Spring; 2010. American Association of Endodontics. Access Opening and Canal Location. [Google Scholar]
- 3.Krasner P, Rankow HJ. Anatomy of the pulp-chamber floor. J Endod. 2004;30:5–16. doi: 10.1097/00004770-200401000-00002. [DOI] [PubMed] [Google Scholar]
- 4.Castellucci A. Magnification in endodontics: The use of the operating microscope. Pract Proced Aesthet Dent. 2003;15:377–84. [PubMed] [Google Scholar]
- 5.Khayat BG. The use of magnification in endodontic therapy: The operating microscope. Pract Periodontics Aesthet Dent. 1998;10:137–44. [PubMed] [Google Scholar]
- 6.Carr GB, Murgel CA. The use of the operating microscope in endodontics. Dent Clin North Am. 2010;54:191–214. doi: 10.1016/j.cden.2010.01.002. [DOI] [PubMed] [Google Scholar]
- 7.Torabinejad M, Fouad A, Walton RE, editors, editors. Endodontics: Principles and Practice. 5th ed. St. Louis: Saunders/Elsevier; 2015. [Google Scholar]
- 8.Bergenholz G, Hørsted-Bindslev P, Reit C. Textbook of Endodontology. Oxford: Wiley Blackwell; 2010. [Google Scholar]
- 9.Beer R, Baumann MA, Kim S. Endodontology. Color Atlas of Dental Medicine. New York: Thieme; 2000. [Google Scholar]
- 10.Clark D, Khademi J. Modern molar endodontic access and directed dentin conservation. Dent Clin North Am. 2010;54:249–73. doi: 10.1016/j.cden.2010.01.001. [DOI] [PubMed] [Google Scholar]
- 11.Taylor GN. Advanced techniques for intracanal preparation and filling in routine endodontic therapy. Dent Clin North Am. 1984;28:819–32. [PubMed] [Google Scholar]
- 12.Schilder H. Cleaning and shaping the root canal. Dent Clin North Am. 1974;18:269–96. [PubMed] [Google Scholar]
- 13.Castellucci A. Endodontics. 1st ed. Vol. 2. Florence, Italy: Edizioni Odontoiatriche Il Tridente; 2005. [Google Scholar]
- 14.Jain P, Patni P, Hiremath H, Jain N. Successful removal of a 16 mm long pulp stone using ultrasonic tips from maxillary left first molar and its endodontic management. J Conserv Dent. 2014;17:92–5. doi: 10.4103/0972-0707.124170. [DOI] [PMC free article] [PubMed] [Google Scholar]
- 15.Nanjannawar GS, Vagarali H, Nanjannawar LG, Prathasarathy B, Patil A, Bhandi S. Pulp stone – An endodontic challenge: Successful retrieval of exceptionally long pulp stones measuring 14 and 9.5 mm from the palatal roots of maxillary molars. J Contemp Dent Pract. 2012;13:719–22. doi: 10.5005/jp-journals-10024-1216. [DOI] [PubMed] [Google Scholar]
- 16.Ranjitkar S, Taylor JA, Townsend GC. A radiographic assessment of the prevalence of pulp stones in Australians. Aust Dent J. 2002;47:36–40. doi: 10.1111/j.1834-7819.2002.tb00301.x. [DOI] [PubMed] [Google Scholar]
- 17.Wu D, Shi W, Wu J, Wu Y, Liu W, Zhu Q. The clinical treatment of complicated root canal therapy with the aid of a dental operating microscope. Int Dent J. 2011;61:261–6. doi: 10.1111/j.1875-595X.2011.00070.x. [DOI] [PMC free article] [PubMed] [Google Scholar]
- 18.van der Vyver PJ, Paleker F. Endodontic and restorative management of a lower molar with a calcified pulp chamber. SADJ. 2013;68:450–6. [PubMed] [Google Scholar]
- 19.Park E, Chehroudi B, Coil JM. Identification of possible factors impacting dental students’ ability to locate MB2 canals in maxillary molars. J Dent Educ. 2014;78:789–95. [PubMed] [Google Scholar]
- 20.Patel S, Rhodes J. A practical guide to endodontic access cavity preparation in molar teeth. Br Dent J. 2007;203:133–40. doi: 10.1038/bdj.2007.682. [DOI] [PubMed] [Google Scholar]
- 21.Buhrley LJ, Barrows MJ, BeGole EA, Wenckus CS. Effect of magnification on locating the MB2 canal in maxillary molars. J Endod. 2002;28:324–7. doi: 10.1097/00004770-200204000-00016. [DOI] [PubMed] [Google Scholar]
- 22.Görduysus MO, Görduysus M, Friedman S. Operating microscope improves negotiation of second mesiobuccal canals in maxillary molars. J Endod. 2001;27:683–6. doi: 10.1097/00004770-200111000-00008. [DOI] [PubMed] [Google Scholar]
- 23.Schwarze T, Baethge C, Stecher T, Geurtsen W. Identification of second canals in the mesiobuccal root of maxillary first and second molars using magnifying loupes or an operating microscope. Aust Endod J. 2002;28:57–60. doi: 10.1111/j.1747-4477.2002.tb00379.x. [DOI] [PubMed] [Google Scholar]
- 24.Pomeranz HH, Fishelberg G. The secondary mesiobuccal canal of maxillary molars. J Am Dent Assoc. 1974;88:119–24. doi: 10.14219/jada.archive.1974.0045. [DOI] [PubMed] [Google Scholar]
- 25.Kulild JC, Peters DD. Incidence and configuration of canal systems in the mesiobuccal root of maxillary first and second molars. J Endod. 1990;16:311–7. doi: 10.1016/s0099-2399(06)81940-0. [DOI] [PubMed] [Google Scholar]
- 26.Eskoz N, Weine FS. Canal configuration of the mesiobuccal root of the maxillary second molar. J Endod. 1995;21:38–42. doi: 10.1016/S0099-2399(06)80555-8. [DOI] [PubMed] [Google Scholar]
- 27.Seidberg BH, Altman M, Guttuso J, Suson M. Frequency of two mesiobuccal root canals in maxillary permanent first molars. J Am Dent Assoc. 1973;87:852–6. doi: 10.14219/jada.archive.1973.0489. [DOI] [PubMed] [Google Scholar]
- 28.Weine FS, Hayami S, Hata G, Toda T. Canal configuration of the mesiobuccal root of the maxillary first molar of a Japanese sub-population. Int Endod J. 1999;32:79–87. doi: 10.1046/j.1365-2591.1999.00186.x. [DOI] [PubMed] [Google Scholar]
- 29.Kakkar P, Singh A. Maxillary first molar with three mesiobuccal canals confirmed with spiral computer tomography. J Clin Exp Dent. 2012;4:e256–9. doi: 10.4317/jced.50850. [DOI] [PMC free article] [PubMed] [Google Scholar]
- 30.Baratto-Filho F, Fariniuk LF, Ferreira EL, Pecora JD, Cruz-Filho AM, Sousa-Neto MD. Clinical and macroscopic study of maxillary molars with two palatal roots. Int Endod J. 2002;35:796–801. doi: 10.1046/j.1365-2591.2002.00559.x. [DOI] [PubMed] [Google Scholar]
- 31.Prashanth MB, Jain P, Patni P. Maxillary right second molar with two palatal root canals. J Conserv Dent. 2010;13:94–6. doi: 10.4103/0972-0707.66720. [DOI] [PMC free article] [PubMed] [Google Scholar]
- 32.Kontakiotis EG, Tzanetakis GN. Four canals in the mesial root of a mandibular first molar. A case report under the operating microscope. Aust Endod J. 2007;33:84–8. doi: 10.1111/j.1747-4477.2007.00068.x. [DOI] [PubMed] [Google Scholar]
- 33.Johal S. Unusual maxillary first molar with 2 palatal canals within a single root: A case report. J Can Dent Assoc. 2001;67:211–4. [PubMed] [Google Scholar]
- 34.Singh S, Pawar M. Root canal morphology of South Asian Indian maxillary molar teeth. Eur J Dent. 2015;9:133–44. doi: 10.4103/1305-7456.149662. [DOI] [PMC free article] [PubMed] [Google Scholar]
- 35.Arslan H, Capar ID, Ertas ET, Ertas H, Akcay M. A cone-beam computed tomographic study of root canal systems in mandibular premolars in a Turkish population: Theoretical model for determining orifice shape. Eur J Dent. 2015;9:11–9. doi: 10.4103/1305-7456.149632. [DOI] [PMC free article] [PubMed] [Google Scholar]
- 36.Hasan M, Raza Khan F. Determination of frequency of the second mesiobuccal canal in the permanent maxillary first molar teeth with magnification loupes (×3.5) Int J Biomed Sci. 2014;10:201–7. [PMC free article] [PubMed] [Google Scholar]
- 37.Das S, Warhadpande MM, Redij SA, Jibhkate NG, Sabir H. Frequency of second mesiobuccal canal in permanent maxillary first molars using the operating microscope and selective dentin removal: A clinical study. Contemp Clin Dent. 2015;6:74–8. doi: 10.4103/0976-237X.149296. [DOI] [PMC free article] [PubMed] [Google Scholar]
- 38.Alaçam T, Tinaz AC, Genç O, Kayaoglu G. Second mesiobuccal canal detection in maxillary first molars using microscopy and ultrasonics. Aust Endod J. 2008;34:106–9. doi: 10.1111/j.1747-4477.2007.00090.x. [DOI] [PubMed] [Google Scholar]
- 39.Yoshioka T, Kikuchi I, Fukumoto Y, Kobayashi C, Suda H. Detection of the second mesiobuccal canal in mesiobuccal roots of maxillary molar teeth ex vivo. Int Endod J. 2005;38:124–8. doi: 10.1111/j.1365-2591.2004.00918.x. [DOI] [PubMed] [Google Scholar]
- 40.Abou-Rass M, Frank AL, Glick DH. The anticurvature filing method to prepare the curved root canal. J Am Dent Assoc. 1980;101:792–4. doi: 10.14219/jada.archive.1980.0427. [DOI] [PubMed] [Google Scholar]
- 41.Oliveira MA, Venâncio JF, Raposo LH, Barbosa Júnior N, Biffi JC. Morphometric evaluation and planning of anticurvature filing in roots of maxillary and mandibular molars. Braz Oral Res. 2015;29:1–9. doi: 10.1590/1807-3107bor-2015.vol29.0012. [DOI] [PubMed] [Google Scholar]
- 42.Martins JN, Marques D, Mata A, Caramês J. Clinical efficacy of electronic apex locators: Systematic review. J Endod. 2014;40:759–77. doi: 10.1016/j.joen.2014.03.011. [DOI] [PubMed] [Google Scholar]
- 43.Krajczár K, Marada G, Gyulai G, Tóth V. Comparison of radiographic and electronical working length determination on palatal and mesio-buccal root canals of extracted upper molars. Oral Surg Oral Med Oral Pathol Oral Radiol Endod. 2008;106:e90–3. doi: 10.1016/j.tripleo.2008.04.007. [DOI] [PubMed] [Google Scholar]
- 44.Christie WH, Thompson GK. The importance of endodontic access in locating maxillary and mandibular molar canals. J Can Dent Assoc. 1994;60:527. [PubMed] [Google Scholar]
- 45.Iqbal A, Akbar I, AL-Omiri MK. An in vivo study to determine the effects of early preflaring on the working length in curved mesial canals of mandibular molars. J Contemp Dent Pract. 2013;14:163–7. doi: 10.5005/jp-journals-10024-1293. [DOI] [PubMed] [Google Scholar]
- 46.Gutmann JL, Dumsha TC, Lovdahl PE, Hovland EJ, editors. 4th ed. St. Louis: Mosby; 2006. Problem Solving in Endodontics: Prevention, Identification and Management. [Google Scholar]


