Abstract
Damage induced in polymer composites by various impacts must be evaluated to predict a component’s post-impact strength and residual lifetime, especially when impacts occur in structures related to human safety (in aircraft, for example). X-ray tomography is the conventional standard to study an internal structure with high resolution. However, it is of little use when the impacted area cannot be extracted from a structure. In addition, X-ray tomography is expensive and time-consuming. Recently, we have demonstrated that a kHz-rate laser-ultrasound (LU) scanner is very efficient both for locating large defects and evaluating the material structure. Here, we show that high-quality images of damage produced by the LU scanner in impacted carbon-fiber reinforced polymer (CFRP) composites are similar to those produced by X-ray tomograms; but they can be obtained with only single-sided access to the object under study. Potentially, the LU method can be applied to large components in-situ.
Keywords: Laser ultrasound, Composites, Carbon fiber reinforced polymers, Impact damage, X-ray tomography, Fiber-optic pump-probe system, Photoacoustics
1. Introduction
Fiber reinforced polymer (FRP) composites have become invaluable structural materials for many industries, ranging from aerospace to sports, because of their outstanding thermo-mechanical properties, high specific strength and stiffness, superior corrosion resistance, improved material properties, and light weight compared to traditional materials such as metals [1], [2], [3], [4]. Although superior in many ways, carbon fiber reinforced polymer (CFRP) composites are highly susceptible to internal damage even under low-velocity impacts such as those impacted by a dropped tool or runway debris [5], [6], [7], [8], [9].
To manage impact damage and improve impact resistance and tolerance, many different laminate configurations have been investigated. Among other useful discoveries, woven-fabric composites are more resistant to impact damage than cross-ply composites made of unidirectional layers [10]. Nevertheless, the effect of laminate configuration on the impact behavior of FRP composites is not well understood. This is particularly true for structural composite components used in the aerospace and automotive industries. Consequently, there is a great need for nondestructive evaluation (NDE) tools that can adequately assess impact damage in both laboratory and field (i.e., in situ) settings. An important criterion is that sub-ply resolution is required for detailed quantification of damage.
Conventional NDE methods for FRP composites include IR thermography [11], [12], [13], [14], [15], X-ray tomography [7], [11], [16], [17], [18], [19], [20], and a variety of ultrasonic (US) techniques [6], [21], [22], [23], [24], [25], [26], [27], [28], [29], [30], [31]. More advanced optical methods, such as digital image correlation (DIC) [11], [13] and optical coherence tomography (OCT) [13], [16], are sometimes used, but they are usually limited to surface inspection or measurements on semi-transparent composites. Moreover, DIC and holographic methods require mechanical loading of the sample, which complicates the setup and is not always appropriate for field applications.
Only US and X-ray tomography, e.g., micro-CT, can precisely locate three-dimensional defects regardless of FRP composite type. However, these techniques have their own disadvantages and limitations. X-ray tomography scanners are very expensive and cumbersome. 3-D X-ray imaging requires extensive data acquisition and is very time-consuming; moreover, the size of the instrument chamber limits the size of the sample to several centimeters and makes this approach completely unsuitable for most field applications, particularly those involving aerospace or automotive devices.
Conventional US pulse-echo techniques usually require couplants [22], [23], [24], [25], [26], [27], [28], [29], [30], [31], or full immersion of the sample for optimal energy transfer, which can affect overall scanning speed and greatly limit the number of applications where these techniques can be used. The layered structure of most composites and their relatively high US attenuation at frequencies greater than 5 MHz make it difficult to resolve separate layers within multi-ply structures. In addition, the “tone-burst” temporal profile of probe US signals enables self-interference between layers, thus creating artifacts. Complicated inversion algorithms can minimize these effects for simple cases, but they are not always efficient due to the inhomogeneous structure of composites [32], [33], [34], [35], [36], [37]. Air-coupled US does not need a couplant, but it must operate at frequencies less than 1 MHz with resultant poor spatial resolution [38], [39], [40]. Surface and Lamb acoustic waves also have limited spatial resolution, which makes them practical only for preliminary determinations of defect location and size [41], [42], [43], [44].
Laser-ultrasound (LU) has many advantages over conventional US. First, laser-generated US transients are ultra-wideband, providing at least 3 times better resolution than conventional US transducers with the same characteristic frequency [45], [46]. Second, the system is fundamentally non-contact and removes all issues related to US coupling. Disadvantages include its low pulse repetition frequency (PRF), the high cost of pump lasers, and some issues with stability and the low sensitivity of optical reception. These limitations, however, have been recently overcome with a new kHz-rate fiber-optic pump-probe system [46], [47] using a modified Sagnac interferometer as the detector [48], [49] to achieve sensitivity rivaling the best contact US transducers.
In previous studies we have shown that the kHz-rate LU scanner can detect not only large defects accurately, but it can also help visualize pores and single layers within composite structures [46], [47], [48], [49], [50], [51]. This makes the LU scanner a very promising candidate for characterization of impact damage. In contrast to X-ray tomography, LU scanning can potentially be used on real structures where access is limited to one side, i.e., it does not require excision of samples from a component to perform high-resolution imaging of potential defects.
In this study, we used the LU scanner for 3-D imaging at high resolution (i.e., layer by layer) of low-velocity impact damage in CFRP composites. X-ray tomograms were also acquired on the same samples with an “Inveon microCT” machine (Siemens, Erlangen, Germany) to validate all LU results.
2. Materials and methods
2.1. Samples of impacted CFRP composites
All samples were fabricated using commercial prepreg, specifically #2511 semi-toughened epoxy resin coated T700G-12K-31E carbon fiber (CF) unidirectional tape manufactured by Toray Industries, Inc. It has a standard resin content of 35 ± 3% by weight and fiber areal weight of 150 ± 6 g/m2. The laminate consisted of eight repeated in-plane stacking sequences of 45°, 0°, −45°, and 90° (i.e., [45/0/-45/90]8); where the 0° fiber orientation was aligned with the lengthwise (long) dimension of the mold. The laminate had 32 layers of CF unidirectional prepreg (UDP), yielding samples 4.86 mm thick.
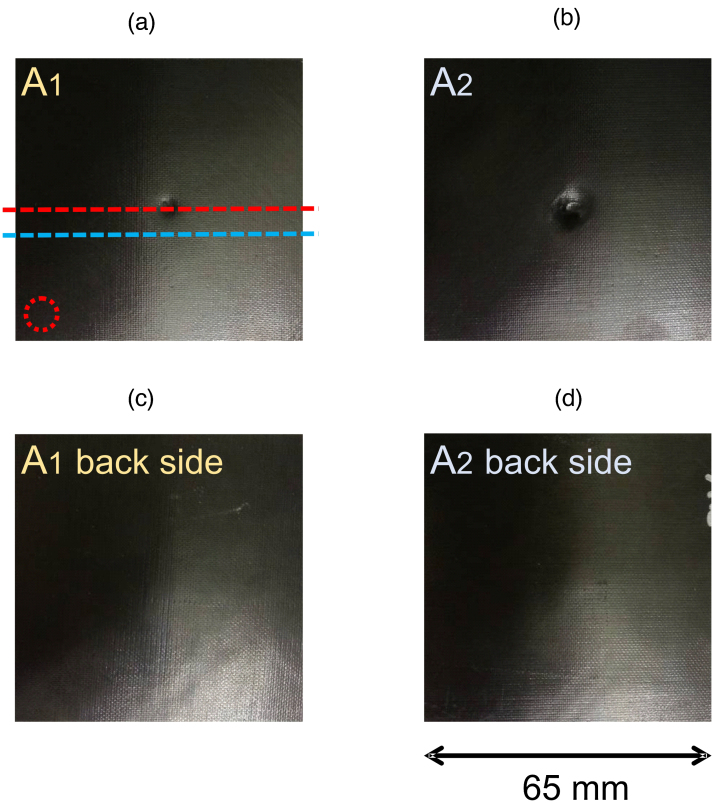
An aluminum mold with cavity dimensions of 609.6 × 914.4 mm was used to fabricate CFRP composites. After placing the material, the mold was sealed using a vacuum bag and sealant tape. It was then held under vacuum at 29 in Hg. Laminates were cured in a convection oven at 88 °C for 1.5 h and post-cured at 132 °C for 2 h. Then, 100 × 100 mm samples were cut from the cured CFRP plates using a diamond saw. Coupons were drop weight tested in an Instron 9250 HV Dynatup, equipped with an 88.96 kN load cell impactor with a 12.7 mm diameter hemishperical head, a velocity detector, and a pneumatic brake to prevent multiple impacts. Specimens were clamped by pneumatically assisted grips. The exposed diameter of the composite plate for the impact test was 76.2 mm, as per ASTM D7136. The prepared GFRP samples were subjected to low-velocity impacts face-on with energies of 25 J and 50 J. Following impact testing, the samples were cut to 65 × 65 mm to fit the chamber of the X-ray machine. Fig. 1 shows the front and back sides of one sample impact tested at 25 J and 50 J energy levels and then cut to size.
Fig. 1.
Photographs of samples of CFRP composites impacted face-on with energies of 25 J (sample A1, on the left) and 50 J (sample A2, on the right) as per ASTM D7136 standard. Samples were 65 mm × 65 mm laterally and had a thickness of 4.86 mm.
The red dashed line indicates the position of X-ray micro-CT B-scan shown in Fig. 2; the blue dashed line corresponds to the position of the LU B-scan shown in Fig. 4; the red circle shows a region in which data are used to calculate TGC coefficients (see Fig. 3).
2.2. Non-contact pump-probe LU system
The LU system has a few key components: a diode-pumped nanosecond laser to generate probe US signals at the surface of composite samples; a fiber-optic modified Sagnac interferometer for non-contact detection of backscattered US; an XY translation platform for scanning; an analog to digital converter (ADC) and a computer (PC) for signal capture, processing, and image display.
Detailed information on the modified Sagnac interferometer can be found in Refs. [48], [49]; the principle and performance of the whole system operating at kHz A-scan rates was detailed in [46], [47]. Incident pump-laser pulses were delivered along an axis inclined at ∼40 ° from the sample normal so that the probe-laser beam is focused to the same point on the sample surface as the detection beam. The laser spot size at the sample surface was about 1.5 mm × 2 mm, resulting in a laser fluence of about 60 mJ/cm2, well below any damage thresholds for composite material illumination.
The composite sample was fixed on a translation platform that can be linearly translated at a speed of 100 mm/s, with peak acceleration of 10 m/s2 in both lateral directions providing a 0.1 mm step between A-scans. A position-synchronized output of the translation platform was used for laser triggering. Thus, all laser firings were triggered based on the coordinate, and the scan step was kept constant even for acceleration/deceleration regions.
A 60 mm × 60 mm area centered on the impact location was scanned in a snake trajectory for each sample. Each B-scan contained 600 A-scans stepped by 0.1 mm. Thus, all A-scans were recorded in a rectangular grid of 0.1 mm in both lateral directions resulting in an overall scan of 600 × 600 signals. Data were recorded in real time, and complete B-scans were displayed at about 2 Hz rate without any delay for scanning. The total scan time for the full 3-D volume was about 10 min. Note that the surfaces of these home-made samples were quite rough, and, owing to very high porosity, US attenuation within them was much higher than that seen in autoclave-manufactured commercial-grade composite materials.
Radio frequency (RF) signals output from the interferometer were amplified in the frequency range of 1–10 MHz by an amplifier (Panametrics, Model 5072PR), digitized to 14 bits by the PCI Express3 ADC, and transferred to the workstation for further signal processing and display. RF data were processed as described below in Section 3 to create a 3-D data set for each sample.
2.3. X-ray tomography
X-ray imaging is the conventional method for high resolution structural inspection of composites. Consequently, X-ray tomography (i.e., micro-CT) measurements were performed on all CFRP samples in addition to LU inspection. The instrument “Inveon microCT” (Siemens, Erlangen, Germany) acquired X-ray tomograms with a resolution of 72 μm (a 36 × 36 × 36 μm3 voxel size). To maximize image contrast, the X-ray tube voltage was varied until an optimum was found at 60 kV. Total scan time was about 3 h for a 50 mm × 50 mm scan area.
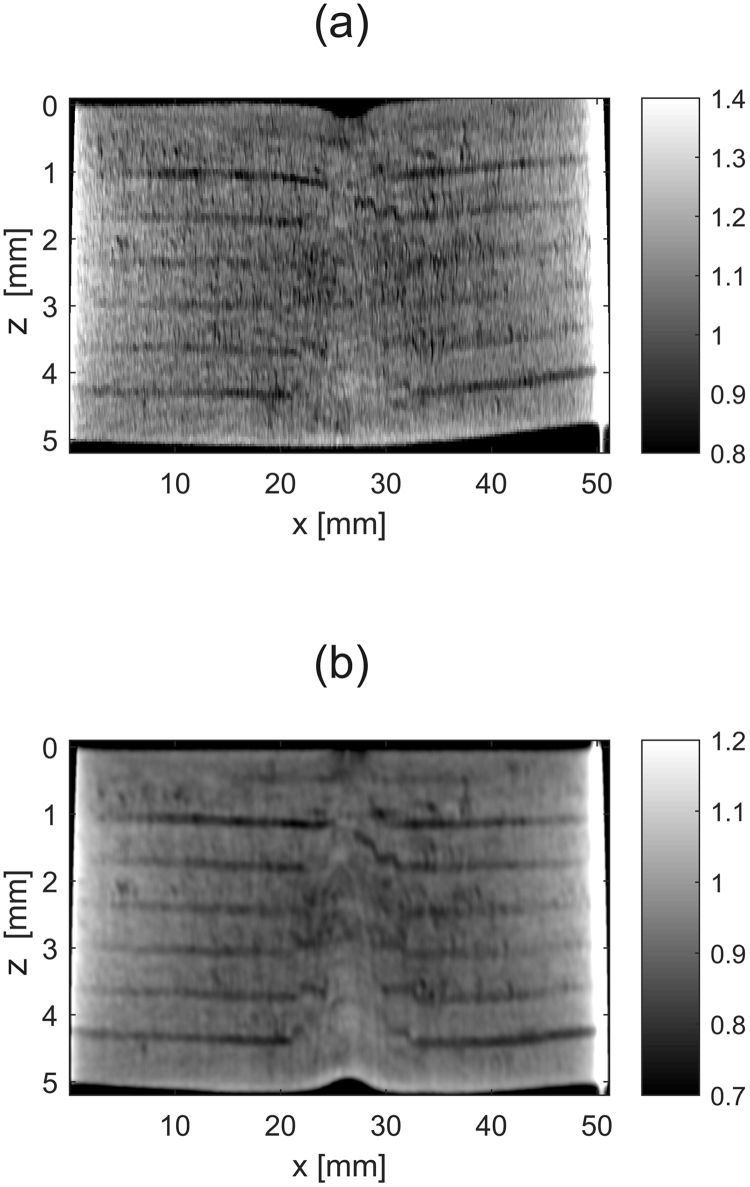
A typical raw CT B-scan covering the cross-section through the impact center (the red dashed line in Fig. 1) is shown in Fig. 2a. Because of the change in surface topology produced by impact, X-ray tomograms cannot be directly compared to LU B-scans. The laser-generated US signal always emanates from the sample surface, making LU B-Scans appear to have a flat front surface. For a damaged surface, this apparent surface flatness is artificial and must be taken into account when comparing LU results with X-ray tomograms. Thus, to make an “apples to apples” comparison between LU and X-ray techniques (see below), we artificially flattened the front surface of X-ray tomograms as shown in Fig. 2b. Flattened CT B-scans are compared with LU images throughout the rest of this paper. In addition, a 2-D Gaussian spatial moving filter,
| (1) |
was applied to the X-ray 3-D data. The coefficients in Eq. (1) were selected to match spatial resolutions in CT and LU images and improve an overall image signal to noise ratio (SNR). Here, i and j range from 1 to 1408. Thus, 2-D filtered LU and X-ray data should match each other in spatial resolution.
Fig. 2.
(a) Unprocessed X-ray micro-CT B-scan. (b) processed (as described in Section 2.3) “flattened” CT B-scan.
3. Results
3.1. 3-D set of LU data
To improve SNR for LU scan data, given the high density of spatial samples, a 2-D Gaussian spatial moving filter was applied for all time points of the signal at all lateral positions (xi, yj) where A-scans were recorded:
| (2) |
The filter yielded a final spatial resolution of about 0.5 mm × 0.5 mm, approximately matching the spatial resolution of processed X-ray tomograms.
All A-scans were then processed as described in detail in [46], [47]. A band-pass filter,
| (3) |
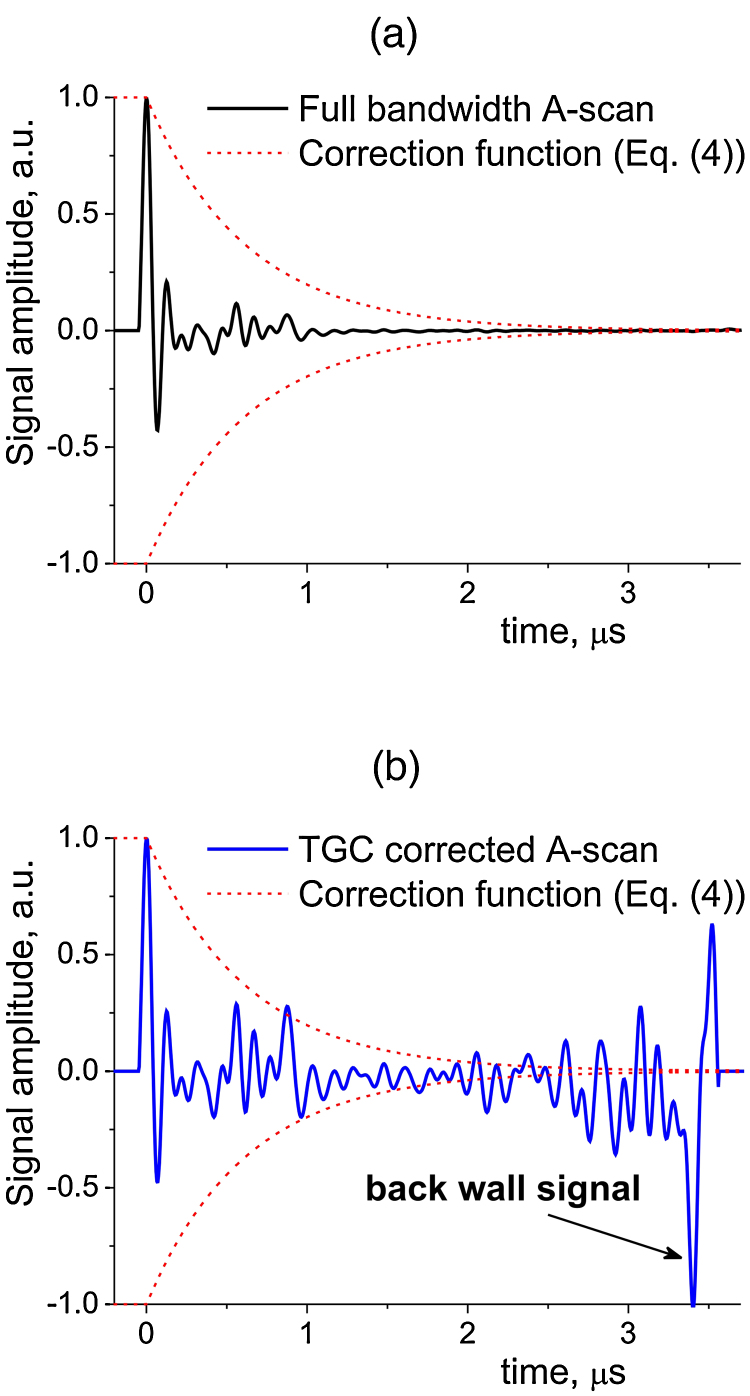
with = 100 kHz, = 11 MHz, = 1.2 was applied in the frequency domain to form a full bandwidth signal (see Fig. 3a). In addition, a low-pass filtered (LPF) version of all A-scans was produced with = 100 kHz, = 5 MHz, = 1.2. The processed A-scans formed the complete 3-D data set and were used to reconstruct B- and C-scans.
Fig. 3.
(a) – Typical full bandwidth LU A-scan with an assumed signal attenuation function (red dashed curve) and (b) – TGC corrected (normalized by the exponent of Eq. (4)) LU A-scan.
In addition to frequency filtering, a time gain correction (TGC) function was applied to all A-scans (and, therefore, to all B- and C-scans in the figures and the b. Research Group on Coastal Resources and Landscape (INTERFASE). Department of Geography. Universitat Autònoma de Barcelona. Bellaterra, Cerdanyola del Vallès. 08193. Spain. s mentioned in Supplementary matarial) to partially compensate for signal loss due to attenuation. Because in-depth US attenuation in a periodic structure should obey an exponential law [52], the TGC correction normalized the recorded A-scan as illustrated in Fig. 3b according to the expression:
| (4) |
where z0 is the starting depth of TGC compensation, zk is the depth for the k-th sample point, and the exponent α was determined in the area far from impact (shown by a red ring in Fig. 1a) so that the amplitude of the average back wall signal equals that of the average front surface signal. The parameter α was found to be 5.63 cm−1 for full bandwidth A-scans and 3.75 cm−1 for LPF signals. The factor of two in the exponent in Eq. (4) accounts for the two-way US propagation before detection at the front sample surface. The constants were maintained for all A-scans within one sample. Again, the applied TGC only approximately compensates for attenuation to increase visibility of damage in deep layers; there is no attempt here to strictly quantify the magnitude of the backscattered US signal amplitude.
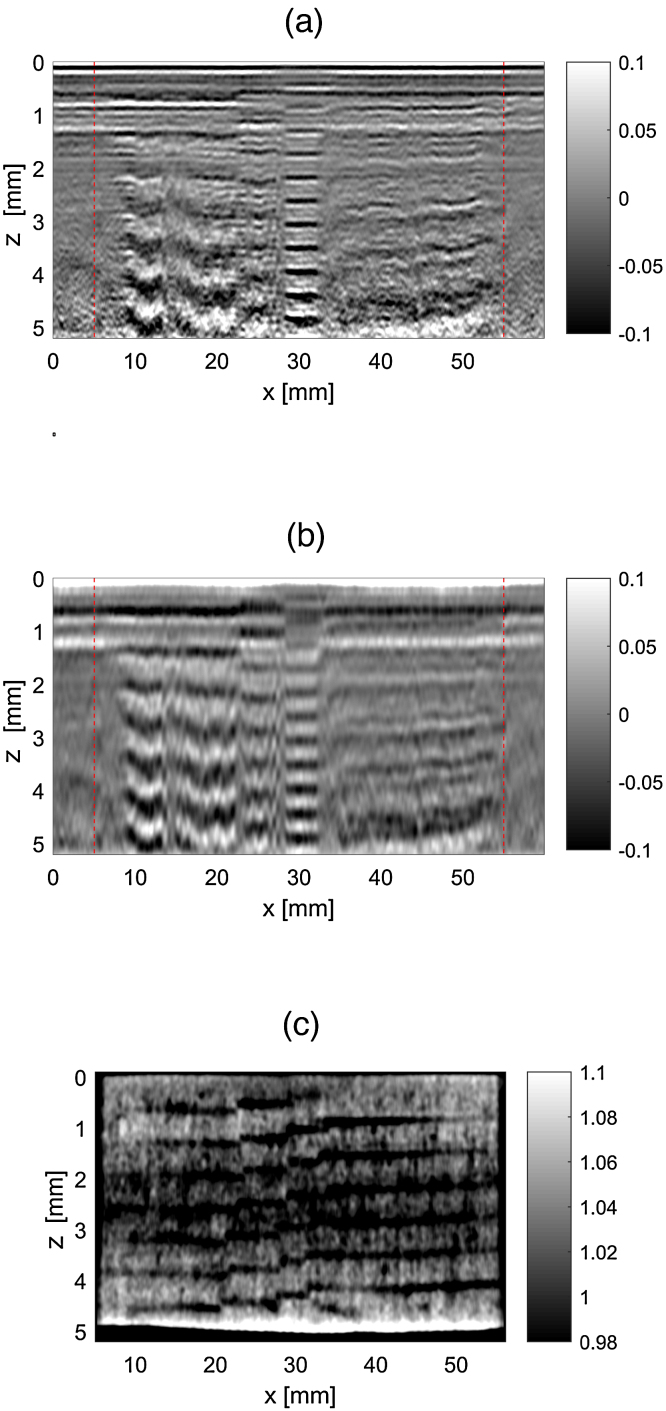
Typical LU full bandwidth and LPF B-scans for sample A1 are presented in Fig. 4a and b respectively. The position of the B-scan transect relative to the surface of sample A1 is indicated by a blue dashed line in Fig. 1a. An X-ray B-scan corresponding to the same cross-section is shown in Fig. 4c. It is important to note that these B-scans were about 6 mm from the center of impact, i.e., in a region away from visible damage (see Fig. 1). Clearly, the damage extended well beyond the visible impacted area.
Fig. 4.
(a) Recorded A-scans after spatial filtering (Eq. (2)), then processed and filtered in the frequency domain using Eq. (3) (as described in [48], [49] in detail), and finally TGC-corrected using Eq. (4) to form TGC-corrected full-bandwidth LU B-scans. (b) Recorded A-scans processed as in (a) but with LPF added using a cutoff frequency f1 = 5 MHz. (c) X-ray micro-CT B-scan for the same sample cross-section.
A complete set of all LU B-scan frames for sample A1 is shown in Movie 1.
The LU full bandwidth B-scan (Fig. 4a) illustrates both the composite layered structure and damage induced by impact, whereas the LPF B-scan almost totally removes the composite regular structure signal [46], [47], [48], [49], [50], [51]. Interfaces among the first three [45/0/-45/90] prepreg layers are evident in Fig. 4b, which shows that stacking layers under laboratory conditions was not perfect and created numerous voids. These voids are the reason for an enlarged (∼50 dB/cm) US attenuation compared with the autoclave-manufactured commercial CFRP composite samples used in our previous studies [46], [47]. The high porosity level was confirmed by the X-ray B-scan (Fig. 4c) obtained for the same section of the sample (the blue dashed line in Fig. 1) and flattened as described in Section 2.3 and shown in Fig. 2.
Using Fig. 4 we can compare images obtained with micro-CT and high-speed LU scanning. X-ray tomography is a transmission method, whereas LU scanning operates in pulse-echo mode. Therefore, if a large delamination appears in the propagation path, most of the US power is reflected back to the front surface, blocking US propagation to deeper sample regions and inducing reverberations between the front surface and the delamination. This means that US can diagnose only the first large delamination along a particular path from the front to back walls. In contrast, X-ray images do not have this limitation. Detection of even a single total delamination, however, indicates that the component should be repaired or scrapped.
A complete 3-D data set can be used to produce a LU B-scan movie. An example, Movie 1, shows how the composite structure changes in the vertical cross-section (XZ plane). B-scan panels are shown over the full bandwidth (left panel) and LPF (right panel) formats. Each B-scan consists of 600 individual TGC-corrected A-scans, and the entire movie consists of 600 B-scans covering a 60 mm distance in the Y direction. The stepping increment for both A- and B-scans is 0.1 mm, the same as the acquisition increment.
Movie presenting running LU B-scans though sample A1 from one side to the other with a vertical cross-section (XZ plane). B-scan panels are shown for the full bandwidth (left panel) and LPF (right panel) formats. Each B-scan consists of 600 individual TGC corrected A-scans. The entire movie consists of 600 B-scans covering a 60 mm distance in the Y direction. Step size for both A- and B-scans is 0.1 mm. Signal processing applied to recorded RF signals is described in detail in Section 3.1.
3.2. C-scans
Complete 3-D data sets obtained with both LU and X-ray methods can be used to create C-scans, images in planes parallel to the front surface, at each depth. TGC corrected A-scans were used to create C-scans at all depths within the samples.
Fig. 5 illustrates the composite structure very close to the front surface, at a depth of 0.14 mm, for sample A1. There is no damage surrounding the geometrical impact at this depth and, therefore, the undisturbed composite structure itself can be visualized. The full bandwidth LU image (Fig. 5a) details pores, as does the X-ray image (Fig. 5c). The LPF image (Fig. 5b) was too close to the front surface to resolve these voids because the image remains saturated (i.e., within the impulse response of the LPF).
Fig. 5.
Full bandwidth (a) and LPF (b) LU C-scans for sample A1 at depth of 0.14 mm obtained with a 3-D LU data set. The 3-D data set was created with TGC corrected LU B-scans processed for multiple Y positions with a 0.1 mm step as described in Sec tion 3. LU C-scans represent image sections parallel to the front sample surface, i.e. correspond to a fixed depth image. (c) Flattened X-ray micro-CT C-scan shown for the same depth. The red rectangles shown in (a) and (b) indicate the area imaged with X-ray in (c).
A complete set of all LU C-scan frames for sample A1 is shown in Movie 2.
Fig. 6a and b demonstrate typical full bandwidth and LPF LU C-scans for sample A1 at a 0.53 mm depth from the front surface, whereas Fig. 6c presents the X-ray C-scan for the same depth. The full bandwidth C-scan (Fig. 6a) contains detailed information on composite structure imperfections, including pores, which partially mask the main damage. The LPF C-scan (Fig. 6b) clearly shows the main damage and matches well with the damage pattern in the X-ray C-scan (Fig. 6c), where small pores and the regular composite structure were filtered from these images.
Fig. 6.
Full bandwidth (a) and LPF (b) LU C-scans for sample A1 at depth of 0.53 mm obtained with a 3-D LU data set. (c) Flattened X-ray micro-CT C-scan shown for the same depth. The red rectangles shown in (a) and (b) indicate the area imaged with X-ray in (c).
A complete set of all LU C-scan frames for sample A1 is shown in Movie 2.
Fig. 7 presents images of the horizontal section of sample A1 at a depth close to the back surface. As mentioned above, LU images accumulate damage signals over the whole depth due to multiple reverberations. Thus, at this depth, the LU image presents the entire area of accumulated damage. Movie 2 in which LPF LU is on the left and CT is on the right, shows the dynamics damage propagation into the sample, layer by layer, from top to bottom. Up to a depth of ∼2 mm, LU C-scans of delaminations in the composite structure are almost identical with X-ray tomograms – exhibiting a counter-clockwise rotation of the defect’s “propeller.” At about 2 mm depth, however, the damage covers the entire sample, blocking US propagation into deeper layers.
C-scan movie for sample A1 sectioning the complete 3-D data set by surfaces parallel to the front sample surface. The left panel corresponds to LPF LU data, whereas the right panel corresponds to the data set obtained with the X-ray micro-CT instrument. The running coordinate corresponds to the image depth from the front surface of the specimen.
Fig. 7.
Full bandwidth (a) and LPF (b) LU C-scans for sample A1 at depth of 4.27 mm obtained with a 3-D LU data set. The accumulation of damage from different layers and effect of a “halo” around the damaged area is shown. (c) Flattened X-ray micro-CT C-scan shown for the same depth. The red rectangles shown in (a) and (b) indicate the area imaged with X-ray in (c).
A complete set of all LU C-scan frames for sample A1 is shown in Movie 2.
Close study of the movies and of the image planes presented in Fig. 7 in some detail elicits the interesting observation that there is a halo around the defective area, which actually appears to lie close to the back surface. This effect is quite apparent in Movies 1 and 2. Because the micro-CT images were flattened to better align US and X-ray data with depth, as described in Section 2.3 and illustrated in Fig. 2, this halo is only partially seen in the CT scan (Fig. 7c). In any event, the correspondence between LU and CT images is nearly perfect, which means that LU scanning can provide information similar to that of high-resolution X-ray tomograms, but measured “in-situ” without sample excision and in minutes, not hours.
Fig. 8a and b show full bandwidth and LPF LU C-scans for sample A2 at 0.67 mm depth. This sample was subjected to double the impact energy, 50 J. For comparison, the X-ray C-scan is presented in Fig. 8c for the same depth. A C-scan movie (Movie 3) corresponding to this sample shows the dynamics of damage propagation deep into the sample, similar to that for sample A1. The “propeller” now extends laterally but keeps the same features, rotating in the counter-clockwise direction. Again, a good match between LU and CT results is observed.
C-scan movie for sample A2 sectioning the complete 3-D data set by surfaces parallel to the front sample surface. The left panel corresponds to LPF LU data, whereas the right panel corresponds to the data set obtained with the X-ray micro-CT instrument. The running coordinate corresponds to the image depth from the front surface of the specimen.
Fig. 8.
Full bandwidth (a) and LPF (b) LU C-scans for sample A2 at depth of 0.67 mm obtained with a 3-D LU data set. (c) Flattened X-ray micro-CT C-scan shown for the same depth. The red rectangles shown in (a) and (b) indicate the area imaged with X-ray in (c).
A complete set of all C-scan frames for sample A2 is shown in Movie 3.
4. Discussion
In this work, we have illustrated a new strategy for non-contact, high-speed inspection of low-velocity impact induced damage in CFRP composites. We have shown that US can image impacted structures layer-by-layer with sub-mm resolution if signals are generated optoacoustically and detected with a point-like, high-sensitivity optical detector (LU). We have demonstrated that LU can visualize the “propeller-like” progression of damage inside a composite structure with a resolution better than 1 ply. These results were validated with X-ray images of the same samples.
In addition to resolving defects at better than 1 ply resolution, high-speed LU scanning can help characterize damage at different spatial scales. Simple visual inspection of a component provided the first scale, showing that surface damage extended laterally about 4 mm and 8 mm for samples A1 and A2, respectively. However, as shown in Fig. 4, Fig. 5, Fig. 6, Fig. 7, Fig. 8, internal damage spread much further laterally. A LPF 3-D data set provided the next spatial scale of inspection. This format did not show the regular composite structure and small voids present in the structure, but it highlighted major defects and easily delineated the primary damage zone resulting from impact. The final spatial scale was contained in full-bandwidth data. These images detailed the regular composite structure and small heterogeneities (e.g., voids). At this scale, microscopic impact-induced changes in composite structure can potentially be quantified in a way similar to our recent findings related to heat damage [51].
Among all NDE methods, only X-ray imaging and LU scanning can visualize the impact damage with sub-layer (sub-ply) resolution. However, there are different practical constraints associated with each type of imaging.
X-ray tomography is a transmission method detecting X-ray absorption along the path from source to detector. Full reconstruction provides the X-ray absorption coefficient at every voxel within the sample. In contrast, LU scanning works in reflection and detects the part of the signal that is reflected back to the detector by the structure. Large delaminations block the US beam, producing multiple reverberations of the probe signal between the delamination and the front surface. Therefore, LU scanning can correctly delineate only US scatterers located between the front surface and the delamination. It would be ideal to remove high order reverberations from LU images, keeping only first reflections, i.e., solve the inverse problem of US scattering [52], [53], [54], [55]. Another possibility is to use time-of-flight (TOF) mode imaging of the first arrival of echo signals having amplitudes above some threshold [25], [26], [27], [28] or various other known advanced signal processing methods [33], [34], [35], [36], [37], [56], [57], [58]. This problem is not simple, however, because of the highly heterogeneous nature of composite structures and the complications of frequency-dependent US diffraction and attenuation. At present, we prefer to retain these artifacts to minimize over-processing of the data. For the specific case of imaging of impact damage, we can clearly see the “propeller-like” profile rotation until it completes one revolution at about 2 mm in depth for the samples used here. At greater depths, it is difficult to discern if the structure is real or is the result of multiple reverberations of US in the upper layers. Nevertheless, the extent of the damage zone could be clearly seen with this display format, as demonstrated in Fig. 7, Fig. 8 and Movies 1–3.
Another important difference between these imaging modalities is that LU naturally flattens the image of the front surface of the sample due to laser generation of US directly inside the composite, even if the surface was deformed by impact (see Fig. 3). That is to say, LU follows the deformed profile of the layers. This is an advantage because LU C-scans automatically reveal the surface of constant depth rather than a geometrical plane. To produce similar X-ray C-scans, post processing of X-ray tomograms is required (see Fig. 2). On the other hand, LU inspection cannot reproduce front surface relief as in conventional US with an external probe.
There is no doubt that X-ray tomography provides more complete information on impact damage, especially at deeper layers where the integrated damage covers the whole damage area laterally (the “propeller” completes a full spin) and blocks US from propagating into deeper regions. If a manufactured component used in a real application is subjected to an impact, however, there is no way to use X-ray tomography without removing a piece for examination. Conventional US or thermography can provide only the contour of the damaged area without any details on its layer-by-layer distribution. Thus, the LU scanning method described here is a great improvement over current tools to characterize impact damage at multiple size scales, enabling in-situ imaging (i.e., without sample excision) at least within the upper part of an in-depth damage distribution on a minute time scale. We hope, and believe, that the damage structure imaged with high-resolution LU scanning in the upper composite layers can be used in advanced mechanical models [59], [60], [61], [62] to predict damage propagation into deeper layers and evaluate residual life of entire components subjected to impact loading. This hypothesis will be tested in future studies.
Finally, we emphasize that the goal of this study was to demonstrate a new LU method which can provide a unique capability for quantitative assessment of damage induced by low-velocity impact on composite components used in practical applications. This tool is especially valuable when excision of a composite sample for X-ray imaging is neither desirable nor possible.
5. Conclusions
We have demonstrated a new, rapid, non-contact method for 3-D high-resolution imaging of damage in impacted CFRP composite components where only one-sided access is possible. Composite samples used for these studies were manufactured with a commercial CF unidirectional prepreg laminated with eight sub-laminates consisting of four plies, with the stacking sequence of 45°, 0°, −45°, and 90° layups (i.e., [45/0/-45/90]8). All laminates had 32 layers and were ∼5 mm thick. Two samples were impacted, one at 25 J and the other at 50 J, as per the ASTM D7136 standard. X-ray tomograms were obtained in the same samples to compare with the results of the LU study. Results clearly showed a “propeller-shaped” damage that rotated counter-clockwise through depth in the sample. The LU method resolved all delaminations until the “propeller” completed one complete rotation, which occurred at a depth of about 2 mm. For deeper regions, LU images were strongly affected by multiple reverberations of US in the upper layers. We hope that results presented here can be leveraged to create advanced mechanical models that predict damage propagation inside impacted composites from high-resolution LU images registered to the upper layers. Finally, high-speed and high-resolution LU scanning is the only method which can potentially enable in-situ non-contact imaging inside composite structures with resolution better than 1 ply.
Acknowledgements
The work reported here was primarily supported by the Department of Bioengineering at the University of Washington. We thank Robert Miyaoka and Greg Garvin for many helpful discussions on micro-CT systems and for X-ray scanning of the composite samples used in this study. We also acknowledge NIH grant # S10OD017980 supporting the CT system at the University of Washington. Finally, the first author would like to acknowledge support from the Foundation for Polish Science via START – stipend for young researchers. At Michigan State University, this work was supported by the U.S. Army and ONR under TACOM/MSU Cooperative Agreement No. W56HZV-07-2-0001 and in collaboration with US Army TARDEC. Additionally, Dr. Haq would like to acknowledge the faculty startup funds from Department of Civil Engineering at MSU.
Biographies

Ivan Pelivanov, Assistant Professor at Physics Faculty of M.V. Lomonosov Moscow State University & visiting Assistant Professor at the University of Washington (WA, USA) Ivan Pelivanov is the Assistant Professor at the Physics Faculty of M.V. Lomonosov Moscow State University and visiting Assistant Professor at the University of Washington (WA, USA). He graduated from the group of Prof. A.A. Karabutov, which is a pioneering and renown team in various physical and biological applications of optoacoustic spectroscopy, and received his Ph.D. degree in 2000. His recent research focuses on designing sensitive wide-band contact and non-contact detectors, application of optoacoustic method in NDT & material evaluation, analytic chemistry and in medicine.
Łukasz Ambroziński, PhD Eng. Received his degree from AGH University of Science and Technology, Krakow, Poland in 2014. His work was concerned with structural health monitoring of metallic and composite planar structures using Lamb waves. In 2015 he started his postdoctoral fellowship at University of Washington, where he broaden his research interests with NDE using photoacoustic techniques.

Dr. Anton Khomenko is a research associate at the Composite Vehicle Research Center (CVRC), Michigan State University (MSU). He received his MSc degree in physics and his PhD in laser physics from M.V. Lomonosov Moscow State University in 2006 and 2010, respectively. His research is highly cross-disciplinary and is focused on various aspects of materials science, including measurements and instrumentation. His research interests include optics, particularly ultrafast laser and fiber optics sensors applications, NDE, composite structures, and biomedical applications.
Ermias G. Koricho, Senior Research Associate, Michigan State University Dr. Koricho graduated in Mechanics (PhD) at Politecnico di Torino (Italy), in Applied Mechanics (MSc) at Addis Ababa University (Ethiopia), and in Mechanical Engineering (BSc), at Bahirdar University. He was lecturer at Addis Ababa and Bahirdar Universities. Internship at FIAT Research Center where he worked on smart adhesives, composites, vehicle crashworthiness and lightweight design. At Politecnico di Torino he was research fellow in European and national projects. Currently, he is a senior research associate, at Michigan State University, Composite Vehicle Research Center. Research area includes: Innovative multi-material joining and tailored fiber placements, fatigue and impact behavior of composite material, vehicle crashworthiness and lightweight design.

Gary L. Cloud, P.E., University Distinguished Professor, Mechanical Engineering Dept., Michigan State University Prof. Cloud’s teaching, research and consulting interests bring together innovative optical and electronic techniques of experimental mechanics plus analytical mechanics to solve problems in geomechanics, biomechanics, composites, fracture mechanics, fastening, nondestructive evaluation, and structural design. He is a Fellow of the Society for Experimental Mechanics and a Fellow of the Institute of Physics as well as Registered Professional Engineer and a Chartered Physicist.

Dr. Mahmoodul Haq is an Assistant Professor in the Department of Civil and Environmental Engineering in the area of Structural Engineering and Mechanics of Materials at Michigan State University (MSU). He leads the group on ‘Structural Joining and Tailorable Materials, ’ at the Composite Vehicle Research Center (CVRC) at MSU. He also holds an Adjunct Professor in the department of Electrical and Computer Engineering at MSU. His research interests include multi-material joining, non-destructive evaluation (NDE), multi-scale reinforced hybrid/tailorable composites, and computational simulation of materials and structures.

Dr. Matthew O’Donnell has worked at General Electric CRD, the University of Michigan, where he was Chair of the BME Department from 1999 to 2006, and the University of Washington (UW), where he was the Frank and Julie Jungers Dean of Engineering from 2006 to 2012. He is now Professor of Bioengineering at UW. His most recent research has focused on elasticity imaging, optoacoustic arrays, photoacoustic contrast agents, thermal strain imaging, and catheter-based devices. He is a fellow of the IEEE and AIMBE and is a member of the Washington State Academy of Sciences and the National Academy of Engineering.
References
- 1.Cantwell W.J., Morton J. The impact resistance of composite materials—a review. Composites. 1991;22:347–362. [Google Scholar]
- 2.Soutis C. Fibre reinforced composites in aircraft construction. Prog. Aerosp. Sci. 2005;41:143–151. [Google Scholar]
- 3.Fuchs E.R.H., Field F.R., Roth R., Kirchain R.E. Strategic materials selection in the automobile body: economic opportunities for polymer composite design. Compos. Sci. Technol. 2008;68:1989–2002. [Google Scholar]
- 4.Witten E., Kraus T., Kühnel M. EuCIA; 2015. Composites Market Report 2015.http://www.eucia.eu/userfiles/files/Composites_Market%20Report_2015.pdf [Google Scholar]
- 5.Naik N.K., Chandra Sekher Y., Meduri S. Damage in woven-fabric composites subjected to low-velocity impact. Compos. Sci. Technol. 2000;60:731–744. [Google Scholar]
- 6.Guinard S., Allix O., Guédra-Degeorges D., Vinet A. A 3D damage analysis of low-velocity impacts on laminated composites. Compos. Sci. Technol. 2002;62:585–589. [Google Scholar]
- 7.Bull D.J., Helfen L., Sinclair I., Spearing S.M., Baumbach T. A comparison of multi-scale 3D X-ray tomographic inspection techniques for assessing carbon fibre composite impact damage. Compos. Sci. Technol. 2013;75:55–61. [Google Scholar]
- 8.Antonucci V., Caputo F., Ferraro P., Langella A., Lopresto V., Pagliarulo V. Low velocity impact response of carbon fiber laminates fabricated by pulsed infusion: a review of damage investigation and semi-empirical models validation. Prog. Aerosp. Sci. 2016;81:26–40. [Google Scholar]
- 9.Katunin A., Dragan K., Dziendzikowski M. Damage identification in aircraft composite structures: a case study using various non-destructive testing techniques. Compos. Struct. 2015;127:1–9. [Google Scholar]
- 10.Naik N.K., Meduri S. Polymer-matrix composites subjected to low-velocity impact: effect of laminate configuration. Compos. Sci. Technol. 2001;61:1429–1436. [Google Scholar]
- 11.Goidescu C., Welemane H., Garnier C., Fazzini M., Brault R., Péronnet E. Damage investigation in CFRP composites using full-field measurement techniques: combination of digital image stereo-correlation, infrared thermography and X-ray tomography. Compos. Part B Eng. 2013;48:95–105. [Google Scholar]
- 12.Avdelidis N.P., Hawtin B.C., Almond D.P. Transient thermography in the assessment of defects of aircraft composites. NDT E Int. 2003;36:433–439. [Google Scholar]
- 13.Lomov S.V., Ivanov D.S., Verpoest I., Zako M., Kurashiki T., Nakai H. Full-field strain measurements for validation of meso-FE analysis of textile composites. Compos. Part Appl. Sci. Manuf. 2008;39:1218–1231. [Google Scholar]
- 14.Meola C., Carlomagno G.M. Impact damage in GFRP: new insights with infrared thermography. Compos. Part Appl. Sci. Manuf. 2010;41:1839–1847. [Google Scholar]
- 15.Pieczonka L., Aymerich F., Brozek G., Szwedo M., Staszewski W., Uhl T. Modelling and numerical simulations of vibrothermography for impact damage detection in composites structures. Struct. Control Health Monit. 2013;20:626–638. [Google Scholar]
- 16.Dunkers J.P., Sanders D.P., Hunston D.L., Everett M.J., Green W.H. Comparison of optical coherence tomography x-ray computed tomography, and confocal microscopy results from an impact damaged epoxy/e-glass composite. J. Adhes. 2002;78:129–154. [Google Scholar]
- 17.Tiseanu I., Tsitrone E., Kreter A., Craciunescu T., Loarer T., Pégourié B. X-ray micro-tomography studies on carbon based composite materials for porosity network characterization. Fusion Eng. Des. 2011;86:1646–1651. [Google Scholar]
- 18.Lau S.H., Chiu W.K.S., Garzon F., Chang H., Tkachuk A., Feser M. Non invasive, multiscale 3D X-Ray characterization of porous functional composites and membranes, with resolution from MM to sub 50 NM. J. Phys. Conf. Ser. 2009;152:012059. [Google Scholar]
- 19.Kastner J., Plank B., Reh A., Salaberger D., Heinzl C. Advanced X-ray tomographic methods for quantitative characterization of carbon fibre reinforced polymers. Procrodeeding of the 4th International Symposium on NDT in Aerospace; Augsburg, Germany; 2012. pp. 1–9. [Google Scholar]
- 20.Kastner J., Plank B., Reh A., Salaberger D., Sekelja J. Defect and porosity determination of fibre reinforced polymers by X-ray computed tomography. 2nd International Symposium on NDT in Aerospace. 2010:1–12. [Google Scholar]
- 21.Ambu R., Aymerich F., Ginesu F., Priolo P. Assessment of NDT interferometric techniques for impact damage detection in composite laminates. Compos. Sci. Technol. 2006;66:199–205. [Google Scholar]
- 22.Kim G., Hong S., Jhang K.-Y., Kim G.H. NDE of low-velocity impact damages in composite laminates using ESPI, digital shearography and ultrasound C-scan techniques. Int J. Precis. Eng. Manuf. 2012;13:869–876. [Google Scholar]
- 23.Sarasini F., Tirillò J., Ferrante L., Valente M., Valente T., Lampani L. Drop-weight impact behaviour of woven hybrid basalt–carbon/epoxy composites. Compos. Part B Eng. 2014;59:204–220. [Google Scholar]
- 24.Shen Q., Omar M., Dongry S. Ultrasonic NDE techniques for impact damage inspection on CFRP laminates. J. Mater. Sci. Res. 2012;1:2–16. [Google Scholar]
- 25.Preuss T.E., Clark G. Use of time-of-flight C-scanning for assessment of impact damage in composites. Composites. 1988;19:145–148. [Google Scholar]
- 26.Steiner K.V. Vol. 1128. ASTM STP; 1992. Defect classifications in composites using ultrasonic nondestructive evaluation techniques; pp. 72–84. (Damage Detection in Composite Materials). [Google Scholar]
- 27.Kaczmarek H., Maison S. Comparative ultrasonic analysis of damage in CFRP under static indentation and low-velocity impact. Compos. Sci. Technol. 1994;51:11–26. [Google Scholar]
- 28.Kaczmarek H. Ultrasonic detection of damage in CFRPs. J. Compos. Mater. 1995;29:59–95. [Google Scholar]
- 29.Polimeno U., Meo M., Almond D.P., Angioni S.L. Detecting low velocity impact damage in composite plate using nonlinear acoustic/ultrasound methods. Appl. Compos. Mater. 2010;17:481–488. [Google Scholar]
- 30.Potel C., Chotard T., de Belleval J.-F., Benzeggagh M. Characterization of composite materials by ultrasonic methods: modelization and application to impact damage. Compos. Part B Eng. 1998;29:159–169. [Google Scholar]
- 31.Aymerich F., Meili S. Ultrasonic evaluation of matrix damage in impacted composite laminates. Compos. Part B Eng. 2000;31:1–6. [Google Scholar]
- 32.Dempster A.P., Laird N.M., Rubin D.B. Maximum likelihood from incomplete data via the EM algorithm. J. R. Stat. Soc. Ser. B. 1977;39:1–38. [Google Scholar]
- 33.Benammar A., Drai R., Guessoum A. Detection of delamination defects in CFRP materials using ultrasonic signal processing. Ultrasonics. 2008;48:731–738. doi: 10.1016/j.ultras.2008.04.005. [DOI] [PubMed] [Google Scholar]
- 34.Drai R., Sellidj F., Khelil M., Benchaala A. Elaboration of some signal processing algorithms in ultrasonic techniques: application to materials NDT. Ultrasonics. 2000;38:503–507. doi: 10.1016/s0041-624x(99)00082-7. [DOI] [PubMed] [Google Scholar]
- 35.Moon T.K. The expectation–maximization algorithm. IEEE Signal Process. Mag. 2000:47–60. [Google Scholar]
- 36.Demirli R., Saniie J. Model-based estimation of ultrasonic echoes. Part I: analysis and algorithms. IEEE Trans. Ultrason. Ferroelectr. Freq. Control. 2001;48:787–802. doi: 10.1109/58.920713. [DOI] [PubMed] [Google Scholar]
- 37.Demirli R., Saniie J. Model-based estimation of ultrasonic echoes. Part II: nondestructive evaluation applications. IEEE Trans. Ultrason. Ferroelectr. Freq. Control. 2001;48:803–811. doi: 10.1109/58.920714. [DOI] [PubMed] [Google Scholar]
- 38.Kazys R., Demcenko A., Zukauskas E., Mazeika L. Air-coupled ultrasonic investigation of multi-layered composite materials. Ultrasonics. 2006;44(Supplement):e819–e822. doi: 10.1016/j.ultras.2006.05.112. [DOI] [PubMed] [Google Scholar]
- 39.Ambrozinski L., Piwakowski B., Stepinski T., Uhl T. Application of air-coupled ultrasonic transducers for damage assessment of composite panels. Boller C., editor. 2012 Proceedings of the Sixth European Workshop, Structural Health Monitoring. 2012:122–129. [Google Scholar]
- 40.Ambrozinski L., Piwakowski B., Stepinski T., Pieczonka L., Uhl T. Pitch – catch air- coupled ultrasonic technique for detection of barely visible impact damages in composite laminates. 7th European Workshop on Structural Health Monitoring. 2014 [Google Scholar]
- 41.Yang I.-Y., Im K.-H., Heo U., Hsu D.K., Park J.-W., Kim H.-J. Ultrasonic approach of rayleigh pitch-catch contact ultrasound waves on CFRP laminated composites. J. Mater. Sci. Technol. 2008;24:407–409. [Google Scholar]
- 42.Giurgiutiu V., Cuc A. Embedded non-destructive evaluation for structural health monitoring damage detection, and failure prevention. Shock Vib. Dig. 2005;37:83–105. [Google Scholar]
- 43.Ng C.T., Veidt M. A Lamb-wave-based technique for damage detection in composite laminates. Smart Mater. Struct. 2009;18 (074006-1-12) [Google Scholar]
- 44.Dziendzikowski M., Kurnyta A., Dragan K., Klysz S., Leski A. In situ barely visible impact damage detection and localization for composite structures using surface mounted and embedded PZT transducers: a comparative study. Mech. Syst. Sig. Process. 2016;78:91–106. [Google Scholar]
- 45.Gusev V.E., Karabutov A.A. AIP; 1993. Laser Optoacoustics. [Google Scholar]
- 46.Pelivanov I., Buma T., Xia J., Wei C.-W., Shtokolov A., O’Donnell M. Non-destructive evaluation of fiber-reinforced composites with a fast 2D fiber-optic laser-ultrasound scanner. AIP Conf. Proc. 2015;1650:43–50. [Google Scholar]
- 47.Pelivanov I., Shtokolov A., Wei C.-W., O’Donnell M. A 1 kHz a-scan rate pump-probe laser-ultrasound system for robust inspection of composites. IEEE Trans. Ultrason. Ferroelectr. Freq. Control. 2015;62:1696–1703. doi: 10.1109/TUFFC.2015.007110. [DOI] [PubMed] [Google Scholar]
- 48.Pelivanov I., Buma T., Xia J., Wei C.-W., O’Donnell M. A new fiber-optic non-contact compact laser-ultrasound scanner for fast non-destructive testing and evaluation of aircraft composites. J. Appl. Phys. 2014;115 doi: 10.1063/1.4868463. [DOI] [PMC free article] [PubMed] [Google Scholar]
- 49.Pelivanov I., Buma T., Xia J., Wei C.-W., O’Donnell M. NDT of fiber-reinforced composites with a new fiber-optic pump-probe laser-ultrasound system. Photoacoustics. 2014;2:63–74. doi: 10.1016/j.pacs.2014.01.001. [DOI] [PMC free article] [PubMed] [Google Scholar]
- 50.Pelivanov I., O’Donnell M. Imaging of porosity in fiber-reinforced composites with a fiber-optic pump-probe laser-ultrasound system. Compos. Part Appl. Sci. Manuf. 2015;79:43–51. [Google Scholar]
- 51.Pelivanov I., Ambrozinski Ł., O’Donnell M. Heat damage evaluation in carbon fiber-reinforced composites with a kHz A-scan rate fiber-optic pump-probe laser-ultrasound system. Compos. Part Appl. Sci. Manuf. 2016;84:417–427. [Google Scholar]
- 52.Brekhovskikh L., Godin O. Springer; 1990. Acoustics of Layered Media. [Google Scholar]
- 53.Bakushinsly A.V., Kokurin M.Y. Springer; 2007. Iterative Methods for Approximate Solution of Inverse Problems. [Google Scholar]
- 54.Colton D., Kress R. Springer; 2012. Inverse Acoustic and Electromagnetic Scattering Theory. [Google Scholar]
- 55.Engl H., Louis A., Rundell W. Springer; 1996. Inverse Problems in Medical Imaging and Nondestructive Testing. [Google Scholar]
- 56.Drai R., Khelil M., Benchaala A. Time frequency and wavelet transform applied to selected problems in ultrasonics NDE. NDT E Int. 2002;35:567–572. [Google Scholar]
- 57.Abbate A., Koay J., Frankel J., Schroeder S.C., Das P. Signal detection and noise suppression using a wavelet transform signal processor: application to ultrasonic flaw detection. IEEE Trans. Ultrason. Ferroelectr. Freq. Control. 1997;44:14–26. doi: 10.1109/58.585186. [DOI] [PubMed] [Google Scholar]
- 58.Stanullo J., Bojinski S., Gold N., Shapiro S., Busse G. Ultrasonic signal analysis to monitor damage development in short fiber-reinforced polymers. Ultrasonics. 1998;36:455–460. [Google Scholar]
- 59.Rudraraju S., Salvi A., Garikipati K., Waas A.M. Predictions of crack propagation using a variational multiscale approach and its application to fracture in laminated fiber reinforced composites. Compos. Struct. 2012;94:3336–3346. [Google Scholar]
- 60.Prabhakar P., Waas A.M. A novel continuum-decohesive finite element for modeling in-plane fracture in fiber reinforced composites. Compos. Sci. Technol. 2013;83:1–10. [Google Scholar]
- 61.Pineda E.J., Waas A.M. Numerical implementation of a multiple-ISV thermodynamically-based work potential theory for modeling progressive damage and failure in fiber-reinforced laminates. Int. J. Fract. 2013;181:93–122. [Google Scholar]
- 62.D’Mello R.J., Maiaru M., Waas A.M. Virtual manufacturing of composite aerostructures. Aeronaut. J. 2016;120:61–81. [Google Scholar]
Associated Data
This section collects any data citations, data availability statements, or supplementary materials included in this article.
Supplementary Materials
Movie presenting running LU B-scans though sample A1 from one side to the other with a vertical cross-section (XZ plane). B-scan panels are shown for the full bandwidth (left panel) and LPF (right panel) formats. Each B-scan consists of 600 individual TGC corrected A-scans. The entire movie consists of 600 B-scans covering a 60 mm distance in the Y direction. Step size for both A- and B-scans is 0.1 mm. Signal processing applied to recorded RF signals is described in detail in Section 3.1.
C-scan movie for sample A1 sectioning the complete 3-D data set by surfaces parallel to the front sample surface. The left panel corresponds to LPF LU data, whereas the right panel corresponds to the data set obtained with the X-ray micro-CT instrument. The running coordinate corresponds to the image depth from the front surface of the specimen.
C-scan movie for sample A2 sectioning the complete 3-D data set by surfaces parallel to the front sample surface. The left panel corresponds to LPF LU data, whereas the right panel corresponds to the data set obtained with the X-ray micro-CT instrument. The running coordinate corresponds to the image depth from the front surface of the specimen.


