Abstract
This review summarises the key points in taking a history and performing a comprehensive clinical examination for patients with foot and/or ankle problems. It is a useful guide for residents who are preparing for their specialty exams, as well as family doctors and any other doctor who has to deal with foot and ankle problems in adults.
Keywords: Foot, Ankle, History, Examination and clinical assessment
Core tip: Patients present with foot and ankle problems can have either single or multiple pathologies. Obtaining adequate history and performing good clinical examination is a key in reaching the accurate diagnosis. Adjuvant tools like radiological images can be used to confirm what has been clinically suspected.
INTRODUCTION
Patients commonly present with foot and ankle problems, either in primary or secondary care clinics. However, many physicians find it challenging to assess these patients[1]. This is probably related to the complexity and multiplicity of joints in this part of the body.
There are 26 bones, 33 Joints and more than 100 ligaments, tendons and muscles in each foot[2]. On average, we walk 10000 steps per day, 1000000 steps per year and 115000 miles in our lifetime. The foot stands 3-4 times body weight during running.
This review summarises the keys points in taking a full history and performing a systematic clinical examination for patients with foot and ankle problem. It is a useful guide for residents who are preparing for their specialty exams, but also for any doctor who may have to deal with these problems in practice.
HISTORY
The common reasons for patient’s presenting to the foot and ankle clinic are: Pain, swelling, deformity, stiffness, instability and/or abnormal gait[2]. For new patients or when the diagnosis has not been confirmed before, we recommend that the examiner should not read the previous notes prior seeing the patient. This good practice allows the examiner to have more lateral thinking, with fresh eyes looking into the problem.
Pain
Ask the patient to finger point to the exact site of the maximum pain. If the pain was diffuse and not localized to one spot, try to identify the area/side of maximum discomfort. Correlate the site with the anatomical location as described in Table 1. Ask about the radiation of pain and quality or nature of it (sharp, dull or burning), whether it is related to weight bearing (degenerative changes, stress fracture or Inflammatory conditions like plantar fasciitis), the radiation (towards the toes or up the leg), severity of the pain (0-10), prevents activity, waking up during the night, time (early morning or night pain which disturbs the sleep), duration, pattern (constant/intermittent), aggravating factors (like walking distance, walking on flat or uneven floor; Going up and down the stairs; relation with shoes), and any alleviating factors (rest, analgesia, preferred type of foot wear)[3].
Table 1.
Correlations between the anatomical site of the pain and the possible underlying causes[6]
| Location of pain | Common possible pathology | |
| Anterior ankle pain | Degenerative disease | Impingement |
| Ankle joint capsule injury ex. Sport injury with maximum ankle joint plantar flexion | ||
| Medial pain below the medial malleolus | Sinus tarsi syndrome Subtalar degenerative changes Tarsal coalition of mid facet | Spring ligament or deltoid ligament pathology Tibialis posterior pathology or medial impingement |
| Postero-medial pain | Tibialis posterior tendonitis | Flexor hallucis longus Tarsal tunnel syndrome |
| Posterior pain | Achilles tendinopathy Posterior impingement | Os trigonum pathology |
| Postero-lateral pain | Peroneal tendon | |
| Lateral pain | Stress fracture of distal fibula ATFL injury Lateral impingement | Sinus tarsi syndrome Subtalar pathology Calcaneal fracture malunion |
| Heel pain | Plantar fasciitis Calcaneal stress fracture Entrapment of first branch of lateral plantar nerve | Fat pad atrophy/contusion Tarsal tunnel syndrome Foreign body reaction Plantar fascia rupture |
| Mid foot pain | Degenerative disease Post traumatic arthritis | Tarsal bones stress fracture Ligament injury ex Lisfranc injury Insertional tendinopathy of peroneal brevis |
| Forefoot pain | Metatarsalgia Morton neuropathy Stress fracture Freiberg disease | Metatarsophalangeal joint synovitis Nail pathology |
| Forefoot pain - big toe | Hallux valgus/rigidus Inflamed bunion | Sesamoiditis Sesamoid fracture |
| Forefoot pain - 2nd, 3rd and 4th toe | Claw toe Hammer toe | Mallet toe |
| Forefoot pain - little toe | Inflamed bunionette | |
ATFL: Anterior inferior tibiofibular ligament.
The chronicity and the severity of the pain can help to establish whether there is an element of central sensitization where by the patient becomes more sensitive and experiences more pain with less provocation. Factors like sleep deprivation and depression can drive central sensitization[4]. Finally, it is important to clarify what is the patients’ belief about their foot pain.
Deformity
Enquire about the duration and when the patient or their family member first noticed the deformity, which area it involves, is it progressing, and whether it associated with other symptoms (for example, skin ulcer, pain, recurrent infection, rapid wear of shoes, or cosmetic).
Swelling
It is important to establish whether the swelling is localized to one area or the whole leg or ankle, whether it is uni- or bilateral, associated with activities, as well as the frequency and the duration of swelling. Generalized bilateral swelling that involves the whole foot and ankle is usually related to more systematic pathology, such as cardiac or renal problems. Swelling which includes the area only around the ankle joint may be related to the tibio-talar joint (for example, degenerative changes or inflammatory arthropathy). On other hand, localized swelling is more likely result from a specific local pathology. As an example, swelling anterior to the distal fibula may indicate chronic injury of the anterior inferior tibio fibular ligament (ATFL) and swelling posterior to the distal fibula may indicate peroneal tendon pathology[5]. Acute painful or painless swelling with or without the deformity of the mid foot deformity could result from Charcot neuropathy.
Instability
Enquire as to when the first episode of instability or sprain occurred, how often it happens and what can precipitate it[6].
History of trauma
History of trauma with details of immediate symptoms and treatment, surgery, injections or infection with date and details of any identified.
Associated symptoms
It is important to look out for red flags symptoms such as night sweating, temperature or weight loss, which may be related to an infection or neoplasm. Neurological symptoms like numbness, limb weaknesses or burning sensation are usually related either to spinal problem or peripheral neuropathy.
General medical history
It is important to cover all the key points that are summarised in Table 2.
Table 2.
Important points not to miss during the history taking[6]
| Important key points not to be missed in general medical history |
| Age |
| Occupation |
| Participation in sports |
| History of lower back pain |
| History of problems with other joints (for example, hip and knee) |
| Diabetes |
| Peripheral neuropathy |
| Peripheral vascular disease |
| Inflammatory arthropathy |
| Rheumatoid arthritis |
| Vasculitis |
CLINCIAL EXAMINATION
The examination begins from the first moment of meeting the patient by observing the gait and whether he/she uses any walking aids. The patient should be adequately exposed and ideally patients should wear shorts with bare feet. Ask for chaperone if appropriate.
Inspection of the patients footwear, insole, and walking aides
Start by examining the patient shoes and whether they are commercial or surgical shoes. Look at the pattern of the wear, which usually involves the outside of the shoe heel. Different patterns of wear indicate abnormal contact of the foot with the ground. Early lateral, proximal, and mid shoe wear, indicates a supination deformity; wear on the medial border indicates a pronation deformity[2]. In case of absence of any wear, it may simply reflect new or unused pair of foot wears. Look for any orthosis or walking aides. Inspect any insole and ask the patient which type of insole is comfortable and which type is painful.
Examination in a standing position
In most clinical setting the patient is sitting on the chair at the start of the examination. First ask the patient to stand up, and assess the alignment of the lower limbs as a whole. In particular look for any excessive varus or valgus knee deformity. Inspect the alignment of the spine in case of scoliosis, and look for any pelvic tilt. Inspect for any thigh or calf muscles wasting[7].
Look from the side for the feet arches (is there any pes cavus or pes planus), any swelling or scars. Inspect for any big toe deformity (hallus valgus, hallux valgus interphalangeus or hallus varus), lesser toes deformity (mallet toe, hammer toes, claw toes)[1]. In normal ankle, you should not be able to see the heel pad on the medial side when you inspect from the front. If this was visible then it is called “peek a boo” sign which exists with pes cavus[2]. It is important to compare both sides as a false-positive sign may be caused by a very large heel pad or significant metatarsus adductus[8].
Inspect the ankle from the back for any bony bumps like calcaneal boss[1]. The normal ankle alignment is neutral. Also notice if there is a “too many toes” sign. In a normal foot you should not be able to see more than 5th and 4th toes when you look at it from behind. If there were more toes visible (3rd or 3rd and 2nd), then it is called “too many toes” sign which can indicate an increased heel valgus angle.
Ask the patient to stand onto tiptoes. Both ankles should turn into varus. This indicates normal subtalar movement and, in case of flat feet, if a medial arch forms on standing on tip toes then this is a flexible pes planus[1].
Gait: Enquire if the patient can walk without a support and be prepared to provide support for elderly patients and those who may unsteady on their feet. Ask the patient to walk as per their normal gait. Observing the gait from the front and the back help to assess the shoulder and pelvic tilt. Looking from at the hip movements, knee movements, initial contact, three rockers, stride length, cadence and antalgesia.
The patient should then be asked to walk on his/her tiptoes, then heels, inner borders and finally the outer borders of the feet. Correlate your finding with possible causes as described in Tables 3 and 4. Beware not to miss a foot drop.
Table 3.
Correlations between the different gait patterns and the functional assessment
| Examination of gait | Assessing the following aspects |
| Tiptoe walking | Ankle flexibility Posterior impingement Achilles/tibialis post function Midfoot function MTPJ problems Fractures (Stress) S1/2 function |
| Heel walking | Ankle mobility Anterior impingement Tibialis anterior function L4/5 EHL/EDL function Plantar fasciitis/heel problems |
| Inner borders (inversion)/outer borders (eversion) foot walking | Sub talar mobility Tibialis posterior function Peroneal tendons function 5th ray problems Medial and lateral gutter impingement 1st ray problem |
Table 4.
Different types of abnormal gaits
| Type of the gait | Physical findings and observations | Possible cause |
| Antalgic gait | Short stance phase of the affected side Decrease of the swing phase of the normal side | Pain on weight bearing could be any reason from Back pathology to toe problem, e.g., degenerative hip joint |
| Ataxic (stamping) gait | Unsteady and uncoordinated walk with a wide base | Cerebral cause Tabes dorsalis |
| Equinus (tiptoes) gait | Walking on tiptoes | Weak dorsiflexion and/or plantar contractures |
| Equinovarous gait | Walking on the out border of the foot | CETV |
| Hemiplegic (circumductory) gait | Moving the whole leg in a half circle path | Spastic muscle |
| Rocking horse (gluteus maximum) gait | The body shift backward at heel strike then move forward | Weak or hypotonic gluteus maximum |
| Quadriceps gait | The body leans forward with hyperextension of the knee in the affected side | Radiculopathy or spinal cord pathology |
| Scissoring gait | One leg crosses over the other | Bilateral spastic adductors |
| Short leg (Equinus) gait (more than 3 cm) | Minimum: Dropping the pelvis on the affected side Moderate: Walks on forefoot of the short limb Severe: Combination of both | Leg length discrepancy |
| Steppage gait (high stepping - slapping - foot drop) | No heel strike The foot lands on the floor with a sound like a slap | Foot drop Polio Tibialis anterior dysfunction |
| Trendelenburg (lurching) gait | Trunk deviation towards the normal side When the foot of the affected side leaves the floor, the pelvis on this side drops | Weak gluteus medius |
| Waddling gait | Lateral deviation of the trunk with an exaggerated elevation of the hip | Muscular dystrophy |
Examination in a sitting position
By this stage, a fair idea of the possible diagnosis may have been established. Hence, you should be able to direct the rest of the examination accordingly. We recommend at this stage to ask the patient to sit on the examining couch, with the legs hanging loosely from the side. Raise the bed so the patient’s foot is at the level of the examiner’s hand, and sit on a chair opposite the patient.
Look: Start with meticulous inspection of the sole then the rest of the foot. Look for skin discoloration, scar, ulcer, lack of hair (circulatory changes), nails, any skin thickening (callosity), hard/soft corns and any signs of infection[7].
Feel: First ask the patient if there are any areas which are painful to touch, so you can try to avoid causing pain during the examination. Then you start with gentle feel of the skin temperature, always comparing to the other side.
The second part of the palpation is to establish area of tenderness. Always follow a systematic method of palpation so you will not miss any part. We recommend to start the palpation for tenderness from proximal fibula, Achilles tendon, distal fibula, peroneal tendons, PTFL, CFL, ATFL, AITFL, Sinus tarsi, Calcaneum, Calcaneocuboid (CC) joint, Cuboid, lesser Metatarsals, Phalanges, 1st IP and MTP joint, 1st ray, TMT joints, Cuneiforms, Navicular, TN joint, Talus, Ankle joint, Medial malleolus, Tibialis post, Tibialis anterior, extensors and other flexors and finally plantar fascia.
Move: Start with active movement by asking the patient to perform dorsiflexion, plantar flexion, inversion, and eversion. Always compare both sides (Table 5).
Table 5.
| Movement | Normal range of motion | Possible causes of restriction |
| Dorsiflexion | 0-20 degrees | Tight Achilles tendon Tightness of the posterior ligaments Loss of flexibility in the ankle syndesmosis Impingement of anterior soft tissue or osteophytes |
| Plantar flexion | 0-50 degrees | Anterior capsule/ligaments contractures Posterior impingement |
| Inversion | 0-35 degrees | Tension in the joint capsules and the lateral ligaments1 |
| Eversion | 0-15 degrees | Tension in the joint capsules and the medial ligaments1 |
Inversion and eversion is mostly the motion of subtalar joint, the most common causes of restriction including subtalar arthritis, tarsal coalitions or calcaneal fracture malunion.
This will be followed by passive movement of dorsiflexion: As the patient is already sitting, the knee is flexed to 90 degrees then repeat the test with knee straight (Silfverskiold test). Keep the foot in a neutral position (0 degree of inversion and eversion), hold the back of the leg with one hand and use the palm of the other hand to push the sole of the examined foot[9]. Now move the palm of the hand to the dorsum of the examined foot to produce the passive plantar flexion.
Supination and pronation are triplanar movements. Supination is the combination of Inversion, Plantarflexion and adduction. Pronation is the combination of Eversion, Dorsiflexion and Abduction.
Inversion: Place one hand over the back of the leg and use your other hand to grasp the calcaneus between your index finger and thumb and use your forearm to fully dorsiflex and lock the talus in the ankle. Rotate the calcaneus in a medial direction to test for inversion and move your hand in a lateral direction to test for Eversion[9].
Midfoot movements: Stabilize the calcaneus and talus with one hand and use the other hand to move the foot medially to test for Adduction). Move the foot laterally to test for the abduction[9]. It is also important to examine the motion of midfoot (transverse tarsal joint) on sagittal plane (specially for patients with end stage ankle arthritis). The motion of 1st TMT joint should be examined as well (for patients with hallux valgus or flexible flatfoot).
Forefoot movements (metatarsophalangeal and interphalangeal joints): You should test the movement in each joint separately. If there is any deformity, try to find whether it is correctable or not (for example, a fixed flexion deformity).
The examination of muscular function and the special tests should be the next step of the assessment. Both of these aspects are summarised in Table 6, Table 7, Table 8 and Table 9. The strength of each muscle is assessed using the medical research council (MRC) scale Table 10.
Table 6.
Examination techniques of muscles functions[3]
| Muscle | Ankle position | Manoeuvre of the test |
| Tibialis Anterior | Maximum Dorsiflexion and inversion | Try to plantar flex the ankle with your hand and ask the patient to resist, use your second hand on the tendon to feel the contraction (Figure 1) |
| Tibialis posterior | Plantar flexion and inversion | Patient inverts the foot in full plantar flexion whilst the examiner pushes laterally against the medial border of the patient’s foot (in an attempt to evert the foot). The examiner needs to use second hand on the tendon to feel the contraction (Figure 2) |
| Peroneal longus and peroneal brevis | Plantar flexion and eversion | Patient everts the foot in full plantar flexion and the examiner pushes medially against the lateral border of the patient’s foot (in an attempt to invert the foot) (Figure 3) |
| Extensor hallucis longus | Neutral | Patient extends the great toe and the examiner try to planter flex it (Figure 4) |
| Extensor digitorum longus | Neutral | Patient extends the lesser toes toe and the examiner try to planter flex it1 (Figure 5) |
| Flexor hallucis longus and flexor digitorum longus | Neutral | Patient curls the toes downward and the examiner tries to dorsiflex them1 |
It can be difficult to neutralize the intrinsic muscles completely.
Table 7.
| Name of the test | Purpose of the test | Maneuver |
| Anterior drawer test | Lateral ligament complex | The leg hangs loosely off the table The examiner hold the patient’s leg just above the ankle joint with one hand The examiner uses the other hand to hold the ankle in plantar flexion and try to gently to pull the ankle forward - anterior translation (Figure 6) Look at the skin over the anterolateral dome of the talus to watch for anterior motion of the talus with this maneuver - sulcus sign |
| Inversion stress test | Stability of the lateral ankle ligaments (ATFL) | The knee is flexed 90 degree With one hand perform inversion stress by pushing the calcaneus and talus into inversion while holding the leg form the medial side with the other hand (Figure 7) The test is positive when there is excessive inversion and/or pain |
| Calf compression or “squeeze” test | Syndesmotic injury | The leg hangs loosely off the table - knee flexed The examiner uses both hand to squeeze at midpoint of the tibia and fibula Pain caused by this maneuver indicates Syndesmotic injury |
| External rotation stress | Syndesmotic injury | The leg hangs loosely off the table - knee flexed and foot fully dorsiflexed The examiner uses one hand to stabilize the lower leg With the other hand they externally rotate the foot Pain caused by this maneuver indicates Syndesmotic injury |
| Coleman block test | To assess the flexibility of the hindfoot, i.e., whether the cavus foot is caused by the forefoot or the hindfoot | A block is placed under the lateral border of the patients foot The medial forefoot is allowed to hang over the side The first metatarsal will be able to drop below the level of the block, i.e., eliminate the contribution by the first ray (Figure 8) With a flexible hindfoot, the heel will fall into valgus or neutral termed forefoot-driven hindfoot varus In case of rigid hindfoot or hindfoot-driven hindfoot varus the heel will remain in varus, and no correction will be happen |
| Semmes-weinstein monofilament test | To assess the degree of sensory deficit | Pressure testing using a 10 g Semmes-Weinstein mono- filament. Especially useful in diabetic charcot feet (Figure 9) |
Table 8.
| Name of the test | Purpose of the test | Manoeuvre |
| Silfverskiold test | Differentiate between a tight gastrocnemius and a tight soleus muscle | The leg hangs loosely off the table - knee flexed Dorsiflex the ankle to the maximum Patient should then extend their knee Repeat the ankle dorsiflexion (Figure 10) If there was more ankle dorsiflexion with the knee flexed then there is gastrocnemius tightness |
| Thompson’s test | Achilles’ tendon rupture | Patient lies is prone on the bed or kneel on a chair The examiner gently squeeze the gastrocsoleus muscle (calf) If the tendon is intact, then the foot passively plantar flexes when the calf is squeezed |
| Test for tarsal tunnel syndrome | Compressions of the posterior tibial nerve underneath the flexor retinaculum at the tarsal tunnel | Tap inferior to the inferior to the medial malleolus to produce Tinel’s sign |
| Test for flat foot | Differentiate between flexible vs rigid | Ask patient to stand on tiptoes If the medial arch forms and heel going into varus then it is flexible flat foot Beware of rupture tibialis posterior tendon or tarsal coalition |
| Test for stress fractures | Stress fractures | Place a tuning fork onto the painful area If it increases the pain, then it is positive Other test: One spot tenderness on palpation with finger |
| Babinski’s response | Upper motor neuron disease | Scratch the lateral border of the sole of the foot A positive response is dorsiflexion of the great toe |
| Oppenheim’s test | Upper motor neuron disease | Run a knuckle or fingernail up the anterior tibial surface A positive response is dorsiflexion of the great toe |
| Mulder's test | Morton’s neuroma | A mass felt or audible Click is elicited by palpating (grasping) the forefoot (web space) with the index finger and thumb of the examiner |
Table 9.
Three common pathologies and the related necessary clinical tests[7]
| Special pathology | Required tests |
| Pes cavus | Claw toes Examine peroneal tendons Tibialis anterior and posterior Coleman block test Examine the Achilles tendon Full lower and upper limb neurological examination Hand - inspect for muscle wasting Spine |
| Pes planus | Single leg sustained tip toe test Testing tibialis posterior power Too many toes sign Examine the Achilles tendon |
| Hallux valgus/ rigidus | Dorsal osteophyte Passive ROM Grind tests Correct the deformity Examine the Achilles tendon |
Table 10.
Medical Research Council scale to assess the strength of muscle[8]
| Grade | Description |
| Grade 0 | No contraction |
| Grade 1 | Flicker or trace of contraction |
| Grade 2 | Active movement with gravity eliminated |
| Grade 3 | Active movement against gravity |
| Grade 4 | Active movement against gravity and resistance |
| Grade 5 | Normal power |
The examination of the foot and ankle is not complete until you perform neurovascular examination, an examination of the spine (deformity like scoliosis, hair tuft on the lower back), leg length, hip joint examination and knee joint examination.
Figure 1.
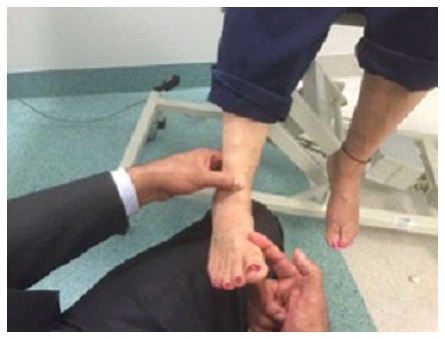
Test for tibialis anterior muscle.
Figure 2.
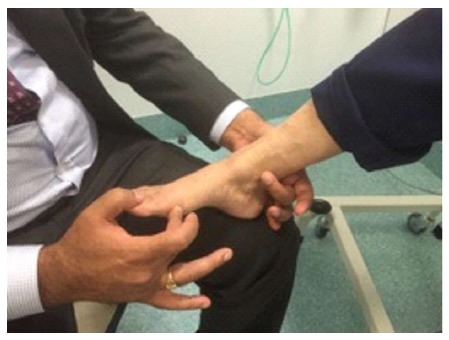
Test for tibialis posterior muscle.
Figure 3.
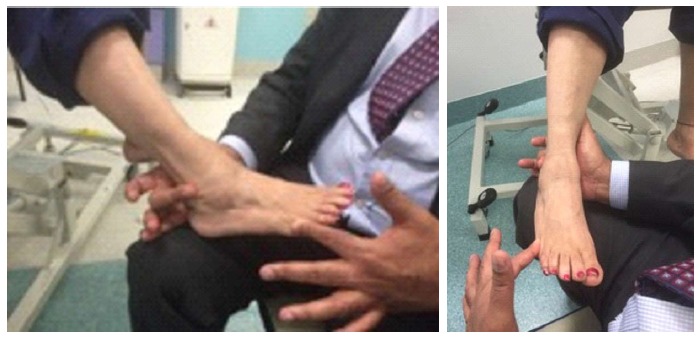
Test for the peroneal tendons.
Figure 4.
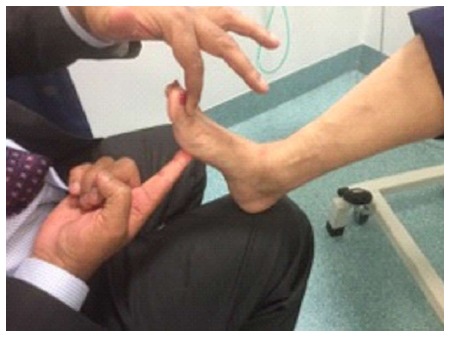
Test for extensor hallucis longus.
Figure 5.
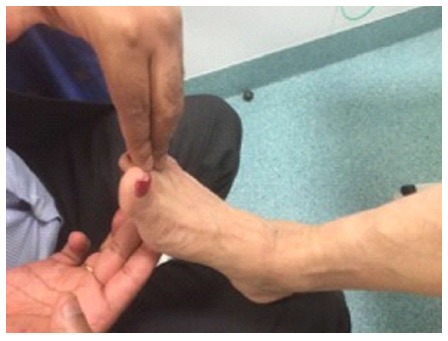
Test for extensor digitorum longus.
Figure 6.
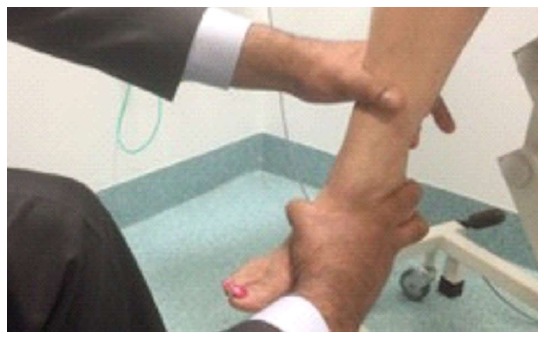
Anterior drawer test.
Figure 7.
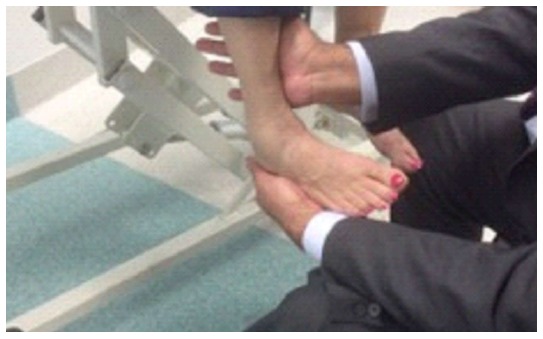
Inversion stress test.
Figure 8.
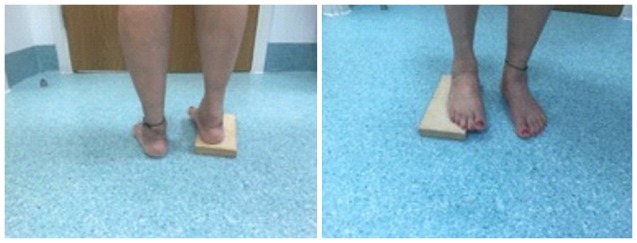
Coleman block test.
Figure 9.
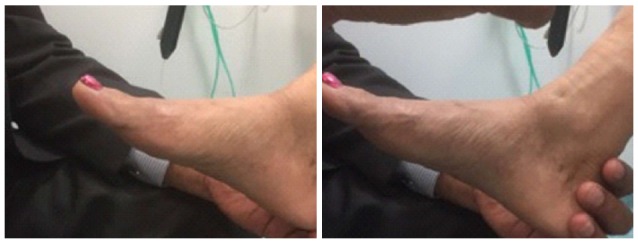
Semmes - weinstein monofilament test.
Figure 10.
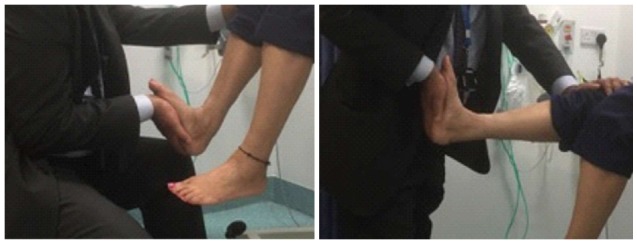
Silfverskiold test.
Finally, it is important to consider Functional testing which is important and needs to be appropriate to the level and background of the patient for instance, a single leg squat or squat jump for higher level athletes may indicate issues not obvious with more static tests.
CONCLUSION
The assessment of foot and ankle pathology can be challenging, hence the importance of following a systematic method for its clinical assessment. We have described here one way of performing the clinical examination. It has been built using the best available evidence, and has been tested and evolved through the experience of the senior author. We recommend this approach for residents who are preparing for their specialty exams, for clinicians in family or sports medicine, and for any physician who has to deal with foot and ankle patients.
Footnotes
Conflict-of-interest statement: None.
Manuscript source: Invited manuscript
Specialty type: Orthopedics
Country of origin: United Kingdom
Peer-review report classification
Grade A (Excellent): 0
Grade B (Very good): B, B
Grade C (Good): 0
Grade D (Fair): 0
Grade E (Poor): 0
Peer-review started: September 20, 2016
First decision: October 21, 2016
Article in press: November 29, 2016
P- Reviewer: Chen GS, Papanas N S- Editor: Ji FF L- Editor: A E- Editor: Wu HL
References
- 1.Papaliodis DN, Vanushkina MA, Richardson NG, DiPreta JA. The foot and ankle examination. Med Clin North Am. 2014;98:181–204. doi: 10.1016/j.mcna.2013.10.001. [DOI] [PubMed] [Google Scholar]
- 2.Coughlin MJ, Saltzman CL, Anderson RB. Mann’s surgery of the foot and ankle. Amsterdam: Elsevier Saunders; 2014. p. 2186. [Google Scholar]
- 3.Reider B. The Orthopaedic Physical Examination. 2nd ed. Amsterdam: Elsevier Saunders; 2005. p. 383. [Google Scholar]
- 4.Finan PH, Goodin BR, Smith MT. The association of sleep and pain: an update and a path forward. J Pain. 2013;14:1539–1552. doi: 10.1016/j.jpain.2013.08.007. [DOI] [PMC free article] [PubMed] [Google Scholar]
- 5.Simpson MR, Howard TM. Tendinopathies of the foot and ankle. Am Fam Physician. 2009;80:1107–1114. [PubMed] [Google Scholar]
- 6.Harris N, Ali F. Examination Techniques in Orthopaedics. England: Cambridge University Press; 2014. [Google Scholar]
- 7.Roberts PJ, Tandon S, Wade RH. Clinical Examination for FRCS (Trauma & Orthopaedics). 1st ed. Oswestry: The Institute of Orthopaedics (Oswestry) Publishing Group; 2002. p. 149. [Google Scholar]
- 8.Thevendran G, Younger AS. Examination of the varus ankle, foot, and tibia. Foot Ankle Clin. 2012;17:13–20. doi: 10.1016/j.fcl.2011.11.006. [DOI] [PubMed] [Google Scholar]
- 9.Gross J, Fetto J, Rosen E. Musculoskeletal Examination 3rd ed. New Jersey: Wiley-Blackwell; 2009. p. 463. [Google Scholar]
- 10.Davies H, Blundell C. Clinical examination of the foot and ankle. Orthopaedics and Trauma. 2011;25:287–292. [Google Scholar]


