Abstract
Traditionally, the spinal cord is isolated by laminectomy, i.e. by breaking open the spinal vertebrae one at a time. This is both time consuming and may result in damage to the spinal cord caused by the dissection process. Here, we show how the spinal cord can be extruded using hydraulic pressure. Handling time is significantly reduced to only a few minutes, likely decreasing protein damage. The low risk of damage to the spinal cord tissue improves subsequent immunohistochemical analysis. By performing hydraulic spinal cord extrusion instead of traditional laminectomy, the rodents can further be used for DRG isolation, thereby lowering the number of animals and allowing analysis across tissues from the same rodent. We demonstrate a consistent method to identify and isolate the DRGs according to their localization relative to the costae. It is, however, important to adjust this method to the particular animal used, as the number of spinal cord segments, both thoracic and lumbar, may vary according to animal type and strain. In addition, we illustrate further processing examples of the isolated tissues.
Keywords: Neuroscience, Issue 119, rat, mouse, hydraulic spinal cord extrusion, lumbar enlargement, dorsal root ganglia
Introduction
The overall goal of this method is to isolate the spinal cord as well as to identify and isolate DRGs1,2. Hydraulic extrusion of the spinal cord is a significantly faster method than the traditional way of spinal cord isolation by laminectomy, i.e. by breaking the spinal vertebrae one at a time, and this method reduces the risk of tissue damage caused by the dissection process3,4. DRGs may be difficult to identify. Correct identification is highly important for tissue analysis, e.g. following sciatic nerve injury. By numbering the DRGs according to their localization relative to the costae, DRGs can be identified consistently.
Tissue isolated by the techniques demonstrated here can be applied to a broad range of analyses including Western blotting5,6, qPCR7 and immunohistochemical staining8.
When identifying DRGs, it is important to take into account that the number of spinal cord segments is known to vary with animal type and strain9,10,11. The advantages in performing this method in mice are the high number of genetically modified variants available and the relatively low housing expenses. The advantages in using rats are the relatively high tissue yield and if involving nerve injuries, the procedure will be eased with size.
Protocol
All animals were handled in full compliance with Danish and European regulations. Permission number: 2012-15-2934.
1. Preparation of the Syringe for Hydraulic Extrusion of the Spinal Cord
For an adult rat, use a 10 mL syringe. For an adult mouse, use a 5 mL syringe. For pups, use a 2.5 mL syringe.
Adjust a non-filter pipette tip universally suitable for 2-200 µL pipettes by trimming the large end of the pipette tip until it fits firmly to the syringe. Place the adjusted pipette tip on the syringe. For pups, use a 23 G or similar needle instead of an adjusted pipette tip.
Aspirate ice-cold sterile PBS and leave the syringe on ice until further use.
2. Euthanasia
Do not perform cervical dislocation, as this will disturb the spinal vertebrae rendering extrusion impossible.
- For adult rat/mouse, euthanize using gas such as CO2 or isoflurane. These substances are harmful. Perform euthanasia in a fume hood and handle the substances according to institution guidelines. (CAUTION: CO2: H280, P410, P403; isoflurane: H361d, P260, P281, P280)
- To ensure that the rodent is dead, ensure absence of reflex by pinching a paw with tweezers. Decapitate the rodent using large scissors. For pups, euthanize by decapitation.
3. Isolation of the Spinal Column
Sprinkle water onto the fur to control the hair.
- Using a pair of scissors, cut open the fur along the spinal column in a distal direction and isolate the spinal column by cutting on both sides along the spinal column past the pelvic bone. Cut the spinal cord distally to the pelvic bone with a pair of scissors. NOTE: The rostral-caudal axis is denoted as the proximal-distal axis throughout the protocol.
- Trim the spinal column using a pair of scissors to avoid the proximal-most and distal-most areas as these may render the spinal column too S-shaped for successful spinal cord extrusion. Ensure that the spinal cord is visible at both ends. If the spinal cord is not visible, trim the spinal column with scissors until the spinal cord becomes visible.
4. Hydraulic Extrusion of the Spinal Cord
Place a Petri dish (100 mm in diameter) filled with sterile PBS on ice.
- Straighten the spinal column by applying an index finger on the bent part (proximal-most end) of the spinal column, thereby straightening the spinal column as much as possible.
- For pups, avoid bending the spinal column, as the vertebrae will be disrupted rendering spinal cord extrusion impossible.
Insert the pipette tip (23 G needle for pups, alternatively 18 G needle for adult mice) at the distal-most end of spinal column. If inserted correctly, the tip is stabilized in the spinal cavity.
Ensure that the spinal column is straightened as much as possible. Apply steady pressure, and extrude the spinal cord into the Petri dish on ice. Ensure that the spinal cord is kept moist on ice by keeping it in PBS until further handling.
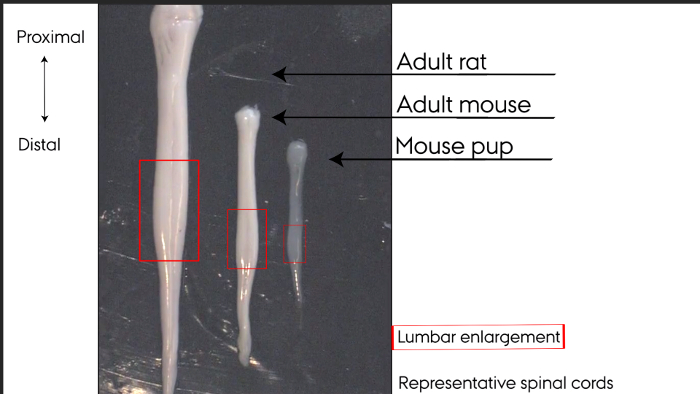
 Figure 1: Representative spinal cords. Hydraulically extruded spinal cords. Left to right: adult rat, adult mouse, mouse pup. Lumbar enlargements marked by box. Please click here to view a larger version of this figure.
5. Identification of Dorsal Root Ganglia (DRGs)
Split the spinal column in two equal longitudinal parts using scissors and place the split spinal column under the microscope.
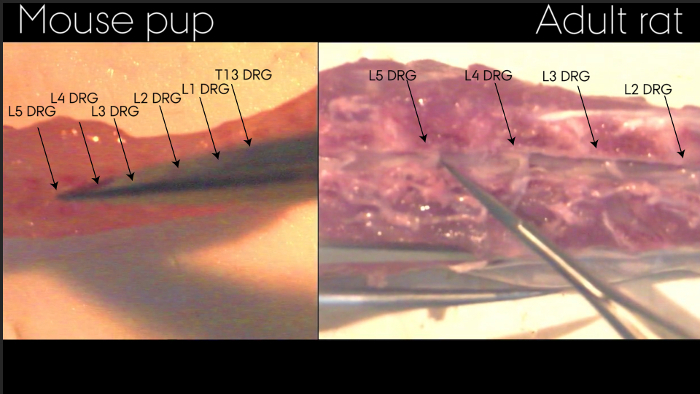
Identify the T13 vertebra segment by locating the attachment site of the distal-most costae on the spinal column paying attention not to confuse the costae with the nearby intercostal nerves. The distal-most costae are attached to the proximal part of the T13 vertebra segment and the T13 DRG is located distally to vertebra T13 and proximally to vertebra L1.
Identify concomitant DRGs in the distal direction. For an adult rat, concomitant DRGs appear white with clearly visible dorsal and ventral roots. For an adult mouse, concomitant DRGs appear white with clearly visible dorsal and ventral roots. For pups, concomitant DRGs appear as clear spheres.
 Figure 2: Identification of DRGs in spinal column after extrusion of spinal cord. The spinal column has been split allowing visualization of DRGs as indicated by arrows. Exemplified by adult rat and mouse pup. Please click here to view a larger version of this figure.
6. Isolation of DRGs
Number Petri dishes (30 mm in diameter) according to the specific DRGs to be isolated, e.g. L3, L4, L5. Fill the Petri dishes with ice-cold sterile PBS and place them on ice.
Using micro scissors, cut dorsal and ventral roots as close to the DRGs as possible to release them while avoiding damaging the DRGs.
With the tip of closed tweezers, gently scoop out DRGs and transfer them to the corresponding numbered Petri dishes.
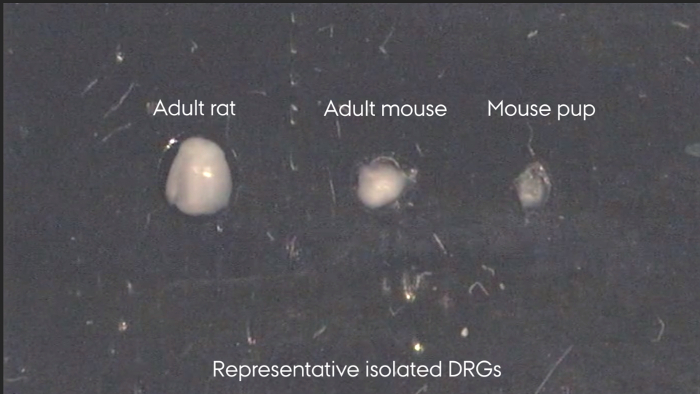
 Figure 3: Representative isolated DRGs. Left to right: adult rat, adult mouse, mouse pup. Please click here to view a larger version of this figure.
7. Processing of Tissues for Further Analysis
- Western blotting
- Isolate the tissue area of interest, e.g. the spinal cord lumbar enlargement. If needed, separate the spinal cord into ipsilateral and contralateral sides and further into dorsal and ventral horns.
- Place the tissue in lysis buffer such as TNE lysis buffer (10 mM Tris-base, 150 mM NaCl, 1 mM EDTA, 1% NP40 in double distilled H2O) containing appropriate enzyme inhibitors on ice.
- Homogenize the tissue for approximately 30 s on ice using a mechanical grinding pestle.
- Immunohistochemistry
- For fresh-frozen tissue (applicable to spinal cord):
- Prepare dry ice powder by pulverizing dry ice cubes to an amount corresponding to two tablespoons of powder. Cover dry ice cubes in a cloth and pulverize the cubes using a hammer. Place silver foil (approximately 5 cm x 5 cm) on a layer of dry ice cubes and cover the silver foil with dry ice powder.
- Place the spinal cord area selected for further analyses on the dry ice powder using tweezers, let it snap-freeze, and transfer the spinal cord to a cryo tube. Keep it on dry ice at all times or store it at -80 °C until further use.
- Transfer the spinal cord to a cryostat (-20 °C). If needed, trim the spinal cord inside the cryostat. Place the spinal cord in embedding material inside the cryostat in order to attach it to the specimen disc.
- Cut the spinal cord in the desired thickness, e.g. 5 µm, and collect on glass plates. Heat the glass plates with a finger immediately prior to tissue collection for better attachment. Keep any leftover tissue in cryo tubes at -80 °C until further use.
- Leave the sections on glass plates inside the cryostat until ready for post-fixing.
- Post-fix the sections by immersion into 4% PFA for 10 min at room temperature.
- Perform staining according to standard protocols8.
- Fixed tissue for cryo sectioning (applicable to spinal cord and DRGs)
- Fix spinal cord and DRGs in 4% PFA (2 h for spinal cord, 1.5 h for mouse DRGs and 4 h for rat DRGs) at 4 °C (place spinal cord in horizontal position to prevent it from fixing in a bent position).
- Transfer the tissue to 25% w/v sucrose overnight at 4 °C. The tissue can be stored in 25% w/v sucrose supplemented with a few droplets of 10% sodium azide to prevent microbial contamination at 4 °C until further use. If needed, trim the spinal cord to make up the lumbar enlargement only on a silicone board or similar.
- Using the tip of a paper towel, aspirate excess sucrose solution from the tissue.
- Fill a cryo mold halfway with embedding material. Push any bubbles to the sides of the cryo mold with tools such as closed tweezers.
- Place the tissue on the embedding material using tweezers and ensure the desired tissue orientation.
- Fill the cryo mold completely with embedding material and push any bubbles as far away from the tissue as possible (e.g. by using closed tweezers).
- Fill a Petri dish (100 mm in diameter) with 2-methylbutane. This substance is harmful. Perform this step in a fume hood and handle the substance according to institution guidelines (CAUTION: H224, H304, H336, H411, P210, P280, P273, P301, P331, P304/P340, P309/P310).
- Place the Petri dish on a layer of dry ice and add two dry ice cubes to the Petri dish. Place the cryo mold in the Petri dish and allow the embedding material to freeze completely.
- Keep the embedded tissue on dry ice at all times or at -80 °C wrapped in Parafilm until further processing.
- Cut the tissue on a cryostat (-20 °C) in the desired thickness, e.g. 5 µm.
- Perform staining according to standard protocols8.
- Fixed tissue for paraffin-embedding (applicable to spinal cord and DRGs)
- Fix spinal cord and DRGs in 4% PFA (2 h for spinal cord, 1.5 h for mouse DRGs and 4 h for rat DRGs) at 4 °C (place spinal cord in horizontal position to prevent it from fixing in a bent position).
- Transfer the tissue to 25% w/v sucrose overnight at 4 °C. The tissue can be stored in 25% w/v sucrose supplemented with a few droplets of 10% sodium azide to prevent microbial contamination at 4 °C until further use.
- Isolate the tissue area of interest, e.g. the spinal cord lumbar enlargement.
- Fill an embedding mold halfway with paraffin.
- Cool down the embedding mold briefly by placing it on the cooling area of the embedding machine to harden the paraffin slightly. This allows for better tissue positioning.
- Place the tissue in the desired orientation in the embedding mold. Fill the embedding mold with paraffin and cool immediately.
- Place the paraffin-containing embedding mold at 4 °C overnight to let it harden completely and remove the paraffin block containing the tissue from the embedding mold.
- Cut sections on a microtome in the desired thickness, e.g. 5 µm.
- Perform staining according to standard protocols8.
Representative Results
Hydraulically extruded spinal cords display a smooth undamaged surface shown in Figure 1. The lumbar enlargement can easily be identified as the thickened area of the spinal cord, boxed in Figure 1. The dorsal and ventral sides of the spinal cord can be identified by eye according to the morphology. In Figure 1, the ventral side is facing the viewer, identifiable by one clear midline along the entire spinal cord. Two broader lines along the spinal cord allow identification of the dorsal side. At the distal-most end, the cauda equina may sometimes remain attached in adult rats and adult mice.
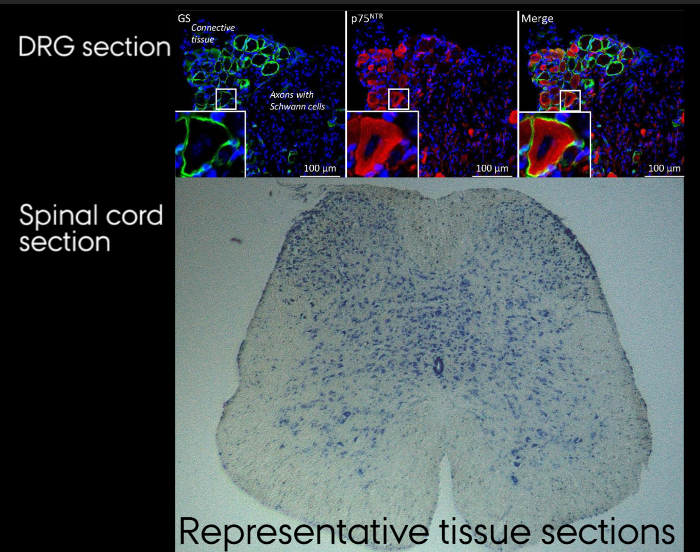
Individual DRGs can only be identified while located in the spinal column, Figure 2. Following isolation, Figure 3, the individual DRGs cannot be identified by appearance. If needed, it is therefore important to keep them clearly separated upon isolation. After isolation, the spinal cord and DRGs can be processed and stained as outlined in step 7.3 and represented in Figure 4. Figure 4a shows an immunohistochemical staining of a DRG section where the neurons and their surrounding satellite glial cells are clearly visible. By correct identification of the DRG it is possible to analyze the effect of sciatic nerve injuries on the soma of the injured neuron as well as on their surrounding satellite glial cells. Figure 4b shows a Nissl staining of a hydraulically extruded spinal cord where the tissue is intact as reflected by the smooth edges of the section.
 Figure 4: Representative tissue sections. A. Immunohistochemical staining of DRG section. B. Nissl stained section of hydraulically extruded spinal cord. Please click here to view a larger version of this figure.
Discussion
If the spinal column is disturbed, e.g. by cervical dislocation, the spinal cord will split during extrusion. If the spinal cord cannot be extruded, the spinal column may be trimmed slightly at both ends and the extrusion attempt can be repeated. In case the entire spinal cord is needed for further analysis, i.e. consisting of the cervical enlargement as well as the lumbar enlargement, the spinal column should only be trimmed slightly. If only the lumbar enlargement is needed for further analysis, the spinal cord should be trimmed according to the present protocol. The spinal column should be straightened using the fingertips to ease extrusion.
The protocol is applicable to rodents of all ages and is here exemplified by an adult mouse (8 weeks), a mouse pup (5 days) and an adult rat (10 weeks). Depending on animal type and strain, the number of thoracic and lumbar sections may vary9,10,11. Depending on the proteins to be analyzed, adult rodents may be perfused with enzyme-inhibiting solutions prior to euthanasia. If performing an experiment involving one-sided nerve injury, the spinal cord can be split into ipsilateral and contralateral sides using ultra-fine tweezers immediately after extrusion. Further, each side can be split into dorsal and ventral sides. The tissue can then be processed for further analyses, e.g. Western blotting.
Transcardial perfusion-fixation with PFA prior to spinal cord extrusion should be avoided, as this renders the spinal cord non-flexible and prevents spinal cord hydraulic extrusion. Hydraulic spinal cord extrusion will tear off the dorsal roots. For experiments where attached dorsal roots are necessary, laminectomy is recommended. Furthermore, spinal meninges are lost by hydraulic extrusion, which can be avoided by standard laminectomy3.
Hydraulic extrusion of the spinal cord and DRG isolation could also be performed using oxygenated artificial cerebrospinal fluid (ACSF) instead of ice-cold PBS. The use of ACSF allows preservation of the isolated tissue in a better physiological environment, which is particularly important in case of subsequent electrophysiological recordings12,13. An alternative to ACSF could be PBS containing 1 g/L glucose for generation of primary DRG cultures14.
Hydraulic extrusion of the spinal cord is a significantly faster method than the traditional way of spinal cord isolation by laminectomy, reducing tissue-handling time and therefore decreasing the risk of protein damage. Perfusion with a fixative prior to isolating the spinal cord by laminectomy may reduce the risk of tissue damage during dissection and during final removal of the spinal cord from the spinal column. However, tissue fixation precludes its applicability to analyses such as Western blotting. Hydraulic extrusion yields structurally undamaged tissue3 suitable for a broader range of analyses.
Consistent identification of DRGs may be difficult. However, this is essential for tissue analysis, e.g. following sciatic nerve injury. By numbering the DRGs according to their localization relative to the costae, DRGs can be identified consistently. Staining of spinal cord tissue as well as of DRGs may be optimized by performing the illustrated tissue treatment variations outlined in protocol step 7.
Disclosures
The authors have nothing to disclose.
Acknowledgments
We would like to acknowledge David Kiel, Aarhus University, for filming and editing. VirtualDub software was used for processing of microscope video sequences. We thank the Danish Research Institute of Translational Neuroscience - DANDRITE, Nordic EMBL Partnership, for access to equipment and the Aarhus University Research Foundation, EU 7FP project PAINCAGE, Det Frie Forskningsrad (DFF) and The Lundbeck Foundation for funding.
References
- Malin SA, Davis BM, Molliver DC. Production of dissociated sensory neuron cultures and considerations for their use in studying neuronal function and plasticity. Nat Protoc. 2007;2(1):152–160. doi: 10.1038/nprot.2006.461. [DOI] [PubMed] [Google Scholar]
- Sleigh JN, Weir GA, Schiavo G. A simple, step-by-step dissection protocol for the rapid isolation of mouse dorsal root ganglia. BMC Res Notes. 2016;9:82. doi: 10.1186/s13104-016-1915-8. [DOI] [PMC free article] [PubMed] [Google Scholar]
- Kennedy HS, Jones C, 3rd, Caplazi P. Comparison of standard laminectomy with an optimized ejection method for the removal of spinal cords from rats and mice. J Histotechnol. 2013;36(3):86–91. doi: 10.1179/014788813X13756994210382. [DOI] [PMC free article] [PubMed] [Google Scholar]
- Meikle AD, Martin AH. A rapid method for removal of the spinal cord. Stain Technol. 1981;56(4):235–237. doi: 10.3109/10520298109067317. [DOI] [PubMed] [Google Scholar]
- JoVE Science Education Database. The Western Blot. Cambridge, MA: JoVE; 2016. http://www.jove.com/science-education/5065/the-western-blot. [Google Scholar]
- Gallagher S, Chakavarti D. Immunoblot analysis. J Vis Exp. 2008. [DOI] [PMC free article] [PubMed]
- Ogrean C, Jackson B, Covino J. Quantitative real-time PCR using the thermo scientific Solaris qPCR assay. J Vis Exp. 2010. [DOI] [PMC free article] [PubMed]
- Crosby K, et al. Immunohistochemistry Protocol for Parraffin-embedded Tissue Sections - ADVERTISEMENT. Cambridge, MA: JoVE; 2014. https://www.jove.com/video/5064/immunohistochemistry-protocol-for-paraffin-embedded-tissue-sections. [Google Scholar]
- Watson C, Paxinos G, Puelles L. The Mouse Nervous System. 1st edition. Academic Press, Elsevier; 2012. pp. 424–426. [Google Scholar]
- Rigaud M, et al. Species and strain differences in rodent sciatic nerve anatomy: implications for studies of neuropathic pain. Pain. 2008;136(1-2):188–201. doi: 10.1016/j.pain.2008.01.016. [DOI] [PMC free article] [PubMed] [Google Scholar]
- Green EL. Genetic and non-genetic factors which influence the type of the skeleton in an inbred strain of mice. Genetics. 1941;26(2):192–222. doi: 10.1093/genetics/26.2.192. [DOI] [PMC free article] [PubMed] [Google Scholar]
- Meyer A, Gallarda BW, Pfaff S, Alaynick W. Spinal cord electrophysiology. J Vis Exp. 2010. [DOI] [PMC free article] [PubMed]
- Ciglieri E, Ferrini F, Boggio E, Salio C. An improved method for in vitro morphofunctional analysis of mouse dorsal root ganglia. Ann Anat. 2016. pp. 62–67. [DOI] [PubMed]
- Peeraer E, et al. Pharmacological evaluation of rat dorsal root ganglion neurons as an in vitro model for diabetic neuropathy. J Pain Res. 2011;4:55–65. doi: 10.2147/JPR.S15452. [DOI] [PMC free article] [PubMed] [Google Scholar]


